DeVilbiss Healthcare drive ROYALE 3 User manual

Royale Scooter Range
Instructions for use

2
ROYALE 3
ROYALE 4
ROYALE 4 SPORT

3
CONTENTS
1. INTRODUCTION 4
2. CONTACT INFORMATION 4
3. PRODUCT DESCRIPTION 5
3.1 Environment 5
3.2 Intended User Group 5
3.3 Intended Use 5
3.4 Indications 5
3.5 Product Overview 6
4. SAFETY 7
4.1 Warnings & Cautions 7
4.2 Risk Assessment 7
4.3 Contraindications 7
4.4 Scooter Loading 8
4.5 Training 8
4.6 General Warnings 9
5. TRANSPORT & STORAGE 10
6. SYMBOL DEFINITION 12
7. CHARGING & PREPARING FOR USE 14
7.1 Charging the Batteries 14
7.2 Adjustments for Comfort 16
7.3 Transferring Users 17
7.4 Checking the Scooter 17
8. OPERATION OF THE SCOOTER 18
8.1 Operational Limits 18
8.2 Control Panel 18
8.3 Buttons 19
8.4 LCD Display 20
8.5 Driving & Braking 22
8.6 Inclines, Raised Areas & Fixed Obstacles 24
8.7 Weather Precautions 25
9. DECONTAMINATION 26
10. MAINTENANCE & SERVICING 27
10.1 General Guidelines 27
10.2 Charger LED Troubleshooting 28
10.3 Regular Inspection & Servicing 29
10.4 Maintaining Motor Brushes 30
10.5 Battery Care & Maintenance 30
10.6 Error Codes 30
11. DISPOSAL OF PARTS 32
12. ELECTROMAGNETIC COMPATIBILITY (EMC) 33
13. SPECIFICATION 34
13.1 Scooter Data 34
13.2 Electrical Data 35
14. WARRANTY 36
15. NOTES 37
16. SERVICE RECORD 39

4
2. CONTACT INFORMATION
For assistance in setting up, using, maintaining your scooter, to report
unexpected operation or for any service, warranty, sales or customer service
information regarding this product, please contact your provider. If in doubt,
contact Drive DeVilbiss Healthcare Ltd. at the following address:
1. INTRODUCTION
Thank you for purchasing this product. These instructions for use should be
read carefully and understood before operating the scooter. Improper use
or unfamiliarity of the scooter may result in harm, injury or trac accidents. A
service record chart is also included at the back. Keep this manual with the
scooter, or in a safe place.
Contact Drive DeVilbiss Healthcare Ltd. or check our website for the latest
version of this document. Users with visual, reading or cognitive disabilities
should seek advice from a professional care provider for an appropriate
format. If this is not viable, users should contact their provider or Drive
DeVilbiss Healthcare Ltd. If you have any questions concerning the operation
or maintenance of the scooter, contact your provider.
For Service & Support outside the United Kingdom, please contact the local
distribution company from where this equipment was purchased. Failure to do
so may result in the product warranty becoming void.
Service & Maintenance
Tel: +44 (0)1422 233136
Fax: +44 (0)1422 233010
Drive DeVilbiss Healthcare Ltd.
Holmfield, Halifax
West Yorkshire
HX2 9TN
United Kingdom
Spares
Tel: +44 (0)1274 475125
Customer Service
Tel: +44 (0)845 0600 333
Fax: +44 (0)845 0600 334
Contact your distributor for safety notices and product recalls. Provide a
product description with all recall notices, including the name, make, model
and any distinguishing features, batch, or serial numbers. The serial code for
the scooter can be found at the front of the scooter base.
Any serious incident that has occurred in relation to the device should
be reported to the manufacturer and the MHRA or competent authority of your
Member State. Please quote the product serial code on all correspondence.

5
3. PRODUCT DESCRIPTION
3.1 Environment
The Royale 3 (HW001), Royale 4 (HW002) and Royale 4 Sport (HW006)
scooters are intended for outdoor use. As Class C scooters, these devices
are large in size, so not intended for indoor use, but capable of travelling over
longer distances and negotiating outdoor obstacles. This product may not be
suitable for home healthcare or community healthcare environments.
3.2 Intended User Group
The Drive Royale scooters are intended for a single user of weight up to 160
kg (25 st). The intended user group for this device is any mobility restricted
individual that requires assistance with transport.
The patient / occupant is the only intended operator. Professional users and
lay users are intended operators of the scooter. Users must be both mentally
and physically capable of operating the device with minimal risk of injury to
themselves.
3.3 Intended Use
The intended use of the scooter is to transport an end user with restricted
mobility, as defined in section 3.2.
The scooter is intended to support a single occupant. A risk assessment must
always be performed on the suitability of the user to the scooter and any
ancillary accessories.
3.4 Indications
To provide mobility to an end user who has diculty walking due to an injury,
physical disability or medical condition.

6
3.5 Product Overview
This product has been designed to provide a comfortable and secure solution
for users who have diculty walking long distances and are capable of
operating a large mobility scooter. The product is a class C scooter (under EN
ISO 12184:2014), class I medical device and class 3 invalid carriage (under The
Use of Invalid Carriages on Highways Regulations 1988).
As a Class C scooter, this scooter is large and intended for outdoor use over
long distances. The rated gradient is 10°. For specific guidance with outdoor
use, see section 8.7.
This manual is composed from the product design and specifications at the
time of publication. As designs change, some illustrations and pictures in the
manual may not correspond to the scooter that you purchased. We reserve
the right to make design modifications.

7
4. SAFETY
4.1 Warnings & Cautions
Warnings in this user manual highlight potential hazards that if
disregarded could lead to injury or death.
Cautions in this user manual highlight potential hazards that if
disregarded could lead to equipment damage or failure.
4.2 Risk Assessment
Before using the scooter, a risk assessment must be performed by a
competent individual to ensure the safe use of the scooter on a user-by-user
basis. It is the responsibility of users and carers to determine that they are
both mentally and physically capable of operating the scooter with minimal
risk of injury to themselves or others.
The risk assessment should include, but not be limited to:
• Entrapment
• Falling out of the scooter
• Small adults (and children)
• Individuals who lack capacity
• Users with visual, reading or cognitive disabilities
• Very active occupants
• Unauthorised people with access to the scooter
Caution
Warning
4.3 Contraindications
• The end user exceeds maximum weight capacity indicated in section 4.4
• The end user has postural support needs
• Inability to safely guide a power mobility device
• Inadequate cognitive function, judgment, vision, motor coordination or
the presence of a suciently serious spatial neglect, to preclude with
reasonable certainty, safe operation of the device
Other contraindications may be relevant which are specific to an individual
and / or care environment.

8
4.4 Scooter Loading
The maximum user weight of the scooter is: 160 kg (25 stone)
Maximum user weight is the sum of the user mass and the mass of ancillary
attachments or accessories. Exceeding the maximum weight capacity will void
your warranty. Drive DeVilbiss Healthcare Ltd. will not be held responsible for
injury and / or damages resulting from failure to observe weight capacities.
• The maximum load is for the scooter to be occupied by one
person only. Additional weight could damage components
or destabilise the scooter, potentially causing injury.
• The scooter may only be used to transport one person at a
time. It should not be used for climbing. The backrest is not
designed to support an entire person's body weight, and
the armrests are not designed to support other individuals
sitting / leaning — risk of collapse, entrapment.
• The scooter is not a toy. Children should not be allowed to
play near or operate the scooter, as they are at risk of harm.
• Never sit on the scooter when it is being used with any type
of lift or hoist — a hazard may be introduced.
Warning
4.5 Training
All individuals operating the scooter are to be suitably familiar with the
functionality and limitations prior to use. It is the responsibility of the user to
ensure they are suitably trained to use the scooter and any associated parts
safely and correctly. Every eort should be made to resolve deficiencies and
should include consideration of retraining, falls prevention and equipment
alterations and modifications.
There are certain situations, including some medical conditions, where the
scooter user will need to practice operating the scooter in the presence
of a trained attendant. A trained attendant may be a family member or care
professional especially trained in assisting a scooter user in various daily living
activities.
If these instructions for use are not deemed sucient and the need for training
is required, please contact Drive DeVilbiss Healthcare Ltd. or your local provider
(see section 2) who can discuss training options with you.

9
• Do not use a damaged or badly worn scooter — risk of harm.
• This device is a large scooter, designed for outdoor use.
Care should be taken when cornering and negotiating
drops, obstacles and gradients.
• Under no circumstances should the scooter be used as a
seat in another motor vehicle.
• The scooter is to be installed and put into service following
the information provided in these instructions for use. Any
serious incident that has occurred in relation to the device
should be reported to Drive DeVilbiss Healthcare Ltd.
• Avoid unnecessary movement of the scooter.
• The scooter is designed for occupants who weigh less than
160 kg; overloading may put the user at risk of falling or
entrapment.
• Do not touch any exposed contacts or connectors while
using the product or while in contact with other individuals.
• Misused electrical equipment can be hazardous.
• Only Drive DeVilbiss Healthcare approved parts, specified
for the Royale scooters, should be used. Accessories that
have not been approved or designed for use with the
scooter are not be used – a hazard could be introduced due
to product combination incompatibility. If in doubt, contact
Drive DeVilbiss Healthcare Ltd. or your local distributor.
• Modification of the scooter, its parts or features is not
allowed without the permission of Drive DeVilbiss
Healthcare Ltd. – a hazard could be introduced.
• The scooter is electrically operated, so should not be used
in oxygen-rich environments, in the presence of flammable
gases, sources of heat or naked flames – risk of explosion
/ fire. Damaged or worn upholstery increases the risk of fire
hazard, and should be replaced immediately.
• Individuals unable to drive the scooter without assistance
or supervision must not use the scooter without such
supervision. Unsupervised use of the scooter must be
avoided if there is any doubt about the ability of an
individual to operate it safely.
• If children, adults with learning diculties or pets pose a
potential risk of tampering with the scooter, its suitability for
use is to be considered during the initial user / product risk
assessment.
4.6 General Warnings
Warning

10
5. TRANSPORT & STORAGE
Environmental conditions for transport and storage:
Scooter ambient temperature: -40°C to +65°C
Battery/charger ambient temperature: -15°C to +40°C
These conditions should be followed when transporting or storing the scooter:
• The scooter should be stored on a flat and level floor.
• Always fully charge, then remove the battery prior to long-term storage.
• The scooter should be stored in clean and dry conditions. Cover to protect
from fluid ingress, dirt, dust, extreme temperatures etc.
• Scooters should not be stored on their side, on their backs, or stacked
atop each other.
• When transporting scooters by vehicle, they should be securely stowed
in the back of a van, truck, or trunk of a car. Adjustable parts should be
removed or properly secured during transport.
• Keep the keys and instructions for use with the scooter or in a safe place.
Note: This vehicle is suitable for land and air transport, but contact your carrier
in advance to determine their specific requirements. The battery may require
special packaging and storage provisions in line with IATA or UN Guidelines.
See this section for details on how to remove the battery.
If your scooter is stored for a prolonged period, flat spots may develop in the
wheels, causing an uneven sensation when driving. This should work itself out
over time. Drive DeVilbiss Healthcare Ltd. suggests placing a sturdy platform
under the frame to lift the wheels o the ground, and take weight o the wheels
during storage. If you notice flat spots after continued use, replace the scooter
wheels immediately.
• Always lift the scooter by the frame. Do not attempt to lift by
any removable parts (e.g. seat or body shrouds).
• Infrequently charged batteries, or batteries stored without a
full charge are susceptible to permanent damage, causing
unreliable performance from your scooter.
• Avoid placing the scooter in direct sunlight — this could
damage the electrical system and / or cause label fading.
• Do not store in damp or humid conditions, as this will lead
to mildew and rapid deterioration of the upholstery.
• Remove the key from an unattended scooter.
Caution
11
• Improper storage of your scooter may result in permanent
damage to the frame and electronics.
• Do not transport or store batteries with tools or metal wire.
This can cause fire or cause the battery to leak acid, overheat,
or explode.
• Do not sit in the scooter while in a moving vehicle.
• To prevent the risk of cross infection, prior to removal,
transport or storage, ensure the scooter has been cleaned
and disinfected in line with section 9 of these instructions
for use. Ensure that disposable gloves are used for all
decontamination activities and that they are then discarded
appropriately, unless the scooter and ancillary parts have
been suitably cleaned and disinfected.
Warning
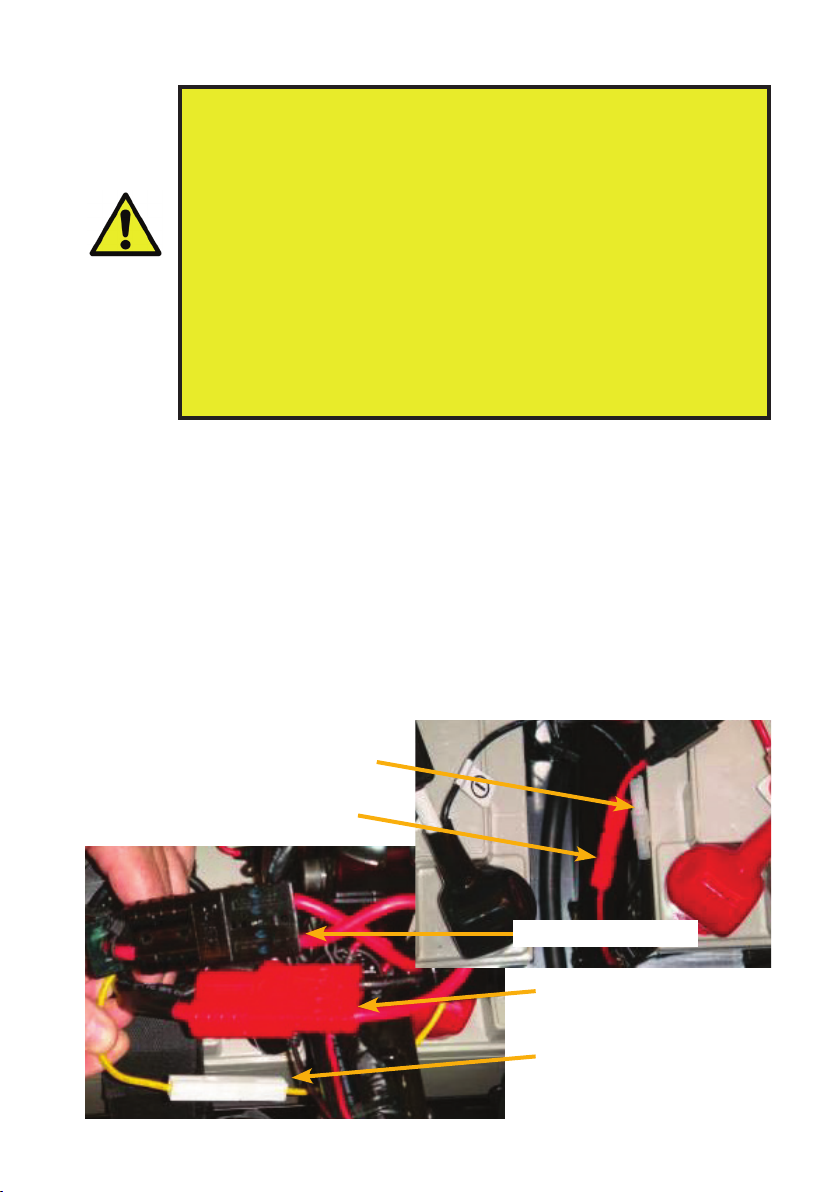
The procedure below shows how to disconnect the battery for transportation
or replacement. This should be done by competent persons, such as approved
service engineers:
1. Switch the scooter on and o, remove the key and exit the scooter.
2. Pull the swivel lever to release the seat (see section 7.2) and lift to remove.
3. Remove the battery compartment lid and unfasten the tie-down strap.
4. Disconnect the battery connectors (two main and three smaller).
5. Once all connectors (A, B, C, D, E) are separated, remove the batteries.
To insert the batteries, place a battery in each battery well, then reconnect the
connectors. Check all the connectors are in the correct position. Reconnect the
battery tie-down strap and reinstall the battery cover and seat.
Connector E (White)
Connector B (Red)
Connector D (Red)
Connector A (White)
Connector C (Black)

12
6. SYMBOL DEFINITION
Symbol Description
Warning
Beware of potential hazard
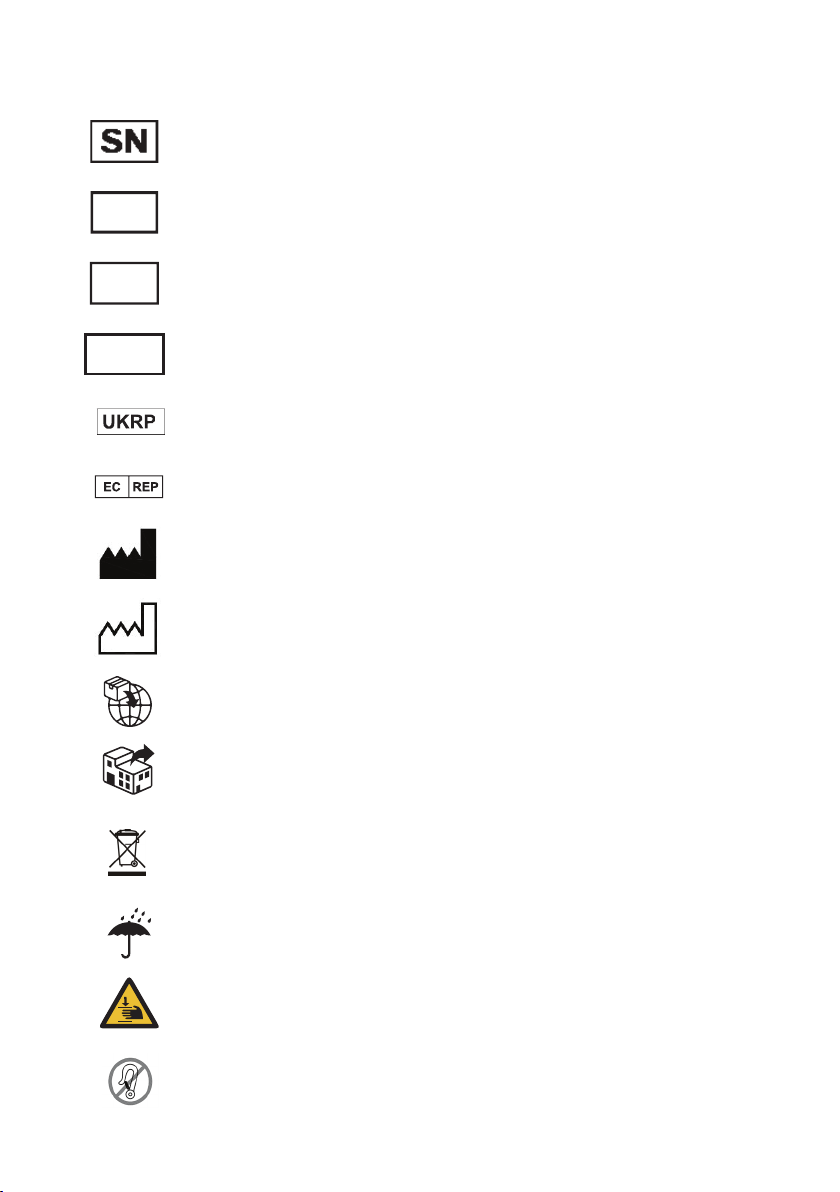
The following symbols are found on this scooter:
Refer to instructions for use - Recommended
Failure to read the instructions for use could introduce a hazard
Refer to instructions for use - Mandatory
Failure to read the instructions for use could introduce a hazard
Caution
Beware of potential product damage
Medical Device
Safe working load
Do not create a stack of more than 2 boxes
MD
!
2
Fragile, handle with care
Use no hooks
This way up
13
Serial number
Symbol Description
REF
Product code
Importer code
#
Manufacturer
Importer
Date of manufacture
Quantity
Authorised EU Representative
QTY
Beware of trapping points
W.E.E.E Label - Found on individual parts of electrical
system
(Waste Electrical and Electronic Equipment) Refer to section 13)
Distributor
Keep away from rain
UK Responsible person
This device must not be used as a seat in a motor vehicle.
14
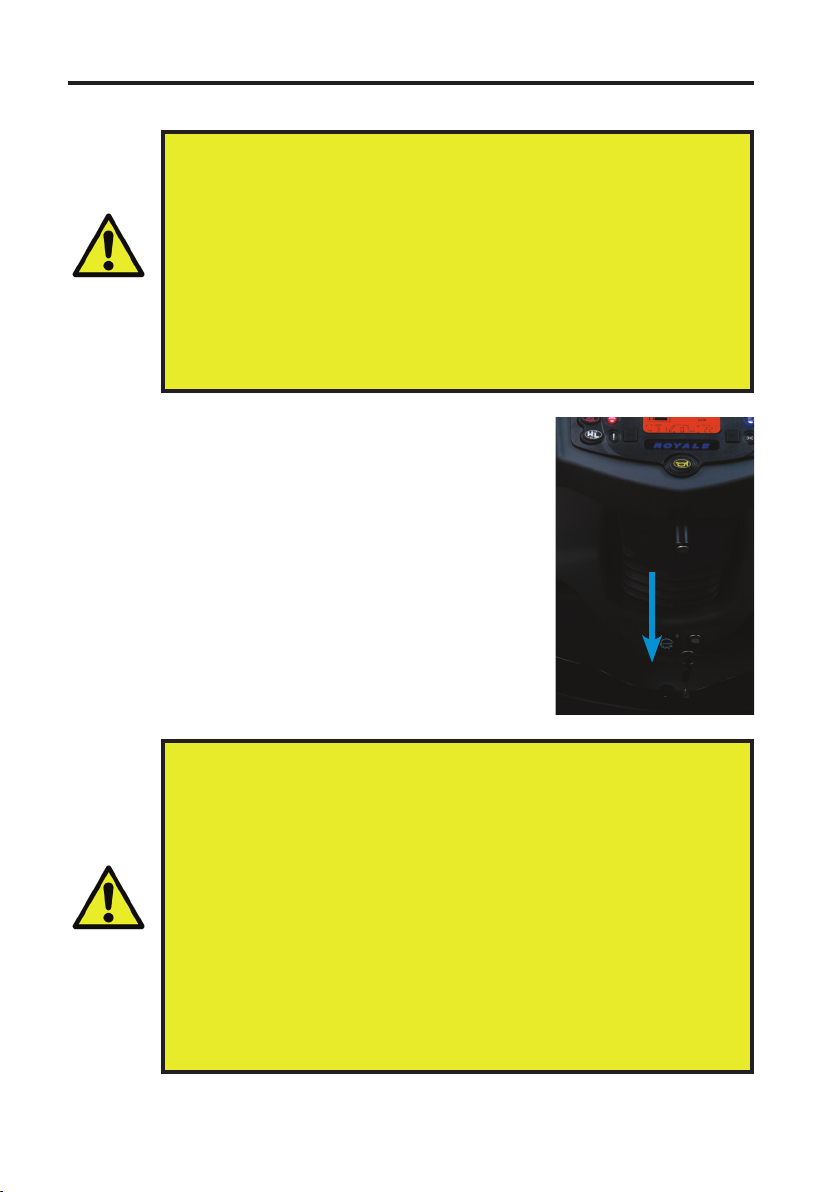
7. CHARGING & PREPARING FOR USE
7.1 Charging the Batteries
Before you first use your scooter, charge the batteries
for 24 hours.
To charge, position the front of the unit next to a
standard electrical outlet and remove the cover from
the charging port (underneath the controls on the
tiller). Plug the charger into the scooter, and then into
the mains. Remove the charger when the batteries
are fully charged.
• Before preparing the scooter, ensure the instructions and
safety labels have been read and fully understood.
• Prepare the scooter indoors before exposing in wet
conditions – risk of electric shock.
• Only competent persons are to prepare the scooter for use.
If in doubt, contact Drive DeVilbiss Healthcare Ltd. or your
local distributor.
• Ensure a risk assessment in line with local health and safety
policy is undertaken to ensure that sta are not put at risk
when performing assembly activities.
Warning
• Do not open the battery.
• Do not connect an extension cord to the battery charger.
• Keep metal objects away from the battery terminals; electric
shock may occur.
• Charge your batteries indoors in well ventilated areas.
• Ensure the charging cable is not under excessive tension
to avoid cable damage — damaged cables can create an
electrocution / fire risk.
• Ensure the battery is not exposed to direct sunlight or a
secondary heat source — direct heating of the battery via an
external source could pose a fire risk or cause an explosion.
• Disconnect the charger from the scooter and the mains
supply when not in use.
Warning
15
• Only charge the Royale scooters with the charger approved
by Drive DeVilbiss Healthcare Ltd. Never charge the scooter
using a dierent charger.
• Failure to charge the batteries often could result in a
reduced range.
Caution
The battery light indicates dierent charge statuses. The table below shows
the lighting modes. Any other signals may indicate faulty equipment. See
sections 10.2 and 10.6 to diagnose and resolve some charging issues.
Light indicator Status
Green flash Power on
Orange flash Pre-charge
Orange Charging is in operation
Green and orange flash Bulk charging (80% charge) is complete
Green Fully charged (trickle charging)
Red flash Charging error. See section 10 for support.
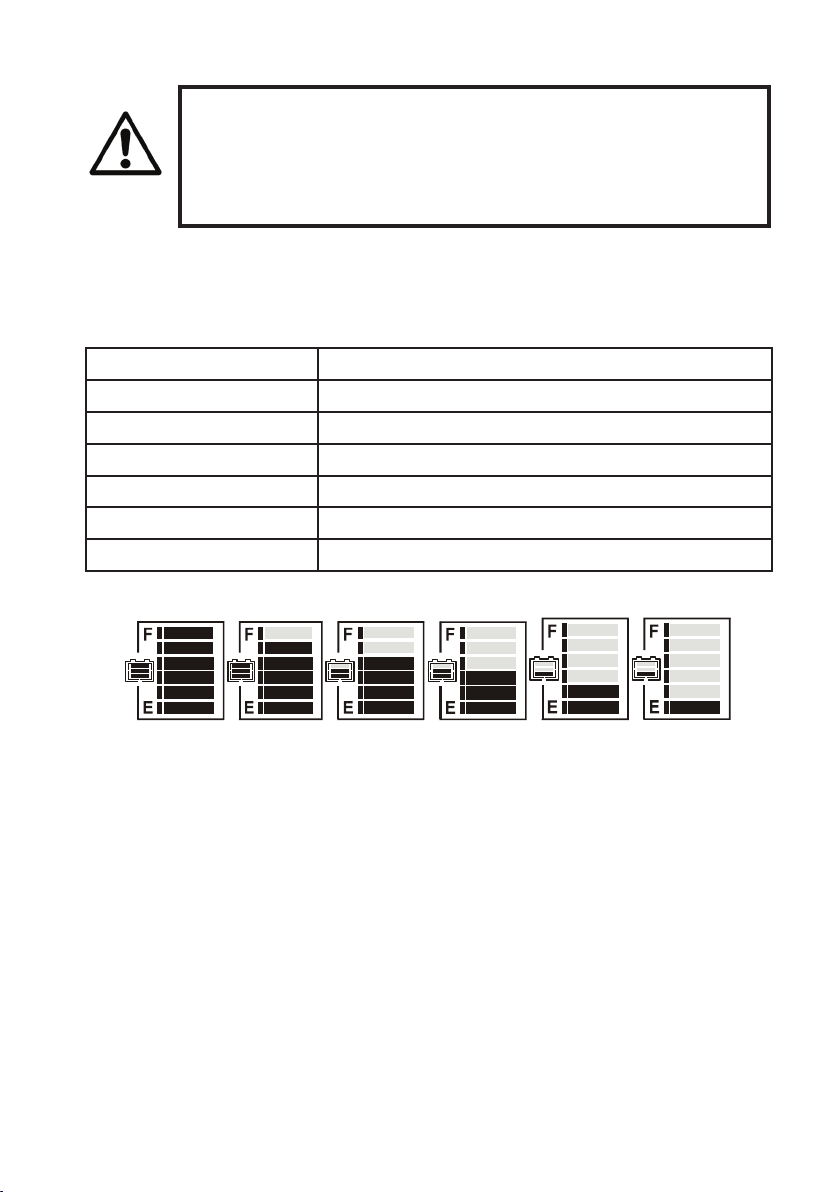
Battery levels:
100% 85% 70% 55% 40% 30%
With regular use, Drive DeVilbiss Healthcare Ltd. recommends charging
the battery after every trip, or 10-14 hours a week. If you do not frequently
use the scooter, fully charge the batteries at least once every two weeks to
prevent battery failure. Completely discharging the batteries may damage the
batteries, or shorten the expected life of the batteries.
Note: If the battery gauge drops below 30% (one bar), the gauge will flash
and the warning sound will beep at 5 second intervals. Recharge the
scooter as soon as possible. If the battery cannot be charged (Orange light
does not turn Green) or if the Orange light turns Green immediately, check
the scooter with a technician. The battery may be defective.
For any concerns about the electrical parts or indicators, see section 13.2 for
fault finding, contact Drive DeVilbiss Ltd. (section 2) or contact your provider.
16
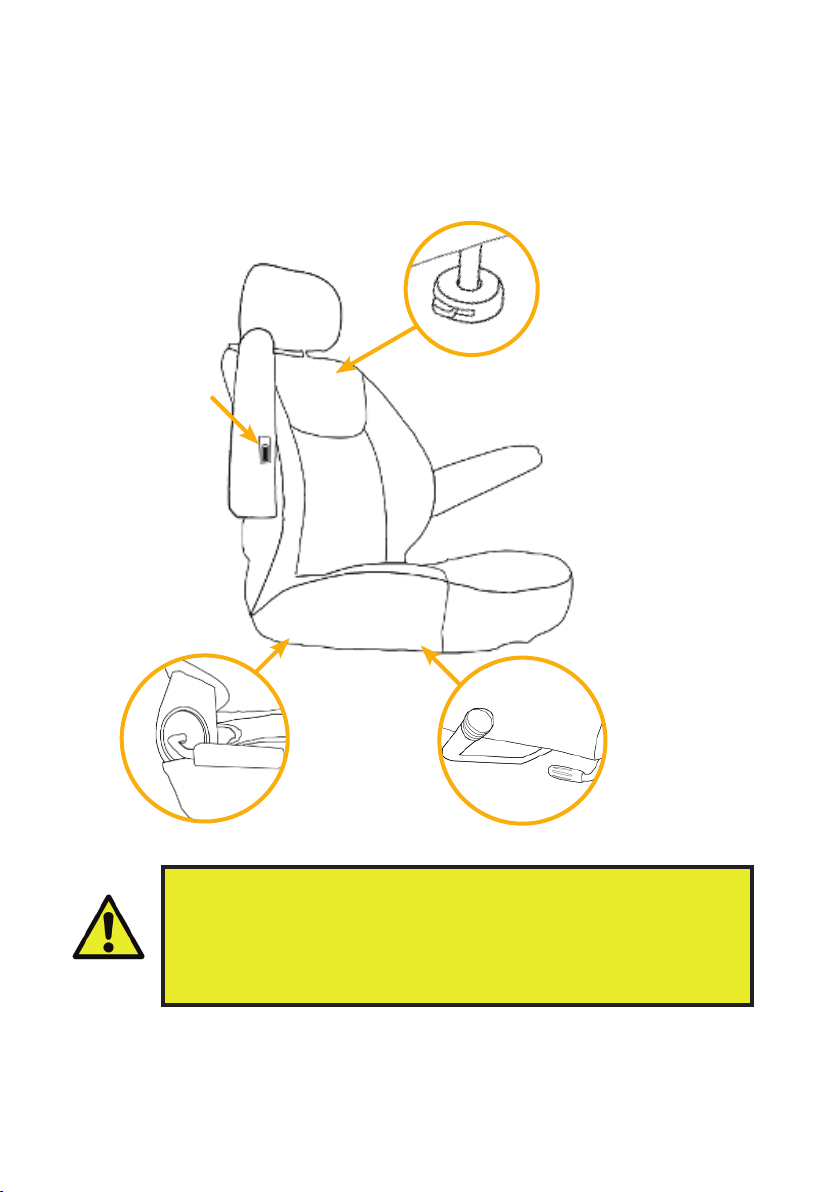
7.2 Adjustments for Comfort
Prior to using your scooter, the seat should be adjusted on a user-by-user
basis. To make the adjustments, follow the instructions below, ensuring all
parts of the seat are secure when ready to use.
Always make these comfort adjustments before using the
scooter, while the user is seated in the scooter. Unsuitable
adjustments, or adjusting while the scooter is in motion put
users at risk of falling. Positioning of the backrest can especially
aect the overall stability of the scooter.
Warning
The flip-up
armrest height
can be adjusted
by turning the
adjustment dial.
Move the seat
back lever
to adjust the
backrest angle.
Press the bottom to
adjust the height of the
headrest.
Turn the middle
swivel lever
downwards to
rotate the seat.
Push the front
lever upwards
to move the
seat forward
and backward.

17
7.3 Transferring Users
If users are unable to enter or leave the scooter without assistance or
supervision, an attendant should always be present while transferring in and
out of your scooter. Safely reduce the distance between your scooter and the
object you are transferring onto, and turn the power o.
• Always make sure the power is o before getting on and
o the scooter. Carers should keep clear once the scooter
is powered on. Do not operate the controls while anyone is
entering or leaving – a hazard may be introduced.
• Position yourself as far back as possible before transferring,
and never place your weight or downward force on any
adjustable or moving parts.
• The motor surface can reach temperatures greater than
41°C after driving. Any surfaces of the scooter that can
come into direct contact with skin during normal use shall
not exceed this temperature. Wait until these surfaces are
cooled before use.
Warning
7.4 Checking the Scooter
Before it is put into use, ensure the scooter has been correctly assembled and
set up by carrying out the following checks:
• Electrical connections and wire harness – secure and free from corrosion
• Batteries – fully charged and free from corrosion with harnesses secure
• Brake – check the electromagnetic brake is functioning
• Folding system – ensure the scooter is fully folded out
• Tyres – inflated to their rated pressure
Drive DeVilbiss Healthcare Ltd recommends that a safety check is performed
before each use to make sure your scooter operates safely.
Damaged or worn upholstery increases the risk of fire hazard,
and should be replaced immediately.
Warning
Drive DeVilbiss Healthcare cannot be held responsible for any injury or
incident which relates to the use of any product combinations not approved
by Drive DeVilbiss Healthcare Ltd.
18
8. OPERATION OF THE SCOOTER
8.1 Operational Limits
Scooter ambient temperature: -10°C to +45°C
Charger ambient temperature: -25°C to +40°C
Batteries may freeze in extremely cold conditions, depending on the charge,
usage, and composition. The scooter may not operate at all under -15°C. In
extremely hot conditions your scooter may operate at a lower speed. This
is due to the safety mechanism built into the unit to prevent damage to the
gearbox and other electronic functions when operating too hot.
Should your scooter come in contact with water or moisture, dry your scooter
thoroughly with a towel. Allow your scooter to sit in a dry place for 8 to 12
hours to allow unseen moisture to evaporate. Check the throttle operation
and brakes before using your scooter again. If any items require service,
please contact your authorised Drive DeVilbiss provider.
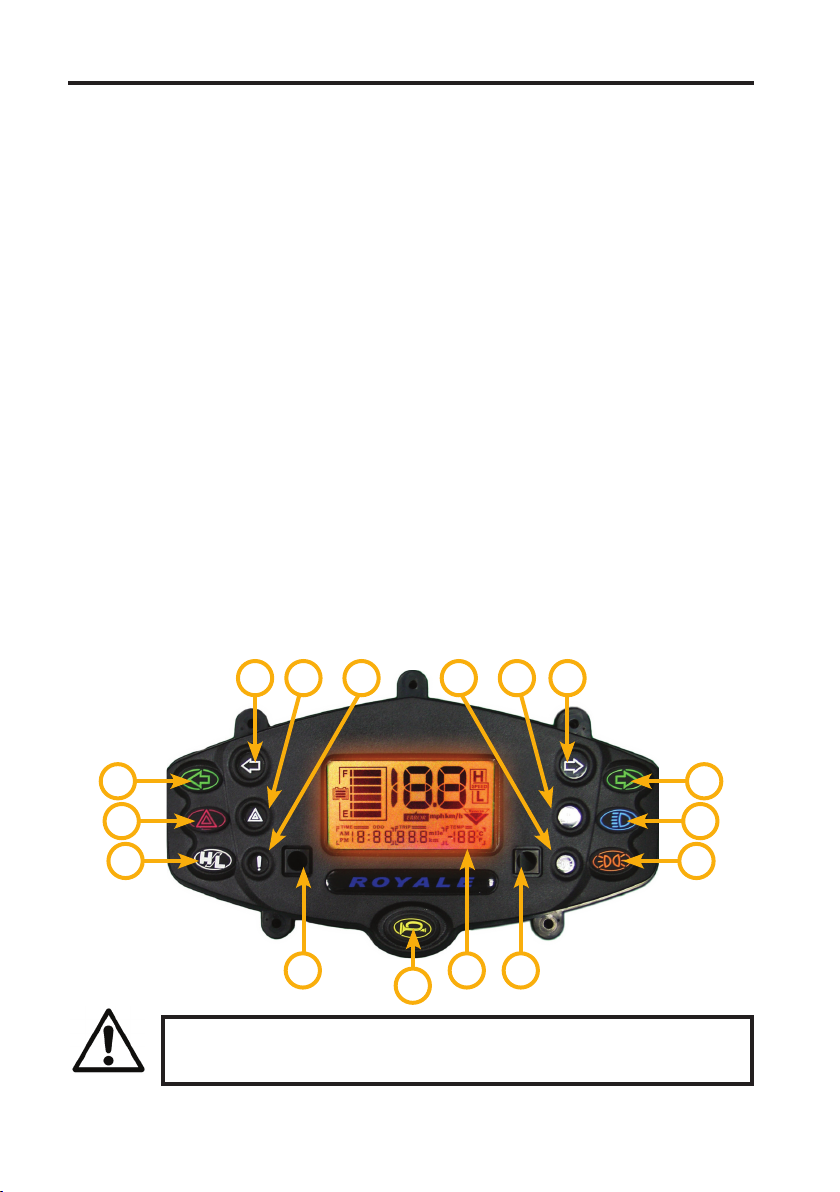
8.2 Control Panel
Please refer to the diagram below to identify your scooter control panel and
its functions. Familiarise yourself with the terminology to better understand
references throughout these instructions.
Make sure the scooter functions work correctly before
operating, using the checklist in section 7.4 for guidance.
Caution
1
14 13 1516
87
109
1211
2 43 5 6

19
When the scooter is first switched on, all the display will light up for 3
seconds whilst the scooter runs a self test.
Note: If the scooter finds an error during this time or during operation, the red
WARNING light will show and the speedo will display a number. See section
10.5 for information on the error codes.
LEDs
1. Left Indicator (Green)
2. Hazard Light (Red)
3. Warning Light (Red)
4. Parking lamp (Amber)
5. Headlight (Blue)
6. Right Indicator (Green)
Buttons:
7. Left-Indicator
8. Right-Indicator
9. Hazard Light
10. Headlight button
11. High / Low speed
12. Side lights control
13. Horn
14. ‘MODE’ switch
15. ‘SET’ switch
16. LCD Display (see section 8.4)
8.3 Buttons
(7, 8) Indicators
Press the LEFT or RIGHT INDICATOR button to operate the indicators, which
will flash with a buzzer sound. Press the button again to stop the indicator.
(9) Hazard Warning Light
Press the HAZARD button to operate the hazard warning light, which will
flash with a buzzer sound. Press the button again to stop the lights.
(10) Headlight
Press the HEADLIGHT button to switch on the headlight. Press the button
again to switch o the headlight.
(11) High / Low / Turn Speed
Press the HIGH / LOW button until the display shows ‘H’
or ‘ L’ to select high or low speed. (as shown).
• Do not adjust the speed dial whilst
driving as this could result in loss of
control.
• Do not set to the highest speed
whilst driving indoors.
Warning
(12) Side Lights
Press the SIDE LIGHT button to switch on the side light. Press the button
again to switch o the side light.
SPEED SPEED

20
8.4 LCD Display
(1) Speedo
Displays current speed in miles per
hour (mph) or kilometres per hour
(kph).
To change the speedo units:
1. Hold the MODE and SET buttons
until the clock starts flashing.
2. Press the MODE button until the
kph or mph is flashing.
3. Press SET to change to the desired setting.
4. Leave the scooter until the display stops flashing, or hold down the
MODE and SET buttons for 2 seconds.
(2) High / Low / Turn Speed
Shows ‘H’ or ‘ L’ top speed. If the display is flashing ‘ L’, the scooter is
automatically limiting its speed. This is a safety feature for when the scooter
is cornering.
(3) Power Indicator
Shows the remaining battery level.
100% 85% 70% 55% 40% 30%
If the battery gauge drops below 30% (one bar), the gauge will
flash and the warning sound will beep at 5 second intervals.
Recharge the scooter as soon as possible to avoid unexpected
shutdown during use.
Warning
The remaining power indicated by the battery gauge will vary by the driving
time incurred and how you drive. Repeated starting, stopping and climbing
will consume power more quickly.
1
4 5 6
7
8
23
This manual suits for next models
9
Table of contents
Other DeVilbiss Healthcare Scooter manuals


