3T EBIKE MOTION X 35 User guide

BOOST RANGE
EBIKE MOTION X 35 System manual

2
READ, THEN GO EXPLORE!
We thank you for buying your 3T frame!
Our aim is to bring back the joy of bike riding.
3T bike frames are for riders that want to do more, feel more,
and explore wider horizons.
In the 3T tradition, our bike frames are fast. Use yours to race
if you want. Or just ride out anywhere, because you can. We
built it to do whatever you dare, comfortably, securely, and
quickly.
Be sure to register your frame to get the 3T extended warranty
and qualify for the crash replacement program.
Thank you for the trust you put in 3T products, and we wish
you joy of your new bike!
GerardRené

3
Your bicycle has been carefully pre-assembled at the
factory. For easier transport, some parts have been
dismantled and put in transport position. In order to
get the bicycle ready and safe to ride, these parts
must be put into a normal position and fastened
after the bicycle is unpacked.
Be sure to read this assembly manual carefully, keep
it safely and follow all of the steps it describes.
If you are unsure about one of the assembly steps
described, contact a 3T specialist dealer or email
our service center. You can find a list of all 3T
specialist dealers and an email contact form on our
homepage http://www.3t.bike under the heading
“Dealer locator”.
These assembly instructions are applicable only
together with the included operating instructions.
PREFACE 2
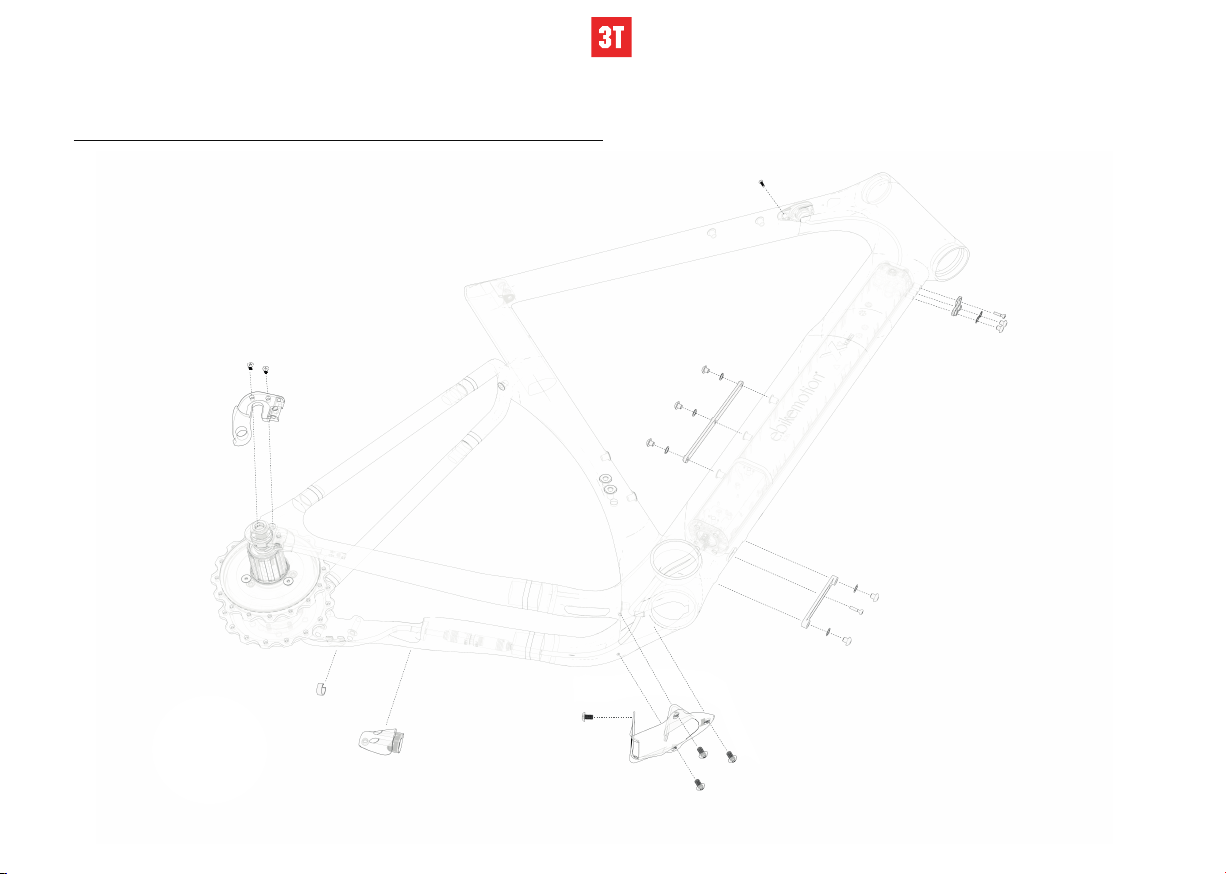
SPARE PARTS - EXPLODED VIEW 4
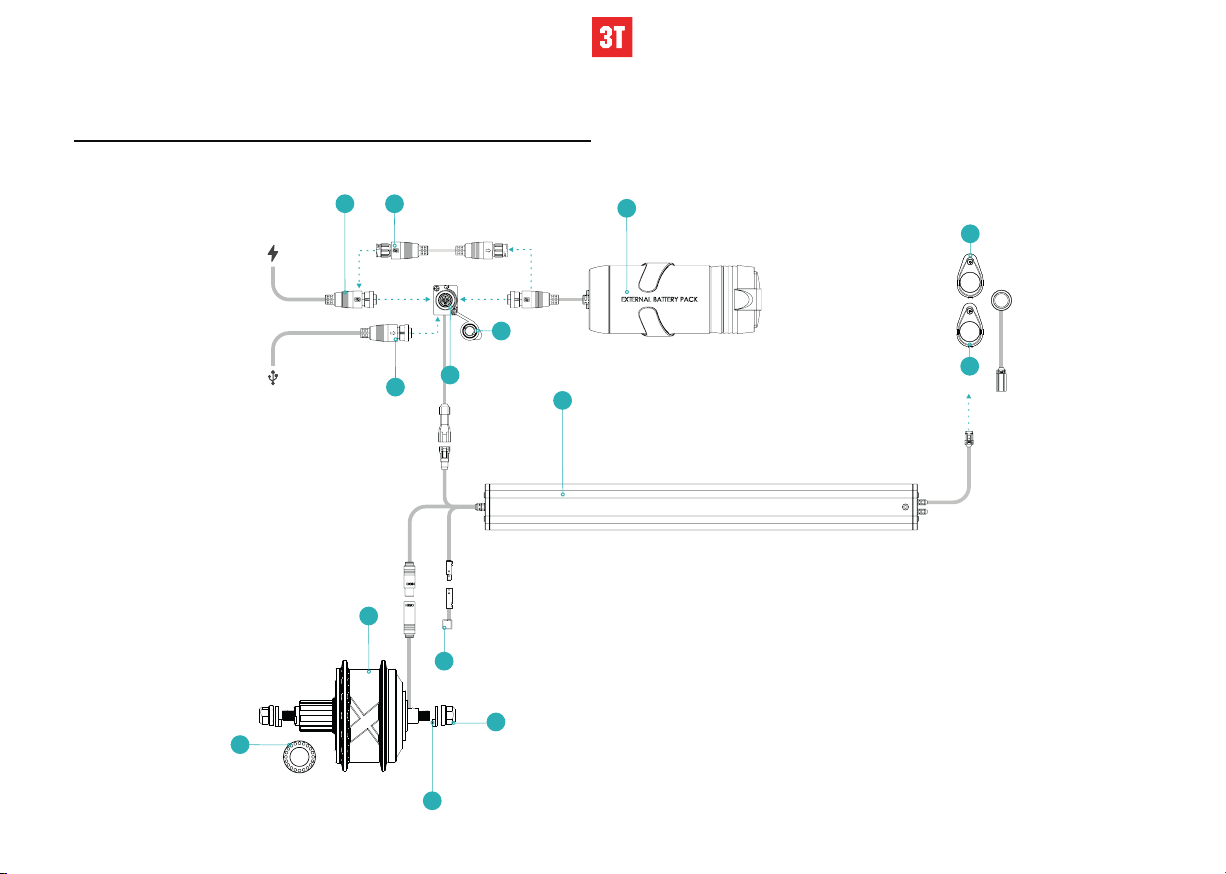
EBIKE MOTION X 35 - SYSTEM SCHEMATICS 6
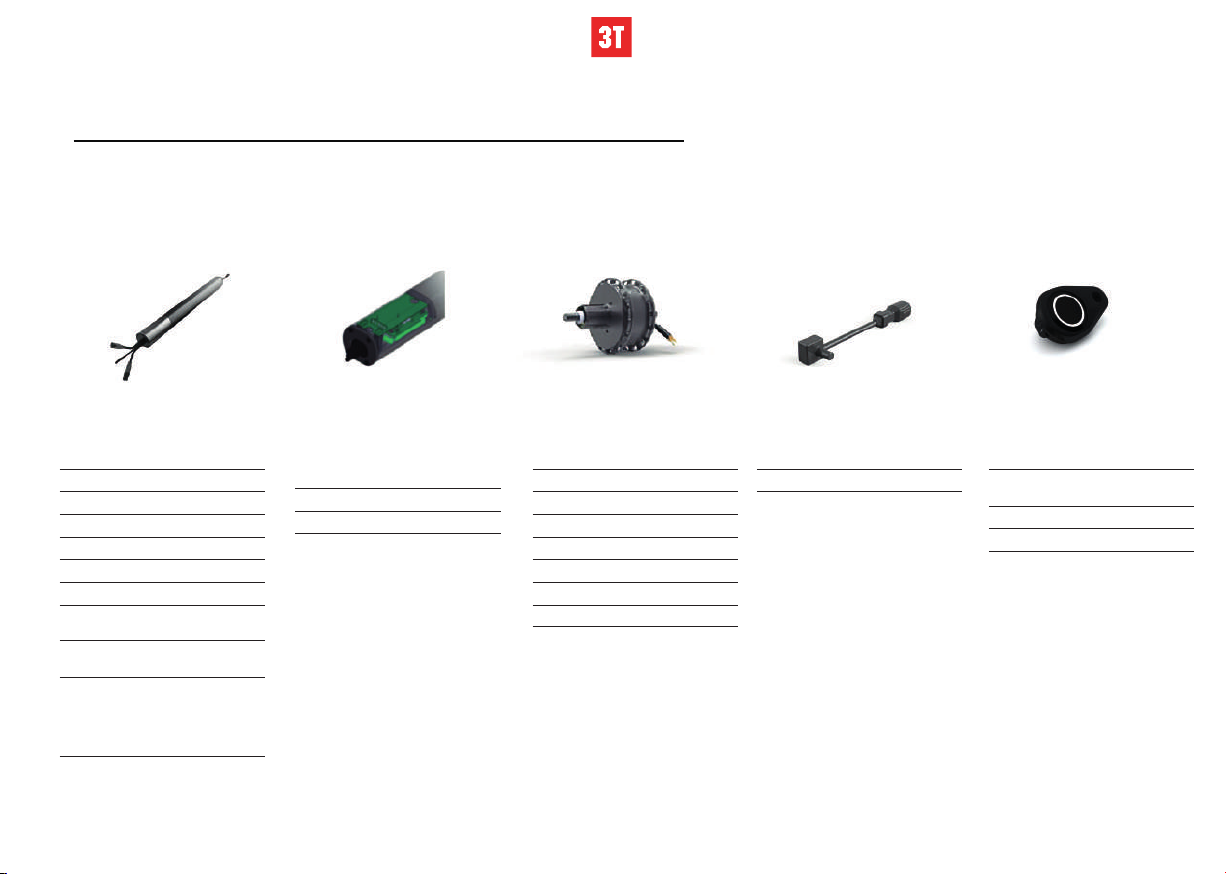
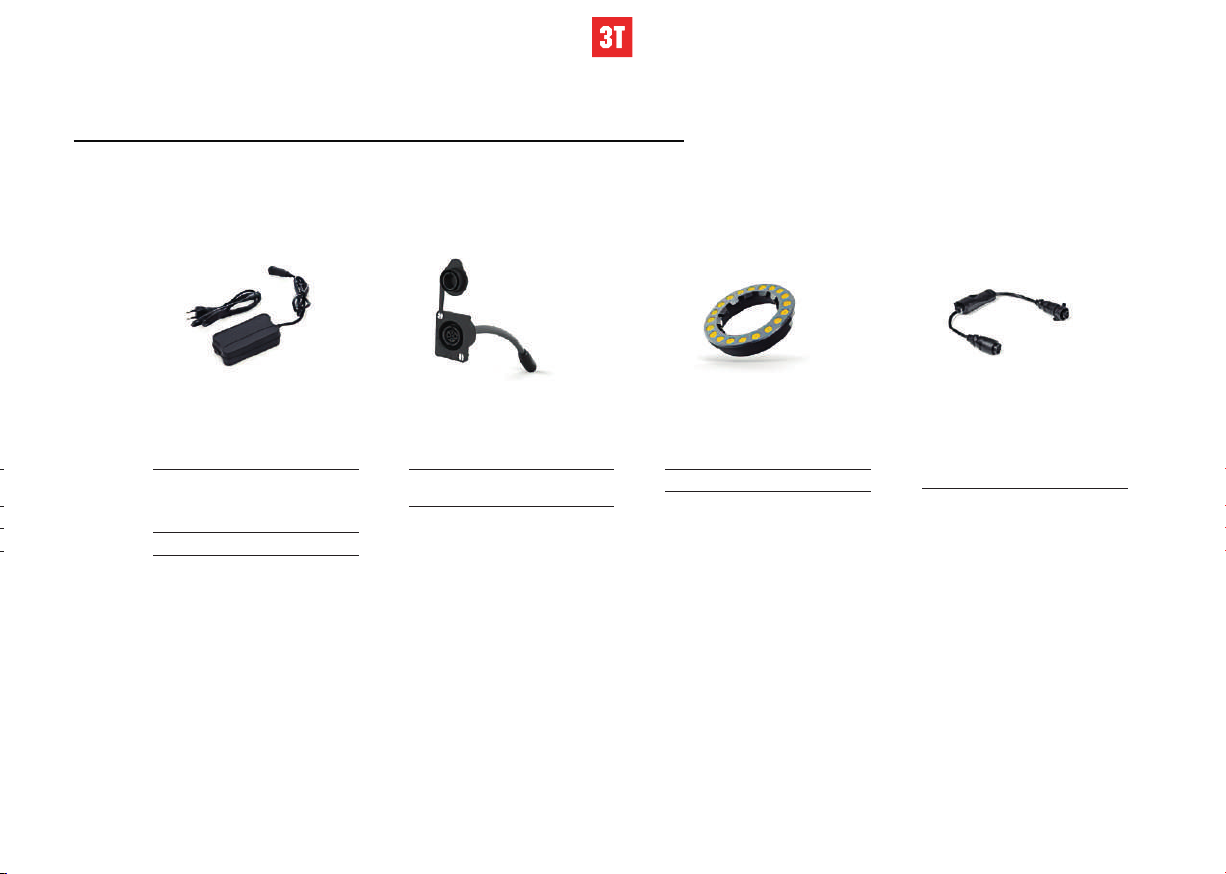
EBIKE MOTION X 35 - MAIN SYSTEM COMPONENTS 8
CABLE ROUTING - INTERNAL MECHANICAL 10
CABLE ROUTING - EBIKE MOTION ROUTING 11
SENSOR - ASSEMBLY INSTRUCTION 12
HUB MOTOR - ASSEMBLY INSTRUCTION 13
BATTERY - ASSEMBLY INSTRUCTION 14
iWOK ONE - INSTRUCTIONS 15
iWOK ONE - GENERAL LIGHT SCHEME AND MEANING 16
iWOK ONE - CHARGING THE BATTERY 18
X35 MAINTENANCE - ALERTS 19
NOTE 20
LEGAL DISCLOSURE / WARRANTY 21
CONTENTS

4
SPARE PARTS - EXPLODED VIEW
30536
30538
30535
30537
30542
30540
30541
30539

5
SPARE PARTS - EXPLODED VIEW
Product Code Model Ean Code
30535 Boost Bottom Braket cover 4895211828934
30536 Boost BB Battery Mount Bracket 4895211828941
30537 Boost HT Battery Mount Bracket 4895211828958
30538 Boost Bottle Cage Mounting Bracket 4895211828965
30539 Boost RD HANGER X35+ 4895211828972
30540 Boost NDS Chainstay motor cable plug 4895211828989
30541 Boost Motor cable fixing guide 4895211828996
30542 Boost iWOC 4895211829009

6
EN
16
1B1 Battery 611
2Motor M1 712 17
Pedaling
Sensor
3813 18
Remote
iWoc ONE
4914
510 15
19
20
ES
DE
FR IT
PT
Remote
iWoc TRIO
Charger
Charging &
Comm. Port
Magnet Nut
Display
Washer Nut
Lock Nut
Aux Charger
Adapter
Diagnosis Tool
Flat Holder
for iWoc ONE
Curved Holder
for iWoc ONE
Cover for
Charging Port
Aux wire
Light wire
Aux + Light
wire
External
Battery
16
1Batería B1 611
2Motor M1 712 17
Sensor de
Pedaleo
3813 18
Remoto
iWoc ONE
4914
510 15
19
20
Remoto
iWoc TRIO
Cargador
Puerto de carga
y Comunic.
Tuerca de
Imanes
Display
Brazo de Par
Tuerca de
Cierre
Adaptador
de Carga
Diagnosis
Embelleceder
Plano
Embelleceder
Curvado
Tapa para el
puerto de
Comunica
Salida Aux
Cable para
Luces
Cable para
Luces y Aux
Batería
Externa
16
1Batterie B1 611
2M1 Motor 712 17
Pedaling
Sensor
3813 18
Remote
iWoc ONE
4914
510 15
19
20
Remote
iWoc TRIO
Charger
Charging &
Comm. Port
Magnet Nut
Display
Couple de
serrage
Vis de serrage
Adaptateur de
charge
Outils de
diagnostic
Support Plat
Support curbè
Cache pour
le point de
recharge
Sortie
Auxiliaire
Cable
d’èclairage
Cable Aux
et èclairages
Batterie
externe
16
1Batteria B1 611
2Motore M1 712 17
Sensore di
pedalata
3813 18
Comando
remoto iWoc
ONE
4914
510 15
19
20
Comando
remoto iWoc
TRIO
Caricabatteria
Porta per carica
e comunicazioni
Magnete
Display
Distanziale
Chiusura
Presa Aux per
carica esterna
Cavo diagnosi
Base piana
ONE
Base curva
ONE
Copertura per
porta di carica
Cavo Aux
Cavo luci
Cavo Aux e
luci
Batteria
esterna
16
1Batterie B1 611
2Motor M1 712 17
Sensor
3813 18
Fernbedienung
iWoc ONE
4914
510 15
19
20
Fernbedienung
iWoc TRIO
Ladegerät
Anshluss
Magnet
Anzeige/Display
Dichtung
Schraube
Lade-Adapter
Auslesegerät
Halter
Halter
(geborgen)
Abdeckung
Aux Anschluss
Lichtkabel
Aux + Licht
Externe
Batterie
16
1Batería B1 611
2Motor M1 712 17
Sensor de
Pedal
3813 18
Comando
iWoc ONE
4914
510 15
19
20
Comando
iWoc TRIO
Carregador
Porta de
comunicações
Íman
Display
Anilha
Porca de
Aperto
Adaptador Aux
Carregador
Ferramente de
Diagnosis
Tampa Plana
Tampa Curva
Tapa da
Ficha do
Carregador
Saída auxiliar
Cabo para
Luzes
Cabo para
Luzes e Aux
Batería
Externa
EBIKE MOTION X 35 - SYSTEM SCHEMATICS

7
EXTERNAL BATTERY
X35EXBATSP1
B1 BATTERY - 6,9A
X35BATTERY-1-B
DRIVE UNIT-M1
X35DRIVE
WASHER NUT
LOCK NUT
X35LOCKNUT
MAGNET
LOCK NUT
PASS SENSOR
X35PASSENSOR-B
DIAGNOSIS
X35DIAGWI
CHARGER
X35CHARGER
CHARGING AND
COMM. PORT
X35CHGPNT
COVER
X35TAP
CHARGER ADAPTER
ONE HOLDER - CURVE
ONE HOLDER - FLAT
GENERAL SCHEME / ESQUEMA GENERAL / ALLGEMEIN / SCHEMA GENERAL / SCHEMA GENERALE / ESQUEMA GERAL
1
2
3
11
15
14
10
8
7
20
16
612
13
X35EXWIRE
X35MAGNUT
X35WASHERNUT
X35ONEHCUR
X35ONEHFL
EBIKE MOTION X 35 - SYSTEM SCHEMATICS

8
EBIKE MOTION X 35 - MAIN SYSTEM COMPONENTS
INTERNAL BATTERY
Capacity: 245W/h
Voltage: 36V
Weight: 1,5Kg
Panasonic 18650GA - 10S/2P Cells
Charge balanced
CAN BUS compatible
Models A,B,C,C2
Front and rear light connetivity
(needs EBM cable)
Shimano 6V. 4W bare cable
compatible
Battery life:
0 cycles= 100% capacity
300 cycles= 80% capacity
800 cycles= 60% capacity
Estimate life span regular use: 5Y
ENGINE: HUB DRIVE M1
36V
Max torque: 40Nm. Ratio 14:1
3-phase engine
11 speed and disc brake compatible
Internal speed sensor
Max. speed: 25 kph (EU). 20 mph (us)
Weight:2.1 Kg
32 spokes
SMART ENGINE
MANAGEMENT SYSTEM
36V
CAN BUS compatible
Bluetooth 4.1
IWOC ONE REMOTE
On/off switch for system and lights
LED display for battery level and
assistance mode
CAN BUS compatible
Bluetooth® connectivity
PASS SENSOR
40 pulses
Magnetized cassette lockring

9
IWOC ONE REMOTE
On/off switch for system and lights
LED display for battery level and
assistance mode
CAN BUS compatible
Bluetooth® connectivity
GPU SYSTEM
UPDATE CABLE
USB-based system updates
CHARGING PORT
2A charging
Main charger and Range Extender
connection
CHARGER
Input:220-240V- AC 50-60Hz
Output: 36V-2A (newer chargers
have a 42V output. The battery
charging management system
adapts this voltage to 36V).
X35 specific lockring connector
MAGNETIC LOCKRING
EBM-specific lockring
20 magnets
EBIKE MOTION X 35 - MAIN SYSTEM COMPONENTS

10
CABLE ROUTING - INTERNAL MECHANICAL
REAR BRAKE CABLE
REAR DERAILLEUR CABLE
HUB MOTOR

11
MOTOR CALBE
(LEFT SIDE)
CHARGE
PORT
SENSOR (RIGHT SIDE)
HUB MOTOR
CABLE ROUTING - EBIKE MOTION ROUTING
iWOK ONE

12
SENSOR - ASSEMBLING INSTRUCTIONS
SENSOR FIXING BOLT M4

13
2
1
8mm
2
· THE MOTOR CABLE MUST FACE FORWARD
· EL CABLE DEL MOTOR DEBE ESTAR ORIENTADO HACIA ADELANTE
· DAS MOTORKABEL MUSS NACH VORNE ZEIGEN
· LE CABLE DU MOTEUR DOIT ETRE ORIENTÉ VERS L'AVANT
· IL CAVO DEL MOTORE DEVE ESSERE ORIENTATO VERSO LA PARTE ANTERIORE
· O CABO DO MOTOR DEVE ESTAR ORIENTADO PARA A FRENTE
3mmMAX:
3
1
MAX.
2
1
8mm
2
· THE MOTOR CABLE MUST FACE FORWARD
· EL CABLE DEL MOTOR DEBE ESTAR ORIENTADO HACIA ADELANTE
· DAS MOTORKABEL MUSS NACH VORNE ZEIGEN
· LE CABLE DU MOTEUR DOIT ETRE ORIENTÉ VERS L'AVANT
· IL CAVO DEL MOTORE DEVE ESSERE ORIENTATO VERSO LA PARTE ANTERIORE
· O CABO DO MOTOR DEVE ESTAR ORIENTADO PARA A FRENTE
3mmMAX:
3
1
MAX.
HUB MOTOR - ASSEMBLING INSTRUCTIONS
WATCH THE VIDEO TUTORIAL
WWW.3T.BIKE/BOOST-TUTORIAL

14
Do not remove the three bottle
cage fixing bracket bolts, leave always one
The battery is fixed on two brackets,
placed at the downside of the downtube
BATTERY - ASSEMBLING INSTRUCTIONS

15
Do not remove the three bottle
cage fixing bracket bolts, leave always one
iWOK ONE - INSTRUCTIONS
1
3
2
5
TURNING ON AND OFF THE BICYCLE'S ELECTRICAL SYSTEM
TURNING ON/OFF THE LIGHTS
CHANGING THE LEVEL OF ASSISTANCE
BLUETOOTH PAIRING AND NOTIFICATIONS
SYSTEM ERROR AND SPECIAL MODES
No assistance Level 01 Level 02 Level 03
+=Lights
ON / OFF
Turns on
the system Turns off
the system
Short
Button
Press
Long
Button
Press
Long
Button
Press
Current level
of assistance
4
Short press the button and the RGB LED will blink, indicating the current
assistance mode. If you short press it again while the LED is blinking, you will
change the assistance level cyclically.
Short press the button and while the LED is blinking, long press the button.
The LED will light up in YELLOW to confirm you want to turn on/off the lights.
When the bicycle is turned on, the system automatically connects to
the closest telephone with an activated Bluetooth® connection. The
connection or disconnection is confirmed when the LED lights up
briefly in BLUE.
If you receive a notification (call, etc.) on your telephone while
connected via Bluetooth®, the RBG LED will light up in LIGHT BLUE
for a few moments.
If the RGB LED remains lit in PINK the bike is in SAFE MODE.
Take it to your nearest store to diagnose the problem.
If the RBG LED blinks constantly in PINK, there is an error in the
system. Connect your mobile terminal by Bluetooth® to see a
detailed description or visit an authorized store for more informa-
tion on the error. If the problem is serious, the system may stop
providing assistance.
The bicycle is in DEMO MODE and can only be ridden
for 50 KM. This mode can only be deactivated by an
authorized store. The second blinking in this mode
indicates the current battery level.
1
3
2
5
TURNING ON AND OFF THE BICYCLE'S ELECTRICAL SYSTEM
TURNING ON/OFF THE LIGHTS
CHANGING THE LEVEL OF ASSISTANCE
BLUETOOTH PAIRING AND NOTIFICATIONS
SYSTEM ERROR AND SPECIAL MODES
No assistance Level 01 Level 02 Level 03
+=
Lights
ON / OFF
Turns on
the system Turns off
the system
Short
Button
Press
Long
Button
Press
Long
Button
Press
Current level
of assistance
4
Short press the button and the RGB LED will blink, indicating the current
assistance mode. If you short press it again while the LED is blinking, you will
change the assistance level cyclically.
Short press the button and while the LED is blinking, long press the button.
The LED will light up in YELLOW to confirm you want to turn on/off the lights.
When the bicycle is turned on, the system automatically connects to
the closest telephone with an activated Bluetooth® connection. The
connection or disconnection is confirmed when the LED lights up
briefly in BLUE.
If you receive a notification (call, etc.) on your telephone while
connected via Bluetooth®, the RBG LED will light up in LIGHT BLUE
for a few moments.
If the RGB LED remains lit in PINK the bike is in SAFE MODE.
Take it to your nearest store to diagnose the problem.
If the RBG LED blinks constantly in PINK, there is an error in the
system. Connect your mobile terminal by Bluetooth® to see a
detailed description or visit an authorized store for more informa-
tion on the error. If the problem is serious, the system may stop
providing assistance.
The bicycle is in DEMO MODE and can only be ridden
for 50 KM. This mode can only be deactivated by an
authorized store. The second blinking in this mode
indicates the current battery level.
1. TURNING ON AND OFF THE BICYCLE’S ELECTRICAL SYSTEM 4. BLUETOOTH PAIRING AND NOTIFICATIONS
5. SYSTEM ERROR AND SPECIAL MODES
2. CHANGING THE LEVEL OF ASSISTANCE
3. TURNING ON / OFF THE LIGHTS (OPTIONAL)
Short press the button and the RGB LED will blink, indicating
the current assistance mode. If you short press it again while the
LED is blinking, you will change the assistance level cyclically.
When the bicycle is turned on, the system
automatically connects to the closest telephone with
an activated Bluetooth® connection. The connection
or disconnection is confirmed when the LED lights up
briefly in BLUE.
If you receive a notification (call, etc.) on your
telephone while connected via Bluetooth®, the RBG
LED will light up in LIGHT BLUE for a few moments.
If the RGB LED remains lit in PINK the bike is in
SAFE MODE.
Take it to your nearest store to diagnose the problem.
If the RBG LED blinks constantly in PINK, there is an
error in the system. Connect your mobile terminal by
Bluetooth® to see a detailed description or visit an
authorized store for more information on the error. If
the problem is serious, the system may stop providing
assistance.
The bicycle is in DEMO MODE and can only
be ridden for 50 KM. This mode can only
be deactivated by an authorized store. The
second blinking in this mode indicates the
current battery level.
Short press the button and while the LED is blinking, long press
the button. The LED will light up in YELLOW to confirm you want
to turn on/off the lights.

16
iWOK ONE - GENERAL LIGHT SCHEME AND MEANING
Battery Charging Level
Go to Dealer
A
X
X
E
YF
N
>15% >10%
ASSIST OFF ASSIST 1 ASSIST 2
Z
>75%
C
>25%
<50%
C
DDL
START OFF
# ERROR
/
CC
>50%
<75%
D
D
C
(by default)
Current Assist Level (While LED is blinking)
DD
>25%
C
ASSIST 3
SAFE MODE
DEMO MODE
<1 SEC >1 SEC
ON
BLINK VERY FAST
BLINK
3 SEC.
B
C

17
Battery Charging Level
Go to Dealer
A
X
X
E
YF
N
>15% >10%
ASSIST OFF ASSIST 1 ASSIST 2
Z
>75%
C
>25%
<50%
C
DDL
START OFF
# ERROR
/
CC
>50%
<75%
D
D
C
(by default)
Current Assist Level (While LED is blinking)
DD
>25%
C
ASSIST 3
SAFE MODE
DEMO MODE
<1 SEC >1 SEC
ON
BLINK VERY FAST
BLINK
3 SEC.
B
C
iWOK ONE - GENERAL LIGHT SCHEME AND MEANING
EN
ASystem Start EY
BSystem OK FX
CNZ
DL
Battery
charge level
Assistance
level
Demo mode
Bluetooth
operation
Notification
Turn On/Off
lights
Safe mode
System
error
System
shoutdown
AEY
BFX
CNZ
DL
Avvio del
sistema
Sistema OK
Livello carica
della batteria
Livello
assistenza
Modalità demo
Funzionamento
Bluetooth
Notifica
Accendre/spegnere
lucI
Modalità
sicura
Errore di
sistema
Spegnimento
del sistema
IT
AEY
BFX
CNZ
DL
System start
System OK
Akkuladestan
Niveau
Unterstützung
Demo-Modus
Betrieb
Bluetooth
Benach-
richtigung
Einschalten/
Ausschalten Leuchten
Sicherer
Modus
Systemfehler
Systemab-
schaltung
AEY
BFX
CNZ
DL
Inicio sistema
Sistema OK
Nivel carga
batería
Nivel
asistencia
Modo demo
Operación
Bluetooth
Notificación
Activar/desactivar
luca
Modo seguro
Error sistema
Apagado
sistema
FR
AEY
BFX
CNZ
DL
Démarrage
du système
Systèm OK
Niveau de
charge batterie
Niveau
d’assistance
Mode dèmo
Bluetooth
fonctionnement
Notification
Allumer/éteindre
lumières
Mode sûr
Erreur
de système
Extinction
de système
AEY
BFX
CNZ
DL
Ligar sistema
Sistema OK
Nível de carga
de bateria
Niveau
d’assistance
Mode dèmo
Bluetooth
fonctionnement
Notification
Allumer/éteindre
lumières
Modo
seguro
Erro
de sistema
Desligar
sistema
ES PT
DE

18
iWOK ONE - CHARGING THE BATTERY
<25% >50%
<75%
>25%
<50% >75%
Connect the charger first to a power outlet and then
to the charging port on the bicycle. The light on the
iWoc® ONE will turn on automatically. While charging,
the intensity of the LED will vary cyclically, indicating
by the color the current level of battery charge. The
battery will be charged(<98%) when the LED remains
lit in white

19
X35 MAINTENANCE - ALERTS
95-180º
0º-90º
<10º >40º
MAX.
100%
30 30
Jan. Feb. 5h
MAX.

20
NOTE
Table of contents