DeVilbiss Healthcare drive Scout User manual

Scout Scooter
Instructions for use

2
CONTENTS
1. INTRODUCTION 3
2. CONTACT INFORMATION 3
3. PRODUCT DESCRIPTION 4
3.1 Environment 4
3.2 Intended User Group 4
3.3 Intended Use 4
3.4 Indications 4
3.5 Product Overview 4
4. SAFETY 5
4.1 Warnings & Cautions 5
4.2 Risk Assessment 5
4.3 Contraindications 5
4.4 Scooter Loading 6
4.5 Training 6
4.6 General Warnings 7
5. TRANSPORT & STORAGE 9
5.1 Disassembling the scooter 10
5.2 Re-assembling the scooter 11
6. SYMBOL DEFINITION 12
7. PARTS IDENTIFICATION 14
8. CHARGING & PREPARING FOR USE 15
8.1 Installation 15
8.2 Battery Charging 15
8.3 Checking Before Use 16
9. OPERATION OF THE SCOUT SCOOTER 17
9.1 Operational Limits 17
9.2 Scooter Controls 17
9.3 Driving the Scooter 23
9.4 Steps, Kerbs & Fixed Obstacles 24
9.5 Inclines 25
9.6 Outdoor Operation & Inclement Weather Precautions 26
9.7 After Use Instructions 26
10. CLEANING 27
11. MAINTENANCE & SERVICING 28
11.1 General Guidelines 28
11.2 Fault Resolution 30
11.3 Repair 30
12. DISPOSAL OF PARTS 31
13. ELECTROMAGNETIC COMPATIBILITY EMC 33
14. SPECIFICATION 33
15. WARRANTY 35
16. MAINTENANCE SCHEDULE 36
17. NOTES 37

3
2. CONTACT INFORMATION
For assistance in setting up, using, maintaining your scooter, to report unexpected
operation or for any service, warranty, sales or customer service information regarding this
product, please contact Drive DeVilbiss Healthcare Ltd.
1. INTRODUCTION
Thank you for purchasing this product. These instructions for use should be read
carefully and understood before operating the scooter. Improper use or unfamiliarity
with the scooter may result in harm, injury or trac accidents. A maintenance schedule
has also included at the back. Keep this manual with the scooter, or in a safe place.
Contact Drive DeVilbiss Healthcare Ltd. or check our website for the latest version of
this document. Users with visual, reading or cognitive disabilities should seek advice
from a professional care provider for an appropriate format. If this is not viable, users
should contact Drive DeVilbiss Healthcare Ltd. If you have any questions concerning
the operation or maintenance of the scooter, contact Drive DeVilbiss Healthcare Ltd.
Any serious incident that has occurred in relation to the device should
be reported to the manufacturer and the MHRA or competent authority of your Member
State. Please quote the product serial code on all correspondence.
For Service & Support outside the United Kingdom, please contact the local distribution
company from where this equipment was purchased. Failure to do so may result in the
product warranty becoming void.
Wu´s Tech (Vietnam) Co., Ltd.
No. 31, VSIP II, Road 6, Thu Dau Mot City,
Binh Duong Province, Vietnam
Drive DeVilbiss Healthcare Ltd.
Sidhil Business Park, Holmfield, Halifax, West Yorkshire,
HX2 9TN, Great Britain
Y. Sung Handelsvertretung
Toulouser Allee 9, 40211 Duesseldorf, Germany
Drive DeVilbiss Sidhil Ltd.
4 Trench Road, Mallusk, Newtownabbey
BT36 4TY, Northern Ireland
UK Aplan Corporation Ltd.
47 Wandle Road, Croydon, Surrey, CR0 1DF, England, Great Britain

4
3. PRODUCT DESCRIPTION
3.1 Environment
The Scout Scooter can be used in both indoor and outdoor environments
where appropriate. The Scout Scooter can be used on flat, even path surfaces,
however the user should avoid grass, gravel, gradients greater than 8° and
motorised roads. Additional care should be taken to avoid inclement weather
and wet surfaces.
3.2 Intended User Group
The Scout Scooter is intended for a single user of weight up to 130kg (20.5st).
The intended user group for this device is any mobility restricted individual that
requires assistance with transport. The patient / occupant is the only intended
operator. Users must be both mentally and physically capable of operating the
device with minimal risk of injury to themselves and others.
3.3 Intended Use
The intended use of the scooter is to transport an end user with restricted
mobility, as defined in section 3.2.
The scooter is intended to support a single occupant. A risk assessment must
always be performed on the suitability of the user to the scooter.
3.4 Indications
To provide transport mobility to an end user with restricted mobility.
3.5 Product Overview
The Scout Scooter has been designed to provide a comfortable and secure
solution for users who have mobility restrictions. The product is a class A
scooter (under EN 12184:2014), class I medical device and class 2 invalid
carriage (under The Use of Invalid Carriages on Highways Regulations 1988).
For specific guidance with outdoor use, see section 9.6.
This manual is composed from the product design and specifications at the time
of publication. As designs change, some illustrations and pictures in the manual
may not correspond to the scooter that you purchased. We reserve the right to
make design modifications.

5
4. SAFETY
4.1 Warnings & Cautions
Warnings in this user manual highlight potential hazards that if
disregarded could lead to injury or death.
Cautions in this user manual highlight potential hazards that if
disregarded could lead to equipment damage or failure.
4.2 Risk Assessment
Before using the scooter, a risk assessment must be performed by a
competent individual to ensure the safe use of the scooter on a user-by-user
basis. It is the responsibility of users and carers to determine that they are
both mentally and physically capable of operating the scooter with minimal
risk of injury to themselves or others.
The risk assessment should include, but not be limited to:
• Entrapment
• Falling out of the scooter
• Small adults (and children)
• Individuals who lack capacity to operate the scooter
• Users with visual, reading or cognitive disabilities
• Very active occupants
• Unauthorised people with access to the scooter
Caution
Warning
4.3 Contraindications
• The end user exceeds maximum weight capacity indicated in section 4.4
• The end user has postural support needs that are not addressed by the
Scout Scooter
• Inability to safely guide a power mobility device
Other contraindications may be relevant which are specific to an individual
and / or care environment.
6
4.4 Scooter Loading
The maximum user weight of the scooter is: 130kg (20.5st)
Maximum user weight is the sum of the user mass and the mass of any
ancillary attachments or accessories. Exceeding the maximum weight
capacity will void your warranty. Drive DeVilbiss Healthcare Ltd. will not be
held responsible for injury and / or damages resulting from failure to observe
weight capacities.
• The maximum load is for the scooter to be occupied by one
person only. Additional weight could damage components
or destabilise the scooter, potentially causing injury.
• The scooter may only be used to transport one person at a
time. It should not be used for climbing. The backrest is not
designed to support an entire person's body weight — risk
of collapse, entrapment.
• The scooter is not a toy. Children should not be allowed to
play near or operate the scooter, as they are at risk of harm.
Warning
4.5 Training
All individuals operating the Scout Scooter are to be suitably familiar with the
functionality and limitations prior to use. It is the responsibility of the user to
ensure they are suitably trained to use the scooter and any associated parts
safely and correctly. Every eort should be made to resolve deficiencies and
should include consideration of retraining, falls prevention and equipment
alterations and modifications.
If these instructions for use are not deemed sucient and the need for training
is required, please contact Drive DeVilbiss Healthcare Ltd. (see section 2) who
can discuss training options with you.
7
• Do not use a damaged or badly worn scooter — risk of harm.
• Check the functionality of the scooter before every use,
using the method listed in section 8.3. Check the current
fastest speed setting is appropriate. (It is recommended to
use a slower speed setting at the beginning of every use,
gradually increasing the speed setting as appropriate.)
• Do not use the scooter in rain, ice or snow conditions. Such
exposure can damage the scooter and put the user at risk. If
exposed to moisture, do not operate the scooter until it has
dried thoroughly.
• Do not drive on tall grass, motorised roads, loose surfaces,
such as gravel or sand, or in muddy conditions.
• Reduced speed and care should be taken when navigating
obstacles.
• Do not attempt to navigate on slopes greater than 8°.
• If unintended movement of the scooter occurs, release the
throttle levers to automatically stop the scooter. Do not use
the key switch to stop your scooter unless an emergency
requires the powering down of the scooter.
• Under no circumstances should the scooter be used as a
seat in a motor vehicle.
• The scooter is designed for occupants who weigh less than
130kg (20.5st); overloading may put the user at risk of falling
or entrapment.
• Do not touch any exposed contacts or connectors while
using the product or while in contact with other individuals.
• Misused electrical equipment can be hazardous.
• Do not operate the scooter while under the influence of
alcohol or when excessively tired.
• Do not operate the scooter at night near motorised roads or
in situations without a clear line of sight.
• Only approved parts, specified for the Scout Scooter, should
be used. Accessories that have not been approved or
designed for use with the scooter are not to be used — a
hazard could be introduced due to product combination
incompatibility. If in doubt, contact Drive DeVilbiss
Healthcare Ltd.
4.6 General Warnings
Warning

8
• Modification of the Scout Scooter, its parts or features
is not allowed without the permission of Drive DeVilbiss
Healthcare Ltd. — a hazard could be introduced.
• The scooter is electrically operated, so should not be used
in oxygen-rich environments, in the presence of flammable
gases, sources of heat or naked flames — risk of explosion
/ fire. Damaged or worn upholstery increases the risk of fire
hazard and should be replaced immediately.
• Individuals unable to drive the scooter without assistance
or supervision must not use the scooter without such
supervision. Unsupervised use of the scooter must be
avoided if there is any doubt about the ability of an
individual to operate it safely.
• If children, adults with learning diculties or pets pose a
potential risk of tampering with the scooter, its suitability for
use is to be considered during the initial user / product risk
assessment.
• Only use freewheel (manual) mode to manually manoeuvre
the Scout Scooter when unoccupied. Do not use freewheel
mode on the scooter whilst occupied and / or on a slope.
Always put the scooter in drive mode when freewheel
manoeuvring is completed.
Warning

9
5. TRANSPORT & STORAGE
Environmental conditions for transport and storage:
Ambient temperature: -20°C to +45°C
Follow these conditions when transporting or storing the scooter:
• The power switch should be turned o.
• Always fully charge, then remove the battery prior to long-term storage to
ensure maximum battery eciency.
• The scooter should be stored in clean and dry conditions. Cover to protect
from fluid ingress, dirt, dust etc.
• Scooters should not be stored on their side, on their backs, or stacked.
• When transporting scooters by vehicle, they should be securely stowed
in the back of a van, truck, or boot of a car. Adjustable parts should be
removed or properly secured during transport.
• Keep the instructions for use with the scooter or in a safe place.
Note: This vehicle is suitable for land and air transport, but contact your carrier
in advance to determine their specific requirements. The battery pack contains
two 12V batteries. The batteries are sealed lead acid type and are maintenance
free and are non-spillable. They are fitted with spade terminals.
The batteries require charging every week to ensure battery longevity.
The batteries supplied as standard with the battery pack are classified as safe
for air transport under IATA special provision A67.
If your scooter is stored for a prolonged period, flat spots may develop in the
wheels, causing an uneven sensation when driving. This should work itself out
over time. Drive DeVilbiss Healthcare Ltd. suggests placing a sturdy platform
under the frame to lift the wheels o the ground and take weight o the wheels
during storage. If you notice flat spots after continued use, replace the scooter
wheels immediately.
• Infrequently charged batteries, or batteries stored without a
full charge are susceptible to permanent damage, causing
unreliable performance from your scooter.
• Avoid placing the scooter in direct sunlight — this could
damage the electrical system and / or cause label fading.
• Clean the scooter in line with section 10 prior to storage.
Caution
• Improper storage of your scooter may result in permanent
damage to the frame and / or electronics.
• Do not sit on the scooter while in a moving vehicle.
Warning
10
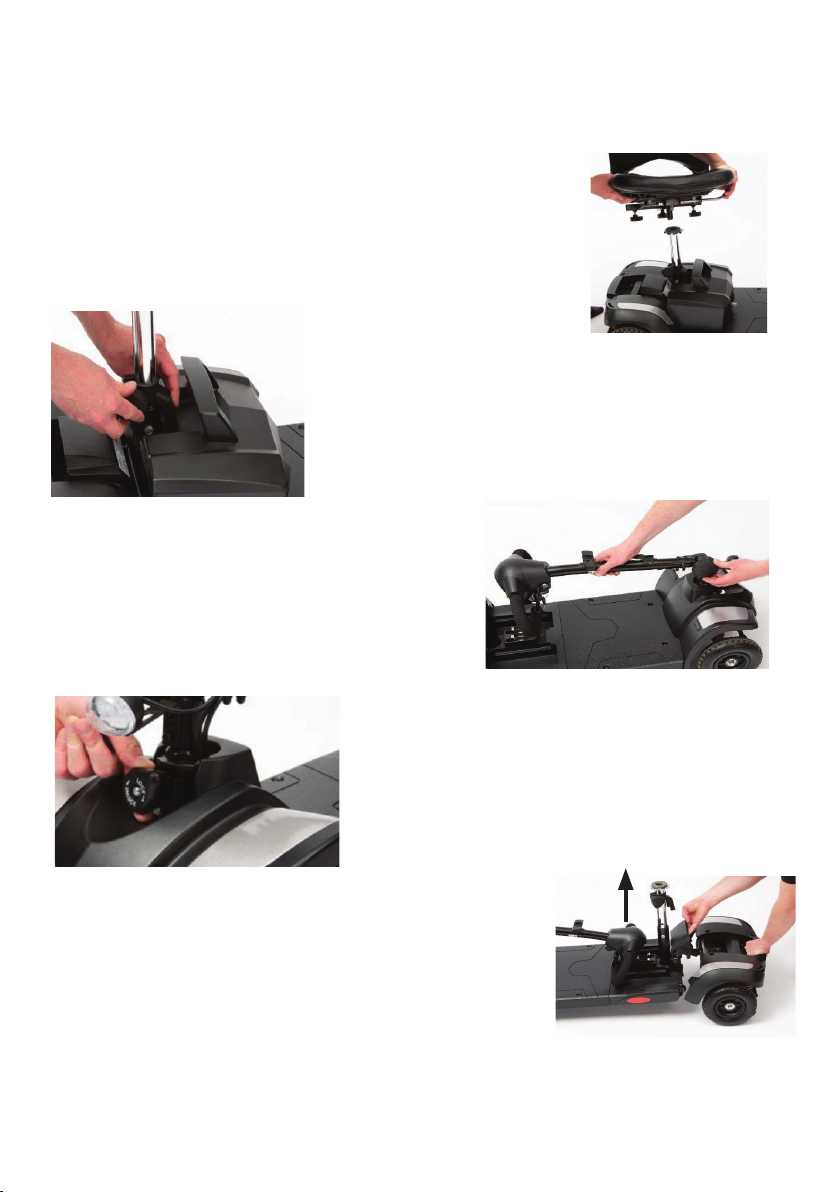
5.1 Disassembling the scooter
All models can be disassembled in to four pieces without tools: seat, front section,
rear section and battery pack. The procedure for disassembly is the same for all
scooters. Please perform the following steps:
1. Push the Seat Rotate Lever, whilst pulling up on the
seat to remove.
2. Turn the handle to release the battery pack,
then lift out the battery pack from the main
body of the scooter.
3. Turn the tiller knob anti-clockwise to loosen
tiller. Lower the tiller and then turn the tiller knob
clockwise to secure.
4. Lock front tiller by pulling the locking knob
out and turning 90º.
5. Pull up on the Connecting Handle to split the two
halves of the base, whilst pushing on the rear of the
scooter.
11
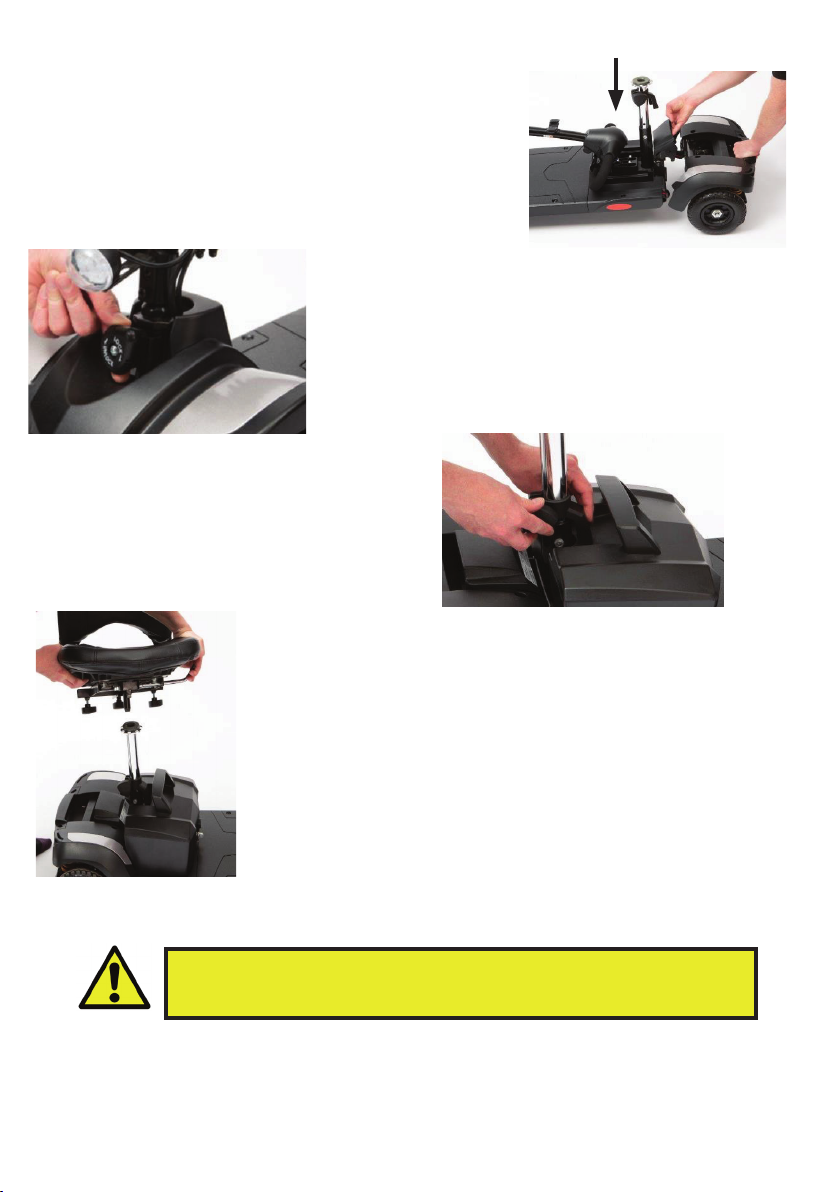
5.2 Re-assembling the scooter
1. Line up the two sections of base. Lift up the handle
and use the handle to slowly lower the two parts so
they lock together, lining up the red markers.
2. Unlock front tiller by pulling the locking knob out
and turning 90º.
3. Loosen the tiller adjustment knob and
pull up the tiller to the required height.
Retighten the knob to secure.
4. Lower battery pack in to the
compartment in the scooter and then turn
the handle to secure the pack in place.
5. Replace the seat and rotate it until it
locks in to its correct position.
• After assembling the Scooter, make sure the tiller adjustment
knob is fully tightened.
Warning

12
6. SYMBOL DEFINITION
Symbol Description
Warning
Beware of potential hazard
The following symbols are found on this scooter:
Refer to instructions for use - Recommended
Failure to read the instructions for use could introduce a hazard
Refer to instructions for use - Mandatory
Failure to read the instructions for use could introduce a hazard
Caution
Beware of potential product damage
Medical Device
Safe working load
Do not create a stack of more than 2 boxes
MD
!
2
Fragile, handle with care
Use no hooks
This way up

13
Serial number
Symbol Description
REF
Product code
Importer code
#
Manufacturer
Importer
Date of manufacture
Quantity
Authorised EU Representative
QTY
Beware of trapping points
W.E.E.E Label - Found on individual parts of electrical
system
(Waste Electrical and Electronic Equipment) Refer to section 12)
Distributor
Keep away from rain
UK Responsible person
This device must not be used as a seat in a motor vehicle.

14
7. PARTS IDENTIFICATION
Backrest
Control Unit
Drive
Wheel Front Wheel
Seat
Handlebar
Battery
Freewheel
lever
Anti-tip Wheel
Seat post
Tiller adjustment knob
Tiller lock
The approximate weights of the major
component parts are below:
• Seat – 8kg (18lb)
• Front Section – 16kg (35lb)
• Rear Section – 11kg (24lb)
• Battery Pack (12Ah) – 9kg (20lb)
• Battery Pack (20Ah) – 14kg (31lb)
• Battery Pack (22Ah) – 14kg (31lb)
The rear suspension is
available on the Explorer model only

15
8. CHARGING & PREPARING FOR USE
8.1 Installation
• Before preparing the scooter, ensure these instructions
have been read and fully understood.
• Prepare the scooter in a dry, indoor environment.
• Do not attempt to fold / unfold the scooter while in use.
• Only competent persons are to prepare the scooter for use.
If in doubt, contact Drive DeVilbiss Healthcare Ltd.
• Ensure a risk assessment in line with local health and safety
policy is undertaken to ensure that sta are not put at risk
when performing assembly activities.
Warning
8.2 Battery Charging
• Do not open the battery.
• Do not connect an extension cord to the battery charger.
• Keep metal objects away from the battery terminals; electric
shock may occur.
• Ensure the charging cable is not under excessive tension
to avoid cable damage — damaged cables can create an
electrocution / fire risk.
• Ensure the battery is not exposed to direct sunlight or a
secondary heat source — direct heating of the battery via an
external source could pose a fire risk or cause an explosion.
• Do not drive the scooter while the charging cable is
attached or connected.
Warning
• Only charge the Scout Scooter with the approved charger,
using the charging port on the battery, or tiller (if fitted).
Never charge the scooter using a dierent charger. Use of
the socket to supply power to other electrical equipment
may damage the scooter’s control system and EMC
performance.
• Charge fully before each use.
Caution
16
The battery pack can be charged either when it is installed or removed from the
scooter.
To Charge through the Tiller (certain models only)
Battery Charger
The charger LED will illuminate orange when the batteries are charging. When
the LED turns green then bulk charging is complete, however the charger will
continue to trickle charge the batteries. Trickle charging is used to improve
battery longevity and performance.
For optimum performance the batteries should be charged for 12 hours, but
never more than 24 hours.
8.3 Checking Before Use
It is important to check the functionality of the scooter before the initial use to
ensure its safe operation.
• With the freewheel lever set to 'NEUTRAL', the scooter should move freely
when pushed by hand. With the freewheel lever set to 'DRIVE', it should not
be possible to move the scooter by hand.
• Gently pull on either of the throttle controls and ensure the scooter
responds correctly.
• Turn the tiller console and ensure the wheels respond correctly.
• Release the throttle control after moving in any direction. The throttle
control should immediately return to the neutral position and the scooter
should come to a stop.
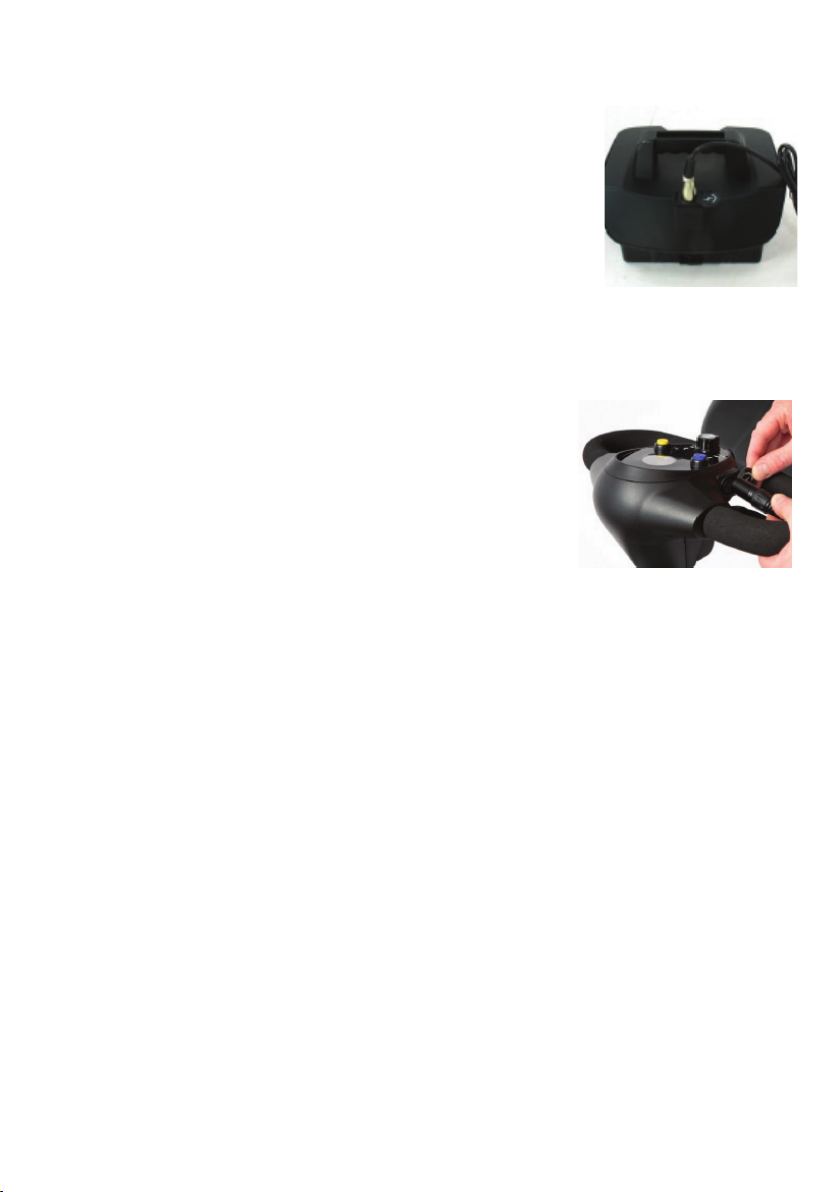
Some models have an additional charging point on the
tiller. To use the tiller charging point:
• Switch the key ignition o.
• Open the charging socket cap on the charging
point. Then connect the charger’s round plug in to
the charging socket (as shown in photo)
• Plug the charger’s power cord in to the mains.
• Switch on the plug socket at the mains.
To Charge through the battery pack (applies to all models)
• Switch the key ignition o.
• If required, remove the battery pack.
• Open the charging socket cap on the charging point.
Then connect the charger’s round plug in to the
charging socket (as shown in photo)
• Plug the charger’s power cord in to the mains.
• Switch on the plug socket at the mains.

17
9. OPERATION OF THE SCOUT SCOOTER
9.1 Operational Limits
Ambient temperature: -10°C to +50°C
Operating Humidity: 20% to 85% RH
9.2 Scooter Controls
Please refer to the diagram below to identify your scooter controls and their
functions. Familiarise yourself with the terminology to better understand
references throughout these instructions.
Make sure the scooter functions work correctly before
operating, using the checklist in section 8.3 for guidance.
Caution
Battery Indicator
Speed
Adjustment
Control
Throttle
Control
Levers
Handlebar
Horn

18
Key Ignition
The key ignition acts as the power switch for the scooter. To switch the power
on, turn the key clockwise and battery gauge should illuminate. To switch the
power o, turn the key anticlockwise, after which the battery gauge should
switch o and the key can be removed.
Speed Dial
Turn the speed dial to determine the maximum speed of the scooter. Turn the
dial clockwise to increase the speed setting and turn the dial anticlockwise to
decrease the speed setting.
• Do not turn the ignition o whilst driving as this will lead to
an emergency stop and possible risk of damage or injury.
• When at rest, power down your scooter to prevent
unintended motion.
Do not adjust the speed dial whilst driving as this could result
in loss of control. Do not set the highest speed whilst driving
indoors.
Warning
Warning
Tiller Lock
When the tiller is centered, pull the tiller lock button out and turn 90º
clockwise then release.
Tiller Unlock
When the tiller is locked, pull the tiller lock button out and turn 90º
anticlockwise then release.
Always ensure the tiller lock is disengaged when driving the
scooter.
Always check the tiller moves and turns freely before driving.
Warning

19
Moving and Braking
To move forward, pull the right hand side of the wigwag paddle with your hand
towards you whilst resting the palm of your hand on the lower handle bar.
Pull the left hand side of the wigwag paddle towards you and the scooter will
move backwards, emitting an audible reversing alarm. To brake, release the
wigwag paddle which will return to neutral and activate the electromagnetic
brake automatically and bring the scooter to a prompt stop. The wigwag
paddle allows you to control the speed of the scooter up to a maximum speed
determined by the Speed Dial. The further the wigwag paddle is deflected, the
faster the scooter will go (up to 4mph).
Do not push both left and right hand sides of the wigwag
simultaneously. You will not be able to control the scooter.
Warning
Horn Button
Press the horn button to sound the horn. Release the button to stop the horn.
The horn is the yellow button located on the control panel.
Front Light (not available on all models)
Press the blue button to illuminate the front light. Press the button again to
switch the light o.
Braking – Electromagnetic Brake
Release the wigwag paddle completely, and the electromagnetic brake will
be activated automatically and the scooter will stop.
When on a gradient, never set the vehicle to freewheel mode.
The brakes will not be applied.
Warning
20
Seat
The seat can be rotated and locked in position at 45º intervals. Lift up the
seat lever and swivel the seat. Release the lever and then continue swivelling
the seat until it locks in position.
Return the seat to
the forward position
before driving.
Warning
Adjusting the Seat Height
Firstly remove the seat by rotating
the seat (as described above)
whilst pulling up on the seat.
Remove the nut and bolt securing
the chrome post in to the chassis
of the scooter. Reposition the seat
post to the required
height and then secure by
reattaching the nut and bolt.
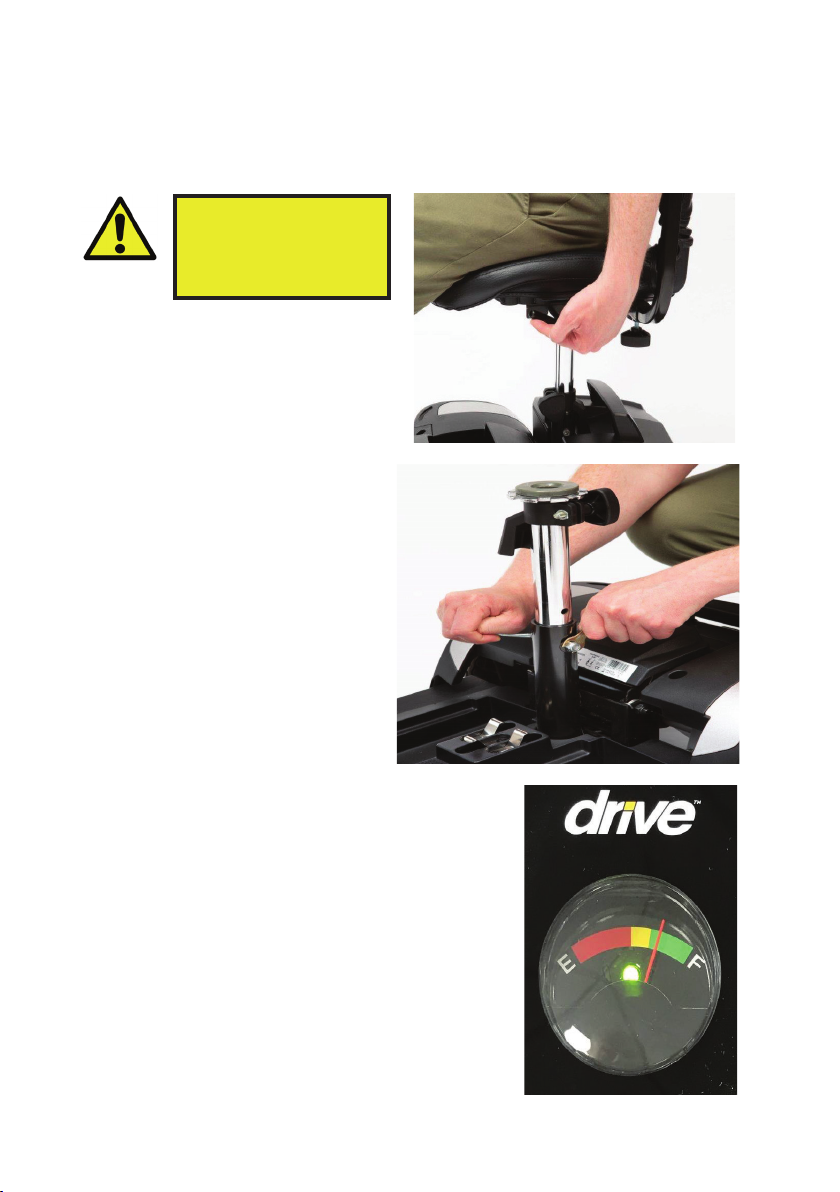
Battery Indicator
When switched on, the power LED in the battery
indicator will illuminate, and the needle will move
to show the remaining charge in the battery.
The needle in the battery indicator on the
scooter tiller will show the following battery
power:
Green: The battery is fully charged
Yellow: The battery is getting low and requires
charging
Red: The battery is empty and requires
immediate charging
This manual suits for next models
7
Table of contents
Other DeVilbiss Healthcare Scooter manuals


