DeVilbiss Intellipap DV5HH User manual

DV54 AUTOADJUST CPAP SERIES
EN
DeVilbiss® SleepCube® Positive Airway Pressure Device
CAUTION–USA Federal law restricts this device to sale by, or on the order of a physician.
Assembled in USA of US & Imported Parts. Instruction Guide.
ES
Dispositivo de presión positiva en las vías respiratorias SleepCube® de
DeVilbiss®
PRECAUCIÓN–La ley federal de EE. UU. limita la venta de este dispositivo a médicos o a personas que dispongan de la corre-
spondiente orden médica.
Montaje efectuado en EE. UU. con piezas fabricadas en EE. UU. e importadas. Guía de instrucciones.
FR
Appareil de ventilation spontanée en pression positive SleepCube® de
DeVilbiss®
ATTENTION–Cet appareil ne peut être vendu que par un médecin ou sur ordonnance de ce dernier.
Assemblé aux États-Unis avec des pièces des États-Unis et des pièces importées. Guide d’instructions.
ZH
DeVilbiss® SleepCube®
注意:美国联邦法律规定本设备只限医师购买或订购
EL
DeVilbiss® SleepCube® συσκευή θετική πίεση των αεραγωγών
ΠΡΟΣΟΧΗ–Η Ομοσπονδιακή Νομοθεσία των Η.Π.Α. περιορίζει την πώληση αυτής της συσκευής μόνο από ιατρό ή με εντολή
ιατρού.
Συναρμολογείται στις Η.Π.Α. από αμερικανικά και εισαγόμενα εξαρτήματα. Οδηγός λειτουργίας
0044

SE-DV54-12
1
2
DV54/DV5HH
DV5HH
A
10 4
6
2
78
B
5 3
Key Features
1
2
6
4
3
5
7
C
2
3
6
1
4
5
7
D
5
1
4
2
6
3
7
E
1
5
2
6
3
7
4
8
910 11
F

EN - 3SE-DV54-1
ENGLISH....................................................................................................... EN-3
ESPAÑOL...................................................................................................... ES-22
FRANÇAIS .................................................................................................... FR-43
CHINESE....................................................................................................... ZH-64
GREEK.......................................................................................................... EL-85
TABLE OF CONTENTS
Symbol Definitions................................................................................................................................................. EN - 4
Important Safeguards............................................................................................................................................ EN - 4
Introduction............................................................................................................................................................ EN - 5
Intended Use ............................................................................................................................................... EN - 5
Indications for Use....................................................................................................................................... EN - 5
Contraindication........................................................................................................................................... EN - 5
Key Features......................................................................................................................................................... EN - 5
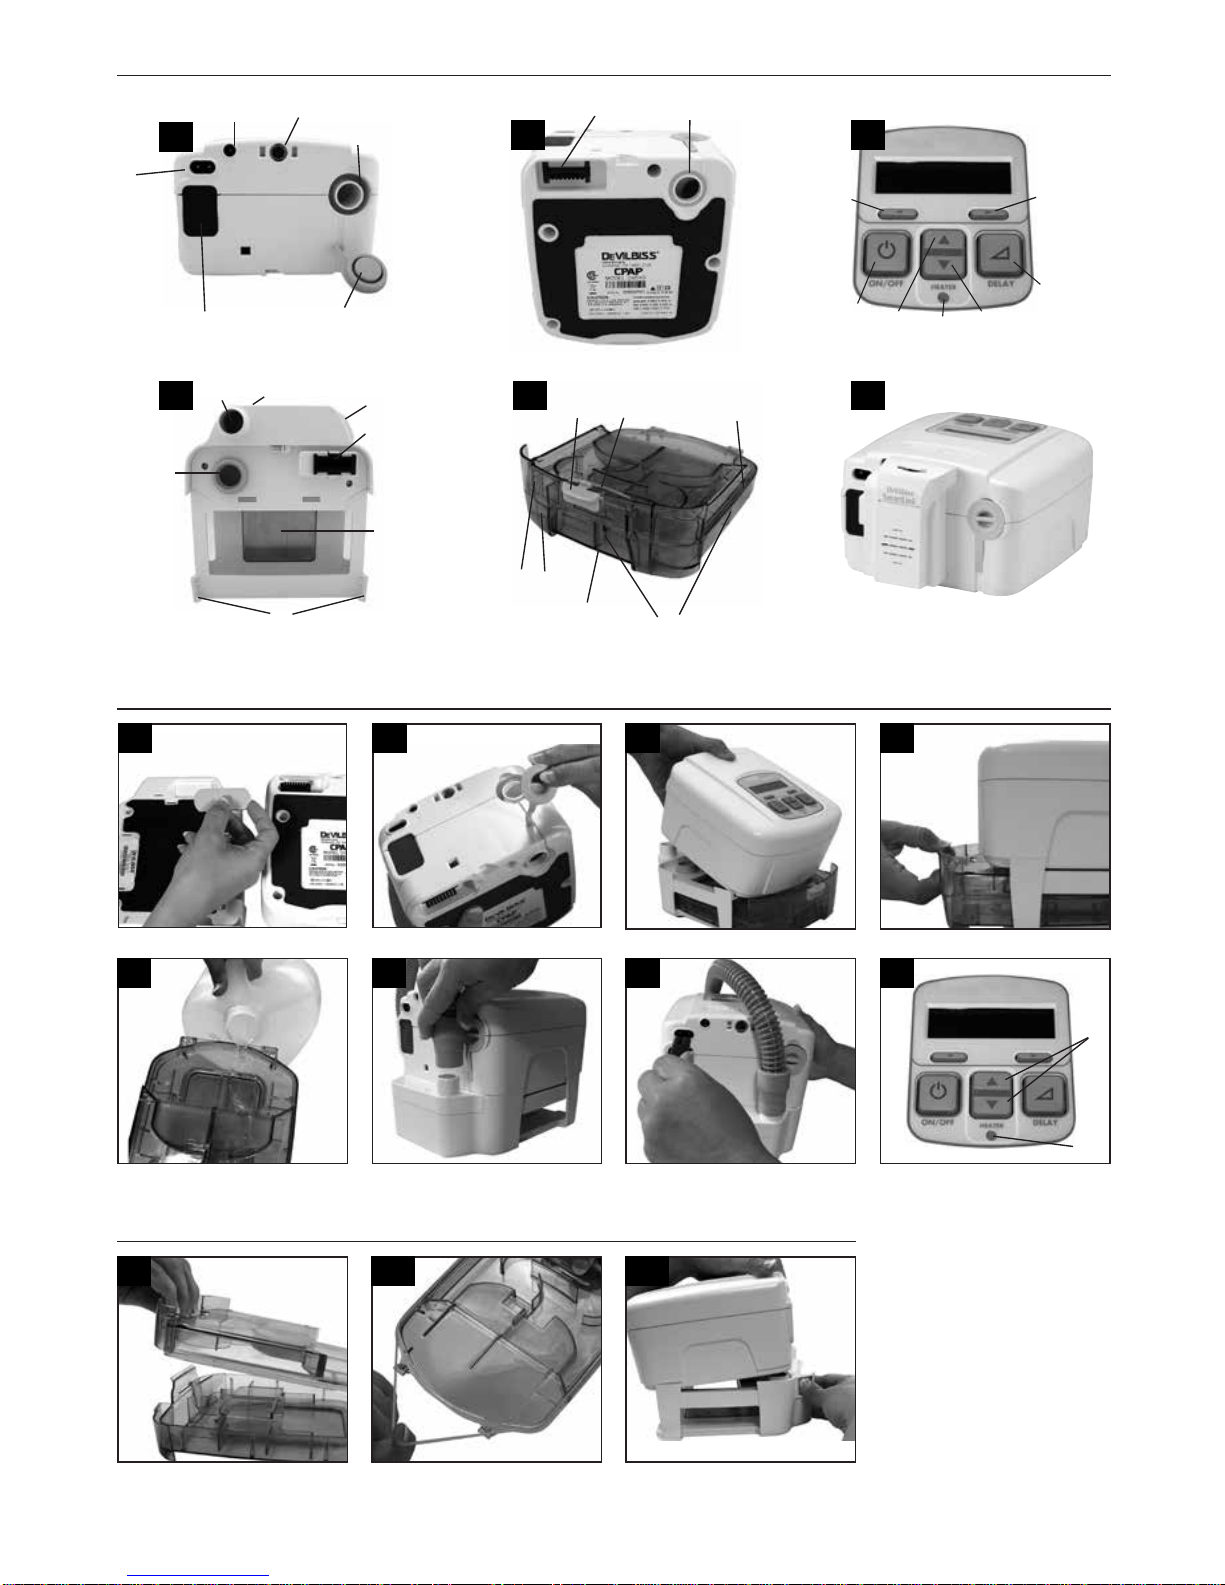
SleepCube Device....................................................................................................................................... EN - 5
Keypad ........................................................................................................................................................ EN - 5
Humidifier Cradle......................................................................................................................................... EN - 5
Water Chamber ........................................................................................................................................... EN - 5
Therapy Management System .................................................................................................................... EN - 5
System Assembly.................................................................................................................................................. EN - 5
Without Heated Humidification.................................................................................................................... EN - 5
With Heated Humidification......................................................................................................................... EN - 6
Keypad and Display .............................................................................................................................................. EN - 6
Operation............................................................................................................................................................... EN - 6
Start-Up ....................................................................................................................................................... EN - 6
Using the Comfort Delay Feature................................................................................................................ EN - 6
Using the SmartFlex™Feature................................................................................................................... EN - 7
Controlling the Humidity .............................................................................................................................. ER - 7
Shut Down................................................................................................................................................... EN - 7
Enable Menu List......................................................................................................................................... EN - 8
SmartCode®and Adherence Score Information.......................................................................................... EN - 8
Patient Messages.................................................................................................................................................. EN - 8
Reminders ................................................................................................................................................... EN - 8
Notifications................................................................................................................................................. EN - 8
SleepCube Travel Information............................................................................................................................... EN - 9
SleepCube DC Operation...................................................................................................................................... EN - 9
Battery Power.............................................................................................................................................. EN - 9
Supplemental Oxygen........................................................................................................................................... EN - 9
Accessories/Replacement Items........................................................................................................................... EN - 10
Maintenance.......................................................................................................................................................... EN - 10
Cleaning ................................................................................................................................................................ EN - 11
Troubleshooting..................................................................................................................................................... EN - 12
Specifications ........................................................................................................................................................ EN - 13
Guidance and Manufacturer’s Declaration............................................................................................................ EN - 15
Advanced Menu Controls...................................................................................................................................... EN - 17

EN - 4 SE-DV54-1
SYMBOL DEFINITIONS
Class II electrical protection-double insulated Type BF equipment-applied part
Data port input/output Standby-turns blower on/off
Next item on LCD display Increase value on LCD display
Previous item on LCD display Decrease value on LCD display
Attention, consult accompanying documents Heat
DC input: 12 VDC, center pin positive 100-240 VAC input 50/60 Hz
Locked Unlocked
IPX1 Drip-proof, vertical Delay-starts the delay cycle
This device contains electrical and/or electronic equipment that must be recycled per EC Directive 2002/96/
EC-Waste Electrical & Electronic Equipment
IMPORTANT SAFEGUARDS
READ ALL INSTRUCTIONS BEFORE USING
THIS DEVICE.
SAVE THESE INSTRUCTIONS.
DANGER
• ElectricShockHazard – Do not use while bathing.
• ElectricShockHazard – Do not immerse this device into water or any other liquid.
• ElectricShockHazard – Do not attempt to open or remove the cabinet. There are no user-serviceable internal
components. If service is required, return the product to your home care provider. Opening or tampering with the
product will void the warranty.
WARNING
• The DeVilbiss SleepCube should be used only with masks recommended by DeVilbiss, your physician or respiratory
therapist.
• To avoid rebreathing of exhaled air, do not use a CPAP mask unless the device is turned on and providing a supply
of air. Venting in the mask should never be blocked. When the device is turned on and providing a fresh supply of
air,exhaledairisushedoutofthemaskvent.However,whenthedeviceisnotoperating,exhaledairmaybe
rebreathed. Rebreathing of exhaled air for longer than several minutes can in some circumstances lead to
suffocation. This warning applies to most CPAP devices.
• The DeVilbiss SleepCube is not a life support device and may stop operating with certain device faults or with a
power failure. It is intended to be used on spontaneously breathing individuals weighing 66 lbs/30 Kg or greater.
• To avoid electric shock, always unplug power cord from wall outlet power source when performing cleaning.
• Use only accessories recommended by DeVilbiss.
• Alwaysremovethewaterchamberfromtheoptionalhumidiercradlebeforelling.
• Ifwaterhasspilledontothehumidiercradleorithasbeensubmergedintowater,unplugpowercordfrompower
source immediately. Allow device to dry completely before use.
• Neverblockairopeningsofthehumidiercradleorchamber.Donotinsertobjectsintoanyopeningsortubes.
• Forproperoperation,placesystemonaat,sturdy,levelsurface.
• Theoptionalhumidierisintendedforsingle-patientuseonly.
• Ifthesystemisplacedontheoor,donotpositionitwhereitmaybesteppedonwhengettingoutofbed.
CAUTION
• The circular data port connector located on the back of the SleepCube is used to attach accessories to the device.
The connector must only be used with accessories approved for use by DeVilbiss. Do not attempt to attach any other
device to this connector as it may damage the CPAP or the accessory device.
• Never rinse or place the device in water. Never allow liquids to get into or around any of the ports, switches or air
lter;doingsowillresultindevicedamage.Ifthisoccurs,discontinueuseandremovethepowercordfromthe
power source. Allow the device to completely dry before use.

EN - 5SE-DV54-1
• DonotplacetheSleepCubewhereitcanbeknockedontotheoororwherethepowercordmaycreateatrip
hazard.
• OnlytheDeVilbissDV5seriesHeatedHumidiersystemisrecommendedforusewiththeSleepCube.Other
humidiersystemsmaypreventthedevicefromdetectingsnoringandmaycauseinappropriatepressurelevelsin
the mask.
• Emptyanddryhumidierwaterchamberbeforetransporting.
INTRODUCTION
Intended Use
TheDeVilbissSleepCubeModelDV54SeriesAutoAdjustisintendedforuseintreatingOSAinspontaneouslybreathing
patients 30 Kg (66 lbs) and above by means of application of positive air pressure. The Device is to be used in home and
clinical environments.
Indications For Use (Optional Heated Humidifier)
Use on the advice and prescription of a licensed physician to help relieve the symptoms of dryness of the throat, nasal
passages and the mouth, which are common with positive airway pressure therapy. This is especially true in dry climates
and during the cold season when humidity in the air is typically lower than at other times.
Contraindication
Do not use SleepCube system if your upper airway has been bypassed.
NOTE–Symptoms of dryness of the throat, nasal passages, and the mouth are common with positive airway pressure
therapy. The SleepCube features an optional humidier system to help minimize these effects.
KEY FEATURES (Page 2, Figures A-F)
DeVilbiss SleepCube Device (Figures A
and B)
1. Keypad/LCD Display (see Figure C)
2. Air Supply Port on Back
3. AirSupplyPortonBottom(foroptionalhumidier)
4. Air Supply Port Plug
5. HeaterPowerConnector(foroptionalhumidier)
6. AC Power Connector
7. DC Power Connector
8. Data Port
9. Power Cord (appropriate to your wall outlet) (not
shown)
10. Air Inlet Filter Opening
11 Connector Cover (not shown)
Keypad (Figure C)
1. On/Off
2. Previous Item
3. Next Item
4. Delay
5. Decrease Value
6. Increase Value
7. Heater PowerLED(foroptionalhumidier)
Ask your equipment provider for information about other
DeVilbiss masks, equipment, and accessories.
Humidifier Cradle (Figure D)
1. Heater plate
2. Heater power connector
3. Storage compartment for connector cover (on
bottom)
4. Air supply port inlet
5. Air supply port outlet
6. Flow generator release button
7. Flow generator locking tabs
Water Chamber (Figure E)
1. Chamber lid
2. Chamber base
3. Heat transfer plate (on bottom)
4. Sealing gasket
5. Water level indicators (front and sides)
6. Chamber release latch
7. Chamber disassembly lever
Therapy Management System (Figure F)
1. SmartLink®(optional)
SYSTEM ASSEMBLY
Without Heated Humidification
1. Locate the air supply port and heater power connector on the bottom of the SleepCube device. Ensure that each
opening has the appropriate soft cover securely attached.
2. Place the SleepCube on a stable surface such as a nightstand or table. If you wish, you may also place the device
ontheooratthebedside,beingcarefultoplacetheunitwhereitwon’tbekickedorsteppedon.Ensurethattheair
inlet in the back of the device is not blocked by anything such as curtains or bedding.
NOTE–Never place the SleepCube system on a soft surface such as a bed or couch during operation.

EN - 6 SE-DV54-1
With Heated Humidification
CAUTION–The height of the SleepCube must be lower than the mask when using a humidier to prevent water from
getting into mask.
1. Ifyoursystemincludesahumidier,pleasefollowstepsinFigures1-7.
a. Remove the air supply tubing from the back of the device.
b. Locate the air supply port at the bottom of the device. Remove the port plug and insert it into the air supply
port in the back of the device.
c. Locate the heater power connector on the bottom of the device. Remove the connector cover and insert it into
thestorageopeninginthebottomofthehumidiercradle.
KEYPAD AND DISPLAY
Basic CPAP Controls
Name Symbol Function
ON/OFF TheON/OFFbuttonstartsandstopstheowofairfromthedevice.
HEATER
IfyourSleepCubehasaheater/humidierattached,thesebuttonsadjusttheheatersetting.
Increase the setting for more humidity and decrease the setting for less humidity.
DELAY
The Delay button activates the comfort delay feature and only functions if this feature has been
enabled. To understand how to set the parameters of this feature, please refer to the Using the
Comfort Delay Feature found on page EN - 6.
NOTE– The left and right arrow keys on the control panel provide access to menus for specic settings. Ask your
homecare provider for more information.
OPERATION
1. Fully insert the power cord into the back of the device. Plug the other end of the power cord into the AC wall outlet.
2. Attach air supply tubing to air supply port in the back of the device.
3. Prepare the mask (supplied by your equipment provider) by referring to the mask’s instruction guide.
4. Connect the air supply tubing to the mask.
NOTE–The air supply tubing supplied with the device is specially designed to prevent kinking and allow you to receive
optimal airow. Use only the 22 mm diameter, smooth-bore, kink-resistant tubing supplied with this device or an air supply
tubing recommended by your equipment provider.
Start-up
Put on your mask and press the ON/OFF button on the keypad OR put on your CPAP mask and take a few breaths to turn
onairowautomatically.Thepressureinyourmaskwillrisetothesetpressureinabout10seconds.
NOTE–If the device does not automatically start after taking 2-3 breaths, this feature may have been disabled. If Auto ON/
OFF is disabled, you must manually press the ON/OFF button to start and stop the device.
The keypad display shows the actual mask pressure while the device is in use. Because this is the actual pressure, the
device pressure reading may vary slightly as you breathe.
IfyourDeVilbissSleepCubesystemincludesahumidier,itsheatercontrolsandstatusaredisplayed.
NOTE– If the display on your device is not similar to those listed above, refer to the section titled “Patient Messages” on
page EN-8.
Using the Comfort Delay Feature
YourSleepCubehasacomfortdelayfeaturetohelpmakeiteasierforyoutofallasleep.Theairowwillstartatalow
pressureandthengraduallyramp-uptotheprescribedsettingoverthelastfewminutesofthespecieddelaytime.
NOTE–When the delay comfort feature is activated, a message will ash on the display periodically, indicating the amount
of time remaining in the delay.
Youcanadjusttheamountoftimespentincomfortdelaybyusingtheadvanceddevicecontrols.TheDelayTimecanbe
adjustedfrom0to45minutesin5-minuteincrements.
NOTE–If you are unable to change the delay time, your provider has locked this setting.
Pressthedelaybuttontoactivatethecomfortdelayfeature.Theairowpressurewilldroptotheprescribedcomfortdelay
pressure.

EN - 7SE-DV54-1
Inthenal10minutesofthedelayperiod,thepressurewillgentlyrisetothepressureprescribedforyourtherapy.You
mayrepeatthecomfortdelaybypressingthedelaybuttonagainifyouhavenotfallenasleepduringtherstuse.
NOTE-The AutoAdjust will not adjust the pressure setting during the comfort delay period, allowing you to fall asleep
without responding to early respiratory events.
Using The SmartFlex Feature
Your SleepCube has a SmartFlex pressure relief feature to help make it easier for exhale against your prescribed pressure
by lowering the pressure slightly when you exhale. The pressure returns to your prescribed pressure during inhale to
maintain your therapy.
The SmartFlex menu is available in all modes and is a sub-menu that allows you to control various functions of your
SleepCube. It is accessed by pressing the down button while “SmartFlex Menu” is shown on the Display.
SmartFlexpressurereliefincludesthreesettingsforexhalerelief;1,2,and3.(1istheleastamountofrelief,3isthemost
amount of relief). Setting SmartFlex pressure relief to OFF turns the SmartFlex feature OFF.
ThepressurewaveformcanalsobeadjustedindependentlyforinhaleandexhaletosmooththetransitionwhenSmartFlex
pressure relief is active. The pressure waveform settings are SmartFlex-i (IRnd) and SmartFlex-e (ERnd) with settings from
0 to 5 in steps of 1 (0 is the least amount of smoothing, 5 is the most amount of smoothing).
SmartFlex pressure relief can be operated Full Time or during the Delay Only. The display will show “FLX” in the top row of
the default screen (between CPAP pressure and Mode) while SmartFlex pressure relief is operating.
When SmartFlex pressure relief is turned on Full Time, the pressure relief operates at all times when you are breathing on
the device. When SmartFlex pressure relief is set to Delay Only, the pressure relief operates only during the Comfort Delay
periodandturnsoffafterthedelayperiodisnished.
The device contains a SmartFlex disengagement feature. If a patient is experiencing a respiratory event while the CPAP is
in the relief pressure mode, after a limited time the CPAP will shift to the prescription pressure and remain at this pressure
until normal breathing resumes.
Controlling the Humidity (optional)
Theheatersettingcanbeadjustedwithinarangeof1to10.Theoptimumtemperaturesettingisdependentonthe
ambient temperature and humidity of your room. If your room temperature is low and/or the relative humidity is high, then a
lower temperature setting may be necessary to prevent excess condensation in the air supply tubing. If the room
temperature is high and/or the relative humidity is low, then a higher temperature setting may be necessary for optimum
comfort.
The heater setting of 1 results in a heater plate temperature of approximately 84°F (29°C). The heater setting of 10 results
in a heater plate temperature of approximately 149°F (65°C).
NOTE–Always allow at least 10 minutes of cooling time after turning the device off before removing the water chamber
from the humidier cradle.
WARNING
Donotattempttollthehumidierwhileitisattachedtothehumidiercradle.Damagetothehumidiercradle
mayoccur.
CAUTION– Use only distilled water that is at room temperature. Do not add any medication or other additives to the water.
CAUTION– For proper operation, ensure the ow generator is OFF before inserting humidier chamber.
WARNING
Nevertouchtheheaterplateonthehumidiercradle.Nevertouchtheheattransferplateonthebottomofthe
waterchamber.Theseplatescanreachtemperaturesashighas149°F(65°C)duringoperation.
Donotoperatetheheaterifthewaterchamberisempty.Theheaterplatemaybeturnedoffusingthekeypad
heatercontrolwhenbeingusedwithoutwater.
Shut Down
Press the ON/OFF button to turn the device off. You may also simply remove your mask. After a few seconds the device
willdisplaythemessage“MaskOff.Pleasecheckmaskt.”Ifyoudonotputthemaskonagainthedevicewill
automatically turn off in about 20 seconds. Pressing any button will remove the message from the display.
NOTE–If the DeVilbiss SleepCube does not turn off automatically, the Auto-OFF feature may have been disabled. In this
case you must manually turn the device off.

EN - 8 SE-DV54-1
Enable Menu List
The Enable menu is available in all modes and is a sub-menu that allows you to control various functions of your
SleepCube. It is accessed by pressing the down button while “Enable Menu” is shown on the Display.
DisplayExample EnableMenuItemDescription
Auto-OFF
Enabled
ThisoptioncontrolstheAuto-OFFfeature,whichautomaticallystopstheowofair
after taking off the mask. The device will require at least 30 seconds to turn OFF
depending on the kind of mask used. When Auto-OFF is enabled, Auto-ON is also
enabled.Iftheunlockedsymbolisshown,youareabletoadjustthissetting.Ifthe
lockedsymbolisshown,thissettingcanonlybeadjustedbyyourprovider.
Auto-ON
Enabled
ThisoptioncontrolstheAuto-ONfeature,whichautomaticallystartstheowofair
after breathing once or twice into the mask. This is always enabled when Auto-OFF is
enabled.Iftheunlockedsymbolisshown,youareabletoadjustthissetting.Ifthe
lockedsymbolisshown,thissettingcanonlybeadjustedbyyourprovider.
MaskFitCheck
Enabled
Thisoptioncontrolsthemasktcheckfeature.Theairowtoyourmaskisconstantly
measuredandiftheamountofairowexceeds95liters/minuteformorethan10%of
thetimeused,anoticationwillbecreated.Thisnoticationwillbedisplayedthenext
time you use the SleepCube.
LowBacklight
Enabled
Low backlight Enable will keep the backlight dim during operation. Low backlight
Disabled will turn the backlight OFF during operation.
ExitMenu
Press
Pressing the up key exits the Enable menu.
SmartCode and Adherence Score Information
Your homecare provider may contact you to retrieve SmartCode and Adherence Score information. To display the
SmartCode, press the LEFT arrow key once. Use the UP arrow or DOWN arrow keys to change the SmartCode reporting
period. Press the LEFT arrow key again to display the Adherence Score.
The Quick View Menu shows a summary of information which is reported in the SmartCode data. Information in the Quick
View includes: Number of days used more than 4 hours (or can be set to 5 hours by clinician), AHI (Apnea/Hypopnea
Index), High Leak percent (percent of time at leak >95 L/m), and Daily Usage (average hours per day used). Each
parameter can be viewed in any of four time periods, 1 day, 7 days, 30 days and 90 days.
Compliance information can be viewed without turning the CPAP on. With the blower OFF (display shows OFF), press the
left or right arrow keys on the keypad to scroll through the information.
PATIENT MESSAGES
Your SleepCube will alert you of issues that may require some action on your part in order to make your therapy more
effective. You can press any key or button to clear the message from the display, but the SleepCube will operate normally
evenifthemessageisnotcleared.Twokindsofmessagesaredisplayed:RemindersandNotications.
Reminders
Reminders alert you when parts of your system need to be replaced. Some components of your system wear over time
and, if not replaced, may compromise your therapy. If you see a message on the display that is not listed below, you may
have the optional DeVilbiss SmartLink Module attached to your device, which provides additional messages. Refer to the
documentation that was provided with the SmartLink Module.
CleanFilter–Theltershouldbecheckedevery10daysforsignsofdirtorwearsothatitcanbecleanedasneeded.
This message helps to remind you to check it regularly.
Notifications
NoticationsidentifyconditionsinyourSleepCubethatmayrequireactionbyyouoryourequipmentproviderinorderto
maintain a high level of therapy. If you see a message on the display that is not listed below, you may have the optional
DeVilbiss SmartLink Module attached to your device, which provides additional messages. Refer to the documentation that
was provided with the SmartLink Module.
DelayRunningxxMinutesLeft–Whileacomfortdelaysessionisactive,thismessageisashedonthedisplayevery5
seconds to let you know how much time is left in the delay.

EN - 9SE-DV54-1
MaskLeak–ThismessagemeanstheSleepCubehasdetectedalargeamountofairowduringtherapyforatleast10%
ofthetimeduringyourprevioususesession.Thisnoticationisdisplayedwhenthedeviceisturnedon.Ifthismessageis
displayed,putonthemaskandadjusttheheadgeartoensurethemaskisproperlyttedtoyourface.Followthemask
manufacturer’sdirectionsforadjustingthemaskandheadgearforpropertting.
MaskOff–Thismessageappearsduetoapoormasktoraremovedmask.Checkforleakaroundthemasksealand
makeadjustmentsasnecessaryaccordingtothemaskmanufacturer’sinstructions.Thismessagewillbedisplayeduntil
thehighairowproblemiscorrected.Ifthehighairowconditionpersistsforabout20seconds,thedevicewill
automatically turn off if Auto-OFF is enabled.
DeviceFault – If a device fault message is displayed, refer to Troubleshooting for instructions.
SLEEPCUBE TRAVEL INFORMATION
International Power Changes
Your DeVilbiss SleepCube is equipped with a universal power supply. This means that it is automatically capable of
acceptinglinevoltagesof100to240V~50/60Hz.Youdonotneedtomakeanyadjustmentstothedeviceifyouare
traveling to another country where the line voltage is different than your domestic line voltage. Simply contact your
equipment provider for the correct style power cord for the region in which you will be traveling (refer to Accessories/
Replacement Items for the correct part number).
Altitude
Your SleepCube automatically compensates for changes in altitude between sea level and 9000 ft (2750 m). You do not
needtomakeadjustmentstothedeviceforchangesinaltitude.
SLEEPCUBE DC OPERATION
Battery Power
Your SleepCube can be operated from a 12V DC power source in a motor home, boat or other recreational vehicle using
the 12V DC cable. Alternatively you can power your SleepCube using a 12V DC stand alone battery with a DC battery
clamp on adapter and 12V DC cable. All cables are available from your equipment provider (refer to Accessories/
Replacement Items for the correct part numbers). The stand alone battery connection uses clamps that attach to the
terminal connections of the battery.
NOTE–The heater for the SleepCube’s humidication system will not operate directly from a 12V DC power source. If you
need humidication, non-heated humidication is still available. Alternately, instead of connecting12V DC power directly to
the SleepCube, you can pass the DC power through an inverter that will deliver AC power to the system. This will allow the
heater to function. The power rating of the inverter must be at least 200 watts @ 110V~ / 400 watts @ 220V~.
NOTE–The SleepCube will automatically switch power sources between AC and 12V DC if both sources are available. If
your unit is connected to both AC and 12V DC power sources, it will operate on AC power as long as AC power is present,
and automatically switch to 12V DC power if AC power is lost. When AC power is restored, it will return to the AC source.
You do not need to reset or adjust any settings when the power source switches, but remember that your heater will not
operate on 12V DC.
SUPPLEMENTAL OXYGEN
WARNING-OXYGEN USE
• Oxygensupportscombustion.Toavoidpossiblephysicalinjury,donotsmokewhileusingthisdevicewith
supplementaloxygen.Donotusethisdevicenearhotobjects,volatilesubstancesorsourcesofopenames.
• Always turn on the SleepCube before turning on the oxygen source. Turn off the oxygen source before turning off the
SleepCube.
• Thisdeviceisnotsuitableforuseinthepresenceofaammableanestheticmixture.
• Ataxedowrateofsupplementaloxygen,theinhaledoxygenconcentrationwillvarydependingonthepressure
setting, patient breathing pattern, mask selection, and leak rate. This warning applies to most types of CPAP devices.
• Never allow the oxygen source to run continuously while connected to the SleepCube if the device is not in use. If
theSleepCubeisnotbeingused,turnofftheoxygenow.
CAUTION
• Oxygen is prescribed gas and should only be administered under the supervision of a physician.
• Theowsettingoftheoxygensourcemustbespeciedbyaphysician.

EN - 10 SE-DV54-1
Supplemental oxygen is sometimes prescribed in addition to CPAP for treatment of Obstructive Sleep Apnea. If your
physician prescribed oxygen for your sleep therapy, you can add the oxygen in one of two ways:
1. Obtain the optional oxygen adapter (part #7353D-601) from your homecare provider and connect it to the air supply
port on the SleepCube. Connect one end of the air supply tubing to the open end of the adapter and the other end of
the air supply tubing to the mask.
2. If your mask is equipped with an oxygen port, your physician may request that you apply oxygen directly to your mask.
ACCESSORIES/REPLACEMENT ITEMS
Replacement Items
Air-inletlter(4/pk) DV51D-602 Heater connection cover DV51D-605
Fineparticlelter(4/pk) DV51D-603 Oxygen adapter 7353D-601
Air supply tubing (6’) DV51D-629 Carrying case DV51D-610
Air supply plug DV51D-604 HeatedHumidier DV5HH
HumidierChamber DV5C Chamber Sealing Gasket DV5C-614
Power Items
AC power cord (USA) DV51D-606 AC power cord (Australia) DV51D-609
AC power cord (UK) DV51D-608 DC power cord DV51D-619
AC power cord (EU) DV51D-607 DC battery clamp-on adapter (requires DC
Power Cord DV51D-619) DV51D-696
DeVilbiss Masks
FlexSet®Masks Serenity®Masks
Large, Silicone 9354L Large, Silicone 9352L
Medium, Silicone 9354D Medium, Silicone 9352D
Small, Silicone 9354S Small, Silicone 9352S
Large, Gel 9354GL Large, Gel 9352GL
Medium, Gel 9354G Medium, Gel 9352G
Small, Gel 9354GS Small, Gel 9352GS
Large, ComfortTouch™Silicone 9354LR Large, ComfortTouch Silicone 9352LR
Medium, ComfortTouch Silicone 9354DR Medium, ComfortTouch Silicone 9352DR
Small, ComfortTouch Silicone 9354SR Small, ComfortTouch Silicone 9352SR
Large, ComfortTouch Gel 9354GLR Large, ComfortTouch Gel 9352GLR
Medium, ComfortTouch Gel 9354GR Medium, ComfortTouch Gel 9352GR
Small, ComfortTouch Gel 9354GSR Small, ComfortTouch Gel 9352GSR
MAINTENANCE
DANGER
Electricshockhazard-Donotattempttoopenorremovethecabinet;therearenouser-serviceablecomponents
inside.Ifserviceisrequired,contactyourequipmentproviderforinstructionsonobtainingservice.Openingor
attemptingtoserviceyourdevicewillvoidthewarranty.
WARNING
Disconnectsupplybeforeservicing.
PressureAccuracy–The SleepCube is designed to provide accurate pressure performance from the factory without
additional calibration. No routine service is required provided the device is used in accordance with the manufacturer’s
directions.
NOTE–Some countries require periodic servicing and calibration of this kind of medical device. Contact your equipment
provider for further information.
StandardAir-InletFilter–Checkthelterevery10daysandcleanitifnecessary.Replacethelterevery6monthsor
soonerifitisdamaged.Thestandardlterisdesignedtolterparticleslargerthan3.0micronsinsize.TheSleepCube
MUSThavethestandardlterinplaceduringoperation.

EN - 11SE-DV54-1
OptionalFineParticleFilter–Checkthelterevery10daysandreplaceitifitisdirtyordamaged;otherwisereplacethe
lterevery30days.Theoptionalneparticlelterisdesignedtolterparticlesassmallas0.3micronsinsize.
CLEANING
WARNING
Toavoidelectricshock,alwaysunplugthepowercordfromthewalloutletpowersourcebeforecleaning.
CAUTION–Never rinse or place the device in water. Never allow liquids to get into or around any of the ports, switches or
air lter; doing so will result in product damage. If this occurs, do not use the device. Contact your equipment provider for
service.
Device Cabinet
1. Unplug the SleepCube from the power source. Wipe the cabinet with a clean, damp cloth every few days to keep the
cabinet dust free.
2. Allow the device to dry completely before plugging it into a power source.
Filters
Air-InletFilter
1. Theair-inletltershouldbecheckedevery10daysandcleanedasnecessary.Thelterislocatedintherearofthe
device.
CAUTION–Proper lter function is important for the operation of the device and to protect the device from damage.
2. Toclean,removethedarkouterfoamlterfromtheframe.
3. Washthelterinasolutionofwarmwateranddishwashingdetergent,andrinsewithwater.Allowtheltertodry
completely.Ifthelter(part#DV51D-602)isdamaged,contactyourequipmentproviderforareplacement.
4. Ensurethelteriscompletelydrybeforeinstallationanduse.
FineParticleFilter(Optional)
1. Ifyouhaveanoptionalneparticlelter(part#DV51D-603),inspectthislterandreplaceitifitshowssignsofdirtor
damage. Do not wash.
2. Installtheneparticlelterbehindthestandardlter.
NOTE–If the ne particle lter is not installed rst according to the directions, the life of the lter will be reduced requiring
more frequent replacement.
Optional Heated Humidifier
WaterChamber-Humidierwaterchambershouldbecleaneddaily.
1. Press on the chamber release latch and pull out the water chamber from the cradle (Fig 4).
2. Separate the chamber halves by pressing forward on the chamber disassembly lever and lifting the lid of the
chamber (Fig 9).
3. Remove the sealing gasket from the chamber lid (Fig 10).
4. Hand wash the parts in a solution of warm water and mild dishwashing detergent.
CAUTION–Do not use any solutions that contain bleach, chlorine, alcohol, scented oils or other aromatic-based ingredients
to clean the humidier components or tubing. These solutions may reduce the life of the product.
5. Allow the parts to dry before reassembly.
CAUTION–Inspect the gasket seal before each use to ensure that it is properly seated in the groove around the entire
chamber.
NOTE– The disassembled chamber may also be washed once per week in a dishwasher on the delicate or glassware
cycle, top shelf only.
HumidierCradle-Thehumidiercradleshouldbecleanedasneeded.
1. Turn off the heater and unplug from power source. Allow system to cool for at least 10 minutes.
2. Detachowgeneratorfromthecradle;rstremovewaterchamberthenfullydepresstheowgeneratorrelease
button to separate (Fig 4).
NOTE–Flow generator release button must be pressed completely to separate.
3. Use a soft, damp cloth to clean the surfaces of unit.

EN - 12 SE-DV54-1
Tubing
The air supply tubing should be cleaned daily. Remove the tubing from the device and mask. Use a mild detergent and
water to clean the inside of the tubing. Rinse the tubing and allow to air dry.
Mask and Headgear
Clean the mask and headgear according to the manufacturer’s instructions.
TROUBLESHOOTING
WARNING
ElectricShockHazard-Donotremovethedevicecabinet;therearenouser-serviceableinternalcomponents.The
cabinetshouldonlyberemovedbyaqualiedDeVilbissprovider.
Issue Possible Cause Remedy
Nothingshowson
thedisplay.
1. Device is not plugged in or the power cord
is not fully inserted.
1a.Verifythatpowercordisrmlyconnectedto
the SleepCube and the power outlet.
1b. If you are using a DC power source, make
sure the cable connections are secure. Verify that
battery is charged.
2.OptionalHumidier-Theowgeneratoris
notfullyseatedonhumidiercradle.
2. Refer to assembly instructions (Fig. 1-7).
3. There is no outlet power. 3. Locate a suitable functioning power source.
TheSleepCube
doesnotstartwhen
breathingintothe
mask.
1. The Auto-ON feature has been disabled. 1. Use the ON/OFF button to start and stop
device.
2. There is no power to the device. 2.Verifythatthepowercordisrmlyconnectedto
the device and the power outlet.
3. Breath is not deep enough for the Auto-ON
feature to detect.
3. Breathe deeply in and out to start the device.
4. You are using a full face mask that has an
anti-asphyxia valve.
4. Auto-ON may not work because your exhaled
breath escapes through the open valve. Use the
ON/OFF button to start and stop the device.
5. The air supply port plug is missing or not
fully inserted.
5. Make sure the air supply port plug is fully
inserted into the unit.
6.Thehumidierchamberisnotfullyengaged
into the cradle or is missing.
6.Slidethehumidierchamberfullyintotheslot.
Verify the latching lever snaps into place.
Theairowhas
stopped
unexpectedly
duringuseor
reportsmaskleak.
1. The Auto-OFF feature has detected large
airowbecauseoflooselyttingmask.
1.Ensureyouhaveagoodmaskt;adjustmask
and headgear.
2. During use, your mouth opens and you
begin to mouth-breathe.
2. Contact equipment provider for a chin strap or
different mask to prevent mouth-breathing.
3.Theoptionalhumidierchamberisnotfully
engaged or is missing.
3.Slidethehumidierchamberfullyintocradle.
Verify the release latch clicks into place.
4. The air supply port plug is missing from the
back of the CPAP or is not fully inserted.
4. Ensure the air supply port plug is fully inserted
into the back of the CPAP.
Thedisplayshows
adevicefault.
An error has occurred in the device and
requires servicing.
Contact your equipment provider for service.
Apneasymptoms
haverecurred.
1.Airltermaybedirty. 1.Cleanorreplacetheairlterandrelocate
device away from drapes or other dusty surfaces.
2. Apnea condition has changed. 2. Contact your physician or equipment provider.
Skinbecomes
irritatedwhere
maskcontactsface.
1. Headgear is too tight or improperly
adjusted.
1. Loosen headgear to reduce contact pressure
on face.
2. Your mask may not be sized properly or is
not the most appropriate shape for you.
2. Contact physician or equipment provider.
Drynessofthroator
nose.
Inadequate humidity. 1a.AddaDeVilbissDV5heatedhumidier.
1b.Increasetheheatersettingonthehumidier.

EN - 13SE-DV54-1
Issue Possible Cause Remedy
Watercondensation
collectinginthe
hosecausinga
gurglingsound.
1.Humidicationistoohigh. 1.Reducehumidierheatersetting.
2.Roomtemperatureuctuatesfromhigherto
lower levels through the night.
2. Increase room temperature.
Airfromow
generatorseemsto
betoowarm.
1.Airltersaredirty. 1.Cleanlters.
2. Air inlet port is blocked. 2. Unblock air inlet.
3. Room temperature is too high. 3. Lower room temperature.
4. Device is located near a heat source. 4. Locate device away from heat source.
5.Humidier(optional)heatersettingistoo
high.
5. Lower heater setting.
Nasal,sinusorear
pain,runnynose
Youmayhaveareactiontoairowpressure. Discontinue use and contact physician.
Heatersettingis
notvisibleon
display
1.Theowgeneratorisnotfullyseatedonto
thehumidiercradle.
1. Ensure proper contact is made (Fig. 3).
2. Your CPAP device is not equipped with the
optionalhumidier.
SPECIFICATIONS
CPAP
Size........................................................................................................... 4.2”H x 6.5”W x 6.9”D (10.7cm x 16.5cm x 17.5cm)
Weight ............................................................................................................................................................. 1.22 kg (2.7 lbs.)
Electrical Requirements AC......................................................................................................................100-240V~, 50/60 Hz
Electrical Requirements DC .................................................................................................................. 10.4 - 15 VDC, 5 Amps
Maximum Power Consumption ......................................................65 watts max from AC power source (flow generator only)
Pressure Range ......................................................................................................................................................3-20 cmH2O
Operating Temperature Range....................................................................................................... 41˚Fto104˚F(5˚Cto40˚C)
Operating Humidity Range.......................................................................................................0%to95%RHnon-condensing
Operating Atmospheric Conditions..........................................................................................Sea level to 9,000 feet (2743 m)
Storage & Transportation Temperature Range ..................................................................... -40°F to +158°F (-40°C to 70°C)
Storage & Transportation Humidity Range...............................................................................0%to95%RHnon-condensing
Maximum Limited Pressure...........................................................................................................20 cmH2O under normal use
Sound Pressure Level (tested per ISO 17510)...............................................................................................................26 dBA
Sound Power Level .........................................................................................................................................................38 dBA
Humidifier
Humidity Output (in the operating flow range): ................................................................................................ ≥10mgH2O/l air
Size:......................................................................................................2.6” H x 6.3” W x 8.4” D (6.6 cm x 16.0 cm x 21.3 cm)
Weight: ........................................................................................................................................................1.75 lbs. (0.794 Kg)
Power Consumption:.................................................................................................................................................... 85 Watts
DV5HH Electrical Requirements ................................................................................................................100-240VAC, 0.95 A
Heater Plate Thermal Cutout:..............................................................................................................................305°F (152°C)
Power/Temperature Control: ......................................................................................Setting of 1 (minimum) to 10 (maximum)
Heater Plate Temperature: ...............................................................................84°F to 149°F (approx. 29°C to approx. 65°C)
Operating Temperature Range:....................................................................................................41°F to 104°F (5°C to 40°C)
Operating Humidity Range:.......................................................................................................0to95%R.H.non-condensing
Operating Atmospheric Pressure Range:........................................................................................................70.0 – 106.0 kPA

EN - 14 SE-DV54-1
Filter Specifications
Standard Filter .........................................................................................................................................> 3.0 micron particles
Optional Fine Particle Filter .....................................................................................................................> 0.3 micron particles
Dynamic Short-Term Pressure Accuracy with and without DV5HH Humidifier (Per
ISO 17510-1:2007)
Waveform Volume[mL] BreathRate[min-1]
SetPressure
[cmH2O]
PressureAccuracy
[Pk-PkcmH2O]
Sinusoidal
cycle with I:E =
1:1
500 10, 15, 20
3.0 0.5
7,0 0.5
12,0 1.0
16,0 1.0
20,0 1.0
Maximum Flow-Rate (per ISO 17510-1:2007)
TestPressures
3,0cmH2O7,0cmH2O12,0cmH2O16,0cmH2O20,0cmH2O
Measured pressure at the patient
connection port (cmH2O) 2.9 6.4 11.0 15.0 19.0
Averageowatthepatientconnectionport
(l/min) 83.8 126.8 137.4 130.0 113.8
Long Term Static Pressure Accuracy ................................................................................................................. +/- 0.5 cmH2O
Additional Specifications
Equipment classification with respect to protection from electric shock ........................................................................ Class II
Degree of protection from electric shock ................................................................................................. Type BF Applied Part
Degree of protection against ingress of liquids......................................................................................IPXI Drip-proof vertical
Mode of operation .................................................................................................................................................... Continuous
Equipment not suitable for use in the presence of a flammable anesthetic mixture with air or with oxygen or nitrous oxide

EN - 15SE-DV54-1
DEVILBISS GUIDANCE AND MANUFACTURER’S DECLARATION
WARNING
MedicalElectricalEquipmentneedsspecialprecautionsregardingElectromagneticCompatibility[EMC]andneeds
tobeinstalledandputintoserviceaccordingtotheEMCinformationprovidedintheaccompanyingdocuments.
PortableandMobileRFCommunicationsEquipmentcanaffectMedicalElectricalEquipment.
Theequipmentorsystemshouldnotbeusedadjacenttoorstackedwithotherequipmentandthatifadjacentor
stackeduseisnecessary,theequipmentorsystemshouldbeobservedtoverifynormaloperationinthe
congurationinwhichitwillbeused.
NOTE– The EMC tables and other guidelines provide information to the customer or user that is essential in determining
the suitability of the Equipment or System for the Electromagnetic Environment of use, and in managing the
Electromagnetic Environment of use to permit the Equipment or System to perform its intended use without disturbing
other Equipment and Systems or non-medical electrical equipment.
Guidance and Manufacturer’s Declaration – Emissions All Equipment and
Systems
Thisdeviceisintendedforuseintheelectromagneticenvironmentspeciedbelow.Thecustomeroruserofthisdevice
should assure that it is used in such an environment.
EmissionsTest Compliance ElectromagneticEnforcement–Guidance
RF Emissions
CISPR 11 Group 1
This device uses RF energy only for its internal function. Therefore,
its RF emissions are very low and are not likely to cause any
interference in nearby electronic equipment.
RF Emissions
CISPR 11
Class B
Radiated and Conducted
Emissions This device is suitable for use in all establishments including
domestic, and those directly connected to the public low-voltage
power supply network that supplies buildings used for domestic
purposes.
Harmonics
IEC 61000-3-2 Class A
Flicker
IEC 61000-3-3 Complies
ImmunityTest IEC60601TestLevel ComplianceLevel ElectromagneticEnvironment-Guidance
Electrostatic
Discharge (ESD)
IEC 61000-4-2
±6kV contact
±8kV air
±6kV contact
±8kV air
Floors should be wood, concrete or ceramic
tile.Ifoorsaresynthetic,therelativehumidity
shouldbeatleast30%.
Electrical Fast
Transient/burst
IEC 61000-4-4
±2kV on AC Mains ±2kV on AC Mains Mains power quality should be that of a typical
commercial or hospital environment.
Surge
IEC 61000-4-5
±1kV Differential
±2kV Common
±1kV Differential
±2kV Common
Mains power quality should be that of a typical
commercial or hospital environment.
Voltage dips, short
interruptions and
voltage variations
on power supply
input lines
IEC 61000-4-11
>95%Dipfor
0.5 Cycle
60%Dipfor
5 Cycles
30%Dipfor
25 Cycles
>95%Dipfor
5 Seconds
>95%Dipfor
0.5 Cycle
60%Dipfor
5 Cycles
30%Dipfor
25 Cycles
>95%Dipfor
5 Seconds
Mains power quality should be that of a typical
commercial or hospital environment. If the user
of this device requires continued operation
during power mains interruptions, it is
recommended that the device be powered
from an uninterruptible power supply or
battery.

EN - 16 SE-DV54-1
ImmunityTest IEC60601TestLevel ComplianceLevel ElectromagneticEnvironment-Guidance
Power Frequency
50/60Hz Magnetic
Field
IEC 61000-4-8
3A/m 3A/m
Powerfrequencymagneticeldsshouldbe
that of a typical location in a typical
commercial or hospital environment.
Conducted RF
IEC 61000-4-6
3 Vrms from
150 kHz to 80 MHz V1 = 3 Vrms
Portable and mobile RF communications
equipment should be separated from the
device by no less than the recommended
separation distances calculated/listed below:
D=(3.5/V1)√
P
Radiated RF
IEC 61000-4-3
3 V/m
80 MHz to 2.5 GHz E1 = 3V/m
D=(3.5/E1)√
P80 to 800 MHz
D=(7/E1)√
P800 MHz to 2.5 GHz
Where P is the maximum power rating in watts
and D is the recommended separation
distance in meters.
Fieldstrengthsfromxedtransmitters,as
determined by an electromagnetic site survey,
should be less than the compliance levels (V1
and E1).
Interference may occur in the vicinity of
equipment containing a transmitter.
For transmitters rated at a maximum output power not listed above, the recommended separation distance D in meters
(m) can be estimated using the equation applicable to the frequency of the transmitter, where P is the maximum output
power rating of the transmitter in watts (W) according to the transmitter manufacturer.
Note 1: At 80 MHz and 800 MHz, the separation distance for the higher frequency range applies.
Note 2: These guidelines may not apply in all situations. Electromagnetic propagation is affected by absorption and
reectionfromstructures,objects,andpeople.
Recommended Separation Distances Between Portable and Mobile RF
Communications Equipment and this device. This device and system are NOT
Life-Supporting
This device is intended for use in the electromagnetic environment in which radiated disturbances are controlled. The
customer or user of this device can help prevent electromagnetic interference by maintaining a minimum distance
between portable and mobile RF Communications Equipment and the device as recommended below, according to the
maximum output power of the communications equipment.
Maximum
OutputPower
(Watts)
RecommendedSeparationDistancesforthedevice(meters)
150 kHz to 80 MHz
D=(1.1667)√
P
80 to 800MHz
D=(1.1667)√
P
800 MHz to 2.5 GHz
D=(2.3333)√
P
0.01 0.11667 0.11667 0.23333
0.1 0.36894 0.36894 0.73785
1 1.1667 1.1667 2.3333
10 3.6894 3.6894 7.3785
100 11.667 11.667 23.333
For transmitters rated at a maximum output power not listed above, the recommended separation distance D in meters
(m) can be estimated using the equation applicable to the frequency of the transmitter, where P is the maximum output
power rating of the transmitter in watts (W) according to the transmitter manufacturer.
Note 1: At 80 MHz and 800 MHz, the separation distance for the higher frequency range applies.
Note 2: These guidelines may not apply in all situations. Electromagnetic propagation is affected by absorption and
reectionfromstructures,objects,andpeople.

EN - 17SE-DV54-1
ADVANCED MENU CONTROLS
With the device on, press the “Next” or “Previous” buttons on the keypad to scroll through the items on the display.
Name Symbol Function
PREVIOUS ITEM kPressing this button displays the previous menu option.
NEXT ITEM jPressing this button displays the next menu option.
SETTING CHANGE h�
iThesebuttonsallowyoutoadjustthesettingthatisshownonthedisplay.
Please note that the values displayed are examples only.
Patient Menu Layout
The following charts show by Mode each Display you will scroll through using the Next or Previous buttons on the keypad.
Pressing the Down key at the Enable Menu Display will allow you to enter this submenu - then use Next or Previous
buttonstoscrollthroughit;presstheUpbuttontoreturntomainmenu.OncethenalDisplayisreached,pressingthe
NextbuttonwillreturnyoutotherstDisplay.
NOTE-If the unlocked symbol is shown, you are able to adjust this setting. If the locked symbol is shown, this setting can
only be adjusted by your provider.

EN - 18 SE-DV54-1
AutoAdjust Patient Menu Layout
UP () BUTTON
RIGHT () LEFT () BUTTONS
Auto-ON
Enabled
Auto-OFF
Disabled
ExitMenu
Press
MaskFitCheck
Enabled
LowBacklight
Enabled
RIGHT () LEFT () BUTTONS
SmartFlexMode
FullTime
SmartFlex
3
ExitMenu
Press
SmartFlexIRnd
3
SmartFlexERnd
3
DOWN () BUTTON
UP () BUTTON
DOWN () BUTTON
UP () BUTTON
RIGHT () LEFT () BUTTONS
Auto-ON
Enabled
Auto-OFF
Disabled
ExitMenu
Press
MaskFitCheck
Enabled
LowBacklight
Enabled
AutoAdjustMode CPAPMode
P:10.0FLX Auto
Heat:Off
UpperLimit
15.0cmH2O
LowerLimit
5.0cmH2O
ComplianceMeter
123456.7hours
SerialNumber
HD000005
FirmwareVersion
V0.2030/06/2010
LCDContrastAdj
50%
EnableMenu
Press
TubingLength
1.8m(6ft)
DelayTime
20minutes
SmartCode 1-Day
F6CD-37F-357R
AdherenceScore
83%(25/30)
NOTE: There are 5 levels of
SmartCode data. Use UP
or DOWN key to change
between levels.
DelayPressure
4.0cmH2O
SmartFlexMenu
Press
RIGHT () LEFT () BUTTONS
SmartFlexMode
FullTime
SmartFlex
3
ExitMenu
Press
SmartFlexIRnd
3
SmartFlexERnd
3
DOWN () BUTTON
P:10.0FLX CPAP
Heat:Off
SetPressure
10.0cmH2O
DelayPressure
4.0cmH2O
DelayTime
20minutes
EnableMenu
Press
SmartCode 1-Day
F6CD-37F-357R
TubingLength
1.8m(6ft)
SmartFlexMenu
Press
UP () BUTTON
ComplianceMeter
123456.7hours
SerialNumber
HD000005
FirmwareVersion
V0.2030/06/2010
LCDContrastAdj
50%
AdherenceScore
83%(25/30)
DOWN () BUTTON
Heater setting shown if
DV5HH is attached, FLX
shown if SmartFlex feature is
turned on.

EN - 19SE-DV54-1
SmartFlex Menu List
The SmartFlex menu is available in all modes and is a sub-menu that allows you to control various functions of your
device. It is accessed by pressing the down button while in this Advanced Menu.
DisplayExample Description
SmartFlex
3
This setting controls the amount of pressure relief.
OFF = SmartFlex feature is OFF
1 = least amount of pressure relief
3 = most amount of pressure relief
SmartFlexMode
FullTime
This setting controls the SmartFlex operating mode.
FullTime means SmartFlex feature is always active
DelayOnly means SmartFlex feature is active only during the pressure delay cycle.
SmartFlexIRnd
3
This setting controls the Inhale pressure waveform.
SmartFlexERnd
3
This setting controls the Exhale pressure waveform.
ExitMenu
Press
Pressing the up key exits the SmartFlex menu
Blower Off Menus
Compliance information can be viewed without turning the CPAP on. With the blower OFF (display shows OFF), press the
left or right arrow keys on the keypad to scroll through the information.
DisplayExample Description
OFF Blower OFF, the CPAP unit is plugged in to AC or DC power with the blower OFF.
QuickViewMenu
Press
Pressing the down key enters the Quick View menu. NOTE:The “Quick View” menu
is only shown if enabled from the clinical menu.
SerialNumber
HD000005
Shows the serial number of the device.
AdherenceScore
83%(25/30)
Shows the maximum adherence achieved for any period of thirty consecutive days of
use within a ninety-day time frame. The score represents the percentage of days,
within thirty consecutive days, where usage met or exceeded the ‘Usage Threshold.’
SmartCode 1-Day
F6CD-37F-357R
SmartCode 7-Day
3CCC-377D-7J7X
SmartCode 30-Day
DWY4-3DB7-DJ7L
SmartCode 90-Day
752TT-47DB-7DT7C
SmartCode Usage
ZDN-79FK-K7H
SmartCodedataisusedfortherapymanagementreporting;therapyinformationis
encoded in a series of letters and numbers, and includes a special character for error
checking to ensure accuracy. Use the UP arrow or DOWN arrow keys to change the
SmartCodereportingperiod.TherearevelevelsofSmartCodedata–1-day,7-day,
30-day, 90-day and Usage. Use UP or DOWN button to change between levels.

EN - 20 SE-DV54-1
Quick View Menu Layout
The Quick View Menu shows a summary of information which is reported in the SmartCode data. Information in the Quick
View includes: Number of days used more than 4 hours (or can be set to 5 hours by clinician), AHI (Apnea/Hypopnea
Index), High Leak percent (percent of time at leak >95 L/m), and Daily Usage (average hours per day used). Each
parameter can be viewed in any of four time periods, 1 day, 7 days, 30 days and 90 days.
The following chart shows the Quick View information that is available on your CPAP display if viewing this information has
been enabled by your provider. The Quick View menu shows a summary of your SmartCode data for 1, 7, 30, and 90 day
periods.Eachofthetimeperiodscontainsinfofor“NumberofDays>xhrs”,ApneaHypopneaIndex(AHI),HighLeak%
(>95 L/m) and Average Daily Hours of while breathing use.
DiagramofCPAPdisplays
Days≥4H 1d
1/1(100%)
AHI 1d
31.5+
HighLeak 1d
31+%
DailyUsage 1d
9.3+hours
ExitMenu
Press
Days≥4H 7d
7/7(100%)
AHI 7d
31.5+
HighLeak 7d
31+%
DailyUsage 7d
9.3+hours
Days≥4H 30d
30/30(100%)
AHI 30d
31.5+
HighLeak 30d
31+%
DailyUsage 30d
9.3+hours
Days≥4H 90d
90/90(100%)
AHI 90d
31.5+
HighLeak 90d
31+%
DailyUsage 90d
9.3+hours
UP () DOWN () buttons
RIGHT () LEFT ()buttons
SmartCode Data and Adherence Score Information
Your Healthcare provider may contact you to retrieve SmartCode data and Adherence Score information. To display the
SmartCode data, press the LEFT arrow key once. Use the UP arrow or DOWN arrow keys to change the SmartCode
reporting period. Press the LEFT arrow key again to display the Adherence Score.
Definitions
Notallofthefeaturesinthetablebelowareavailableinallmodels;someareoptionalandsomedependonwhatyour
physician and/or home care provider has selected. The table shows the items you may see, and describes the feature
associated with each item. Also, some features are only available in certain modes or with the DeVilbiss SmartLink
Therapy Management Module – these are noted in the ‘Mode’ column below. If you do not see some of these options, your
modelorcongurationdoesnotsupportthem.
Please note that the values displayed are examples only.
DisplayExample Description Mode
OFF Blower OFF, the CPAP unit is plugged in to AC or DC power with the
blower OFF.
All
QuickViewMenu
Press
Pressing the down key enters the Quick View menu. NOTE:The
“Quick View” menu is only shown if enabled from the clinical menu.
All
P:5.0 Auto
Heat:Off
This is the default screen when the device is turned on. The actual
mask pressure and heater setting are shown. The displayed pressure
may vary slightly while breathing. If the heater system is not connected,
the heat setting will be blank.
All
UpperLimit
15.0cmH2O
This is a prescription setting which limits the maximum pressure at
whichthedevicewilloperateifinAutoAdjustmode.Yourhomecare
provider programs this setting for you during device setup.
AutoAdjust
Mode
LowerLimit
5.0cmH2O
This is a prescription setting which sets the minimum pressure at which
thedevicewilloperateinAutoAdjustmode.Yourhomecareprovider
programs this setting for you during device setup.
AutoAdjust
Mode
Other manuals for Intellipap DV5HH
2
This manual suits for next models
1
Table of contents
Languages:
Other DeVilbiss Health Care Product manuals