Page 4 SB-2-605-F
CLEANING
Note
For
routine
cleaning,
it
is
not
nee¥
essary to remove
cup
from
gun.
Do
not
remove washer (26)
from
gun.
If washer
(26)
is removed, it
must
be
replaced.
The
cup
lid
is
designed to be disposable
but
may
be cleaned and reused
if
slightly
contaminated
with
-overspray.
If
lid
becomes
tight, or does
not
fit,
it is due
to
extended
soaking
in
solvent,
Let lid air
dry
overnight
and
the
lid
should
return
to
its
original
size
and
fit.
some
solvent
to
be
flushed
through
gun.
Remove
lid
and
pour
out
dirty
solvent.
Add
a
small
amount
of
clean solvent and repeat
procedure.
Wipe
exterior
of
lid
with
aclean
doth
and
clean solvent.
[~~~T!?:~:J
Remove
lid
and
properly
dispose
of
any
excess paint. Pour in a small
amount
of
clean solvent. The
amount
will
vary
with
different
coatings
and solvents. Reinstall
lid. Shake cup
to
wash
down
the inside
surfaces. Hold
lid
while
shaking
to
prevent
lid
from
coming
off. Pull
trigger
to
allow
If
a
paint
filter
was
used
in
the
bottom
of
the
cup
outlet,
it
should
be
removed
and
cleaned
or
replaced
at
thfs
time.
Dispose
of
used
cup
lid
if
contaminated
and
replace
with
new.
Do
not
soak
the
lid
in
solvent
for
extended
periods
of time. Doing
so
could
cause
cup/lid
sealing
problems
and leakage.
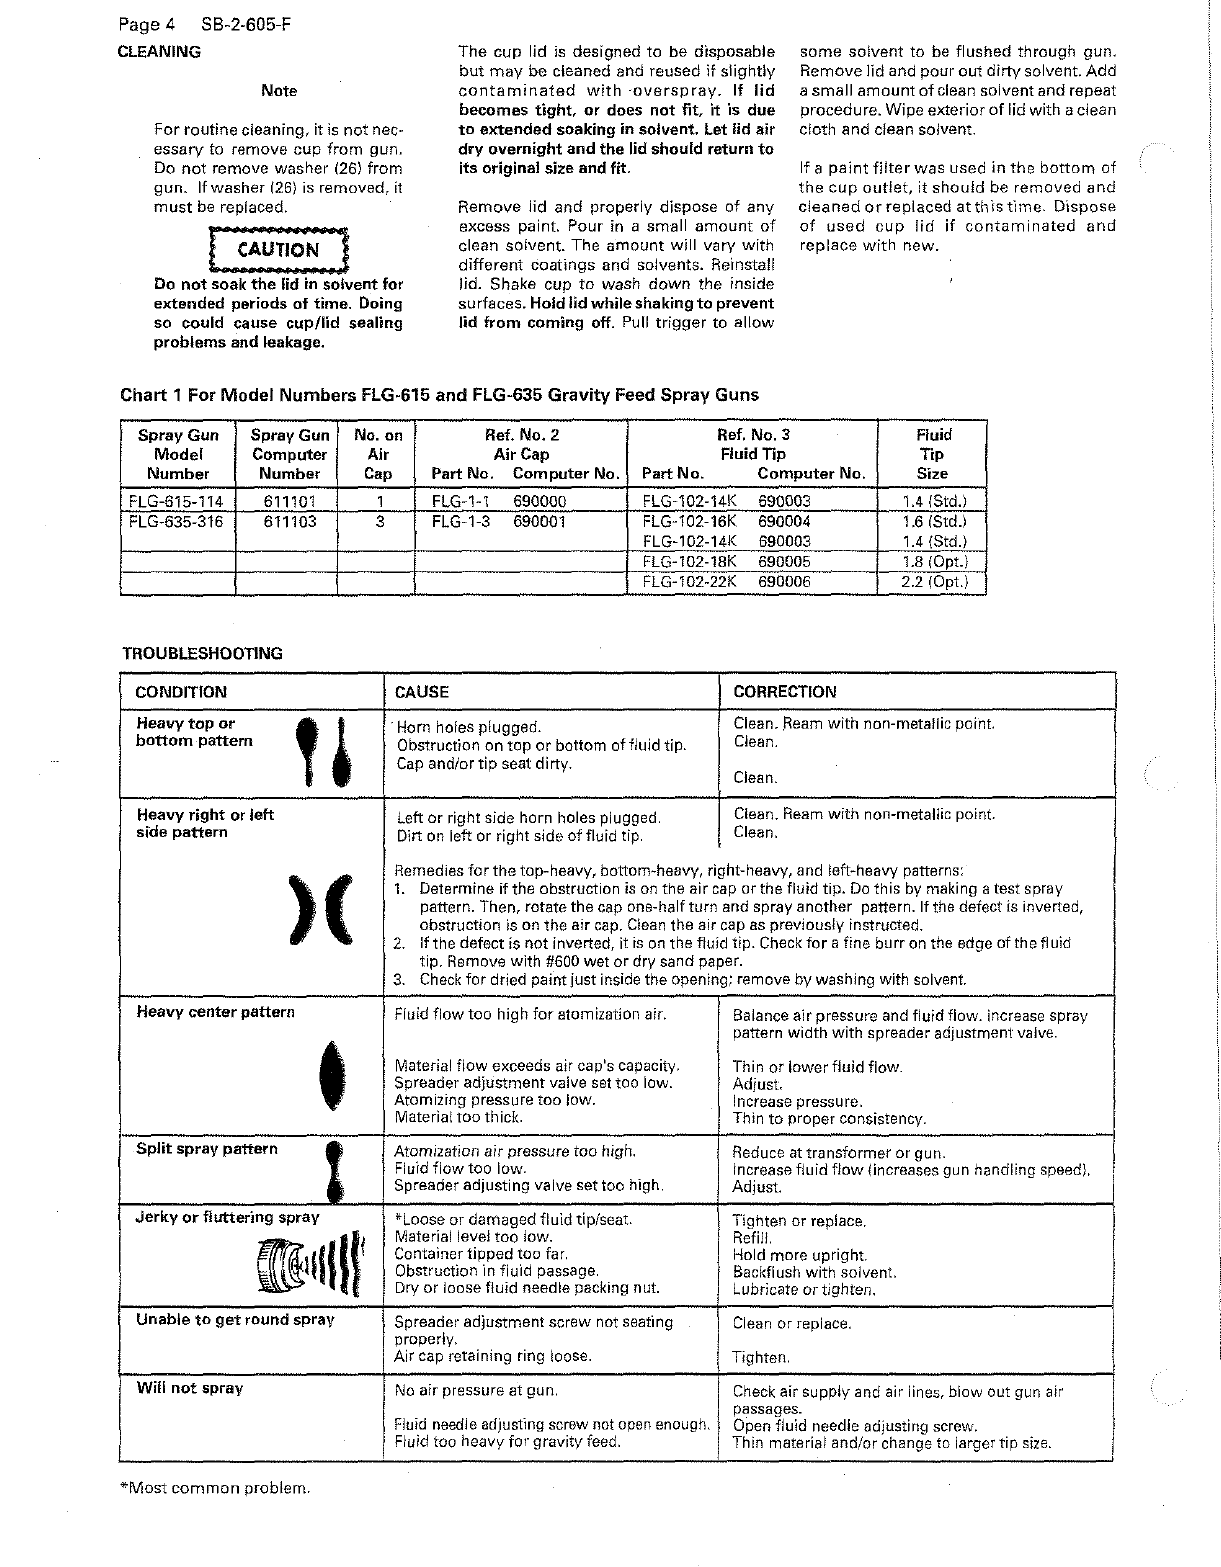
Chart
1 For
Model
Numbers
FLG-615 and FLG-635
Gravity
Feed
Spray
Guns
Spray
Gun
Spray
Gun No. on
Ref.
No.2
Ref.
No.3 Fluid
Model
Computer
Air Air
Cap
Fluid Tip
Tip
Number
Number
Cap
Part
No.
Computer
No.
Part
No.
Computer
No.
Size
FLG-615-114 611101 1 FLG-1-1 690000 FLG-102-141< 690003 1.4 (Std.)
FLG-635-316 611103 3 FLG-1-3 690001 FLG-102-16K 690004 1.6 !Std.)
FLG-1 02-14K 690003 1.4 (Std.)
FLG-102-18K 690005 1.8 (Opt.)
FLG-102-22K 690006 2.2 (Opt.)
TROUBLESHOOTING
CONDITION CAUSE CORRECTION
Heavy
top
or
'
•·Horn holes plugged. Clean.
.Ream
with non-metaHic point.
bottom
pattern
Obstruction on
top
or
bottom
of
fluid tip. Clean.
Cap
and/or
tip
seat dirty. Clean.
Heavy
right
or
left
Left
or
right side horn holes plugged. Clean.
Ream
with
non-metallic point.
side
pattern
Dirt on left or right side
of
fluid tip. Clean.
)( Remedies
for
the top-heavy, bottom-heavy, right-heavy, and left-heavy patterns:
1.
Determine
if
the obstruction
is
on the air
cap
or
the fluid tip.
Do
this
by
making atest spray
pattern. Then, rotate the cap one-half turn and spray another pattern. If the defect is inverted,
obstruction is on the air cap.
Clean
the air cap
as
previously instructed.
2. If the defect is
not
inverted,
it
is
on
the fluid tip. Check
for
a fine burr
on
the edge of the fluid
tip. Remove with
#600
wet
or
dry sand paper.
3.
Check
for
dried paintjust inside the opening; remove
by
washing with solvent.
Heavy
center
pattern
Fluid
flow
too high
for
atomization air. Balance air pressure and fluid flow. increase spray
t pattern width with spreader adjustment valve.
Material
flow
exceeds air cap's capacity. Thin
or
lower fluid flow.
Spreader adjustment valve set too low.
Adjust
Atomizing pressure
too
low. Increase pressure.
Material
too
thick. Thin
to
proper consistency.
Split
spray
pattern
Atomization
air
pressure
too
high. Reduce at transformer
or
gun.
Fluid
flow
too low. Increase fluid
flow
{increases gun handling speed).
Spreader adjusting valve set too high. Adjust.
Jerky
or
fluttering
spray *Loose
or
damaged fluid tip/seat. Tighten or replace.
~~~~~~~~
Material level
too
low. Refill.
Container tipped too far. Hold more upright.
Obstruction in fluid passage. Backflush with solvent.
Dry
or
loose fluid needle packing nut.
lubricate
or
tighten.
I
Unable
to
get
round
spray
Spreader adjustment screw not seating
Clean
or
replace.
properly.
Air cap retaining ring loose. Tighten.
Will
not
spray
No
air pressure at gun.
Check
air supply and air lines, blow out gun air
passages.
Fluid needle adjusting screw not open enough. Open fluid needle adjusting screw.
Fluid too heavy
for
gravityfeed. Thin material and/or change to larger
tip
size.
*Most
common
problem.
I
I