Devine WMD 168 User manual

WMD 168 (614 – 638 MHz)
Dual wireless microphone system
User manual
Any information and illustrations shown in this user manual are subject to change without further notice.
User manual version: 3.0 Creation date + author initials: 27-03-2014 RV Revision date + author initials: 08-09-201 RV

afety instructions
This unit must be operated by, or under the supervision of an adult. This device is not suitable for children.
Every person involved with the installation, operation and maintenance of this device has to:
- Be qualified
- Follow the instructions of this manual
- Ma e sure there is no damage caused by transport. If the device seems damaged from the outside, do not
use it and contact your dealer for more information.
- To ma e sure the device remains in perfect condition and for safe operation, the user must follow the
instructions and warning notes of this user manual.
- Damage caused by improper use or modifications to the device are not covered by the warranty.
- This device does not have any user-serviceable parts inside. This device must be serviced by qualified
technicians.
- The light source of this device is not replaceable. When the light source reaches its end of life, the whole
luminaire must be replaced.
Important notes regarding safety and health:
- Never let the power cord come in contact with other cables. Handle the power cord and all mains
connectors with caution.
- Never remove any warning or informative labels from the unit.
- The ground contact must be connected at all times. Do not cover or remove the ground contact.
- Never leave cables lying around.
- Do not open the device and do not modify any hardware or software.
- Do not insert objects into air vents of this device.
- Do not connect this device to a dimmer pac .
- Do not switch the system on and off frequently, as this will reduce the lifespan of the device.
- Do not drive the inputs of the fixture with a signal greater than required to wor at full performance.
Any information and illustrations shown in this user manual are subject to change without further notice.
User manual version: 3.0 Creation date + author initials: 27-03-2014 RV Revision date + author initials: 08-09-201 RV
WARNING!
Always keep this device away from moisture and rain! Hazardous electrical shocks may occur!
WARNING!
Only connect this device to a matching power outlet. This device is intended to work on a
specified AC currency. Connecting this device to power outlets with other voltages may result in
permanent damage and possible hazardous situations, such as fire or electrical shocks!
WARNING!
Be careful with every operation of this device. Touching live wires inside and outside the unit
may cause hazardous electrical shocks!

- Only use this device indoors, avoid contact with water, moisture and other liquids. Do not place items filled
with liquids on top of the unit.
- Avoid nearby flames or heat sources, do not place this device near flammable liquids, gas or flammable
items.
- Always disconnect the device when it is not in use for a longer period or time, when servicing is needed, or
when the device needs cleaning.
- Only handle the power cord by its connectors. Never pull the cable to remove a connector from its soc et,
as this could lead to damage and electric shoc s.
- Always operate this device with a stable AC current.
- Always operate this device with the AC ground wire connected to the electrical system's ground.
- Never use other types of cables than specified in the manual, do not use defective or malfunctioning
cables. Contact your dealer if the included or required cables do not wor properly with this device.
- If the device has been exposed to considerable temperature changes (for example, transport from outdoors
to indoors), do not connect the device immediately. Do not activate the unit until it has reached room
temperature, as moisture might build up inside the unit, which may cause short-circuiting and/or electric
shoc s.
Guidelines and types of use:
- This device is intended to be used by professionals on stage, in theatres, clubs and similar venues.
- This device is not suitable for use by children and must always be operated by an adult.
- Only use the device when the environment is suitable and will not cause any damage. Do not use the
product in moist or dusty environments, or where long-term damage may occur such as:
- indoor swimming pools where chlorine is used.
- Beaches, where sand and salt are present.
- Outdoors.
- Indoor areas where intense heat sources are present or where the temperature exceeds levels that
are comfortable for humans.
- Use only the included power cable and only connect the device to a suitable power outlet with the correct
output voltage. Connecting the device to a power outlet with the wrong type of voltage or using the product
with a wrong type of power supply may cause permanent damage to the device.
- Avoid shoc s and collision during use and transport. Do not transport the device while in use. Avoid brute
force during the installation and operation of this device.
- Familiarise yourself with the functions of the device before use. Do not allow operation of the device by
uns illed or unqualified people.
- Use of the device in other ways than described in this user manual may cause damage and injury. Ayra
cannot be held responsible for any damage or injury caused by improper use.
torage and transport:
- This device is intended for mobile use as well as fixed installations. During transport, use the original
pac aging of the product or install the device in a 19 inch flight case.
- This device is not intended for continuous use. Operation brea s will ensure that the lifespan of the device
is not reduced.
- If the device is not used for a longer period of time, disconnect it from its power source and store it in its
original pac aging, or in a fitting flightcase.
- Store the device dry and indoors, and do not expose the device to extreme temperature changes.
Housing:
- Inspect the housing of the device frequently. Severe dents, crac s and missing screws should be prevented
at all costs. Do not use the device when the housing is not in optimal condition. Contact your dealer or a
s illed technician when in doubt about the state of the device.
- Chec the fixture and screws for corrosion. Corrosion should not be present on the fixture. Contact your
dealer or a s illed technician when corrosion is found on the fixture.
- Every power or signal chassis/connector should be mounted tightly. Do not use the device when connectors
are loose.
- Do not use the power cord if the cores are visible. Contact your dealer for a replacement if needed.
- Prevent the build-up of dust and dirt. Clean the exterior of the fixture every month with a dry or damp cloth.
If the device is intensively used, the cleaning frequency must be increased. Disconnect the fixture when it is
going to be serviced.
Any information and illustrations shown in this user manual are subject to change without further notice.
User manual version: 3.0 Creation date + author initials: 27-03-2014 RV Revision date + author initials: 08-09-201 RV

Fuses:
- The main fuse of this device can be found on the rear of the device, next to the power inlet.
- Only replace the fuse for a new one of the same type and rating! Do not use a fuse with a higher or lower
rating.
- Do not bridge the fuse in any way, as the fuse is used for protection against electric shoc s and short-
circuiting. The fuse is a safety measure to protect your audience from hazardous electric shoc s.
- Always replace the fuse cover over the fuse compartment. Do not use tape or other fastening materials to
close the cover. If the fuse holder is bro en, contact your local dealer and do not use the fixture.
Batteries:
CAUTION:
- Danger of explosion if batteries are incorrectly replaced.
- Replace only with the same or equivalent type of batteries.
- Keep new and used batteries away from children.
- If the battery compartment does not close securely, stop using the product and eep it away from children.
- Do not expose batteries to excessive heat such as sunshine, fire and the li e.
- Do not leave batteries in an extremely high-temperature environment, as this may cause explosions or
lea age of flammable liquids or gas.
- Do not burn batteries, do not place batteries in a hot oven, and do not crush or cut batteries, as this may
cause explosions.
- Do not expose batteries to extremely low air pressure (high altitudes), as this may cause explosions or
lea age of flammable liquids or gas.
- If the equipment is not used for an extended period of time (e.g. a few months), batteries should be
removed.
- Instantly remove empty batteries from the equipment.
- Replace all batteries at the same time. Mixing old and new batteries or mixing different types (such as
al aline and zinc carbon) will reduce overall performance and may cause lea age or rupture.
- Do not store loose batteries or carry them in your poc et or purse. Contact with metal objects li e coins and
eys, etc. may cause them to lea , rupture or short-circuit.
Recycling:
Do not dispose of batteries in general household waste. Batteries can contain substances that may harm the
environment. If they are properly recycled, used batteries are a valuable source of reusable materials.
Contact your local government for information on battery disposal.
ymbol clarification:
WEEE: Dispose of this product properly. This product is part of the WEEE directive – the
Waste Electrical and Electronic Equipment directive. The requirements stated in this directive
apply to all manufacturers and producers of electronic equipment in the EU.
Do not dispose of this product together with regular household rubbish. Contact your local
government for more information about proper disposal and recycling of electronic products in
your region. By recycling this product properly after use, we can wor together to enjoy these
products and also protect our environment from being polluted.
CE: The CE mar indicates that the product complies with applicable European directives and
regulations.
Indoor use only: This device is designed to only be used indoors. The maximum ambient
temperature should not exceed 40 degrees Celsius (104 degrees Fahrenheit)
Any information and illustrations shown in this user manual are subject to change without further notice.
User manual version: 3.0 Creation date + author initials: 27-03-2014 RV Revision date + author initials: 08-09-201 RV

Contact:
Devine pro audio and studio products
Verrijn Stuartweg 18
4462 GE Goes
The Netherlands
Please do not send any products directly to this address. If you wish to return a product for a refund or
repair, please contact your local dealer for an RMA (Return Material Authorisation)
Any information and illustrations shown in this user manual are subject to change without further notice.
User manual version: 3.0 Creation date + author initials: 27-03-2014 RV Revision date + author initials: 08-09-201 RV

Box contents
Box contents:
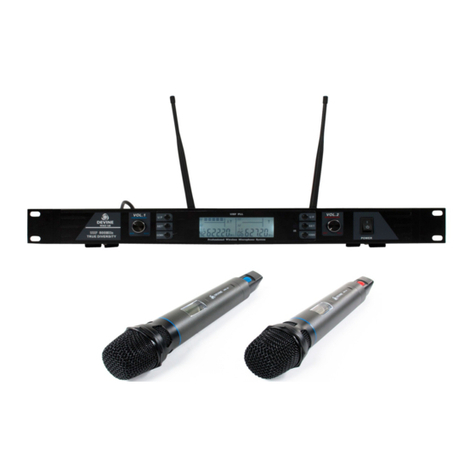
2x wireless microphone
1x 19 inch rac mountable receiver
2x BNC type antenna for receiver
1x power cable to Schu o
1x power cable to UK plug
1x user manual
1x mono 6.35mm TS jac audio cable (mixed out)
2x set of 2 AA batteries (two batteries for each microphone)
Unit and accessory inspection
- Always use the supplied power cable to connect the unit to a power supply. If the cable appears bro en or
has visible damage, do not use it.
- When the unit is not going to be used for a longer period of time, disconnect it from the power supply and
store it in a dust-free environment.
- Always chec the unit for possible damage before use. If you suspect that something is wrong with the unit,
do not connect it to a power source! When you suspect that your unit is bro en or damaged, contact your
local dealer or a certified technician to inspect the unit.
Any information and illustrations shown in this user manual are subject to change without further notice.
User manual version: 3.0 Creation date + author initials: 27-03-2014 RV Revision date + author initials: 08-09-201 RV
Preparing the system
Inserting batteries
This system uses AA 1.5V batteries for the handheld microphones. Each handheld microphone uses 2 AA
batteries. Always use quality batteries, as the lifespan may vary. This may result in an operation lifespan,
varying from 8 to 20 hours. The included batteries are solely supplied for testing purposes. Devine
recommends to replace these with batteries from brands as Duracell when using the microphones for
performance. Please dispose of the testing batteries properly if you are not going to use them or if you are
not using them anymore.
To access the battery compartment, grab the microphone with two hands – one hand on the blac grill, one
hand on the grey base. Twist the grill section counter cloc wise and the base cloc wise. You will notice that
the body cover will come loose. When loosened, pull the grill section so the inner body will detach from the
grey base. After you have removed the body cover, you have access to the LCD display and the battery
compartment.
Insert the batteries with the right sides up. The indicators inside the battery compartment show how the
batteries should be inserted (+ and – should match). Pay attention to the placement of the batteries, as the
microphone will fail to operate when the batteries are inserted incorrectly.
There is an on/off switch at the bottom of the microphone. When you turn the switch to the ‘ON’ position, the
LCD screen of the microphone will turn on, as illustrated below.
Any information and illustrations shown in this user manual are subject to change without further notice.
User manual version: 3.0 Creation date + author initials: 27-03-2014 RV Revision date + author initials: 08-09-201 RV
etting up the receiver
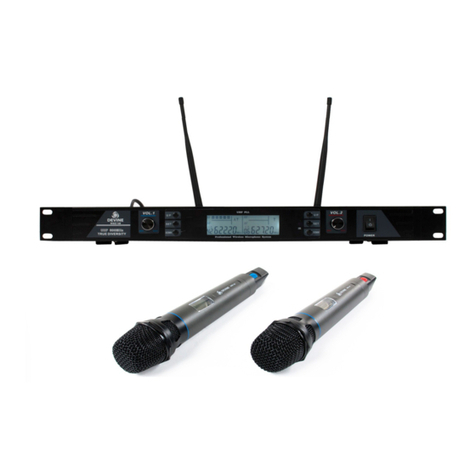
Install the receiver on a solid surface, or in a 19 inch flightcase or rac . When rac mounting is preferred, the
receiver unit needs to be installed using proper rac ware, on all 4 front panel installing points.
Use the two included antennas and screw them onto the device at the provided BNC connector points.
These will only attach to the BNC connectors in one way. When installed, the antenna connector needs to be
turned to loc into place and establish a decent connection.
Aim the antennas in a V-shape, to create the best signal receiving environment for the antennas. The best
set-up of the antennas would be in a 60 to 90 degree angle, compared to each other.
Plug the power supply cable into the provided connector-chassis at the rear of the unit. Chec the power
supply you wish to plug the unit into, to ma e sure the outlet has a proper voltage. Do not turn the power on
or connect any cable if you suspect that the voltage is incorrect, or if the cable shows defects.
Please note that the switch on the front panel needs to be pressed to turn on the unit. When switched off, the
unit will be in stand-by mode (and power could still flow through the unit). Please beware that the device
needs to be disconnected from the mains when not used for a longer period of time. If the unit is installed
into a 19 inch rac , ensure that the mains connection of the entire rac can be shut down instantly if
necessary. If you wish to shut down just the WMD 168 system, install a proper power management device
with bipolar contacts which can shut down the power supply to your WMD 168 system.
Connecting the receiver to your PA or sound system
The receiver unit is equipped with several outputs, for several purposes. To connect the WMD 168
microphone system to a professional PA system, use the balanced XLR outputs. There are two outputs, each
for one microphone channel. This way, you are able to control the sound and volume of each microphone
seperately. The volume for both microhphones can be set to a fixed level if you are going to control the
volume on your PA mixer.
A mixed output is also available, through a 6.35 mm TS mono jac plug connector. A cable to connect the
device to a sound system is included. Most HiFi setups and spea ers with microphone input wor with this
ind of connector. The jac plug output contains a mixed output signal of both channels. On the front panel of
the receiver, the volume can be set for each microphone for your convenience.
Devine recommends to use the XLR outputs as much as possible, as this provides a better signal
transportation with a minimum chance of errors and signal distortion. An unbalanced 6.35mm jac cable is
included.
ynchronizing the microphones, selecting the right frequencies
The microphones are usually set to a specific frequency, as well as the receiver. To ma e both wor , they
need to be set to the same frequency.
Any information and illustrations shown in this user manual are subject to change without further notice.
User manual version: 3.0 Creation date + author initials: 27-03-2014 RV Revision date + author initials: 08-09-201 RV
On the receiver, you are able to set a specific channel and matching frequency for each channel. Use the UP
and DOWN buttons to select the frequency and channel of your choice.
When the desired channel and matching frequency are selected, you are able to send these settings to the
wireless microphone through an IR signal. The microphone is equipped with an IR sensor. Please note that
you use the right microphone to match the frequency with. The blue microphone will not match with the red
channel on the receiver.
To sync the channel and frequency on the receiver display, press the 'SET' button. While doing this, the IR
function will activate and the display will change. During this time, hold the microphone in front of the receiver
unit with the IR sensor facing the IR sending unit on the receiver.
If the synchronisation is successful, the display of the microphone will light up and show the new set channel
and frequency.
RF distance adjustment
Sometimes, other electronic devices might interrupt your performance as you are performing on stage. When
these disturbing devices are relatively far away, you can decrease the distance setting to avoid interference
at the receiver.
Use the H and L buttons on the microphone (when the cover is removed) to adjust the distance (by
decreasing the signal power). H stands for far distance, L stands for short distance. You will see on the main
display that the RF signal indicator changes.
Volume adjustment
On the front of the receiver, two volume rotary nobs are available. These are used to change the
microphone output volume. If for any reason the sound is distorted, try to change the microphone technique
of the vocalist.
Microphone display information
As shown in the illustration above, the information of both microphones is bundled on 1 display. Each
microphone shows information on the display, regarding the Frequency and the Channel.
Also, the RF status and the AF signals are mentioned, as well as the microphone connection status.
When the microphone has a stable connection (but no sound), it will loo li e the left side of the image
above. The RF signal is very strong, the RF coupling says 'A' (and mentions the A channel).
If for any reason there is no stable signal or no signal at all, the display will probably loo li e shown on the
right side of the image above. As you can see there is no RF signal and the RF coupling is inactive.
Any information and illustrations shown in this user manual are subject to change without further notice.
User manual version: 3.0 Creation date + author initials: 27-03-2014 RV Revision date + author initials: 08-09-201 RV

On the microphone itself, you will find the set channel and frequency, as well as a battery indicator. So before
every show, you are able to chec if all microphones have sufficient battery power to last the entire event.
Any information and illustrations shown in this user manual are subject to change without further notice.
User manual version: 3.0 Creation date + author initials: 27-03-2014 RV Revision date + author initials: 08-09-201 RV
Technical specifications
Technical specifications microphone:
- Frequency: 614 ~ 638 MHz
- channels: 120 (2 channels, choose from 60 frequencies per microphone)
- oscillation-mode: PLL
- frequency stability: +/- 10 ppm
- modulation mode: FM
- radio frequency power: 10 ~ 30 mW (variable)
- audio frequency response: 40 ~ 18.000 Hz
- distortion: < 0.5%
- batteries: 2x AA, 1.5V
- using time: 8 ~ 20 hours (depends on battery quality)
Technical specifications receiver:
- frequency: 614 ~ 638 MHz
- channels: 120 (2 channels, choose from 60 frequencies per microphone)
- oscillation-mode: PLL
- frequency stability: +/- 10 ppm
- superheterodyne double-supersystem receiving
- sensitivity: -95 ~ -71 dBm
- audio frequency response: 40 ~ 18.000 Hz
- distortion: < 0.5%
- signal to noise ratio (S/N ratio): >110dB
- audio output: 800mV (1x 6.35mm mixed output jac , 2x separate balanced XLR)
- wor ing power: 230V, 50 Hz
- power consumption:
- power connection: IEC C14
- power supply: AC 230V, 50 Hz
- 19 inch rac mountable, 1U
Dimensions:
- Receiver: 483 (with rac ears) x 210 (without antennas connected) x 50 mm (with rubber feet)
- Microphone: 263 x 51 x 51 mm
Included in delivery:
2x wireless microphone
1x 19 inch rac mountable receiver
2x BNC type antenna for receiver
1x IEC C13 power cable to Schu o
1x IEC C13 power cable to UK
1x user manual
1x mono 6.35mm TS jac audio cable (mixed out)
2x set of 2 AA batteries (two batteries for each microphone)
Any information and illustrations shown in this user manual are subject to change without further notice.
User manual version: 3.0 Creation date + author initials: 27-03-2014 RV Revision date + author initials: 08-09-201 RV
Other manuals for WMD 168
1
This manual suits for next models
2
Table of contents
Other Devine Microphone System manuals