DEVOLA Platinum DVPH18PSMB User manual
INSTRUCTION MANUAL
Model(s): DVPH18PSMB/DVSH24PSMB
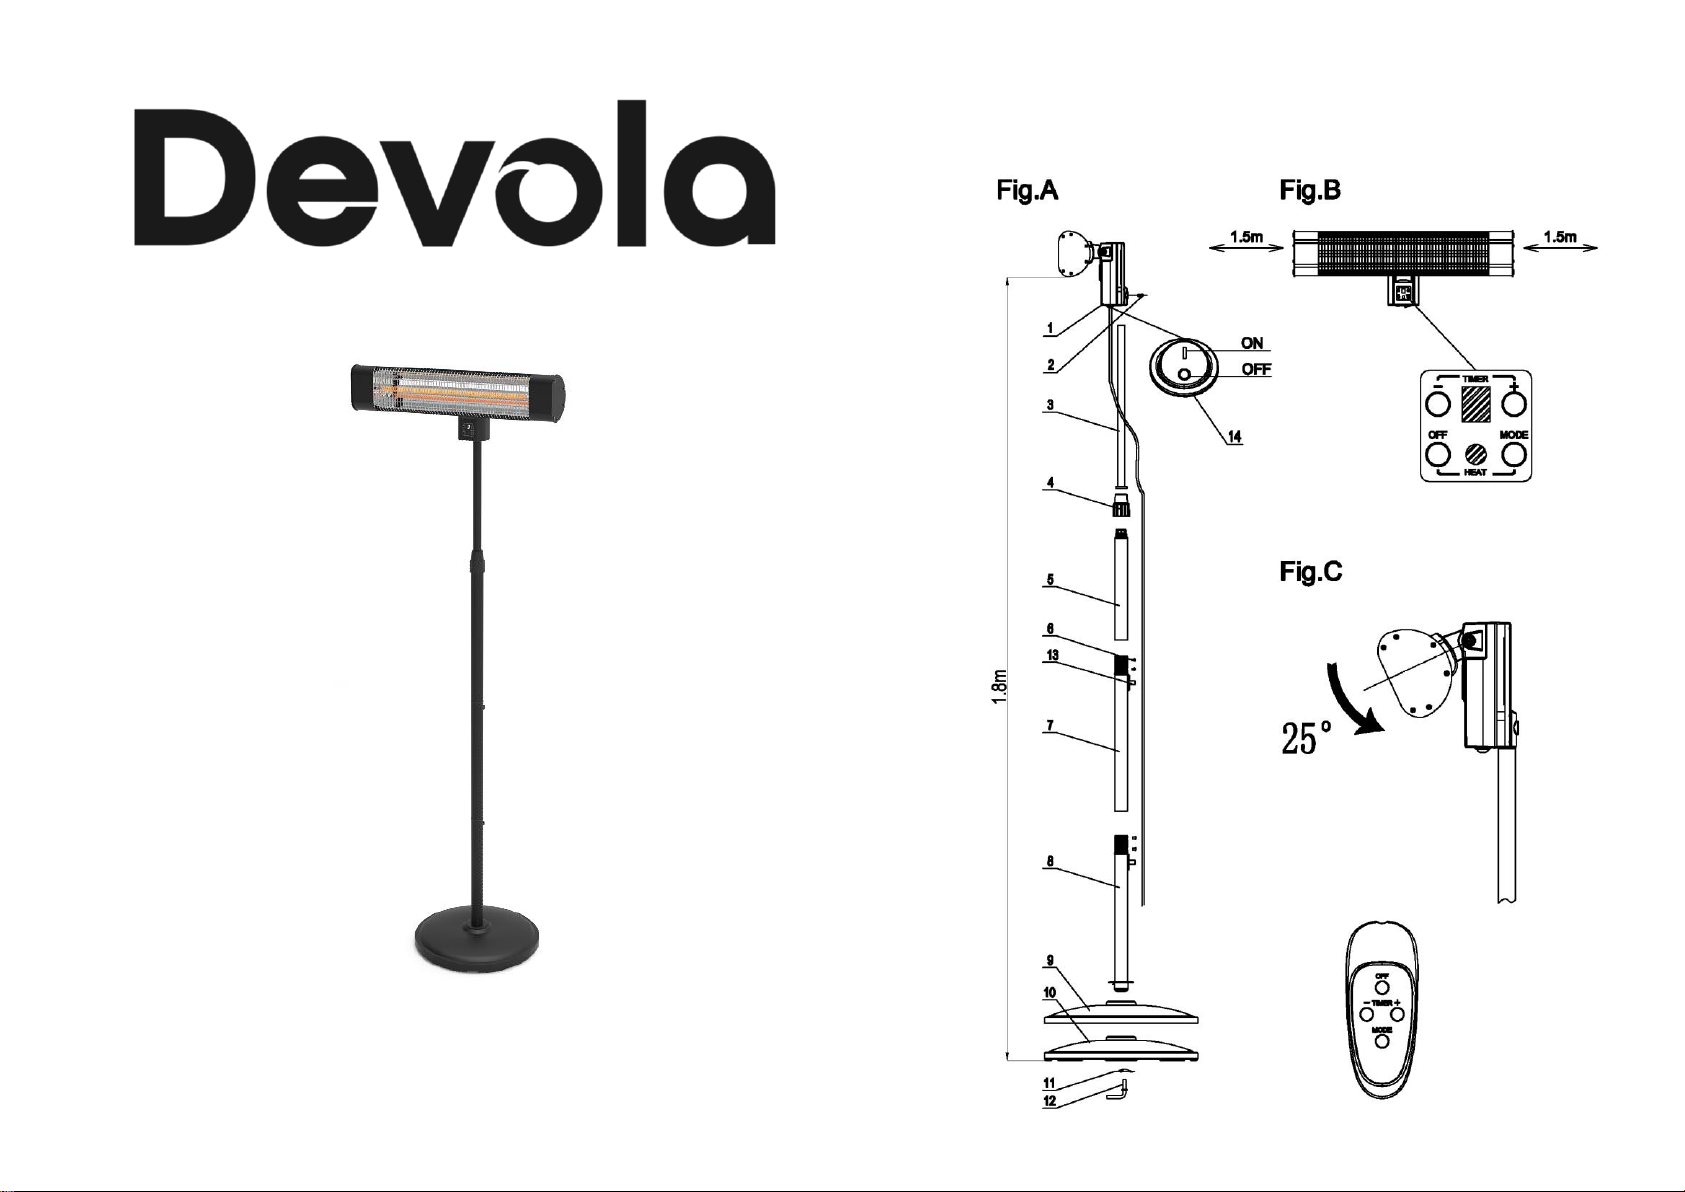
Parts Identification
Cautions:
1. Children aged from 3 years and less than 8 years shall only switch on/off the appliance provided that it
has been placed or installed in its intended normal operating position and they have been given
supervision or instruction concerning use of the appliance in a safe way and understand the hazards
involved. Children aged from 3 years and less than 8 years shall not plug in, regulate and clean the
appliance or perform user maintenance.
CAUTION -- Some parts of this product can become very hot and cause burns. Particular attention has
to be given where children and vulnerable people are present.
2. The heater must not be located immediately below a socket-outlet.
3. Do not use this heater with a programmer, timer or any other device that switches the heater on
automatically, since a fire risk exists if the heater is covered or positioned incorrectly.
4. Do not use this heater in the immediate surroundings of a bath, a shower or a swimming pool.
5. Do not place the unit close to curtain and/or other flammable objects. Otherwise there will be a danger
of catching fire.
6. Do not cover the unit with anything during operation or a short time after it's shut down.
7. Do not wrap the power supply cord on the unit.
8. Do not use this unit in place where causticity or volatile air exists, i.e. dust, steam, gas, etc.
9. Do not use this unit as a cloth drier or towel drier.
10. Do not use this unit as a sauna heater.
11. Do not use this unit as a room heater of heat storing.
12. Do not use this unit in place of animal propagating and raising.
13. Do not use this unit in heating system of hot air centre.
14. Do not immerse this unit into water for cleaning.
15. The unit must be placed with the clearance of 150cm at least to the wall.
16. The unit must be securely placed on a horizontal and flat surface.
17. The unit is at high temperature during operation. It keeps hot for a period after shut down. Potential
danger would occur when touching it during this period.
18. The unit must be handled with care, and avoid of vibration or hitting.
19. The unit must be securely grounded during operation.
20. When damaged, the unit must be repaired by professional repairing team.
21. If the supply cord is damaged, it must be replaced by the manufacturer, its service agent or similarly
qualified persons in order to avoid a hazard.
22. When assembling, keep clear from any board or flammable material.
23. This appliance is not intended for use by persons (including children) with reduced physical, sensory or
mental capabilities, or lack of experience and knowledge, unless they have been given supervision or
instruction concerning use of the appliance by a person responsible for their safety.
24. The unit is for outdoor use only. It's not allowed to use in building site, greenhouses, barn or stable where
there's flammable dust.
25. The head of the unit is at high temperature during operation. Unplug the unit and wait till it's cool before
cleaning.
26. The unit should be plugged in a socket, which is easily visible and reachable.
WARNING:
This heater is not equipped with a device to control the room temperature. Do not use this heater in small rooms
when they are occupied by persons not capable of leaving the room on their own, unless constant supervision is
provided.
Preparation:
1. Prepare a cross head screw driver.
2. Read this instruction manual carefully before installation and use. Keep this instruction manual in a proper
and safe place for future use in case needed.
Installation:
1. As shown in Fig. A, put Lower Tube (#9) through the hole of Base (#10) and Base Cover(#14) making sure
the end of Lower Tube with welded plate is downward, and the extra tongue is located in the sink of the
base. Fix Lower Tube and Base together with Washer (#11) & L Screw (#12).
2. As shown in Fig. A, Install Middle Tube (#8) on top of Lower Tube. Pullout Straight Tube (#5) upward from
inside of Upper Tube (#7). Screw Outer Fastener (#6) clockwise to lock it. Then install Upper Tube (#7) on
Middle Tube (#8).
3. As shown in Fig. A, Insert Straight Tube (#5) into the hole on bottom of Control Box (#1). Then fix them
together with Screw (#13).
4. As shown in Fig. A, Turn Outer Fastener (#6) counter-clockwise and adjust the unit to a desired height.
Then tighten Fastener (#6).
5. As shown in Fig. A, after step1~step4, fix Cord Clip(#3) both to the hole on Tube(#7) and Tube(#9) with
Screw(#4)
6. Clip Power Supply Cord with Cord Clips (#3). Fix them onto the tubes..
7. As shown in Fig. C, the tilting of the heater is adjustable for 25º. Adjust it to a desired angle when
necessary.
Operations:
1. Plug in the unit to a socket. Make sure the power supply is same as rated.
2. Press Main Switch on the bottom of the control box . The mark ”-”in the digital display starts flashing
showing the heater is on standby. Press MODE button on control panel or remote control to switch the
heater on or to higher power. Power setting level 1, level 2, level 3 will show on the digital display. Press
TIMER “+/-”button on control panel or remote control to choose the timer between 0-9 hours. “0”means
the timer is off. The digits of the power settings and timer will be displayed as cycled: power settings for
ten seconds, timer flashing for five seconds.
3. To shift the heater to standby mode, press OFF button on control panel or remote control. The mark ”-”in
the digital display starts flashing again.
4. To switch off the heater, press Main Switch on left side of the heater accordingly.
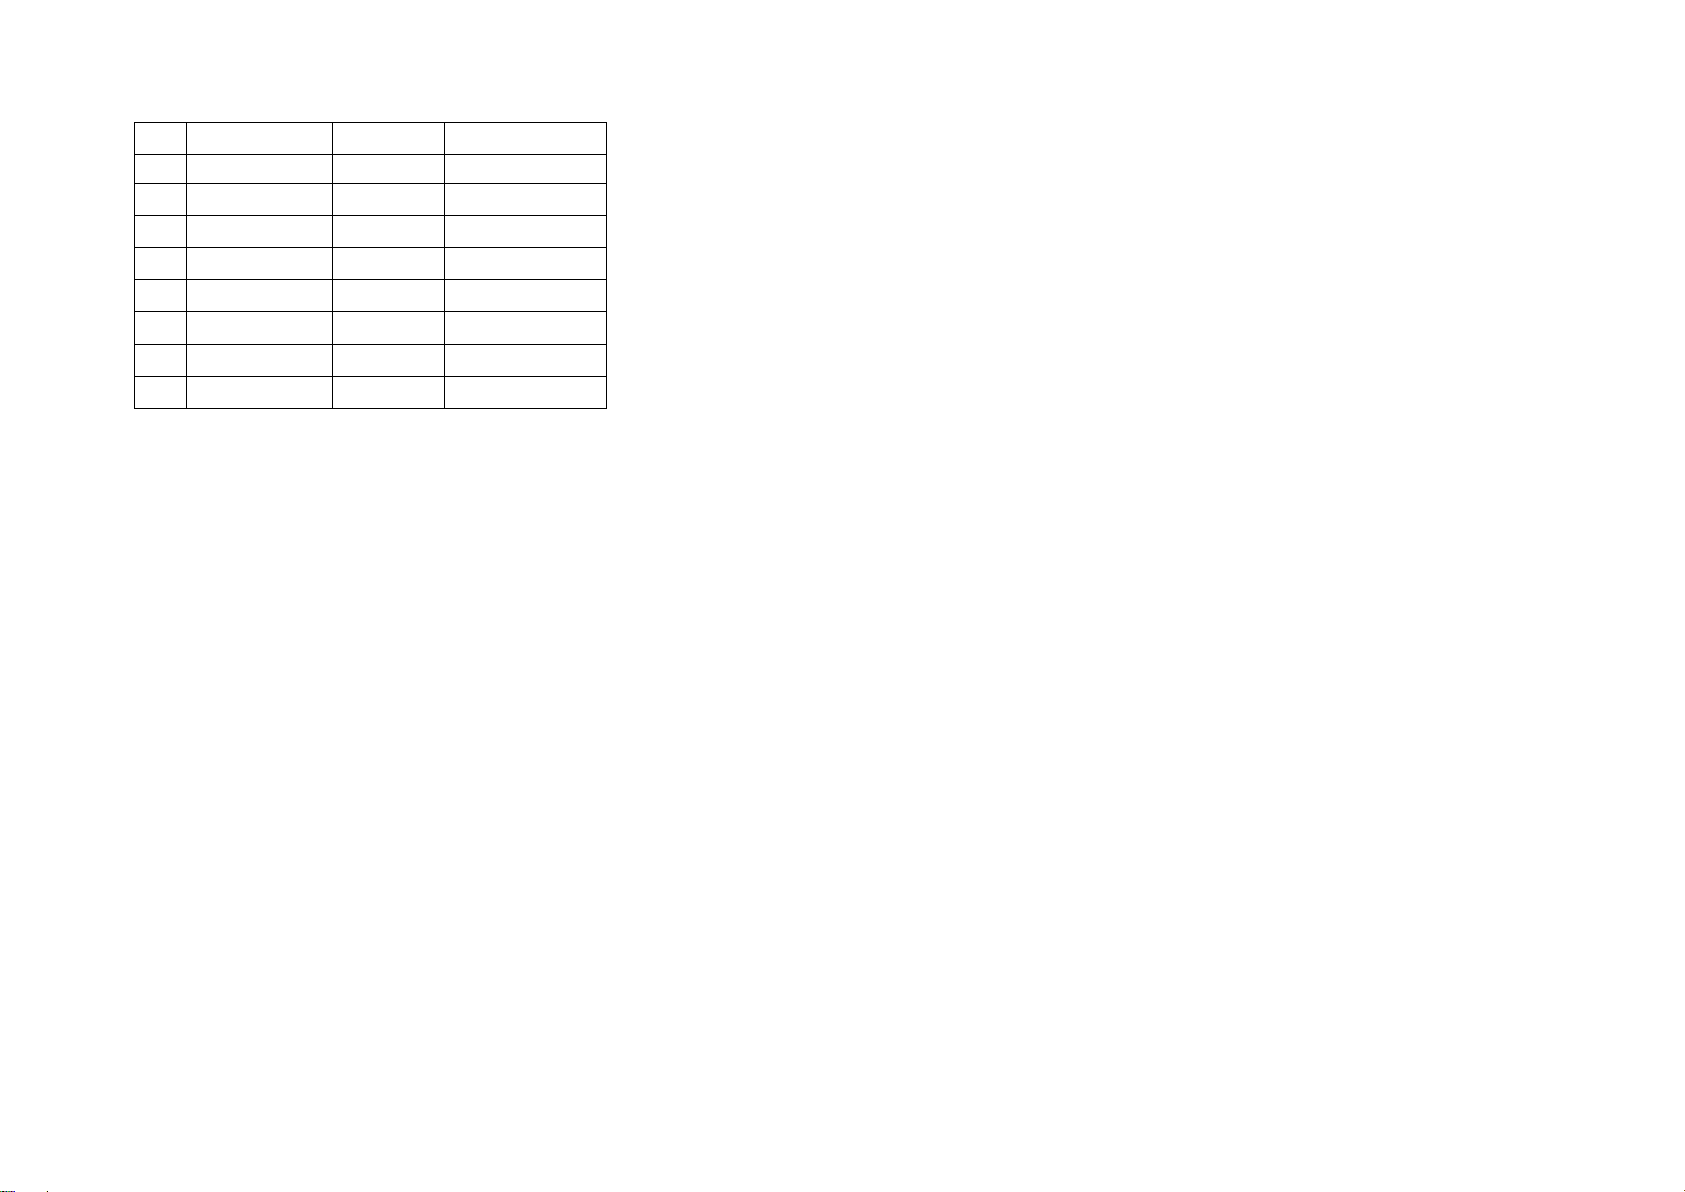
No.
Part Name
No.
Part Name
1
Control Box
9
Base Cover
2
Screw
10
Base
3
Straight Tube
11
Washer
4
Outer Fastener
12
L Screw
5
Upper Tube
13
Cord Clip
6
Screw
14
Switch
7
Middle Tube
15
Remote Control
8
Lower Tube

Cleaning:
Unplug the unit before cleaning. It should be wiped with wet cloth. Do not use too much water.
Disposal of appliances and batteries
After the implementation of the European Directive 2002/96/EU in the national legal
system, the following applies:
Electrical and electronic devices may not be disposed of with domestic waste.
Consumers are obliged by law to return electrical and electronic devices at the end of
their service lives to the public collecting points set up for this purpose or point of sale.
Details to this are defined by the national law of the respective country. This symbol on
the product, the instruction manual or the package indicates that a product is subject to
these regulations. By recycling, reusing the materials or other forms of utilising old
devices, you are making an important contribution to protecting our environment.

Warranty
Guarantee and Service Policy
This product is covered by a standard parts or replacement warranty for a period of
12 months from the date of purchase.
Extend your warranty for 12 months for free by visiting www.devola.co.uk/warranty.
Incorrect installation and failure to follow correct operating instructions are
excluded. Consequential costs such as labour charges or damage to surroundings
are expressly excluded.
Contact Us
If you experience a problem with this product you should first contact us on 0121
250 2180 before taking any further action.
CLAIM YOUR EXCLUSIVE 5% OFF YOUR NEXT ONLINE ORDER
DISCOUNT CODE: DEV5
OFFER VALID FOR 21 DAYS. DON’T MISS OUT!
YOUR DISCOUNT CODE ALSO APPLIES TO OUR SISTER WEBSITES
Visit our websites:
www.devola.co.uk
www.energybulbs.co.uk
www.airconcentre.co.uk
www.ledbulbs.co.uk
This manual suits for next models
1
Other DEVOLA Patio Heater manuals


