DeWalt Multi-Cutter DW872 User manual

DW872
Final Page size: A5 (148mm x 210mm)

B
Copyright DeWALT
English 6
한국어 12

1
Fig. A
그림 A
Fig. B1
그림 B1
2
3
26
1
4
5
6
8
10
9
7
4
11
42
4
5
30
13
28 27
29 12
Fig. B1
그림 B2

2
Fig. C2
그림 C2
Fig. C1
그림 C1
Fig. C3
그림 C3
19
9 7 6
31143233
36 7
15
34

3
Fig. C6
그림 C6
Fig. C4
그림 C4
Fig. C5
그림 C5
16 18
35 39 38 37 36 17
40 40
20
7

4
Fig.D2
그림 D2
Fig. D1
그림 D1
Fig. E
그림 E
24
25
21
41 7
23 35 23 22 36

5
Fig. G
그림 G
Fig. F
그림 F
21
34
9

6
ENGLISH
Safety Instructions
WARNING: When using electric tools basic safety
precautions should always be followed to reduce the
risk of fire, electric shock and personal injury including
thefollowing.
Read all these instructions before attempting to operate this
product and save theseinstructions.
SAVE THIS MANUAL FOR FUTURE REFERENCE
General Safety Rules
1 . Keep work areaclear.
ʵ Cluttered areas and benches inviteinjuries.
2 . Consider work areaenvironment.
ʵ Do not expose the tool to rain. Do not use the tool in damp
or wet conditions. Keep the work area well lit (250–300
Lux). Do not use the tool where there is a risk of causing
fire or explosion, e.g., in the presence of flammable liquids
andgases.
3 . Guard against electricshock.
ʵ Avoid body contact with earthed surfaces (e.g., pipes,
radiators, cookers and refrigerators). When using the
tool under extreme conditions (e.g., high humidity, when
metal swarf is being produced, etc.), electric safety can be
improved by inserting an isolating transformer or a (FI)
earth-leakage circuit-breaker.
4 . Keep other personsaway.
ʵ Do not let persons, especially children, not involved in the
work, touch the tool or the extension cord and keep them
away from the workarea.
5 . Store idletools.
ʵ When not in use, tools must be stored in a dry place and
locked up securely, out of reach ofchildren.
6 . Do not force thetool.
ʵ It will do the job better and safer at the rate to which it
wasintended.
7 . Use the righttool.
ʵ Do not force small tools to do the job of a heavy duty tool.
Do not use tools for purposes not intended; for example do
not use circular saws to cut tree limbs orlogs.
8 . Dressproperly.
ʵ Do not wear loose clothing or jewellery, as these can
be caught in moving parts. Non-skid footwear is
recommended when working outdoors. Wear protective
hair covering to contain longhair.
9 . Use protectiveequipment.
ʵ Always use safety glasses. Use a face or dust mask if
working operations create dust or flying particles. If these
particles might be considerably hot, also wear a heat-
resistant apron. Wear ear protection at all times. Wear a
safety helmet at alltimes.
Congratulations!
You have chosen a DeWALT tool. Years of experience, thorough
product development and innovation make DeWALT one of the
most reliable partners for professional power toolusers.
Technical Data
DW872
Voltage VAC 220-240
Power Input W2200
No-load speed min-1 1300
Blade diameter mm 355
Blade bore mm 25.4
Blade body thickness mm 1.8
Blade kerf thickness mm 2.2
No. of blade teeth 66
Cross-cutting capacity at 90˚
circular mm 130
square mm 100 x 100
rectangular mm 75 x 130
angular mm 92 x 92
Cross-cutting capacity at 45˚
circular mm 79
square mm 79 x 79
rectangular mm 79 x 123
angular mm 56 x 56
Weight kg 22.5
Definitions: Safety Guidelines
The definitions below describe the level of severity for each
signal word. Please read the manual and pay attention to
thesesymbols.
DANGER: Indicates an imminently hazardous
situation which, if not avoided, will result in death or
seriousinjury.
WARNING: Indicates a potentially hazardous situation
which, if not avoided, could result in death or
seriousinjury.
CAUTION: Indicates a potentially hazardous situation
which, if not avoided, may result in minor or
moderateinjury.
NOTICE: Indicates a practice not related to
personal injury which, if not avoided, may result in
propertydamage.
Denotes risk of electricshock.
Denotes risk offire.
English (original instructions)
TOOTHED CHOPSAW
DW872

7
ENGLISH
10 . Connect dust extractionequipment.
ʵ If devices are provided for the connection of dust
extraction and collecting equipment, ensure these are
connected and properlyused.
11 . Do not abuse thecord.
ʵ Never yank the cord to disconnect it from the socket.
Keep the cord away from heat, oil and sharp edges. Never
carry the tool by itscord.
12 . Securework.
ʵ Where possible use clamps or a vice to hold the work. It
is safer than using your hand and it frees both hands to
operate thetool.
13 . Do notoverreach.
ʵ Keep proper footing and balance at alltimes.
14 . Maintain tools withcare.
ʵ Keep cutting tools sharp and clean for better and safer
performance. Follow instructions for lubricating and
changing accessories. Inspect tools periodically and if
damaged have them repaired by an authorized service
facility. Keep handles and switches dry, clean and free
from oil andgrease.
15 . Disconnecttools.
ʵ When not in use, before servicing and when changing
accessories such as blades, bits and cutters, disconnect
tools from the powersupply.
16 . Remove adjusting keys andwrenches.
ʵ Form the habit of checking to see that adjusting keys and
wrenches are removed from the tool before operating
thetool.
17 . Avoid unintentionalstarting.
ʵ Do not carry the tool with a finger on the switch. Be sure
that the tool is in the “off” position before pluggingin.
18 . Use outdoor extensionleads.
ʵ Before use, inspect the extension cable and replace
if damaged. When the tool is used outdoors, use
only extension cords intended for outdoor use and
markedaccordingly.
19 . Stayalert.
ʵ Watch what you are doing. Use common sense. Do not
operate the tool when you are tired or under the influence of
drugs oralcohol.
20 . Check for damagedparts.
ʵ Before use, carefully check the tool and mains cable to
determine that it will operate properly and perform its
intended function. Check for alignment of moving parts,
binding of moving parts, breakage of parts, mounting
and any other conditions that may affect its operation. A
guard or other part that is damaged should be properly
repaired or replaced by an authorized service centre
unless otherwise indicated in this instruction manual.
Have defective switches replaced by an authorized
servicecentre. Do not use the tool if the switch does not
turn it on and off. Never attempt any repairsyourself.
WARNING: The use of any accessory or attachment or
performance of any operation with this tool other than
those recommended in this instruction manual may
present a risk of personalinjury.
21 . Have your tool repaired by a qualifiedperson.
ʵ This electric tool complies relevant safety rules. Repairs
should only be carried out by qualified persons using
original spare parts; otherwise this may result in
considerable danger to theuser.
Additional Safety for Metal Saws
• Do not use saw blades which are damaged or deformed;
• Use only saw blades recommended by the manufacturer
which conform to EN 847-1;
• Do not use saw blades manufactured from high speed steel;
• Wear suitable personal protective equipment when necessary,
this could include:
ʵ hearing protection to reduce the risk of induced hearing
loss;
ʵ eye protection;
ʵ respiratory protection to reduce the risk of inhalation of
harmful dust;
ʵ gloves for handling saw blades (saw blades shall be
carried in a holder wherever practicable) and rough
material;
Maintenance and Servicing
• Operator’s instructions on factors influencing exposure to
noise (e.g. use of saw blades designed to reduce the emitted
noise, saw blade and machine maintenance);
• Report faults in the machine, including guards or saw blades,
as soon as they arediscovered.
Safe Operation
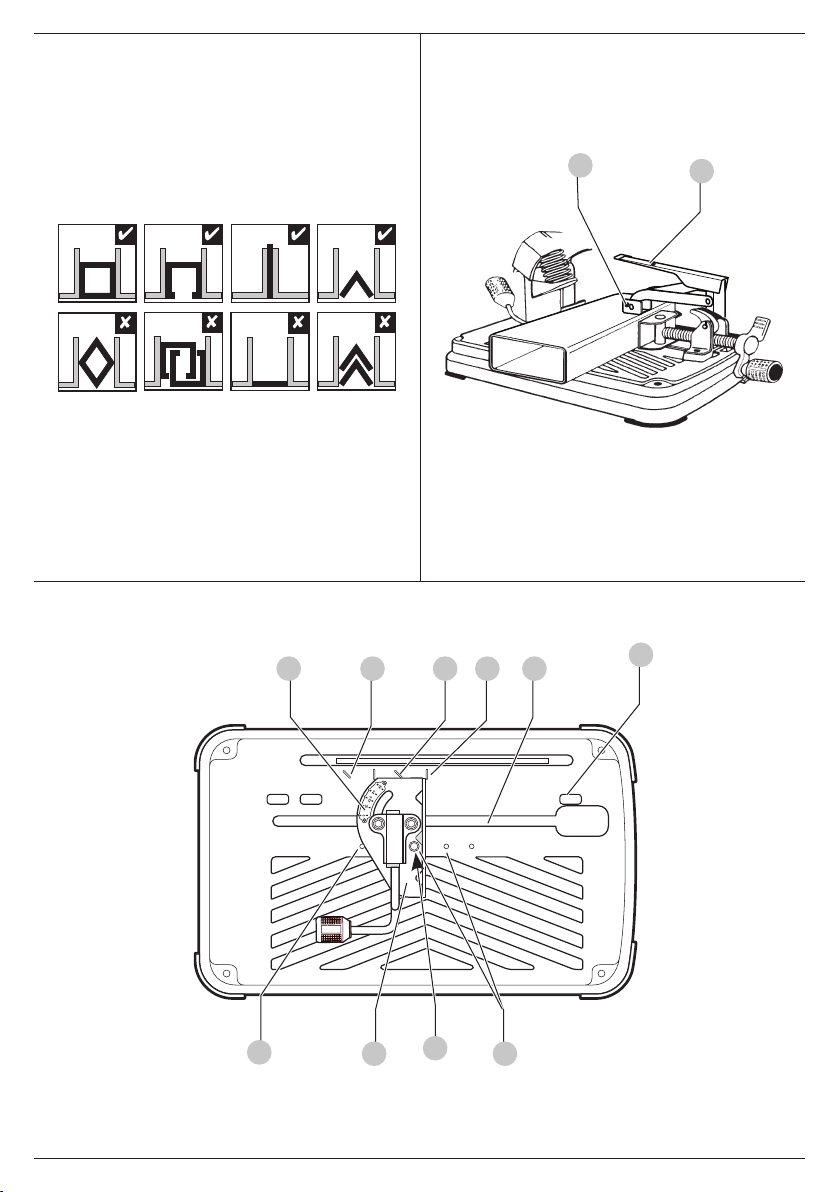
• Select the correct saw blade for the material to be cut;
• Do not use the saw to cut other materials than those
recommended by the manufacturer;
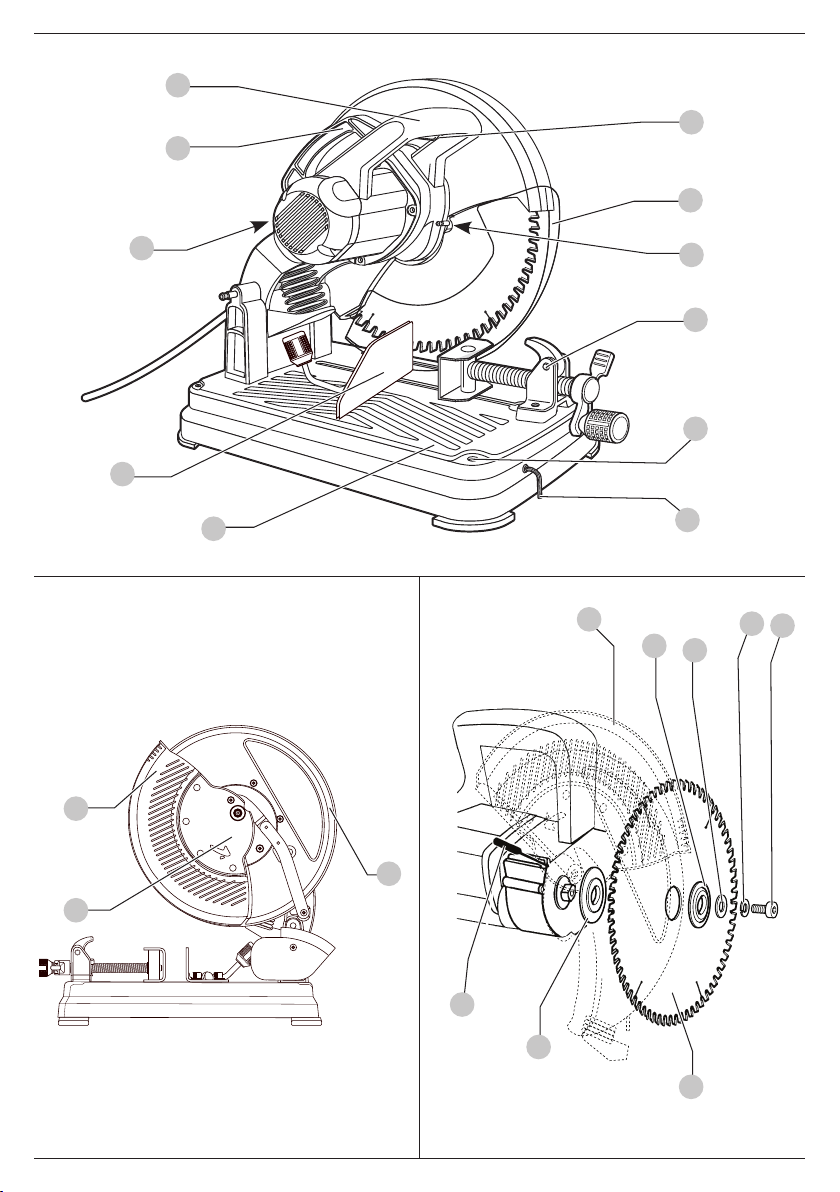
• Lifting and transportation information. To lift and support the
metal saw see FigureF.
• Do not use the saw without the guards in position, in good
working order and properly maintained;
• Keep the floor area around the machine level, well maintained
and free of loose materials e.g. chips and cut-offs;
• Provide adequate general or localised lighting;
• The operator is adequately trained in the use adjustment and
operation of the machine;
• Use correctly sharpened saw blades. Observe the maximum
speed marked on the saw blade;
• Ensure that any spacers and spindle rings used are suitable for
the purpose as stated by the manufacturer;
• Refrain from removing any cut-offs or other parts of the
workpiece from the cutting area while the machine is running
and the saw head is not in the rest position;
• Ensure that the machine is always stable and secure. (e.g. fixed
to a bench)

8
ENGLISH
• To support long pieces see FigureC3.
WARNING: We recommend the use of a residual current
device with a residual current rating of 30mA orless.
Residual Risks
The following risks are inherent to the use of saws:
• Injuries caused by touching the rotating parts
• Injuries caused by disruption of the cuttingblade.
These risks are most evident:
• Withing the range of operation
• Within the range of the rotating machine parts
In spite of the application of the relevant safety regulations
and the implementation of safety devices, certain residual risks
cannot be avoided. These are:
• Impairment ofhearing.
• Risk of accidents caused by the uncovered parts of the rotating
sawblade.
• Risk of injury when changing theblade.
• Risk of squeezing fingers when opening theguards.
Electrical Safety
The electric motor has been designed for one voltage only.
Always check that the power supply corresponds to the voltage
on the ratingplate.
Your DeWALT tool is double insulated in accordance
with IEC61029; therefore no earth wire isrequired.
WARNING: 220-240V units have to be operated via a fail-
safe isolating transformer with an earth screen between
the primary and secondary winding.
If the supply cord is damaged, it must be replaced by a
specially prepared cord available through the DeWALT
serviceorganisation.
Using an Extension Cable
If an extension cable is required, use an approved 3–core
extension cable suitable for the power input of this tool (see
Technical Data).The minimum conductor size is 1.5 mm2; the
maximum length is 30m.
When using a cable reel, always unwind the cablecompletely.
Package Contents
The package contains:
1 Toothed Chopsaw
1 Cutting blade
1 Hex key
1 Vertical clamp
1 Instruction manual
• Check for damage to the tool, parts or accessories which may
have occurred duringtransport.
• Take the time to thoroughly read and understand this manual
prior tooperation.
Markings on Tool
The following pictograms are shown on the tool:
Read instruction manual beforeuse.
Wear earprotection.
Wear eyeprotection.
Date Code Position (Fig. A)
The date code26, which also includes the year of manufacture,
is printed into thehousing.
Example:
2018 XX XX
Year of Manufacture
Description (Fig. A)
WARNING: Never modify the power tool or any part of it.
Damage or personal injury couldresult.
1 On/off switch
2 Main handle
3 Carrying handle
4 Guard
5 Spindle lock
6 Material clamp
7 Fence
8 Mounting holes
9 Cutting table
10 Hex key
Intended Use
Your professional DeWALT toothed chopsaw has been designed
for the cutting of variously shaped metal materials: water and
gas pipes, angular iron, U-profiles, T-bars, rods, bolts, etc. Using
the appropriate cutting blade, it can cut hot and cold rolled
carbon steel, construction steels according to DIN 1700 (ST33,
ST37–2, ST52–3), non-ferrous metals (i.e. aluminum, brass,
copper), stainless steel and synthetic materials (i.e. PVC). This
tool is not intended to be used in cast-iron, brick, tile or ceramic
materials. The tool is never to be used for cutting magnesium
work pieces
DO NOT use under wet conditions or in the presence of
flammable liquids orgases.
These chopsaws are professional powertools.
DO NOT let children come into contact with the tool.
Supervision is required when inexperienced operators use
thistool.
• Young children and the infirm. This appliance is not
intended for use by young children or infirm persons
withoutsupervision.

9
ENGLISH
• This product is not intended for use by persons (includng
children) suffering from diminished physical, sensory or
mental abilities; lack of experience, knowledge or skills
unless they are supervised by a person responsible for their
safety. Children should never be left alone with thisproduct.
ASSEMBLY AND ADJUSTMENTS
WARNING: To reduce the risk of serious personal
injury, turn tool off and disconnect tool from power
source before making any adjustments or removing/
installing attachments or accessories. An accidental
start-up can causeinjury.
Bench Mounting (Fig. A)
Mounting holes8 have been provided to facilitate
benchmounting.
Removing and Fitting a Cutting Blade
(Fig.A, B1,B2)
1. With the arm in the rest position, use the lip42 to slide the
guard4 back. Leave the guard retracted (Fig. B1).
2. Press and hold down the spindle lock5 (Fig. B2).
3. Rotate the cutting blade until itlocks.
4. Rotate the bolt cover11 out of the way (Fig. B1).
5. Using the hex key10, remove the bolt12 by turning
counterclockwise and then remove the lock washer29, the
flat washer27 and the retaining flange28 (Fig.B2).
6. Replace the cutting blade13. Make sure that the the
new blade is placed onto the flange30 in correct
rotationaldirection.
7. Secure the blade with the retaining flange28, the flate
washer27 and lock washer29 and the bolt12.
8. Move the guard back down and release the spindle lock5.
WARNING: The teeth of a new blade are very sharp and
can bedangerous.
Clamping the Workpiece in Position
(Fig.A,C1–C6)
The tool is equipped with a material clamp6 (Fig. A).
1. Pull the lever14 toward the handle31 (Fig. C1).
2. Push the clamp shaft32 forward until the jaw33 is almost
touching theworkpiece.
3. Press the lever14 toward the jaw33 until it engages with
the clamp shaft32.
4. Rotate the handle31 clockwise and clamp the
workpiecesecurely.
5. To release the workpiece, rotate the
handle31counterclockwise.
WARNING:
• Clamp the workpiece as far towards the operator
aspossible.
• Set the clamping position for cutting downstroke as
long as the thickness of the workpiece is not exceeding
the maximum downstroke cutting capacity (Fig. C2).
-The maximum downstroke cutting capacity is
marked by slot36.
-Continue setting the clamping position as
describedbelow.
• Always attemp to clamp the workpiece in a way to
minimize the number of teeth cutting through the
material (Fig. C4).
• Support long workpieces using a piece of wood15
(Fig. C3). Do not clamp the cut off end34.
Vertical Clamp (Fig. C5, C6)
The vertical clamp16 is used for upstroke cutting of wide and
irregular shaped materials (Fig. C5).
1. Insert the vertical clamp in the hole17 in the base (Fig.C6)
until the clamp16 rests on the workpiece (Fig.C5).
2. Pull the lever18 down to clamp theworkpiece.
3. Lift the lever18 to release the clamp16.
WARNING: Always use the vertical clamp when
cuttingupstroke.
Quick Travel Feature (Fig. C1)
The clamp has a quick travelfeature.
• To release the clamp, rotate the handle31 one or two
turns counterclockwise and pull the lever14 toward the
handle31.
Setting the Clamping Position (Fig. C1,C6)
The clamping position can be set to match the cuttingblade.
1. Pull the clamp lever19 toward the handle31(Fig. C1) and
pull out the location pin20 to release the fence7 (Fig. C6).
2. Move the fence7 asrequired.
3. Push the clamp lever19 back down to the cutting table9
to lock the fence7 (Fig. C1).
WARNING: If the clamp lever resistance is too light,
slightly tighten the two adjusting bolts on thefence.
Setting the Angle of Cut (Fig. C1,C6)
The tool can be used for mitre cuts up to 45°.
1. Pull the clamp lever19 toward the handle31 to release
the fence7 (Fig. C1).
2. Set the fence7 to the required angle. The angle can be
read on the scale35. Use the edge of the slot36 as a
reference (Fig. C6).
3. Push the clamp lever19 back down to the cutting table9
to lock the fence (Fig. C1).
4. If additional clamping is required, the angle of cut can be
further fixed in the 90° and 45° cross-cutpositions.
a. Align the fence7 with slot37, slot38 or slot39 in
order to fix the 90° or 45° cross-cut position (Fig. C6).
b. Place the pin20 through the fence into one of the
holes40.

10
ENGLISH
Checking and Adjusting the Mitre Scale
(Fig.C1,D1,D2)
1. Pull the clamp lever19 toward the handle31 to release
the fence (Fig. C1).
2. Pull down the arm and lock it in this position by pushing in
the lock-down pin21 (Fig. D2).
3. Place a square22 against the fence7 and the left side of
the cutting blade creating a perfect 90° (Fig. D1).
WARNING: Do not touch the tips of the blade teeth with
thesquare.
4. Push the clamp lever19 back down to the cutting table9
to lock the fence (Fig. C1).
5. Pull out the lock-down pin21 and return the arm to its
upper rest position (Fig. D2).
6. Check that the 0° marking on the scale35 aligns with the
edge of the slot36 (Fig. D1).
7. If adjustment is required, proceed as follows:
a. Loosen the screws23.
b. Align the 0° marking on the scale35 with the edge of
the slot36.
c. Retighten the screws23.
Adjusting the Spark deflector (Fig. E)
1. Loosen the screw24.
2. Set the spark deflector25 asappropriate.
3. Tighten the screw24.
Prior to Operation:
• Install the appropriate cutting blade. Only use sharp or
correctly sharpened blades. The maximum rotation speed of
the tool must not exceed that of the cuttingblade.
• Make sure the blade rotates in the direction of the arrows on
the accessory and thetool.
• Secure theworkpiece.
• Make sure all locking knobs and clamp handles aretight.
• Always set the spark deflectorcorrectly.
• Do not attempt to cut excessively small pieces. Never perform
cuts on small workpieces bundledtogether.
OPERATION
Instructions for Use
WARNING: Always observe the safety instructions and
applicableregulations.
WARNING: To reduce the risk of serious personal
injury, turn tool off and disconnect tool from power
source before making any adjustments or removing/
installing attachments or accessories. An accidental
start-up can causeinjury.
WARNING: Do not apply excessive pressure to thetool.
WARNING: Avoid overloading. Should the tool
become hot, let it run a few minutes under no
loadcondition.
Performing a Cut (Fig. A)
1. Place the material to be cut against the fence7 and as far
towards the operator as possible. Secure using the material
clamp6.
2. Switch on the machine and pull down the Main handle2
to cut the workpiece. Allow the motor to reach full speed
before cutting.
3. Allow the blade to cut freely. Do not force.
4. After completing the cut, switch off the machine and return
the arm to its upper restposition.
Switching On and Off (Fig. A)
The on/off switch1 is mounted in the Main handle2.
To run the tool, press the on/off switch1.
Keep the on/off switch depressed while performing
theoperation.
To stop the tool, release theswitch.
WARNING: Do not switch the tool on or off when
underload.
WARNING: Do not cutmagnesium.
Transporting (Fig. F)
The tool is equipped with a lock-down pin21 which locks the
tool in closed-down position forcarrying.
Lower the guard4 onto the cutting table9 and secure the
tool in this position by pushing in the lock-down pin21.
Transport the tool using the carrying handle3.
To release the tool, pull out the lock-down pin21.
Proper Hand Position (Fig. A, G)
WARNING: To reduce the risk of serious personal injury,
ALWAYS use proper hand position asshown.
WARNING: To reduce the risk of serious personal
injury, ALWAYS hold securely in anticipation of a
suddenreaction.
Proper hand position requires one hand on the main handle2
and the other hand holding the workpiece away from theblade.
WARNING:
• Never place your hands near the cuttingarea.
• Hold the workpiece tightly to the table and the fence
when cutting. Keep your hands in position until
the switch has been released and the blade has
completelystopped.
• Do not cross yourhands.
• Keep both feet firmly on the floor and maintain
properbalance.

11
ENGLISH
MAINTENANCE
Your DeWALT power tool has been designed to operate
over a long period of time with a minimum of maintenance.
Continuous satisfactory operation depends upon proper tool
care and regularcleaning.
WARNING: To reduce the risk of serious personal
injury, turn tool off and disconnect tool from power
source before making any adjustments or removing/
installing attachments or accessories. An accidental
start-up can causeinjury.
Lubrication
Your power tool requires no additionallubrication.
Cleaning
WARNING: Blow dirt and dust out of the main housing
with dry air as often as dirt is seen collecting in and around
the air vents. Wear approved eye protection and approved
dust mask when performing thisprocedure.
WARNING: Never use solvents or other harsh chemicals
for cleaning the non-metallic parts of the tool. These
chemicals may weaken the materials used in these parts.
Use a cloth dampened only with water and mild soap.
Never let any liquid get inside the tool; never immerse any
part of the tool into aliquid.
Optional Accessories
WARNING: Since accessories, other than those offered
by DeWALT, have not been tested with this product, use
of such accessories with this tool could be hazardous.
To reduce the risk of injury, only DeWALT recommended
accessories should be used with thisproduct.
Consult your dealer for further information on the
appropriateaccessories.
Protecting the Environment
Separate collection. Products and batteries marked
with this symbol must not be disposed of with normal
householdwaste.
Products and batteries contain materials that can
be recovered or recycled reducing the demand for raw
materials. Please recycle electrical products and batteries
according to local provisions. Further information is available at
www.2helpU.com.

12
한국어
안전 지침
경고: 화재, 감전 및 다음과 같은 부상을 위험을
줄이려면 전동 공구를 사용할 때 항상 기본적인
안전 주의사항을 준수해야 합니다.
이 제품을 사용하기 전에 모든 지침 사항을 읽고 안전한
장소에 보관하십시오.
향후 참고할 수 있도록 본 사용 설명서를
보관해두십시오.
일반 안전 규칙
1 .
작업장을 깨끗하게 유지하십시오.
ʵ
어수선한 작업장과 작업대가 부상을 초래합니다.
2 .
작업장의 환경을 고려하십시오.
ʵ
공구를 비에 노출시키지 마십시오. 축축하거나
젖은 상태에서 공구를 사용하지 마십시오. 작업
장을 충분히 밝게 유지하십시오
(250
-
300
럭스
)
.
화재나 폭발의 위험이 있는 곳
(
예, 가연성 액체
및 가스가 존재하는 곳
)
에서 공구를 사용하지
마십시오.
3 .
감전이 되지 않도록 조심하십시오.
ʵ
파이프 관, 라디에이터, 렌지 및 냉장고 등의 접지
표면에 몸이 닿지 않도록 하십시오. 극한의 조건
(
예, 고습, 금속 부스러기가 나오는 경우 등
)
에서
공구를 사용할 때는 절연 변압기 또는
(FI)
접지
누전 자동 차단기를 삽입하여 전기 안전을 높일
수 있습니다.
4 .
다른 사람이 주변에 있지 않도록 하십시오.
ʵ
작업과 관련이 없는 사람, 특히 어린이가 공구나
연장 코드를 만지지 않도록 하고 작업장에서 멀리
떨어져 있도록 유지하십시오.
5 .
사용하지 않는 공구는 보관해 두십시오.
ʵ
사용하지 않을 때는 어린이의 손이 닿지 않도록
건조하고 확실히 잠겨 있는 장소에 보관해야
합니다.
6 .
공구에 무리한 힘을 가하지 마십시오.
ʵ
용도에 맞는 힘을 사용함으로 보다 안전한 작업을
할 수 있습니다.
7 .
적합한 공구를 사용하십시오.
ʵ
강력 전동공구를 사용해야 하는 작업에 작은
공구를 사용하여 힘을 가하지 마십시오. 의도하지
않은 용도, 예를 들어, 나뭇가지 또는 통나무를
절단하는 용도로 회전 톱을 사용하지 마십시오.
8 .
적절한 작업복을 착용하십시오.
ʵ
늘어지는 옷이나 장신구를 착용하지 마십시오.
움직이는 부품에 끼일 수 있습니다. 실외에서
작업할 때는 미끄럼 방지 신발을 신는 것이
좋습니다. 긴 머리를 넣을 수 있는 머리카락 보호
덮개를 착용하십시오.
축하합니다!
DeWALT 공구를 선택해 주셔서 감사합니다. 제품 개발과
혁신을 통한 다년간의 경험은 DeWALT를 전문 전동 공구
사용자들이 가장 믿을 수 있는 제품으로 만들어 왔습니다.
기술 데이터
DW872
전압 VAC 220-240
소비전력 W 2200
무부하 속도 분-1 1300
톱날 직경 mm 355
톱날 구멍 mm 25.4
톱날 본체 두께 mm 1.8
톱날 절단 두께 mm 2.2
톱니 개수 66
90˚ 에서의 교차 절삭 능력
원형 mm 130
정사각형 mm 100 x 100
직사각형 mm 75 x 130
모서리 mm 92 x 92
45˚ 에서의 교차 절삭 능력
원형 mm 79
정사각형 mm 79 x 79
직사각형 mm 79 x 123
모서리 mm 56 x 56
무게 kg 22.5
정의: 안전 지침
다음 정의는 각 경고 문구의 심각도를 설명합니다. 사용
설명서를 읽고 다음 기호들에 유의하십시오.
위험: 절박한 위험 상태를 나타내며, 방지하지
않으면 사망 또는 심각한 부상을 초래합니다.
경고: 잠재적 위험 상태를 나타내며, 방지하지
않으면 사망 또는 심각한 부상을 초래할 수
있습니다.
주의: 잠재적으로 위험한 상태를 나타내며,
방지하지 않으면 경미하거나 가벼운 부상을
초래할 수 있습니다.
참고: 신체 부상을 초래하지 않는 행위를
나타내며, 방지하지 않으면 재산상의 손해가
발생할 수 있습니다.
감전 위험을 나타냅니다.
화재 위험을 나타냅니다.
금속 절단기
DW872

13
한국어
9 .
보호 장비를 사용하십시오.
ʵ
항상 보안경을 착용하십시오. 작업 시 먼지나
날아다니는 입자가 발생하는 경우 얼굴 또는
먼지 마스크를 착용하십시오. 이러한 입자는
상당히 뜨거울 수 있으므로, 내열성 앞치마도
착용하십시오. 항상 귀 보호 장구를 착용하십시오.
또한 항상 안전 헬멧도 쓰십시오.
10 .
먼지 배출 장비를 연결하십시오.
ʵ
먼지 배출 및 집진 장비 연결을 위한 장치가
제공되는 경우, 이들 장치가 연결되어 적절히
사용되고 있는지 반드시 확인하십시오.
11 .
코드를 함부로 다루지 마십시오.
ʵ
콘센트에서 코드를 분리할 때 절대로 코드를
홱 잡아당기지 마십시오. 코드가 열, 오일 및
날카로운 가장자리에 닿지 않도록 하십시오.
공구를 코드로 들고 다니지 마십시오.
12 .
안전하게 작업하십시오.
ʵ
가능할 경우 클램프 또는 바이스를 사용해 작업을
고정하십시오. 손을 사용하는 것보다 더 안전하며
공구를 작동할 수 있도록 양쪽 손이 자유롭습니다.
13 .
무리하게 팔을 뻗지 마십시오.
ʵ
항상 올바른 자세로 서서 균형을 유지 하십시오.
14 .
주의 깊게 공구를 유지보수하십시오.
ʵ
바이트를 날카롭게 유지하고 보다 안전하고
우수한 성능을 위해 청소를 하십시오. 액세서리를
윤활하고 교환할 경우 지침 사항을 준수하십시오.
공구를 정기적으로 검사하고 손상된 경우 공인
서비스 기관에서 수리를 받으십시오. 핸들과
스위치는 건조하고 깨끗한 상태를 유지하고 오일
/
기름이 묻지 않도록 하십시오.
15 .
전원에서 공구 플러그를 빼십시오.
ʵ
사용하지 않을 때, 정비하기 전, 그리고 톱날, 비트
및 커터 등 액세서리를 교환할 때는 전원에서
공구 플러그를 빼십시오.
16 .
조정 키와 렌치를 제거하십시오.
ʵ
공구를 작동하기 전에 공구에서 조정 키와 렌치가
제거되었는지 확인하는 습관을 들이십시오.
17 .
의도하지 않은 가동을 방지하십시오.
ʵ
스위치에 손가락이 닿는 상태로 공구를 들고
다니지 마십시오. 플러그를 끼우기 전에 공구가
“꺼짐” 위치에 있는지 확인하십시오.
18 .
옥외 연장선을 사용하십시오.
ʵ
사용하기 전에 연장 케이블을 검사하고
손상되었을 경우 교체하십시오. 옥외에서 공구를
사용할 경우 옥외용으로 나오고 그에 맞는 표시가
있는 연장 코드만 사용하십시오.
19 .
경계심을 늦추지 마십시오.
ʵ
조심해서 작업을 하십시오. 상식을 최대한
적용하고, 피로하거나 약 또는 알코올을 섭취한
상태에서는 공구를 조작하지 마십시오.
20 .
손상된 부품을 확인하십시오.
ʵ
사용하기 전에 공구가 올바르게 작동하여 의도하는
기능을 수행할 것인지 판단하기 위해 공구와
본선을 주의 깊게 점검하십시오. 움직이는 부품의
정렬, 움직이는 부품의 바인딩, 부품의 파손, 장착
및 작동에 영향을 미칠 수 있는 기타 모든 상태를
점검하십시오. 사용 설명서에 달리 명시되어 있지
않는 한 손상된 가드 또는 기타 부품은 올바르게
수리하거나 공인 서비스 센터에서 교체해야 합니다.
결함 있는 스위치는 공인 서비스 센터에서 교체를
받으십시오. 스위치를 켜거나 끌 수 없는 경우
공구를 사용하지 마십시오. 절대로 직접 수리하
려고 하지 마십시오.
경고: 사용 설명서에서 권장하는 방식 이외의
다른 방식으로 본 공구를 조작하거나 액세서리
또는 부착물을 사용하는 경우 신체 부상의 위험이
있을 수 있습니다.
21 .
유자격 기술자로부터 공구를 수리 받으십시오.
ʵ
이 전동 공구는 관련 안전 규칙을 준수합니다.
수리는 유자격 기술자가 예비 부품을 사용해
실시해야 합니다. 그렇지 않을 경우 사용자에게
상당한 위험이 초래될 수 있습니다.
금속 톱에 대한 추가 안전
•
손상되거나 변형된 톱날을 사용하지 마십시오.
• EN
847
-
1
을 준수하고 제조업체에서 권장하는 톱날만
사용하십시오.
•
고속도 강으로 제조된 톱날을 사용하지 마십시오.
•
필요 시 다음과 같은 적절한 신체 보호 장비를
착용하십시오.
ʵ
유발된 청력 손상의 위험을 줄이기 위한 청력
보호 장구,
ʵ
눈 보호 장구,
ʵ
유해한 먼지의 흡입 위험을 줄여 주는 호흡기
보호 장구,
ʵ
톱날
(
톱날은 가능할 때마다 홀더 안에 넣어
운반해야 함
)
및 거친 재료 취급 시 장갑,
유지보수 및 정비
•
소음 노출에 영향을 주는 요인에 대한 작업자의 지침
(
예, 방출되는 소음, 톱날 및 기계 유지보수를 줄이기
위해 고안된 톱날 사용
)
,
•
가드나 톱날을 포함한 기계 결함은 발견 즉시
보고해야 합니다.
안전한 작동법
•
절단할 재료에 맞는 정확한 톱날을 선택하십시오.
•
제조업체에서 권장하는 재료 이외의 물질을 절단하는
데 이 톱을 사용하지 마십시오.
•
리프팅 및 운반 정보. 금속 톱을 들어올려서
지지하려면 그림
F
를 참조하십시오.
•
가드가 제자리에 있지 않거나, 올바른 작업 순서가
아니거나 제대로 유지보수되지 않은 경우 톱을
사용하지 마십시오.

14
한국어
•
기계 주변의 바닥을 잘 관리하고 부스러기 조각과
절단 물질 등 마음대로 돌아다니는 물질이 없도록
유지하십시오.
•
적절한 전체 또는 부분 조명을 제공하십시오.
•
작업자는 기계 사용, 조정 및 작동에 대해 충분히
교육을 받아야 합니다.
•
정확하게 날카로운 톱날을 사용하십시오. 톱날의
최대 속도 지점을 준수하십시오.
•
모든 스페이서와 축 링이 제조업체에서 기술한 대로
해당 용도에 적합한지 확인하십시오.
•
기계가 돌아가고 있고 톱 헤드가 정지 위치에 있지
않을 경우 절단 영역에서 작업물의 절단된 부분 또는
기타 부품 제거를 삼가십시오.
•
기계가 항상 안정적으로 고정되어 있는지 확인하십
시오
(
예, 벤치에 고정됨
)
.
•
긴 조각을 지지하려면 그림
C3
을 참조하십시오.
경고: 정격 잔류 전류가
30mA
미만인 누전
차단기를 사용하는 것이 좋습니다.
기타 발생 가능한 위험
다음 위험들은 톱 사용 시 내재하고 있습니다.
•
돌아가는 부품을 만짐으로 인해 발생하는 부상
•
절단 날 파쇄로 인한 부상.
이러한 위험은 다음과 같은 곳에서 뚜렷하게 나타납니다.
•
작업 범위 이내
•
회전하는 장비 부품의 작동 범위 이내
관련된 안전 규정을 준수하고 안전 장치를 사용한다고
해도 특정한 위험은 피할 수 없습니다. 이러한 위험은
다음과 같습니다.
•
청력 손상.
•
돌아가는 톱날의 덮여 있지 않는 부품으로 인한
사고의 위험.
•
톱날 교체 시의 부상 위험.
•
가드를 열 때 손가락이 눌리는 위험.
전기 안전
전기 모터는 한 가지 전압에만 맞추어 설계되었습니다.
전원이 전동기 라벨에 기재된 전압과 일치하는지 항상
확인하십시오.
DeWALT 공구는 IEC61029에 따라 이중 절연되어
있습니다. 따라서 접지선이 필요하지 않습니다.
경고:
220
-
240V
기기는
1
차 권선과
2
차 권선
사이에 접지판이 있는 페일 세이프 절연 변압기를
통해 작동되어야 합니다.
전원 코드가 손상된 경우에는 DeWALT 서비스 센터를
통해 특수 제작된 코드로 교체해야만 합니다.
연장 케이블 이용
연장 케이블이 필요할 경우 이 공구의 소비전력에 맞는
승인된 3 코어 연장 케이블을 사용하십시오(
기술 데이터
참조). 최소 도체 크기는 1.5 mm2, 최대 길이는 30 m
입니다.
케이블 릴을 사용할 때는 항상 케이블을 완전히 푸십시오.
포장 내용물
포장에는 다음 내용물이 들어 있습니다.
1 금속 절단기
1 절단 날
1 육각 키
1 수직 클램프
1 사용 설명서
•
운반 중에 발생할 수 있는 공구, 부품 또는
액세서리의 손상 여부를 확인하십시오.
•
작동 전에 시간을 내어 본 사용 설명서를 읽고
숙지하십시오.
공구에 표시된 마크
공구에는 다음과 같은 그림이 있습니다.
사용 전에 사용 설명서의 내용을 숙지하십시오.
귀 보호 장구를 착용하십시오.
보안경을 착용하십시오.
날짜 코드 위치(그림 A)
날짜 코드 26 에는, 제조년도가 포함되며 이 제조년도는
케이스에 인쇄되어 있습니다.
예:
2018 XX XX
제조년도
설명(그림 A)
경고: 전동 공구 또는 전동 공구의 어떤 부품도
절대 개조하지 마십시오. 제품이 파손되거나 신체
부상을 당할 수도 있습니다.
1 켜짐/꺼짐 스위치
2 주 핸들
3 운반용 핸들
4 가드
5 스핀들 잠금 장치
6 작업물 고정대
7 펜스
8 장착 구멍
9 절단 테이블
10 육각 키
용도
전문적인 DeWALT 금속 절단기는 다양한 모양의 금속
재료(배수관 및 가스관, 각이 진 철, U-프로파일, T자형
바, 봉, 볼트 등)를 절단하도록 고안되었습니다. 적합한
절단 날을 사용하면, DIN 1700 (ST33, ST37–2, ST52–3)
에 따라 열간 및 냉간압연 탄소강, 철근, 비철금속
(예, 알루미늄, 황동, 구리), 스테인리스강 및 합성 자재
(예, PVC)를 절단할 수 있습니다. 이 공구는 주철, 벽돌,

15
한국어
타일 또는 자기 재료에서 사용하도록 고안되지 않았습
니다. 마그네슘 작업물을 절단하는 데 이 공구를 사용해
서는 안됩니다.
습한 환경이나 가연성 액체 또는 가스가 있는 장소에서
사용하지 마십시오.
이 절단기는 전문적인 전동 공구입니다.
어린이가 이 공구를 만지지 않도록 하십시오. 경험이
없는 작업자가 이 공구를 사용할 때는 감독자의 지도가
필요합니다.
• 어린이 및 노약자. 본 제품은 어린이나 노약자가
사용하도록 설계되지 않았습니다. 이러한 사람이
사용할 때는 감독이 필요합니다.
• 본 제품은 안전 책임을 맡고 있는 사람이 감독을
하고 있지 않는 한 경험, 지식 또는 기술이 부족하고
신체적, 감각적 또는 정신적 능력이 미약한 사람
(어린이 포함)이 사용하도록 고안된 것이 아닙니다.
이 제품과 함께 어린이만 혼자 두어서는 안됩니다.
조립 및 조정
경고: 심각한 신체 부상의 위험을 줄이려면 부착물
또는 액세서리를 조정하거나 제거/설치하기 전에
공구를 끄고 전원에서 공구 플러그를 빼십시오.
공구가 갑자기 작동하여 부상을 당할 수 있습니다.
작업대 장착(그림 A)
장착 구멍 8 은 작업대에 쉽게 장착할 수 있도록 제공되어
있습니다.
절단 날 분리 및 장착(그림 A, B1, B2)
1. 암을 휴지 위치에 놓고 립 42 을 이용해 가드 4 를
뒤쪽으로 제칩니다. 가드를 후퇴시킵니다(그림 B1).
2. 스핀들 잠금 장치 5 를 눌러 고정시킵니다(그림 B2).
3. 절단 날이 잠길 때까지 회전시킵니다.
4. 볼트 커버 11 를 밖으로 돌립니다(그림 B1).
5. 육각 키 10 을 사용하여 볼트 12 를 시계 반대
방향으로 돌려서 제거한 다음 잠금 와셔 29 , 평
와셔 27 및 고정 만조 28 를 제거합니다(그림 B2).
6. 절단 날 13 을 교체합니다. 새 날이 정확한 회전
방향으로 만조 30 에 고정되었는지 확인합니다.
7.고정 만조 28 , 평 와셔 7 , 잠금 와셔 9 및 볼트 12 를
사용하여 날을 고정합니다.
8.가드를 뒤쪽으로 이동시킨 뒤 스핀들 잠금 장치 5 를
풉니다.
경고: 새 톱니는 매우 날카로우므로 위험할 수
있습니다.
작업물을 제자리에 고정하기
(그림 A, C1–C6)
공구에는 작업물 고정대 6 가 장착되어 있습니다(그림 A).
1. 레버 14를 핸들 31쪽으로 당깁니다(그림 C1).
2. 죠33가 작업물에 거의 닿을 때까지 고정대 축 32을
앞쪽으로 밉니다.
3. 레버 14 를 죠 33 쪽으로 밀어 고정대 축 32 과
체결되게 합니다.
4. 핸들 31 을 시계 방향으로 돌려 가공품을 견고하게
고정합니다.
5.가공품 고정을 풀려면 핸들 31 을 시계 반대 방향으로
돌립니다.
경고:
•
작업자 쪽에서 가능한 멀리 작업물을
고정하십시오.
•
작업물의 두께가 최대 다운스트로크 절삭력을
초과하지 않는 한 다운스트로크 절단을 위한
고정 위치를 설정합니다
(
그림
C2)
.
-
최대 다운스트로크 절삭력은 슬롯
36
으로
표시되어 있습니다.
-
아래에 설명한 대로 고정 위치를 계속해서
설정합니다.
•
항상 재료를 절단하는 톱니의 수를 최소화하는
방식으로 작업물을 고정하려고 하십시오
(
그림
C4)
.
•
긴 가공품은 나무 조각
15
을 이용해 지지하십
시오
(
그림
C3)
. 절단할 끝 부분
34
을 고정하지
마십시오.
수직 클램프(그림 C5, C6)
수직 클램프 16 는 넓고 불규칙한 모양의 재료를
업스트로크 절단하는 데 사용됩니다(그림 C5).
1. 클램프 16 가 작업물 위에 놓일 때까지 베이스(그림
C6)의 구멍 17 에 수직 클램프를 끼웁니다(그림 C5).
2. 작업물을 고정하려면 레버 18 를 아래로 당깁니다.
3. 레버 18 를 위로 올려 고정대 16 를 풉니다.
경고: 업스트로크 절단 시 항상 수직 클램프를
사용하십시오.
빠른 이동 기능(그림 C1)
고정대에는 빠른 이동 기능이 있습니다.
• 고정대를 풀려면 핸들 31 을 시계 반대 방향으로
1~2 바퀴 돌린 다음 레버 14 를 핸들 14 쪽으로
당기십시오.
고정 위치 설정(그림 C1, C6)
절단 날에 맞게 고정 위치를 설정할 수 있습니다.
1. 클램프 레버 19 를 핸들 31 쪽으로 당기고(그림 C1)
위치 핀 20 을 빼 내어 펜스 7 를 풉니다(그림 C6).
2. 필요에 따라 펜스 7 를 이동합니다.
3. 클램프 레버 19 를 다시 절단 테이블 9 로 밀어
내려서 펜스 7 를 잠급니다(그림 C1).
경고: 클램프 레버 저항이 너무 약할 경우, 펜스에
있는 두 개의 조정 볼트를 살짝 조입니다.
절단 각도 설정(그림. C1, C6)
최대 45°까지의 마이터 절단에 공구를 사용할 수
있습니다.
1. 클램프 레버 19 를 핸들 31 쪽으로 당겨서 펜스 7 를
풉니다(그림 C1).
2. 펜스 7 를 원하는 각도로 설정합니다. 각도는 눈금 35
으로 읽을 수 있습니다. 슬롯 36 의 가장자리를
참조로 사용합니다(그림 C6).

16
한국어
3. 클램프 레버 19 를 다시 절단 테이블 9 로 밀어
내려서 펜스를 잠급니다(그림 C1).
4. 추가 고정이 필요한 경우, 절단 각도는 90° 및 45°
교차 절단 위치로 추가 고정할 수 있습니다.
a. 90° 또는 45° 교차 절단 위치를 고정하려면 펜스 7
를 슬롯 37 , 슬롯 38 또는 슬롯 39 와 맞춥니다
(그림 C6).
b. 펜스를 통해 핀 20 을 구멍 40 중 하나에 놓습니다.
마이터 눈금 확인 및 조정
(그림 C1, D1, D2)
1. 클램프 레버 19 를 핸들 31 쪽으로 당겨서 펜스를
풉니다(그림 C1).
2. 암을 내리고 내려 잠금 핀 21 을 눌러서 이 위치에서
잠급니다(그림 D2).
3. 펜스 7 에 직각자 22 를 대면 절단 날 왼쪽에 완벽한
90°가 생성됩니다(그림 D1).
경고: 직각자로 톱니의 끝을 건드리지 마십시오.
4. 클램프 레버 19 를 다시 절단 테이블 9 로 밀어
내려서 펜스를 잠급니다(그림 C1).
5. 내려 잠금 핀 21 을 빼내어 암을 더 위쪽의 휴지
위치로 돌려 놓습니다(그림 D2).
6. 눈금 35 의 0° 표시가 슬롯 36 의 가장자리와 맞추어
졌는지 확인하십시오(그림 D1).
7. 조정이 필요할 경우 다음과 같이 진행하십시오.
a. 나사 23 를 풉니다.
b. 눈금 35 의 0° 표시를 슬롯 36 의 가장자리에
맞춥니다.
c. 나사 23 를 다시 조입니다.
불꽃 반사대 조정(그림 E)
1. 나사 24 를 풉니다.
2. 불꽃 반사대 25 를 적절하게 놓습니다.
3. 나사 24 를 조입니다.
작동을 하기 전에:
•
적절한 절단 날을 설치하십시오. 날카롭거나 정확하게
날카로워진 날만 사용하십시오. 공구의 최대 회전
속도가 절단 날의 최대 회전 속도를 초과해선 안됩니다.
•
날이 액세서리 및 공구의 화살표 방향으로
회전하도록 하십시오.
•
작업물을 고정하십시오.
•
모든 잠금 노브와 클램프 핸들이 조여졌는지
확인하십시오.
•
항상 불꽃 반사대를 올바로 설정하십시오.
•
지나치게 작은 조각을 절단하려고 하지 마십시오. 함께
묶여져 있는 작은 작업물을 절대 절단하지 마십시오.
조작
사용 지침
경고: 안전 지시 사항과 해당 규정을 항상
준수하십시오.
경고: 심각한 신체 부상의 위험을 줄이려면 부착물
또는 액세서리를 조정하거나 제거/설치하기 전에
공구를 끄고 전원에서 공구 플러그를 빼십시오.
공구가 갑자기 작동하여 부상을 당할 수 있습니다.
경고: 공구에 지나친 압력을 가하지 마십시오.
경고: 과부하를 피하십시오. 공구가 가열되면
무부하 상태로 몇 분 정도 작동시키십시오.
절단 작업 수행(그림 A)
1. 절단할 재료를 펜스 7 에 맞대어 놓고 가능한 한
작업자로부터 멀리 두십시오. 작업물 고정대 6 를
사용하여 고정합니다.
2.기계 스위치를 켜고 주 핸들 2 을 내려서 작업물을
절단합니다. 절단 전에 모터가 최대 속도에 도달할 수
있어야 합니다.
3. 날이 자유자재로 절단할 수 있어야 합니다. 힘을 주지
마십시오.
4. 절단을 완료한 후 기계를 끄고 암을 더 위쪽의 휴지
위치로 돌려 놓습니다.
전원 켜기 및 끄기(그림 A)
주 핸들 2 에는 on/off 스위치 1 가 장착되어 있습니다.
공구를 작동하려면 on/off 스위치 1 를 누릅니다.
작업 수행 중에는 on/off 스위치를 눌러 둡니다.
공구를 멈추려면 스위치를 풀어 줍니다
.
경고: 부하가 실려 있을 때는 공구를 켜거나 끄지
마십시오.
경고: 마그네슘을 절단하지 마십시오.
운반(그림 F)
공구에는 운반을 위해 공구를 닫힌 상태로 고정해 주는
내려 잠금 핀 21 이 장착되어 있습니다.
가드 4 를 절단 테이블 9 위로 내려놓고 내려 잠금 핀 21
을 밀어 넣어서 공구를 이 위치에 고정합니다.
운반용 핸들 3 을 이용해 공구를 운반하십시오.
공구를 풀려면 내려 잠금 핀 21 을 빼 냅니다.
올바른 손의 위치(그림 A, G)
경고: 심각한 신체 부상의 위험을 줄이려면 항상
그림과 같이 올바르게 손을 위치하십시오.
경고: 심각한 신체 부상의 위험을 줄이려면,
항상 급작스러운 반동을 예상하고 확실하게
잡으십시오.
손 위치는 한 손을 기본 핸들 2 위에 놓고 다른 손은
날로부터 멀리 작업물을 잡는 것이 바람직합니다.
경고:
•
절대 절단할 영역 가까이에 손을 두지 마십시오.
•
절단 시 테이블과 펜스에 대해 작업물을 단단히
잡으십시오 스위치가 풀리고 톱날이 완전히
멈출 때까지 손을 제자리에 유지하십시오.
•
손을 교차하지 마십시오.
•
양쪽 발을 바닥에 단단히 고정하고 적절한
균형을 유지하십시오.

17
한국어
유지 보수
DeWALT 전동 공구는 최소한의 유지 보수로 장기간에
걸쳐 작업이 가능하도록 설계되어 있습니다. 만족스러운
연속 작동은 적절한 공구 관리와 정기적인 청소에 따라
그 성능이 달라질 수 있습니다.
경고: 심각한 신체 부상의 위험을 줄이려면 부착물
또는 액세서리를 조정하거나 제거/설치하기 전에
공구를 끄고 전원에서 공구 플러그를 빼십시오.
공구가 갑자기 작동하여 부상을 당할 수 있습니다.
윤활방법
전동 공구는 별도의 윤활 작업이 필요하지 않습니다.
청소
경고: 통풍구 속이나 주변에 먼지가 쌓여있는 것이
보이면 가능한 한 자주 건조한 공기를 이용하여
몸체에서 먼지를 불어내십시오. 이 절차를 수행할
때에는 승인된 눈 보호 장구 및 승인된 방진 마스
크를 착용하십시오.
경고: 공구의 금속 이외 부품을 청소할 때는 용제
등의 강력한 화학약품을 절대 사용하지 마십시오.
그렇지 않으면 이러한 부분에 사용된 재료가 약해질
수 있습니다. 헝겊에 물과 순한 비누를 적셔 닦아
주십시오. 공구 내부에 액체를 넣거나 공구 부품을
액체에 담그는 행동은 절대 금물입니다.
선택 액세서리
경고:
DeWALT
에서 제공되지 않은 액세서리는 이
제품에 테스트되지 않았으므로, 그러한 액세서
리를 이 공구와 함께 사용하면 위험할 수 있습니다.
신체 부상의 위험을 줄이려면 본 제품에 알맞은
액세서리만 사용해야 합니다.
해당 액세서리에 대한 자세한 정보는 판매 대리점으로
문의하십시오.
환경 보호
분리 수거. 이 기호가 표시된 제품과 배터리를
일반 가정용 쓰레기와 함께 처리하면 안됩니다.
제품과 배터리에는 재용되거나 재활용되고 고철
자원에 대한 수요를 줄일 수 있는 자재가 포함
되어 있습니다. 전기 제품과 배터리는 지역 규정에 따라
재활용하십시오. 자세한 내용은 www.2helpU.com에서
찾아 볼 수 있습니다.

N659270 09/2018
Other manuals for Multi-Cutter DW872
7
Table of contents
Other DeWalt Saw manuals

DeWalt
DeWalt DCS370 User manual

DeWalt
DeWalt DW304P-XE User manual

DeWalt
DeWalt D24000 User manual

DeWalt
DeWalt DWS780 User manual

DeWalt
DeWalt DW364 User manual

DeWalt
DeWalt DW715 User manual

DeWalt
DeWalt DWS779-CA User manual

DeWalt
DeWalt DWE7490X User manual

DeWalt
DeWalt DW384 User manual

DeWalt
DeWalt DWS782-CA User manual

DeWalt
DeWalt DCS371 User manual

DeWalt
DeWalt DW861W User manual

DeWalt
DeWalt D27113 User manual

DeWalt
DeWalt DW328 User manual

DeWalt
DeWalt DWS780 User manual

DeWalt
DeWalt DW744 User manual

DeWalt
DeWalt DW708 User manual

DeWalt
DeWalt DW718 User manual

DeWalt
DeWalt DCS781 User manual

DeWalt
DeWalt DWS713 User manual