Dewenwils HOWL07B User manual

SKU: HOWL07B
[Instruction Manual]
Outdoor Wall Light
Thank you for your purchase.
Please contact us if you have any questions.
We will get back to you within 24 hours.
Please attach your Order ID so that
we can serve you better.
V20329

IDX
1
2
3
4
ITEMNAME
Wall light
Wire connectors
Mounting screw
Instruction manual
SPEC
42.8”x18”x16”
P3
M4x25mm
A5 PAPER
QUANTITY
1 pc
3 pcs
2 pcs
1 pc
NOTE
Warning:
Risk of fire. Min 75°C supply conductors. Consult a qualified electrician to
ensure correct installation. Before installation, please turn off the main
power of the circuit breaker to prevent possible electric shock.
Packing list
01
Product specifications
- Input Voltage: 120VAC 60HZ
- Maxload Power: Incandescent Bulb 60W
- Socket Type: Standard medium E26( bulb not included)
- Materal: Die-casting Aluminum and Water Ripple Glass
- Certification: ETL
Installation Instructions
FIG.1 WALL SWITCH FIG.2 BREAKER PANEL

FIG.3 FUSE BOX
02
STEP 01: POWER OFF
FIG.1. Turn the wall switch to the “OFF” position.
Depending on which type of fuse box in your home:
FIG.2. Either turn the main (Master) switch to the "OFF" position to cut off
the power supply of the entire home, or turn off the individual switch that
supplies power to the fixture installation location.
OR
FIG.3. Either turn the main (Master) switch to the "OFF" position to cut off
the power supply of the entire home, or unscrew the fuse that supplies
or turn off the individual switch that supplies power to the fixture installation
location.
STEP 02: CLEAN THE LIGHT
Cleaning: Cleaning the glass and photocell sensor surface of the light with a
soft and damp cloth.Dust will affect the sensitivity of photocell and brightness
of the light.
STEP 03: CONNECT THE WIRE
Connect black live wire, white neutral wire and ground wire with wire
connectors,be sure that the wires are connected together sturdily.
STEP 04: FIX THE LIGHT
Fix the lamp on the wall with mounting screws,unload the light body by
taking off two screws,install A19 bulb(E26 base) in the wall light.
(Not included)

STEP 05: POWER ON
Turn on the main (Master) switch to get the power back, the light will turn
on automatically at dusk and off at dawn.
The lamp structure is described as following picture:
MOUNTING
BRACKET
WIRE
CONNECTORS
BLACK LIVE
WIRE
MOUNTING
SCREWS
BULB
(not included)
GROUND WIRE
WHITE NEUTRAL
WIRE
CLASS
SHADES
03
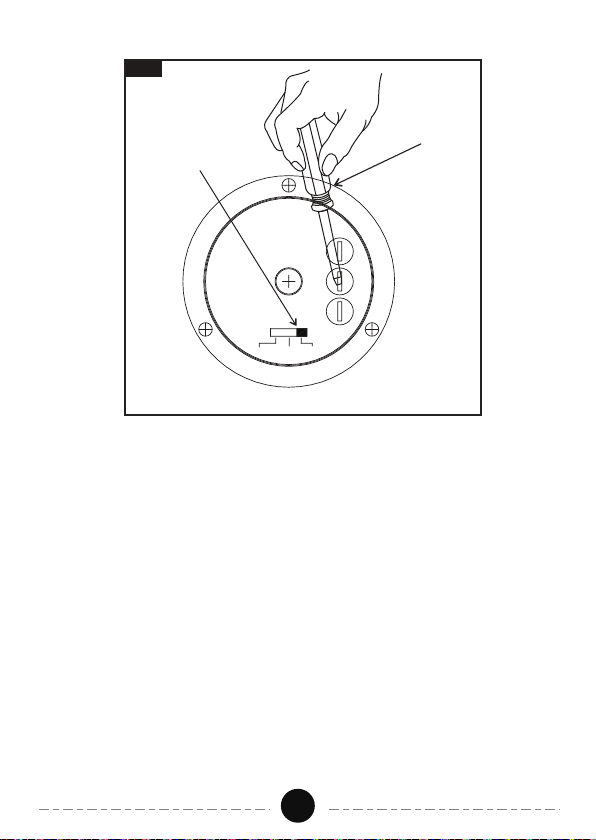
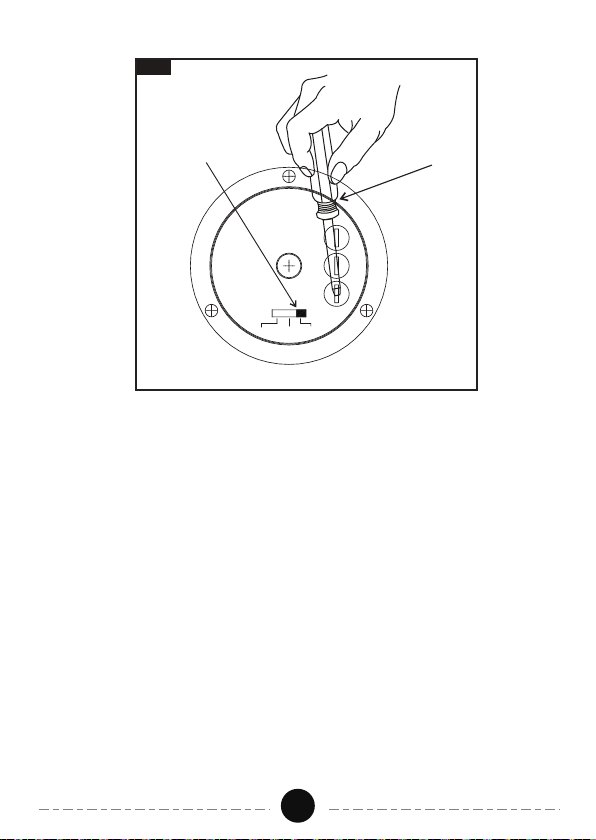
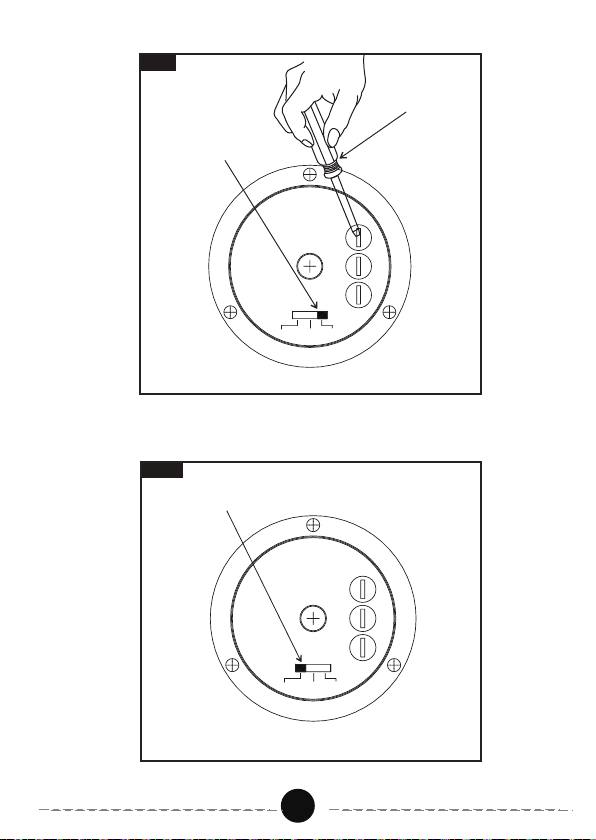
(1)Turn on the light, wait 30 seconds for the sensor to warm up, then select
one function.
(2)Unscrew the top knob and top cover, then you can adjust different modes,
sensitivity and delay time. Reinstall the top knob and cover after completing
the setting to ensure waterproofing reliability, as shown in Figure 1~4.
Operation description

04
AUTO MODE - Set the slide switch to AUTO. The fixture will stay off at
daytime and automatically turn on when human body activity is sensed
at night. It automatically turns off when the person leaves or remains
stationary for 20-180 seconds(according to the time you set). The factory
preset time is 60s and the brightness is 100%.
The lighting time can be adjusted. Factory setting is AUTO mode (60 second,
the maximum preset induction distance is 10 meters.)
-
Remark:
TIME - Adjust Lighting Time: Adjust the “Time” knob with a flat head
screwdriver(Not Included). Turn clockwise to increase the lighting time,
and counterclockwise to decrease the lighting time. For every 1/4 clockwise

05
rotation, the lighting time increases by 60 seconds. The maximum is 180
seconds.
oPC Aut Aut o+
Time
Low
Sens
Level
+
-
+
-
+
-
Slide Switch (Set to AUTO)
Detail A View
Flathead Screwdriver
not included)
Fig.5
SENS - Adjust Sensing Distance: Adjust the “Sens” knob with a flat head
screwdriver(Not Included). Turn clockwise to increase sensing distance,
and counterclockwise to decrease the sensing distance. The factory
preset distance is 10M(Maximum), you can adjust the “Sens” knob to set
it in the range of 3-10 meters.

06
Flathead Screwdriver
not included)
oPC Aut Aut o+
Time
Low
Sens
Level
+
-
+
-
+
-
Slide Switch (Set to AUTO)
Detail A View
Fig.6
4. AUTO+ MODE: Set the slide switch to AUTO+.The fixture will stay OFF
at daytime and stay low-level brightness (0%-50% brightness to be manually
adjusted)at night if no motion is detected within 20-180 seconds,and
automatically adjust the brightness to 100% when human body activity
is sensed at night. It returns to the preset low-level brightness again
when the person leaves or remains stationary for 20-180 seconds
(according to the time you set). The factory preset time is 60s and the
brightness is 100%.
LOW LEVEL - This function is out of work in AUTO mode.
TIME - Adjust Lighting Time: Adjust the “Time” knob with a flat head
screwdriver (Not Included). Turn clockwise to increase the lighting time,
and counterclockwise to decrease the lighting time. For every 1/4 clockwise
rotation, the lighting time increases by 60 seconds. The maximum is 180
seconds.
07
Flathead Screwdriver
not included)
oPC Aut Aut o+
Time
Low
Sens
Level
+
-
+
-
+
-
Slide Switch (Set to AUTO+
)
Detail A View
Fig.7
SENS - Adjust Sensing Distance: Adjust the “Sens” knob with a flat head
screwdriver(Not Included). Turn clockwise to increase sensing distance,
and counterclockwise to decrease the sensing distance. The factory preset
distance is 10M(Maximum), you can adjust the “Sens” knob to set it in the
range of 3-10 meters.
08
LOW LEVEL- Adjust low-level brightness: Adjust the “Sens” knob with a
flat head screwdriver(Not Included). Turn clockwise to increase brightness,
and counterclockwise to decrease brightness.
Note:
This function is only available for Incandescent bulbs or dimmable LED bulbs.
Flathead Screwdriver
not included)
oPC Aut Aut o +
Time
Low
Sens
Level
+
-
+
-
+
-
Slide Switch (Set to AUTO+
)
Detail A View
Fig.8
09
oPC Aut Aut o+
Time
Low
Sens
Level
+
-
+
-
+
-
Flathead Screwdriver
(not included)
Slide Switch (Set to AUTO+ )
Detail A View
Fig.9
oPC Aut Aut o+
Time
Low
Sens
Level
+
-
+
-
+
-
Slide Switch (Set to PC)
Detail A View
Fig.10
5.PC MODE:Lights off during the day and on at dusk. Other functions are
out of work.

10
NOTE:
1. The sensitivity of the motion sensor will increase as the environmental
temperature drops. For best performance, gently clean the lens with a
soft cloth every 1 or 2 months to ensure maximum sensitivity.
2. The magnitude of adjustment for sensitivity and time may not be precisely
correspond to the amount of the knob is turned.
3. When installed at a height of 6.5 feet, at 77 degrees Fahrenheit, the light
will provide a maximum detection distance of 40 feet and detection range
of 180 degrees. (See Fig.11 Fig.12)
4. The sensor will be more sensitive to motion across its detection path than
motion directly towards it. (See Fig.13)
5. To reduce possible nuisances, do not mount the fixture near a heat source
like an air conditioner, vent or furnace exhaust, or in a direction facing any
reflecting object or other light sources.
6. Be sure the light is mounted straight on the wall; otherwise, the detection
distance may be limited.
5`
6`
10`
40`
Fig.11 Fig. 12
180˚
Motion
Least sensitivity Most sensitivity
Sensor
Motion
Fig. 13
11
- Yes. But the light bulb is not included. You can replace it with a suitable
bulb (ST64 bulb is recommended). Please cut off the power before
replacing the bulb.
(3)Can this lamp be used outdoors in rainy and snowy weather?
- Yes. With a rubber pad at the top and a drainage hole at the bottom,
this outdoor wall light can discharge condensed water and other
accidental water effectively.
Aftersales service
Warrants this product to be free from defects in material and workmanship
for a period of one year from the date of purchase.
Warranty is void if damage is caused by misuse or improper installation.
Our dedicated customer service team will get back to you within 24 hours.
Aftersales FAQS
(1)Is there any matching POST LIGHT for sale?
- Yes, we have matching POST LIGHT for sale, you can search
W008161817 and buy it on Wayfair.
(2)Is the light bulb replaceable?
Table of contents
Other Dewenwils Outdoor Light manuals


