dewert okin HE150 User manual
HE150 System Quick Guide
23.08.2018 Id-Nr. xxxxx 4.0 1 / 6
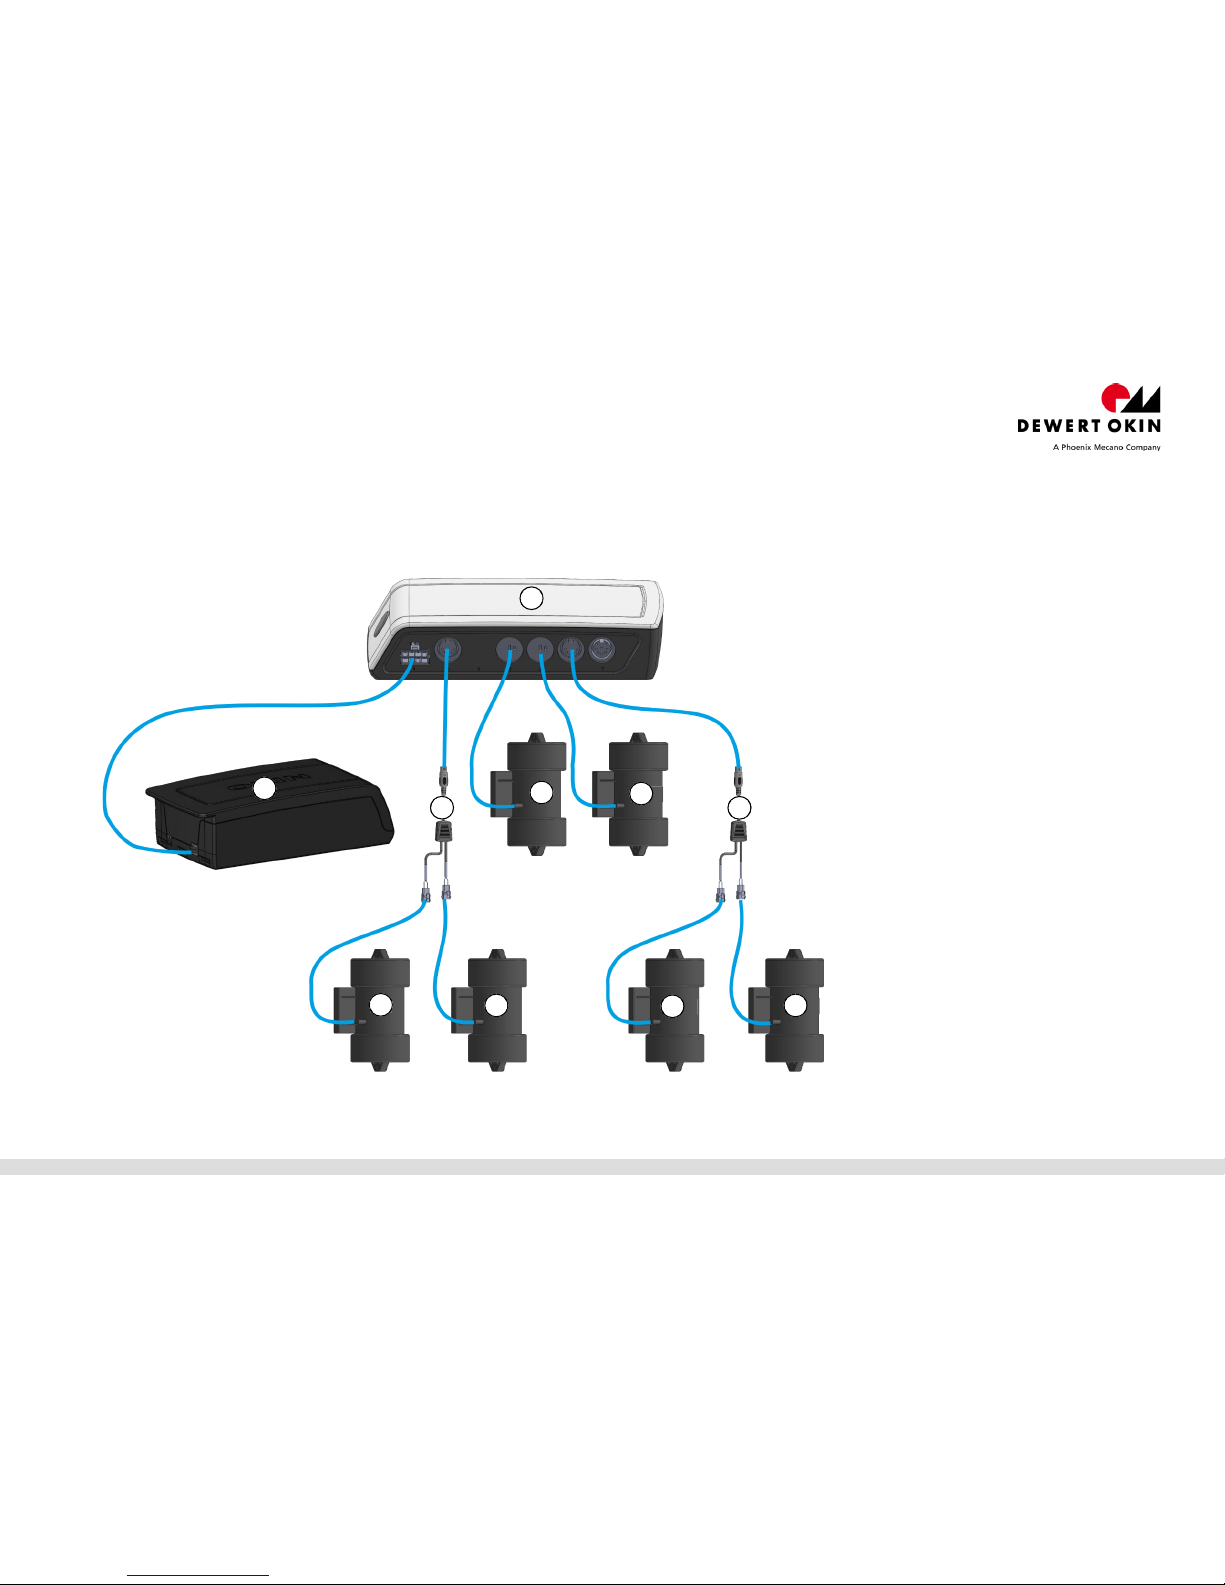
System overview: HE150 / PP1300 / RF-TOUCH / RF-TOPLINE
CAUTION! Electrical components should be connected or disconnected only when the power supply cord is unplugged.
CAUTION! There is a delay after the supply voltage is applied before the device actually turns on. Wait at least two seconds before beginning the commissioning.
Components that can be connected:
1. HE150
2. PP1300
3. JLDQ Massage motor
4. Distribution cable
5. JLDQ Massage motor
6. JLDQ Massage motor
7. JLDQ Massage motor
8. Distribution cable
1
4
3
7
6
8
2
5
3
7
HE150 System Quick Guide
23.08.2018 Id-Nr. xxxxx 4.0 2 / 6
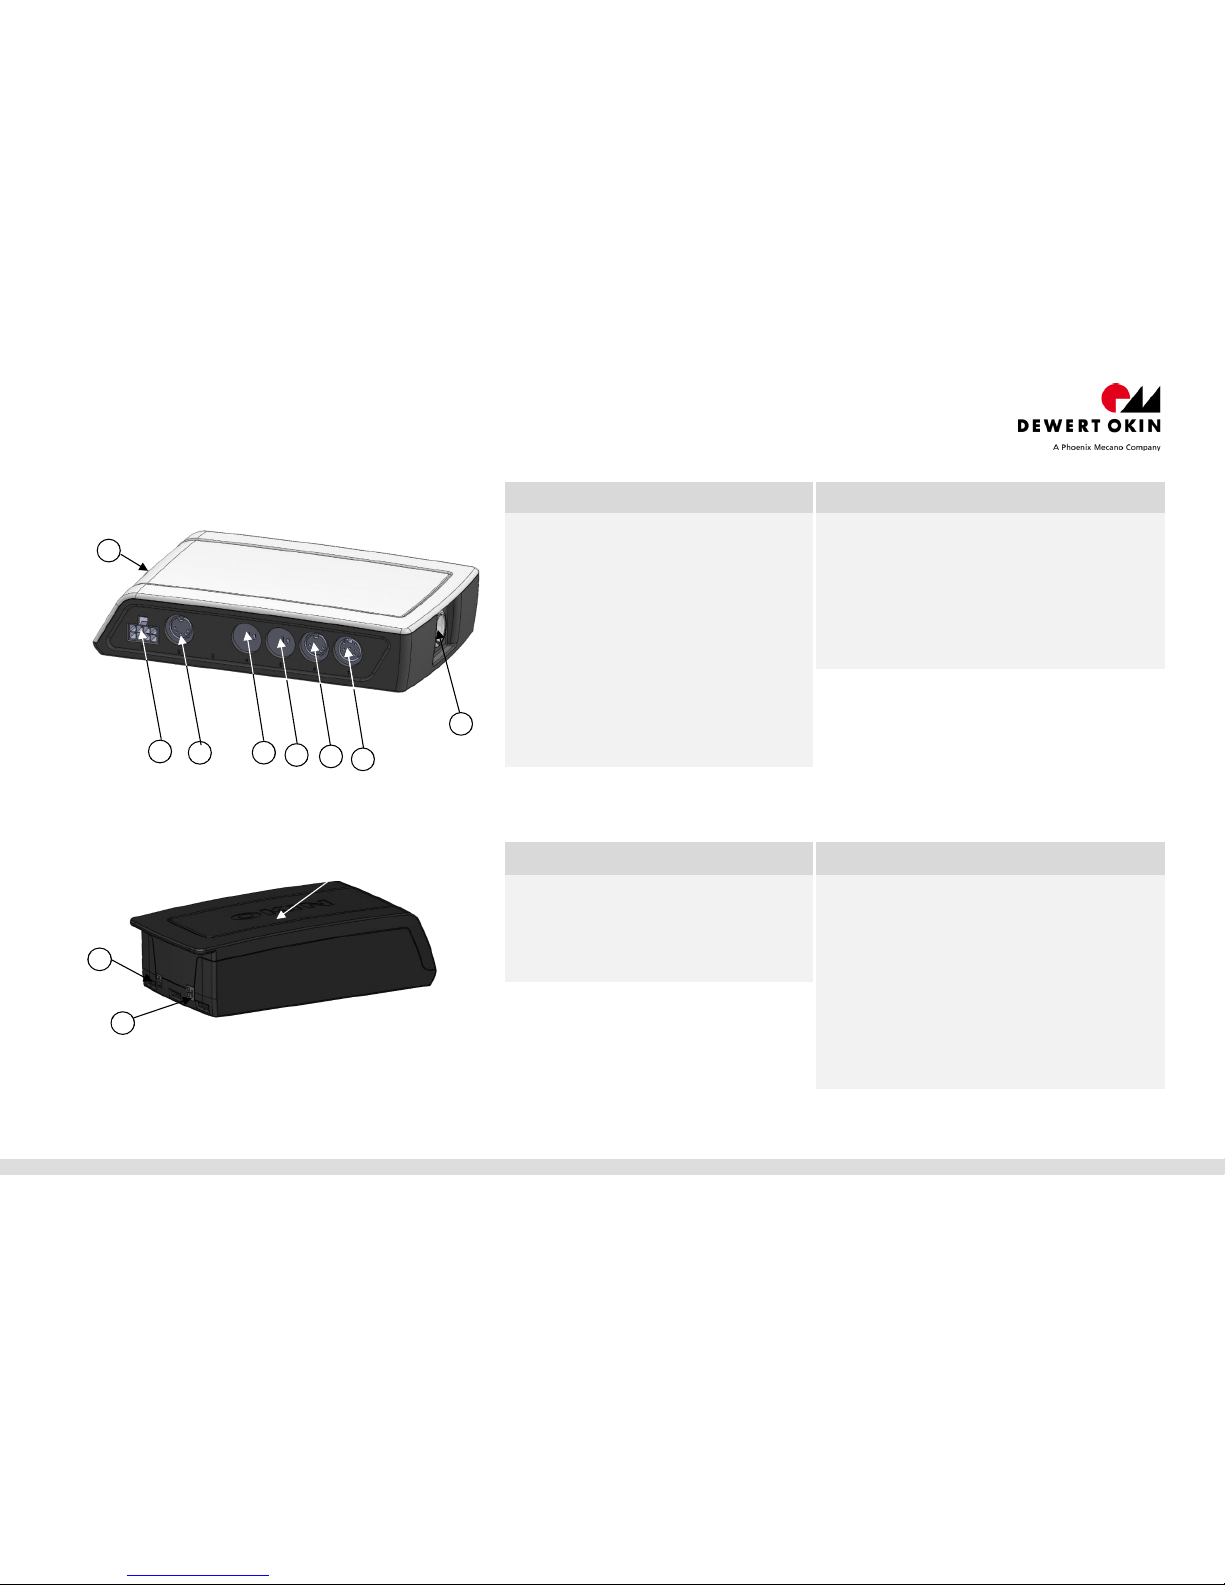
HE150
Connection ports and functions Technical specifications
1. Cable connection (HE-300 SMPS
POWER SUPPLY)
2. Connection for distribution cable
(PP1300 and JLDQ)
3. Connection for M3
4. Connection for M4
5. Connection for massage motor
6. Multi-function port for accessories
7. Floor lighting (LED white) /
Reset / Pairing button
(Bluetooth®Pairing LED blue)
8. Floor lighting (LED white)
Input voltage 24-29 V DC
Current consumption max. 6.00 A
Mode of operation
Protection class III
Protection degree IP20
Length x width x height 196 x 116 x 40 mm
PP1300
Connection ports and functions Technical specifications
9. Connection socket
10. Charging socket
Output voltage max. 29.4 V DC
Output current max. 5.00 A
Protection degree IP20
Length x width x height 147 x 77 x 42 mm
1
3
4
5
6
2
8
7
Intermittent duty
2 min. / 18 min.
9
10
HE150 System Quick Guide
23.08.2018 Id-Nr. xxxxx 4.0 3 / 6
RF-TOPLINE Description of button
Button Function
Note:
By pressing the buttons, the lights lit blue
Drive (head rest) up: The drive(s) move as long as this button is pressed.
Drive (head rest) down: The drive(s) move as long as this button is pressed
.
Drive (foot rest) up: The drive(s) move as long as this button is pressed.
Drive (foot rest) down: The drive(s) move as long as this button is pressed.
Drive (head & foot rest) up: The drive(s) move as long as this button is
pressed.
Drive (head & foot rest) down: The drive(s) move as long as this button is
pressed.
Memory position 1: The drives move to the saved position. The drives
move as long as this button is pressed.
Memory position 2: The drives move to the saved position. The drives
move as long as this button is pressed.
Memory save button: The drives move to their desired positions. Press
the memory save button once then press the desired position button within
three seconds. The memory position is saved and the floor lighting blinks
twice and a “Peep” signal sounds.
Floor lighting on/off:Switch the internal and external floor lighting on/off.
The floor lighting turns off automatically after 30 minutes.
Flashlight on/off: The flashlight is on as long as this button is pressed.
1 Drive M1 up
2 Drive M1 down
3 Drive M2 up
4 Drive M2 down
5 Reset M1 + M2 up
6 Reset M1 + M2 down
7 Memory position 1
8 Memory position 2
9 Memory save button
10 Floor lighting on/off
11 Flashlight on/off
1 + 2 Pairing (first System)
1 + 2 Floor lighting on/off
3 + 4 Pairing (second System)
or
Pairing External Power
Socket
3 + 4 Switchable power socket
on/off
1
3
5
7
9
2
4
6
8
10
11

HE150 System Quick Guide
23.08.2018 Id-Nr. xxxxx 4.0 4 / 6
Acknowledgement: The floor lighting will blink twice and a "peep" tone will
sound to signal the successful completion of the step.
1. Teach-in for the RF remote or app
To start using the RF remote with a Bluetooth®device, the wireless link with
the HE150 must first be established.
In order to use a Bluetooth®device (a smart phone or tablet) with your system
,
you will first need to download and install the "OKIN" app for your device.
a. Automatic teach-in
Insert the power plug into a power outlet. The HE150 will be in pairing
mode for 120sec which is divided as follows: During the first 60sec, an RF
remote can be discovered (the teach-in). During the next 60sec, a
Bluetooth®device can be discovered.
The floor lighting and the blue LED only are used for indicator light, the
function are display, not for illumination.
The floor lighting and the blue LED are illuminated during this teach-in
phase for the RF remote.
RF-TOUCH: Press pairing button A in the battery compartment.
RF-TOPLINE: Simultaneously press buttons 1 and 2.
A successful pairing will be acknowledged.
The floor lighting will switch off after the teach-in process for the RF
remote is finished. The blue LED for pairing with a Bluetooth®device
starts flashing.
The blue LED switches off when the Bluetooth®pairing process has timed
out or when the device has connected successfully. A successful pairing
will be acknowledged.
If, during the RF remote's teach-in process, you press any button on an
already paired RF remote, then it switches to the Bluetooth®teach-in mode
.
If the RF remote or a Bluetooth®device is discovered during the pairing
phase, then this pairing mode is automatically ended. The floor lighting
and the blue LED switch off.
Repeat the automatic teach-in process. First, remove the plug from the
power supply. Then wait 60sec and insert the plug back into the power
supply. You can now start the new teach-in process.
When operating a system in parallel, you must execute the teach-in
processes for the HE150s sequentially. First, connect the HE150 to the
power supply. Then execute the teach-in process for the first RF remote
or
Bluetooth®device. Then execute the teach-in for the second device.
Note! Only commission onesystem at a time. Never configure multipl
e
systems simultaneously
b. Manuel teach-in
The system must be connected to the power supply.
Quickly press the Reset/Pairing button twice on the HE150 (button
7) or the HE-300 SMPS (button 9). The floor lighting and the green
pairing LED will illuminate. The HE150 is now in pairing mode for 120
seconds, which is divided as follows: During the first 60 seconds, an
RF remote can be discovered (the teach-in). During the next 60
seconds, a Bluetooth®device can be discovered.
The floor lighting and the blue LED are illuminated during this teach-in
phase for the RF remote.
RF-TOUCH: Press pairing button A in the battery compartment.
RF-TOPLINE: Simultaneously press buttons 1 and 2.
A successful pairing will be acknowledged.
The floor lighting will switch off after the teach-in process for the RF
remote is finished. The blue LED for pairing with a Bluetooth®device
starts flashing.
The blue LED switches off when the Bluetooth®pairing process has
timed out or when the device has connected successfully. A
successful pairing will be acknowledged.
If, during the RF remote's teach-in process, you press any button on
an already paired RF remote, then it switches to the Bluetooth®teach-
in mode.
If the RF remote or a Bluetooth®device is discovered during the
pairing phase, then this pairing mode is automatically ended. The
floor lighting and the blue LED switch off.
When operating a system in parallel, you must execute the teach-in
processes for the HE150s sequentially. First, connect the HE150 to
the power supply. Then execute the teach-in process for the first RF
remote or Bluetooth®device. Then execute the teach-in for the
second device.
Note! Only commission onesystem at a time. Never configure
multiple systems simultaneously

HE150 System Quick Guide
23.08.2018 Id-Nr. xxxxx 4.0 5 / 6
2. Execute a reference movement with the HE150 or HE-300 SMP
S
The referencing must be execute in the following scenarios:
The initial commissioning
A change in hardware
After the battery-powered electrical reset function has been execute.
The system has a positional feedback feature. A referencing movement
must first be execute before this feature can function properly. Press the
Reset/Pairing button on the HE150 (button 7) or the HE-300 SMPS
(button 9) until the end position has been reached.
A successful pairing will be acknowledged.
3. Saving the memory positions
You can save different memory locations to the "Memory position"
buttons (M1, M2 or M3)" as follows:
Move to the desired positions by pressing the movement buttons on
the RF remote or app.
Press the "Memory save" button and hold for one second.
Press one of the "Memory position" buttons (M1, M2 or M3) within
three seconds. A successful pairing will be acknowledged.
The desired position is now saved to the memory position button
(M1, M2 or M3).
You can overwrite the saved memory position at any time by
repeating this process.
4. Resetting the saved positions to the factory default settings
The memory positions saved to buttons M1, M2 or M3 can be reset to
the factory default as follows:
Press the Memory save button on the RF Touch andhold down for
three seconds.
The "Memory position" buttons (M1 M2 and M3) first light up blue
and then white.
After about three seconds, the background lighting flashes white once.
Within one second, press and hold the "Floor lighting on/off"
button. The successful completion will be acknowledged.
Release the "Floor lighting on/off" button.
5. Moving two systems in parallel using a sync cable
CAUTION! Only connect the electrical components when the power
supply is switched off.
Two operating systems can be connected to each other using a sync
cable at the multi-function port. In this way, they can be run
simultaneously.
Press the Reset/Pairing button on the HE150 to move both
systems to their end positions.
Disconnect the power plug on both systems from the power socket.
Connect both systems by connecting the proper synchronous cable
to the multi-function port.
Insert the mains plug from both systems into the power socket.
Parallel operations are possible as soon as both systems are
connected to the power supply.
Parallel mode on: Press the "Parallel mode on/off" button and
hold for about three seconds. The blue button illumination will now
be lit. The successful completion will be acknowledged.
Parallel mode off: Press the "Parallel mode on/off" button and
hold for about three seconds. The blue button illumination will now
go off. The successful completion will be acknowledged.
Both programmed RF remotes can be used to move the systems.
6. Moving two systems in parallel using remote radio signals
CAUTION! Only connect the electrical components when the power
supply is switched off.
Two systems can be moved and operated simultaneously (parallel
mode) using one RF remote.
Press the Reset/Pairing button on the HE150 to move both
systems to their end positions.
Execute the teach-in process first for system 1 and then for system
2. Note that the teach-in processes are always sequential. The
teach-in should never be carried out on two systems at the same
time.
The systems are permanently paired together in this mode. The
"Parallel mode on/off" button has no function.
The teach-in can be execute for a second RF remote in this mode.
HE150 System Quick Guide
23.08.2018 Id-Nr. xxxxx 4.0 6 / 6
7. Cleaning and care
The system was designed so that it would be easy to clean.
Be sure to unplug the power cord on the power supply before you
begin cleaning it!
Clean the system using a dry antistatic cloth.
Be sure that you do not damage the connecting cables during the
cleaning.
8. Disposal
The system consists of electronic components, cables and metal and
plastic parts. You should observe all corresponding national and regional
environmental regulations when disposing of the system.
The disposal of the product is regulated in Germany by Elektro-G,
internationally by the EU Directive 2012/19/EC (WEEE), or by any
applicable national laws and regulations.
The system should not be disposed of with
normal household waste!
FCC Warning / IC Warning
FCC: This device complies with Part 15 of the FCC Rules. Operation is subject to
the following two conditions: (1) this device may not cause harmful interference, and
(2) this device must accept any interference received, including interference that
may cause undesired operation. Note: Any changes or modifications not approved
by the party responsible for compliance could void the user's authority to operate
the equipment.
IC:
This device complies with
Industry Canada's licence- exempt RSSs.
Operation is
subject t
o the following two conditions: (1) this device may not cause interference,
and (2) this device must accept any interference, including interference that may
cause undesired operation of the device."
Leprésent appareil est conforme aux CNR d'Industrie Canada applicables aux
appareils radio Exempts de licence. L'exploitation est autorisée aux deux conditions
suivantes: (1) l'appareil ne doit pas produire de brouillage, et (2) l'utilisateur de
l'appareil doit accepter tout brouillage radioélectrique subi, même si le brouillage es
t
susceptible d'en compromettre le fonctionnement.
DewertOkin GmbH
Weststraße 1
32278 Kirchlengern
Germany
Phone: +49 (0)5223/979-0
Fax: +49 (0)5223/75182
http://www.dewertokin.de
Table of contents
Popular Control Unit manuals by other brands

Festo
Festo Compact Performance CP-FB6-E Brief description

Elo TouchSystems
Elo TouchSystems DMS-SA19P-EXTME Quick installation guide

JS Automation
JS Automation MPC3034A user manual

JAUDT
JAUDT SW GII 6406 Series Translation of the original operating instructions

Spektrum
Spektrum Air Module System manual

BOC Edwards
BOC Edwards Q Series instruction manual

KHADAS
KHADAS BT Magic quick start

Etherma
Etherma eNEXHO-IL Assembly and operating instructions

PMFoundations
PMFoundations Attenuverter Assembly guide

GEA
GEA VARIVENT Operating instruction

Walther Systemtechnik
Walther Systemtechnik VMS-05 Assembly instructions

Altronix
Altronix LINQ8PD Installation and programming manual


