Diamant Cipollini FLUSSO User manual

#LiveYourRide
OPERATION AND
MAINTENANCE MANUAL
FLUSSO

OPERATION AND MAINTENANCE MANUAL
The pedal-assisted bicycle is guaranteed to comply with the
specifications and technical instructions described in the
Manual on the date of issue of the same, reported on this
page; the pedal-assisted bicycle may in the future undergo
technical changes, even significant ones, without the
Manual being updated. It is advisable to consult the website
www.mcipollini.com for information on the variations that
may be implemented.
#LiveYourRide
INDEX
1 INTRODUCTION
1.1 LIABILITY
2 DESCRIPTION OF THE BICYCLE
2.1 INTENDED USE
2.2 GENERAL PRODUCT DESCRIPTION
2.3 IDENTIFICATION PLATES
2.4 BICYCLE COMPONENTS
2.4.1 GEAR CHANGE
2.4.2 SADDLE AND SEATPOST
2.4.3 HANDLEBAR
2.4.4 BRAKES
2.4.5 PEDALS
2.4.6 LIGHTS
2.4.7 PEDAL ASSISTANCE SYSTEM
2.4.7.1 SWITCHING ON/OFF THE ASSISTANCE SYSTEM
2.4.7.2 ADJUSTING THE LEVEL OF ASSISTANCE
2.4.7.3 COMPATIBILITY WITH CYCLOCOMPUTERS
2.4.7.4 INTERACTION WITH THE PARAMETERS OF THE ASSISTANCE SYSTEM
2.4.7.5 REPLACING THE REAR WHEEL
2.4.8 BATTERY
3. BICYCLE CLEANING
4. MAINTENANCE
4.1 INSPECTION INTERVALS
5. WARRANTY
5.1 WHAT TO DO IN CASE A WARRANTY INTERVENTION IS NEEDED
6. DISPOSAL
6.1 PACKAGING
6.2 ELECTRONIC COMPONENTS AND ACCESSORIES
6.3 TYRES AND AIR CHAMBERS
6.4 LUBRICANTS, BRAKE OIL AND SPECIAL LIQUIDS FOR THE CARE OF THE BICYCLE
6.5 OTHER PEDAL-ASSISTED BICYCLE COMPONENTS
7. BIKE TRANSPORT
8. WARNINGS AND PRECAUTIONS
8.1 GENERAL WARNINGS
8.2 STORAGE AND TRANSPORT
8.3 OPERATION
PG. 4
PG. 5
PG. 16
PG. 17
PG. 19
PG. 21
PG. 22
PG. 22

#LiveYourRide
1.
INTRODUCTION
This manual is an integral and essential part of the pedal-assisted bicycle,
FLUSSO model, and must be delivered to the user. Before commissioning,
it is essential that users carefully read, understand and follow the following
provisions. The manufacturer shall not be liable for damage to persons
and/or property or to pedal-assisted bicycles, if they are used incorrectly in
relation to the requirements indicated. In view of continuous technological
development, the manufacturer reserves the right to modify the pedal-
assisted bicycles without notice, without this manual being automatically
updated. The User and Maintenance Manual is an integral part of the pedal-
assisted bicycles; therefore it is necessary to keep it intact and in a safe place
throughout their life. This manual must always be available to the user. For
any problem or request for clarification, contact the specialist dealer at which
the pedal-assisted bicycle was purchased without delay; the list of specialist
dealers is available on the website:
https://www.mcipollini.com/store-locator/
2.
DESCRIPTION OF THE BICYCLE
2.1
INTENDED USE
The manufacturer or retailer shall not be held liable in any way for damage
resulting from use that does not comply with the intended use of the
pedal-assisted bicycle. The intended use of the FLOW pedalassisted cycle is
expressed below.
Category: racing, triathlon and chrono bikes, bicycles for recreational use and
city bikes, including pedal-assisted versions of these.
Intended use: intended for use on artificially paved surfaces, such as paved
roads and cycle paths. The wheels are constantly in contact with the ground.
2.2
GENERAL PRODUCT DESCRIPTION
All FLUSSO pedal-assisted variants are equipped with a rechargeable battery
and an electric engine, whose intervention takes place only at the same time
as pedalling and progressively stops as the vehicle speed approaches 25
km/h, and then stops completely at this speed. The models are listed below
with the relevant code (for complete specifications, please refer to the link
https://www.mcipollini.com/bikes/usso/ ):
- L40UG
Transmission group: SRAM Red AXS
Engine: Maxon Bikedrive Air
Battery: Maxon Bikedrive Air 250 Wh
- O40OP
Transmission group: SRAM Rival AXS
Engine: Maxon Bikedrive Air
Battery: Maxon Bikedrive Air 250 Wh
1.1
LIABILITY
Failure to comply with the operating instructions and safety instructions
contained in this manual exempts the manufacturer from any liability. If the
servicing of the pedal-assisted bicycle is carried out in a manner that does
not comply with the instructions provided, with non-original spare parts or in
any way in such a way as to impair its integrity or modify its characteristics,
the manufacturer shall be relieved of any liability inherent in the safety
of persons and the malfunction of the pedal-assisted bicycle. The pedal-
assisted bicycle is delivered assembled and ready for use by the dealer,
unless otherwise indicated at the time of sale. The seller is responsible for
unpacking and fine-tuning the bicycle.
Any alteration to the pedal-assist system, whether at the hardware or
software level, immediately invalidates any liability of Diamant srl. Please
note that pedal-assisted bicycles are considered as such if they comply with
the EPAC standard which stipulates that the system only assists pedalling up
to 25 km/h, for a maximum of 250 W and only following muscular pedalling
applied by the user.
4 5
#LiveYourRide
2.3
IDENTIFICATION PLATES
The FLUSSO pedal-assisted bicycle is equipped with an identification plate
that certifies its approval according to EC regulations, in accordance with EN
15194 (2017). This plate must be present, legible and not removable, on the
bicycle.
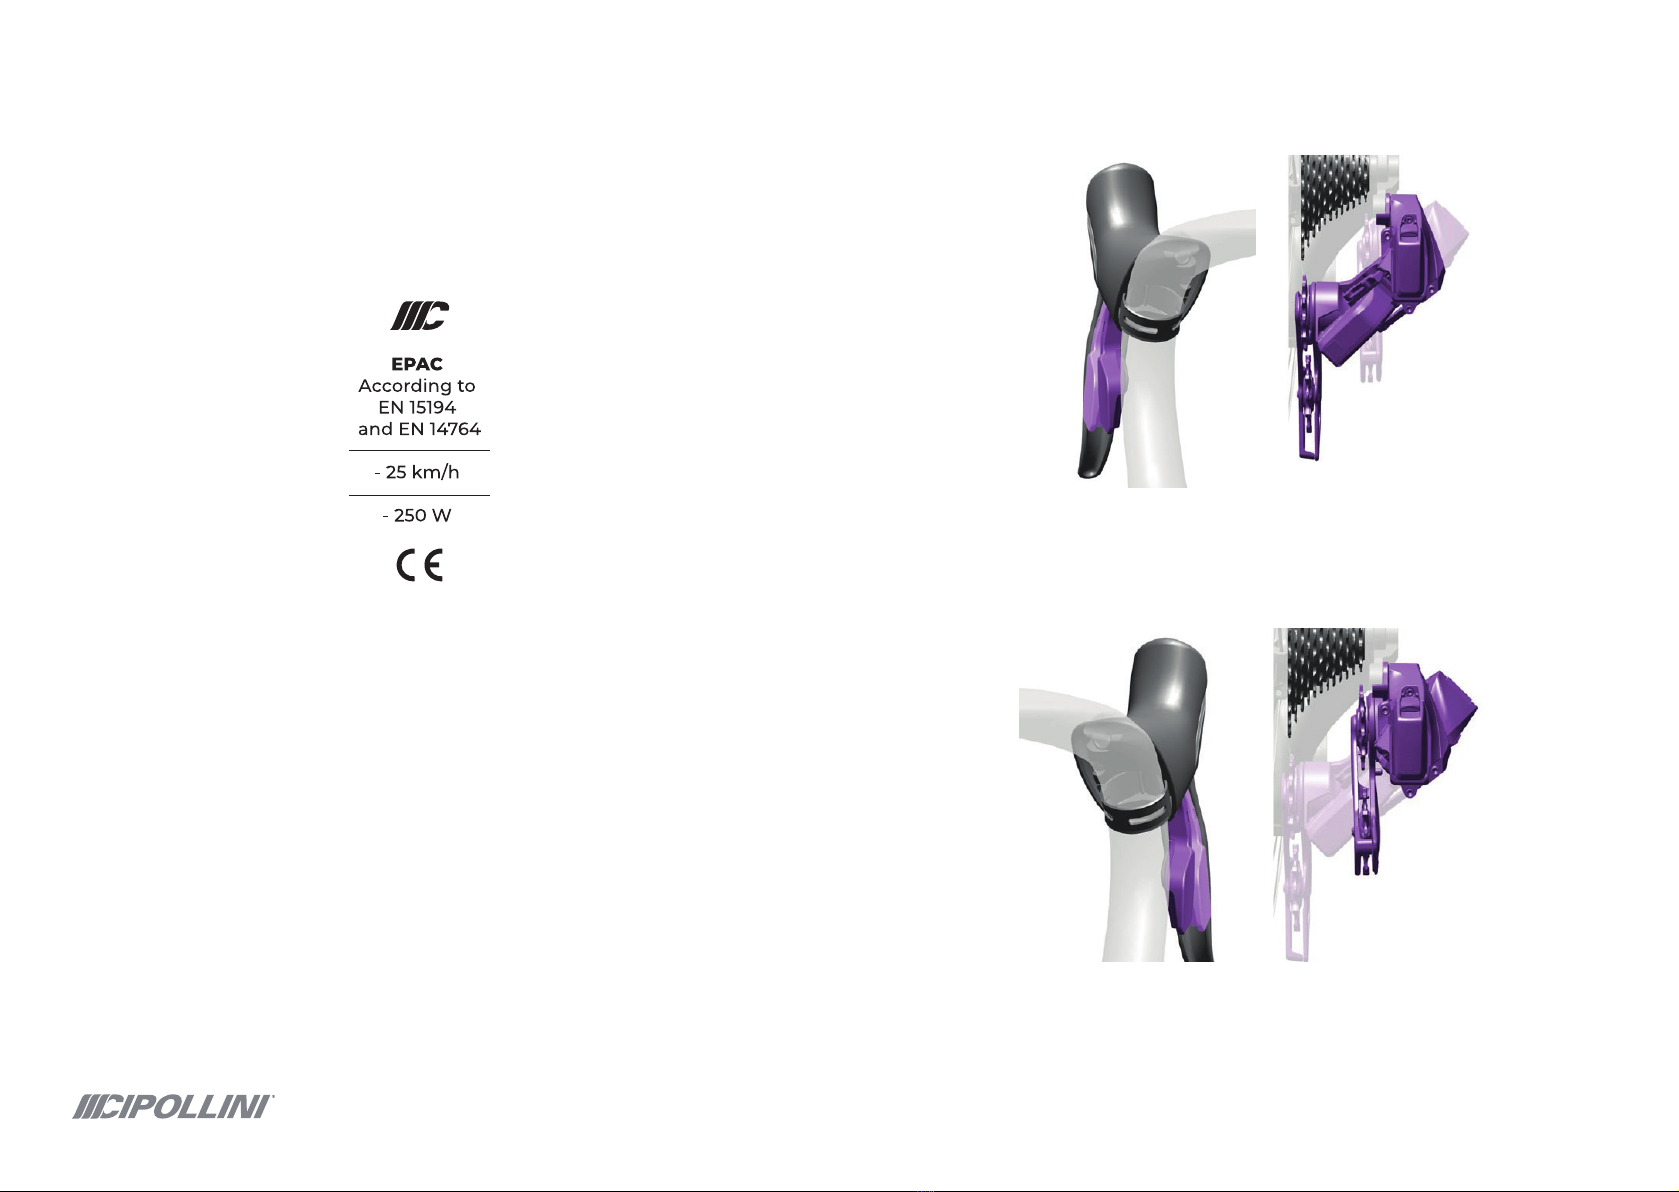
Press the right shift paddle to move the rear derailleur outwards. Press and
hold the paddle for multiple shifting.
2.4
BICYCLE COMPONENTS
2.4.1
GEAR CHANGE
The gear change adjusts the relationship between the user’s pedalling and
the distance travelled by the bicycle. By moving the chain from one sprocket
to another, the gearbox allows you to use different transmission gears
depending on the type of track you are following.
For shifting, press the left shift paddle to move the rear derailleur inwards.
Press and hold the paddle for multiple shifting.
6 7
#LiveYourRide
- L40UG
Transmission group: SRAM Red AXS
Type of control: wireless electronic
Number of gears: 24 (2 x 12)
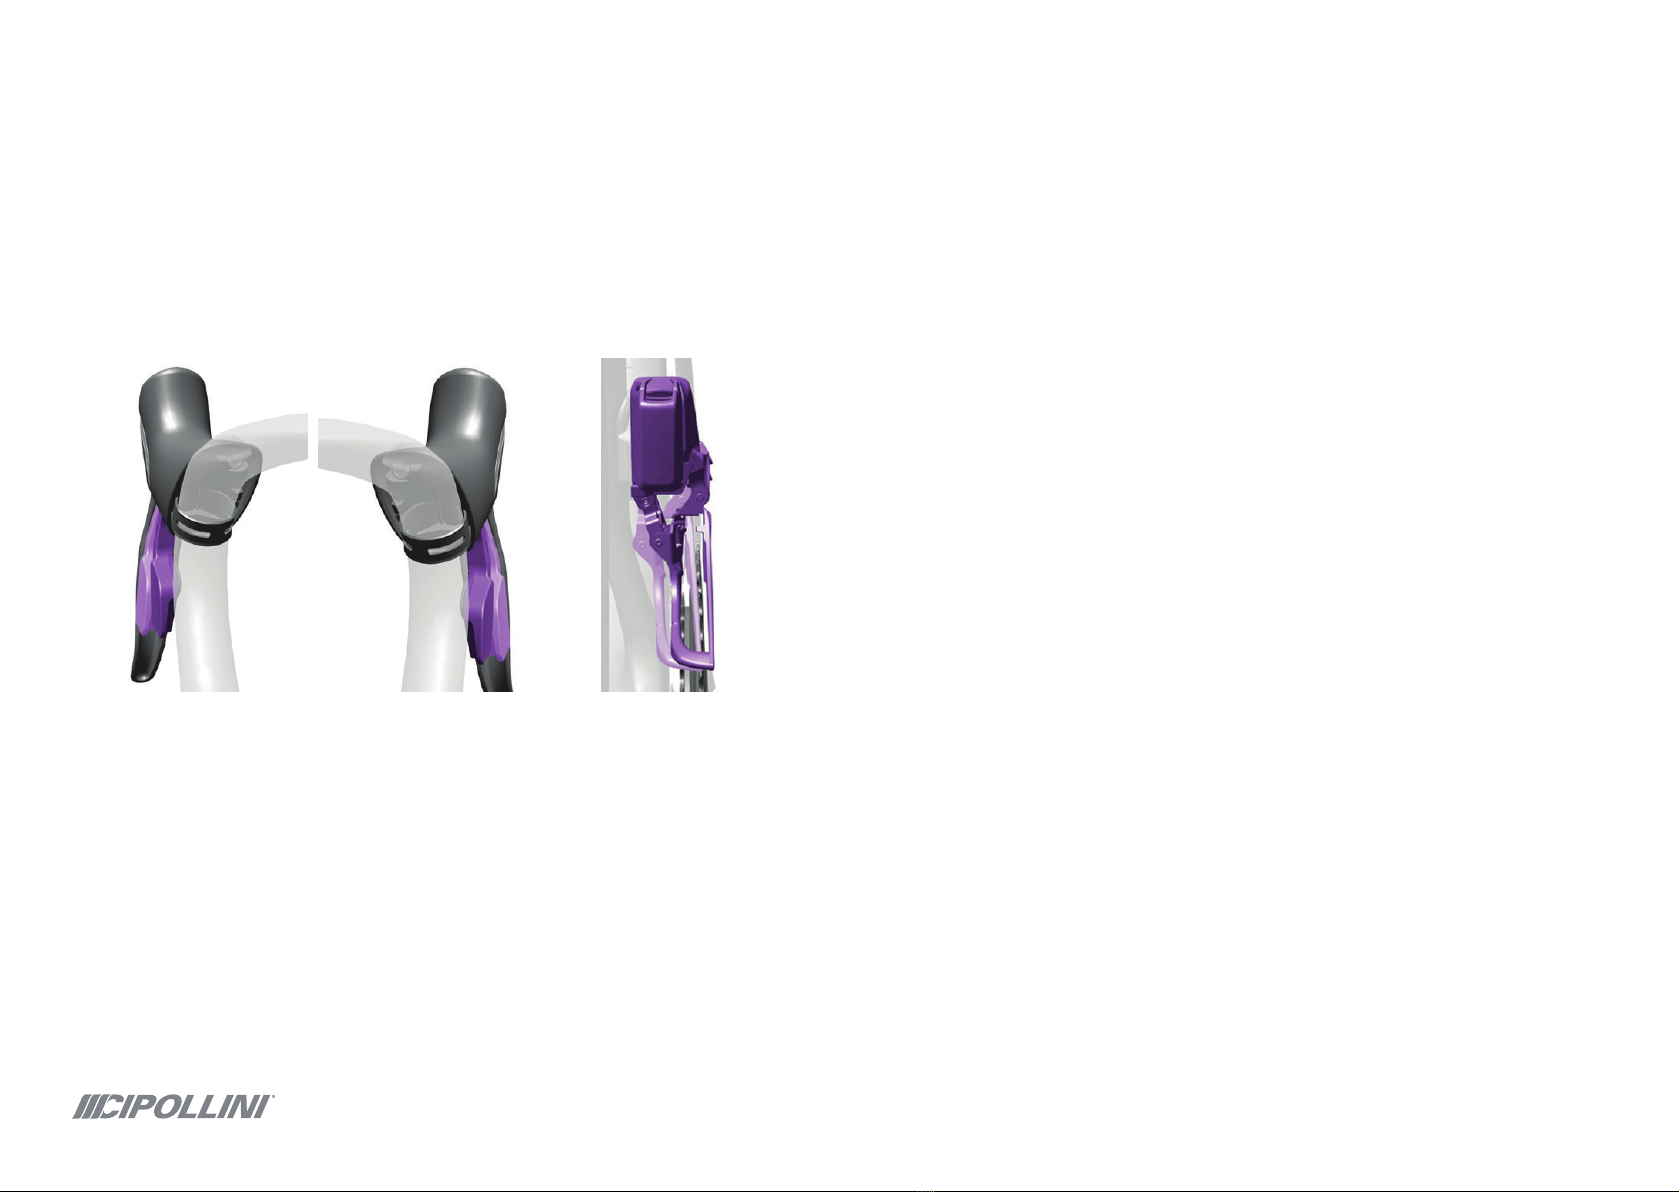
The derailleur is also present in this variant. To activate shifting, press both
shifting paddles simultaneously to shift the front derailleur inwards or
outwards. The system does not allow shifting in the smaller chainring and
small sprocket combination.
- O40OP
Transmission group: SRAM Rival AXS
Type of control: wireless electronic
Number of gears: 12 (1 x 12)
The derailleur is also present in this variant. To activate shifting, press both
shifting paddles simultaneously to shift the front derailleur inwards or
outwards. The system does not allow shifting in the smaller chainring and
small sprocket combination.
2.4.2
SADDLE AND SEATPOST
Before using the pedal-assisted bicycle, check that the adjustment screws
are tightened as indicated near them and/or at the link
https://www.mcipollini.com/coppie_chiusura.pdf.
If in doubt about the adjustment, consult an authorised dealer.
2.4.3
HANDLEBAR
The height of the handlebar can be adjusted by managing the thicknesses
placed under the handlebar attachment and the corresponding adjustment
screws. The inclination is adjustable only for the version with non-integrated
handlebar and handlebar attachment. The position of the screws and modes
may vary depending on the equipment:
- L40UG
Handlebar: Deda Alanera
Possible adjustments: handlebar height
- O40OP
Handlebar: Vision Trimax Aero ACR
Handlebar attachment: FSA ST Road NS ACR
Possible adjustments: height and inclination of the handlebar
Before using the pedal-assisted bicycle, check that the adjustment screws
are tightened as indicated near them and/or at the link https://www.
mcipollini.com/coppie_chiusura.pdf. If in doubt about the adjustment,
consult an authorised dealer.
8 9
#LiveYourRide
2.4.6
LIGHTS
In all FLUSSO models there is a rear light integrated in the seatpost. It is also
advisable to affix reflectors (not supplied) after consulting the national and
regional regulations of the relevant country of use.
Once the pedal assistance system has been switched on (see next paragraph),
the rear light is activated by pressing the power button on the Maxon
controller again.
Pressing the power button again turns the rear light off.
2.4.7
PEDAL ASSISTANCE SYSTEM
All FLUSSO models are equipped with MAXON electric engine for assistance
to the user during pedalling. Once the assistance intensity of the electric
engine has been selected, the engine activates autonomously while the
pedals are being operated, and is deactivated immediately if the pedalling
stops. The power of the engine depends on the torque imparted to the
pedals, according to a multiplicative factor according to the level of assistance
selected. The assistance drops linearly until it cancels out when it reaches 25
km/h.
2.4.4
BRAKES
All FLUSSO assemblies are equipped with a disc braking system that can
be operated using the levers on the SRAM controls. The right lever activates
the rear brake, the left lever activates the front brake. The braking torque
is proportional to the force applied to the levers. It is possible to adjust the
inclination and positioning of the levers by loosening the relative locking
screw. Before using the pedal-assisted bicycle, make sure that you have
tightened the fixing screws of the brake levers according to the torque
indicated on the screws and/or on the documentation available on the
website https://www.sram.com/en/sram. It is not recommended to
adjust any other parameter of the braking system. If in doubt about the
adjustment, consult an authorised dealer. Do not touch the brake discs after
braking, they may be hot and cause burns.
2.4.5
PEDALS
The pedals must be tightened to the cranks. By applying torque to the pedals,
it is possible to impose a translational motion on the pedal-assisted bicycle.
All FLUSSO models are equipped with electric pedal assistance, the engine is
automatically activated once the pedal-assisted bicycle is switched on and a
torque is applied to the pedals. The user can mount and dismount the pedals
making sure that they are tightened to a torque between 22 and 25 Nm.
When mounting, pay attention to the direction of screwing the pedals: the
right pedal has a right-hand thread, the left pedal has a left-hand thread.
The pedals are not supplied, it is recommended to assemble a model in
accordance with the laws in force in the country of use.
10 11

#LiveYourRide
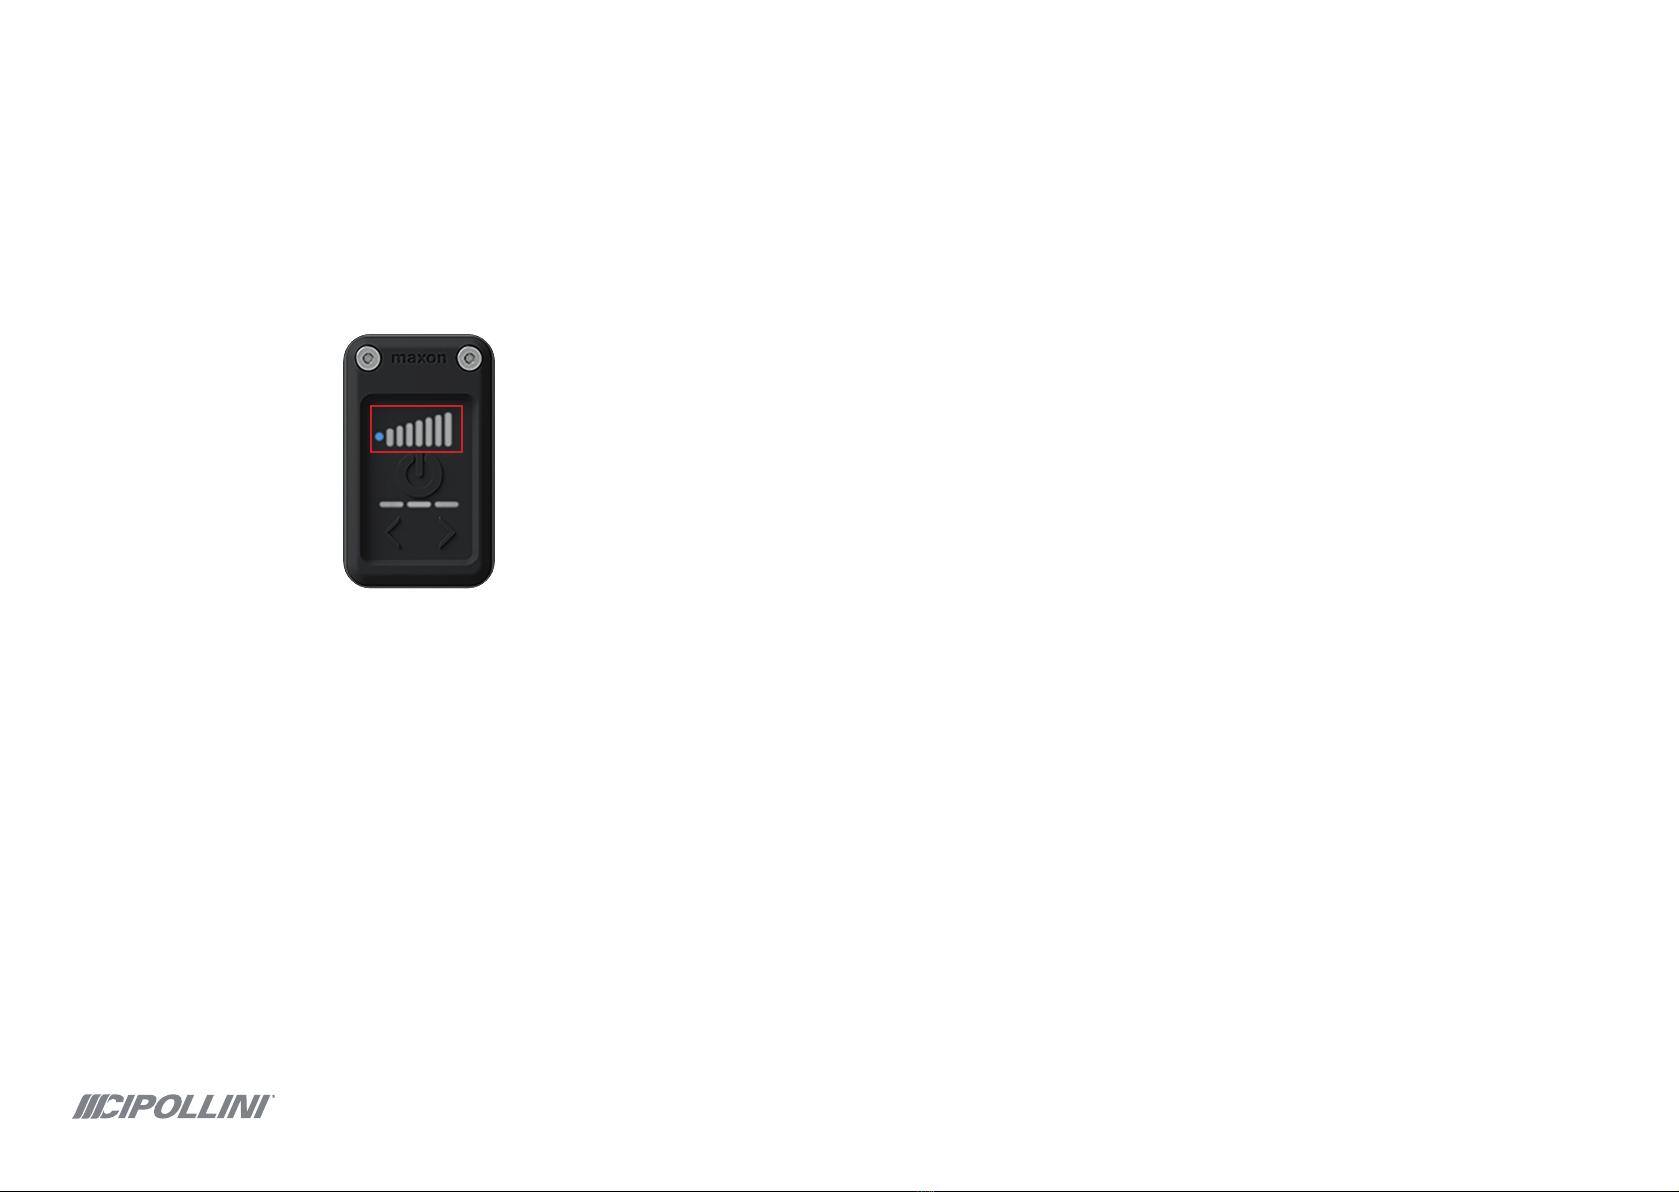
2.4.7.2
ADJUSTING THE LEVEL OF ASSISTANCE
On the controller, you can set the e-Bike engine assistance level while
pedalling. The level of assistance can be changed at any time, even while
moving. There are 4 levels of assistance available:
• LEVEL 0: the engine assistance is deactivated; it is possible to operate the
pedal-assisted bicycle by pedalling as on a normal push bicycle. With this
level of assistance, the impetus aid cannot be activated.
• LEVEL 1: active assistance at the highest level of efficiency, for maximum
autonomy.
• LEVEL 2: uniform level assistance, for long-distance excursions.
• LEVEL 3: maximum level assistance, up to high pedalling frequencies, for
athletic use.
The selected layer is visible in the image below on the controller or on the
computer loop attached to it.
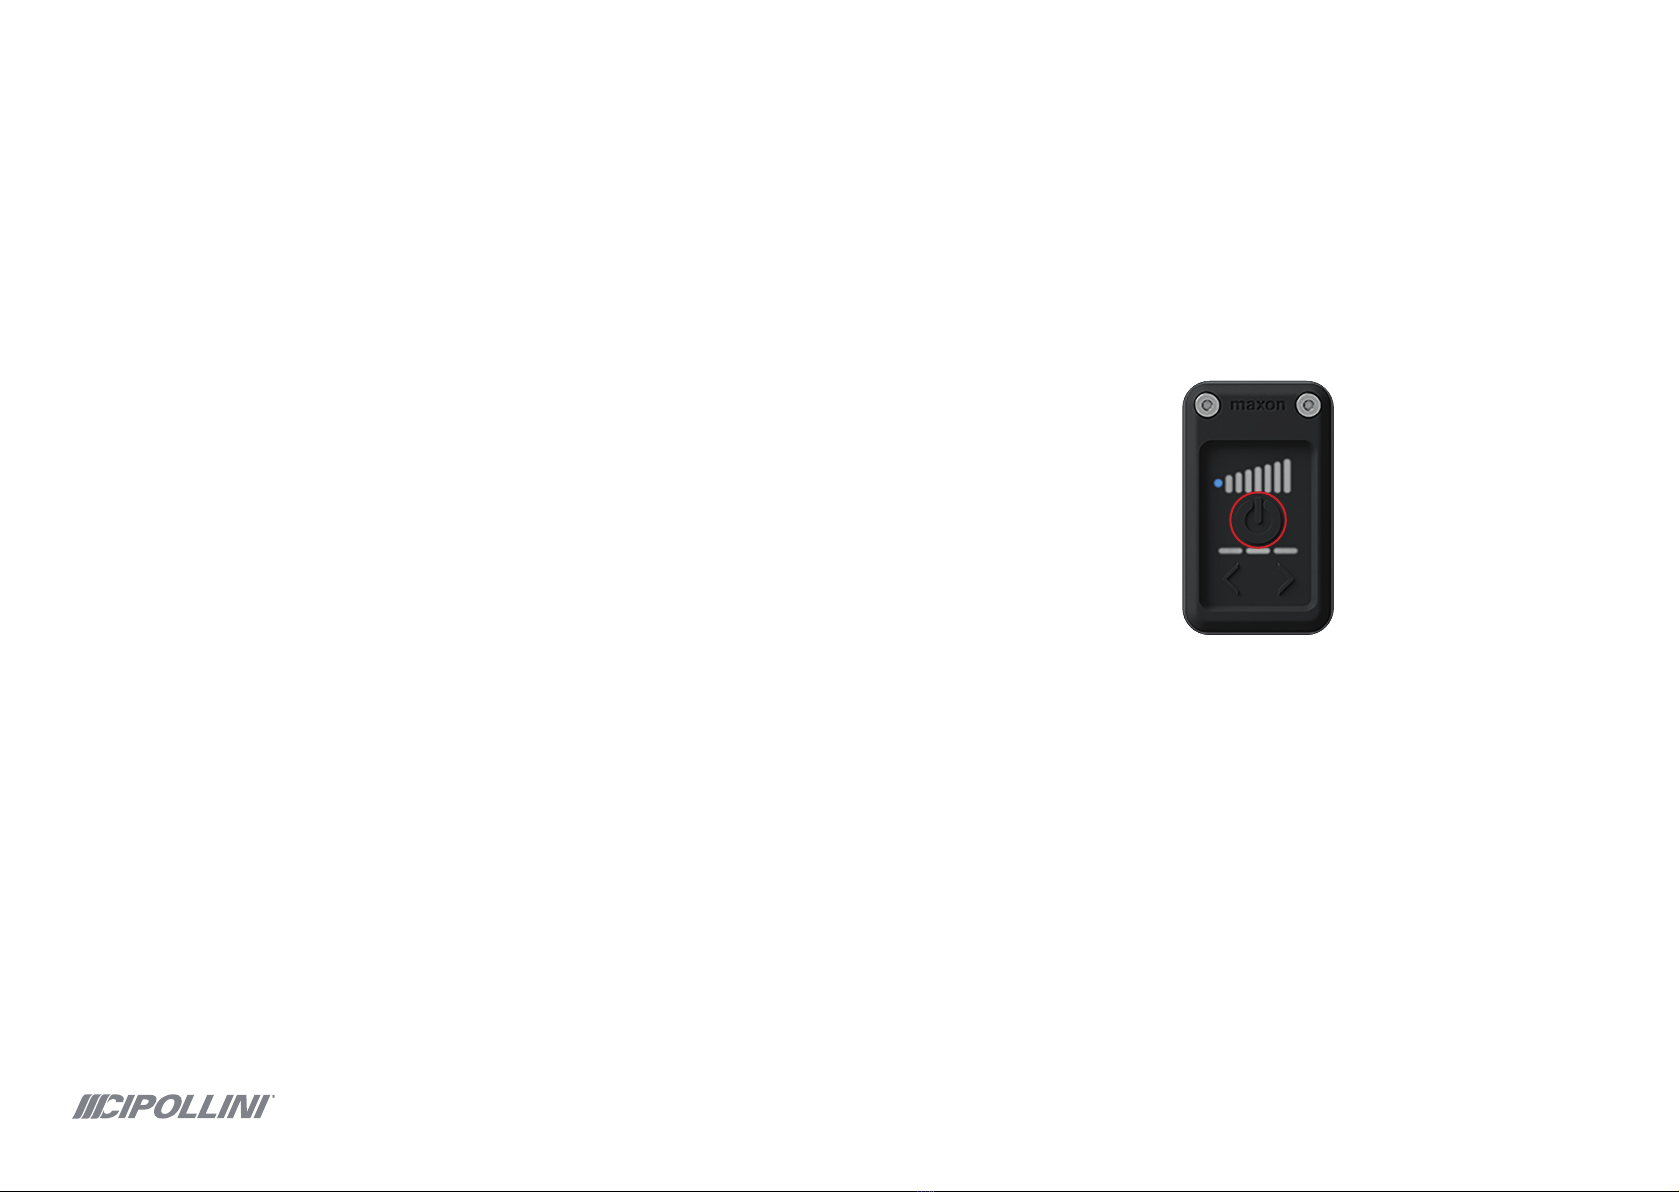
2.4.7.1
SWITCHING ON/OFF THE ASSISTANCE SYSTEM
The assistance system is activated by pressing the power button circled in
the following image.
The assistance system can only be activated if the battery is sufficiently
charged. In addition, the speed sensor must be properly connected to the drive
unit (see engine-specific instructions at https://www.maxonbikedrive.
com/en/e-bike-system/bikedrive-air if in doubt). After a long period
of inactivity (cycling assistance is not used and no key is pressed) the
assistance system will deactivate. Do not press on the pedals when the pedal-
assisted bicycle is switched on. Start cycling when the bicycle is fully on.
The assistance system is switched off by keeping the power button pressed
for about 4 seconds.
12 13
#LiveYourRide
2.4.7.5
REPLACING THE REAR WHEEL
If it is necessary to replace the rear wheel, make sure that the speed sensor
does not interfere with this operation. It is recommended to bring with you
the tools necessary to change the position of the sensor for a correct removal
of the wheel and for the subsequent correct repositioning of the sensor
during use. MCipollini reserves the right not to respond under warranty in
the event of breakage of the speed sensor itself. In this regard, consult the
documentation at the link
https://www.mcipollini.com/usso_warning_update.pdf .
2.4.8
BATTERY
The battery is charged using the supplied Maxon battery charger (735990)
properly connected to the electrical outlet and inserted into the port used to
charge the bicycle on the engine cover shown in the following image.
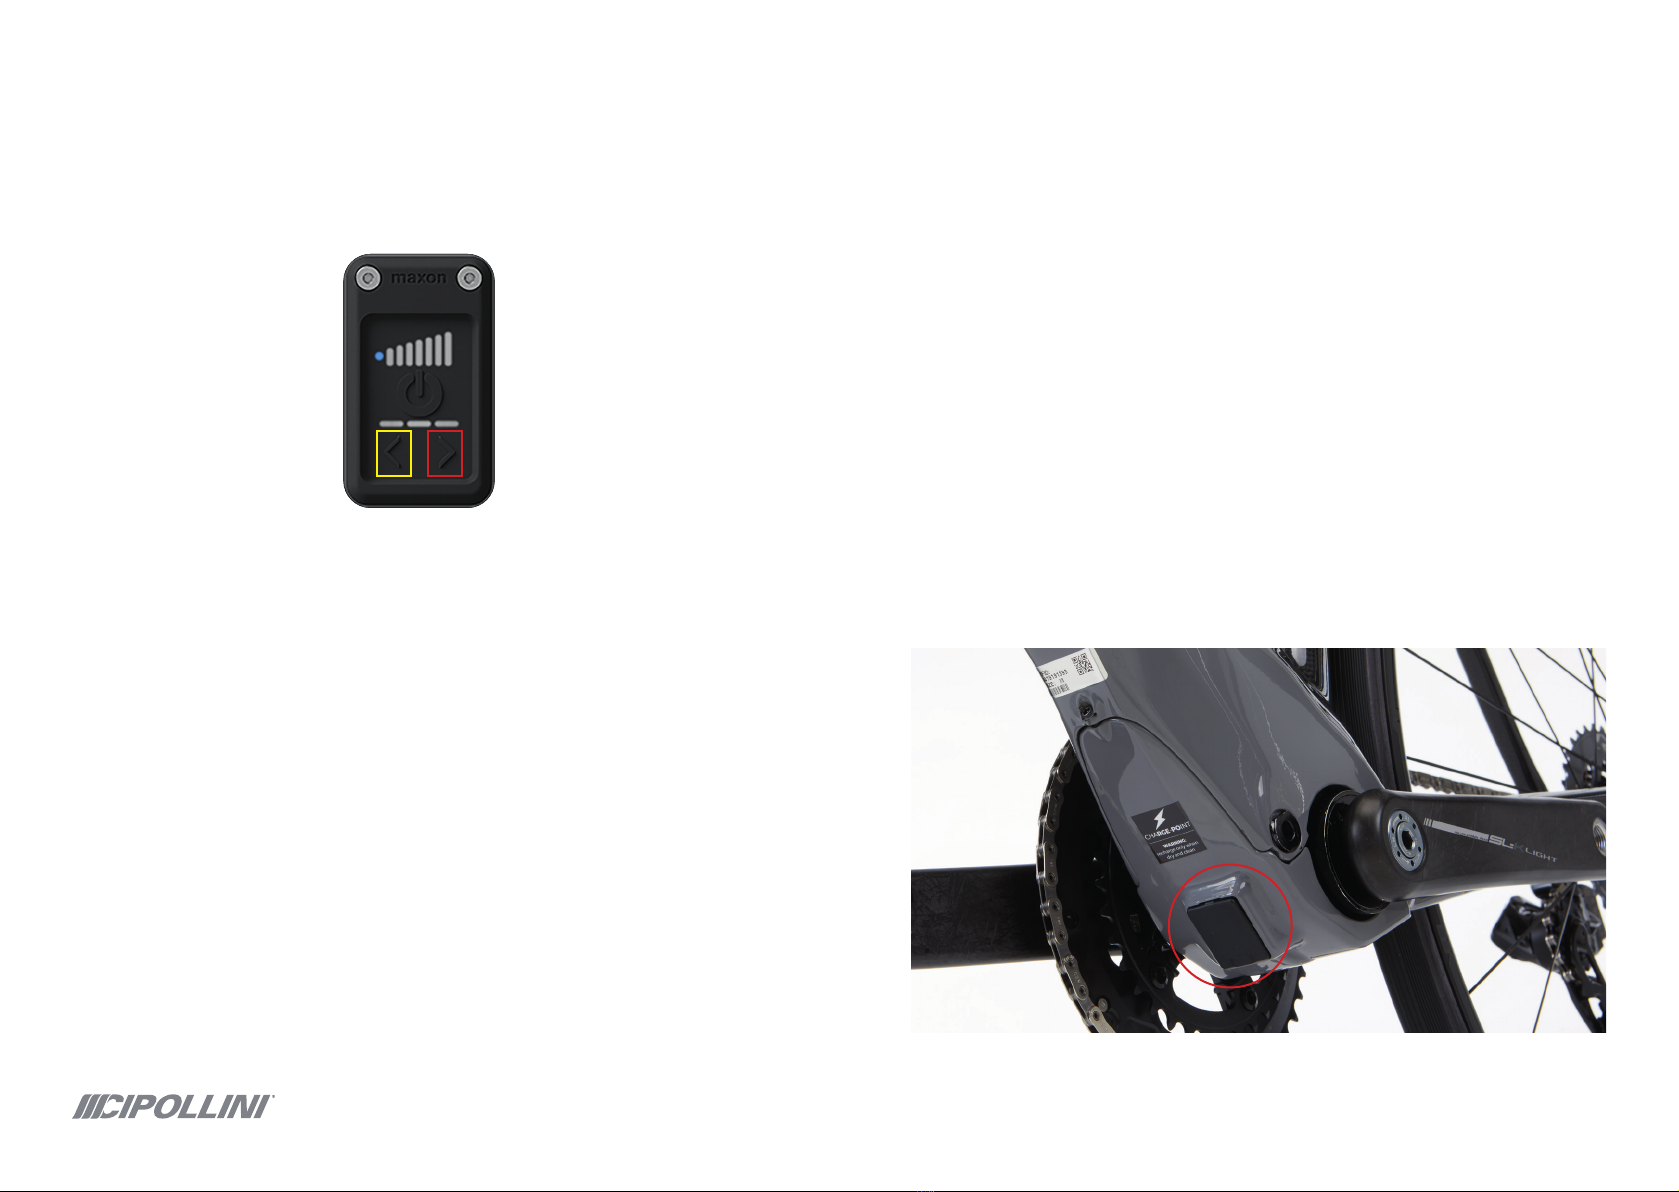
To increase the level of assisted pedalling, briefly press the button highlighted
in red on the following image, repeating the action until the desired level of
assisted pedalling is displayed; to reduce the level, briefly press the button
highlighted in yellow.
For safer use, the level of assistance can be varied even without removing
your hands from the handlebar. In fact, near the SRAM commands there are
some remote commands that by pressing them allow you to:
- increase the level of assistance by pressing the remote control located near
the right SRAM command
- decrease the level of assistance by pressing the remote control located near
the left SRAM command
2.4.7.3
COMPATIBILITY WITH CYCLOCOMPUTERS
The BLE and ANT+ compatible computer loops can be connected to the
Maxon system. The completeness of the data is total in the case of use of
Sigma cycle-computer.
2.4.7.4
INTERACTION WITH THE PARAMETERS OF THE
ASSISTANCE SYSTEM
You can change the Maxon system service parameters by downloading and
connecting the system to the Maxon BIKEDRIVE Service App.
14 15
#LiveYourRide
For cleaning and maintenance, it is necessary to have:
• A clean cloth
• Warm water with a little mild soap
• A soft brush or sponge
• Paint protection products
• Chain lubricant
Clean the pedal-assisted bike frequently, even if it is not dirty. Be sure to wipe
all surfaces and components (except brakes, gearboxes and chain) with a
sponge moistened with warm water and mild or neutral soap. Always rinse
with a sponge moistened with lukewarm water only and remove all soap
residues. Dry all components with a dry, soft cloth. If deemed necessary, apply
a paint protection product (ask your dealer for the most suitable product). Do
not treat the brake discs with any product. After cleaning the bike, lubricate
the chain with suitable chain oil (ask your dealer if you have any questions).
For additional information on cleaning the individual components, refer to
the specific instructions provided by the manufacturer.
4
MAINTENANCE
The proper functioning of the pedal-assisted bicycle depends to a large
extent on its proper maintenance. Refrain from bicycle maintenance if you
do not have sufficient skills and contact a specialist dealer instead.
Particular attention should be paid to:
• Correct tightening of all the screws and pins, in accordance with the torque
prescribed in the link://www.mcipollini.com/coppie_chiusura.pdf, if you do
not have a torque wrench, contact your specialist dealer.
• Any leakage of oil from the braking system. In this case, contact a dealer
immediately.
• Any leakage of liquid from the battery. In this case, contact a dealer
immediately.
• Any emission of smoke from the battery. In this case, contact a dealer
immediately.
To insert the socket inside the connector on the bicycle, it is necessary to
raise the rubber cover and connect the charger in the appropriate socket.
Clean the cover of the charging socket. Avoid, in particular, the presence of
water or dirt on the socket and on the contacts, e.g. sand or earth. Given
the heating of the charging station during charging, there is a risk of fire.
Recharge the batteries on the bicycle only if they are dry and where there is
no risk of fire. The charging status of the battery is visible through the 7 LED
indicators on the Maxon controller.
It is absolutely forbidden to use water or solvents to clean the battery
charging socket. When the battery is fully depleted, the assistance will be
progressively reduced. For more information, error codes, maintenance, and
assistance in the event of issues, see the Maxon Bikedrive Service App. In
order not to compromise the total capacity of the battery and its performance,
carry out frequent charging cycles and do not leave the battery totally
discharged for more than 24 hours.
3
BICYCLE CLEANING
The cleanliness of the bicycle is essential to ensure the correct functioning of
all its parts. Do not use harsh cleaning products. Do not use sharp, pointed, or
metallic objects to clean. Never clean the pedalassisted bike with a violent jet
of water or using high-pressure tools, such as pressure washers.
MCipollini is not liable for damage to the engine, batteries or electrical parts
caused by the infiltration of water due to high pressure jets.
16 17

#LiveYourRide
4.1
INSPECTION INTERVALS
Compliance with the inspection intervals is in the interest of the user to
ensure the proper operation and safety of the bicycle. MCipollini reserves the
right, in the event of a request for action under warranty, to verify whether
the disputed defect could be avoided with regular maintenance. Based on
this verification, MCipollini reserves the right to invalidate the warranty
service. It is necessary to carry out a first service of the bicycle after 30/60
days from purchase and strictly within 500 km of use.
The service is to be carried out by the specialist dealer and includes the
following services:
• Tread wear check
• Checking and/or adjustment of radius voltage and centering
• Hub clearance check
• Pin tightness check
• Chain tension adjustment and wear check
• Steering series wear check and clearance adjustment
• Checking the tightening of the handlebar screws
• Checking disc brake pads for wear and condition of the discs
(possible replacement)
• Checking and adjusting cable and brake casing functions
• Checking of gears and adjustment of brake controls
• Checking of central movement and tightening of pedal screws
• Seatpost locking check
• Checking for cracks on the frame
5
WARRANTY
In addition to the legal guarantee according to Directive 99/44 EC, MCipollini
provides an additional Commercial Conventional Warranty on the frame of
the pedal-assisted bicycle. This Conventional Guarantee – in addition to the
legal guarantee according to Directive 99/44 EC – is provided if each of the
following Conditions applies:
1. The Product is part of the MCipollini range and is purchased at one of
the MCipollini Stores listed on the website www.mcipollini.com or from
authorised dealers.
2. The Purchaser provides proof of purchase of the Product.
3. The Buyer provides proof of registration of the Product on the website
www.mcipollini.com under the item “Register your frame.”
4. The Buyer checks the bicycle together with the MCipollini Point of Sale
before taking possession, in order to ascertain its compliance with their
expectations. The registration of the Product on the website www.mcipollini.
com under the item “Register your frame” and the subsequent issue of a
document certifying the registration.
5. The Product is used in accordance with the intended use stated in the use
and maintenance manual.
6. In the case of sale of the Product by the Buyer to third parties, in addition to
the above documents, the Buyer shall send a copy of the contract certifying
the transfer to another person.
Where all of the foregoing Conditions apply, the Manufacturer’s Conventional
Warranty will be provided in the following manner and within the following
Limits:
1. The MCipollini frame is guaranteed free of original conformity defects for a
period of 5 years (60 months) from the date of delivery, i.e. three years more
than the provisions of Directive 99/44 EC, while all other components of the
bicycle are guaranteed free of original conformity defects for a period of
2 years (24 months) from the date of delivery, as provided for by Directive
99/44 EC.
18 19

#LiveYourRide
2. The services in execution of this Conventional Warranty will be rendered
exclusively by the MCipollini Point of Sale at which you purchased the
Product. To this end, the Buyer must contact only the Dealer at which the
purchase was made.
3. E-Bike batteries due to the intrinsic performance degradation to which
they are subject are guaranteed for a duration of 1 year and in any case their
warranty is managed directly by Maxon through the Maxon Bikedrive Service
App.
5.1
WHAT TO DO IN CASE A WARRANTY INTERVENTION IS
NEEDED
In the event that, during the warranty period, the Product requires repair
depending on an original defect, the Buyer must immediately contact the
MCipollini Point of Sale where the product was purchased, describing the
problem and having it examined, carrying the warranty booklet, proof of
purchase and a proof of the Warranty Certificate. The intervention under
warranty may only be carried out by the Dealer from whom the Product
was purchased. In the event of a request for repair in relation to which it
is ascertained that the warranty is not operational, MCipollini reserves the
right to charge the Buyer for the cost of processing. In the event that the
Buyer turns to a Point of Sale other than the one from which they purchased
the Product, this Point of Sale has the right not to provide the service under
warranty. In the event that the MCipollini Point of Sale other than that of
purchase of the Product still agrees to provide the service, it may ask the
Buyer for additional costs not covered by the MCipollini warranty, which
will remain entirely the responsibility of the Buyer. The warranty applies
as part of the first purchase of the pedal-assisted bicycle. In order for the
guarantee action to be effective, proof of purchase and proof of the warranty
extension certificate must be provided. If the bicycle is subject to a change
of ownership, a copy of the contract between private individuals establishing
the aforementioned change of ownership must be submitted in addition to
the previous documents. The warranty covers only the original conformity
defects. The warranty does not cover any costs of transporting and returning
the defective frame (which may be requested by MCipollini) and the
processing costs for replacing it with a new frame.
6
DISPOSAL
To avoid any form of environmental pollution, MCipollini invites the end
customer to dispose of the product and its packaging in accordance with
the regulations in force in the country of purchase.
6.1
PACKAGING
The packaging of the bicycle is generally disposed of by the dealer.
6.2
ELECTRONIC COMPONENTS AND ACCESSORIES
Batteries and electronic components must be disposed of at a centre for the
collection of electrical equipment. Do not allow any liquid leaking from the
batteries to escape into the environment.
6.3
TYRES AND AIR CHAMBERS
Tyres must be disposed of at a special waste centre. Do not disperse into the
environment or dispose of them in household waste.
6.4
LUBRICANTS, BRAKE OIL AND SPECIAL LIQUIDS FOR THE
CARE OF THE BICYCLE
Lubricants, oils and liquids of various kinds used for cycling must not by any
means be disposed of in domestic waste, sewage or the environment, but in
a centre for the collection of special waste.
6.5
OTHER PEDAL-ASSISTED BICYCLE COMPONENTS
The pedal-assisted bicycle is defined as end-of-life WEEE. It can therefore be
disposed of free of charge in its entirety in a special waste collection centre.
In this respect, contact the competent office in your country of residence or
consult the regulations in force in this regard.
20 21

#LiveYourRide
7
BIKE TRANSPORT
The bicycle is equipped with a 250 Wh lithium-ion battery (plus a possible
range extender with a second battery, also 250 Wh). It is recommended
to follow the specific regulations in each country regarding transport.
Particularly in the case of air transport, we urge you to contact the
international forwarding agents, who lay down rules for each air route.
8
WARNINGS AND PRECAUTIONS
8.1
GENERAL WARNINGS
- The battery may only be used for its intended purpose.
- Do not disassemble, open or crush the battery.
- The battery must not be exposed to heat or fire. Avoid direct exposure to
sunlight. Do not leave the battery in a car or similar place where the internal
temperature may exceed 60°C.
- Do not throw the battery into a fire.
- Do not heat any part of the battery.
- Do not immerse the battery in water, do not throw it away.
- Keep the battery clean and dry.
- The battery must not be short-circuited.
- The battery must not be subjected to mechanical shocks.
- Do not step on the battery or throw it on the floor.
- Do not pierce the battery with a sharp object such as a needle or screwdriver.
- In the event of a leak from a cell, do not allow the liquid to come into contact
with skin or get into the eyes. In case of contact, wash the affected area with
plenty of water and seek medical attention.
- Do not use badly damaged or deformed batteries.
- Do not place the battery in a microwave oven, tumble dryer or high pressure
container.
8.2
STORAGE AND TRANSPORT
- Keep the battery out of the reach of children.
- Store the battery at a low temperature (we recommend a temperature
below 20 °C), at low humidity, in an environment free of dust and corrosive
gases.
- Do not store one or more batteries dangerously in a box or in a drawer
where they could short-circuit each other or be short-circuit each other or be
short-circuited by other materials conductors.
- Do not store the battery in a pocket or bag with metal objects such as keys,
necklaces, hairpins, coins or screws.
- Crushed, punctured or torn packages must not be transported. Such
packages must be isolated until the shipper has given instructions to inspect
and repack the product, if necessary.
- If damage to the packaging results in the leakage of cells or batteries, the
spilled products shall be collected and isolated immediately.
- If the bike will not be used for some time, check that the battery level does
not fall below 30%. If a lower level is found the battery must be recharged to
30%.
8.3
OPERATION
- The battery must be charged before use. The correct charger must always
be used. The manufacturer’s instructions or information in the manual of the
device for proper charging must always be followed.
- Only use original Maxon chargers to charge the battery. The use of an
unsuitable charger can lead to malfunctions and a limited service life of the
battery. There is also a risk of fire and explosion. Diamant and Maxon will not
be liable for damage caused by the use of unapproved chargers.
- If the battery terminals/connectors become dirty, clean them with a clean,
dry cloth.
- The charging process stops automatically as soon as the battery is charged.
It is therefore impossible to overcharge the battery.
- If the bike is not used for a long period of time (e.g. in winter), do not leave
the charger connected.
22 23

- At the end of the charging process, it is recommended to disconnect the
charger first from the power socket and then from the battery.
- Do not expose the charger to moisture (water, rain, snow) during charging.
- Never carry out the charging process in an environment where moisture
could condense on the charger.
- Beware of condensation. If the charger is moved from a cold room to a
warm room, condensation may form. In this case, use of the charger should
be postponed until the condensation has evaporated. This may take several
hours.
- Take care not to damage the power or charging cables during transport.
- Never rip the power cable to disconnect the charger from the wall socket.
- Do not exert any pressure on the cables and plugs. Electric shocks or fires
may occur if the cables become excessively stretched or twisted.
- Lay the power cable and connected charging cable in such a way that no
one can step on or trip over them, or that neither cable is exposed to other
harmful influences or stresses.
- Do not use the charger if the power cable, charging cable or plugs connected
to the cables are damaged. Damaged parts must be replaced immediately
by an authorised dealer.
- Do not use or disassemble the charger if it has received a heavy blow, been
dropped or has been damaged in any other way. Take the damaged charger
to an authorised dealer for repair.
- The charger must not be used by small children.
- Do not disassemble or modify the charger.
- Do not cover the charger during charging and do not place any objects on
it.
- Never short-circuit the poles of the charging plug with metal objects.
- Make sure that the power plug is firmly inserted in the socket.
- Do not touch the plugs with wet hands.
- Do not use the charger plug and/or power plug if they are wet or dirty. Clean
the plugs with a dry cloth before charging.
- Stop charging the battery if it is not completed within the specified time.
- Stop using the battery if it becomes unusually hot, discoloured or deformed,
or if abnormal conditions are observed during use, charging or storage.
- If you notice any leaks or unpleasant odours, immediately move away from
fire or other heat sources. If liquid gets on your skin or clothing, wash it off
immediately with fresh water.
#LiveYourRide
24 25

Table of contents


