Diamond Multimedia AMP1000 User manual


Package Includes:
1 x AMP Android Media Player
1x Quick Installation Guide (this guide you are viewing right now)
3 x AAA batteries
1 x HDMI cable
1 x Component HD video cable (Red, Blue and Green)
1 x Composite audio cable (red and white)
1 x 3 in 1 remote control
Power Connection:
1. Connect the power adapter connector to your media player box and then plug the AC plug into
an available wall plug or power strip.
2. Press the power button located on the front of the media player.
Connecting your AMP box to your
HDTV
HDMI connection:

1. Check your TV input connection type. If your TV supports HDMI it is recommended to use the
HDMI connection from your media player to your TV. HDMI will support both HD video and
HD Audio through the single cable connection.
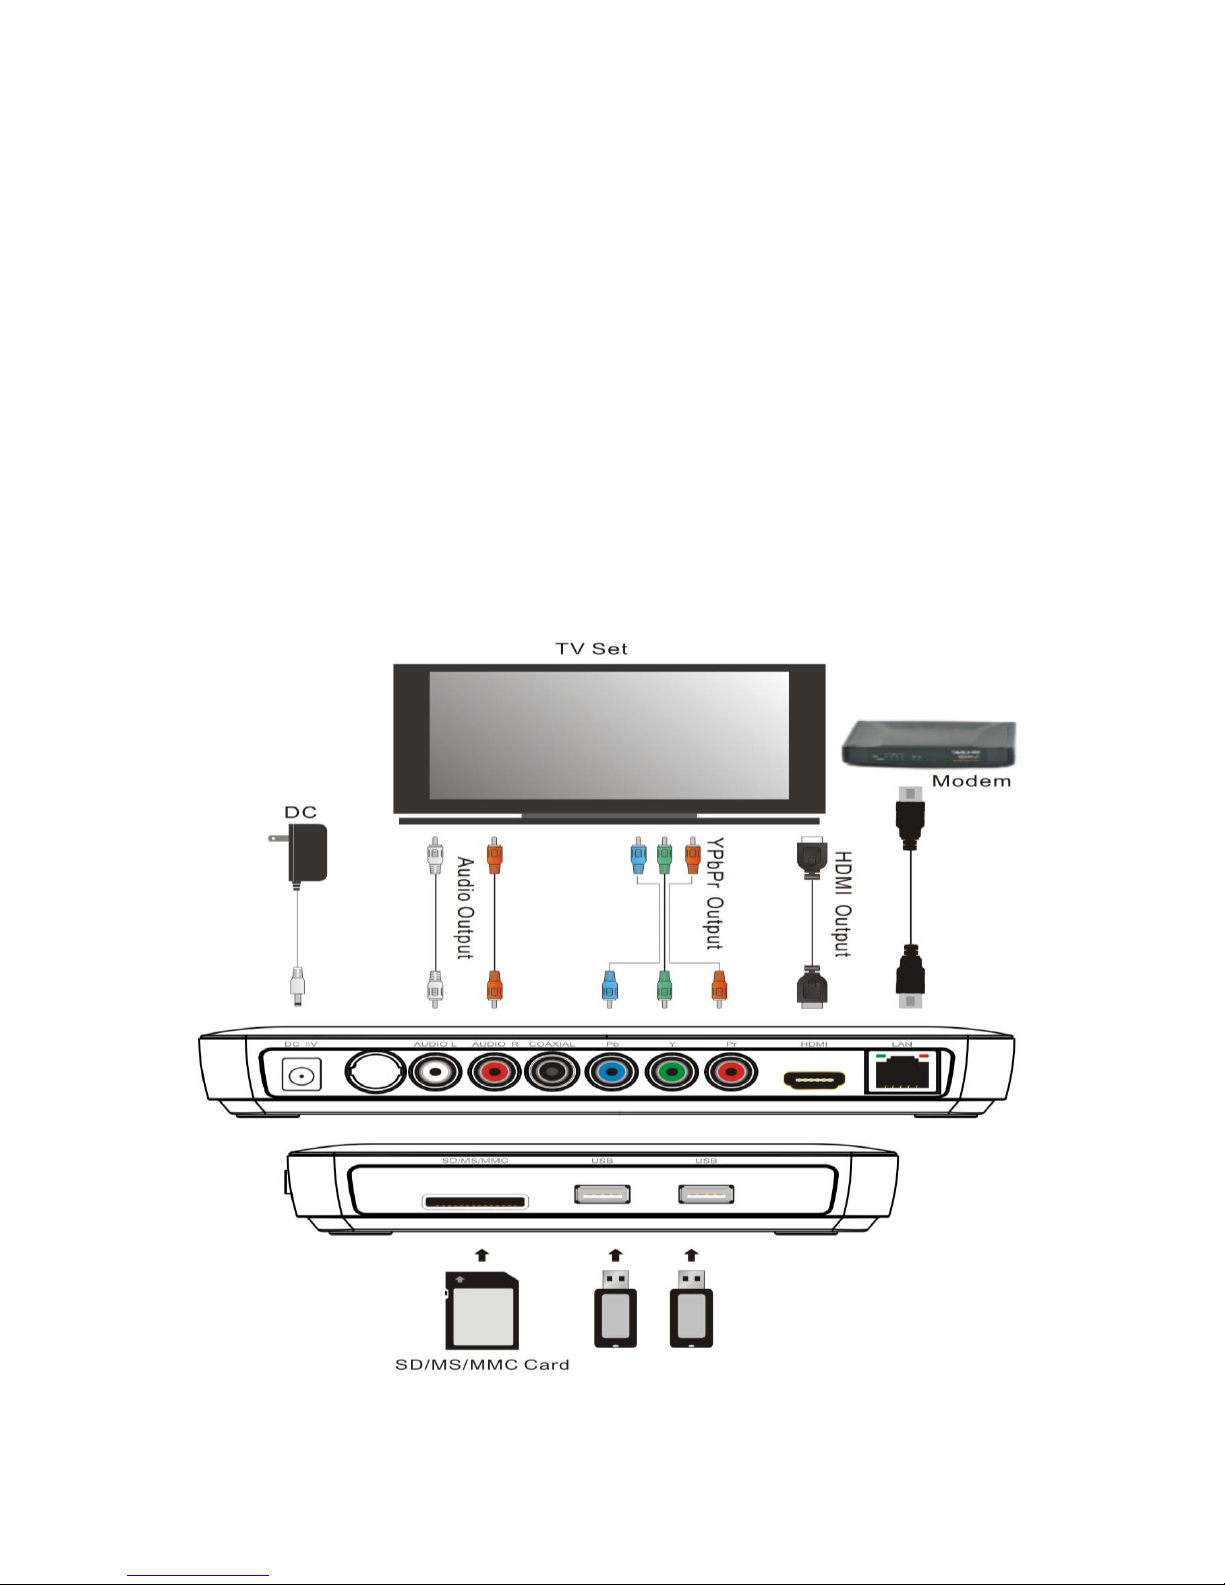
2. Connect one end of the HDMI cable to your HDMI input of your TV and then connect the other
end to the HDMI connector to the AMP media player.
3. Turn on your TV. Your TV should have an “Input selection or Source selection” option on your
TV’s remote control button, if not select menu from your TV’s remote. You must select the
input source you are using to connect to the media player box. Example; If the HDMI
connector you are using is labeled HDMI 2, you must select HDMI 2 on your TV’s input
selector. See image below for example:
Component (YPbPr) connection:
1. Check your TV input connection type. If your TV does not support HDMI it is recommended to
use the Component YPbPr connection from your media player to your TV.
Note: This connection only supports HD video and the red and white RCA audio cable must
also be connected:
2. Connect one end of the Component YPbPr cable to your Component YPbPr input on your TV
and then connect the other end to the Component YPbPr cable to the AMP media player.
3. Connect the RCA audio cables to the audio input of the TV and connect the other end to the
audio output connector on the media player.
4. Turn on your TV. Your TV should have an “Input selection or Source selection” option on your
TV’s remote control button, if not select menu from your TV’s remote. You must select the
input source you are using to connect to the media player box.

Example; If the Component cable is connected to the input on the TV is labeled “Component
1”, you must select “Component 1”, on your TV’s input selector.
Turning on the player:
1. Press the power button located on the front panel of your media player
2. You will see the following images on your TV screen while the player is starting up:
Using Your Remote 3 in 1 Remote Control
1. Status Indicator LED
If the LED keep shining, it means the connection is successful and Motion Mouse with
QWERT is working properly.

Note: if the LED is blinking while not in use, this indicates the batteries need to be replaced
2. Hot Keys
F1: MENU
F2: HOME
F3: NOTIFICATION
F4: BROWSER
F5: MAIL
F6: MUSIC
F7: ZOOMIN/Fast Backward
F8: PLAY/PAUSE
F9: ZOOMOUT/Fast Forward
F10: MUTE
F11: VOL--
F12: VOL++
[ ] mouse navigation key(Diamond Hey: press and hold this button or double click it, the cursor will
appear exactly where you point, wave your wrist around.
Single click this button (in this mode, only mouse right and left buttons are workable, the other buttons
are useless)
[ ] Quick double click: active/de-active working/suspend mode.
[ ] Mouse left button of the mouse: work the same as the common mouse left button
[ ] Mouse right button of the mouse: work the same as the common mouse right button
3.13 How to use
Point the arrow buttons towards your TV.

1. You will see the following screen when your media player is ready to use:
Network Connection:
We recommend you first setup your internet connection before proceeding to other
configurations. See below setup instructions for wireless and wired connections.
Wireless Connection:
Before you start you must have the following information from your home router’s wireless
network connection settings:
Your SSID (your home wireless network name).
Your wireless security key or passphrase.
1. Click on the application menu icon as shown below:
2. Click on the “Settings Icon” as shown below:

3. By default you will see the first option to configure is Wireless. Click on the “Off” button to
turn on Wi-Fi.
4. You will see that OFF status changes to on as shown below:

5. A list of wireless network available in the area will be displayed as shown. Click on your
Wi-FI network name.
See example image below. Here in the image the Wi-Fi name we are using is “WGR7000”
6. If you have security enabled on your WiFi network enter your password as shown below and
then click connect:
7. After successfully connecting to your WiFi network you will see the status for Wi-Fi shows
connected:

You are now configured to use your media player’s online applications such as Internet Browser, Google
Play Internet Radio and all other favorite on line applications.
Wired Connection Ethernet:
1. Connect the Cat 5 RJ-45 Ethernet cable (not included) into the jack labeled “LAN” of the
media player. Connect the other end to your home router’s Ethernet port.
2. Click on the application icon as shown below:

3. Click on “Settings” as shown below:
4. Click on Ethernet:
5. Click on the “OFF” button

6. You will see the OFF status turns to ON:
7. Click on Ethernet Configuration:

8. If you have DHCP enabled on your router leave the default settings as shown below, there is
no need to change any configuration. If you are using Static IP select “Static IP” as shown
below and enter an IP, Netmask, DNS and Gateway address.
9. You will be prompted to reboot for MAC address to take effect. Once rebooted you should
have internet connection through your router. To Verify you received an IP address, after
rebooting go back to the Ethernet setup and you should see similar information pertaining
to your own network:

Software Applications
1. Click on the applications icon as shown below:
2. Out of the box your AMP1000 media player provides the following default applications on the
main screen:

Amazon Kindle:Kindle book store
Angry Birds: Free Game
AppBackup: Back up your apps
AppInstaller: Use this application to install Android applications obtained from sources other than
the Play Store. Example if you obtained from a third party source and it is stored on
your external media, you will need to insert your media containing the application you
want to install. Applications obtained from the Play Store the AppInstaller will not be
needed.
Browser: Use this application to browse the internet and open web pages
Cache Cleaner: Use this to clear your cached files. Helps improve your players performance by
removing and closing un used data
Calculator: Calculator
Calendar: Application calendar for everyday planning
Clock: Clock and Alarm application
Downloads: View your down load history
Email: Create and existing email accounts to be used on your AMP1000
File Manager: Use to control how your files are managed by other applications such as default
actions for music files
File Browser: View and manage your data, photos and movie files
Gallery: Manage and view your photo images
Global News: On line news application
Gmail: Direct access to your Gmail account
Google+ On-line social media application
Latitude: Share your location with friends and family (Google Maps)
Local: On-line local information (Google Maps)
Maps: On-line Google Maps
Messaging: Instant messenger application
Messenger: Google messenger
Messenger: Windows Live Messenger
Movie Player: Video player for your movie files
Music: Audio player

Navigation: On line Google Navigator
Network: Search and view files and other devices on your network
Play Music: On-line Google Music library and store
Play Store: Buy and download free apps on the Google Play Store. Note: The first time you launch
the Play Store app, it will ask you if you have an existing Gmail account or New.
Choose option that applies to you.
Search: Browser short cut to on line search
Settings: Configures all device settings and capabilities
Skype: Make voice and video calls. Video calls require additional web cam hardware
Upgrade: Use to upgrade your AMP1000 with future firmware releases.
Wi-Fi Analyzer: Provides detailed information for Wi-Fi networks in range
Wi-Fi Transfer: Wireless transfer application to other Wi-Fi devices

Technical Support
Diamond Technical Support staff is here to help resolve any issues
that you may be experiencing with the installation of the Diamond
product. Prior to contacting technical support please make sure you
have the following information available.
1. Model #: (Printed on the bar code, located on the box)
2. Installation CD Version: (printed on the CD label)
3. The version of Windows that your system is running.
4. The manufacturer and model # of your computer.
5. CPU type and speed (example: Intel Pentium4 2.4GHZ)
6. A complete description of the problem that you are
experiencing including any steps that you have taken to try
to resolve the issue.
Technical Support Options
Free Telephone Support
818-534-1414
(long distance rates may apply)
Mon - Fri, 8 - 4:30 PST
http://www.diamondmm.com

One Year Limited Warranty
The warranty described below is extended only to the original buyer and is not transferable.
PLEASE NOTE THAT THE PRODUCT YOU HAVE PURCHASED IS DISTRIBUTED AND WARRANTED BY
DIAMOND MULTIMEDIA ("DIAMOND") AS DESCRIBED BELOW. QUESTIONS REGARDING THIS WARRANTY
AND
WARRANTY CLAIMS SHOULD BE MADE TO DIAMOND.
Diamond warrants to the original purchaser of the hardware product, that the product is free from defects in materials
or workmanship under normal use and service for a period of one (1) year from the date of purchase at retail. All
cables and accessories provided with a Diamond product are warranted to be free from defects in materials or
workmanship under normal use and service for a period of for (90) ninety days from date of purchase at retail.
Diamond ’s sole obligation under this warranty shall be, at Diamond ’s option, to: (i) repair the defective product or
part; (ii) deliver to customer an equivalent product or part to replace the defective product. When a product or part is
replaced or exchanged, the item becomes customer’s property and the replaced or exchanged item becomes
Diamond ’s property. When a refund or replacement product is given, the defective product becomes Diamond’s
property. Replacement parts or products may be new or include serviceable used parts with at least the same
functional equivalence to the original product. If, at the time of repair, a product is "out of warranty" or within the last
ninety (90) days of the warranty period, Diamond warrants any repair for ninety (90) days. All software provided is
subject to the terms of the associated software end-user license agreement.
WARRANTY EXCLUSIONS AND LIMITATIONS THIS WARRANTY IS ONLY APPLICABLE TO PRODUCTS SOLD
BY DIAMOND AFTER MAY 1, 2007. THIS WARRANTY IS ONLY APPLICABLE IF PRODUCT REGISTRATION IS
RECEIVED WITHIN 30 DAYS OF THE DATE THE PRODUCT IS PURCHASED. TO BE ELIGIBLE FOR THIS
WARRANTY, YOU MUST REGISTER AT diamondmm.com. THE ORIGINAL SALES RECEIPT SHOWING THE
DATE OF PURCHASE OF THE PRODUCT IS PROOF OF THE DATE OF PURCHASE. DIAMOND MAY REQUEST
THE ORIGINAL SALES RECEIPT OR A COPY AS PROOF OF DATE OF PURCHASE.
Diamond does not warrant third party products which Diamond distributes "AS IS" unless otherwise specified. Third
party products may be warranted by the third party. Diamond makes no warranty or representation that: (i) the
operation of the product will be uninterrupted or error free; (ii) defects in the product will be corrected; or (iii) that the
product will meet Customer’s requirements or work in combination with any hardware or software provided by third
parties.
TO THE FULLEST EXTENT ALLOWED BY LAW, THE WARRANTIES, REMEDIES AND LIMITATIONS
CONTAINED HEREIN ARE EXCLUSIVE AND ARE IN LIEU OF ALL OTHER WARRANTIES, TERMS OR
CONDITIONS, EXPRESS OR IMPLIED, EITHER IN FACT OR BY OPERATION OF LAW, STATUTORY OR
OTHERWISE, INCLUDING WITHOUT LIMITATION, WARRANTIES, TERMS OR CONDITIONS OF
MERCHANTABILITY, FITNESS FOR A PARTICULAR PURPOSE, QUALITY, CORRESPONDENCE WITH
DESCRIPTION AND NON-INFRINGEMENT, ALL OF WHICH ARE EXPRESSLY DISCLAIMED. DIAMOND WILL
NOT BE LIABLE UNDER THIS WARRANTY IF ITS TESTING AND EXAMINATION DISCLOSE THAT THE
ALLEGED DEFECT OR MALFUNCTION IN THE PRODUCT OR SOFTWARE DOES NOT EXIST OR WAS
CAUSED BY CUSTOMER’S OR ANY THIRD PARTY’S MISUSE, NEGLECT, IMPROPER INSTALLATION OR
TESTING, UNAUTHORIZED ATTEMPTS TO OPEN, REPAIR OR MODIFY THE PRODUCT OR SOFTWARE, OR
ANY OTHER CAUSE BEYOND THE RANGE OF THE INTENDED USE, OR BY ACCIDENT, FIRE, LIGHTNING,
OTHER HAZARDS, OR ACTS OF GOD. THIS WARRANTY WILL NOT APPLY TO PRODUCTS USED FOR
NUCLEAR RELATED, WEAPONS RELATED, MEDICAL OR LIFE SAVING PURPOSES.
TO THE FULLEST EXTENT ALLOWED BY LAW, DIAMOND ALSO EXCLUDES FOR ITSELF AND ITS SUPPLIERS
ANY LIABILITY, WHETHER BASED IN CONTRACT OR TORT (INCLUDING NEGLIGENCE), FOR INCIDENTAL,
CONSEQUENTIAL, INDIRECT, SPECIAL OR PUNITIVE DAMAGES OF ANY KIND, OR FOR LOSS OF REVENUE
OR PROFITS, LOSS OF BUSINESS, LOSS OF INFORMATION OR DATA, OR OTHER FINANCIAL LOSS ARISING
OUT OF OR IN CONNECTION WITH THE SALE, INSTALLATION, MAINTENANCE, USE, PERFORMANCE,
FAILURE, OR INTERRUPTION OF ITS PRODUCTS, EVEN IF DIAMOND, ITS SUPPLIERS OR ITS RESELLER
HAS BEEN ADVISED

OF THE POSSIBLITY OF SUCH DAMAGES. DIAMOND ’S SOLE LIABILITY WITH RESPECT TO ITS PRODUCT IS
LIMITED TO REPAIR OR REPLACEMENT OF THE PRODUCT, AT DIAMOND ’S OPTION. THIS DISCLAIMER OF
LIABILITY FOR DAMAGES WILL NOT BE AFFECTED IF ANY REMEDY PROVIDED HEREIN SHALL FAIL FOR
ESSENTIAL PURPOSE.
DISCLAIMER: Some jurisdictions may not allow the exclusion or limitation of incidental or consequential damages for
products supplied to consumers, or the limitation of liability for personal injury, so the foregoing limitations and
exclusions may not apply or may be limited in their application to you. When implied warranties are not allowed to be
excluded in their entirety, they will be limited to the duration of the applicable written warranty. This warranty gives
you specific legal rights that may vary depending on the law of the applicable jurisdiction.
OBTAINING WARRANTY SERVICE: Please review the online "help" resources referred to in the accompanying
documentation before seeking warranty service. If the product is still not functioning properly after making use of
these resources, please access the online help website at diamondmm.com for warranty instructions or to obtain
warranty services. Some additional charges may apply for phone support.
This manual suits for next models
1
Table of contents
Popular Media Player manuals by other brands

Seagate
Seagate ST905004CEA2E1-RK - FreeAgent Theater+ - Digital Multimedia... user guide

ITC Audio
ITC Audio T-6230 Operation manual

Aquatic
Aquatic AQ-MP-5BT-H User & installation manual

PLAYAWAY
PLAYAWAY Wonderbook How to use

AGPtek
AGPtek ROCKER MUSIC PLAYER user manual

BrightSign
BrightSign 4K Series Hardware manual