Digital Stream DTX9900 User manual

mportant Safety nstruction
Always be careful when using your product. To reduce the risk of fire, electrical shock, and other
injuries, keep these safety precautions in mind when installing, using, and maintaining your
machine.
) Read these instructions.
2) Keep these instructions.
3) Heed all warnings.
4) Follow all instructions.
5) Do not use this apparatus near water,
6) Clean only with a dry cloth.
7) Do not block any ventilation openings. Install in accordance with the manufacturer's instructions.
8) Do not install near any heat sources such as radiators, heat registers, stoves, or other apparatus
(including amplifiers) that produce heat.
9) Do not defeat the safety purpose of the polarized or grounding-type plug. A polarized plug has two blades with one
wider than the other. A grounding type plug has two blades and a third grounding prong. The wide blade or the third
prong are provided for your safety. If the provided plug does not fit into your outlet, consult an electrician for replacement
, of the obsolete outlet.
0) Protect the power cord from being walked on or pinched particularly at plugs, convenience receptacles, and the point
where they exit from the apparatus.
)
Only use the attachments/accessories specified by the manufacturer.
2) Use only with a cart, stand, tripod, bracket, or table specified by the manufacturer, or sold with the apparatus.
When a cart is used, use caution when moving the cart/apparatus combination to avoid injury from tip-over.
3) Unplug this apparatus during lightning storms or when unused for long periods of time.
4) Refer all servicing to qualified service personnel. Servicing is required when the apparatus has been damaged in
any way, such as power supply cord or plug is damaged, liquid has been spilled or objects have fallen into the
apparatus, the apparatus has been exposed to rain or moisture, does not operate normally, or has been dropped.
5) Lightning. For added protection for this product during a lightning storm, or when it is left unattended and unused
for long periods of time, unplug it from the wall outlet and disconnect the antenna or cable system, This will prevent
damage to the product due to lightning and power-line surges.
6) Power Lines. An outside antenna system should not be located in the vicinity of overhead power lines or other
electric light or power Circuits, or where it can fall into such power lines or circuits. When installing an outside
antenna system, extreme care should be taken to keep from touching such power lines or circuits as contact with
them might be fatal.
7) Overloading - Do not overload wall outlets, extension cords, or integral convenience receptacles as this can result
in a risk of fire or electrical shock,
0
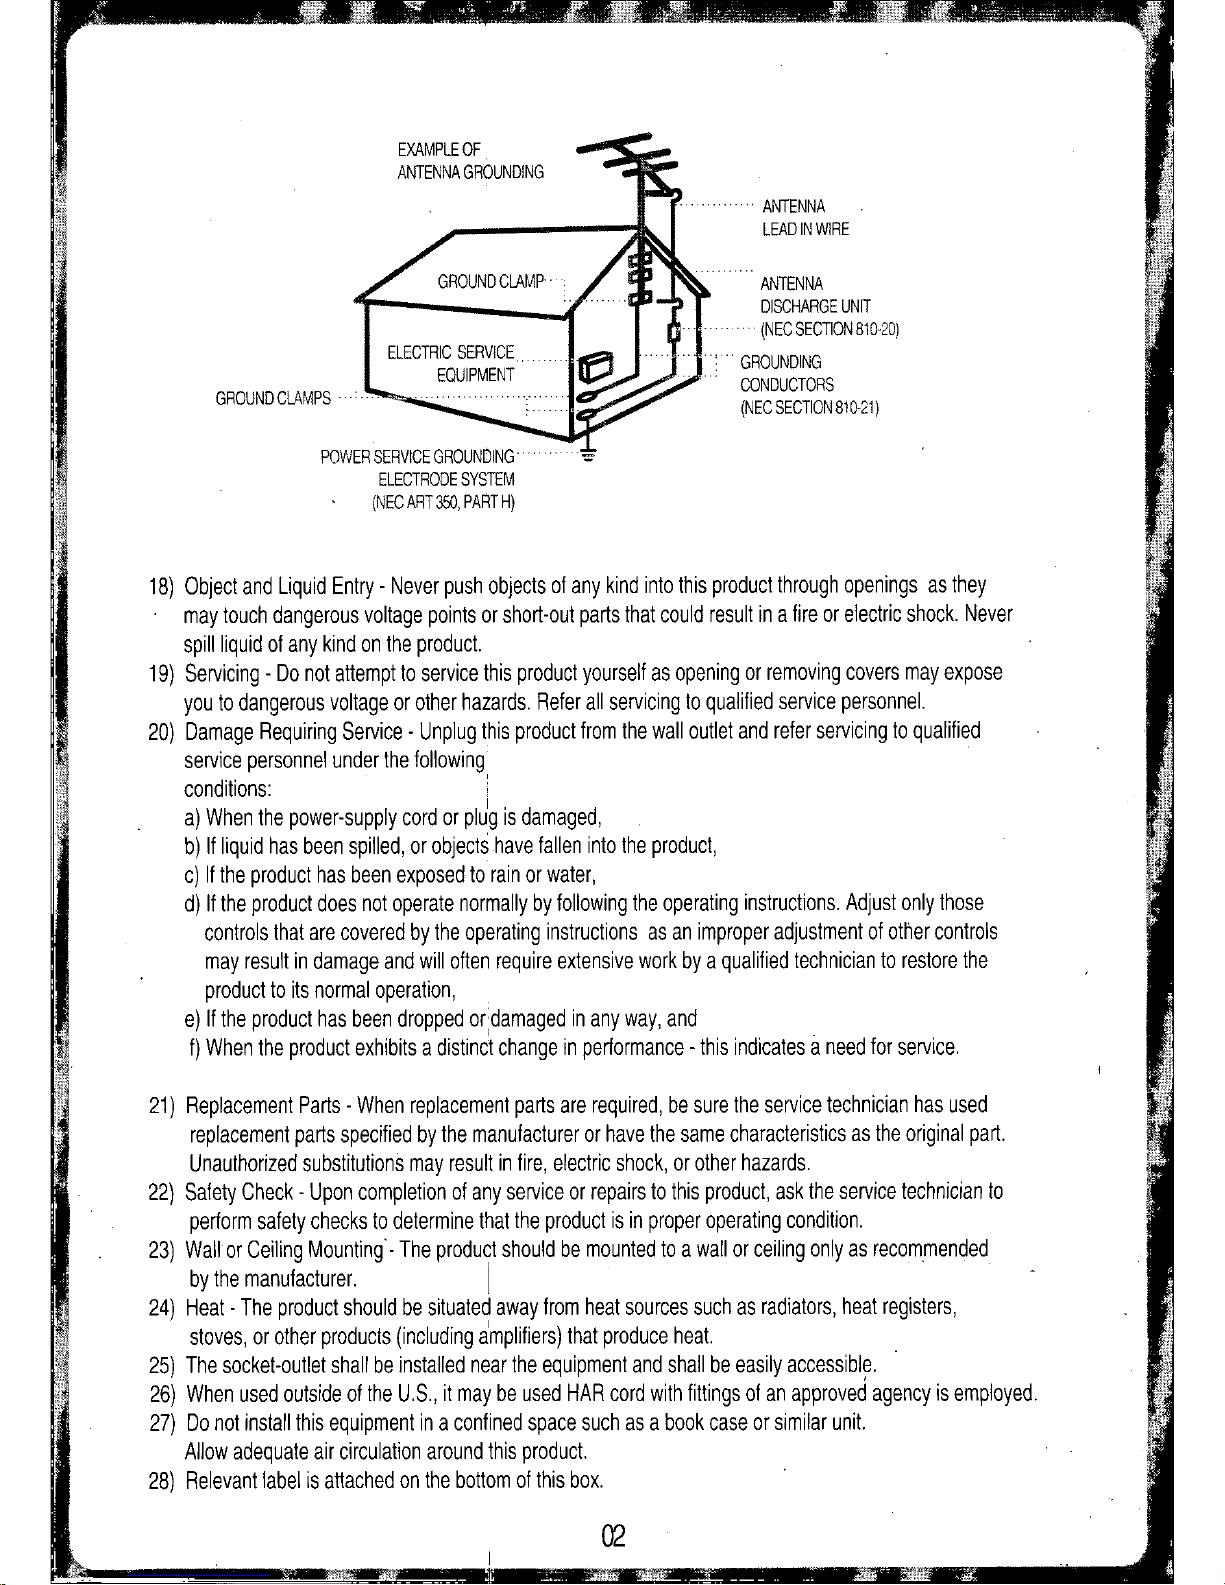
EXAMPLE OF
ANTENNA ROUNDIN
ROUND CLAMPS
POWER SERVICE ROUNDIN .
ELECTRODE SYSTEM
(NEC ART 350, PART H)
ANTENNA
LEAD IN WIRE
ANTENNA
DISCHAR E UNIT
(NEC SECTION 810-20)
ROUNDIN
CONDUCTORS
(NEC SECTION 810-21)
18) Object and Liquid Entry - Never push objects of any kind into this product through openings as they
may touch dangerous voltage points or short-out parts that could result in a fire or electric shock. Never
spill liquid of any kind on the product.
19) Servicing - Do not attempt to service this product yourself as opening or removing covers may expose
you to dangerous voltage or other hazards. Refer all servicing to qualified service personnel.
20) Damage Requiring Service. Unplug this product from the wall outlet and refer servicing to qualified
service personnel under the following
conditions: '
a) When the power-supply cord or plJg is damaged,
b) If liquid has been spilled, or objects have fallen into the product,
c) If the product has been exposed to rain or water,
d) If the product does not operate normally by following the operating instructions. Adjust only those
controls that are covered by the operating instructions as an improper adjustment of other controls
may result in damage and will often require extensive work by a qualified technician to restore the
product to its normal operation,
e) If the product has been dropped or damaged in any way, and
f) When the product exhibits a distinct change in performance - this indicates
a
need for service.
21) Replacement Parts - When replacement parts are required, be sure the service technician has used
replacement parts specified by the manufacturer or have the same characteristics as the original part.
Unauthorized substitutions may result in fire, electric shock, or other hazards.
22) Safety Check - Upon completion of any service or repairs to this product, ask the service technician to
perform safety checks to determine that the product is in proper operating condition.
23) Wall or Ceiling Mounting'- The product should be mounted to a wall or ceiling only as recommended
by the manufacturer.
I .
24) Heat - The product should be situated away from heat sources such as radiators, heat registers,
stoves, or other products (including amplifiers) that produce heat.
25) The socket-outlet shall be installed near the equipment and shall be easily accessible.
26) When used outside of the U.S., it may be used HAR cord with fittings of an approved agency is employed.
27) Do not install this equipment in a confined space such as a book case or similar unit.
Allow adequate air circulation around this product.
28) Relevant label is attached on the bottom of this box.
2

_jjli:i£ IIIlIIIII!i!!lII:IIIlIII"""IIIlIII ••,
m
I
j
How to change a dio preference.
PAA Rating System ( ovies)
G: General audience. No restriction.
PG: Parental guidance suggested. Some material may not be suitable for children.
PG.13: Parents strongly cautioned. Some material may be inappropriate for children under 13.
R: Restricted. Under 17 requires accompanying parent or adult guardian.
NC-17: No one 17 and under admitted.
X: Adults only.
etting
p the
Audio
and
Video
How to select available display modes.
Use "Function
->
Audio/Video
->
Display ode" menu to
change display mode. Use "Functions
->
AudioNideo
->
Audio Preference" menu to
select your default audio languages.
If your selected language is unavailable or "Auto" is selected,
the primary audio will be used.
Anamorphic mode - Video is fit to entire display screen regardless of aspect ratio of incoming
video. It may stretch picture vertically.
Wide 16:9 mode - Video shrink vertically and black bars exist at the top and bottom of the
screen and entire image will be shown.
Wide 14:9 mode - ixture of "Wide 16:9" and "Zoom" mode. Left and Right portions of video
are cropped and black bars exist at the top and bottom of the screen.
Zoom mode - Top and Bottom portions of video are cropped out and center area of video is displayed.
Left and right black bars may exist, depending upon the broadcasting station.
The size of black bars may vary depending upon the TV set.
U@
How to select preferred connection.
Use "Function
->
AudioNideo
.>
Preferred Conn." menu to select
your preferred connection mode.
Two modes are available:
- Line Out: If you used an optional AudioNideo Cable to connect to
the TV, select "Line Out."
- CH 3/4: If you used the included RF Cable to connect to the TV,
select "CH 3/4" (this is the default setting).

ront Panel
)
leB@]
)
ANTENNA IN (75 Ohm) : Connect the outdoor / indoor
antenna here.
@
TV OUT: Connect to television's antenna input.
@
CH 3/4 : Use channel 4 setting unless already in use
by another device.
@
VIDEO: Connect to a TV with this video inputs.
) -:
Channel down
+:
Channel up
Power: Turn the Converter Box on and off
@
IR Receiver
Rear Panel
@
Power LED When the receiver is powered on, the LED indicator lights
green. In standby mode, LED light is red. LED will blink
whenever IR input is detected. LED may blink when the
receiver is entering standby mode. Do not disconnect AC plug
while LED is blinking.
@
AUDIO UR : When using VIDEO out, connect these tenminals to the
analog audio inputs of a TV set (i.e., to a TV that has
jacks for UR inputs). or, connect these terminals to the
UR inputs of a separate audio component.
@
Power Cable: Connect the AC Power 100-240V into
power source.
,
,.
Analog outputs are displayed in 480i (CVBS) format only.
Checking
Parts
)
Remote Control
@
Install Guide
@
F
cable
@
Owner's Manual
@
Digital to Analog
Converter Box
tNSTALL
GUIDE
QWNET($
03
MANUAL
AAA15V
. Battery x 2
Sexual content.
Violence.
:
v:
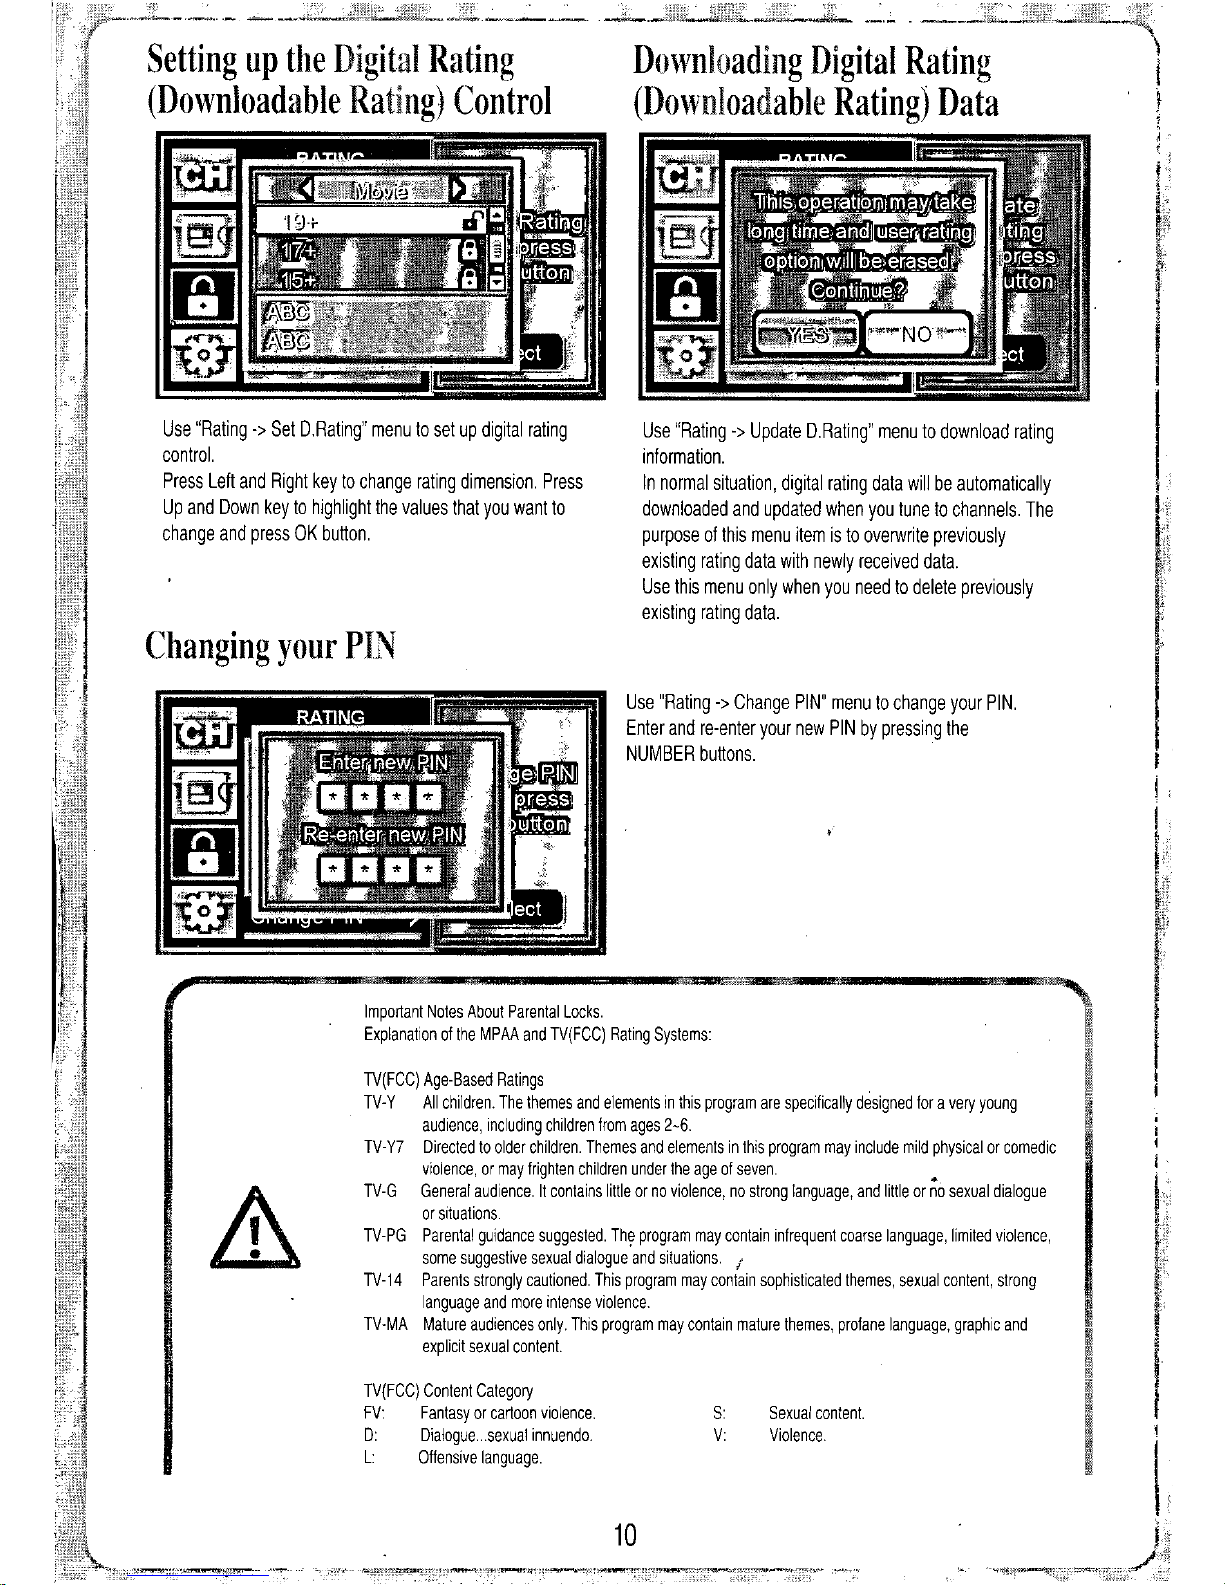
se "Rating
->
pdate D.Rating" menu to download rating
information.
In normal situation, digital rating data will be automatically
downloaded and updated when you tune to channels. The
purpose of this menu item is to overwrite previously
existing rating data with newly received data.
se this menu only when you need to delete previously
existing rating data.
Downloading Digital Rating
(Downloadable Rating) Data
se "Rating
->
Change PIN" menu to change your PIN.
Enter and re-enter your new PIN by pressing the
N MBER buttons.
0
TV(FCC) Age-Based Ratings
TV-Y All children. The themes and elements in this program are specifically designed for a very young
audience, including children from ages
2.6.
TV- Y7 Directed to older children. Themes and elements in this program may include mild physical or comedic
violence, or may trighten children under the age ot seven. •
TV-G General audience. It contains little or no violence, no strong language, and little or no sexual dialogue
or situations.
TV-PG Parental guidance suggested. The program may contain infrequent coarse language, limited violence,
some suggestive sexual dialogue and situations.
TV-14 Parents strongly cautioned. This program may coniain sophisticated themes, sexual content, strong
language and more intense violence.
TV-MA Mature audiences only. This program may contain mature themes, profane language, graphic and
explicit sexual content.
Important Notes About Parental Locks.
Explanation of the MPAA and TV(FCC) Rating Systems:
TV(FCC) Content Category
FV: Fantasy or cartoon violence.
D: Dialogue ...sexuat innuendo.
L: Offensive language.
se "Rating
->
Set D.Rating" menu to set up digital rating
control.
Press Left and Right key to change rating dimension. Press
p and Down key to highlight the values that you want to
change and press OK button.
etting up the Digital Rating
(Downloadable Rating) Control
Changing your PIN

Vendor Code: 1234
Channel-Number Buttons:
Pressto directly tune to.a particular
channel. o tune with RF number, press
dash (dot) keyfirst.
V
Volume up: Increase V volume.
V
Volume down: Decrease V volume.
FAV (Favorite Channel): Press to switch
to your favorite channel(s). You can edit
favorite channel(s) in Channel Edit menu.
OK (Channel Info): Whileusing
........theon-screenmenus,pressto select
(orchange)a particularfunction.Inviewingstate,
pressOKto bringuptheChannelInfoBannerwith
stationandprograminfomationof currentchannel.
./y.@~~+ MENu@+".....previOuSChannel:presstoalternatebetween
'0:.J '0:.J
the current channel and the last channel
(OJ',
that was viewed.
//(3 \::.)(3
Channel up and down: Presstochangechannels
o
co,"
WOM
0"
and navigate through the on-screen menus.
/"",....0.0....
c
INFO: Pressto view the channel info.
i
CD G)
01
banner and current program information.
:CD CD 0,
cc:
Pressto turn On or Off the CC service,
.0.
0
Q).
or toggle through available languages,
if available from the broadcaster.
8'
00
i
ZOOM: Pressto select picture display mode
for bestviewing.
V Input: Pressto selecrtv" .
input options ( V Antenna,
V
1,
V
2, etc.).
V Power: urn on and urn off
the power of
V
set.
Program Guide: Pressto display
the on-screen,
Electronic Program Guide (EPG).
MENU: Press to display the
on-screen menus,
or to exit the menu-screen.
BACK: Press to return
to the previous menu.
Volume
up and down:
Pressto change volume.
MU E: Press to turn off the sound.
Press again to restore the sound.
Step 1: urn on the V set.
Step 2: Press and hold " V Power (
@)"
button of the Universal Remote, and slowly
press "Up
(0)"
button repeatedly until V s~t turns off. (see NO ES below.)
Step 3: When the V set turns Off, release " V Power (
@ )"
button. Program is done.
Step 4: Check whether " V Power (
@)",
" V Input (
@)",
" V Volume up (
@)",
'' V Volume
Down (
@ )"
buttons work well. If the V set responds, no further programming is required.
Step 5: If " V power (
@ )"
button works, but not others, repeat from Step 1 again.
04
. Power: urnstheConverterBoxonandoff.
NO E: Press "Down
(8)"
button to try the previous code.
NO E: If the V does not respond within 150 trials, this Universal Remote can not control the V.
AUDIO (Multitrack Sound):
Press to select available "multitracks"
or audio languages. Depending
on the particular broadcast, one or
moreforeign language
translations may be available.
How to program the Universal Remote
ME ER (Signal Quality Information):
Pressto view signal strength of
the current channel.
niversal Remote Control
IR Code Listing
OOFF POWER 02FD UP 1DE2 BACK 13EC 3 18E7 8 1EE1 EPG 23DC AUDIO
08F7 CH_UP 03FC DOWN 01FE OK 14EB 419E6 9
2200
MU E 28D7 INFO
09F6 CH_DOWN 04FB LEF 10EF 0 15EA 5 20EF PREV 25DA CC
06F9 VOL_UP 05FA RIGH 11EE 1 16E9 6 1FEO FAV 1AE5 DO
07F8 VOL_DOWN 1BE4 MENU 12ED 2 17E8 7 24DB ZOOM 2CD3 ME ER
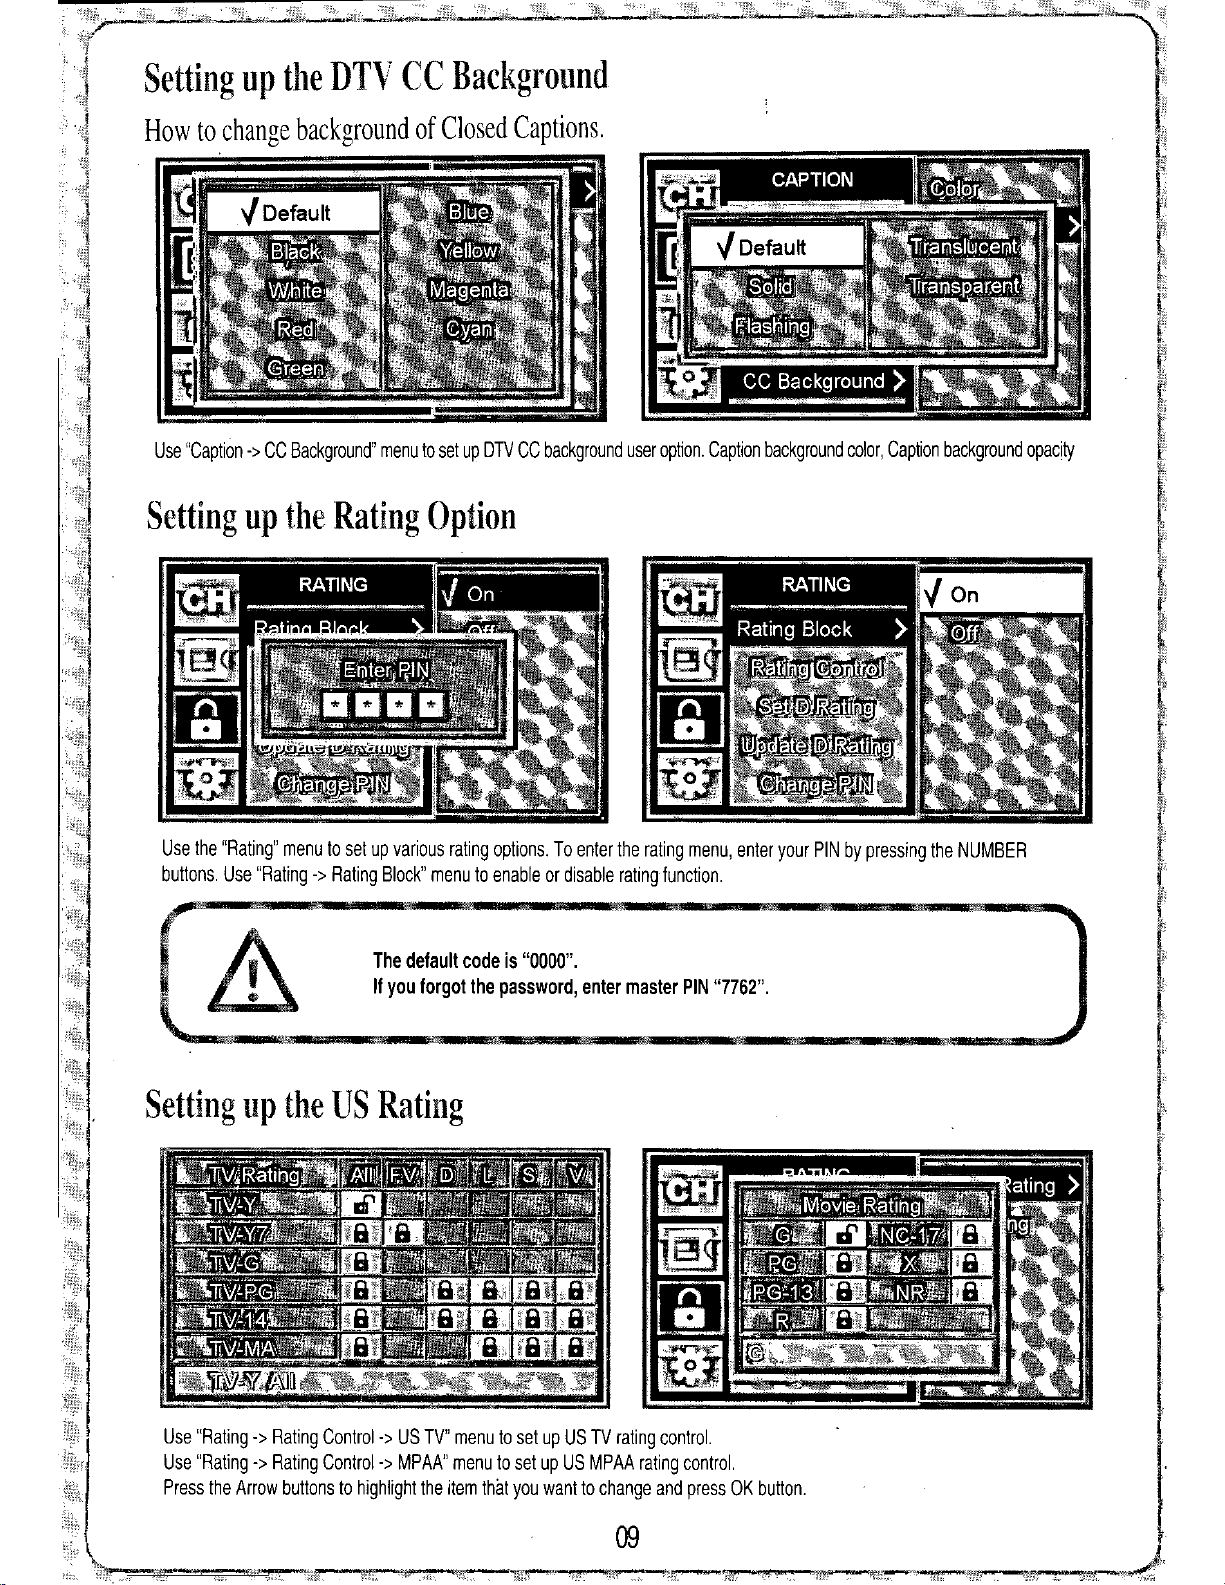
he default code
is
"0000".
If
you forgot the
password, enter master PIN
"7762",
09
se "Rating -> Rating Control-> S TV" menu to set up S TV rating control.
se "Rating -> Rating Control-> MPAA" menu to set up S MPAA rating control.
Press the Arrow buttons to highlight the item thilt you want to change and press OK button.
se the "Rating" menu to set up various rating options, To enter the rating menu, enter your PIN by pressing the N MBER
buttons. se "Rating -> Rating Block" menu to enable or disable rating function.
se "Caption -> CC Background" menu to set up DTV CC background user option, Caption background color, Caption background opacity
etting up the Rating Option
etting up the U Rating
etting up the DTV CC Background
ow to change background of Closed Captions,

onnecting the onvel1er Bodo your Antenna
onnect the coaxial cable from your antenna to the antenna input jack of the onverter Box.
ntenna
NTENN IN
Digital to nalog Converter Box
udioNideo Cable (Optional)
udioNideo Cables and Splitters are available at your local RadioShack store or RadioShack.com.
RF Cable (Included)
- Do NOT bend/crease the coaxial cable. Bending of cable will hamper signal transfer.
. - Use a UHFNHF amplifier to boost signal strength.
NOTE: If you live in an area where some TV stations are still broadcasting analog signals, you
can receive them by attaching a splitter between your antenna and the Converter Box.
ttach one RF Cable from the splitter to the Converter Box and one RF Cable from the
splitter to your TV. ttach an udioNideo Cable from the Converter Box to your TV.
Use the video mode on your TV to watch digital stations.
If your TV has Video and Left/Right udio ports, you can use an optional udioNideo
Cable for the best sound and picture quality.
If you use an udioNideo Cable, select "Line Out" for the Preferred Connection (see page 11).
fIIlI' OIiG"" MlI_'"""'1It..
onnecting the onverter Box to your Analog TV Set
I. onnect the RF able from the "TV Out" of the onverter Box to the antenna input jack of your analog TV.
2. Plug the power cord into a power outlet.
3. Set the H 3/4 switch to H 3 or H 4 and tune your TV accordingly.
4. Power on the onverter Box and then follow the Setup Wizard.

c@us
ISTED
(HDTV DiCITAl HE :EIVER)
3NW3
E237355
Toreziucp.lhe ti~;koffre or
to radio communication. However, there :s no gWJralltee that interference will not occur
in a If Ihis e'l"ipnnent does causeharm{uI interference to radie or
the equipment off and on,
user is encouraged 10 try to correcl the interference one
morC'
of the following
measures Reorient or I"elocate the antenna. Increase fhe separation
between the receiver. Connect into el'1 oulet !][1 a circuit
{jifferenl from to which the receiver is Consult the deafer or an
experienced
radioiTV
technician for help.
15
to Part 15 of the FCC
r~ules
limits
protection against harmful interference in a residential
equipmint gem,rntes, uses
nd
can radiate radio
inst,)i!ed and used In accordance with the instruction,
&
'&''''',"'''''''''''O''''UJ'O'''''"''''''''''''
CAUTION:TO REDUCE THE RI K OF ELECTRIC
SH~~~~~R~S~~~~~~~~i~Z~~S(~NRS;D~CKI>
M!
Til'"
s}'mbri;~
inlend,,(j
to aler1
:hi' tJ',ert01hr:
REFER ERVICING TO QUALIFIED ~
SERVICE PERSONNE .
",,,mop,,.!,,,,
"'''p,'I,,,,,,,,
ix (6) Months Labor and Parts
This limited warranty begins on the original date of purchase, and is valid only on products purchased and used in the United tates,
1-LABOR: During the six months labor limited warranty period: Digital tream Technology, Inc, will, at its option, repairthe defective product at no cost to you,
or replace the defective procuct with a new or remanufactured functionally equivalent product of equal value,
2-PART : During the six months parts limiled warranty perioc, Digital tream Technology, Inc,will supply new or rebuilt replacements for defective parts as may be
deemed,
3-This Warranty DOE NOT APPLY to products that have been damaged due to abuse, misuse, accident, alteration, modification, negligence, line power surges,
connection to improper voltage supply or settings, aocident, acts of God and tampering or procucts that have been serviced by any unauthorized service center or
third party, This Warranty DOE NOT APPLY to batteries, oonnecting cables, or other accessories packaged with the unit.
4-ln order to have your merchandise repaired or replaced by warranty, you must oontact our Customer ervice representatives by phone or email, and get RMA
number. Once you have obtained a RMA number, send the unit pre-paid to our authorized service center in the original packaging or reasonable substitute to prevent
damage, You "Mus!' include your full name, shipping address and telephone number for our reference with Proof of purchase, No retum will be shipped back to a PO
BOX, Digital tream Technology, Inc, will not be responsible for delays or unprocessed claims resulting from a purchaser's failure to provide any or all of the
necessal}' information, It will take approximately 3 to 4 weeks to process, from the date of receipt.
All of the accessories that came with the product package must be sent along with the main unit. The RMA number issued by our customer service rep, must be
written on the mail package, along with retum address,
imited Warranty
This brand product is warranted by Digital tream Technology, Inc, to the original purchaser against manufacturing defects in materials and workmanship
encountered in the normal noncommercial use of this product for a limited warranty period of:
EXCEPTTO THE EXTEND PROHIBITED BY APPLICABLE LAW, ALL IMPLIED WARRANTIE IN CONNECTION WITH THE PRODUCT, INCLUDING
WARRANTY OF MERCHANTABILITY, ARE LIMITED TO THE DURATION OF THE EXPRE WARRANTY HEREIN, AND NO WARRANTIE EXPRE OR
IMPLIED INCLUDING AID WARRANTY OF MERCHANTABILITY, HALL APPLY TO THI PRODUCT AFTER AID PERIOD, HOULD THI PRODUCT
PROVE TO BE DEFECTIVE IN WORKMAN HIP OR MATERIAL, THE CON UMER' OLE REMEDY HALL BE UCH REPAIR OR REPLACEMENT A IN
HEREIN ABOVE EXPRE LY PROVIDED, AND UNDER NO CIRCUM TANCE HALL BE LIABLE FOR ANY LO OR DAMAGE, DIRECT OR
CON EQUENTIAL ARI ING OUT OF THE U E, MI U E, OR IN ABILITY TO U E THI PRODUCT. THI WARRANTY I NONTRAN FERABLE.
ome states do not allow the exclusion and limilation of incidental or oonsequential damage, or allow limitations on how long an implied warrant lasts, so the above
limitations or exclusions or inclusions may not apply to you, This warranty gives you specITiclegal right and you may also have other rights, which val}' from state to state,
Contact the number below for service:
1.866-706-4367
License Notice
Manufactured under license from Dolby Laboratories,
Trademark Acknowledgment
"Dolby" and the double-D symbol are trademarks of Dolby Laboratories,

etting up Antenna or Cable Input
ow to setup the source input. ,~ ,
Auto
Scanning Channels
ow to scan and store channels.
se "Channel -> Auto Scan" menu to automatically perform
channel searching.
Two modes are available:
- Select Rescan to delete all previously stored channels and store
channels found with the current scan.
- Select pdate to keep all previously stored channels and update
the channel list with newly found channels.
If you want to stop the AutoScan during scanning, press the OK
button once more.
Press OK button to
ctiv te
or deactivate the channel, or delete from your favorite
channellisl.
If you
remove
the" ." "icon, the channel cannot be viewed.
If you set the" • "icon, the channel will be added to the favorite list.
- The Converter Box M ST be connected to an antenna in order to receive digital TV signals.
- Generally, you can tune to specific channel by pressing the N MBER buttons.
- " pdate" scan is ideal for regions where station transmit towers are in different directions and
your antenna is required to rotate.
se "Channel-> Input Selection" menu to setup source
input according to your TV reception environment.
Two modes are available:
- Select Air to receive Over-the-Air (terrestrial) channels.
- Select Cable to receive free retransmitted channels from
Cable Company.
Editing tored Channels
ow to edit your channel list and favorite channel list
se "Channel-> Channel Edit" menu to enter channel edit menu.
se the "Channel up/down" button to move to previous/next page.
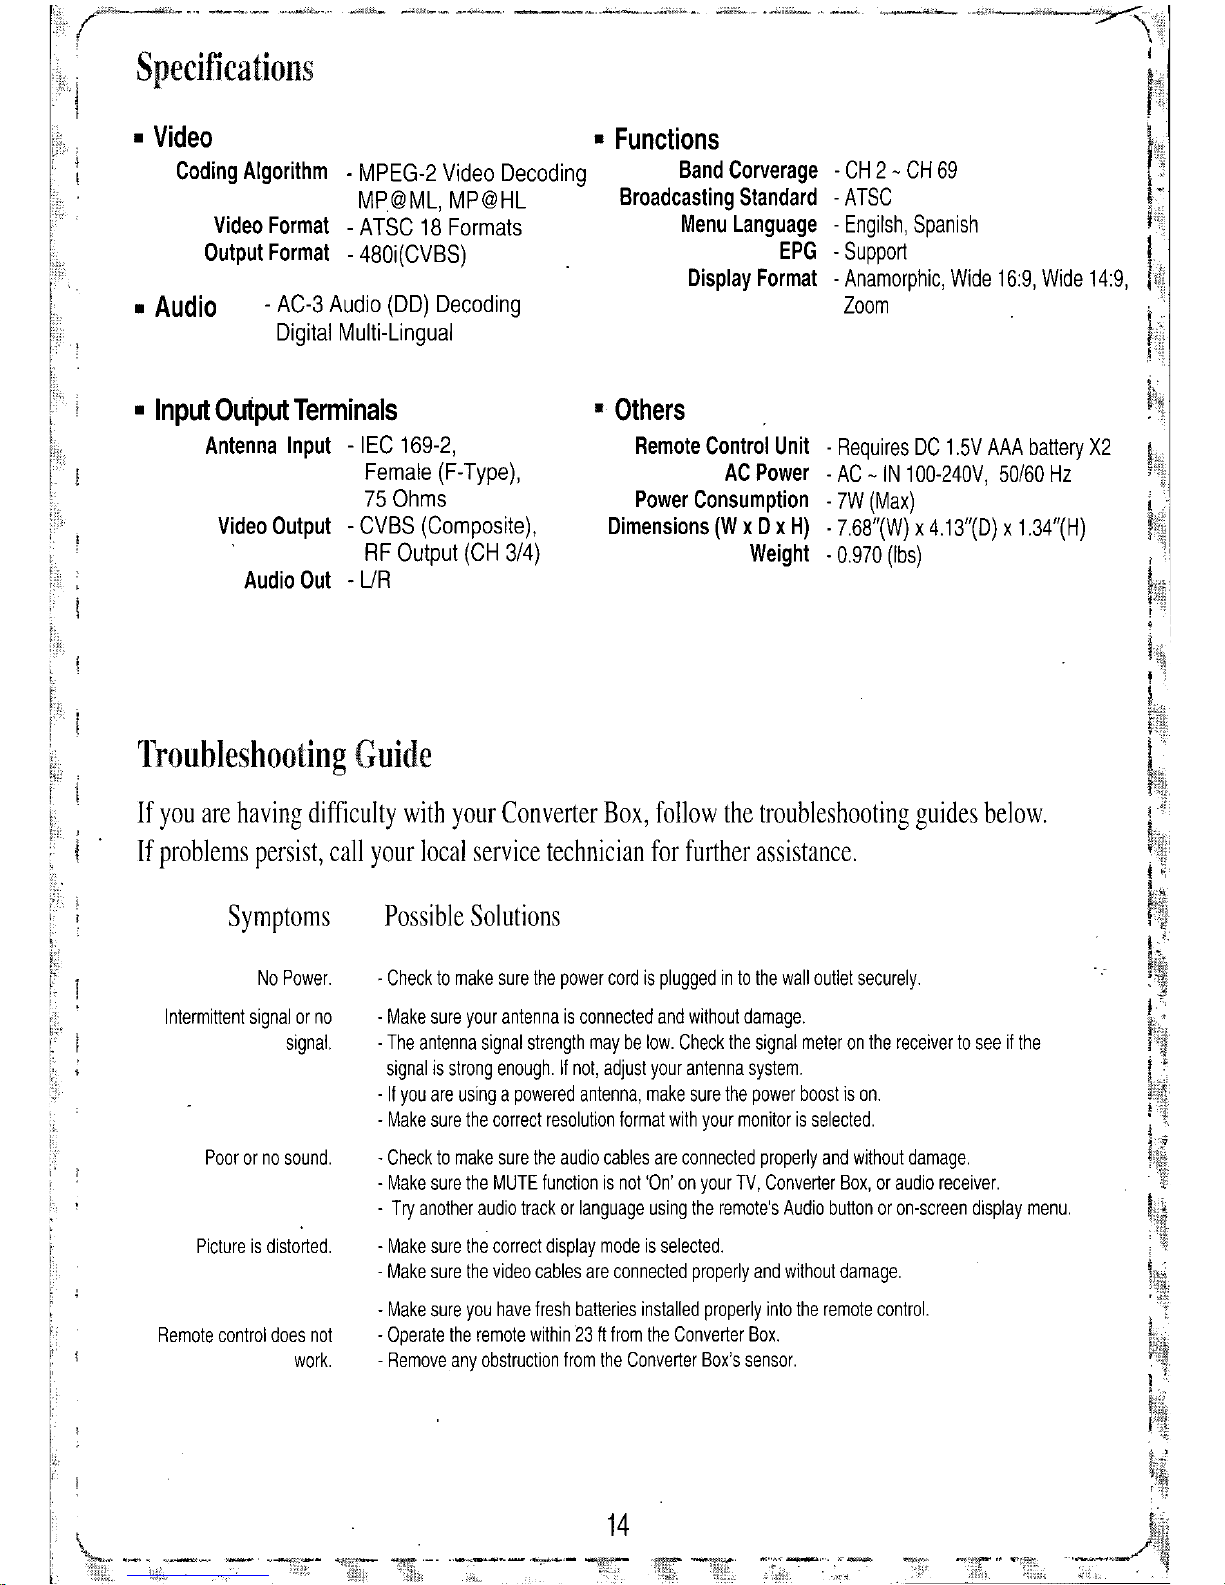
If you are having difficulty with your Converter Box, follow the troubleshooting guides below.
If problems persist, call your local service technician for further assistance.
- H 2 - H 69
-ATS
- Engilsh, Spanish
- Support
- Anamorphic, Wide 16:9, Wide 14:9,
Zoom
Others
Remote ontrol Unit - Requires D 1.5V AAA battery X2
A Power - A -IN 100-240V, 50/60 Hz
Power onsumption - 7W (Max)
Dimensions (W x D x H) . 7.68"(W) x 4.13"(0) x 1.34"(H)
Weight .0.970 (Ibs)
Possible olutions
14
. heck to make sure the power cord is plugged in to the wall outlet securely.
- Make sure your antenna is connected and without damage.
. The antenna signal strength may be low. heck the signal meter on the receiver to see if the
signal is strong enough. If not, adjust your antenna system .
. If you are using a powered antenna, make sure the power boost is on.
- Make sure the correct resolution format with your monitor is selected .
. heck to make sure the audio cables are connected properly and without damage.
- Make sure the MUTE function is not 'On' on your TV, onverter Box, or audio receiver.
- Try another audio track or language using the remote's Audio button or on-screen display menu.
- Make sure the correct display mode is selected.
. Make sure the video cables are connected properly and without damage.
- Make sure you have fresh batteries installed properly into the remote control.
- Operate the remote within 23 ft from the onverter Box.
. Remove any obstruction from the onverter Box's sensor.
Functions
. MPEG-2 Video Decoding Band orverage
MP@ML, MP@HL Broadcasting Standard
- ATS 18 Formats Menu Language
- 480i( VBS)
EPG
Display Format
- A -3 Audio (DO) Decoding
Digital Multi-Lingual
Video Format
Output Format
ymptoms
Poor or no sound.
Picture is distorted.
No Power.
Intermittent signal or no
signal.
Remote control does not
work.
Troubleshooting Guide
pecifications
Input Output Terminals
Antenna Input - IE 169-2,
Female (F-Type),
75 Ohms
Video Output - VBS ( omposite),
RF Output ( H 3/4)
Audio Out -
UR
Audio
Video
oding Algorithm

se "Caption -> Display" menu to enable or disable
caption display,
- You may press the EPG button on the remote to view the EPG,
- To receive the EPG information from a broadcaster, you must tune to the specific channel to receive
the broadcaster's PSIP(Program and System Information Protocol) to update the EPG (if available),
se "Channel-> EPG" menu to view EPG,
Press p and Down buttons to navigate through the EPG,
Press OK button to view detailed program information,
Using the EPG (Electronic Program Guide)
The EPG gives you an overview of available programs. The EPG shows the program list, start and end times,
and detailed infonnation. (Availability and amount of program details depend upon broadcast's feed.)
Setting up the DT CC Display
How to enable/disable display of Closed Caption.
erifying the Signal Strength of
igital Channels
How to view the signal strength meter to adjust the antenna system.
se "Channel-> Signal Strength" menu to verify signal
strength of current channels,
You may press the METER button on the remote to view the
Signal Strength,

@.Signal strength
@
Program start and end time
Factory Reset
Menu
Timeout
se "Function
->
Menu
->
Menu Timeout" menu to change
menu timeout.
j)
Program rating information
@
Imll"
is highlighted when broadcast feed is 720p or 1080i resolution.
~ is highlighted when stereo is available.
«4:»)
is highlighted when multilanguage audio tracks are available.
Ie CI
is highlighted when Closed Caption service is available.
DOD
is highlighted when multi channel Dolby Digital surround sound source.
13 .
mergency Alert
se "Function
->
Emergency Alert" menu to set up
an Emergency Alert option of each alert priority.
If "Off" is selected, an emergency alert message of the
specified priority will be ignored.
11
The Info banner shows
G)
The major channel number and
the sub/minor channel number.
@
Name of station.
@
Program title.
@
Current date and time.
@
Program start and end time.
@
Signal strength.
se "Function
->
Factory Reset" menu to initialize Receiver as factory
default state. You should enter PIN number to enter this menu. This is
same number used in Rating menu. Note that channel list data will not
be initialized. To reset channel data, use "Auto Scan
>
Rescan" menu.
After Factory Reset is completed, Converter Box will be automatically
reset. You need to follow the Setup Wizard again.
Viewing Current Channel Information
How to view the channel info banner to obtain quick information of program .
To view the Info banner To hide the Info banner
Press OK or INFO button on the Press OK, BACK, MEN , or wait
remote control while viewing program. 10 seconds and the' display will disappear.
" To change audio volume To change next available audio multi-track or audio language
Press LEFT, RIGHT button. Press A DIO button.
G)
Channel number
@
Broadcaster
@
Current date and time
@
Program title
j)
@

Use "Caption
->
CC Text" menu to set up DTV CC text option.
Caption text size, Caption text style, Caption text color, Caption text opacity
etting up the DTV CC
et ice
How to change service of Closed Captions.
Use "Caption
->
CC Service" menu to select caption service.
etting up the DTV CC Text
How to change text of Closed Captions.
etting
up
the DTV CC User Option
How to change option of Closed Captions.
Use "Caption
->
CC Option" menu to select auto mode or user mode.
User mode - To use ''Caption Texf' and "Caption Backgruuncf' option.
Auto mode - To use caption parameters inside broadcast's caption data.
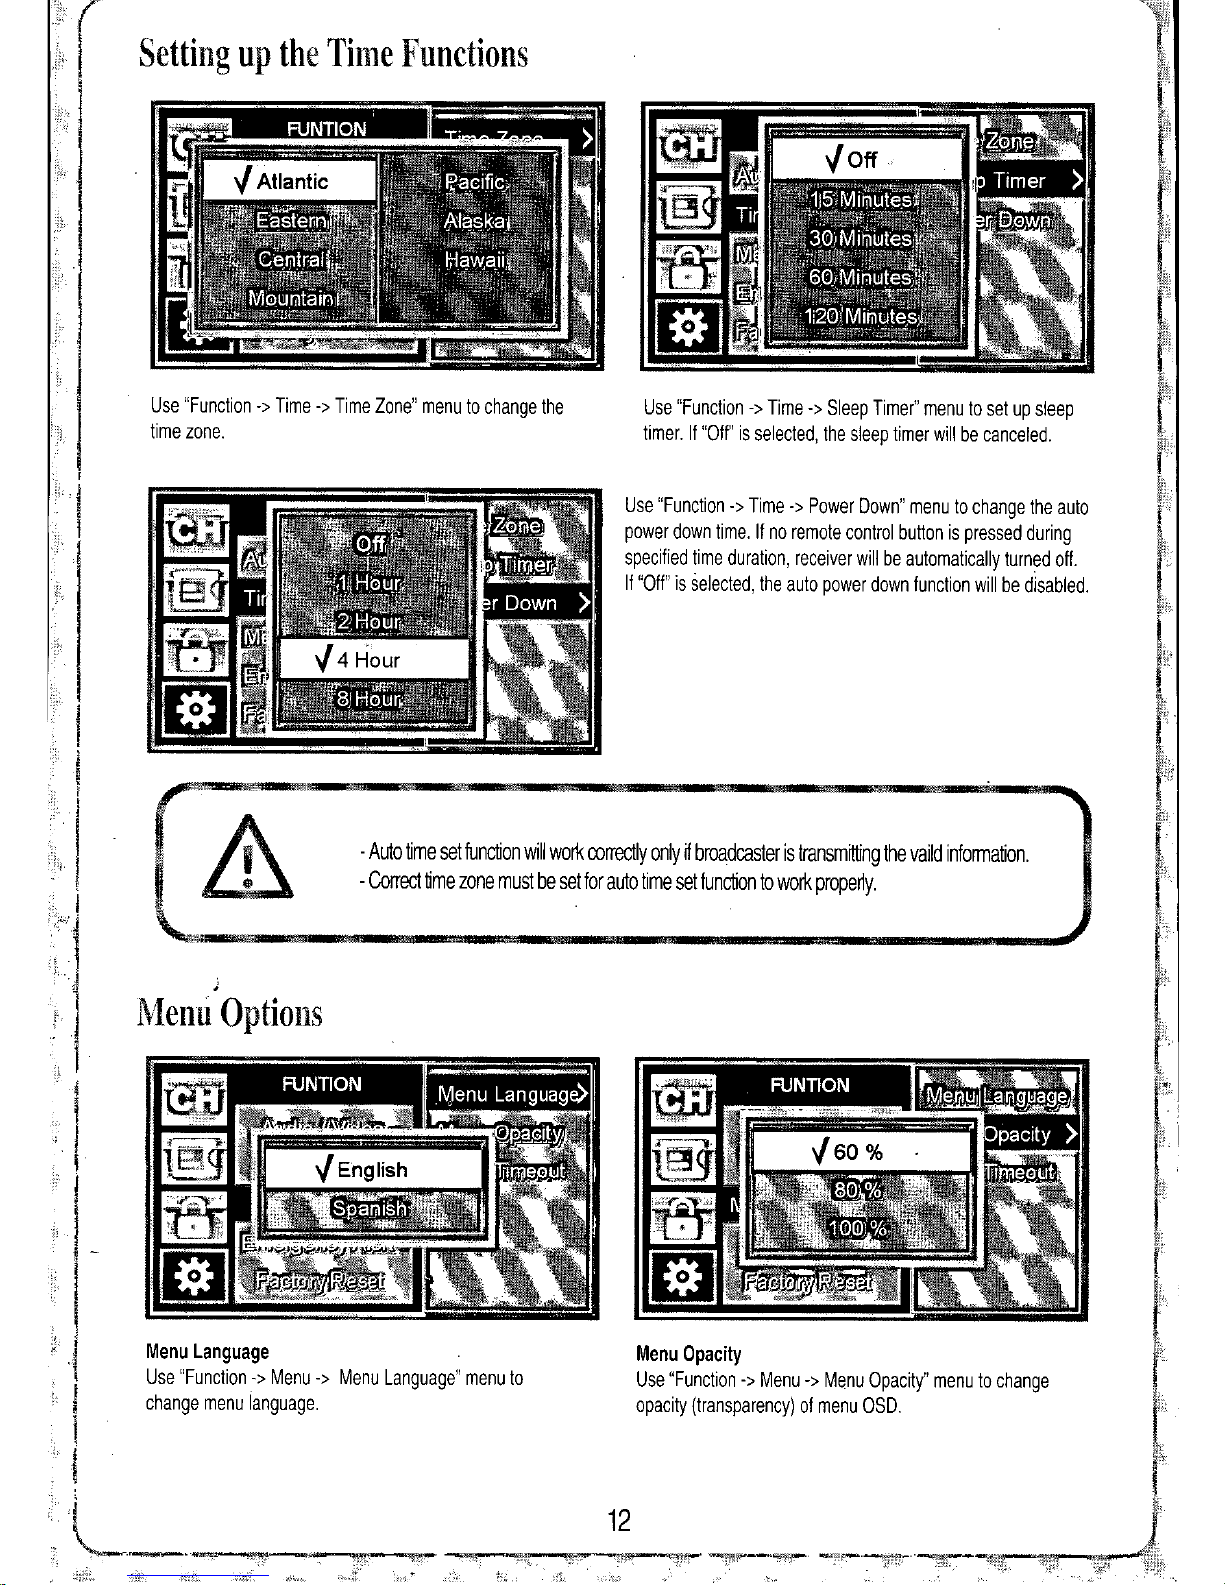
etting up the Time Functions
se "Function
->
Time
->
Time Zone" menu to change the
time zone. se "Function
->
Time
->
Sleep Timer" menu to set up sleep
timer. If "Off" is selected, the sleep timer will be canceled.
se "Function
->
Time
->
Power Down" menu to change the auto
power down time.
If
no remote control button is pressed during
specified time duration, receiver will be automatically turned off.
If "Off" is selected, the auto power down function will be disabled.
- Auto time set function will work correctly only
f
broadcaster is transmitting the vaild information.
- Correct time zone must be set for auto time set function to work properly.
enu Opacity
se "Function
->
Menu
->
Menu Opacity" menu to change
opacity (transparency) of menu OSD.
enu Language
se "Function
->
Menu
->
Menu Language" menu to
change menu language.
Menu Options
Other manuals for DTX9900
1
Table of contents
Other Digital Stream Media Converter manuals


