manuals.online logo
Brands
  1. Home
  2. •
  3. Brands
  4. •
  5. Digital Watchdog
  6. •
  7. Media Converter
  8. •
  9. Digital Watchdog Compressor DW-EN19RE User manual

Digital Watchdog Compressor DW-EN19RE User manual

Model Power Consumption
DW-ENHD16 12V DC, 2A Max. 14.4W, 1.2A
Default Login Information
Username: admin Password: admin
Quick Start Guide
Tel: +1 (866) 446-3595 / (813) 888-9555
Technical Support Hours: 9:00AM – 8:00PM EST, Monday thru Friday
digital-watchdog.com
DW-ENHD16
Quick Start Guide
1. Mount and install all necessary cameras and external devices. Refer to their individual
manuals for additional information.
2. Place the encoder in its final position. See installation tips below.
3. Connect all necessary cables to the encoder.
4. Once all additional devices have been properly connected to the encoder, connect the
encoder to an appropriate power supply. The encoder will boot up automatically.
1. When the encoder boots up, it will be in
protective mode. This means you will not be able
to access the encoder’s setup menu until you
login using the proper username and password.
2. To unlock the encoder, right-click anywhere on
the screen. The login screen will appear. (Default
Username / Password: admin / admin)
3. When the encoder boots up for the first time,
you will be guided through the Startup Wizard.
It is highly recommended that you change
your password after initial setup for security
purposes.
STEP 1 – CONNECTING THE ENCODER STEP 2 – POWERING UP THE ENCODER
SAFETY TIPS
1. Make sure the cameras and the monitors are properly connected to the encoder.
2. The encoder should be placed in a dust and moisture free environment. It must
never be directly exposed to sunlight. Server room temperature is highly recommended
to reduce the chance of overheating, which may cause the encoder to become unstable.
3. During the boot up process, the encoder should not be interrupted by pressing any
buttons on the mouse. Do not unplug the power adapter or turn the encoder o during
the boot up process.
4. A UPS (Uninterrupted Power Supply) is highly recommended to prevent damage to the
encoder during a power outage.
15
3 1
4
AUDIO IN VIDEO IN
2
13 11 9 7 5 3 1
16 14 12 0 8 6 4 2
AMPLIFIED
SPEAKER
AUDIO IN
CMS / WEB
VIEWER
ALARM
OUT
CAMERAS
SPOT
MONITOR ALARM IN
KEYBOARD
CONTROLLER
POWER
ADAPTOR
DC 12V
LAN 3 4 o + -
ALARM IN OUT
1 2 + A+ A-
ALARM IN OUT
CVBS
AUDIO OUT VGA HD Output
MONITOR
SPOT
WHAT’S IN THE BOX
Quick setup and
download guides 1 set 12V D/C and power cable 1 set
DW-EN19RE -
19” rack mount
ears
1 set
Attention: This document is intended to serve as a quick reference for the initial setup. It is recommended
that the user read the entire instruction manual for complete and proper installation and usage.
NOTE: Download all your support materials and tools in one place
1. Go to: http://www.digital-watchdog.com/resources
2. Search your product by entering the part number in the ‘Search by Product’ search
bar. Results for applicable part numbers will populate automatically based on the
part number you enter.
3. Click ‘Search’. All supported materials, including manuals and quick start guide
(QSGs) will appear in the results.
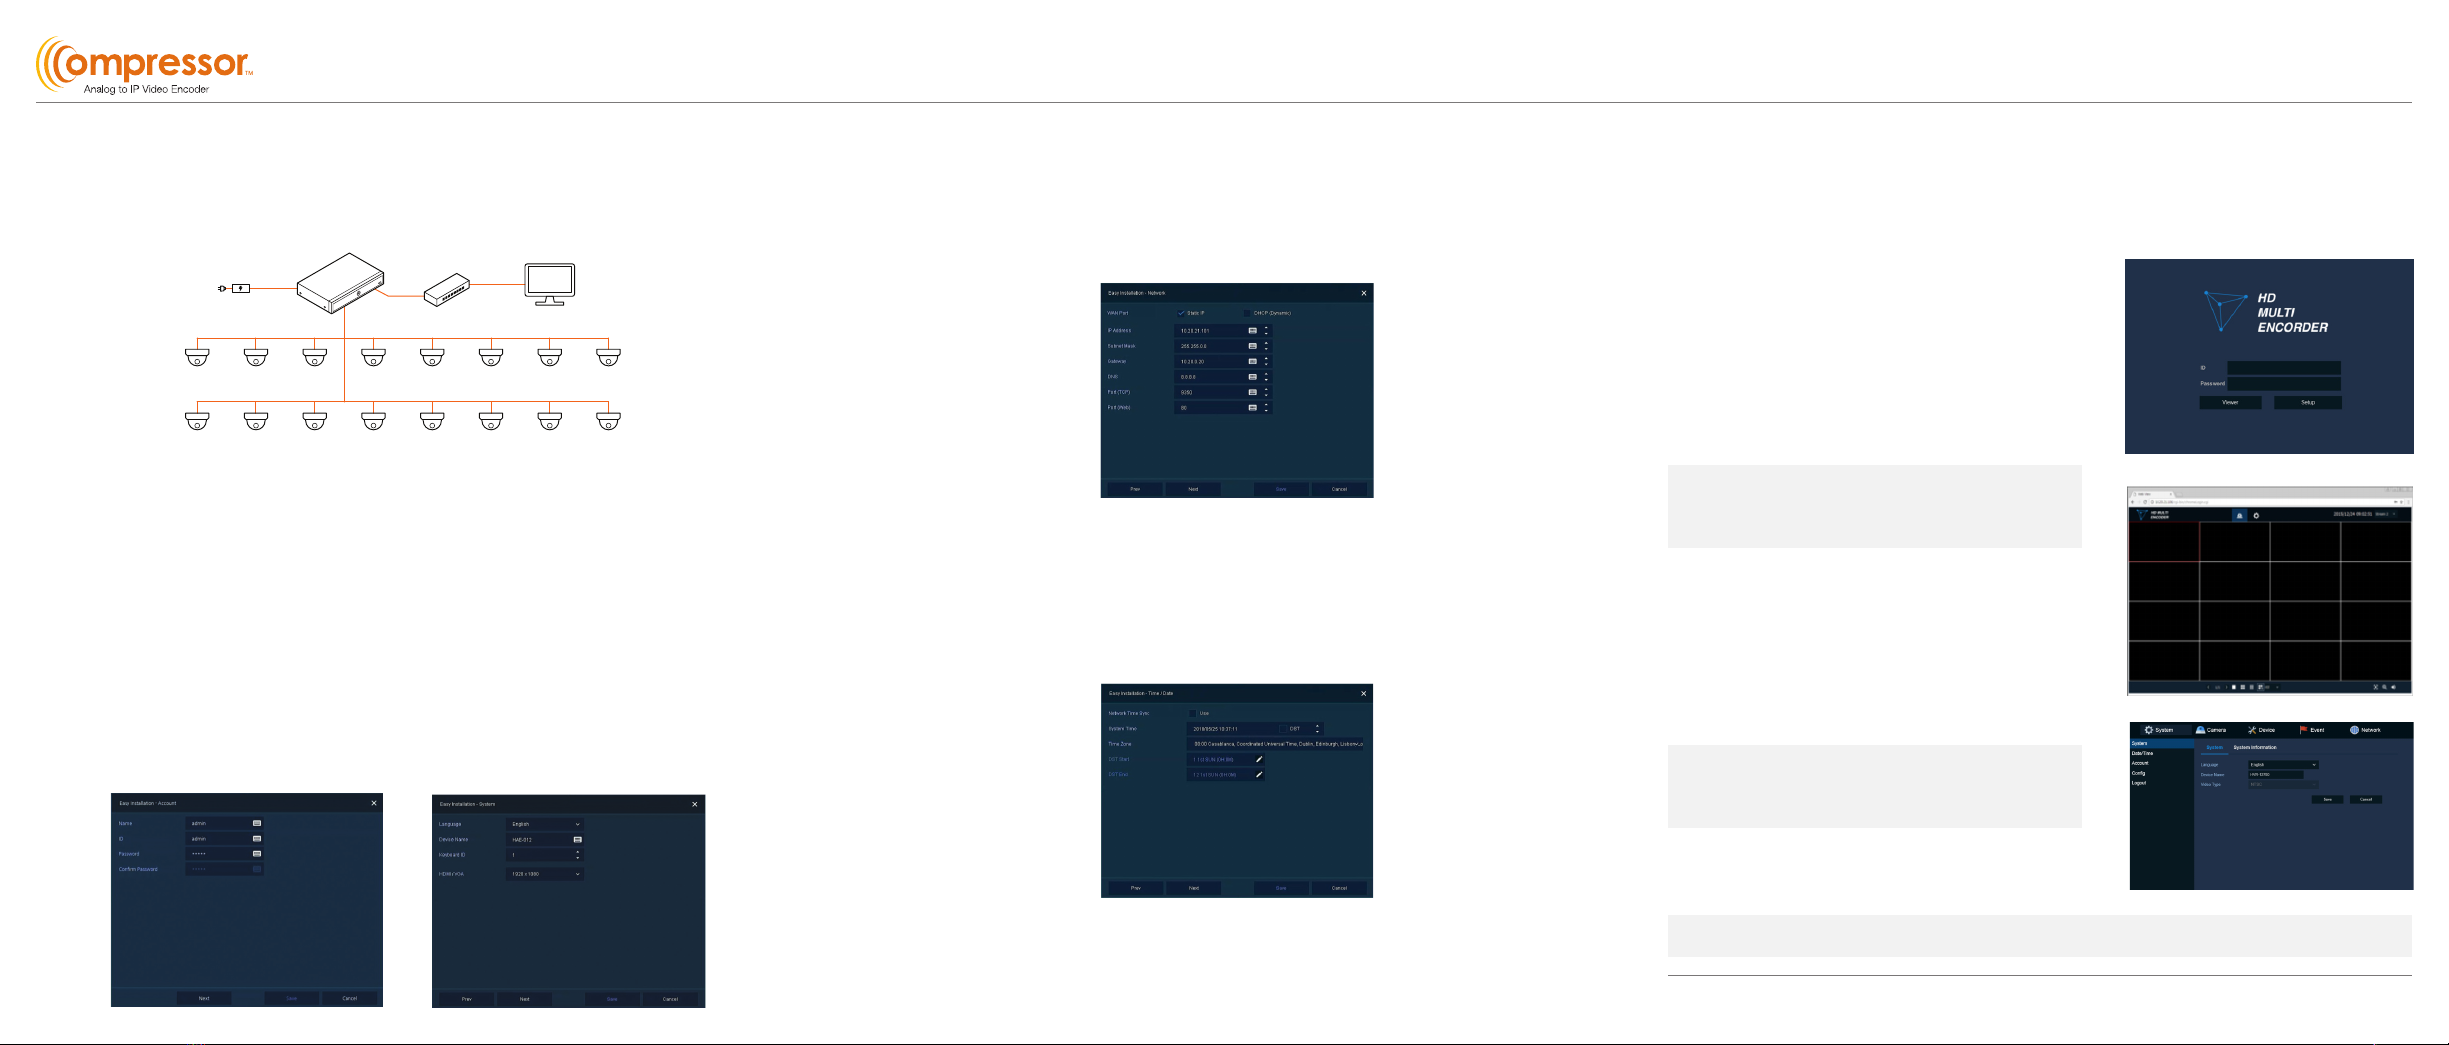
Once the encoder’s network settings have been setup properly, you can access the
encoder’s web viewer for live monitoring and remote setup. To open the encoder’s
web viewer:
1. Open a new web browser window and enter the
encoder’s IP address in the address bar. Press enter
to proceed.
2. Enter the encoder’s user-name and password
(default admin / admin). Select to go to the
live viewer or the remote setup by pressing the
corresponding button.
3. If you wish to use the web interface for remote live
viewing, download and install the Java from the pop-
up window. Once the Java file is installed properly,
the monitoring view will appear.
4. If you are using the web interface for remote setup*,
press the setup button. The same setup window and
options as in the local encoder will appear.
Quick Start Guide
Rev Date: 09/21
Copyright © Digital Watchdog. All rights reserved.
Specifications and pricing are subject to change without notice.
4. Set the encoder’s network settings to match your network’s requirements. It is
recommended to set the network type to DHCP and let the encoder auto-detect the
network’s settings. Then, change the type to Static. Please contact your Network
Administrator for additional information. Press Save and Next to move to the next step.
1. Below is an example of a proper connection between the Compressor, the cameras, and
your remote monitoring software.
1. Follow the startup wizard’s instructions to setup the encoder’s basic settings, setting
up a new username and password, language and system settings, network settings and
date/time settings. At any time you can skip steps, go back, or exit the wizard and setup
the encoder manually.
2. Account - Set a new username and password for the admin account. The default
username and password are admin / admin, yet it is highly recommended that you
change the password for security purposes. Press ‘Save’ and ‘Next’ to move to the next
setup screen.
3. System - In this screen, you can adjust the system’s language, the name of the unit,
adjust the ID connection for the unit (if you are connecting a keyboard), and adjust the
resolution for both HDMI and VGA local outputs. Press ‘Save’ and ‘Next’ to move to the
next setup screen.
5. Time/Date - Use this screen to set the encoder’s date and time, including time zone,
daylight savings and time sync. Confirm that the network box is checked. If needed,
set the encoder to sync its time automatically with an external NTP server.
6. Easy Installation - Check box to run Installation Wizard with every system start.
7. Close dialog box when complete.
STEP 3 – COMPRESSOR CONNECTION EXAMPLE
STEP 4 – STARTUP WIZARD
STEP 5 – WEB VIEWER
NOTE: It is highly recommended that you change the
default admin user-name and password as soon as
initial setup is completed.)
NOTE: Please see the full manual for additional installation options, connecting external devices, web
viewer setup, camera settings and more.
Power Source
Analog Camera 8
PC
Analog Camera 1 Analog Camera 2 Analog Camera 3 Analog Camera 4 Analog Camera 5 Analog Camera 6 Analog Camera 7
Analog Camera 16Analog Camera 9 Analog Camera 10 Analog Camera 11 Analog Camera 12 Analog Camera 13 Analog Camera 14 Analog Camera 15
Compressor
Network Switch
NOTE: Please be aware that the Web Viewer’s Setup
functions DO NOT include all menus available
directly at the unit. Please connect a display
monitor to the Compressor to access all menu
options.

Other Digital Watchdog Media Converter manuals

Digital Watchdog DWC-GPLT User manual

Digital Watchdog

Digital Watchdog DWC-GPLT User manual

Digital Watchdog Compressor DW-CP16 User manual

Digital Watchdog

Digital Watchdog Compressor DW-CP16 User manual

Digital Watchdog Compressor DW-EN4K16 User manual

Digital Watchdog

Digital Watchdog Compressor DW-EN4K16 User manual

Digital Watchdog Compressor DW-CPUHD16 User manual

Digital Watchdog

Digital Watchdog Compressor DW-CPUHD16 User manual

Digital Watchdog Compressor DW-ENHD16 User manual

Digital Watchdog

Digital Watchdog Compressor DW-ENHD16 User manual

Digital Watchdog Compressor DW-CPUHD16 User manual

Digital Watchdog

Digital Watchdog Compressor DW-CPUHD16 User manual

Digital Watchdog Compressor DW-ENHD16 User manual

Digital Watchdog

Digital Watchdog Compressor DW-ENHD16 User manual

Digital Watchdog Compressor DW-CP16 User manual

Digital Watchdog

Digital Watchdog Compressor DW-CP16 User manual

Popular Media Converter manuals by other brands

Net Media SitePlayer Telnet Series user manual

Net Media

Net Media SitePlayer Telnet Series user manual

Encore 2040MO instruction manual

Encore

Encore 2040MO instruction manual

Sierra Video UDC-162 owner's manual

Sierra Video

Sierra Video UDC-162 owner's manual

Lindy 42926 user manual

Lindy

Lindy 42926 user manual

Kramer KDS-SW2-EN7 user manual

Kramer

Kramer KDS-SW2-EN7 user manual

LDT S-DEC-4-DC-G operating instructions

LDT

LDT S-DEC-4-DC-G operating instructions

Partilink V23-H04H04 user manual

Partilink

Partilink V23-H04H04 user manual

Miranda ASD-711i Guide to installation and operation

Miranda

Miranda ASD-711i Guide to installation and operation

Data Video DAC-60 instruction manual

Data Video

Data Video DAC-60 instruction manual

ADF Web HD67604-A1 user manual

ADF Web

ADF Web HD67604-A1 user manual

evertz 2430GDAC-WARP instruction manual

evertz

evertz 2430GDAC-WARP instruction manual

Exsys EX-3605 manual

Exsys

Exsys EX-3605 manual

TR-Electronic CEH802M-8192/4096 SSI NTS 25H7N KRF manual

TR-Electronic

TR-Electronic CEH802M-8192/4096 SSI NTS 25H7N KRF manual

Atlona AT-DP400 user manual

Atlona

Atlona AT-DP400 user manual

osprey video TALON 4K-SC quick start guide

osprey video

osprey video TALON 4K-SC quick start guide

MuxLab 500087 Quick installation guide

MuxLab

MuxLab 500087 Quick installation guide

Omnitron Systems Technology Omnitron iConverter 10/100M2 quick start guide

Omnitron Systems Technology

Omnitron Systems Technology Omnitron iConverter 10/100M2 quick start guide

Parker 8902/EQ Technical manual

Parker

Parker 8902/EQ Technical manual

manuals.online logo
manuals.online logoBrands
  • About & Mission
  • Contact us
  • Privacy Policy
  • Terms and Conditions

Copyright 2025 Manuals.Online. All Rights Reserved.