DIGITAL YACHT iKommunicate Quick guide

iKommunicate
NMEA - SignalK
Gateway

Quick Start Guide for iKommunicate V1.01
TEL + 44 1179 554474 www.digitalyacht.co.uk sales@digitalyacht.co.uk
1. Introduction
Congratulations on the purchase of your iKommunicate Gateway. It is recommended that your gateway is installed by a
professional installer. If iKommunicate is to be connected to the internet via a long range Wi-Fi, 3G/4G or satellite
connection, it is recommended that this installation/configuration is carried out by someone with suitable IT experience
and knowledge of Ethernet networks.
The iKommunicate can be used in the following configurations;
1) Directly connected to a PC or Mac via its supplied network cable in an Ad-Hoc network
2) In conjunction with a Digital Yacht iKConnect or iNavConnect wireless router if you do not already have an
Ethernet network on your boat
3) Connected to the boat’s existing Ethernet network via the supplied network cable
Before operating the unit you should familiarise yourself with this Quick Start manual and any manuals
for the equipment you intend to interface with iKConnect.
2. Before you start
You will need the following items and tools to complete the installation:
The iKommunicate Gateway
RJ45 Cat 5 cable to connect between the iKommunicate and your Ethernet network (supplied)
A connection to the boat’s 12v DC supply where the unit is to be installed.
Four screws for fixing the iKommunicate in a suitable mounting location.
To test and configure the iKommunicate you will need:
A PC, Mac, iPhone/iPad or other wireless device that has a web browser such as IE, Chrome, Firefox, etc.
To connect the iKommunicate to the internet to check and download firmware updates, you will need:
Your boat’s Ethernet network to have a long range Wi-Fi, 3G/4G or satellite connection to the internet
A standard RJ45 Network cable (supplied)
To update the iKommunicate firmware when you do not have an internet connection on the boat you will need:
A cross head screw driver to remove the iKommunicate plain end cap
A computer with an SD card slot or USB Card Reader and if required the micro SD adaptor (supplied)
To interface the iKommunicate to your boat’s navigation systems, then you will need;
A spare “T Piece” connection to the NMEA2000 network
An adaptor cable if connecting to SeaTalkNG (Raymarine P/No A06045) or Simnet (Simrad P/No 24006199)
Additional multi-core cable (Alarm/Signal Cable is suitable) for NMEA0183 connections
3. Installation
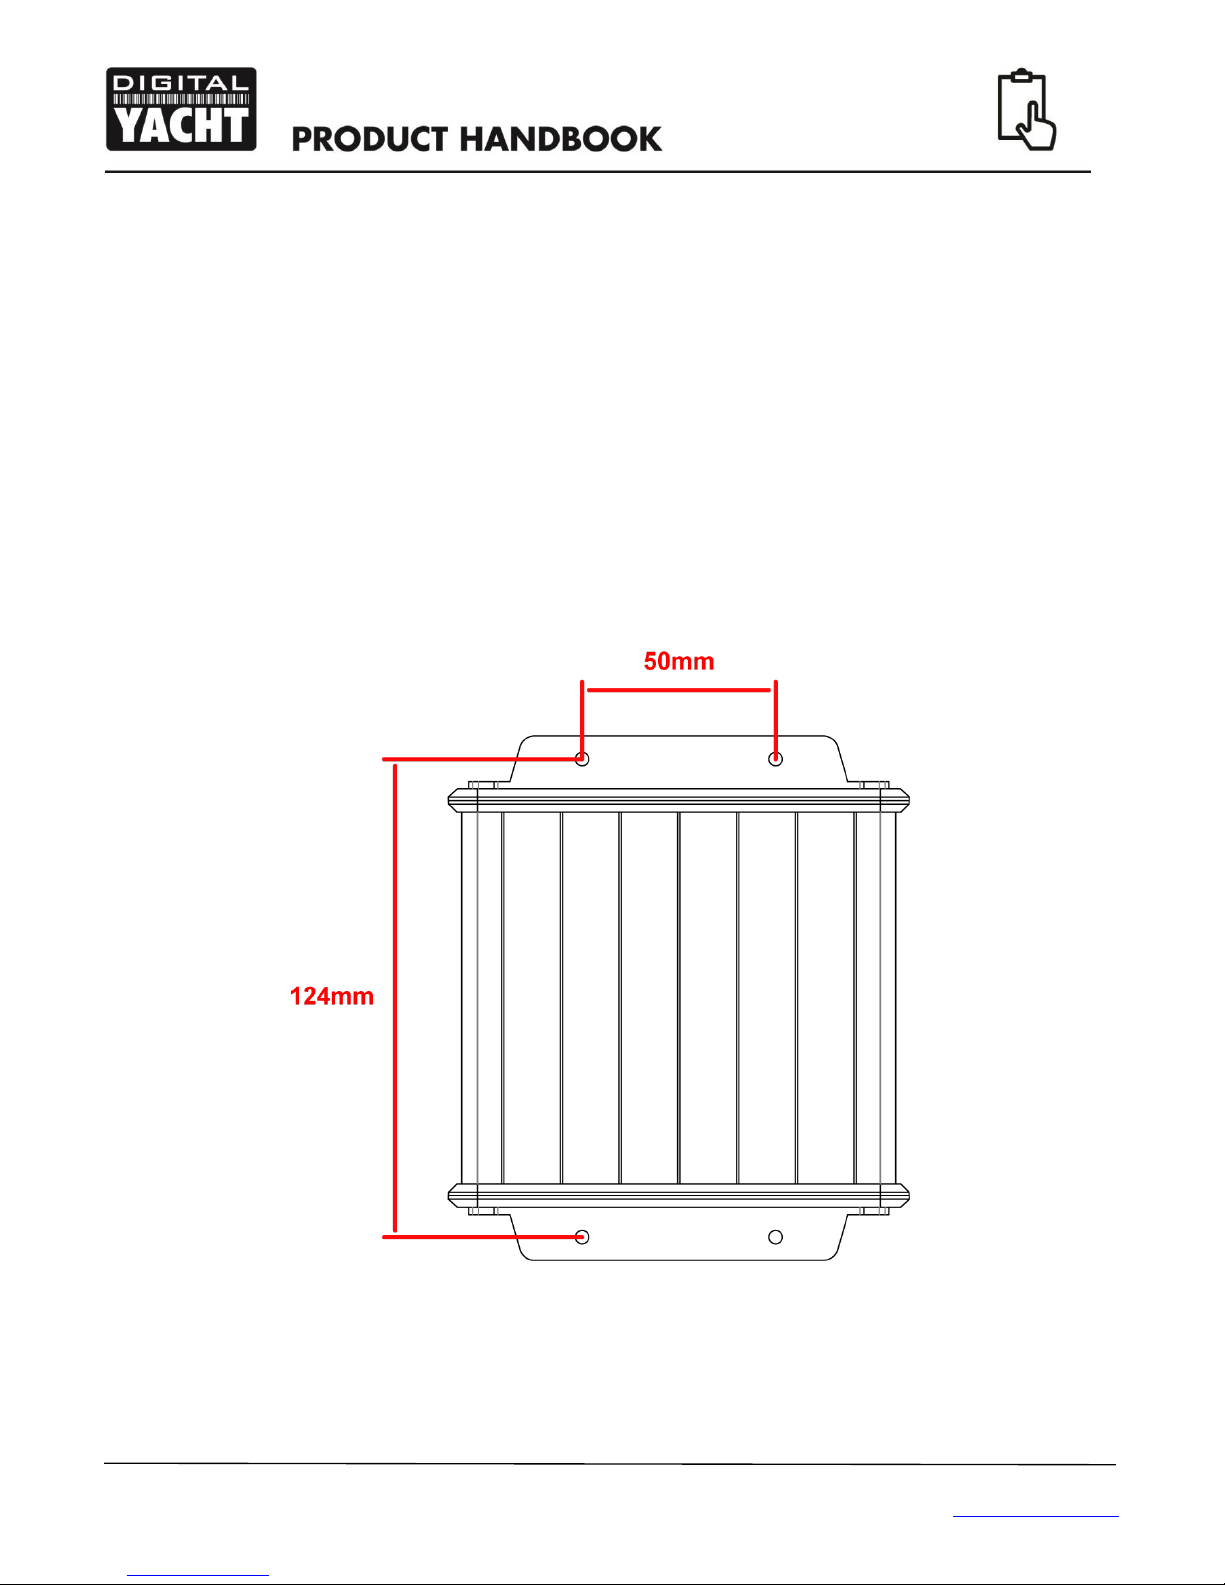
Before starting installation select a suitable location for the iKommunicate Gateway. The unit is designed for below deck
mounting on board a boat and is not water resistant. It should be installed in a cool, dry location and can be mounted on a
vertical or horizontal surface. When locating the unit you should consider:
Routing of power, data and network cables to the unit.
Provision of sufficient space around the unit for cable connections.
Maintaining the compass safe distance of 0.5m.
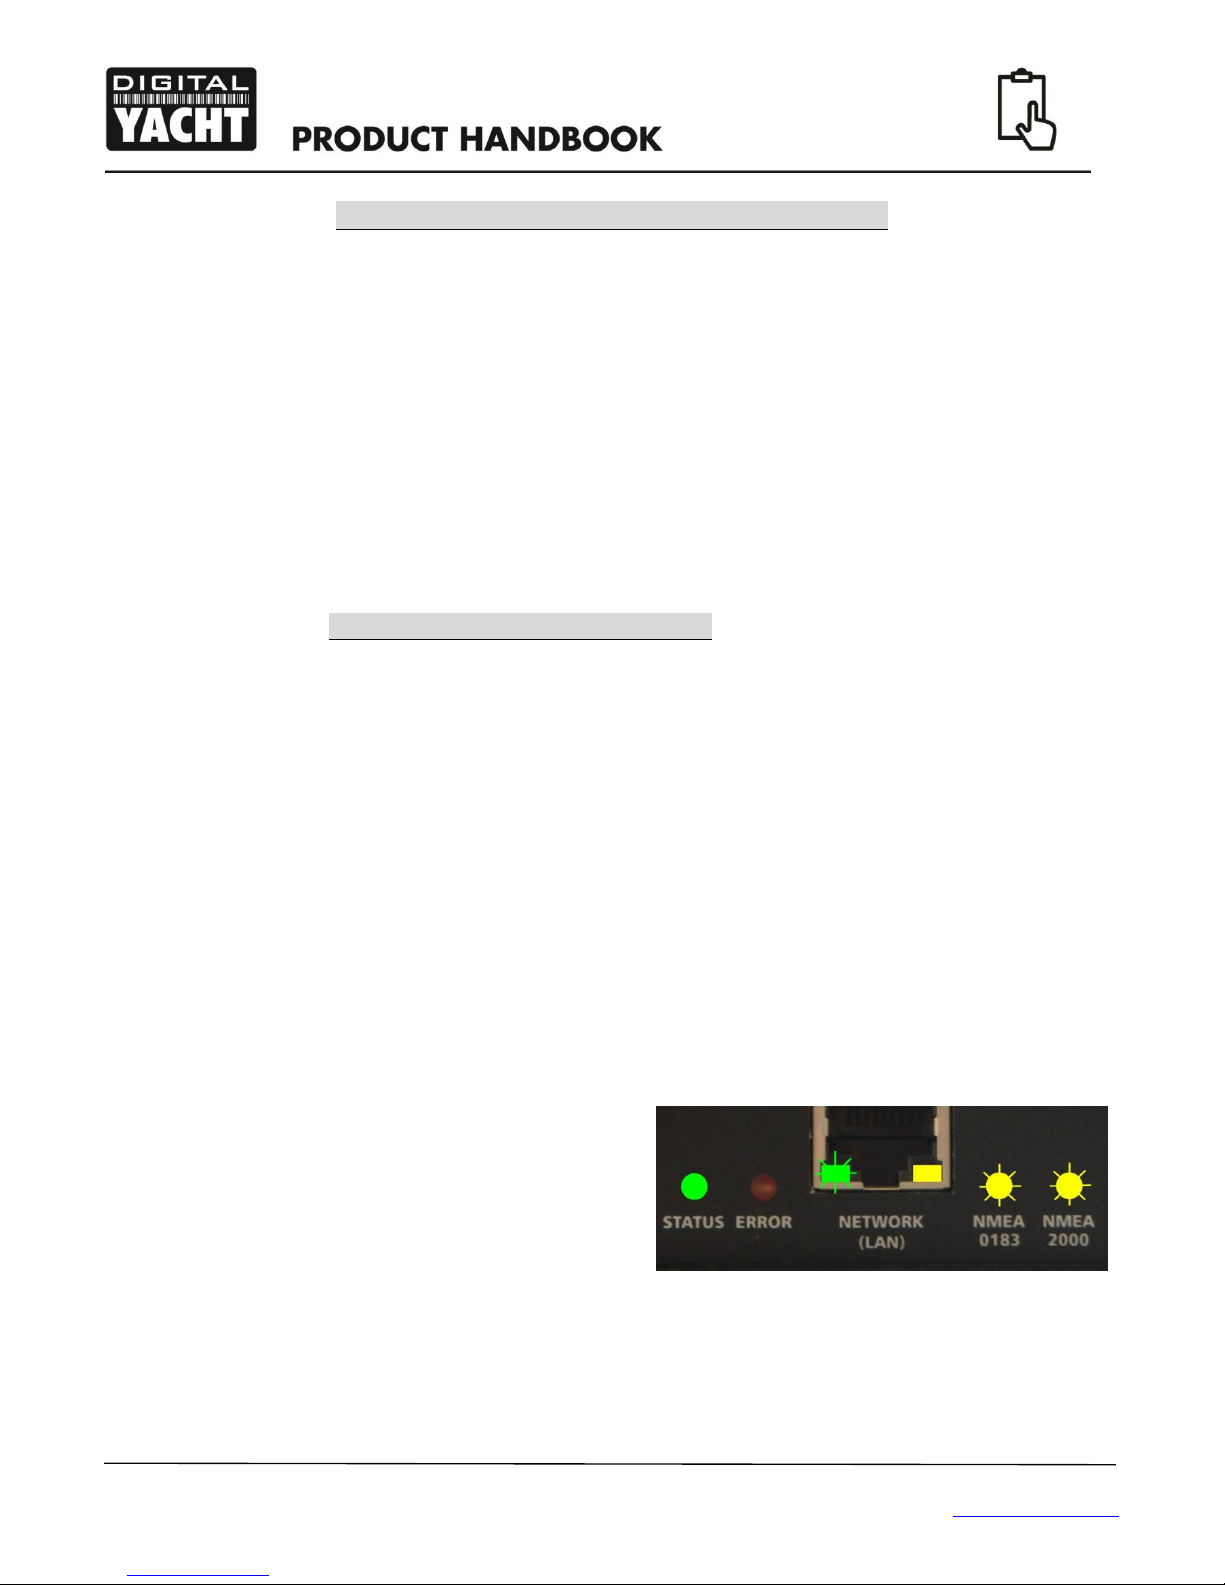
Visibility of status LEDs

Quick Start Guide for iKommunicate V1.01
TEL + 44 1179 554474 www.digitalyacht.co.uk sales@digitalyacht.co.uk
3.1 Preparation
The only critical consideration in siting iKommunicate is if you are connecting it to an NMEA2000 network
(SeaTalkNG/Simnet). We supply an integral 1m NMEA2000 cable and ideally you should connect this directly to
a spare “T Piece” on the NMEA2000 network’s “backbone”. You can purchase and fit a 3rd party NMEA2000
extension cable, but the total drop cable length between iKommunicate and the “T piece” should be 5 meters or
less.
The supplied 1m network cable will need to be connected to the boat’s wireless router or network switch. If you
need to fit a longer network cable, then we recommend that the cable is a shielded Cat6 SFTP network cable,
which are slightly more expensive than normal unshielded network cables, but are less prone to crosstalk and
electrical interference in the “noisy” confines of a modern boat’s nav station.
3.2 Mounting
iKommunicate has 4 x 4mm Diameter fixing holes. Use suitable fixings (not supplied) to fix the IKommunicate to a
flat surface –using the dimensions and details shown in the drawing below. Note that the unit may be installed in
any orientation.
Dimension drawing
3.3 DC Power (12V or 24V)
Provide power connections to the unit from the boat’s supply. Power is connected to the iKommunicate via the
integral Power/Data cable. The Red wire is the positive (+) connection and the Black wire is the negative (-)
connection. Connect the wires to the nearest source of primary 12V or 24V DC power. Ensure that the supply is
connected via a suitable 1A fuse or circuit breaker. Add the fuse in the positive power connection to the unit if
necessary.

Quick Start Guide for iKommunicate V1.01
TEL + 44 1179 554474 www.digitalyacht.co.uk sales@digitalyacht.co.uk
3.4 NMEA0183
The following steps only need to be followed if you are connecting the iKommunicate to other equipment using
NMEA0183 interfacing
iKommunicate has three NMEA0183 Inputs and two NMEA0183 Outputs. All of the connections are brought out
on the Power/Data cable and a table showing the wire colours is shown below;
Wire colour
Description
Function
RED
Power in +
Power supply connections
BLACK
Power in -
ORANGE
NMEA0183 port 1 TX+
Low speed NMEA0183 Output (4,800 baud)
BROWN
NMEA0183 port 1 TX-
LIGHT BLUE
NMEA0183 port 1 RX+
Low speed NMEA0183 input (4,800 baud)
GREY
NMEA0183 port 1 RX-
PINK
NMEA0183 port 2 TX+
Low speed NMEA0183 Output (4,800 baud)
VIOLET
NMEA0183 port 2 TX-
YELLOW
NMEA0183 port 2 RX+
Low speed NMEA0183 input (4,800 baud)
GREEN
NMEA0183 port 2 RX-
WHITE
NMEA0183 port 3 RX+
High speed NMEA0183 input (38,400 baud)
Ideal for connecting AIS
BLUE
NMEA0183 port 3 RX-
iKommunicate can receive the following NMEA0183 Sentences and convert them to Signal K;
Sentence
Description
APB
Heading Track Controller (Autopilot) Sentence B
DBT
Depth Below Transducer
DPT
Depth
GLL
Geographic Position Lat Long
GSV
GNSS Sats in view
HDG
Heading Deviation and Variation
HDM
Heading Magnetic
HDT
Heading True
MTW
Water Temperature
MWV
Wind Speed and angle (relative and theoretical)
RMB
Recommended Minimum Navigation Info
RMC
Recommended Minimum Specific GNSS Data
RSA
Rudder Sensor angle
VHW
Water Speed and Heading
VLW
Dual Ground/Water Distance
VTG
Course over Ground and Ground Speed
VWR
Relative (apparent) Wind Speed and Angle
XTE
Cross track Error Measured

Quick Start Guide for iKommunicate V1.01
TEL + 44 1179 554474 www.digitalyacht.co.uk sales@digitalyacht.co.uk
iKommunicate will also retransmit all NMEA0183 data that it receives on to the Ethernet network via TCP or UDP.
The TCP or UDP connections must be enabled in the Web Interface (default is OFF) but once enabled, all
sentences (not just the ones in the previous list) will be retransmitted.
It is also possible for NMEA0183 TCP data received from a network device to be retransmitted to one of the
NMEA0183 Outputs for driving an autopilot. This must be configured in the Web Interface and only one
device/app can drive an autopilot at a time.
3.5 NMEA2000
The following steps only need to be followed if you are connecting the iKommunicate to other equipment using
NMEA2000 (SeaTalkNG/Simnet) interfacing
iKommunicate has an N2Net connection which is Digital Yacht’s NMEA2000 compliant interface. To connect to
other NMEA2000 products, simply find or add a spare NMEA2000 “T” piece on the existing NMEA2000 network
and connect the AIT2000 N2Net connector to the “T” piece.
The N2Net cable is just over 1m long and is terminated in an NMEA2000 Micro Male Connector.
The AIT2000 does not take any power from the NMEA2000 network
For connection to a Raymarine SeaTalkNG network a SeaTalkNG to Device net female adaptor cable will be
required (Raymarine Part No. A06045)
For connection to a Simrad Simnet network a Micro C female to Simnet adaptor cable will be required (Simrad
P/No 24006199)
iKommunicate can receive the following NMEA2000 PGNs and convert them in to Signal K;
PGN
Description
127245
Rudder
127250
Vessel Heading
127251
Rate of Turn
127258
Magnetic Variation
128259
Speed Water Referenced
128267
Water Depth
128275
Distance Log
129025
Position, Rapid Update
129026
COG SOG, Rapid Update
129029
GNSS Position
129033
Time and Date
129044
Datum
129283
Cross Track Error
129284
Navigation Data
130306
Wind Data
130310
Environmental Parameters
130316
Temperature
127488
Engine Parameters, Rapid Update
127489
Engine Parameters, Dynamic

Quick Start Guide for iKommunicate V1.01
TEL + 44 1179 554474 www.digitalyacht.co.uk sales@digitalyacht.co.uk
PGN
Description
127493
Transmission Parameters
127505
Fluid Level
127506
DC detailed Status
127508
Battery Status
127513
Battery Configuration Status
129038
AIS Class A Position Report
129039
AIS Class B Position Report
129794
AIS Class Static and Voyage Related Data
129809
AIS Class B Static Related Data
129810
AIS Class B Static Data Report
iKommunicate will also convert some of the data coming in on NMEA2000 in to NMEA0183 sentences that it
outputs the network as TCP and/or UDP data. Currently only the following limited number of popular sentences
are output;
Sentence
Description
DPT
Depth
GLL
Geographic Position Lat Long
GSV
GNSS Sats in view
HDG
Heading Deviation and Variation
VTG
Course over Ground and Ground Speed
VDM
AIS Data
3.6 Networking
iKommunicate is designed to be connected to a normal wired Ethernet network (10 or 100Mbits) via its RJ45
connector and the supplied network cable. By default it will try to automatically obtain a network address via
DHCP and self assign itself an IP address if its DHCP request fails. It can also be configured via its web interface
to use manual (static IP) network settings.
If you need to use a longer network cable, we recommend using a shielded Cat5e SFTP cable.
3.7 Powering Up
Make one last check that all of the connections are
correct and then apply power to iKommunicate
After 1-2 seconds, there should be some LED
activity and if iKommunicate connects to the
Ethernet and NMEA2000 networks correctly after
about 10 seconds the LEDs should be as shown

Quick Start Guide for iKommunicate V1.01
TEL + 44 1179 554474 www.digitalyacht.co.uk sales@digitalyacht.co.uk
4. Configuring iKommunicate
Once iKommunicate has got an IP address on the network, you will need to “discover” what IP address it has.
iKommunicate supports two network Discovery services; Windows SDDP and mDNS (also known as Bonjour).
If you have a Windows Laptop on the same network, simply open Windows Explorer, go to your Network and, as
long as you have network discovery turned on, you will see “iKommunicate” listed as a network device.
Double clicking “iKommunicate” will open your browser and display the iKommunicate Web interface (see Fig1).
Figure 1
If you are using LINUX, open a terminal and use Avahi to browse for network devices. The command is avahi-
browse –aor if you want to see all of the information avahi-browse –a –rto resolve all of the discovered data.
For iOS, we recommend a free Bonjour App called “Discover” or one called “Fing” which scans the network rather
than uses Bonjour.
For Android the best free app to use is “Bonjour Browser” which is also available for Windows and Mac.
Once you have discovered the IP address of iKommunicate, type this in to the address bar of your browser and
this will bring up the iKommunicate web interface as shown in Fig.1.
To configure iKommunicate, click on the “Admin Page” button and you will see the web page shown in Figure 2.
Figure 2
The password to login to the “Admin Page” is admin and once logged in you will see the page shown in Fig 3.
The web interface has a number of different “tabs” (pages) that can configure iKommunicate, monitor the NMEA
data and also update the iKommunicate firmware (if connected to the internet).

Quick Start Guide for iKommunicate V1.01
TEL + 44 1179 554474 www.digitalyacht.co.uk sales@digitalyacht.co.uk
Figure 3
The “Configuration” tab allows you to configure a number of different settings including;
oYour boat’s MMSI and Boatname plus iKommunicate’s network Hostname
oWhether iKommunicate uses an automatic (DHCP) IP address or a fixed (static) one
oThe baud rates of the three NMEA 0183 ports (also displays the sentences received)
oEnabling NMEA0183 Output on Port 1, 2 or over the network via TCP/UDP
Figure 4

Quick Start Guide for iKommunicate V1.01
TEL + 44 1179 554474 www.digitalyacht.co.uk sales@digitalyacht.co.uk
The “Devices” tab lists all of the devices on the NMEA2000 network as shown below in Fig 5.
Figure 5
The “Administration” tab is where you can change the password for accessing the Admin Web Interface and also
check for firmware updates and download them (requires the network to have internet an connection).
Figure 6

Quick Start Guide for iKommunicate V1.01
TEL + 44 1179 554474 www.digitalyacht.co.uk sales@digitalyacht.co.uk
5. iKommunicate Features
iKommunicate is primarily designed to convert NMEA data in to Signal K data, so that Signal K apps and servers can
access the boat’s NMEA data. However, to get you started, we have pre-loaded a couple of Signal K Apps that you can
play with “straight out of the box”. To access these apps, type the IP address of iKommunicate in to your browser and
you should see iKommunicate’s Home page again (Fig 7).
Figure 7
5.1 iKompass App (Embedded)
Clicking the “iKompass App” button on the home page will display Digital Yacht’s embedded App. iKompass is stored in
iKommunicate’s flash memory along with the firmware and will always be available even if the micro SD card is removed.
Figure 8

Quick Start Guide for iKommunicate V1.01
TEL + 44 1179 554474 www.digitalyacht.co.uk sales@digitalyacht.co.uk
iKompass reads the Signal K data and assuming that all of the information it needs is available, displays a compass rose
with the boat’s COG, heading and wind direction (and speed). On the right side of the screen is the boat’s current
position, SOG and Depth and a list of the seven nearest AIS targets, with range and bearing.
5.1 Instrument Panel App (Hosted)
Clicking the “Hosted App” button on the Home page displays the Index.Html page in the “hosted” folder on the
iKommunicate’s micro SD Card –see section x.x for details of how to access the micro SD Card.
It is intended that users will be able to store their favourite Signal K Web Apps on the SD Card and then use
iKommunicate as a simple web server to serve up the web apps and the data they require.
We have included a copy of the popular Instrument Panel web app that is written and maintained by the Signal K
development team. It is an open source web app with all of the sources and documentation available at…
https://github.com/SignalK/instrumentpanel
To access a hosted app, click on the “Hosted App” button on the Home page and the Index.html page in the “hosted”
folder on the micro SD Card will be displayed (see Fig.9).
Figure 9
If you have played with HTML, then you will find it very easy to edit this Index.html landing page and add your own
buttons to link to additional Web Apps that you copy in to the “hosted” folder on the micro SD Card.
Instrument Panel is a very flexible app that can display most of the data that Signal K currently supports and as such
provides a good method of checking what data is available on your boat’s NMEA networks. When you run Instrument
Panel for the first time, it will display a screen like the one in Fig.10.
Figure 10

Quick Start Guide for iKommunicate V1.01
TEL + 44 1179 554474 www.digitalyacht.co.uk sales@digitalyacht.co.uk
Instrument Panel will automatically set the correct IP address for iKommunicate, so you can just click the “Connect”
button and see what data is available from iKommunicate (Fig.11).
Figure 11
Each data reading is shown in a different panel and these will scroll all the way down the page. The panels are fully
editable and you can decide which ones are visible, stretch and drag them around the page, set what units they are
displayed in and whether they are Digital or Analogue gauges.
Step 1 - Choose what panels to display by clicking the button and you will see the page shown in Fig.12.
Figure 12

Quick Start Guide for iKommunicate V1.01
TEL + 44 1179 554474 www.digitalyacht.co.uk sales@digitalyacht.co.uk
From this page you can set three things for each panel;
1. Whether the panel is visible by un-ticking the “Visible” check box
2. The type of panel either Digital or Analogue
3. The units the panel displays from the drop down box
Once you have finished configuring the panels, click the icon to return to the normal screen and see your
changes, which will be automatically stored.
Also in the Settings page you can add additional pages and have a different set of panels on each page i.e. a Navigation
set, a Propulsion (Engine) set and an Electrical set.
To Add a new page, click on the + button next to the Blue button with a 1 in it
and a new Page 2 will be added. Also a new “Del Current” button will appear
so that you can delete the current page if you need to
Finally in the Settings page, there is a button, which as the name suggests deletes all of the stored
settings for Instrument Panel.
Step 2 - Resize and Position your panels by clicking the icon and the panels will turn yellow as in Fig.13
Figure 13
Now you can click on a panel, drag it in to the position (row/column) you want or click and drag the bottom right corner of
a panel to resize it. All of the changes you make are specific to that page and will be stored as soon as you click the
Padlock icon again.
In Figures 14 and 15 you can see two typical pages.
In the top right hand corner of Instrument Panel are a Power Icon and a data indicator
The Power Icon closes the websocket connection between Instrument Panel and iKommunicate, while the data indicator
flashes each time a new Delta message is received.

Quick Start Guide for iKommunicate V1.01
TEL + 44 1179 554474 www.digitalyacht.co.uk sales@digitalyacht.co.uk
Figure 14
Figure 15
5.3 Document Storage
Clicking the “Documents” button on the Home page, will display the contents of the “docs” folder on the iKommunicate
micro SD Card. We have included some useful documents and pictures on iKommunicate and Signal K (including this
manual) and you can click on any of the document links to display the PDF, JPG or PNG file in your browser.
If you are experienced in HTML, it is fairly easy to edit the Index.html file in the docs folder and add your own documents
and links. There are also some useful tools available online to generate the Index.html file with all of the links to whatever
files you include in the docs folder. We used Arclab Dir2HTML which is a very simple, yet powerful indexing tool but there
are other tools available, including some free ones.

Quick Start Guide for iKommunicate V1.01
TEL + 44 1179 554474 www.digitalyacht.co.uk sales@digitalyacht.co.uk
Fig.16 below shows the list of documents included on the SD Card. The top table is the main Documents folder and the
bottom table is the Pictures sub-folder.
Figure 16
Then once you click on the file you wish to look at, it will open in your browser (see Fig.17).
Figure 17
Table of contents
Other DIGITAL YACHT Gateway manuals