DIGMA FreeDrive 440 User manual

USER MANUAL/ BEDIENUNGSANLEITUNG/ РУКОВОДСТВО ПОЛЬЗОВАТЕЛЯ
Dashcam/ Autokamera/ Видеорегистратор
FreeDrive 440


EN
CONTENTS
Precautions
Specications
Component parts
Controls
Buttons and connectors
Video Recording Mode
Photo Mode
Playback Mode
Additional button functions
Troubleshooting
Thank you for purchasing a DIGMA product!
A dashcam is a device that records, stores, and plays video information.
Before using this device, please read through this manual to ensure the product is used correctly and
to prevent it from damage.
The soware, the device’s design features, and the content of this User Manual may change without
prior notice for product improvement reasons.
The manufacturer and distributors of this product shall not be responsible for any damage to the
device’s body or for any damage due to improper or inappropriate use by the user.

PRECAUTIONS
1. Install this device correctly. Do not install the product in a location where it can interfere with the
eld of vision of the driver or the system. This may cause the device to fail, or you may suer an injury.
2. Do not install the device near any magnetic eld sources that may damage the equipment.
3. Do not switch o the device while using or when formatting it. Do not insert or remove the TF card.
This may cause damage to the TF card or result in program malfunction.
4. The product’s TF card shall not be used for storing other les. Before using the product, please
format TF card in the device and make back up copies of video recordings and images.
5. To avoid electric shock, do not insert/pull out the cable with wet hands.
6. Do not use the product in temperatures above 60 °С or below 10 °С. Do not install the product in
environments with high humidity.
7. The charging device and accessories suitable for this device should be used.
8. Use TF cards up to 32 GB.

SPECIFICATIONS:
Screen: 2” TFT 320x240
Processor: NTK96658
Sensor: Sony IMX323 | 2 megapixels
Lens: wide-angle lens |140° viewing angle
Video format: MOV
Supported video resolution: FHD/1920х1080 (30 f/s), HD/1280х720 (60 f/s), HD/1280х720 (30 f/s),
WVGA/848х480 (30 f/s)
Video recording time: 3 min, 5 min, 10 min
Photo format: JPG
Supported photo resolution: 12M (4032 х 3024), 10M (3648 х 2736), 8M (3264 х 2448), 5M (2592 х
1944), 3M (2048 х 1536), 2MHD (1920 х 1080), 1.3M (1280 х 960), 0.3 (640 х 480)
G-sensor (automatic le locking when an accident occurs)
Memory Card: TF-card (supports up to 32 GB)
Parking Mode: supported
Microphone: in-built
Audio format: PCM
Languages: German/English/Russian
Battery: in-built Li-Pol, 300 mA·h
OS Compatibility: Windows 2000, XP, Vista, 7, 8, 8.1, Mac OS 10+, LINUX
Device dimensions: 53 х 58 х 38 mm
Device mass: 57 g
COMPONENT PARTS
• FreeDrive Dashcam 440
• Vehicle windshield mount
• USB cable
• Charging device (mini-USB connector)
• User manual

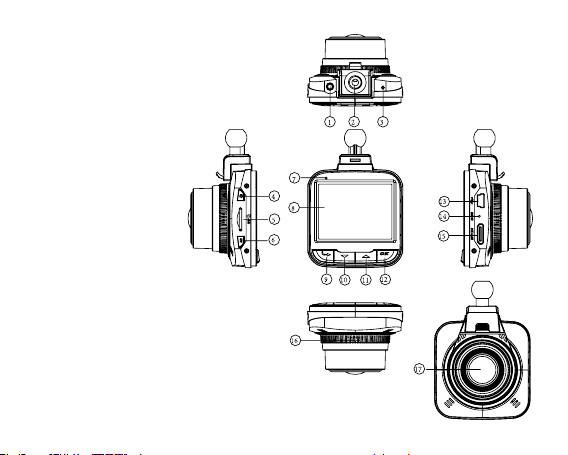
INTERFACE
1. AV-output
2. Connector for holder with power terminal
3. Reset button
4. Power button
5. MicroSD card slot
6. Menu button
7. Operation mode indicator
8. Display
9. Mode button
10. Down button
11. Up button
12. OK button
13. miniUSB interface
14. Microphone
15. HDMI interface
16. Speaker
17. Lens

BUTTONS AND CONNECTORS
1. AV output
Analog Video/Audio (composite) output for dashcam connection to a TV or monitor.
2. Connector for holder with power terminal
Connect the holder to the connector until it clicks. The dashcam can either be powered with a
dashcam miniUSB connector (13) or a holder miniUSB connector.
3. Reset button
Press the Reset button if the dashcam does not respond when buttons are pressed, and/or when the
external power adapter is connected/disconnected.
4. Power button
When external power is available on connector 13 (or when the holder is connected to the miniUSB
holder connector), the dashcam will automatically switch on and, if an SD card is installed, begin
video recording. However, the dashcam can be switched on/o manually using the Power button.
Briey press the Power button to switch the dashcam on. Press and hold the Power button to switch
the dashcam o. It can also be used for switching the screen on/o (brief press) in any mode.
5. MicroSD card slot
Slot for a microSD card. Please make sure you insert the card into the slot the right way up. If the
card is inserted the wrong way, it may damage the device and card. When a card is inserted into
device, it will be dened as the main data storage device: all previously recorded information on the
card could be lost. Please use high speed cards with recording class 6 or higher.

6. MENU button
Settings menu button. Each dashcam mode (video, photo, playback) has two settings menu tabs. The
rst tab is for customized settings for the current mode. The second tab is for system settings, which
are the same for all three modes. Therefore, common system options can be set from any of the three
modes. And customized settings for one mode can only be set from the corresponding mode.
Menu button additional function: in video recording mode, it locks the current le from being
overwritten.
Stop the video recording to enter the settings menu. Briey press the MENU button. The list of menu
items for all three modes is provided below:
Video Recording Mode -> Video Recording Mode Settings:
Video resolution: video resolution settings in video recording mode.
Available values: FHD/1920х1080 (30 f/s), HD/1280х720 (60 f/s), HD/1280х720 (30 f/s),
WVGA/848х480 (30 f/s).
Recording cycle: duration of recorded video les. Values: O, 3 min, 5 min, 10 min. When selecting
one of the time values, the recording will be made into les of specied length. When the memory is
full, new les will be recorded over the oldest ones.
WDR: Wide Dynamic Range It improves image quality at high contrast lighting: sharp dierence
between dark (shade) and highly lighted areas (in the sun). Values: On, O
G-sensor tracks changes in acceleration, both positive and negative (hard braking or hard
acceleration), thereby automatically identifying incidents and marking the current video le Read_
Only, which prevents it from being overwritten.* Values for sensor sensitivity settings: O, High,
Medium, Low
* If les are locked from being overwritten, or if the G-sensor is switched on with the wrong settings,
the memory card may become full, and the dashcam will be unable to continue recording video. If this
happens, clear the memory card to continue normal operations

Exposure: manual adjustment of sensor light sensitivity. Values: -2.0, -5/3, -4/3, -1.0, -2/3, -1/3 0.0,
+1/3, +2/3, +1.0, +4/3, +5/3, +2.0.
Motion detector: motion detector function on/o: the dashcam will automatically start video
recording when it detects motion. The recording lasts 10 seconds, then the dashcam switches to
standby mode until the next motion is detected. Values: ON/OFF
Microphone: sound recording on/o during video recording. Values: ON/OFF
The microphone can be switched on and o during video recording by briey pressing the DOWN
button.
Date stamp: switch on/o the date/time stamp—video recording date and time information overlay
on the video image. Values: ON/OFF
Number stamp: enable/disable car license plate stamp on video recording. The license plate is
specied in system settings. Values: ON/OFF
Photo mode -> Photo mode settings:
Photo mode: photo mode selection: single photo or timer photo. Values: Single, 2 s, 5 s, 10 s.
Photo resolution: photo resolution settings in photo mode. Values: 12M (4032*3024), 10M
(3648*2736), 8M (3264*2448), 5M (2592*1944), 3M (2048*1536), 2MHD (1920*1080), 1.3M (1280*960),
0.3 (640*480)
Series: a series of photos. When the OK button is pressed, the device takes the number of photos in
succession specied in the current item. Values: O, 3, 5, 10.
Photo quality: photo quality settings in photo mode. Available values: high, normal, low
Sharpness: image sharpness when taking photos. Values: Sharp, Normal, Mild.
White balance: adjustment of the image color gamut when taking photos, depending on dierent
types of lighting source. Values: Auto Balance, Sunny, Gloomy, Tungsten, Fluorescent.
Color: photo color eects. Values: Color, Black&White, Sepia.
ISO: sensor light sensitivity settings. Values: Auto, 100, 200, 400.
Exposure: manual adjustment of sensor light sensitivity. Values: -2.0, -5/3, -4/3, -1.0, -2/3, -1/3, 0.0,

+1/3, +2/3, +1.0, +4/3, +5/3, +2.0.
Stabilization: image stabilization during handheld shooting (jitter). Values: ON/OFF
Stamp: switch on/o the date/time stamp—photo date and time information overlay on image.
Values: O, Date, Date/Time.
Playback Mode -> Playback mode menu:
Delete: delete previously recorded video and photo les. Values: Delete one, Delete all.
Protection: enable/disable protection from overwriting for one or several les.
Values: Protect One, Disable One, Protect All, Disable All.
Slideshow: shows photos in slideshow mode with a delay specied in this item. Values: 2 s, 5 s, 8 s.
System settings (common):
Date/Time: Time/Date settings.
Auto shuto: The dashcam automatically switches o aer a set time when it is inactive. Values:
O, 1 min, 3 min.
Button Sound: sound when buttons are pressed. Values: ON/OFF
Parking Mode: in this mode the switched o dashcam tracks the G-sensor status. As soon as the
dashcam (car) shakes enough to be detected by the G-sensor, the dashcam will switch on and start
video recording. Please note that in most vehicles the cigarette lighter power turns o when the
ignition key is in the OFF position. To ensure that this mode operates correctly, take additional
measures to providing the dashcam with uninterruptible power in parking mode.
Language: system language selection. Values: Russian, English.
AV output: selection of a color coding system for analog AV output. Values: PAL, NTSC.
Frequency: power frequency of lighting devices. This parameter can be used to stop ickering that
occurs during video shooting under articial lighting. Values: Auto, 50 Hz, 60 Hz.
Formatting: MicroSD card formatting. All information will be deleted from the card.
Reset settings: reset all settings to factory settings (by default)
Soware version: displays the dashcam’s embedded soware version.

7. Operation mode indicator
The red indicator is for power supply and battery charging, the blue indicator displays the dashcam
operation mode. The red indicator is on when the internal battery is charging. The indicator goes o
when the battery is fully charged. The indicator ashes during recording. When the recoding stops,
the blue indicator goes o.
9. Mode button
Dashcam mode switching button. When the button is briey pressed, the dashcam will switch to one
of the following operation modes: Video -> Photo -> Playback.
10. Down button
Button for menu navigation down/microphone on/o/ZOOM-
11. UP button
Button for menu navigation Up/ ZOOM+
12. ОК button
Button for conrming a menu selection. Start/Stop recording in Video mode. Take a photo in Photo
mode.
13. MiniUSB interface
Connector for external power supply (included) or PC. When external power is available on connector 13 (or
when the holder is connected to the miniUSB holder connector), the dashcam will automatically switch on
and, if an SD card is installed, begin video recording. During recording, when external power is not available on
this connector, the dashcam will automatically stop recording and switch o. The dashcam can be switched
on/o manually using the Power button.
14. HDMI interface
Digital Video/Audio output for connection to a TV or monitor.

ADDITIONAL BUTTON FUNCTIONS
Apart from their main functions, some buttons have additional functions in the dashcam’s dierent
operation modes. The table of additional functions for buttons is provided below.
ƵƚƚŽŶ DŽĚĞ
sŝĚĞŽ WŚŽƚŽ WůĂLJďĂĐŬ
ZĞĐŽƌĚŝŶŐƐƚŽƉƉĞĚZĞĐŽƌĚŝŶŐ
ŝŶƉƌŽŐƌĞƐƐ
WKtZ
ƉƌĞƐƐ
ďƌŝĞĨůLJ
^ĐƌĞĞŶKŶKĨĨ ^ĐƌĞĞŶ
KŶKĨĨ
^ĐƌĞĞŶKŶKĨĨ^ĐƌĞĞŶKŶKĨĨ
WKtZ
ƉƌĞƐƐĂŶĚ
ŚŽůĚ
WŽǁĞƌŽĨĨ
DŽĚĞ^ǁŝƚĐŚ
sŝĚĞŽWŚŽƚŽWůĂLJďĂĐŬ
ŵŽĚĞƐ
ʹ ^ǁŝƚĐŚ
sŝĚĞŽWŚŽƚŽWůĂLJďĂĐŬ
ŵŽĚĞƐ
^ǁŝƚĐŚ
sŝĚĞŽWŚŽƚŽWůĂLJďĂĐŬ
ŵŽĚĞƐ
DĞŶƵsŝĚĞŽƐĞƚƚŝŶŐƐ^LJƐƚĞŵ
ƐĞƚƚŝŶŐƐ
ƵƌƌĞŶƚĨŝůĞ
ƉƌŽƚĞĐƚŝŽŶ
WŚŽƚŽƐĞƚƚŝŶŐƐ^LJƐƚĞŵ
ƐĞƚƚŝŶŐƐ
WůĂLJďĂĐŬŵĞŶƵ^LJƐƚĞŵ
ƐĞƚƚŝŶŐƐ
ŽǁŶKKDͲDŝĐƌŽƉŚŽŶĞ
KŶKĨĨ
KKDͲ
DŝĐƌŽƉŚŽŶĞ
KŶKĨĨ
KKDͲ&ŝůĞůŝƐƚŶĂǀŝŐĂƚŝŽŶ
hƉKKDнKKDнKKDн &ŝůĞůŝƐƚŶĂǀŝŐĂƚŝŽŶ
KŬ^ƚĂƌƚƌĞĐŽƌĚŝŶŐ ^ƚŽƉ
ƌĞĐŽƌĚŝŶŐ
dĂŬĞĂƉŚŽƚŽWůĂLJďĂĐŬ

BATTERY
Fully charged
Not fully charged
Low battery
Battery is discharged
The dashcam’s built-in battery is not designed for it to operate continuously o-line and is only
used to ensure that the device’s internal timer works and properly nishes a video recording when
the external power is interrupted. When external power is provided, the device indicator turns red.
The device shuts o automatically. The indicator turns green. If a memory card is installed in the
dashcam, video recording will begin. The blue indicator will start ashing. The in-built battery charges
when the external power supply is connected. The charge status is shown in the bottom right corner.
TROUBLESHOOTING
Problem: Cannot take a photo/video.
Possible solution: Check if there is enough free space on the TF card.
Problem: The video does not stop automatically.
Possible solution: Use a high-speed TF card compatible with SDHC. This TF card will be marked С6/
С10. The card must be formatted before use.

Problem: no image when connecting the dashcam to an LCD TV.
Possible solution: Check that the TV AV or HDMI plug is connected to the AV or HDMI socket.
Problem: Blurred image.
Possible solution: Check that the lens is clean. Before use, clean the lens with special cleaning cloth.
NOTE
• Storage conditions: (5 to 40) °С with maximum humidity of 85%, avoid direct sunlight.
• The product should be transported in its original package.
• Please contact a specialized center for product disposal.
Importer information is indicated on the package.
The manufacturing date is indicated on the package.

DE
INHALT
Sicherheitshinweise
Technische Daten
Lieferumfang
Beschreibung der Bedienelemente
Funktion der Tasten und Anschlüsse
Modus „Videoaufnahme“
Modus „Foto“
Modus „Wiedergabe“
Zusätzliche Funktionen der Tasten
Mögliche Probleme und deren Lösungswege
Vielen Dank, dass Sie sich für ein DIGMA-Produkt entschieden haben!
Die Autokamera ist ein Gerät, das für die Aufnahme, Speicherung und Wiedergabe von Videodaten
bestimmt ist.
Vor dem Beginn der Nutzung dieses Geräts lesen Sie bitte aufmerksam die Bedienungsanleitung,
um den richtigen Betrieb des Erzeugnisses sicherstellen zu können und dessen Beschädigung zu
vermeiden.
Soware, konstruktive Besonderheiten des Geräts und Inhalt der vorliegenden Bedienungsanleitung
können zum Zwecke der Produktverbesserung ohne vorherige Benachrichtigung geändert werden.
Hersteller und Händler dieses Produkts haen nicht für Beschädigungen am Gehäuse des Geräts
sowie für Schäden infolge eines falschen oder nicht zweckbestimmten Einsatzes durch den Nutzer.

SICHERHEITSHINWEISE
1. Das Gerät ist wie vorgeschrieben zu installieren. Die Sicht für den Fahrer und das System ist frei zu
halten. Sonst kann das Gerät außer Betrieb gesetzt oder Sie können verletzt werden.
2. Das Gerät darf nicht in der Nähe von Magnetfeldquellen installiert werden, diese könnten die
Ausrüstung beschädigen.
3. Beim Einsatz des Geräts oder während der Formatierung nicht die Stromversorgung unterbrechen
sowie die TF-Karte nicht einstecken bzw. nicht entfernen. Sonst kann die TF-Karte beschädigt werden
oder dies kann zu Programmfehlern führen.
4. Die TF-Karte dieses Produkts darf nicht für die Speicherung anderer Dateien genutzt werden.
Formatieren Sie bitte die EA-Karte im Gerät vor der Nutzung des Produkts und erstellen Sie
Sicherheitskopien der Videos und Bilder.
5. Das Kabel nicht mit feuchten Händen anschließen bzw. abtrennen, um Verletzungen durch den
elektrischen Strom zu vermeiden.
6. Es ist verboten, das Produkt bei einer Umgebungstemperatur von über 60 °С oder unter 10 °С zu
betreiben. Das Produkt darf nicht bei erhöhter Lufeuchtigkeit benutzt werden.
7. Nur Ladevorrichtung und Zubehör benutzen, die zu diesem Gerät passen.
8. Verwenden Sie TF-Karten mit einer Kapazität von bis zu 32 GB.

TECHNISCHE DATEN:
Bildschirm 2" TFT 320x240
Prozessor: NTK96658
Sensor: Sony IMX323 | 2 MPixel
Objektiv: Weitwinkel | Bildwinkel 140°;
Videoformat: MOV
Unterstützte Videoauösung: FHD/1920х1080 (30 fps), HD/1280х720 (60 fps), HD/1280х720 (30 fps),
WVGA/848х480 (30 fps)
Dauer der Videoaufnahme: 3 min, 5 min, 10 min
Bildformat: JPG
Unterstützte Bildauösung: 12M (4032х3024), 10M (3648х2736), 8M (3264х2448), 5M (2592х1944),
3M (2048х1536), 2MHD (1920х1080), 1,3M (1280х960), 0,3 (640х480)
G-Sensor (automatische Sperre der Datei bei einem Autounfall)
Speicherkarte: TF-Karte (unterstützt werden bis zu 32 GB)
Parkmodus: Unterstützt
Mikrophon: Integriert
Audioformat: PCM
Sprachen: Deutsch/Englisch/Russisch
Batterie: Integrierte Li-Pol 300 mAh
Kompatibilität mit Betriebssystemen: Windows 2000, XP, Vista, 7, 8, 8.1, Mac OS 10+, LINUX
Abmessungen des Geräts: 53х58х38 mm
Gewicht des Geräts: 57 g
LIEFERUMFANG
• Autokamera FreeDrive 440
• Befestigung an der Frontscheibe des Autos
• USB-Kabel
• Ladevorrichtung (mit Mini-USB-Anschluss)
• Bedienungsanleitung
BEDIENELEMENTE
1. AV-Ausgang
2. Anschluss für den Halter mit Stromversorgung
3. Taste „Reset“ (Zurücksetzen)
4. Taste „Ein/Aus“
5. Einschub für microSD-Karte
6. Taste „Menü“
7. Anzeige der Betriebsart
8. Bildschirm
9. Taste „Modus“
10. Taste „Ab“
11. Taste „Auf“
12. Taste „OK“
13. Mini-USB-Schnittstelle
14. Mikrophon
15. HDMI-Schnittstelle
16. Lautsprecher
17. Objektiv

FUNKTION DER TASTEN UND ANSCHLÜSSE
1. AV-Ausgang
Analoger Video-/Audioausgang (Composite) zum Anschluss der Autokamera an einen Fernseher oder
Monitor.
2. Anschluss für den Halter mit Stromversorgung
Verbinden Sie den Halter mit dem Anschluss, bis er hörbar einrastet. Die Stromversorgung der
Autokamera kann sowohl über den Mini-USB-Anschluss der Kamera selbst (13) als auch über den
Mini-USB-Anschluss des Halters erfolgen.
3. Taste „Reset“ (Zurücksetzen)
Falls die Autokamera auf Tastendrücke und/ oder auf den Anschluss/die Abtrennung des externen
Stromadapters nicht reagiert, drücken Sie die Taste „Reset“.
4. Taste „Ein/Aus“
Bei Aktivierung der externen Stromversorgung über den Anschluss 13 (oder über den Mini-USB-
Anschluss des Halters) schaltet sich die Autokamera automatisch ein und beginnt die Videoaufnahme,
sofern eine SD-Karte eingesetzt ist. Die Autokamera kann aber auch manuell durch Drücken der
Taste „Ein/Aus“ ein- bzw. ausgeschaltet werden. Zum Einschalten der Autokamera drücken Sie kurz
die Taste „Ein/Aus“. Zum Abschalten der Autokamera drücken Sie die Taste „Ein/Aus“ länger. Wird
außerdem auch zum Ein-/Ausschalten des Bildschirms (kurze Betätigung) in einem beliebigen Modus
verwendet.
5. Einschub für microSD-Karte
Schacht zum Einstecken einer microSD-Karte. Beachten Sie die Richtung für das Einstecken der
Karte. Das Einstecken der Karte mit der verkehrten Seite kann das Gerät und die Karte beschädigen.

Beim Einstecken der Karte ins Gerät wird diese als Hauptdatenträger deniert. alle früher auf
der Karte gespeicherten Daten können verlorengehen. Benutzen Sie Highspeed-Karten mit
Geschwindigkeitsklasse 6 und höher.
6. Taste „MENÜ“
Taste des Kongurationsmenüs. Jede der drei Betriebsarten der Autokamera (Video, Foto,
Wiedergabe) hat zwei Tabs im Kongurationsmenü. Der erste Tab enthält individuelle Einstellungen
des aktuellen Modus. Der zweite Tab enthält die für alle Betriebsarten gleichen Systemeinstellungen.
Somit können allgemeine Systemparameter der Autokamera aus jeder der drei Betriebsarten heraus
eingestellt werden. Individuelle Einstellungen einer der Betriebsarten lassen sich nur aus dem
entsprechenden Modus heraus einstellen.
Zusätzliche Funktion der Taste „Menü“: im Videoaufnahmemodus – Schutz der aktuellen Videodatei
vor dem Überschreiben.
Zum Önen des Kongurationsmenüs stoppen Sie zunächst die Videoaufnahme. Drücken Sie kurz die
Taste „Menü“. Nachstehend nden Sie die Liste der Menüpunkte für jede der drei Betriebsarten:
Modus „Videoaufnahme“ -> Einstellungen des Videomodus:
Videoauösung: Einstellung der Videoauösung im Videoaufnahmemodus.
Mögliche Werte: FHD/1920х1080 (30 fps), HD/1280х720 (60 fps), HD/1280х720 (30 fps),
WVGA/848х480 (30 fps).
Loop-Aufnahme (Endlosschleife): Dauer der aufgenommenen Videodateien. Werte: Aus, 3 min, 5 min,
10 min. Bei Auswahl eines der Zeitwerte wird die Aufnahme in eine Datei mit der angegebenen Länge
geschrieben. Bei vollem Speicher werden die ältesten Dateien mit den neuen überschrieben.
WDR: erweiterter dynamischer Bereich (WideDynamicRange). Verbessert die Bildqualität bei sehr
kontrastreicher Beleuchtung: große Kontraste zwischen dunklen (Schatten) und sehr hellen Bereichen
(in der Sonne). Werte: Ein, Aus
This manual suits for next models
1
Table of contents
Languages:
Other DIGMA Dashcam manuals

Popular Dashcam manuals by other brands

Fleet Complete
Fleet Complete Vision 2.0 Quick reference card

Sylvania
Sylvania ROADSIGHT BASIC manual

Toyota
Toyota PT949-34222 manual

Panasonic
Panasonic CY-VRP112T1 operating instructions

Provision ISR
Provision ISR PR-DVR-C10 Quick installation guide

FalconEye Electronics
FalconEye Electronics Pinnacle manual


