Dinan DINANFLASH User manual


BASIC MENU LAYOUT ............................................................................... 3
BEFORE YOU BEGIN................................................................................. 4
LIST OF COMPONENTS...................................................................... 4
BUTTON FUNCTIONALITY .................................................................. 4
CARB/EPA COMPLIANCE............................................................................ 5
TUNING LEVELS EXPLAINED ....................................................................... 6
SAFETY WARNING & CAUTION .................................................................... 6
GETTING STARTED.................................................................................. 7
ECU UNLOCK......................................................................................... 8
ADVANCED TUNING OPTIONS.....................................................................11
ADVANCED TUNING OPTIONS EXPLAINED.......................................................13
COMMON TUNING QUESTIONS....................................................................14
RETURNING YOUR VEHICLE TO STOCK..........................................................14
READ DTCs ..........................................................................................16
CLEAR DTCs.........................................................................................17
VIEWING GAUGES ..................................................................................18
DATA LOGGING.....................................................................................19
DATA LOGGING RETRIEVAL .......................................................................20
BATTERY VOLTAGE ................................................................................21
VEHICLE INFO ......................................................................................22
DEVICE INFO ........................................................................................23
DOWNLOAD UPDATE AGENT 1.0 TOOL..........................................................24
PRODUCT UPDATES USING UPDATE AGENT 1.0................................................26
TROUBLE SHOOTING...............................................................................28
STORAGE AND MAINTENANCE ....................................................................30
SAFETY GUIDELINES ...............................................................................31
LIMITED 1 YEAR WARRANTY ......................................................................32
VEHICLE WARRANTY INFO ........................................................................33
2
TABLE OF CONTENTS
WARNING
3
Some of the menu options or features displayed in this manual are
vehicle specic, and may not be available for your specic make and model.
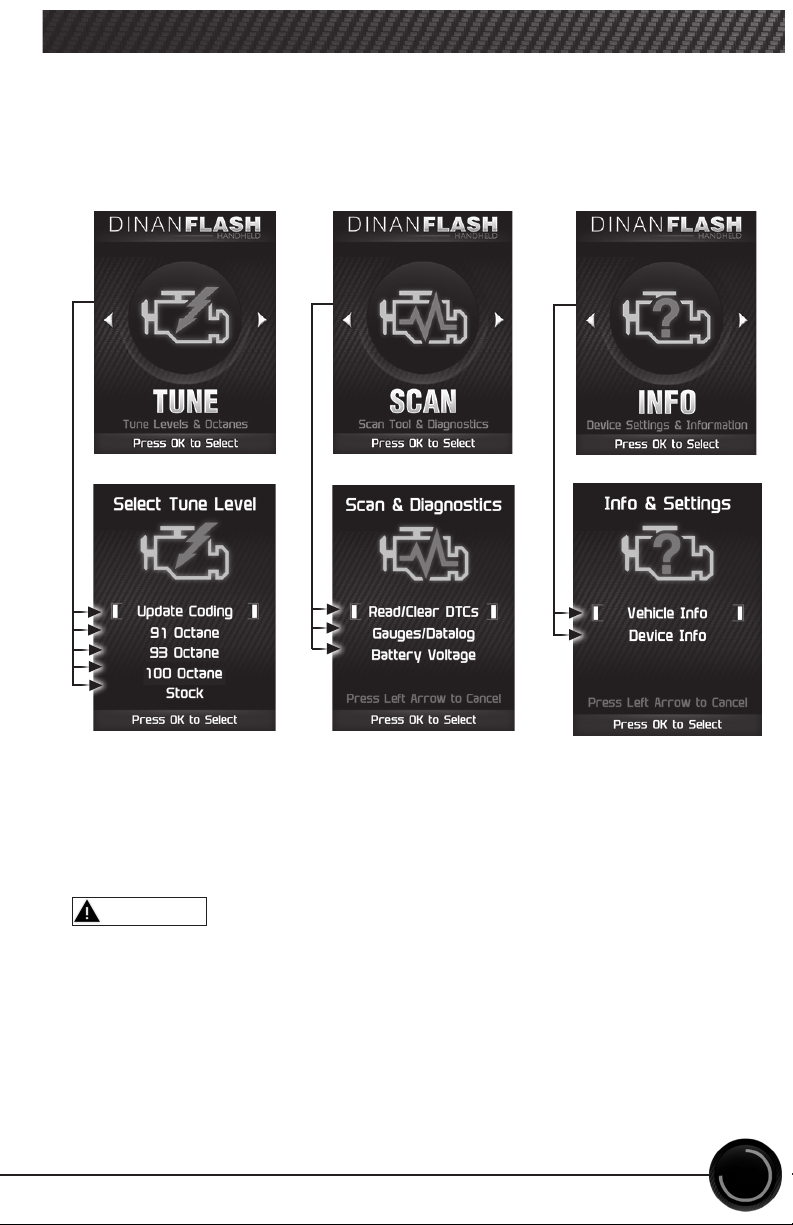
BASIC MENU LAYOUT
Misapplication or misuse of this product could lead to a serious or
fatal accident. Comply with all safety information in this manual, and
your vehicle owner’s manual. Follow safety, installation and operating
instructions in this User Manual to assure proper use.

NAVIGATING TIPS:
• To move back to the previous menu,
press the button.
• To move forward to the next menu,
you can press either OK or
button to enter the highlighted
option.
• The & buttons are used to
select menu options and adjust
values for certain features.
Up/Increase
Right
Next
Forward
Left
Back
Exit
Down/Decrease
OK
LIST OF COMPONENTS BUTTON FUNCTIONALITY
DISPLAY DEVICE
USB CABLE
POWEIR HARNESS
POWEIR MODULE
4
BEFORE YOU BEGIN

5
CARB/EPA COMPLIANCE
This part is legal under the provisions of EPA’s Tampering Policy dat-
ed November 23rd, 2020. The company has reasonable basis (test re-
sults) to verify that this product allows the vehicle to operate within
legal emissions standards and is therefore legal to be sold for on-
street use in all states that accept the legal provisions of the Clean
Air Act and the EPA Tampering Policy. This product is NOT LEGAL
FOR SALE OR USE IN THE STATE OF CALIFORNIA. Testing with the Cali-
fornia Air Resources Board, in order to achieve 50-state compliance,
is pending with CARB. Once testing is complete with California, and
an E.O. number is issued, this product will be updated to 50-state
legal status.
The DINANFLASH Handheld comes with pre-tuned levels, or maps, based on the
fuel quality/octane(RON) used. It is imperative for the safety of the engine that
you do not use lower grade fuel than what the map being run requires.
The dierent tuning levels are listed below, but availability may vary based on
your vehicle’s year, make, and model:
Update Coding: This option should only be used when prompted to by a
technician or by the DINANFLASH device, OR if after programming your vehicle
is displaying “drivetrain malfunction”. It is part of the tuning procedure
and restores previously written ECU characteristics that get erased when
programming.
91 Octane
93 Octane
100 Octane
Stock - Returns vehicle to factory stock. Removes all Dinan tuning from your
vehicle. It is recommended that you calibrate your vehicle back to stock prior to
taking it in for service or maintenance. See page 12 for details on how to return
your vehicle to stock.
6
TUNING LEVELS EXPLAINED
Throughout this User Manual you will see important messages regarding your
safety or the protection of your vehicle. These messages are designated by the
words WARNING, CAUTION, or NOTICE.
A WARNING indicates a hazardous situation which, if not avoided, will result
in death or serious injury.
A CAUTION indicates a hazardous situation which, if not avoided, could result
in minor or moderate injury.
NOTICE
A NOTICE indicates a condition that could cause damage to the product or
your vehicle.
The Dinan Product you have purchased is a high-performance product. As such,
it does present some risks of which you should be fully aware. Do not use this
product until you have carefully read the following safety information and the
Owner Agreement.
SAFETY WARNING & CAUTION
CAUTION
WARNING
7
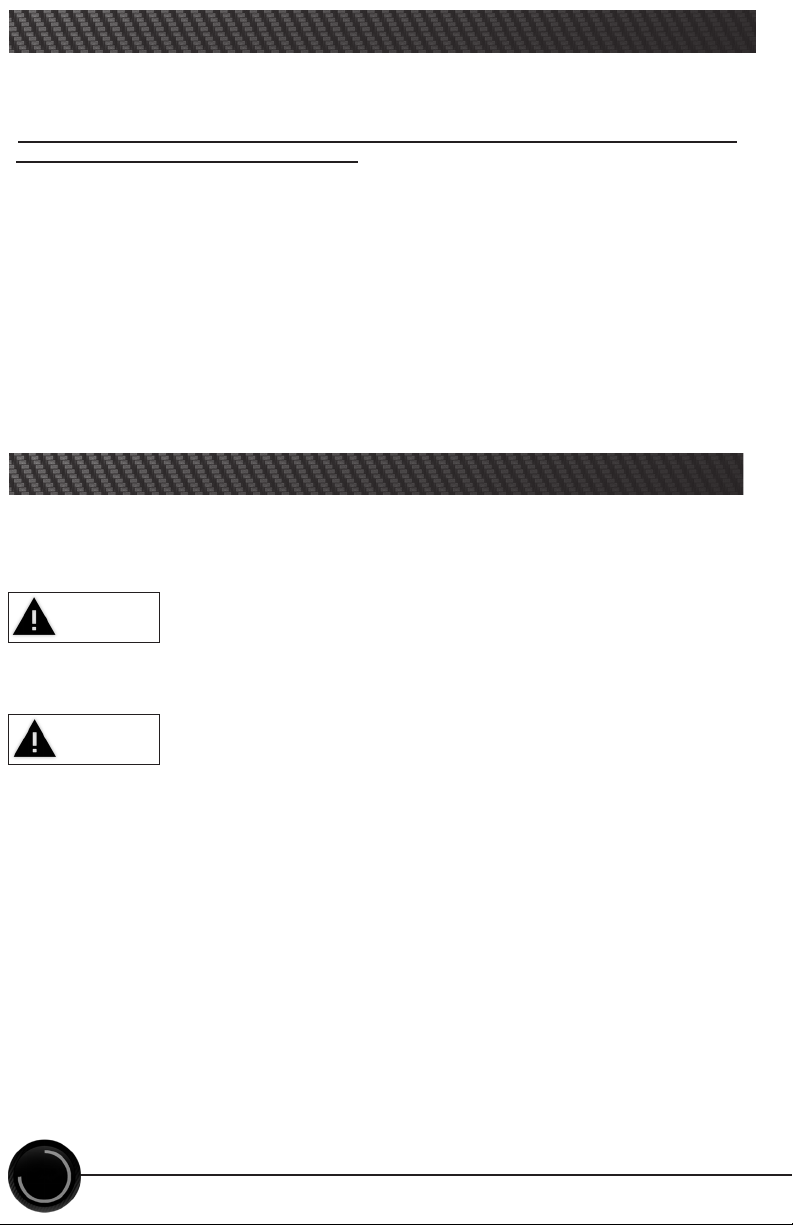
Change the power level of your vehicle using custom options and settings.
NOTE: Not all features are available on every make, model, and engine.
NOTICE: Do not remove or bump the OBD-II connector during any programming
sequence. If you do, the vehicle may not start.
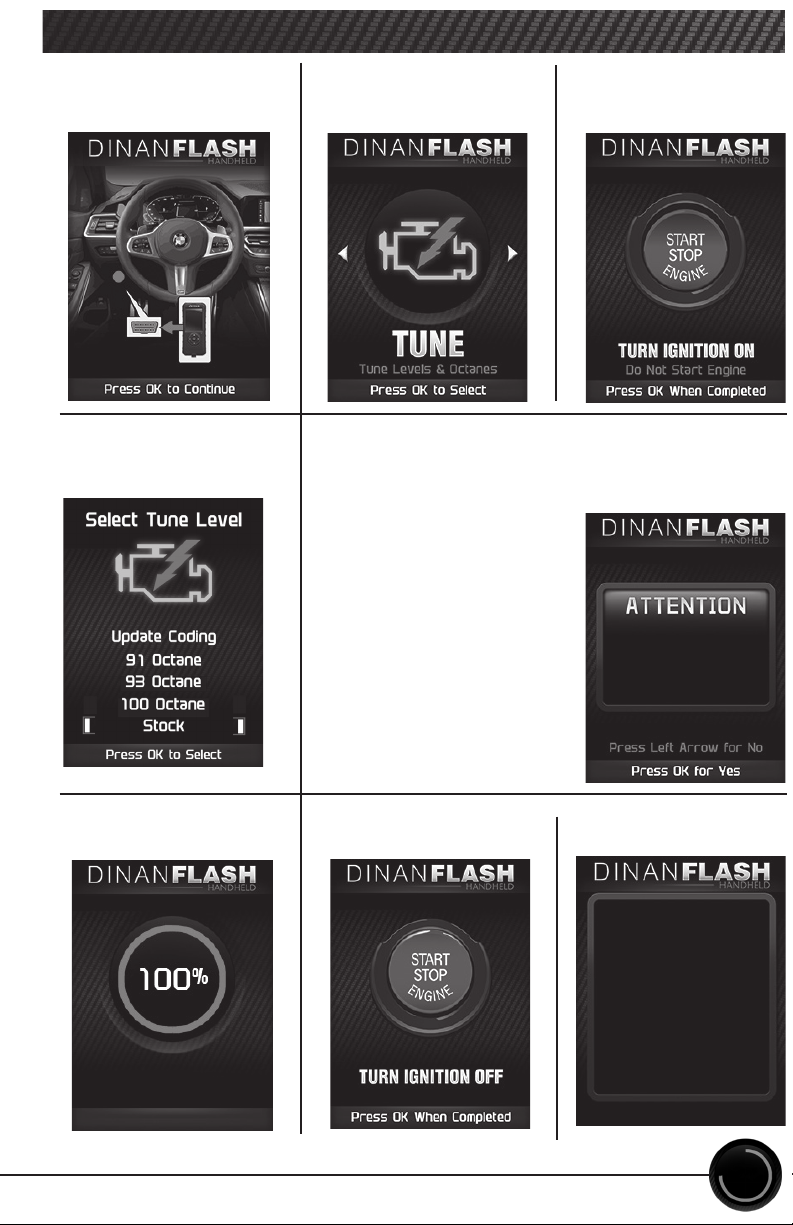
STEP 2 - Enter the
Tuning Menu by
pressing OK.
STEP 3 - Follow
the on-screen
instructions.
STEP 4a - Select a
tuning level.
STEP 1 - Plug the
device into the OBDII
port.
WARNING
STEP 4b - Press OK to
customize options.
Do not program your vehicle while parked in unsafe locations, including in heavy
trac or places without cell phone service.
Do you want to customize
options?
GETTING STARTED
STEP 5 (If ECU is
locked) - Follow the
on-screen instructions.
If ECU is already
unlocked, proceed to
page 12.

8
STEP 1 - Go to ECU location shown on device prompt.
All stock ECUs will need to go through the unlock process. This process
also includes installing the Tune selected on page 9 (while connected to
the OBDII port).
STEP 2 - Remove ECU cover and shroud.
* May require a athead screwdriver to aid in unclipping shroud
STEP 3 - Disconnect all harness connectors from ECU.
* Each connector is keyed to only t in one location
ECU UNLOCK

QR Code
QR Code
View 1 View 2
9
STEP 4 - Connect Poweir™
harness to ECU.
ECU UNLOCK CONT’D
Correct plugs can be identied by
locating the QR code on the ECU
connector bezel at one end of the
DME. One connector will connect to
the plug closest to the QR code and
the other will plug into the second-
farthest plug on the opposite end of
the QR code as shown by the images
below.

10
STEP 6 - Connect Poweir™ harness to Poweir™.
STEP 7 - Connect device
to Poweir™ and wait
for all les to nish
installing. Follow on-
screen prompts as this
process may need to be
repeated for dual ECU
platforms.
STEP 8 - Once Unlock
and Tune les have
been installed, follow
Poweir™ install steps
in reverse order to
reconnect ECU to
factory harness.
STEP 9 - Vehicle is now
tuned and ready to
be driven. If any DTCs
persist, connect device
to OBDII port and use the
Clear DTC function found
in the SCAN menu to aid
in clearing them.
ECU UNLOCK CONT’D
STEP 5 - Connect Poweir™
harness to battery/battery
jumper post.

Change the power level of your vehicle using custom options and settings.
NOTE: Not all features are available on every make, model, and engine.
NOTICE: Do not remove or bump the OBD-II connector during any programming
sequence. If you do, the vehicle may not start.
STEP 2 - Enter the
Tuning Menu by
pressing OK.
STEP 3 - Follow
the on-screen
instructions.
STEP 4 - Select a
tuning level.
STEP 1 - Plug the
device into the OBDII
port.
WARNING
STEP 5 - Press OK to
customize options.
Do not program your vehicle while parked in unsafe locations, including in heavy
trac or places without cell phone service.
Do you want to customize
options?
11
ADVANCED TUNING OPTIONS
STEP 6 - Select and adjust the custom option
according to your specic requirements.
Speed Limiter
Throttle Sensitivity
Continue
STEP 7 - Select
Continue when
done modifying.
91 Octane File
Installed
Press OK to Continue
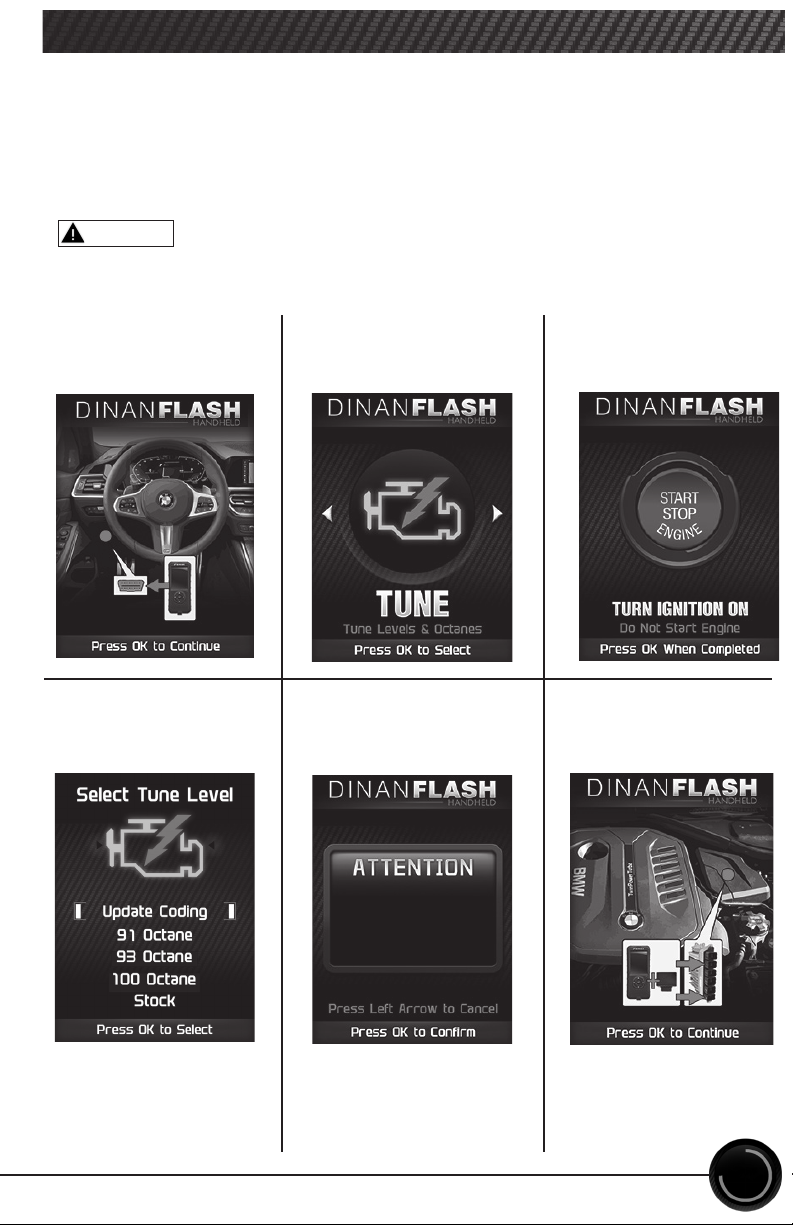
STEP 8 - Press OK to install the le. On-screen
instructions may prompt you to connect
directly to the ECU.
STEP 9 - Allow the
le to be installed.
STEP 10 - Turn the ignition O. STEP 11 - Press OK
to return to the main
menu.
Install The 91 Octane
File?
*See ECU Unlock/
Relock section for
more info.
Speed Limiter
Throttle Sensitivity
Continue
12
ADVANCED TUNING OPTIONS CONT’D

Availability of specic options may vary based on your
vehicle’s make and model:
Speed Limiter
Adjustment:
• Stock
• Raised
* Adjusting the Speed Limiter does not mean the tires or vehicle are rated
to operate at the set speed. Obey local trac laws and do not exceed the
appropriate operating conditions.
Throttle Sensitivity - Adjusts the pedal feel for dierent drive modes.
Drive Modes:
• Eco Mode
• Comfort Mode
• Sport Mode
Adjustment:
• STOCK
• 5% to 25%, with 5% increments
13
ADVANCED TUNING OPTIONS EXPLAINED

NOTICE:
Before taking your vehicle into a service center, return your vehicle to Stock with
relock. The service center might reprogram your vehicle with an updated program
without your knowledge. If you do not use this device to return your vehicle to factory
stock and your vehicle is reprogrammed by the service center, the programmer will no
longer be able to program your vehicle.
“Stock” is a factory performance tune with Dinan enhancements. This option is
useful for a temporary power reduction, or vehicle performance diagnostics. This
mode will still allow for a quick reflash, as the DME remains unlocked.
“Stock with relock” is for customers wishing to completely remove Dinan perfor-
mance software and return the car to an OEM stock configuration.
Questions and Answers
Q: Can my DINANFLASH program more than one vehicle at a time?
A: No, only one vehicle can be programmed per DINANFLASH device. However,
once the original value is ashed back to stock, the DINANFLASH can be used to
program a dierent vehicle.
-----------------------------------------------------------------------------
Q: Does Dinan support custom tuning?
A: Not at this time. Please check us out online for updates.
-----------------------------------------------------------------------------
Q: What aftermarket accessories will my DINANFLASH work with?
A: The DINANFLASH is engineered to work with otherwise stock cars or those
with bolt-on hardware such as intakes, exhausts, intercoolers, etc.
-----------------------------------------------------------------------------
Q: How do I change my vehicle’s calibration?
A: Refer to the TUNING sections of this guide for detailed instructions.
14
RETURNING YOUR VEHICLE TO STOCK
COMMON TUNING QUESTIONS
STEP 1 - Plug the device
into the OBDII port.
Installing Engine
STEP 6 - Allow the stock
settings to be re-installed.
Write ALL STOCK Files
and Relock ECU?
15
STEP 5 - Selecting “Yes” will write the stock les to
the vehicle and relock the DME. Select this option if
you wish to completely remove Dinan software and
return the car to factory conguration.
STEP 2 - Enter the
Tuning Menu by pressing
OK.
STEP 3 - Turn the
ignition on, but do not
start the engine.
STEP 4 - Select the
Stock option from the
list.
STEP 7 - Turn the ignition
o. Press OK to continue.
STEP 8 - Press OK to
return to the main menu.
Stock File Installed
Press OK to continue
RETURNING YOUR VEHICLE TO STOCK CONT’D
Selecting “No” will return
the vehicle to stock
performance levels and
leave the DME unlocked for
quick reash via the port.
16
READ DTCs
This feature allows you to troubleshoot issues that your vehicle may be
experiencing. Most vehicles will illuminate the in-dash check engine light. A
Diagnostic Trouble Code (DTC) arises when a vehicle’s computer detects a sensor
failure or a parameter outside of specic range.
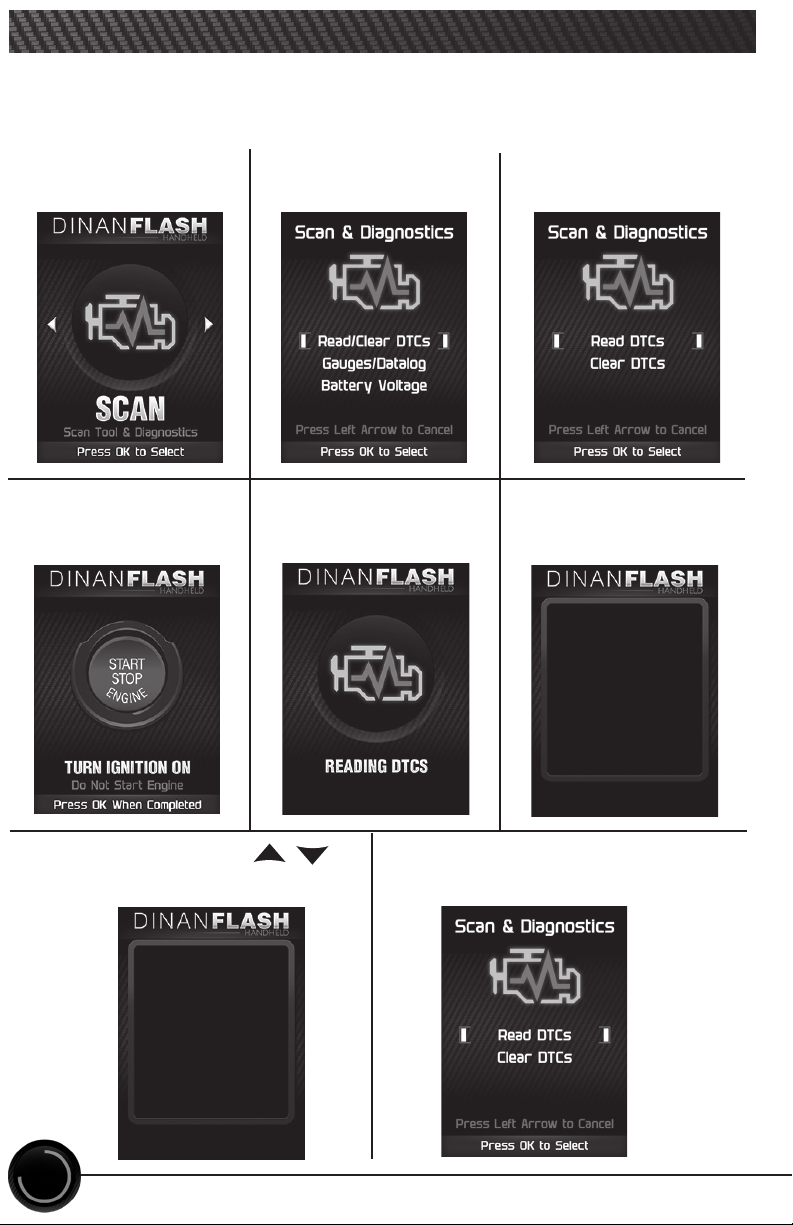
STEP 1 - Enter the
Scan Menu. STEP 2 - Select
Read/Clear DTCs.
STEP 3 - Select
Read DTCs.
STEP 4 - If asked,
turn ignition on,
but do not start.
STEP 5 - Allow the
device to search for
DTCs.
STEP 6 - Read and
follow the on-screen
instructions.
STEP 7 - Push the /
arrows to view each DTC.
STEP 8 - Press OK to
return to the DTC menu.
Pressing UP or DOWN will
cycle through the
DTCs
Pressing OK or LEFT
will exit
Press OK to Continue
DTC - 1of2
P0090
Fuel Pres Reg Ctrl Circ

17
CLEAR DTCs
This feature allows you to clear the DTC and turns o the check engine light.
NOTE: If a DTC persists, this could indicate a vehicle malfunction. We recommend
seeking a qualied professional in resolving the issue. Program the vehicle back to
stock prior to service.
STEP 1 - Enter the
Scan Menu.
STEP 2 - Select
Read/Clear DTCs.
STEP 3 - Select Clear
DTCs.
STEP 4 - If asked,
turn ignition on,
but do not start.
STEP 5 - Allow the
device to search
for DTCs to clear.
STEP 6 - Read and
follow the on-screen
instructions.
STEP 7 - Press OK to
return to the DTC menu.
Vehicle DTCs
Successfully Cleared
Press OK to Continue
18
If you would like to view Parameter IDs (PIDs) specic to your vehicle, follow
these instructions to learn how to view them using your DINANFLASH device.
Do not exceed legal speed limits on public roadways.
VIEWING GAUGES
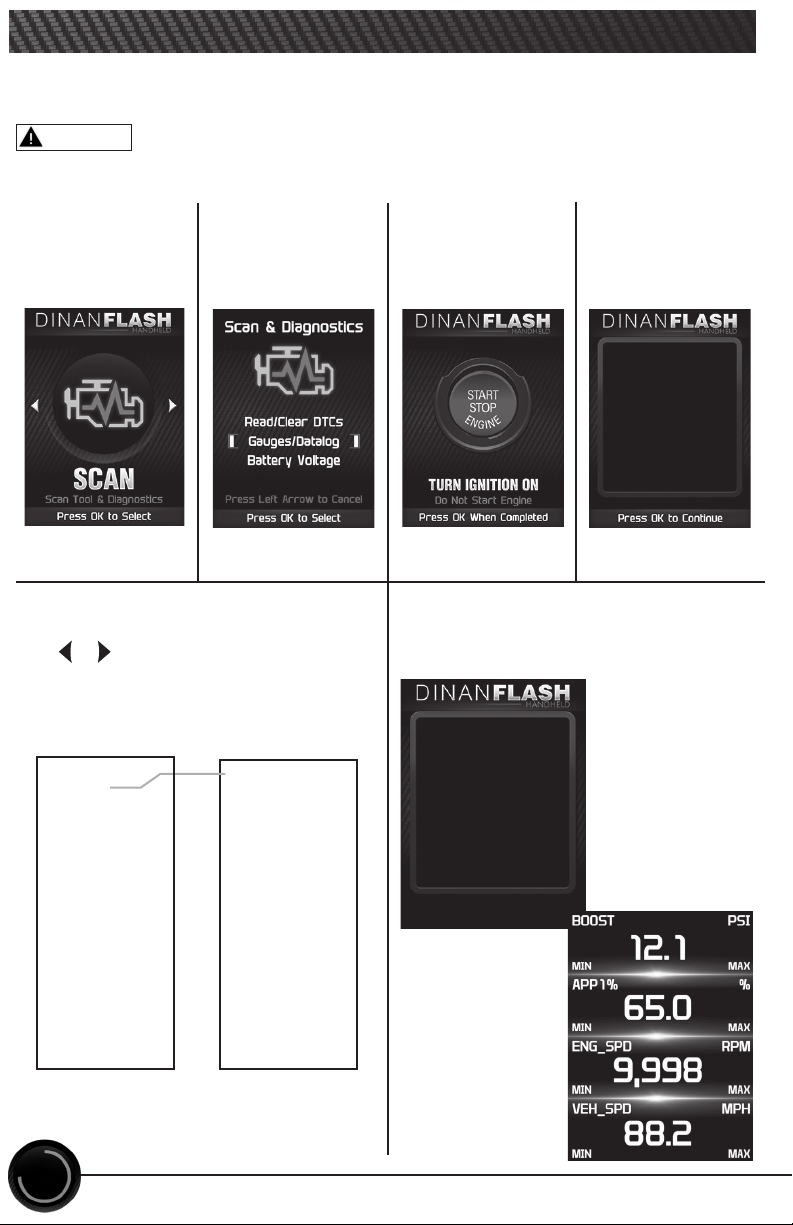
STEP 1 - Enter
the Scan Menu. STEP 2 - Select
Gauges/Datalog.
STEP 3 - If asked,
turn ignition on,
but do not start.
STEP 4 - Follow
the on-screen
instructions.
STEP 5 - Select a PID Group, then
select between 1 and 8 PIDs. Use
the / arrows to switch between
screens. OK to select.
While viewing gauges,
press OK to start
Datalogging
Press OK again to
stop Datalogging
Press OK to continue
STEP 6 - Follow the on-screen
instructions. Note the RED highlights.
See DataLogging for more information.
Engine Misc 1/1
Calc Eng Load
Engine Coolant Temp
Manifold Abs Pressure
Engine RPM
Spark Advance
Intake Air Temperature
Mass Air Flow
Abs Throttle Position
WARNING
Select up to Eight PIDs
Within the Following PID
Groups
PID Groups 1/1
Engine Misc
Fuel Trim/Press
Time/Distance
Oxygen Sensors
Misc Non-Engine
Egr/Evap
Catalyst Temp
Throttle Detail
19
DATA LOGGING
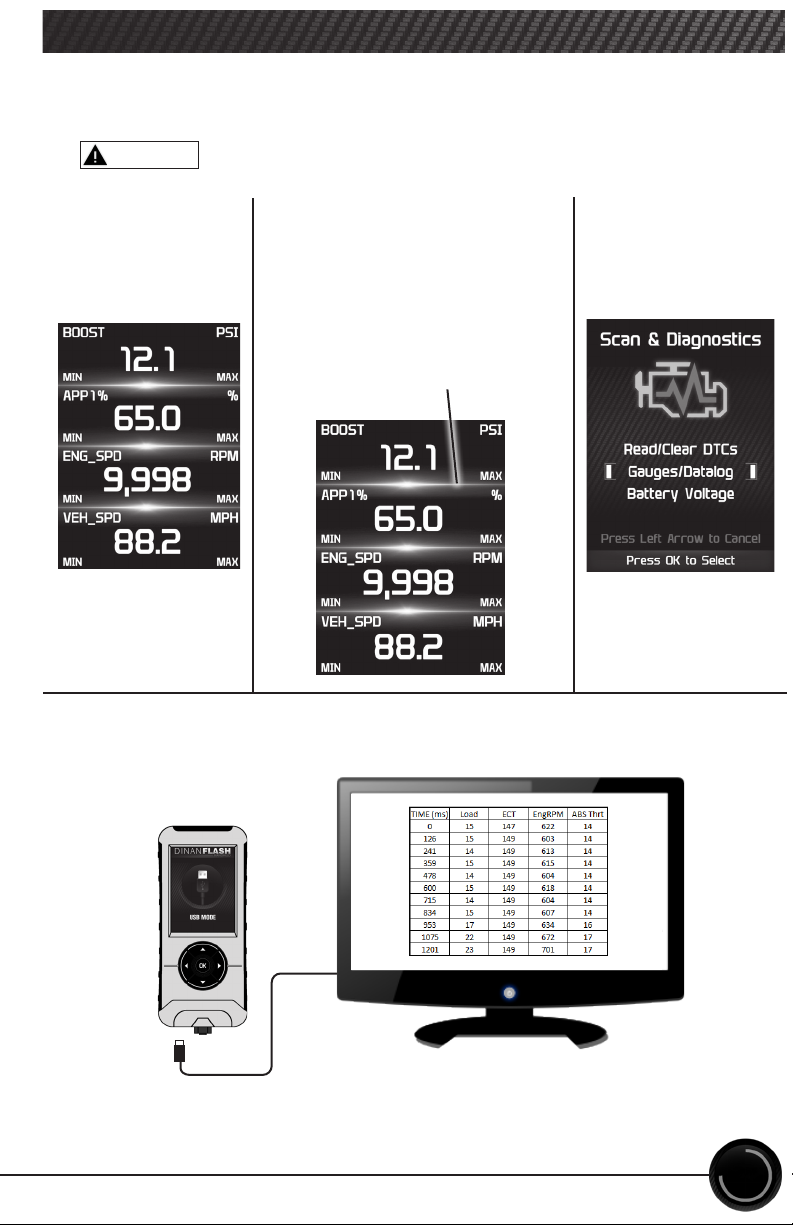
STEP 1 - Refer to
the previous section
and follow the
steps.
STEP 2 - Press the OK button to
begin recording the PID data.
Press the OK button again to
stop the recording.
STEP 3 - Press the left
arrow to return to the
menu.
Data logging allows you to record specic vehicle information while driving.
Follow these instructions to nd out how to datalog, and how it may be
helpful to your particular needs.
Do not exceed legal speed limits on public roadways.
The information will be stored on the device and may be retrieved using a
computer. For more information continue to the next section.
WARNING
The separator lines will change
from Red to Green, which
indicates that the device is
actively recording (datalogging).

20
DATA LOGGING RETRIEVAL
STEP 1 - Remove the
device from the vehicle
OBDII port.
STEP 2 - Using the USB
cable provided, connect
the device to your
computer.
STEP 3 - The device will
enter USB Mode, and allow
your computer to open its
les.
To learn more about how Data Logging results can be extracted from the
device, please follow these instructions:
STEP 6 - Copy the Excel le to your computer desktop, then open it. A le will
open that looks similar to the following:
STEP 5 - Open the folder named DataLogs.
STEP 4 - Open the folder
to view les.
Table of contents
Other Dinan Automobile Accessories manuals


