manuals.online logo
Brands
  1. Home
  2. •
  3. Brands
  4. •
  5. Velleman
  6. •
  7. Automobile Accessories
  8. •
  9. Velleman CAMCOLLIC User manual

Velleman CAMCOLLIC User manual

CAMCOLLIC VELLEMAN
-
1
-
CAMCOLLIC – FRAME WITH CAMERA FOR EUROPEAN LICENSE PLATE
1. Introduction
To all residents of the European Union
Important environmental information about this product
This symbol on the device or the package indicates that disposal of the device after its lifecycle could harm the environment.
Do not dispose of the unit (or batteries) as unsorted municipal waste; it should be taken to a specialized company for recycling.
This device should be returned to your distributor or to a local recycling service.
Respect the local environmental rules.
If in doubt, contact your local waste disposal authorities.
Thank you for choosing Velleman! Together with a monitor (e.g. Velleman MONCOLHA5PN5, not incl.), the CAMCOLLIC will eliminate the blind spot directly behind the vehicle, even at night. Please read the manual thoroughly before bringing this device into
service. If the device was damaged in transit, don't install or use it and contact your dealer.
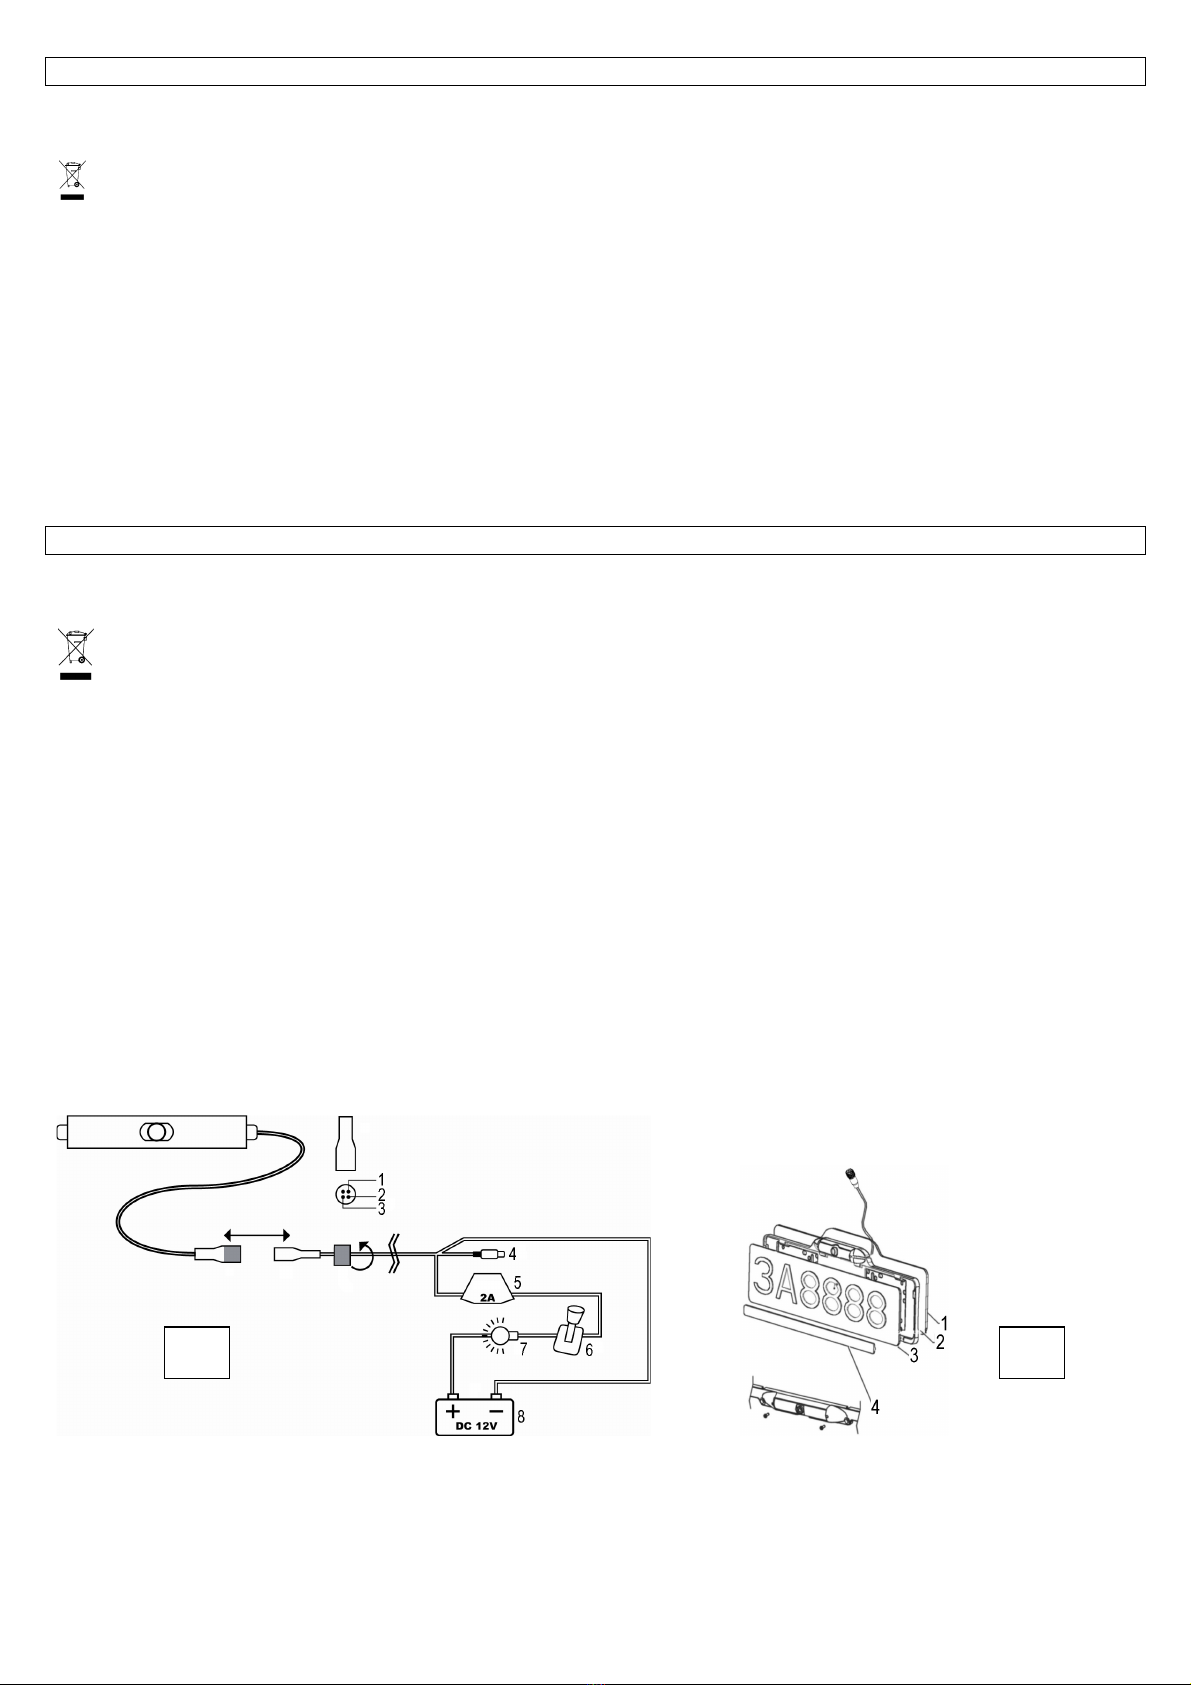
2. Connection
Connect the plate according to illustration no 1.
1. reverse 2. ground 3. video 4. video RCA input (yellow)
5. 2A fuse 6. reverse (red) 7. reversing light 8. battery
3. Mounting
Mount the plate according to illustration no 2. We recommend using more unconventional screw types like e.g. Torx or hex to reduce the risk of theft.
1. bumper or chassis 2. frame 3. license plate 4. fixation strip
Use this device with original accessories only. Velleman nv cannot be held responsible in the event of damage or injury resulted from (incorrect) use of this device.
For more info concerning this product, please visit our website www.velleman.eu.
The information in this manual is subject to change without prior notice.
CAMCOLLIC – FRAME MET KLEURENCAMERA VOOR EUROPEES KENTEKENPLAAT
1. Inleiding
Aan alle ingezetenen van de Europese Unie
Belangrijke milieu-informatie betreffende dit product
Dit symbool op het toestel of de verpakking geeft aan dat, als het na zijn levenscyclus wordt weggeworpen, dit toestel schade kan toebrengen aan het milieu.
Gooi dit toestel (en eventuele batterijen) niet bij het gewone huishoudelijke afval; het moet bij een gespecialiseerd bedrijf terechtkomen voor recyclage.
U moet dit toestel naar uw verdeler of naar een lokaal recyclagepunt brengen.
Respecteer de plaatselijke milieuwetgeving.
Hebt u vragen, contacteer dan de plaatselijke autoriteiten inzake verwijdering.
Dank u voor uw aankoop! Samen met een monitor (vb. Velleman MONCOLHA5PN5, niet meegelev.) zal de CAMCOLLIC de dode hoek achter het voertuig wegnemen, zelfs bij weinig licht. Lees deze handleiding grondig voor u het toestel in gebruik
neemt. Werd het toestel beschadigd tijdens het transport, installeer het dan niet en raadpleeg uw dealer.
2. Aansluiting
Sluit het frame aan volgens illustratie nr. 1.
1. achteruit 2. aarding 3. video 4. video RCA-ingang (geel)
5. 2A-zekering 6. achteruit (rood) 7. achteruitrijlamp 8. accu
3. Montage
Monteer het frame volgens illustratie nr. 2. Wij raden aan om meer ongebruikelijke schroeftypes te gebruiken, zoals Torx of zeskant, om het risico op diefstal te verminderen.
1. bumper of chassis 2. frame 3. kentekenplaat 4. hechtstrip
Gebruik dit toestel enkel met originele accessoires. Velleman nv is niet aansprakelijk voor schade of kwetsuren bij (verkeerd) gebruik van dit toestel.
Voor meer informatie omtrent dit product, zie www.velleman.eu.
De informatie in deze handleiding kan te allen tijde worden gewijzigd zonder voorafgaande kennisgeving.
CAMCOLLIC – CADRE AVEC CAMÉRA COULEUR POUR PLAQUE MINÉRALOGIQUE EUROPÉENNE
1. Introduction
Aux résidents de l'Union européenne
Des informations environnementales importantes concernant ce produit
Ce symbole sur l'appareil ou l'emballage indique que l’élimination d’un appareil en fin de vie peut polluer l'environnement.
Ne pas jeter un appareil électrique ou électronique (et des piles éventuelles) parmi les déchets municipaux non sujets au tri sélectif ; une déchèterie traitera l’appareil en question.
Renvoyer les équipements usagés à votre fournisseur ou à un service de recyclage local.
Il convient de respecter la réglementation locale relative à la protection de l’environnement.
En cas de questions, contacter les autorités locales pour élimination.
Nous vous remercions de votre achat ! Raccordé à un moniteur (p.ex. Velleman MONCOLHA5PN5, non incl.), le CAMCOLLIC éliminera l’angle mort à l’arrière d’un véhicule, même avec un éclairage réduit. Lire la présente notice attentivement avant la
mise en service de l’appareil. Si l’appareil a été endommagé pendant le transport, ne pas l’installer et consulter votre revendeur.
2. Connexion
Connecter le cadre selon l’illustration n° 1.
1. marche arrière 2. masse 3. vidéo 4. entré RCA vidéo (jaune)
5. fusible 2A 6. marche arrière (rouge) 7. phare de recul 8. accu
3. Montage
Monter le cadre selon l’illustration n° 2. Nous vous conseillons d’utiliser des vis moins conventionnelles comme p.ex. Torx ou hex afin de réduire les risques de vol.
1. pare-choc ou châssis 2. cadre 3. plaque minéralogique 4. bande de fixation
N’employer cet appareil qu’avec des accessoires d’origine. SA Velleman ne sera aucunement responsable de dommages ou lésions survenus à un usage (incorrect) de cet appareil.
Pour plus d’information concernant cet article, visitez notre site web www.velleman.eu.
Toutes les informations présentées dans cette notice peuvent être modifiées sans notification préalable.
CAMCOLLIC VELLEMAN
-
2
-
CAMCOLLIC – MARCO CON CÁMARA COLOR PARA MATRÍCULA EUROPEA
1. Introducción
A los ciudadanos de la Unión Europea
Importantes informaciones sobre el medio ambiente concerniente este producto
Este símbolo en este aparato o el embalaje indica que, si tira las muestras inservibles, podrían dañar el medio ambiente.
No tire este aparato (ni las pilas eventuales) en la basura doméstica; debe ir a una empresa especializada en reciclaje. Devuelva este aparato a su distribuidor o a la unidad de reciclaje local.
Respete las leyes locales en relación con el medio ambiente.
Si tiene dudas, contacte con las autoridades locales para residuos.
¡Gracias por haber comprado el CAMCOLLIC! Conectado a un monitor (p.ej. Velleman MONCOLHA5PN5, no incl.), el CAMCOLLIC eliminará el ángulo muerto de la parte trasera de un vehículo, incluso con poco luz. Lea atentamente las instrucciones
del manual antes de usar el aparato. Si el aparato ha sufrido algún daño en el transporte no lo instale y póngase en contacto con su distribuidor.
2. Conexión
Conecte el marco según figura n° 1.
1. marcha atrás 2. masa 3. vídeo 4. entrada RCA vídeo (amarillo)
5. fusible 2A 6. marcha atrás (rojo) 7. faro de marcha atrás 8. batería
3. Montaje
Monte el marco según figura n° 2. Utilice tornillos menos utilizados como p.ej. Torx o hex para disminuir los riesgos de robo.
1. parachoques o chasis 2. marco 3. matrícula 4. cinta de fijación
Utilice este aparato sólo con los accesorios originales. SA Velleman no será responsable de daños ni lesiones causados por un uso (indebido) de este aparato.
Para más información sobre este producto, visite nuestra página web www.velleman.eu.
Se pueden modificar las especificaciones y el contenido de este manual sin previo aviso.
CAMCOLLIC – RAHMEN MIT FARBKAMERA FÜR EUROPÄISCHES KENNZEICHEN
1. Einführung
An alle Einwohner der Europäischen Union
Wichtige Umweltinformationen über dieses Produkt
Dieses Symbol auf dem Produkt oder der Verpackung zeigt an, dass die Entsorgung dieses Produktes nach seinem Lebenszyklus der Umwelt Schaden zufügen kann.
Entsorgen Sie die Einheit (oder verwendeten Batterien) nicht als unsortiertes Hausmüll; die Einheit oder verwendeten Batterien müssen von einer spezialisierten Firma zwecks Recycling entsorgt werden.
Diese Einheit muss an den Händler oder ein örtliches Recycling-Unternehmen retourniert werden.
Respektieren Sie die örtlichen Umweltvorschriften.
Falls Zweifel bestehen, wenden Sie sich für Entsorgungsrichtlinien an Ihre örtliche Behörde.
Wir bedanken uns für den Kauf des CAMCOLLIC! Zusammen mit einem Monitor (z.B. Velleman MONCOLHA5PN5, nicht mitgeliefert wird der CAMCOLLIC den toten Winkel hinten Fahrzeug, sogar bei wenig Licht. Lesen Sie diese Bedienungsanleitung
vor Inbetriebnahme sorgfältig durch. Überprüfen Sie, ob Transportschäden vorliegen. Sollte dies der Fall sein, verwenden Sie das Gerät nicht und wenden Sie sich an Ihren Händler.
2. Anschluss
Schließen Sie den Rahmen an (siehe Abb. 1).
1. Rückwärtsgang 2. Masse 3. Video 4. Video RCA-Eingang (gelb)
5. 2A-Sicherung 6. Rückwärtsgang (rot) 7. Rückfahrscheinwerfer 8. Akku
3. Montage
Montieren Sie den Rahmen (siehe Abb. 2). Verwenden Sie unübliche Schrauben, wie z.B. Torx oder Sechskant, um Diebstahlrisiko zu verringern.
1. Stoßstange oder Chassis 2. Rahmen 3. Kennzeichen 4. Befestigungsband
Verwenden Sie dieses Gerät nur mit originellen Zubehörteilen. Velleman NV übernimmt keine Haftung für Schaden oder Verletzungen bei (falscher) Anwendung dieses Gerätes.
Für mehr Informationen zu diesem Produkt, siehe www.velleman.eu.
Alle Änderungen ohne vorherige Ankündigung vorbehalten.
Fig. 1 Fig. 2

Other Velleman Automobile Accessories manuals

Velleman EDA5001 User manual

Velleman

Velleman EDA5001 User manual

Velleman CARSFM1 User manual

Velleman

Velleman CARSFM1 User manual

Velleman ACC0502 User manual

Velleman

Velleman ACC0502 User manual

Velleman CAMSET28 User manual

Velleman

Velleman CAMSET28 User manual

Velleman SPBS10 User manual

Velleman

Velleman SPBS10 User manual

Velleman CARS4500 User manual

Velleman

Velleman CARS4500 User manual

Velleman CARSFM2 User manual

Velleman

Velleman CARSFM2 User manual

Velleman CARS5000 User manual

Velleman

Velleman CARS5000 User manual

Velleman SP150 User manual

Velleman

Velleman SP150 User manual

Velleman BTSP2 User manual

Velleman

Velleman BTSP2 User manual

Velleman CAMSET5N2 User manual

Velleman

Velleman CAMSET5N2 User manual

Popular Automobile Accessories manuals by other brands

IKH XK6262 instruction manual

IKH

IKH XK6262 instruction manual

Pandora DWM-210 User & installation manual

Pandora

Pandora DWM-210 User & installation manual

Monacor Carpower ENF-30 quick guide

Monacor

Monacor Carpower ENF-30 quick guide

Fortin EVO ONE manual

Fortin

Fortin EVO ONE manual

PNEUMATIC KU-MB-B000-02 Installation instruction

PNEUMATIC

PNEUMATIC KU-MB-B000-02 Installation instruction

Whispbar K355W Fitting instructions

Whispbar

Whispbar K355W Fitting instructions

Westfalia Automotive AD65U Installation and operating instructions

Westfalia Automotive

Westfalia Automotive AD65U Installation and operating instructions

BMW CMT 3000VR owner's manual

BMW

BMW CMT 3000VR owner's manual

Seizmik 08072 Installation & operation manual

Seizmik

Seizmik 08072 Installation & operation manual

Whispbar K130W Fitting instructions

Whispbar

Whispbar K130W Fitting instructions

Gibson 315555L instruction manual

Gibson

Gibson 315555L instruction manual

Menabo YELLOWSTONE Fitting instructions

Menabo

Menabo YELLOWSTONE Fitting instructions

Safe Fleet PRIME DESIGN VCR-TC21B manual

Safe Fleet

Safe Fleet PRIME DESIGN VCR-TC21B manual

BMW E65 installation instructions

BMW

BMW E65 installation instructions

Standby P1 PANEL user manual

Standby

Standby P1 PANEL user manual

Rightline Gear PackRight Edge Car Top Carrier Setup guide

Rightline Gear

Rightline Gear PackRight Edge Car Top Carrier Setup guide

hymer Backrack+ Mini Rack Safety and installation instructions

hymer

hymer Backrack+ Mini Rack Safety and installation instructions

Menabo Barra OE Fitting instructions

Menabo

Menabo Barra OE Fitting instructions

manuals.online logo
manuals.online logoBrands
  • About & Mission
  • Contact us
  • Privacy Policy
  • Terms and Conditions

Copyright 2025 Manuals.Online. All Rights Reserved.