DINUY MI KNX 001 User manual
EGB
MI KNX 001 TELERRUPTOR / TEMPORIZADOR INALÁMBRICO DE 1 CANAL
ESPECIFICACIONES TÉCNICAS
Tensión Alimentación 110-230V~
Potencia Nominal Relé µ 16A / 250V
Radio-Frecuencia 868,4MHz
De acuerdo a la Norma UNE-EN 60669-2-1
Tª Funcionamiento -10ºC ~ +45ºC
Dimensiones 55 x 53 x 34mm
Temporización 3seg ~ 5min
Grado Protección IP20
Función Interruptor, Temporizador y
Repetidor de señales KNX-RF
Compatible con IEC 14543-3
Nº canales 1 canal de salida
1 - CHANNEL WIRELESS SWITCH / TIMER
TECHNICAL DATA
Alcance Campo abierto: 100m
Interior: ~30m
Power supply 110-230V~
Relay nominal power capacity µ 16A / 250V
Radio-Frequency 868,4MHz
According to the Standard EN 60669-2-1
Working temperature -10ºC ~ +45ºC
Dimensions 55 x 53 x 34mm
Time delay 3sec ~ 5min
Protection degree IP20
Functions Switch, Timer &
RF-KNX Signals Repeater
Compatible with IEC 14543-3
Channels 1 output channel
Range Free field: 100m
Indoor: ~30m
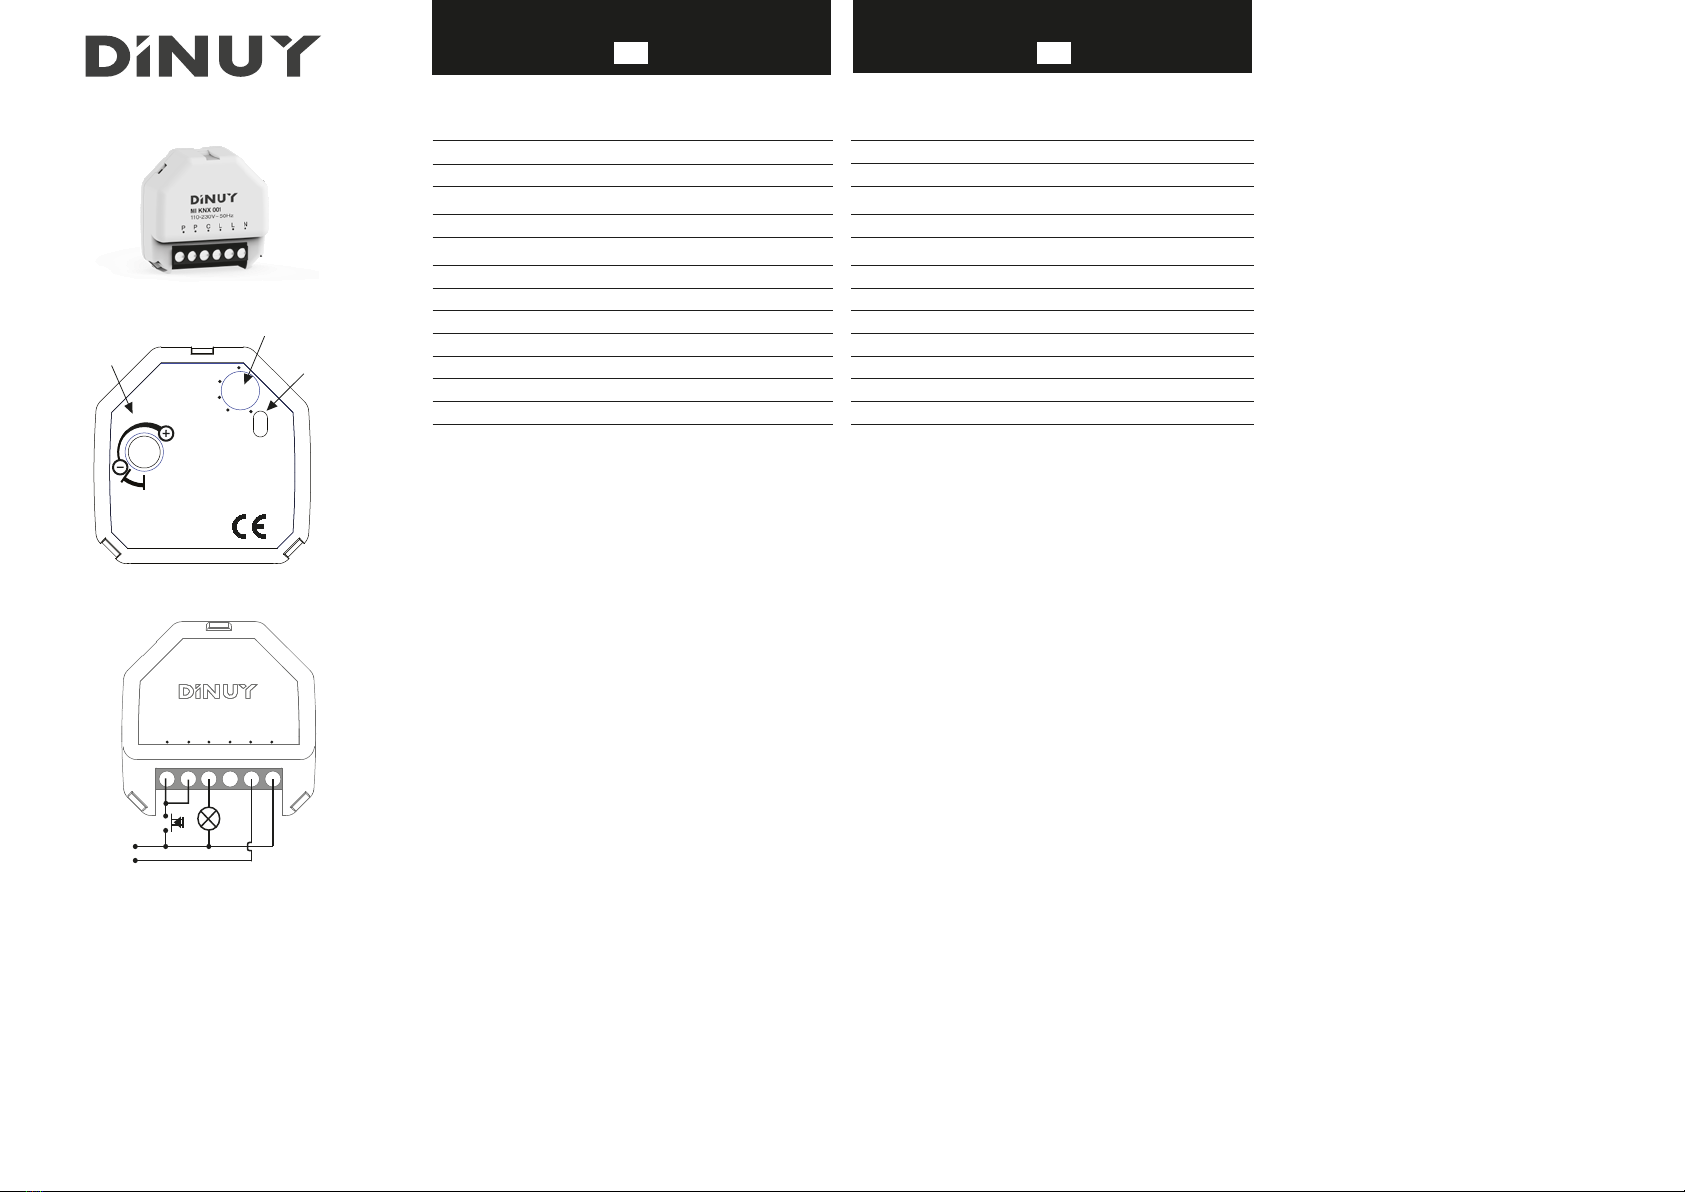
Fig. 1
L
N
110-230V
MI KNX 001
110-230V~ 50Hz
LP NC LP
3
1
2
E
EA
S
RP
Prog
TIME
A
B
DESCRIPTION
· Wireless switching or timing actuator compatible with the RF-KNX protocol.
· Control by any RF-KNX sensor: pushbutton, remote control...
· Compatible with DINUY's sensors: RC KNX 001, PU KNX 001 & EM KNX 002.
· RF-KNX signals repeating function is available, which allows increasing the
distance between the sensors and the receivers.
CHARACTERISTICS
Working mode selector switch for the setting-up and commissioning (3):
- P: link programming.
- R: standard operation with repeater function.
- S: standard operation.
- E: one link deletion from the receiver channel.
- EA: all links deletion from the receiver and transmitter channels.
Function type selector knob (2):
- A: Switch ON/OFF.
- B: Timer (3sec ~ 5min).
It has a Programming key (1) for linking other RF devices.
INSTALLATION
Warning: Disconnect the main supply before the installation.
Install the actuator according to the shown wiring diagram. (Fig. 1).
Note: The connection of the load is optional and will not be required in installations
where only the repeater function is required.
COMMISSIONING
It can be configured as a time switch, where it can be selected the desired timing,
and asKNX-RF signals repeater, allowing to increase the range between the
transmitter and the receiver.
2.a.- Programming a link from the receiver channel (P) with other RF
transmitter
1 - Set the mode selector switch (3) of the MI KNX 001 at programming mode,
placing it at “P” The green LED of the programming key (1) will flash slowly.
2 - Press briefly the programming key (1). The green LED must light up. At this
moment, the MI KNX 001 will be waiting to accept a link from the transmitter
channel of other RF device.
3 - Set the transmitter channel of the other RF device in link mode according to the
instructions given by the manufacturer.
4 - If the link is successful the MI KNX 001 will leave automatically the programming
mode and the red LED will flicker slowly. If the link is not successful the
MI KNX 001 will leave automatically the programming mode and the red LED
will flicker quickly for 3 seconds.In the same way, 2 minutes after the
MI KNX 001 is in programming mode without no attempt to link a transmiter, the
green LED will start flickering and it will leave the link mode.
DESCRIPCIÓN
· Se trata de un actuador de conmutación o de temporización inalámbrico, compatible con
el protocolo KNX-RF.
· Control a través de cualquier emisor KNX-RF del mercado: pulsador, mando a distancia...
· Compatible con los emisores DINUY: RC KNX 001, PU KNX 001 y EM KNX 002.
· Dispone de la opción de repetición de señales KNX-RF, lo que permite ampliar la distancia
entre los emisores y los receptores.
CARACTERÍSTICAS
Selector de modos para la programación de enlaces y configuración (3):
- P: programación de un enlace del canal receptor.
- R: funcionamiento normal con función de repetidor de mensajes.
- S: funcionamiento normal.
- E: borrado de un enlace del canal receptor.
- EA: borrado de todos los enlaces de los canales transmisor y receptor.
Selector de tipo de función (2):
- A: Función Interruptor ON/OFF.
- B: Función Temporizador (3seg ~ 5min).
Dispone de tecla de Programación para el enlace con otros dispositivos RF (1).
INSTALACIÓN
Importante: Desconecte la tensión de red cuando realice la instalación.
Instale el actuador de acuerdo al esquema de conexión mostrado (Fig. 1).
Observaciones: La conexión de la carga es opcional, y no será precisa en aquellas
nstalaciones donde sólo se requiera la función Repetidor.
CONFIGURACIÓN
Puede ser configurado como interruptor temporizado, donde se podrá
seleccionar la temporización deseada, y como repetidor de señales KNX-RF,
permitiendo un mayor alcance entre el emisor y el receptor fina
l2.a.- Programación de un enlace (asociación) del canal receptor con un canal
transmisor de otro dispositivo RF (P).
1 - Poner el MI KNX 001 en modo programación de enlaces “P”. El LED del botón de
programación (1), parpadeará lentamente en color verde.
2 - Pulsar brevemente el botón de programación. El LED del botón de programación
quedará fijo en verde. El canal receptor del MI KNX 001 se encuentra en estos
momentos en espera de fijo en verde. El canal receptor del MI KNX 001 se encuentra en
estos momentos en espera de aceptar un enlace de un canal transmisor de un
dispositivo RF.
3 - Poner el canal transmisor del dispositivo KNX que se quiere enlazar en modo
programación de enlaces.
4 - Si el establecimiento del enlace (asociación) tiene éxito, el MI KNX 001 abandonará
automáticamente el modo de programación, volviendo a quedar en parpadeo lento.
Si el establecimiento del enlace (asociación) no tuviera éxito,el MI KNX 001
abandonará automaticamente el modo de programación, indicándolo mediante
parpadeo rápido del LED rojo durante 3 segundos.
Del mismo modo, si pasan 2 minutos desde que estuviera en modo programación, sin
recibir ningún intento de enlace de un posible canal transmisor de un dispositivo RF,
automaticámente abandonará el modo programación.

DINUY S.A.
c/Auzolan Nº2
20303 Irún (Spain)
info@dinuy.com
www.dinuy.com
Importante: no se recomienda el empleo de más de 2 repetidores en una misma
instalación. Así mismo, no se recomienda la utilización de repetidores si no son
necesarios.
Detector de
Movimiento
Emisor
Receptor
MI KNX 001
Tiempo ajustado
ON
OFF
ON
OFF
ON
OFF
Important: The use of more than 2 repeaters is not recommended in the same
installation. Also, no use of repeaters is recommended if they are not necessary.
Motion
Detector
Transmitter
Receiver
MI KNX 001
Set Time
ON
OFF
ON
OFF
ON
OFF
3
1
2
E
EA
S
RP
Prog
TIME
A
B
DECLARACION DE CONFORMIDAD CE
Disponible para descarga en www.dinuy.com
DECLARATION OF CONFORMITY CE
Download from www.dinuy.com
E
GB
2.b.- Delete a link from the receiver channel (E)
1 - Set the mode selector knob of the MI KNX 001 at “E” position. The red LED of the
programming key (1) will flicker slowly.
2 - Press briefly the programming key (1). The red LED of the programming key (1) will
light up. The receiver channel of the MI KNX 001 is waiting to receive the signal from
the transmitter channel of the other device.
3 - Set the transmitter channel of the other device in unlink mode.
4 - If the unlink is successfull the red LED will flicker slowly.
If the unlink is not successful the MI KNX 001 will leave automatically the deletion mode
and the red LED will flicker quickly for 3 seconds.
In the same way, 1 minute after the MI KNX 001 is in deletion mode without no attempt
to unlink a transmitter device it will leave automatically this mode.
2.c.- Delete all links (EA)
1 - Set the mode selector knob of the MI KNX 001 at "EA" position. The red LED of the
programming key (1) will flicker slowly.
2 - Press for mor than 3 seconds the programming key (1). While it is pressed the red LED
will flicker quickly.
Three seconds after, the red LED will flicker slowly. It means all links are going to be
deleted. At this moment the programming key can be released.
2.d.- Normal operation (S)
The load connected to the MI KNX 001 must be activated by a RF device.
With the function selector knob (2) it is possible to choose between 2 working modes:
· A: Switch ON/OFF: the device will switch-on the load as soon as it receives the "ON"
telegram and it will switch-off the load when receives the "OFF" telegram.
· B: Time Switch (3sec ~ 5min): the device will connect the load for the set time, upon
receipt of any "ON" telegram. This time delay is adjustable and resettable at any time
upon receiving a new "ON" telegram.
In this mode, the repeater function is disabled.
2.e.- Repeater function + Normal operation (R)
The MI KNX 001 can also act as a RF signal repeater (only working as Switch, not as
Timer).
This function is useful in the installations where are problems with the coverage between
the devices because of the distance.
It is not advisable to use more than two repeaters in the same installation.
Application example (a transmitter connected to a motion detector)
Receiving “OFF” telegram during timer cycle, will switch-off the load.
Application example (a transmitter connected to a motion detector):
2.b.- Borrar un enlace del canal receptor (E)
1 - Poner el MI KNX 001 en modo borrar un enlace “E”. El LED del botón de programación
(1) parpadeará lentamente en color rojo.
2 - Pulsar brevemente el botón de programación (1). El LED del botón de programación (1)
quedará fijo en rojo.
El canal receptor del MI KNX 001 se encuentra en estos momentos en espera del recibir
información del canal transmisor del dispositivo RF Dinuy del que se ha de desenlazar
(borrar el enlace previamente establecido).
3 - Poner el canal transmisor del dispositivo KNX que se quiere desenlazar en modo
programación de enlaces.
4 - Si el borrado del enlace tiene éxito, el MI KNX 001 abandonará automáticamente el
modo de borrado, volviendo a quedar en parpadeo lento.
Si el borrado del enlace no tuviera éxito,el MI KNX 001 abandonará automáticamente el
modo de borrado, indicándolo mediante parpadeo rápido del LED rojo durante 3
segundos. Del mismo modo, si pasa 1 minuto desde que estuviera en modo borrado, sin
recibir ningún intento de desenlace de un posible canal transmisor de un dispositivo RF,
automaticámente abandonará el modo.
2.c.- Borrado de todos los enlaces (EA)
Para borrar todos los enlaces del MI KNX 001 hubiese establecido previamente con otros
dispositivos RF:
1 - Girar el potenciómetro del MI KNX 001 a la posición “EA”. El LED del pulsador de
programación (1) parpadeará lentamente en color rojo.
2 - Pulsar más de 3 segundos el pulsador de programación. Mientras se mantenga la
pulsación el LED del pulsador de programación parpadeará rápidamente en color rojo.
Pasados 3 segundos el led rojo volverá a un parpadeo lento, indicando de esta forma,
que se van a borrar todos los enlaces que MI KNX 001 hubiese establecido previamente
con otros dispositivos. Se puede soltar entonces el botón de programación.
2.d.- Funcionamiento Normal (S)
La carga conectada al MI KNX 001 puede gobernarse remotamente, vía radiofrecuencia,
desdeun dispositivo transmisor RF programado.
Hay 2 posibles modos de funcionamiento, seleccionables con el selector de función (2).
· A: Interruptor ON/OFF: el aparato conectará la carga cuando reciba un mensaje de
"encendido" y no la apagará hasta que reciba el mensaje de "apagado".
· B: Temporizador (3seg ~ 5min): el aparato conectará la carga, de forma temporizada, ante
la recepción de cualquier mensaje de "encendido". Esta temporización es ajustable y
rearmable en cualquier momento al recibir un nuevo mensaje de "encendido".
Estando en este modo, la función repetidor estará desactivada.
Si durante el ciclo de encendido se recibe un mensaje de apagado, concluirá la
temporización y la carga se apagará.
2.e.- Función Repetidor + Normal (R)
El MI KNX 001 puede, opcionalmente si se desea, realizar la función de repetidor (sólo en
función Interruptor, no temporizador).
Esta función es útil en aquellas instalaciones donde
se detecten problemas de comunicaciónentre dos dispositivos, debido a la distancia que los
separa. Cuando la función repetidor está activada, esta no impide su funcionamiento normal.
La función repetidor, realiza la función de escucha y retransmisión de mensajes.
Ejemplo de aplicación (emisor conectado a un detector de movimiento):
Other DINUY Switch manuals


