Diono Monterey User manual

Instruction Manual
Canada English Version
Scan QR codes inside for installation videos.

2
Product: Monterey child booster seat
Model: 15000
Mfg. by: Diono LLC
275 Frobisher Drive, Suite 3
Waterloo, ON N2V 2G4
Customer Service
Tel: 519-725-1700
Email: ca-sales@diono.com
www.diono.com

3
Contents
Page
4Warnings
SAFETY INFORMATION
7General Information
7Certications
7Restraint Registration
8Vehicle Seat Belt Systems
9Vehicle Seating Positions
9Cup Holders
ASSEMBLY AND ADJUSTMENTS
10 Assembly Illustration
11 Attaching and Removing the Backrest
11 Headrest Adjustment
11 Backrest Width Adjustment
BOOSTER SEAT USE
12 UAS Installation
13 Proper Positioning on Vehicle Seat
13 Adjusting Recline Angle
14 Securing the Child
15 Proper Buckle Position
16 Backless Booster Seat Use
17 CARE AND MAINTENANCE
18 WARRANTY

4
Failure to follow all written instructions and product labels can
result in death or serious injury in a crash. Carefully read and
understand this instruction manual prior to using this
restraint. If you have any questions visit diono.com or contact
Diono LLC. To insure proper long-term use, store this manual
under the bottom of the base.
•Use only with children whose height is between 97 cm and
160 cm (38" – 63") and whose weight is between 18 kg and
54 kg (40 lbs – 120 lbs).
•Child Height: Child is too tall if the tops of
the ears are above either the top of the
booster headrest or raised vehicle seat
headrest.
•Only use this restraint forward-facing.
•Use only the vehicle’s lap and shoulder belt
system when restraining the child in this
booster seat.
•NEVER use with only a vehicle lap belt to
restrain a child. This could result in serious
injury or death to a child.
•Some vehicle seat belt systems cannot be used with this
booster seat. Read vehicle owner’s manual and ‘Vehicle Seat
Belt Systems’ section of this manual.
•DO NOT use this booster seat without the backrest unless
there is vehicle headrest for that seating position.
•DO NOT use this booster seat without the backrest unless
proper vehicle seat belt placement can be achieved.
WARNING !
Death or SERIOUS INJURY can occur.

5
WARNING !
Death or SERIOUS INJURY can occur.
•DO NOT use this booster seat with any other backrest or
cushions.
•To prevent injury due to product deterioration, do not use this
booster seat if it has been involved in a severe accident or if it
is older than six years.
•Never leave a child alone in a vehicle, even for a short time.
•Always secure this booster seat using vehicle seat belt or UAS
anchors even when not occupied. In a crash, an unsecured
restraint can cause injury to other vehicle occupants.
•Except as described in this manual, do not dissemble or
modify any part of this booster seat or vehicle seat belt.
•Register your child restraint with the manufacturer.
•DO NOT place anything under the booster seat to raise it o
the vehicle seat.
•This restraint is not a toy. Do not let a child play with it.
•DO NOT leave folding vehicle seats unlatched. In the event of
a sudden stop, a loose seat back could prevent the booster
seat from protecting the child as well as it should.
•In the event of an accident, the vehicle body itself provides the
most signicant passenger protection. While a properly
installed restraint will improve chances for survival in most
accidents, a booster seat will not protect a child if the vehicle
is too severely impacted.

6
WARNING !
Death or SERIOUS INJURY can occur.
•According to accident statistics, Transport Canada recom-
mends that parents select the rear seat as the safest location
to properly install a booster seat. Please read carefully the
section concerning vehicle seat belts in this guide to insure
the child’s safety. If in doubt about installing this booster seat,
please consult the vehicle owner’s manual.
WARNING: DO NOT place a child
restraint in the front seat of a vehicle
with a passenger air bag. DEATH or
SERIOUS INJURY can occur. The
back seat is the safest place for
children under 12.
IMPORTANT: Children who weigh 18 kg (40 lbs) or less are best
protected in a 5-point harness restraint. Diono recommends that
children remain in a 5-point harness restraint up to the
maximum weight or height allowed for that restraint.
• If the child will not keep the vehicle shoulder belt properly
positioned at all times, DO NOT use a booster seat. You must
use a harnessed child restraint.
•Maximum Child Height: Child is too tall if the top of the ears
are above the top of either the fully raised booster seat
headrest or fully raised vehicle headrest.

7
Safety Information
GENERAL
• Cover this booster seat if vehicle is left in direct sunlight.
Portions of the booster seat can become hot enough to burn a
child and cover fabric can become faded.
• Store this booster seat in a safe place when not in use. Do not
store near direct heat source or place heavy objects on top of it.
• Always make sure vehicle seat is locked in its upright position.
Reclining the vehicle seat will adversely aect the safety and
performance of the child seat in an accident.
CERTIFICATION
This child restraint system conforms to all applicable Canadian
Federal Motor Vehicle Safety Standards. This restraint is certied
for use in motor vehicles. This restraint is not certied for use
in aircraft. Lap belts in aircraft cannot be used safely with this
booster seat. Register this restraint with the manufacturer.
REGISTRATION
Child restraints can be recalled for safety reasons. To be reached
directly in the event of a recall, you must register your restraint
with the manufacturer. Fill out the included product registration
card and mail it. You can register online at www.diono.com You
can also register by sending your name, address, restraint model
and serial number to:
Diono Product Registration
275 Frobisher Drive, Suite 3
Waterloo, ON N2V 2G4
866-954-9786

8
Safety Information (continued)
VEHICLE SEAT BELT SYSTEMS
IMPORTANT: Some vehicles have no seating positions
compatible with booster seats. If in doubt, please contact the
vehicle manufacturer for assistance.
In order to protect a child in an accident, this booster must be
used with a compatible vehicle seat belt.
The following seat belt types are NOT compatible with this
booster seat:
XTwo-point seatbelts of any kind
XThree-point seat belts with separate retractors for lap and
shoulder sections
XMotor-driven, automatic seat belts
XSeat belts with anchorage points on the door
WARNING: ONLY use this booster seat with a 3-point
(lap-and-shoulder) vehicle seat belt that is NOT
motorized or anchored to the vehicle door.
The vehicle owner’s manual will have complete information on
the types of seat belts in the vehicle. If the seat belt type is listed
above, choose another seating position in the vehicle.

9
VEHICLE SEATING POSITIONS
Diono and Transport Canada warn that children under 12 must
ride in the rear seats and away from front airbags. The only
exception is if the airbag is turned o. When using a vehicle with
airbags, refer to the vehicle owner’s manual for additional
booster seat installation instructions and precautions.
WARNING: Only use this booster seat in forward-
facing vehicle seats. DO NOT use this booster seat in
side-facing or rear-facing seats in vans or station
wagons.
CUP HOLDERS
Cup holders are located on both sides
of seat bottom: swivel outward to the
locked position for use. Swivel inward
to the recessed and locked position
when not in use.
IMPORTANT: Do not step on or put
excess weight on cup holder which could cause it to break.
CAUTION: DO NOT use with hot liquids as this could burn a child.
Seats which face
sides of vehicle. Seats which face rear of vehicle.
10
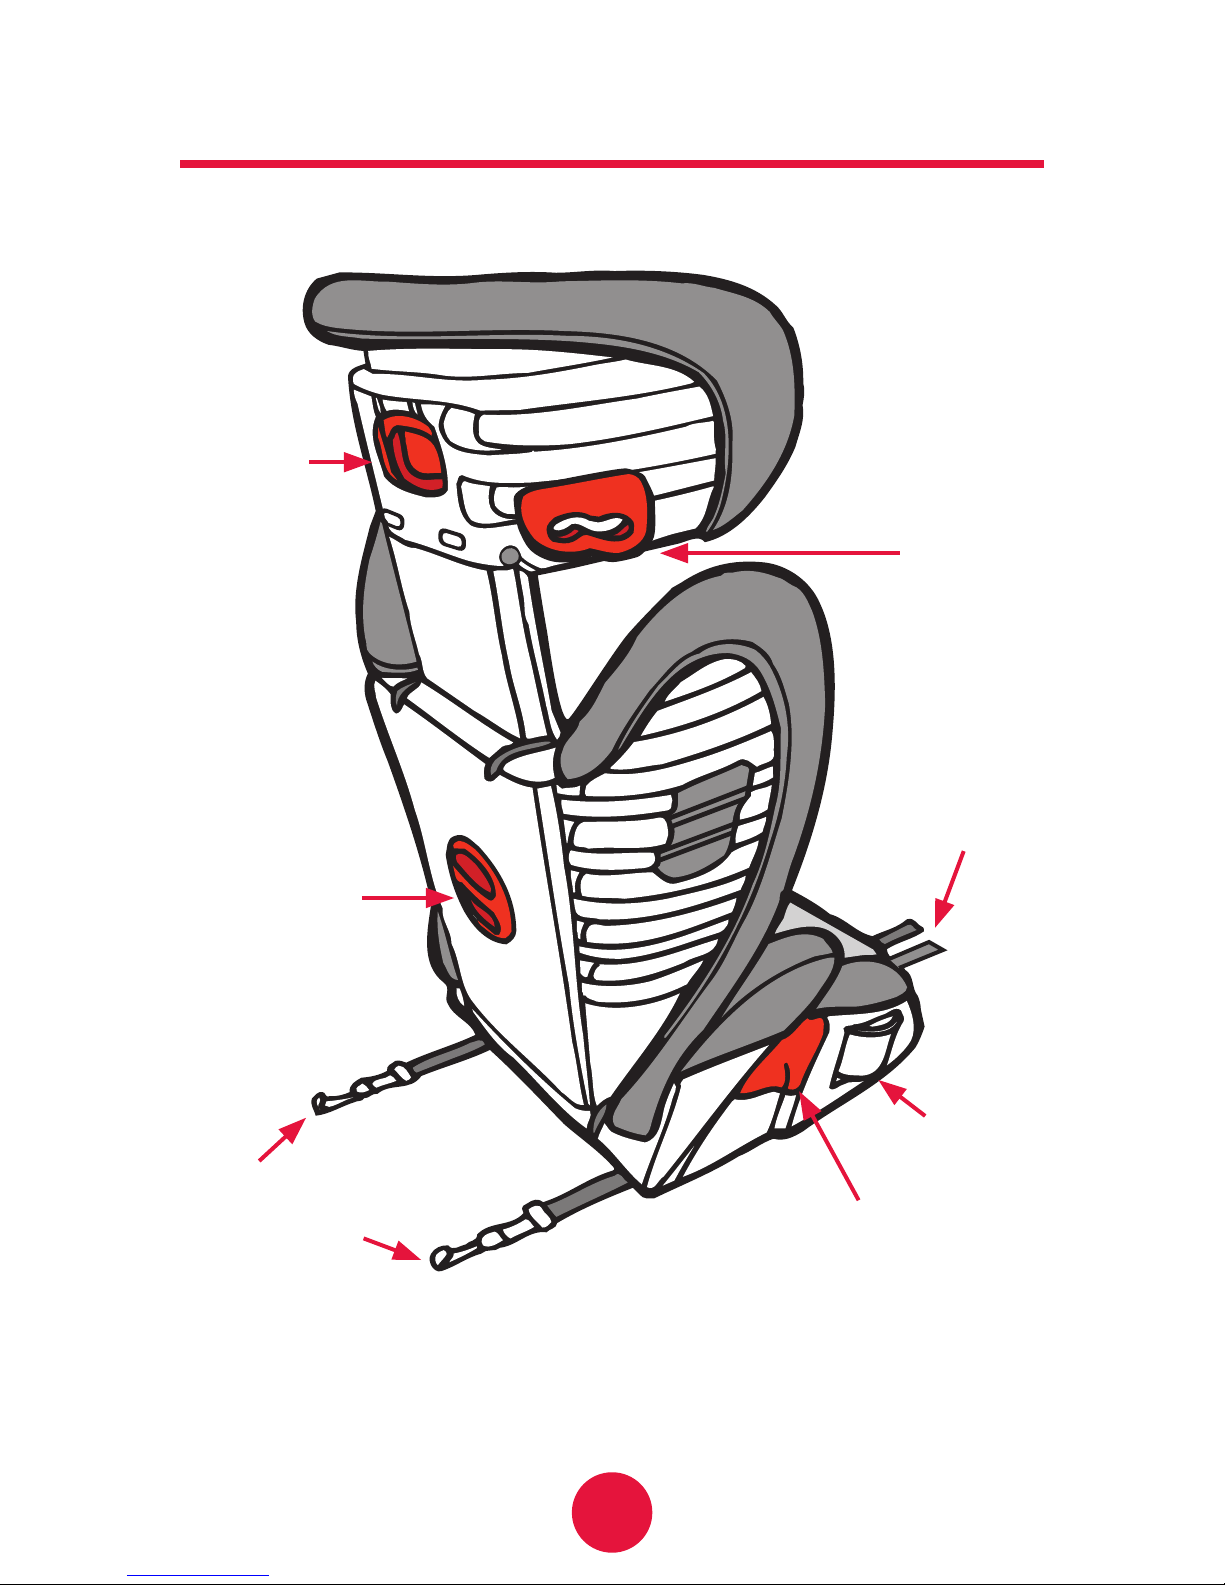
Parts for Assembly & Installation
Head
support
adjuster Upper
belt
guide
UAS
adjuster
straps
Adjuster for
seat back
width
UAS
connectors
Cup
holder
Lower
belt guide

11
Booster Seat Assembly
ATTACHING THE BACKREST
1Lay backrest on at surface
with front facing down.
2Hold seat bottom facing
down. Align seat bottom pivot
bar at 90oangle with backrest
hooks. Push in to attach seat
bottom to backrest.
3Rotate seat bottom downwards and under back rest until a
‘click’ is heard and the seat shape is formed.
REMOVING THE BACKREST
Follow above instructions in reverse.
ADJUSTING THE HEADREST
Squeeze the red head support adjuster on
back of booster seat head rest while adjust-
ing its height up or down to t the child.
Suggestion: It may be easier to adjust backrest to proper width prior to
securing the booster seat installation using UAS.
ADJUSTING BACKREST WIDTH
This booster seat features a unique,
width-adjusting seat back to best t
a growing child as well as seasonal
clothing. Turn the dial on the back of
the backrest 1to adjust its width:
turn clockwise to increase backrest
width, turn counter-clockwise to make
backrest narrower.
12
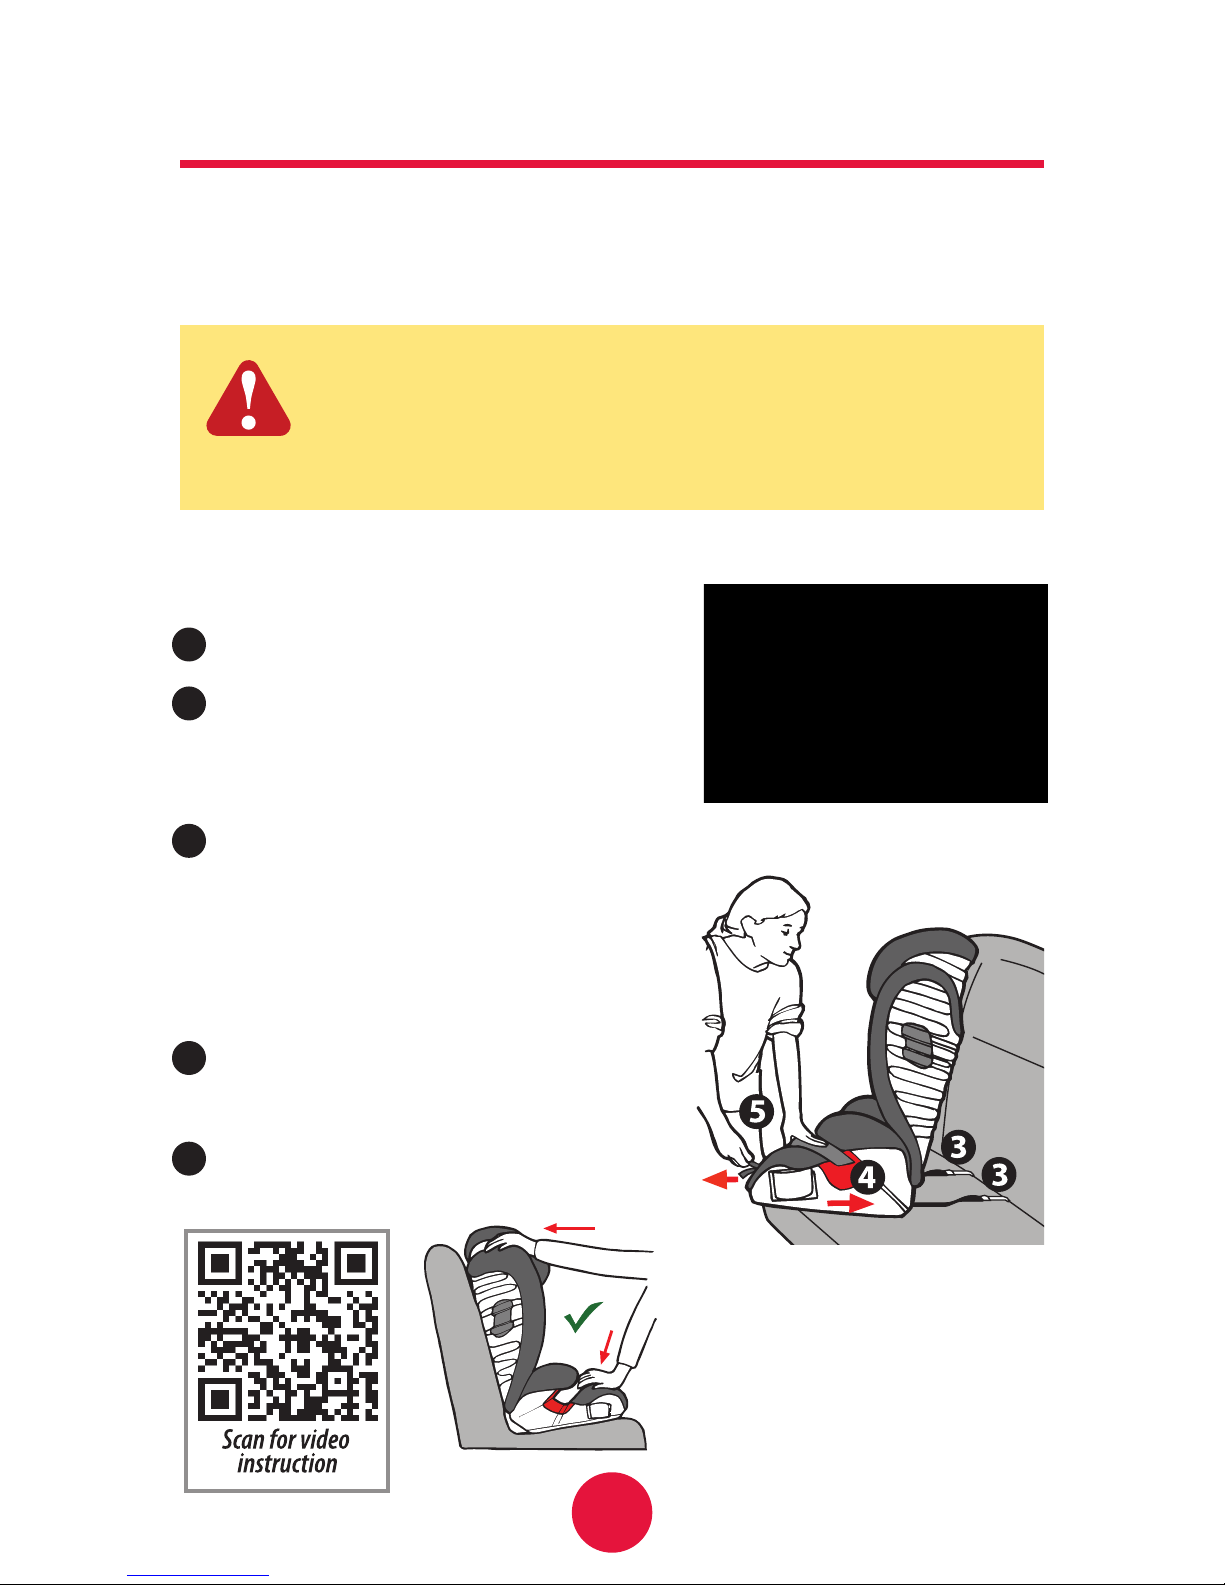
UAS Installation
WARNING: Unsecured objects can become ying
hazards and can cause serious injury in an accident.
Diono always recommends utilizing UAS installation
in vehicles equipped with lower anchors.
To improve safety and performance, this booster seat is
equipped with a unique, UAS system that allows secure
attachment to a vehicle’s lower UAS anchor locations.
Disengage UAS connectors from storage slots and lay booster
seat on its side.
1While depressing the cam lock lever,
2pull UAS connectors away from the
booster seat and extend both straps all
the way.
3Attach both UAS connectors to the vehicle anchors,
starting with the connector that is
furthest from you. For ease of use,
make sure open end of hooks face
upward during use.
4While pushing booster against
vehicle seat,
5pull one adjuster strap tight and
then the other.
NOTE: Even with UAS properly
attached and adjusted, child
seat will still have movement
against the vehicle seat back
and bottom.

13
DISENGAGING UAS INSTALLATION
Follow above instructions in reverse:
1) Depress the cam lock lever while pulling child seat away from
the vehicle seat back until the UAS straps are extended all the
way.
2) Disconnect UAS connectors from vehicle anchors.
3) Pull UAS adjuster straps to recess the UAS connectors into the
back of the booster seat bottom for safe storage.
Proper Positioning on Vehicle Seat
Place booster seat on vehicle seat so it is
resting rmly on vehicle seat bottom and
touching the vehicle seat back.
IMPORTANT: When using the booster seat
as a high-back booster, try to position back-
rest in full contact with vehicle seat back. It
may also be necessary to adjust the recline
angle of the booster seat to match that of the vehicle seat.
IMPORTANT: When using booster seat in center seating posi-
tion, make sure it is stable and does not rock from side to side.
IMPORTANT: Do not use UAS if installation interferes with
vehicle seat belt.
ADJUSTING THE RECLINE ANGLE
This booster seat features a recline angle that can adjust to
match that of the vehicle seat:
1) Push booster seat backrest backwards until you hear a click.
Backrest will now pivot freely and does not need to click into
another position.
2) Push seat bottom and backrest of booster seat down and
back into vehicle seat until there is secure positioning and full
contact with the booster seat and vehicle seat bottom and
vehicle seat back.

14
Securing the Child
1) Make sure booster seat is properly positioned and installed on
vehicle seat as per the instructions in pages 7–9 and 11–13.
2) Properly position child: sitting upright and all the way back in
the booster seat.
3) Make sure booster seat backrest width is adjusted to
narrowest width setting that comfortably ts child (see page 11).
4) Raise the headrest to access red
upper belt guides. AFeed the diagonal
portion of the seatbelt through the guide
on the side opposite the seatbelt buckle.
5) Fasten seatbelt across child: Lap
portion of seatbelt should rest within
both red lower belt guides. Diagonal
shoulder portion should route inside
the red lower belt guide closest to the
buckle and over child’s shoulder.
6) Adjust headrest (page 11) to proper
height: Upper shoulder guide should be
slightly above (at least 1 cm) the child’s
shoulders.
WARNING: If headrest is adjusted to maximum
height and child’s shoulder height is closer than 1 cm
to the upper belt guide, child is too tall and the seat
can only be used a backless booster.

15
7) Make sure seat belt is not twisted and
lays at across child’s lap, torso and
shoulder.
8) Tighten the seatbelt by pulling the
diagonal shoulder belt portion in the
direction of the arrows.
9) Conrm seatbelt buckle is in correct
position (see below).
PROPER BUCKLE POSITION
IMPORTANT: After booster seat is installed and seatbelt is fastened
around child, it is important to conrm correct seatbelt buckle posi-
tion to ensure secure installation. Correct seatbelt buckle position:
Buckle is on the outside of lower belt guide.
Incorrect seat belt buckle position.
If buckle is being
pulled across the
lower belt guide
and into the seat,
choose another
seating position
within the vehicle.
WARNING: If lap portion and diagonal portion of
seatbelt are not positioned correctly, the booster
seat is not properly installed:
• Diagonal portion of seatbelt should lay over the shoulder
and NOT touching the neck.
• Lap belt position should be forward and as low as possible
over child’s pelvis and contacting the upper thigh.

16
Backless Booster Seat
While this booster seat is designed to oer advanced side-
impact protection with its backrest section attached, the seat
bottom can also be used alone as a backless booster.
1) Remove seat bottom from backrest section (see page 11).
2) Disengage the two middle elastic straps
and unfold padded fabric ap on back of
seat bottom. A
3) Make sure booster seat is correctly
installed (pages 12–13) and properly
positioned on vehicle seat.
4) Properly position child: sitting upright
and all the way back in the booster seat.
5) Fasten seatbelt across child.
6) Make sure seat belt is not twisted and
lays at across child’s hips, torso and
shoulder.
7) Tighten the seatbelt by pulling the
diagonal shoulder belt portion in the
direction of the arrows.
IMPORTANT: Lap belt position should be as
far forward and as low as possible over child’s
pelvis and contacting upper thighs.
IMPORTANT: Diagonal seat belt portion should route inside the
red lower belt guide closest to the buckle and over child’s shoulder. It
should NOT be touching the neck.
NEVER position the shoulder belt loosely or under the child’s
arm or behind their back.

17
WARNING: If the diagonal seat belt portion does
not correctly t the child, then the seat must only be
used with the seatback portion attached and
properly adjusted to t the child.
Care & Maintenance
CLEANING THE COVER
Read all labels attached to cover for washing instructions.
Hand wash cover in cold water with mild detergent only.
Line dry to prevent shrinkage.
Do NOT wash cover in hot water.
Do NOT bleach, machine wash or machine dry.
CLEANING THE SHELL
Sponge clean ONLY using warm water and mild soap. Towel dry
when nished. Do NOT use solvents, detergents or any other
chemical or cleaning agent. Do NOT lubricate any part of the seat.
REMOVING THE FABRIC COVER
1) Separate seat back section from seat bottom section.
2) Remove plastic fasteners and elastics that secure fabric cover
to seat bottom, seat back and head rest.
3) Remove fabric cover pieces from the booster seat sections.
ATTACHING THE COVER
Follow the above instructions in reverse.

18
Warranty Information
The manufacturer of this child restraint, Diono LLC, warrants this
product only to the original retail purchaser. Visit www.diono.com
for complete warranty information and details.

19

20
Product: Monterey child booster seat
Model: 15000
Mfg. by: Diono LLC
275 Frobisher Drive, Suite 3
Waterloo, ON N2V 2G4
Customer Service
Tel: 519-725-1700
Email: ca-sales@diono.com
www.diono.com
© 2011 Diono LLC. All rights reserved. Monterey CA Eng 072611
Making travel safe and easy©
Other manuals for Monterey
1
Table of contents
Other Diono Car Seat manuals

Diono
Diono Solana User manual

Diono
Diono Radian 5 User manual

Diono
Diono RadianR100 User manual

Diono
Diono Radian 3R SafePlus Series User manual

Diono
Diono Cambria User manual

Diono
Diono Cambria 2XT User manual

Diono
Diono Radian 3 R User manual

Diono
Diono Radian 5 User manual

Diono
Diono SantaFe User manual

Diono
Diono Monterey User manual

Diono
Diono Cambria 2 User manual

Diono
Diono Radian 3QXT User manual

Diono
Diono Radian 5 Assembly instructions

Diono
Diono Radian 3QX User manual

Diono
Diono Radian 3 RX User manual

Diono
Diono Radian 3 RXT User manual

Diono
Diono solana 2 User manual

Diono
Diono Everett NXT User manual

Diono
Diono Solana User manual

Diono
Diono Monterey 4 DXT User manual


