DiscountRamps Silver Spring ESC400 User manual

Page 1Rev. 061218 DiscountRamps.com •1-888-651-3431
Deluxe Electric Powerchair and Scooter Carrier
Instructions for Part # ESC400
Congratulations on your new lift purchase. Powered mobility lifts are one of the easiest and most trou-
ble-free ways to transport your power chair or scooter. This manual is an installation guide as well as
an operation guide for the end user. Please read the manual thoroughly BEFORE attempting any
installation, adjustment, or use of the lift.
The manual is divided into the following sections for easy reference:
Section 1: Unpacking the Lift
Your electric lift includes:
Check the contents of the box to ensure all parts are included for proper installation. If any parts are
missing or if any damage is noted, immediately contact DiscountRamps.com. DO NOT attempt to
install or use the lift with any missing or damaged parts.
Section 2: Vehicle Preparation
To install a powered mobility lift on a vehicle, the vehicle must be capable of accepting a 2" Class III/
IV hitch. If you are unsure about the hitch required, check with local automotive shops that specialize
in trailer hitches. They will normally have the hitch type in stock required for use with this powered
mobility lift. Some websites also list the compatibility of hitches with vehicles.
Caution: Some scooters and powerchairs may be unsuitable for transport in or on a motor vehicle.
Please contact the manufacturer of your mobility device to determine its ability to be transported.
Section 1 - Unpacking the Lift
Section 2 - Vehicle Preparation
Section 3 - Wiring the Vehicle
Section 4 - Installation
Section 5 - Preparing the Lift
Section 6 - Safety Lift Arm Operation
Section 7 - Safety & Maintenance
Section 8 - Troubleshooting
IMPORTANT NOTE: It is a requirement that the receiver tube on the hitch must be installed parallel
to the ground. If the hitch is not installed properly, it may prevent the lift from working properly.
NOTE: Some vehicles may require supplemented rear suspension by the addition of air adjustable
shocks, air bags in the springs, or other devices designed to keep the vehicle level.
Your powered mobility lift is equipped with a license plate holder and light. At the time of lift installa-
tion, have the hitch installer run a standard Flat 4 trailer wiring harness to the hitch area. This will al-
low you to simply plug the license plate wiring into the trailer plug. Any attempt to wire the lift into ANY
secondary harness could possibly damage the motor and will void the warranty. The trailer light wiring
simply does not carry the proper current to power the lifting motor.
IMPORTANT NOTE: The trailer light wiring plug is for the license plate light and not to power your
mobility lift. All lifts must be connected directly to the vehicle battery using the supplied wiring harness.
• Main Carrier Assembly
• Hitch Tube and Hardware
• License Plate Holder and Hardware
• Wiring Harness
• Keys

Page 2Rev. 061218 DiscountRamps.com •1-888-651-3431
An anti-tilt device is included. This device stabilizes the lift when the lift is attached to your 2" hitch. It
prevents rocking by pinching the main tube of the hitch mounted product into the trailer's hitch. It is
required that this anti-tilt device is installed.
To install the anti-tilt device:
1. Slide the anti-tilt device onto the hitch tube of the carrier being in-
stalled with the at side facing the end of the tube that ts into the
vehicle hitch.
2. Secure the carrier to the vehicle hitch.
3. Fit the anti-tilt device against the vehicle hitch.
4. Using an Allen wrench, make sure all bolts are tightened evenly and
securely.
□Vehicle has a working order 2” Class III/IV hitch receiver installed level to the ground
□Power Mobility Lift is not damaged or missing parts
□Vehicle suspension is capable of bearing lift weight - see formula below
CHECK LIST: Installing a powered mobility lift onto a vehicle may require the help of a professional
installer, especially if the desired vehicle requires the installation of a hitch receiver. The vehicle is
prepared for install and meets the requirements outlined in this section only if:
The license plate holder attaches to the top of the lift's power box using included hardware. Line up
the base of the holder with the mounting holes, install bolts, washers, and nuts, then tighten securely
with a wrench and Allen wrench. Attach the license plate to the bracket using existing hardware.
Carrier Weight Weight of Powerchair or Scooter
*Must NOT exceed manufacturer's
hitch tongue weight capacity
+ =
154 lbs
Page 3Rev. 061218 DiscountRamps.com •1-888-651-3431
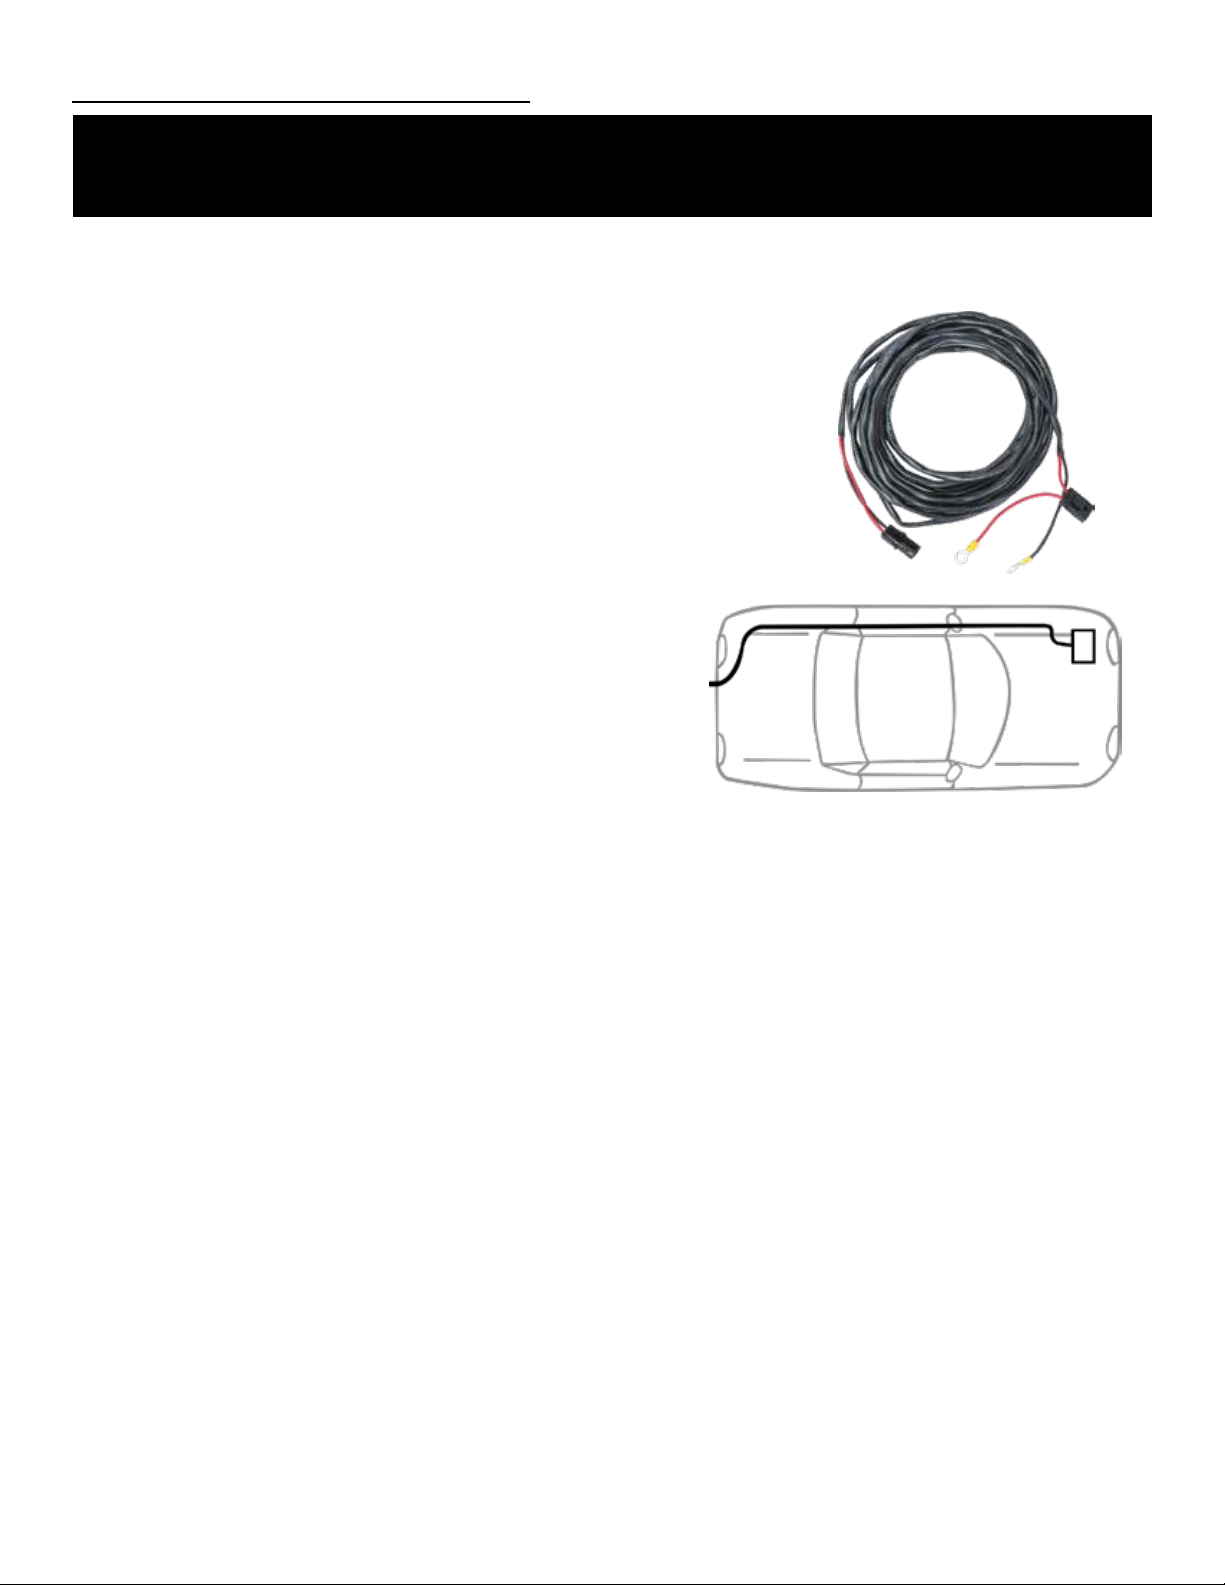
Section 3: Wiring the Vehicle
Located in the hardware package is a vehicle wiring harness manufactured to comply with SAE J1128
requirements. The harness is approximately 20 ft. long and will accommodate most vehicles.
Unwind the harness and lay it at. One end will have a black plug
designed for the mobility lift; it should be placed at the back of the
vehicle.
DO NOT ATTACH RED WIRE
Begin routing the wiring harness at vehicle battery. Attach the
black wire to the negative terminal.
• Run the wiring harness under or when possible,
through the vehicle, back to the trailer hitch.
• Always locate the wiring harness where it cannot be
snagged by road debris. Keep it away from the gas
tank, exhaust system, brake lines, fuel lines, pinch
points, sharp edges, and moving parts.
• If the harness is too long for the vehicle, coil the ex-
cess wire and secure it to the frame with tie wraps.
DO NOT CUT OR SHORTEN THE WIRING HARNESS
• Secure the wiring plug even with the end of the trailer hitch tube.
• Only after the wiring harness is routed through the vehicle and secured to the vehicle frame can
the red wire can be connected to the positive terminal on the battery.
Recommendation: Regularly perform routine maintenance or schedule a maintenance visit with a
mechanic. The lift should always be greased in applicable areas and harness connections should be
free from corrosion and decay.
IMPORTANT NOTE: IMPROPER WIRING IS THE #1 CAUSE OF PROBLEMS IN THE OPER-
ATION OF A VEHICLE LIFT. BE SURE TO FOLLOW THE VEHICLE WIRING INSTRUCTIONS
CAREFULLY.

Page 4Rev. 061218 DiscountRamps.com •1-888-651-3431
Section 4: Installation
Your powered mobility lift is shipped in the box as factory pre-assembled. Once the vehicle wiring
harness is connected, the lift can be installed to the vehicle hitch with help of the battery.
Measure from the bottom of the vehicle hitch to the ground to determine the orientation of the hitch
adapter based on the vehicle’s hitch ground clearance.
Measure from bottom of
hitch receiver to ground
15" - 20"
10" - 15"
Non-Powered Method
Bolt the hitch adapter to the powered mobility lift with (2) bolts,
(4) washers, and (2) nuts using the measured orientation.
Move the folded lift to the rear of the vehicle with the motor box
folded down and away from the vehicle. It’s highly recommend-
ed to have at least two people lift the unit upward and place it
into the vehicle hitch receiver. While holding the mobility lift in
place, secure it to the hitch receiver with a hitch pin or pinch
bolt.
Powered Method
Install the hitch adapter into the vehicle hitch receiver using the
orientation obtained from measuring, secure with hitch pin or
pinch bolt.
Place the mobility lift at the rear of the vehicle with the motor
box folded down and away from the vehicle.
Plug the wiring harness previously installed in the vehicle, into
the mobility lift. Turn the key and use the toggle DOWN switch
to raise the motor box toward the hitch adapter. Continue to
power the lift until the mounting holes line up with the hitch
adapter.
Bolt the mobility lift to the hitch adapter with (2) bolts, (4) wash-
ers, and (2) nuts.
*Hex bolts MUST be at least one hole
away from each other
Routing the Power Cord
Route the lift power cord down the lift, away from moving parts. The cord should follow along the mo-
tor box post and be secured with zip ties to allow the lift to operate without disconnecting or pinching
the power cord.

Page 5Rev. 061218 DiscountRamps.com •1-888-651-3431
Section 5: Preparing the Lift
Adjustable Ratchet Straps: Your powered mobility lift includes
retractable tie-down straps to secure your powerchair or scooter for
transport. These straps pull out and attach to a tie-down point on
the opposite side of the mobility lift.
Ratchet straps attach directly to the carrier frame with the included
nuts and bolts.
Caution: Check straps between uses for fraying or issues that may
render the strap unable to secure the powerchair in place. Please
contact DiscountRamps.com for a replacement if the retractable
straps ever become unt for securing a mobility device on the lift.
Always secure straps to the tie-down points on the mobility lift platform. Do not attach tie-
down straps directly to the powerchair or scooter.
Lift Arms Down
Lift Arms Up
Lever
Lever
Section 6: Safety Lift Arm Operation
Put the lift arms in the downward position when raising
the platform completely into a vertical alignment for
storage or travel without a powerchair or scooter.
For all other uses, keep the lift arms in the upward
position.
A lever located beside the lift arms controls/locks their
position, which can be operated by pulling outward
and twisting.
Caution: For your safety it is recommended to
keep the lift power box turned OFF while adjusting
the lift arm position.
To operate the lift after the arms are in the desired po-
sition, turn the key to the ON position, then press and
hold the toggle switch in the UP or DOWN position.
USING THE LIFT
Always be sure your powerchair or scooter is properly
secured to the platform by using the integrated tie-
down straps and tie-down points BEFORE lifting.
IMPORTANT: ONLY LOWER THE PLATFORM UNTIL IT TOUCHES THE GROUND. DO NOT
CONTINUE TO LOWER THE PLATFORM AFTER IT HAS TOUCHED THE GROUND. THIS MAY
CAUSE PERMANENT DAMAGE TO THE LIFT MOTOR, VEHICLE HITCH, VEHICLE SUSPEN-
SION, OR RESULT IN PERSONAL INJURY.

Page 6Rev. 061218 DiscountRamps.com •1-888-651-3431
Section 7: Safety & Maintenance
• Inspect the condition of your lift often to be sure it remains in good working order. Do not use the lift
if any parts are worn or damaged. Contact DiscountRamps.com for part replacement or repairs.
• Do not place objects under the lift.
• Be sure powerchairs or scooters with pneumatic tires are properly inated prior to placing them on
the lift platform for transport. Tires that are not properly inated may hinder the powerchair/scoot-
er’s ability to stay positioned on the platform.
• Always secure your powerchair or scooter for transport with the retractable tie-down straps. The
straps should always be placed over the powerchair or scooter and then attached to the respec-
tive tie-down point on the platform. Do not hook the tie-down straps directly to your powerchair or
scooter.
• Exercise extra caution while driving with the mobility lift attached to a vehicle hitch receiver. Slow
down for potholes, speed bumps, uneven roads, and railroad tracks. Excessive bouncing due to
rough driving may result in damage to the mobility lift, powerchair, or vehicle suspension.
• Avoid driving up or down steep inclines to prevent the mobility lift from dragging or scraping on the
ground.
• Do not operate or transport the lift while the powerchair/scooter is occupied.
• The mobility lift is designed specically for transporting powerchairs and mobility scooters. Do not
transport other vehicles or materials with the mobility lift.
• Regular maintenance is necessary to ensure the mobility lift continues performing at its best and
without problems. Always inspect the lift before use.
• Grease the eight ttings on the pivot arm using a grease gun every 90 days.
• Check for dirt, dust, and grime buildup over time. Lower the platform and clean with mineral spirits
or high-performing solvent. Once clean, grease areas with a high-grade water-resistant mixture,
such as boat trailer wheel bearing grease.
• Check for paint chips and touch up any bare metal with a gloss black lacquer to inhibit rust. This
may be necessary more frequently when the mobility lift is subjected to road salt spray.
General Guidelines
• It is the user’s responsibility to read and follow all instructions.
• It is the responsibility of this product’s owner to furnish the instructions to any person that borrows
or purchases the product.
• Inspect the product before use to ensure it is assembled properly and all parts are in safe working
order and free of defects.
• Never modify this product in any way.
• Please use common sense and practice general safety measures when using this product.
• Parts and/or instructions are subject to change without notice.

Page 7Rev. 061218 DiscountRamps.com •1-888-651-3431
Section 8: Troubleshooting
Lift does not operate
• Check the power supply. The wiring harness red wire and the ground must be run directly to the
battery.
• Run the lift from a shop battery and not through the vehicle wiring harness. If this solves the prob-
lem, check the vehicle wiring harness for bad connections or broken wires.
• Check wiring harness fuse. Replace if necessary with a 25A breaker.
Motor does not lift the platform completely when in use
Check the lift harness ground wire and make sure it is connected to the battery. A poor ground will
cause the motor to run slowly and have less lifting capacity.
Motor works intermittently
• Check wires leading to the toggle switch of the motor housing box and the toggle switch.
• Check lift ground wire and make sure it makes solid contact with the vehicle frame.
• Check vehicle battery.
Platform does not fold properly when not in use
• Make sure the lift arms are in the down position
• Make sure there are no obstructions in the pivot area of the platform
• Check the lift platform springs for wear or damage
License plate light does not work
Make sure the Flat 4 trailer plug on the vehicle wiring harness is properly attached to the trailer light
plug on the vehicle.
What do I do with the extra length of wire from the wiring harness?
Coil the excess wire and zip-tie it to the vehicle frame out of the way of moving parts. Be sure the
excess wiring is in a location where it cannot be snagged by road debris, and that it’s a safe distance
away from the vehicle exhaust. Do not cut the excess wiring.
Lift does not reach the ground when lowered completely
Check that the hitch adapter is installed at the proper height. See page 4 of these instructions.
Lift bottoms out when traveling over bumps and driveways
• Always traverse steep inclines, speed bumps, or uneven surfaces slowly and at an angle to pre-
vent dragging or scraping the lift on the ground.
• Check that the hitch adapter is installed at the proper height. See page 4 of these instructions.
Lost the Lift Keys
Contact DiscountRamps.com to obtain a new set of keys.

Page 8Rev. 061218 DiscountRamps.com •1-888-651-3431
Product Warranty and Liability
GENERAL PRODUCT WARRANTY: Products purchased from the Authorized Dealer (original place
of purchase) or Merchant (“Dealer”) will be free of defects in material and workmanship at the time of
receipt, and will meet the specications stated at the place of purchase transaction or online at the
Dealer’s website, under normal use and service when correctly installed, operated and maintained.
This product warranty is eective for the period of time stated below, unless otherwise stated in the
product instructions or depicted in the product advertisement. All Authorized Dealer warranties are
NON-TRANSFERABLE and cover only the original end purchaser. This limited warranty does not
cover products purchased through non-authorized dealers. Non-authorized dealer receipts are not
accepted for warranty verication.
***Warranty claims must be made directly to the original place of purchase.***
WARRANTY PERIOD: This warranty remains in force for one year from the date of the product’s
accepted delivery. The Authorized Dealer oers a one year manufacturer’s warranty for most products
unless otherwise specied on the product advertisement.
WARRANTY SERVICE: The Authorized Dealer will replace any defective or malfunctioning part at
no charge, including payment of the shipping costs of parts or replacement product to and from the
manufacturer. The purchaser is responsible for labor charges. If the product does not meet specica-
tions as depicted in the advertisement, the Authorized Dealer will refund the full purchase price of the
product.
Questions regarding the warranty on a specic product and warranty claims should be directed to the
Authorized Dealer with whom the purchase transaction was made.
WARRANTY LIMITATIONS: The above warranty does not apply to products that are repaired, modi-
ed or altered by any party other than the Authorized Dealer; are subjected to unusual physical stress
or conditions (such as overloaded ramps or corrosion), natural disaster, governmental actions, wars,
strikes, labor disputes, riots, theft, vandalism, terrorism or any reason beyond reasonable control; are
damaged due to improper installation, misuse, abuse, accident or negligence in use, storage, trans-
portation or handling, or tampering; or to products that are considered consumable items or items
requiring repair or replacement due to normal wear and tear.
Product should be inspected prior to signing for delivery. Product damage incurred during shipping,
unless noted on the Bill of Lading at the time of delivery, renders this warranty void.
LIMITED LIABILITY: In no event shall THE AUTHORIZED DEALER be liable to the purchaser or any
third party for any indirect, incidental, consequential, special, exemplary or punitive damages arising
out of the use of the product, including, without limitation, property damage, loss of value of the prod-
uct or any third party products that are used in or with the product, or loss of use of the product or any
third party products that are used in or with the product.
Table of contents
Popular Wheelchair manuals by other brands


Decon wheel
Decon wheel eWalk user manual

Pride Mobility
Pride Mobility Quantum Rehab Jazzy Select 6 Parts Replacement Guide

Invacare
Invacare Shark operating manual

Meyra
Meyra Primus 2 3.310 active operating manual

Sunrise Medical
Sunrise Medical One-Arm Drive Quickie 2 owner's manual

Convaid
Convaid Rodeo User and service manual