DK2 Power OPC503V User manual

OPC503V
3 INCH CHIPPER SHREDDER
OFFROAD TOW ONLY • KOHLER ENGINE • TOP LOADING • VACUUM KIT
ASSEMBLY GUIDE
PARTS AND SERVICE 1 (888) 277-6960 | WWW.DETAILK2.COM
DK2 USA WEST
4301 S VALLEY VIEW BLVD.
SUITE 1011 LAS VEGAS, NEVADA
89103 USA
DK2 USA EAST
3750 SOUTH AVENUE
NORTH UNIT, TOLEDO, OHIO
43615 USA
DK2 CORPORATE HEAD OFFICE
5330 MAINWAY
BURLINGTON, ONTARIO
L7L6A4 CANADA

2 | OPC503V man.
TABLE OF CONTENTS
SECTION I: ASSEMBLY ............................................................3
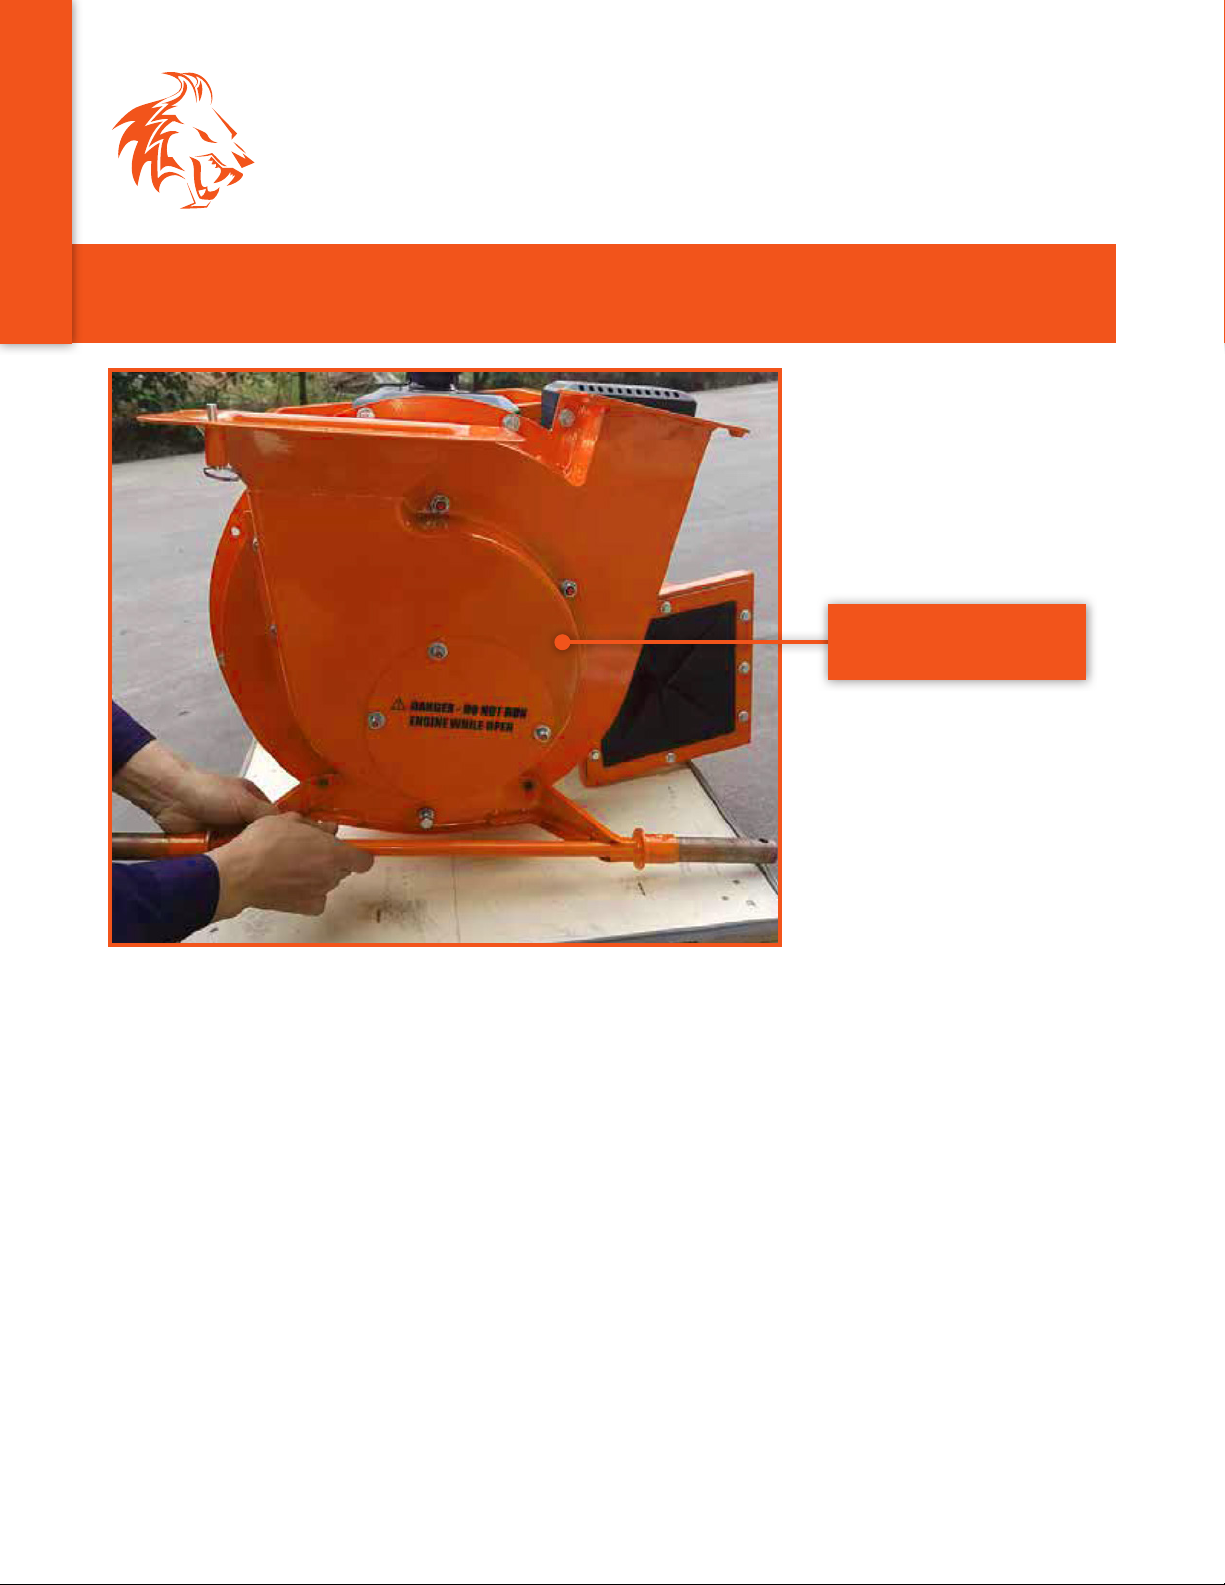
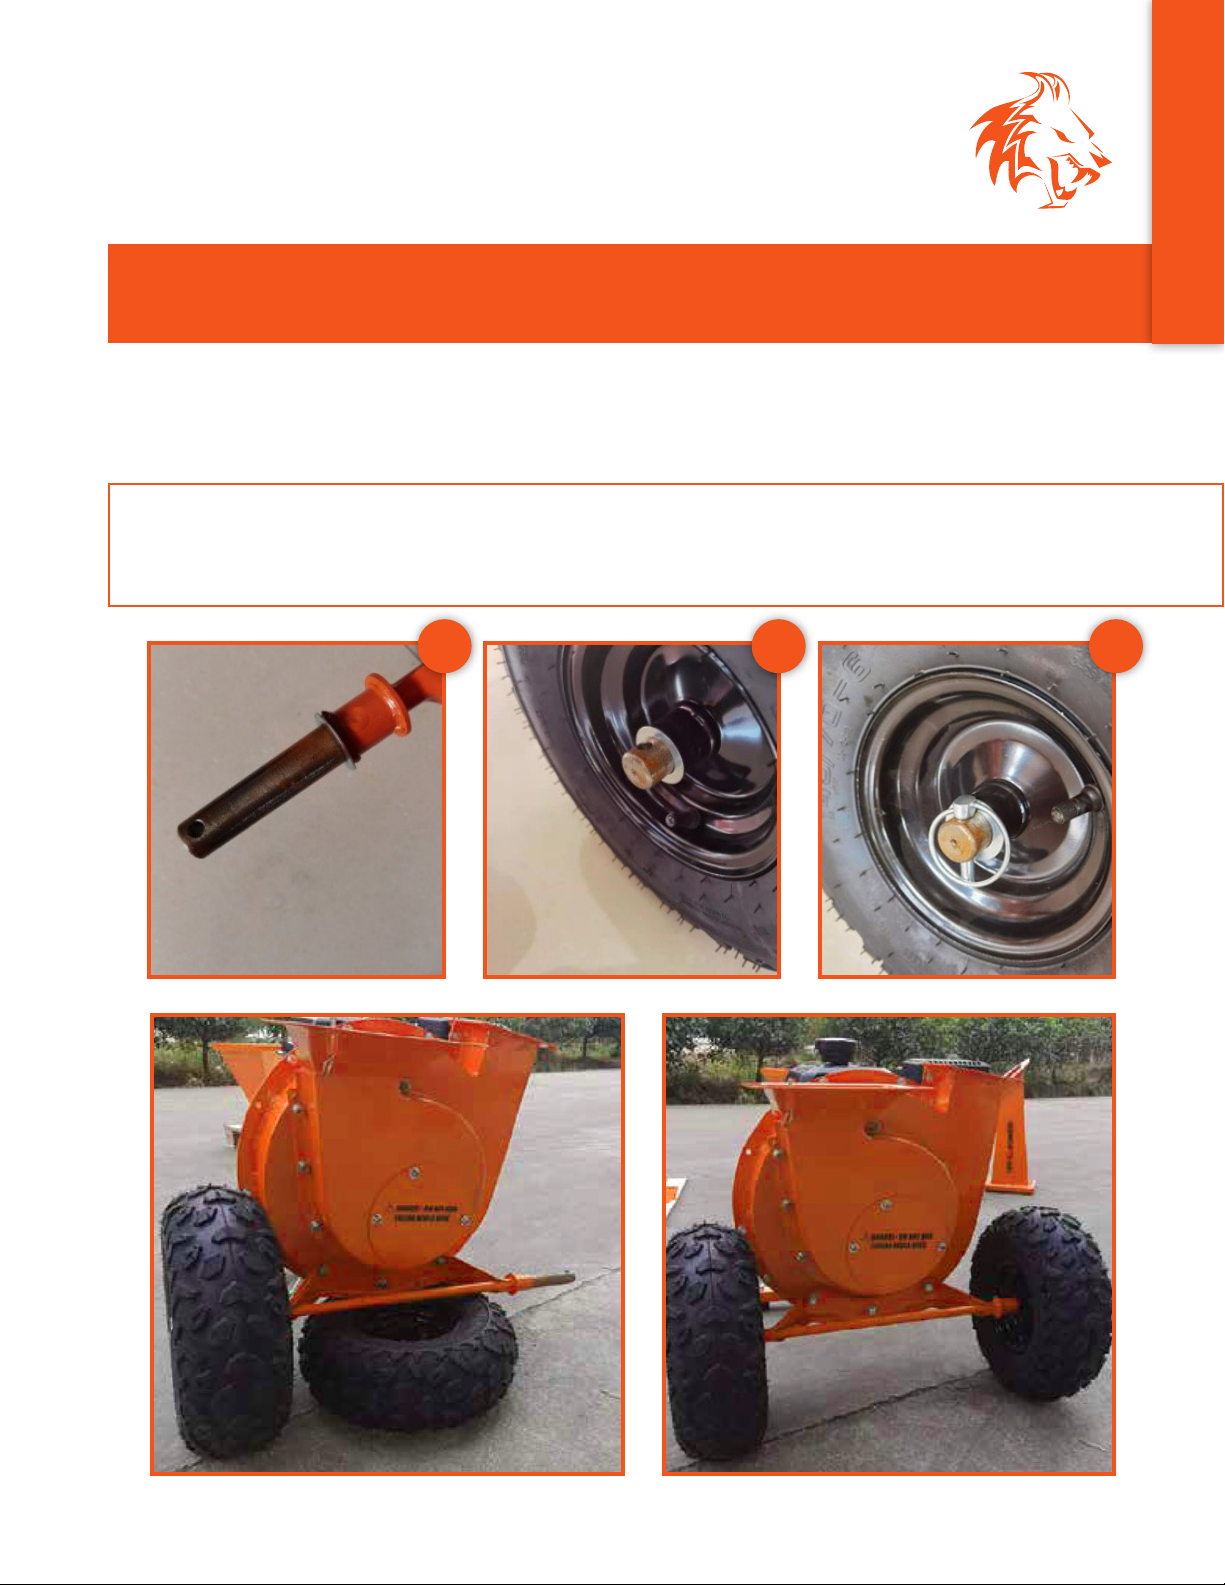
STEP 1: AXLE.........................................................................4
STEP 2: WHEELS .....................................................................5
STEP 3: DROP STAND & TOW BAR .....................................................6
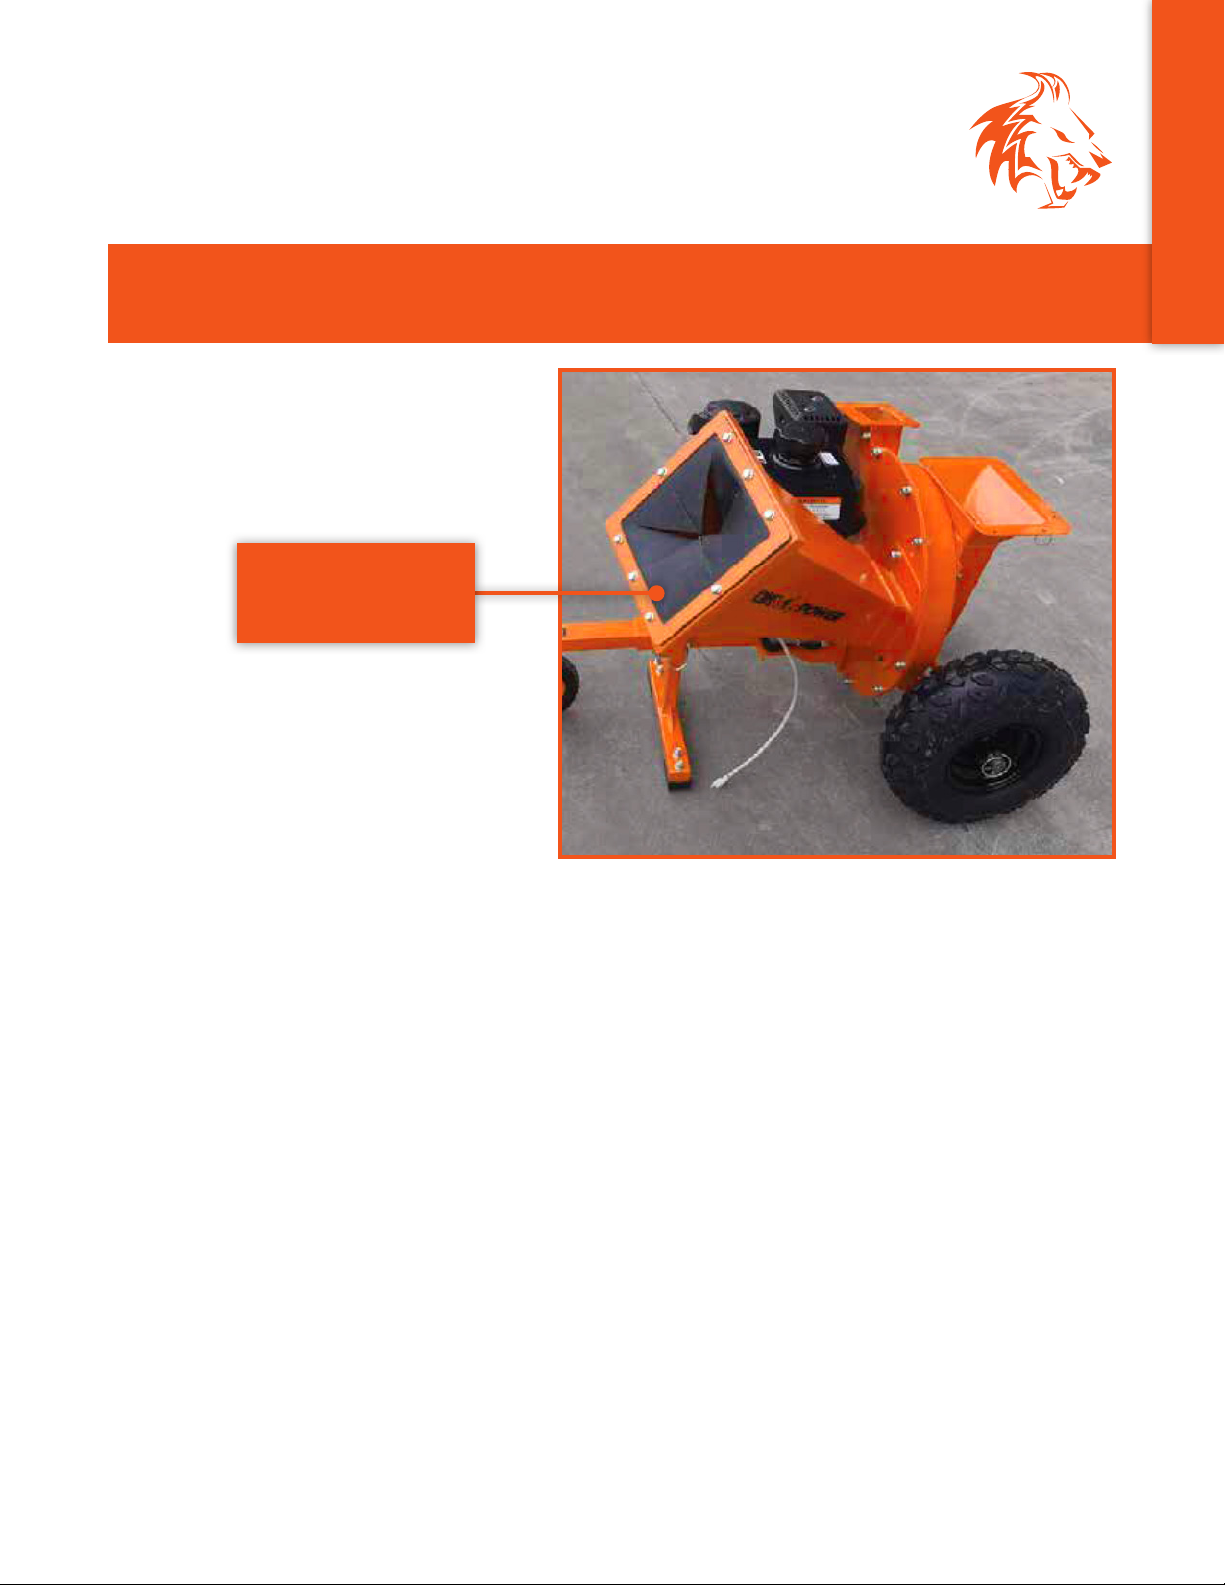
STEP 4: SIDE FEED CHUTE ............................................................7
STEP 5: TOP LOADING FEED CHUTE HANDLE ...........................................8
STEP 6: TOP LOADING FEED CHUTE ...................................................9
STEP 7: CHIP CHUTE.................................................................10
STEP 8: HOSE ASSEMBLY .............................................................11
STEP 9: HOSE INSTALLATION.........................................................12
SECTION II: SAFETY & OPERATION ................................................13
YOUR KOHLER ENGINE ..............................................................14
SAFE PRACTICES & GENERAL INFORMATION ..........................................15
SECTION III: PARTS & SCHEMATICS ................................................16
SCHEMATICS ....................................................................... 17
PARTS LIST .........................................................................18
WARRANTY .....................................................................19
ENGLISH

SECTION I
ASSEMBLY

4 | OPC503V man.
ASSEMBLY
STEP BY STEP INSTRUCTIONS
STEP 1: AXLE
INSTALL THE AXLE WITH
THE BOLTS PROVIDED
ENGLISH

v.210818 | 5
ASSEMBLY
STEP BY STEP INSTRUCTIONS
STEP 2: WHEELS
1. Install the first washer on the wheel axle.
2. Install the wheel and second washer.
3. Install the locking pin.
NOTE: Relocate the pin in the wheel axle to lock the wheels from moving while chipping, or
free-wheel when towing.
1 2 3
ENGLISH

6 | OPC503V man.
ASSEMBLY
STEP BY STEP INSTRUCTIONS
STEP 3: DROP STAND & TOW BAR
INSTALL THE DROP STAND
INSTALL THE TOW BAR
ENGLISH

v.210818 | 7
ASSEMBLY
STEP BY STEP INSTRUCTIONS
STEP 4: SIDE FEED CHUTE
INSTALL THE 3 INCH
FEED CHUTE WITH
THE BOLTS PROVIDED
ENGLISH

8 | OPC503V man.
ASSEMBLY
STEP BY STEP INSTRUCTIONS
STEP 5: TOP LOADING FEED CHUTE HANDLE
INSTALL THE
HANDLE WITH THE
4 BOLTS PROVIDED
ENGLISH

v.210818 | 9
ASSEMBLY
STEP BY STEP INSTRUCTIONS
STEP 6: TOP LOADING FEED CHUTE
1. Align the door frame with the 4 holes in the body and set the door in place as shown.
2. Mount the chute to the unit.
3. Plug in the white connector for the key switch.
1
2
3
ENGLISH

10 | OPC503V man.
ASSEMBLY
STEP BY STEP INSTRUCTIONS
STEP 7: CHIP CHUTE
MOUNT THE CHIP CHUTE
ENGLISH

v.210818 | 11
ASSEMBLY
STEP BY STEP INSTRUCTIONS
STEP 8: HOSE ASSEMBLY
ASSEMBLE THE VACUUM HOSE
USING PROVIDED HARDWARE
ATTACH HANDLE TO HOSE
USING PROVIDED HARDWARE
ENGLISH

12 | OPC503V man.
ASSEMBLY
STEP BY STEP INSTRUCTIONS
STEP 9: HOSE INSTALLATION
1. Remove the 3 nuts, hardware, and cover plate.
2. Keep the plate in case you wish to remove the hose in the future.
3. Install the hose plate as shown below, replace the nuts and fasten.
1 2
3
ENGLISH

SECTION II
SAFETY & OPERATION

14 | OPC503V man.
SAFETY & OPERATION
YOUR KOHLER ENGINE
Read the Kohler engine manual supplied with your unit for full engine operation, safety, and
maintenance instruction.
1On / O Key Lock
2Gas - Use Mid Grade or Higher
3Choke - Left is On / Right is O (Run Position)
4Gas On / O Switch - Left is O / Right is On
5Throttle - Rabbit Fast / Turtle Slow
6Pull Starter - Pull Tight - Then Pull Start
7
Oil - Fill to mark 10W30, will not start if oil is low, has
low oil shuto protection. Two yellow caps are oil fill
caps, use either one to fill oil.
1
2
3
5
4
6
7
ENGLISH

v.210818 | 15
SAFETY & OPERATION
SAFE PRACTICES & GENERAL INFORMATION
BEFORE TURNING THE KEY AND PULL STARTING ENGINE
• Clear area of all people and property that could be damaged. Think safety.
• Chips are flying projectiles and can cause injury.
• Check both chutes and make sure they are closed and locked.
• Wear safety glasses, hearing protection, and gloves.
IF YOUR UNIT WILL NOT START
1. Check all white wire connections.
2. Check key switch is turn to the ON - right hand position.
3. Also unplug the white connector from the key switch and try it.
SAFE PRACTICES
• Do not wear loose fitting clothes that could get stuck in the chipper.
• Only chip wood, no metal or plastic.
• Children should not run this equipment.
• Stay alert of your surroundings and persons that could appear in the chipping projectile path
while operating.
• Feed large diameter trees slowly into the cutting drum to regain cutting RPM between cuts.
GENERAL INFORMATION
• Oil used should be 10W30.
• Gas should be mid-grade or higher.
• Small sticks 3/8” in diameter max and leaves in the top hopper.
• Trees up to 3 inches into side feed chute.
READ AND OBEY ALL WARNING LABELS ON THIS MACHINE.
ENGLISH

SECTION III
PARTS & SCHEMATICS

v.210818 | 17
PARTS & SCHEMATICS
SCHEMATICS
Scan here to access the DK2 POWER Parts Store or open your browser and go
to www.detailk2.com/shop-power-equipment-parts
Your Chipper model is: OPC503V
ENGLISH

18 | OPC503V man.
PARTS & SCHEMATICS
PARTS LIST
No. Specification No. Specification
1M10 x 70 bolt 39 Axle
2Hitch trailer 40 M8 x 16 bolt
3Washer dia. 10.5 x dia. 22 x 2 41 M6 locknut
4Spring washer dia. 10 42 Spring washer dia. 6
5M10 locknut 43 Washer dia. 6.4 x dia. 12 x 1.6
6M8 x 45 bolt 44 Side chipper room
7Washer dia. 8.4 x dia. 20 x 1.6 45 Side chipper room cover
8Rubber pad 46 M6 x 12 bolt
9Support feet 47 M8 x 20 bolt
10 M8 locknut 48 M8 x 25 bolt
11 Spring washer dia. 8 49 Rubber pad
12 Tow bar 50 Switch key wire
13 Latch dia. 8 51 Top feed hopper
14 Engine plate 52 Switch stop cover
15 M8 x 60 bolt 53 M6 x 16 bolt
16 Rubber pad dia. 10 54 Switch key
17 M8 x 85 bolt 55 Handle
18 U-protection plate 56 Plate for protection sheet
19 Engine wire 57 Protection sheet
20 Engine 58 M6 x 20 bolt
21 Protection pipe 59 Outlet hopper adjusting plate
22 Main chipper room cover 60 Knob
23 5/16-24 UNF x 85 bolt 61 Outlet hopper
24 M8 x 25 bolt 62 M6 x 35 bolt
25 Blade 63 Side plate for protection sheet
26 Key 64 Side protection sheet
27 Blade roller 65 Side feed hopper
28 M8 x 20 bolt 66 Trolley wheel
29 Washer dia. 30 x dia. 13 x 4 67 M10 x 50 bolt
30 Straight hammer 68 M10 locknut
31 L-hammer 69 Spring washer dia. 10
32 Straight sleeve 70 Hose Clamp
33 M8 x 50 bolt 71 Hose
34 Gland 72 Hose cover
35 5/16-24 UNF x 135 bolt 73 Hose handle
36 Main chipper room 74 M6 x 50 bolt
37 O-latch dia. 8 75 Washer dia. 25
38 Tire 76 Latch dia. 8 x 45
ENGLISH

v.210818 | 19
PLEASE DO NOT RETURN TO THE STORE
YOU HAVE A 1 YEAR WARRANTY AND DK2 WILL REPLACE A DEFECTIVE PART FOR FREE.
CALL US AT 1 (888) 277-6960 FOR FAST WARRANTY PARTS AND QUESTIONS.
WHAT IS COVERED – 3 YEAR ENGINE AND 1 YEAR COMMERCIAL WARRANTY INCLUDED
Detail K2 Inc. warrants to the original purchaser that product will be free and clear of manufacturing defects in
workmanship and materials under normal use and service fora period of one (1) year from the date of the original
purchase. If within one (1) year from the original date of purchase this product fails due to defect inmaterial or
workmanship, Detail K2 will repair, replace, or supply any covered defective part at ouroption. DK2 POWER is 1-year
parts only warranty no labor. Kohler 3 year warranty is PARTS and LABOR.
Upon expiry of one (1) year, Detail K2 will have no further liability related to theproduct. Detail K2 does not authorize
any party, including its authorized distributors ordealers, to oer any other warranty on behalf of Detail K2 Inc.
SERIAL NUMBERS MUST BE REGISTERED ONLINE AT WWW.DK2POWER.COM, WARRANTY NON-
TRANSFERABLE.
KOHLER ENGINES –KOHLER CH SERIES ENGINES COMMERCIAL 3 YR PARTS AND LABOR WARRANTY
KOHLER ENGINES –KOHLER SH SERIES ENGINES RESIDENTIAL 2 YR PARTS AND LABOR WARRANTY
see your Kohler manual for specific warranty.
DK2–1-Year parts only, no labor. 3-year commercial Kohler warranty.
THIS WARRANTY DOES NOT COVER OR APPLY TO:
(a) Damage to the product due to misuse, mishandling and abuse
(b) Improper installation, maintenance and storage
(c) Expendable parts such as nuts and bolts, pins and springs, wiring and switch components, hydraulic hoses and
fittings, cutting teeth, cutting chains, cutting blades, throttles, belts and tires.
(d) Normal wear and tear
(e) Consequential damage & incidental damages such as damage to persons or property
PROCEDURE FOR OUTDOOR POWER EQUIPMENT WARRANTY
Within the one (1) year warranty period, the purchaser of the product can CALL 1 (888) 277-6960 or contact us on
www.DK2Power.com. Notify us of the claimed defect and provide proof of original purchase.At this timethe validity
of the claim will be determined, and if approved replacement parts will be issued. No returned product will be
accepted underwarranty unless accompanied by an RGA# issued by Detail K2 Inc.
DAMAGED FREIGHT
Damage to your product caused by freight mishandling is NOT covered under warranty. If your freight arrives
damaged, REFUSE it. Inspect your product when it arrives, otherwise if you accept it, you will be responsible for
filing any freight claims with the delivery company. DK2 warranty excludes damage to product.
RETURNS BEFORE GAS AND OIL
Follow the return policy from the retailer you purchased the equipment from.
RESOLUTION FOR A DEFECTIVE PRODUCT AFTER GAS AND OIL HAS BEEN ADDED.
Call us at 1 (888) 277-6960 between 8am-4pm Monday to Friday EST.
WARRANTY
3 YEAR ENGINE & 1 YEAR CHASSIS
ENGLISH

Other manuals for OPC503V
2
Table of contents
Languages:
Other DK2 Power Paper Shredder manuals
Popular Paper Shredder manuals by other brands

UNITED OFFICE
UNITED OFFICE UAV 300 A1 Operating instructions and safety instructions

texet
texet CC15M instruction manual

Martin Yale
Martin Yale intimus 120SC2 operating instructions

UNTHA
UNTHA RS100-4-S operating manual

Gardol
Gardol GLH 250 SB operating instructions

Parrot Products
Parrot Products S1008MC user manual