DMB HEPBURN MK-II User manual

GUIDE DE DÉMARRAGE RAPIDE
GUIA DE INÍCIO RÁPIDO
KURZANLEITUNG
HURTIGVEILEDNING
GUÍA DE INICIO RÁPIDO
BEKNOPTE HANDLEIDING
QUICK START GUIDE

The Benets of Digital Radio
When you upgrade to digital radio you get more choice than ever before – with your existing favourite
stations just waiting to be experienced in digital quality but also a plethora of new digital-only stations
featuring all kinds of; music, chat and programming you’ll love.
Digital radio is not just about choice, it’s about quality – with digital broadcasts you’ll hear everything in
crystal clear clarity.
If you have any concerns about the digital coverage in your area – you can check your signal on the UK Digital
Radio website, it’s completely free and totally impartial – www.ukdigitalradio.com

Your VQ Hepburn Mk II - Born In Britain
You can be proud of your Hepburn Mk II and rely on its quality as it’s
designed and engineered in Britain featuring British acoustic
development.
At VQ we’re proud to be British and we’re proud to take
our inspiration from quintessential British areas of excellence
- Design, Fashion, Music and The Arts.
It’s our aim to take these inspirations and create our own unique sense of Sound & Style – but also to share
these inuences with you to inspire your own sense of style.

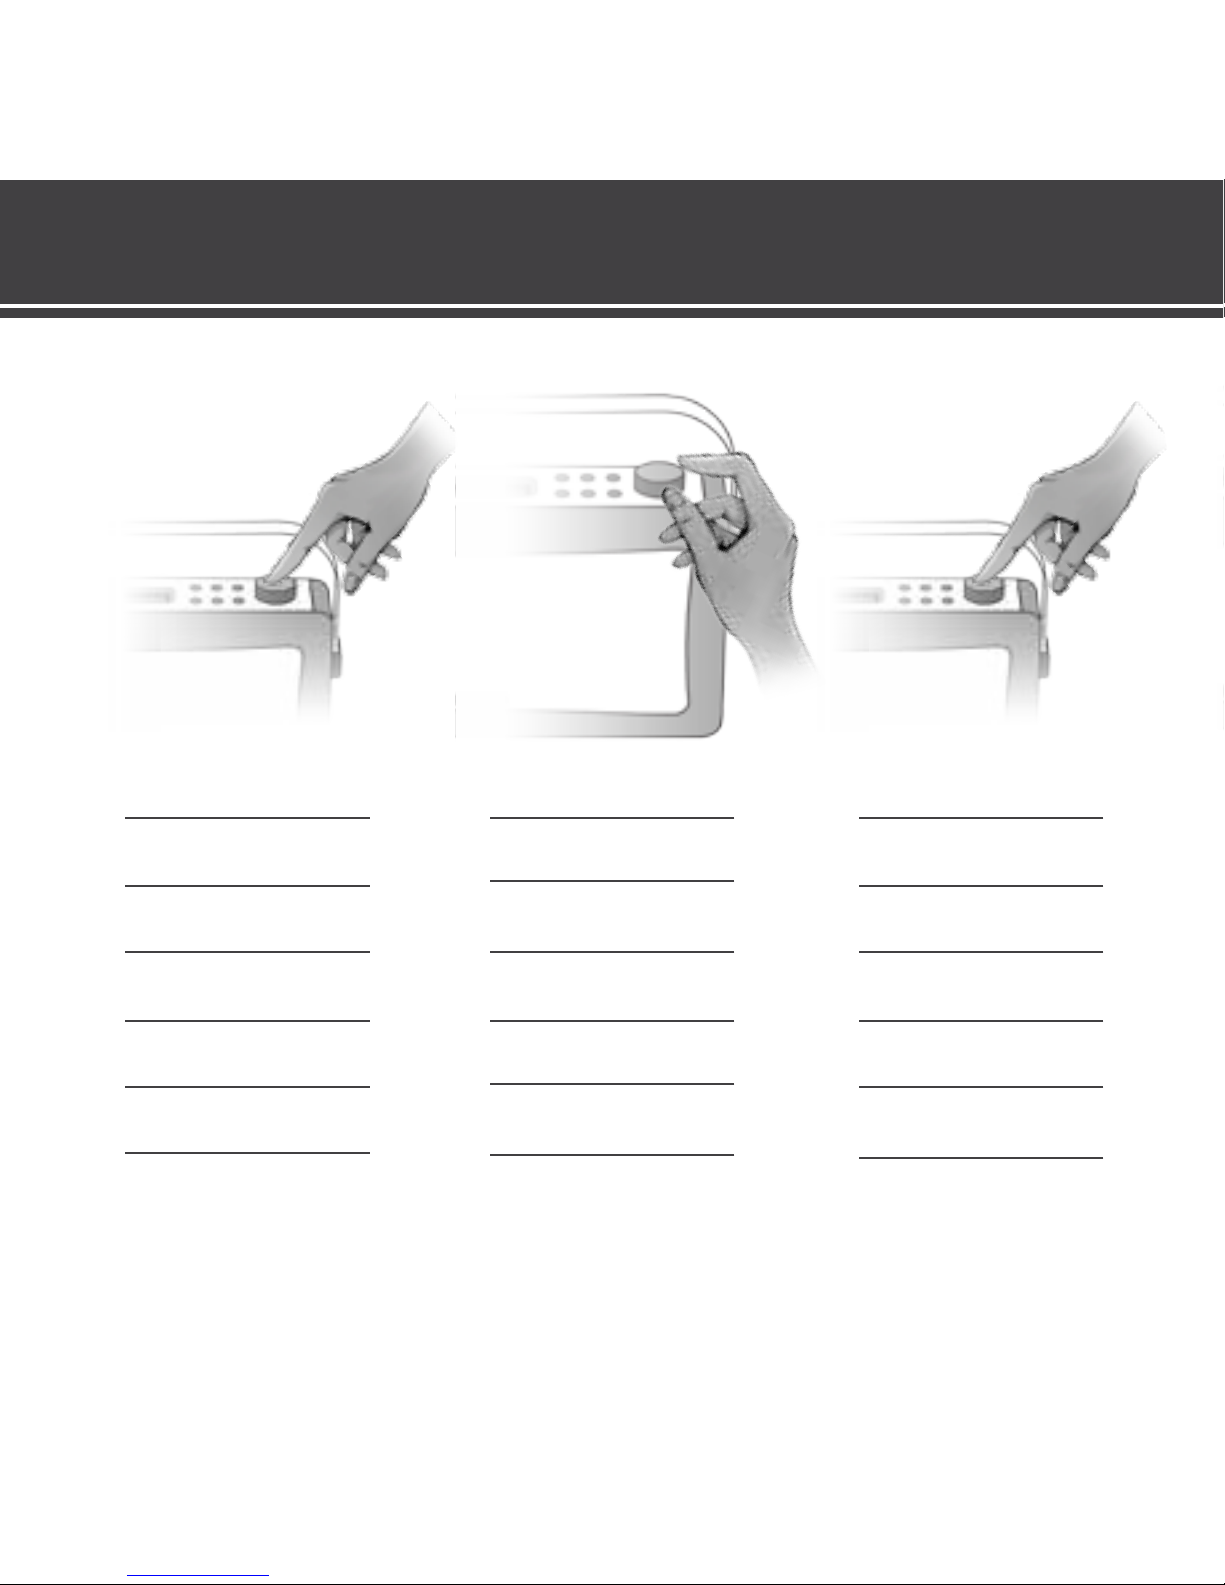
Know Your Hepburn Mk II
Découverte de votre Hepburn Mk II | Lernen Sie Ihr Hepburn Mk II kennen | Conozca su Hepburn Mk II
POWER SOURCE PAIR MENU ALARM SNOOZE
EQ INFO PRESETS
VOLUME TUNING
MODE MENU
MODE MENU
MODE MENU
MODE MENU
MODE MENU
AUX IN POWER USB CHARGING
HEADPHONE
OUTPUT
Know Your Hepburn Mk II
Fique a conhecer o seu Hepburn Mk II| Bli kjent med Hepburn Mk II | Leer je Hepburn Mk II kennen

Know Your Hepburn Mk II
Découverte de votre Hepburn Mk II | Lernen Sie Ihr Hepburn Mk II kennen | Conozca su Hepburn Mk II
USB CHARGING
These are the basic features for
your Hepburn Mk II - explore the
product to nd out what else
it can do for you. If you need a
lile more help, the full manual
can be downloaded from:
www.MyVQ.com
Or contact our Support Team:
0333 1234 601
Estas são as caracteríscas
básicas do seu Hepburn Mk II
- explore o produto e descubra
que mais ele pode fazer por si.
Se necessitar de mais ajuda,
pode descarregar o manual
completo em:
www.MyVQ.com
Em alternava, pode contactar
a nossa Equipa de Apoio:
0044 (0)333 1234 601
Dit zijn de basisfunces van
je Hepburn Mk II - leer het
product kennen om de andere
funces te ontdekken. Als je
wat meer hulp nodig hebt, kun
je de volledige handleiding
downloaden op:
www.MyVQ.com
Of neem contact op met ons
Support Team:
0044 (0)333 1234 601
Nachfolgend nden Sie eine
Beschreibung der wesentlichen
Eigenschaen Ihres Hepburn Mk
II – lernen Sie das Produkt ken-
nen und entdecken Sie, welche
Vorteile es Ihnen noch bietet.
Falls Sie weitere Hilfe benö-
gen, können Sie das vollständige
Handbuch herunterladen:
www.MyVQ.com
Oder wenden Sie sich an unser
Support-Team:
0044 (0)333 1234 601
Voici les fonconnalités de
base de votre Hepburn Mk II
- explorez votre produit pour
découvrir ses autres avantages.
Si vous avez besoin d’aide, vous
pouvez télécharger le manuel
complet ici :
www.MyVQ.com
ou contacter l’équipe du
support client :
0044 (0)333 1234 601
Know Your Hepburn Mk II
Fique a conhecer o seu Hepburn Mk II| Bli kjent med Hepburn Mk II | Leer je Hepburn Mk II kennen
Estas son las caracteríscas
principales de su Hepburn Mk
II. Explore el producto para
averiguar qué más puede hacer
por usted. Si necesita ayuda
adicional, puede descargar el
manual completo en:
www.MyVQ.com
O contactar con nuestro Equipo
de Asistencia:
0044 (0)333 1234 601
Her er de grunnleggende
funksjonene l Hepburn Mk II –
uorsk produktet for å nne ut
hva mer det har å by på. Hvis du
trenger mer hjelp, kan du laste
ned hele bruksanvisningen fra:
www.MyVQ.com
Alternavt kan du kontakte
kundestøe:
0044 (0)333 1234 601

1 |
Hepburn Mk II uses mains power or the
VQ baery pack
Hepburn Mk II fonconne sur secteur ou avec
l’accumulateur VQ
Sie können das Hepburn Mk II mit dem
Netzanschluss verbinden oder mit
dem VQ-Baeriepack betreiben
La radio Hepburn Mk II funciona con toma de
corriente o con el pack de
batería VQ
O Hepburn Mk II é alimentado de energia ou a
parr da rede, ou por
um conjunto de pilhas VQ
Hepburn Mk II gebruikt netstroom of het
VQ baery pack
Hepburn Mk II drives med strøm eller
VQ-baeripakken
2 |
Connect to power port,
to use mains power
Connectez l‘appareil à une prise
pour uliser le courant secteur
Le connecter à une prise pour
uliser le courant secteur
Conecte a la entrada de alimentación
para ulizar con toma de corriente
Ligue o aparelho à tomada de alimentação
para ulizar a rede de alimentação
Gebruik de stroomaansluing
om netstroom te gebruiken
Koble l strømporten
for å bruke nestrøm
3 |
Baery can be inserted in the boom of
Hepburn Mk II
Il est possible d‘insérer des piles à
l‘arrière de l‘appareil Hepburn Mk II
Die Baerien werden auf der Unterseite
des Hepburn Mk II eingelegt
Las baterías se introducen por la parte
inferior de la Hepburn Mk II
As pilhas podem ser colocadas na parte
de baixo do Hepburn Mk II
Je kunt baerijen plaatsen in de
onderzijde van de Hepburn Mk II
Baerier kan sees inn i bunnen på
Hepburn Mk II
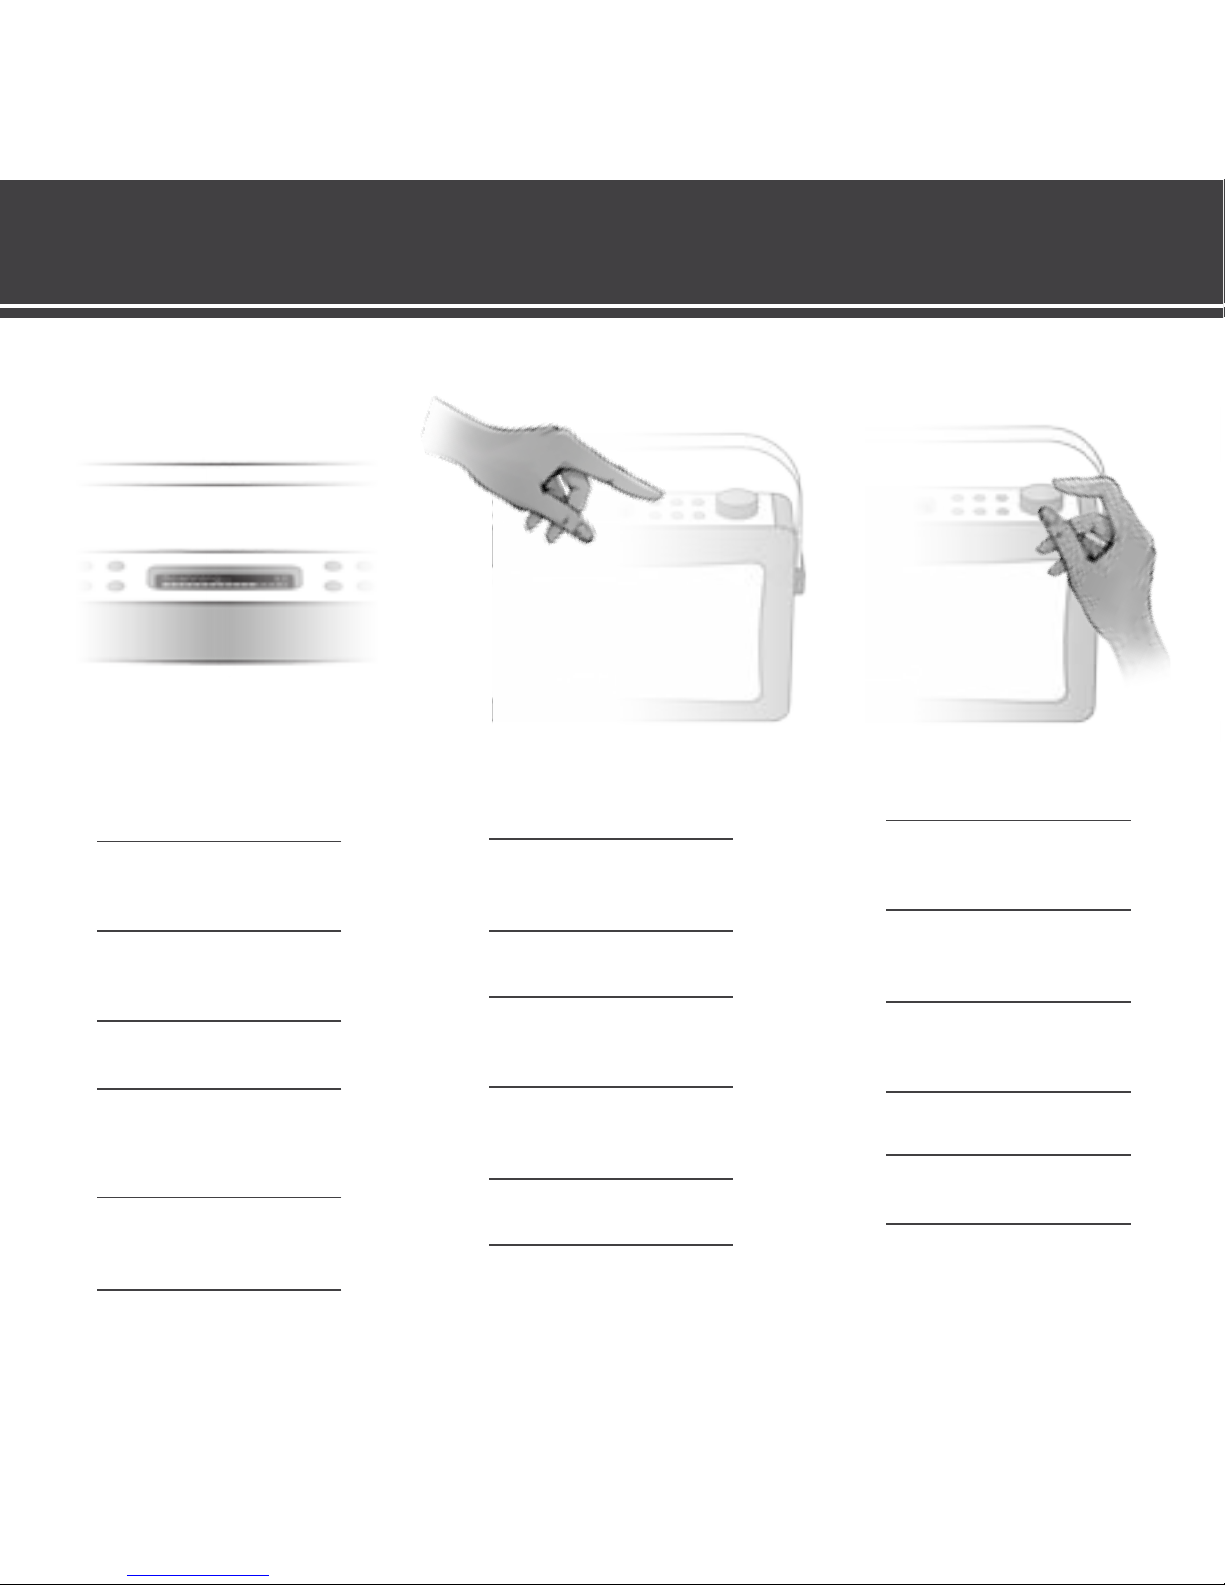
Power On/O Hepburn Mk II
Allumer/éteindre Hepburn Mk II | Ein/Aus Hepburn Mk II | Encendido y apagado de la Hepburn Mk II
4 |
Clock will show when powered, this is
standby mode
L‘heure est achée lorsque l‘appareil est sous
tension (mode veille)
Mit dem Einschalten des Geräts wird die Uhr
angezeigt. Das Gerät bendet sich nun im
Standby-Modus
Una vez que la radio tenga alimentación se
mostrará el reloj. La radio estará en modo
de espera
Quando o aparelho está a ser alimentado de
corrente é mostrado o relógio; este é o modo
de standby
Onder spanning zal de klok zichtbaar zijn, dit
is de standby modus
Når enheten er slå på, vises klokken (dee er
standbymodus)
Power On/O Hepburn Mk II
Ligar/desligar o Hepburn Mk II | Slå på/av Hepburn Mk II | Power Aan/Uit Hepburn Mk II

Power On/O Hepburn Mk II
Allumer/éteindre Hepburn Mk II | Ein/Aus Hepburn Mk II | Encendido y apagado de la Hepburn Mk II
4 |
Clock will show when powered, this is
standby mode
L‘heure est achée lorsque l‘appareil est sous
tension (mode veille)
Mit dem Einschalten des Geräts wird die Uhr
angezeigt. Das Gerät bendet sich nun im
Standby-Modus
Una vez que la radio tenga alimentación se
mostrará el reloj. La radio estará en modo
de espera
Quando o aparelho está a ser alimentado de
corrente é mostrado o relógio; este é o modo
de standby
Onder spanning zal de klok zichtbaar zijn, dit
is de standby modus
Når enheten er slå på, vises klokken (dee er
standbymodus)
5 |
Press the Power buon to turn on
Appuyez sur le bouton 'Power' ( Alimentaon )
pour allumer l‘appareil
Drücken Sie die Einschalaste, um das
Gerät einzuschalten
Pulse el botón „Power“ (Encender) para
encender el aparato
Prima o botão “Power” (Ligar) para ligar o
aparelho
Druk op de Power knop om in te schakelen
Trykk på På/av-knappen for å slå på
Power On/O Hepburn Mk II
Ligar/desligar o Hepburn Mk II | Slå på/av Hepburn Mk II | Power Aan/Uit Hepburn Mk II
6 |
Press the Power buon again to turn o
Appuyez à nouveau sur le bouton 'Power'
( Alimentaon ) pour éteindre l‘appareil
Drücken Sie die Einschalaste erneut, um das
Gerät auszuschalten
Pulse nuevamente el botón „Power“ (Encender)
para apagarlo
Volte a premir o botão “Power” (Ligar) para
o desligar
Druk nogmaals op de Power knop om uit te
schakelen
Trykk en gang l på På/av-knappen for å slå av
1 |
On rst power on, Hepburn Mk II will autoscan
for available DAB staons
Lors de la première mise en route, Hepburn Mk
II lance un scan automaque pour rechercher les
staons DAB disponibles
Mit dem Einschalten Ihres Hepburn Mk II
sucht dieses automasch nach verfügbaren
DAB-Sendern
Al encenderla por primera vez, la Hepburn Mk II
hará una búsqueda automáca de emisoras DAB
Quando é ligado pela primeira vez à alimentação
de energia, o Hepburn Mk II efetua um
varrimento automáco para localizar estações
DAB disponíveis
Als je de Hepburn Mk II voor het eerst
inschakelt zal hij automasch gaan scannen
naar beschikbare DAB-staons
Første gang Hepburn Mk II slås på, blir det gjort
et automask søk eer lgjengelige
DAB-stasjoner
Tuning into DAB
Réglage DAB | DAB einstellen | Sintonizar en DAB
2 |
You can also press MENU to access scan
opons at any me
Vous pouvez aussi à tout moment
appuyer sur MENU pour accéder
aux opons de scan
Über die Menü-Taste können Sie außerdem
jederzeit auf die Suchfunkonen zugreifen
También puede presionar el botón MENU para
acceder a las opciones de búsqueda
en cualquier momento
Também pode premir „MENU“ para
aceder às opções de varrimento
em qualquer altura
Je kunt ook aljd op MENU drukken om
toegang te krijgen tot de scanopes
Du kan også trykke på MENU for
å åpne alternavene for søk
3 |
Scroll with the Tuning dial to ‘Full Scan’
Ulisez le bouton de sélecon pour
séleconner ‘Full Scan’ ( Scan
intégral )
Stellen Sie den Drehknopf zur
Senderwahl auf die Opon ‘Full
Scan’ ein
Desplácese con el mando de
sintonización hasta 'Full Scan'
(búsqueda completa)
Rode o botão „Tuning“ (Sintonia) para a
opção „Full Scan“ (Varrimento Total)
Scroll met de tuningknop naar ‚Full
Scan‘
Rull med Tuning-hjulet l 'Full Scan'
(fullstendig søk)
Tuning into DAB
Sintonização de DAB | Slå på DAB | Afstemmen op DAB
4 |
Press the Tuning dial when ‘Full Scan’
is displayed
Appuyez sur le bouton de sélecon
lorsque ‘Full Scan’ (Scan intégral)
est aché
Drücken Sie den Drehknopf zur
Senderwahl, wenn ’Full Scan’ angezeigt
wird
Presione el mando de sintonización
cuando aparezca 'Full Scan'
Prima o botão „Tuning“ (Sintonia)
quando for apresentada a indicação
„Full Scan“ (Varrimento Total)
Druk op de tuningknop als ‚Full Scan‘
weergegeven wordt
Trykk på Tuning-hjulet når «Full Scan»
blir vist

Tuning into DAB
Réglage DAB | DAB einstellen | Sintonizar en DAB
3 |
Scroll with the Tuning dial to ‘Full Scan’
Ulisez le bouton de sélecon pour
séleconner ‘Full Scan’ ( Scan
intégral )
Stellen Sie den Drehknopf zur
Senderwahl auf die Opon ‘Full
Scan’ ein
Desplácese con el mando de
sintonización hasta 'Full Scan'
(búsqueda completa)
Rode o botão „Tuning“ (Sintonia) para a
opção „Full Scan“ (Varrimento Total)
Scroll met de tuningknop naar ‚Full
Scan‘
Rull med Tuning-hjulet l 'Full Scan'
(fullstendig søk)
Tuning into DAB
Sintonização de DAB | Slå på DAB | Afstemmen op DAB
4 |
Press the Tuning dial when ‘Full Scan’
is displayed
Appuyez sur le bouton de sélecon
lorsque ‘Full Scan’ (Scan intégral)
est aché
Drücken Sie den Drehknopf zur
Senderwahl, wenn ’Full Scan’ angezeigt
wird
Presione el mando de sintonización
cuando aparezca 'Full Scan'
Prima o botão „Tuning“ (Sintonia)
quando for apresentada a indicação
„Full Scan“ (Varrimento Total)
Druk op de tuningknop als ‚Full Scan‘
weergegeven wordt
Trykk på Tuning-hjulet når «Full Scan»
blir vist
5 |
A full autoscan will start now
Un scan intégral est automaquement
eectué
Nun wird eine komplee Suche
gestartet
En ese momento se iniciará una
búsqueda automáca
Tem início um varrimento automáco
total
Nu zal een volledige autoscan volgen
Et fullstendig søk starter automask
6 |
Extending the aerial will give beer
recepon
Sortez l‘antenne pour obtenir une
meilleure récepon
Durch das Ausfahren der Antenne
erhalten Sie einen besseren Empfang
Al extender la antena se obtendrá una
mejor recepción
Escar a antena fará com a receção
seja melhor
De antenne uirekken zorgt voor
betere ontvangst
Trekk ut antennen for å få bedre moak

Saving/Recalling Preset Staons
Enregistrer/appeler des staons préréglées | Speichern/Abruf voreingestellter Sender | Guardar/Sintonizar emisoras presintonizadas
1 |
To save a preset staon, press & hold
PRESETS buon
Pour enregistrer une staon préréglée,
maintenez le bouton ’PRESETS’
(staons préréglées) enfoncée.
Um einen voreingestellten Sender zu
speichern, halten Sie die ’PRESETS’-
Taste gedrückt
Para guardar una emisora en
Presintonías, mantenga pulsado el
botón PRESETS (Presintonías)
Para guardar uma estação predenida,
mantenha premido o botão “PRESETS”
(Estação Predenida).
Om een preset staon op te slaan,
druk op de PRESETS knop en houd deze
ingedrukt
Trykk og hold inne PRESETS-knappen
for å lagre en forhåndsinnslt stasjon
2 |
Use Tuning dial to pick an available
preset number
Ulisez le bouton de sélecon pour
séleconner un numéro de staon
préréglée disponible
Benutzen Sie den Drehknopf, um
die Nummer eines verfügbaren
voreingestellten Senders auszuwählen
Ulice el mando de sintonización
para elegir un número de presintonía
disponible
Use o botão Tuning“ (Sintonia) para
escolher um número de estação
predenida disponível
Gebruik de tuningknop om een
beschikbare preset te kiezen
Bruk Tuning-hjulet for å velge et
lgjengelig forhåndsinnsllingsnummer
3 |
Press down on the Tuning dial to
save preset
Appuyez sur le bouton de sélecon
pour enregistrer la staon préréglée
Drücken Sie den Drehknopf zur
Senderwahl, um den voreingestellten
Sender zu speichern
Presione el mando de sintonización
para guardar la presintonía
Prima o botão „Tuning“ (Sintonia) para
guardar a estação predenida
Druk de tuningknop in om de preset
op te slaan
Trykk inn Tuning-hjulet for å lagre
forhåndsinnsllingen
Saving/Recalling Preset Staons
Guardar/reproduzir estações predenidas | Lagre/åpne forhåndsinnslte stasjoner | Preset staons opslaan/oproepen
4 |
To recall a preset, press the PRESETS
buon
Pour appeler une staon préréglée,
appuyez sur le bouton ’PRESETS’
(staons préréglées)
Um einen voreingestellten Sender
abzurufen, drücken Sie die ‘PRESETS’-
Taste
Para sintonizar una emisora guardada
en Presintonías, pulse el botón PRESETS
(Presintonías).
Para reproduzir uma estação
predenida guardada prima o botão
“PRESETS” (Estação Predenida)
Om een preset op te roepen, druk op
de PRESETS knop
Trykk på PRESETS-knappen for å åpne
en forhåndsinnslt stasjon

Saving/Recalling Preset Staons
Enregistrer/appeler des staons préréglées | Speichern/Abruf voreingestellter Sender | Guardar/Sintonizar emisoras presintonizadas
3 |
Press down on the Tuning dial to
save preset
Appuyez sur le bouton de sélecon
pour enregistrer la staon préréglée
Drücken Sie den Drehknopf zur
Senderwahl, um den voreingestellten
Sender zu speichern
Presione el mando de sintonización
para guardar la presintonía
Prima o botão „Tuning“ (Sintonia) para
guardar a estação predenida
Druk de tuningknop in om de preset
op te slaan
Trykk inn Tuning-hjulet for å lagre
forhåndsinnsllingen
Saving/Recalling Preset Staons
Guardar/reproduzir estações predenidas | Lagre/åpne forhåndsinnslte stasjoner | Preset staons opslaan/oproepen
4 |
To recall a preset, press the PRESETS
buon
Pour appeler une staon préréglée,
appuyez sur le bouton ’PRESETS’
(staons préréglées)
Um einen voreingestellten Sender
abzurufen, drücken Sie die ‘PRESETS’-
Taste
Para sintonizar una emisora guardada
en Presintonías, pulse el botón PRESETS
(Presintonías).
Para reproduzir uma estação
predenida guardada prima o botão
“PRESETS” (Estação Predenida)
Om een preset op te roepen, druk op
de PRESETS knop
Trykk på PRESETS-knappen for å åpne
en forhåndsinnslt stasjon
5 |
Use Tuning dial to nd your preset
Ulisez le bouton de sélecon pour
trouver votre staon préréglée
Benutzen Sie den Drehknopf zur
Senderwahl, um Ihren voreingestellten
Sender zu nden
Ulice el mando de sintonización para
localizar la presintonía que desee
Use o botão „Tuning“ (Sintonia) para
localizar a sua estação predenida
Gebruik de tuningknop om je preset
te vinden
Bruk Tuning-hjulet for å nne
forhåndsinnsllingen
6 |
Press down on Tuning dial to listen
to preset
Appuyez sur le bouton de sélecon
pour écouter la staon préréglée
Drücken Sie den Drehknopf zur
Senderwahl, um den voreingestellten
Sender zu hören
Presione el mando de sintonización
para escuchar la presintonía elegida
Prima o botão „Tuning“ (Sintonia) para
ouvir a estação predenida
Druk de tuningknop in om naar het
preset staon te luisteren
Trykk inn Tuning-hjulet for å lye l
forhåndsinnsllingen
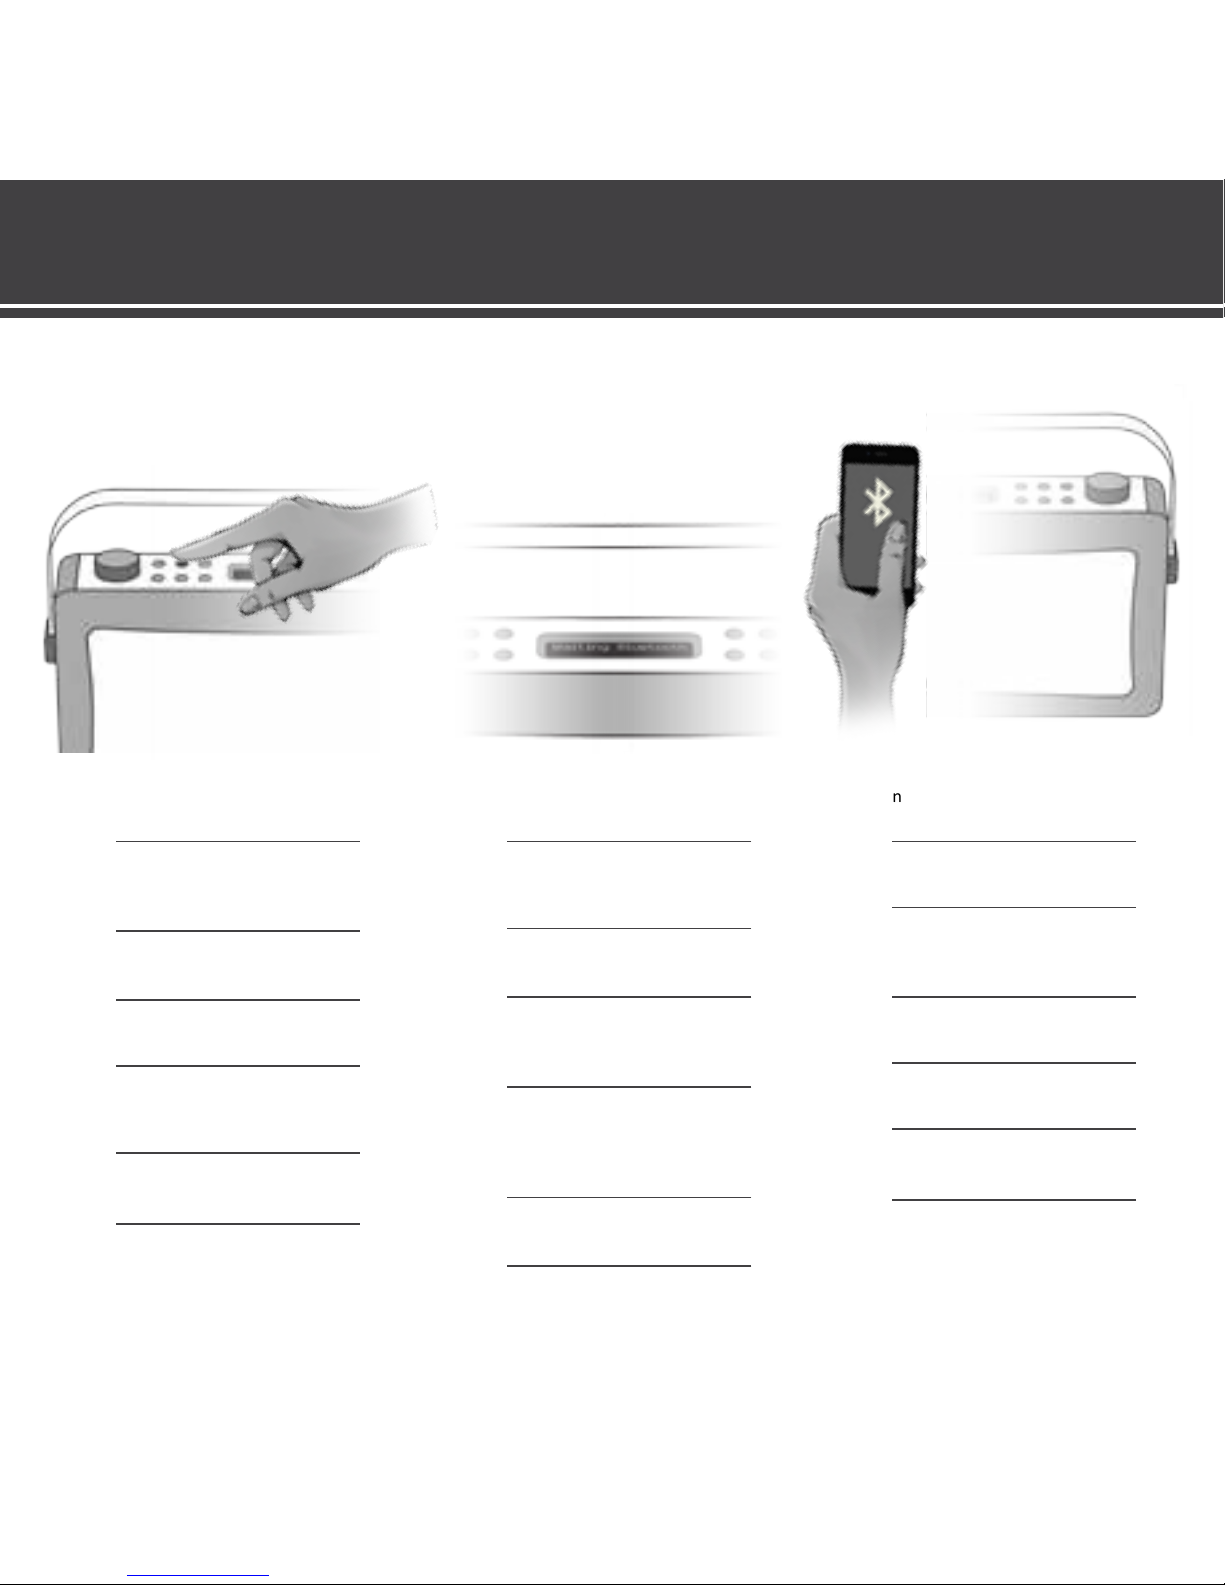
Connecng via Bluetooth
Connexion via Bluetooth | Verbindung über Bluetooth | Conexión a través de Bluetooth
1 |
Press SOURCE buon to select
‘Bluetooth’
Appuyez sur le bouton SOURCE pour
séleconner 'Bluetooth’ (Appareil
intelligent)
Drücken Sie die Quellentaste, um ein
‘Bluetooth’ auszuwählen
Presione el botón SOURCE (Fuente)
para seleccionar 'Bluetooth'
Prima o botão „SOURCE“ (Fonte)
para selecionar a opção „Bluetooth“
(Aparelho Inteligente)t
Druk op de SOURCE knop om
‘Bluetooth’ te selecteren
Trykk på SOURCE-knappen for å velge
'Bluetooth' (smartenhet)
2 |
Hepburn Mk II will show ‘Waing
Bluetooth connecon’
Hepburn Mk II ache ‘Waing
Bluetooth connecon’ (En aente de
connexion Bluetooth)
Hepburn Mk II zeigt ‘Waing Bluetooth
connecon’ an
La Hepburn Mk II mostrará 'Waing
Bluetooth connecon' (Esperando
conexión Bluetooth)
O Hepburn Mk II mostra a indicação
„Waing Bluetooth connecon“
(à espera de emparelhamento por
Bluetooth)
Je Hepburn Mk II zal ‘Waing
Bluetooth connecon’ weergeven
Hepburn Mk II viser 'Waing Bluetooth
connecon' (venter på Bluetooth-
lkobling)
3|
Scan Bluetooth devices on your smart
device
Scannez les appareils Bluetooth sur
votre appareil intelligent
Suchen Sie auf Ihrem ‘Smart Device’
nach
Bluetooth-Geräten
Busque disposivos Bluetooth en su
disposivo inteligente
Localize disposivos Bluetooth com o
seu disposivo inteligente
Zoek naar Bluetooth apparaten op je
smaroestel
Søk eer Bluetooth-enheter på
smartenheten
Connecng via Bluetooth
Emparelhamento por Bluetooth | Koble l via Bluetooth | Verbinden met Bluetooth
Connecng via Bluetooth
Connexion via Bluetooth | Verbindung über Bluetooth | Conexión a través de Bluetooth
Connecng via Bluetooth
Emparelhamento por Bluetooth | Koble l via Bluetooth | Verbinden met Bluetooth
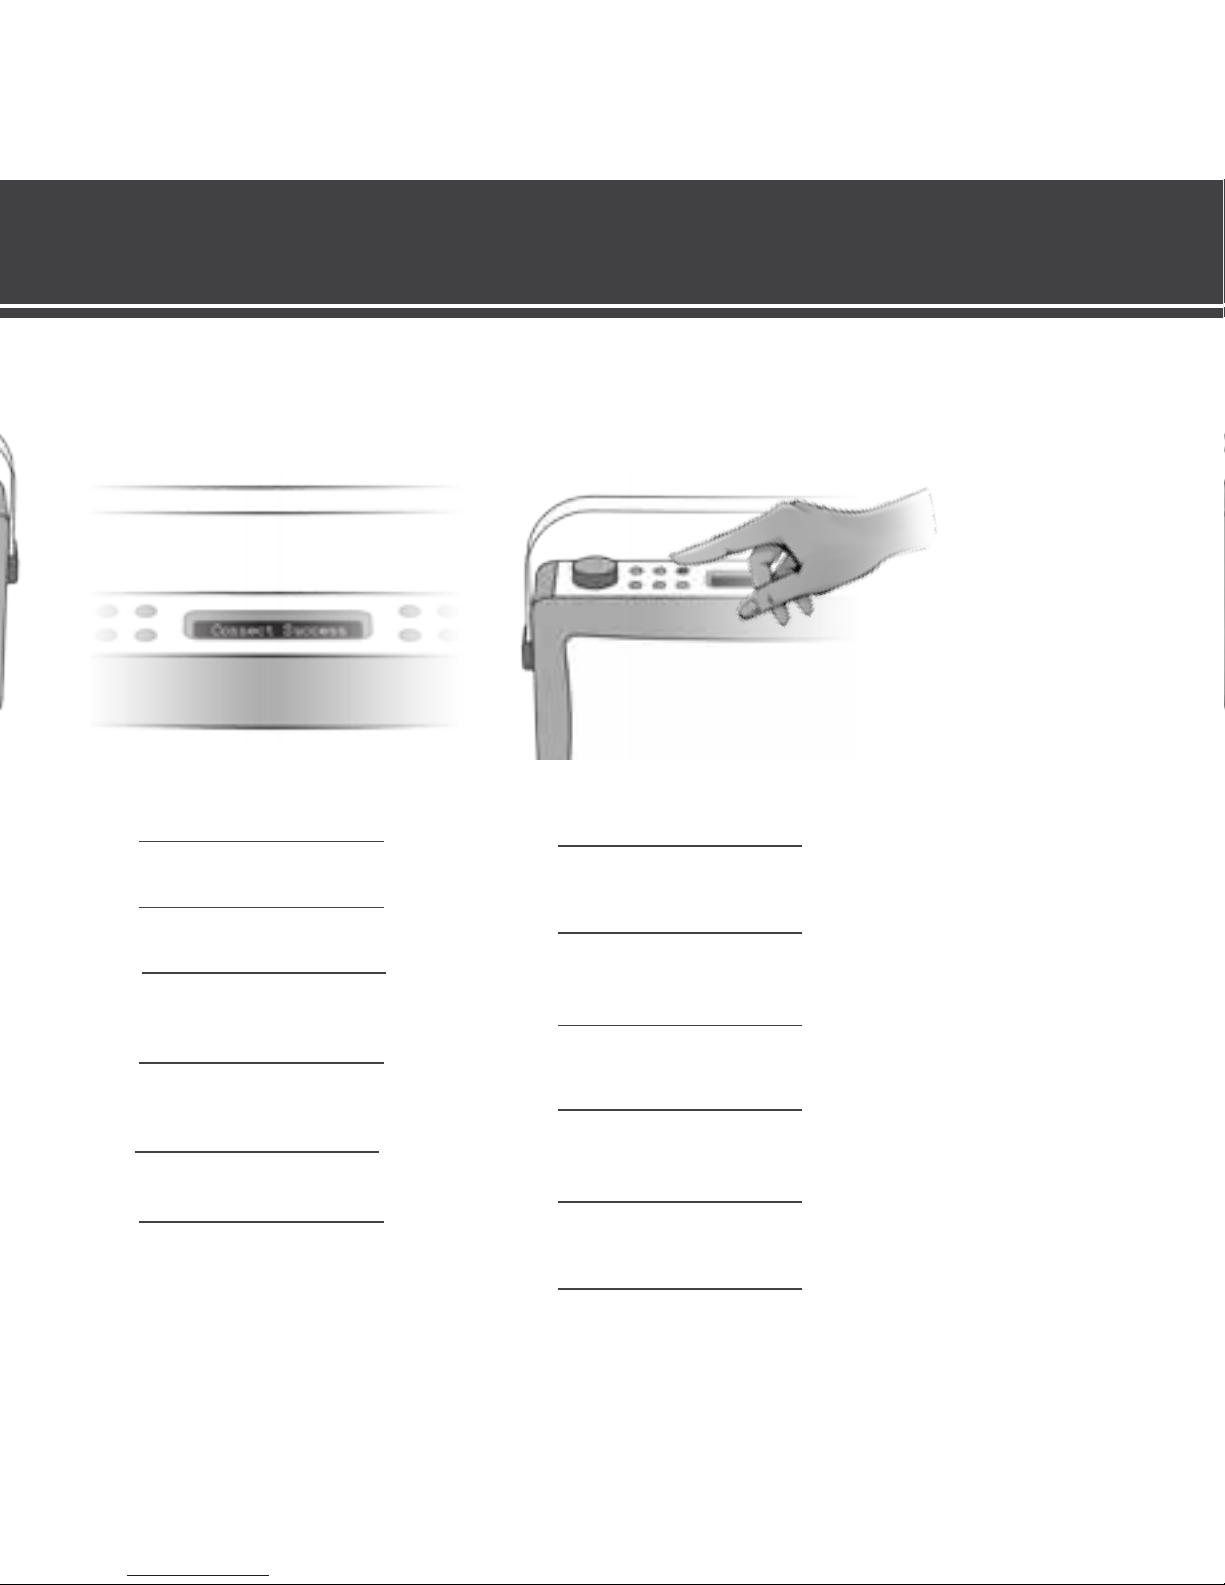
4|
Connect to ‘Hepburn Mk II’, you will see
‘Connect success’ on Hepburn Mk II
Connectez-vous à ' Hepburn Mk II ' ; le message
‘Connect success’ est aché à l‘écran de Hepburn Mk II
Sobald Sie Ihr Gerät mit ‘Hepburn Mk II’ verbinden,
erscheint auf Ihrem Hepburn Mk II ‘Connect success’
Conéctese a 'Hepburn Mk II'. Verá
'Connect success' (Conexión realizada con éxito) en su
Hepburn Mk II
Emparelhe o seu disposivo com o „Hepburn Mk II“; no
Hepburn Mk II verá a indicação „Connect success“
(Emparelhamento realizado com êxito)
Verbind met ‚Hepburn Mk II‘
‘Connect success’ zal te zien zijn op de Hepburn Mk II
Når du kobler l 'Hepburn Mk II', vises
'Connect success' (lkobling vellykket) på Hepburn Mk II
5|
To pair an alternave device to your Hepburn Mk II
press and hold PAIR buon and return to Step 2
Pour jumeler un disposif alternave à votre presse
Hepburn Mk II et maintenez le bouton PAIR et
retourner à l‘étape 2
Um eine alternave Vorrichtung, um Ihren Hepburn
Mk II Presse paaren und halten PAIR-Taste und
kehren Sie zu Schri 2
Para emparejar un disposivo alternavo a la
prensa Hepburn Mk II y sostenga el botón PAIR y
volver al Paso 2
Para parear um disposivo alternavo para o seu
imprensa Hepburn Mk II e segure o botão PAIR e
voltar para a Etapa 2
Om een alternaef apparaat koppelen aan uw
Hepburn Mk II druk en PAIR-knop ingedrukt en terug
te keren naar stap 2
Å pare en alternav enhet l Hepburn Mk II trykk og
hold PAIR-knappen og gå lbake l trinn 2
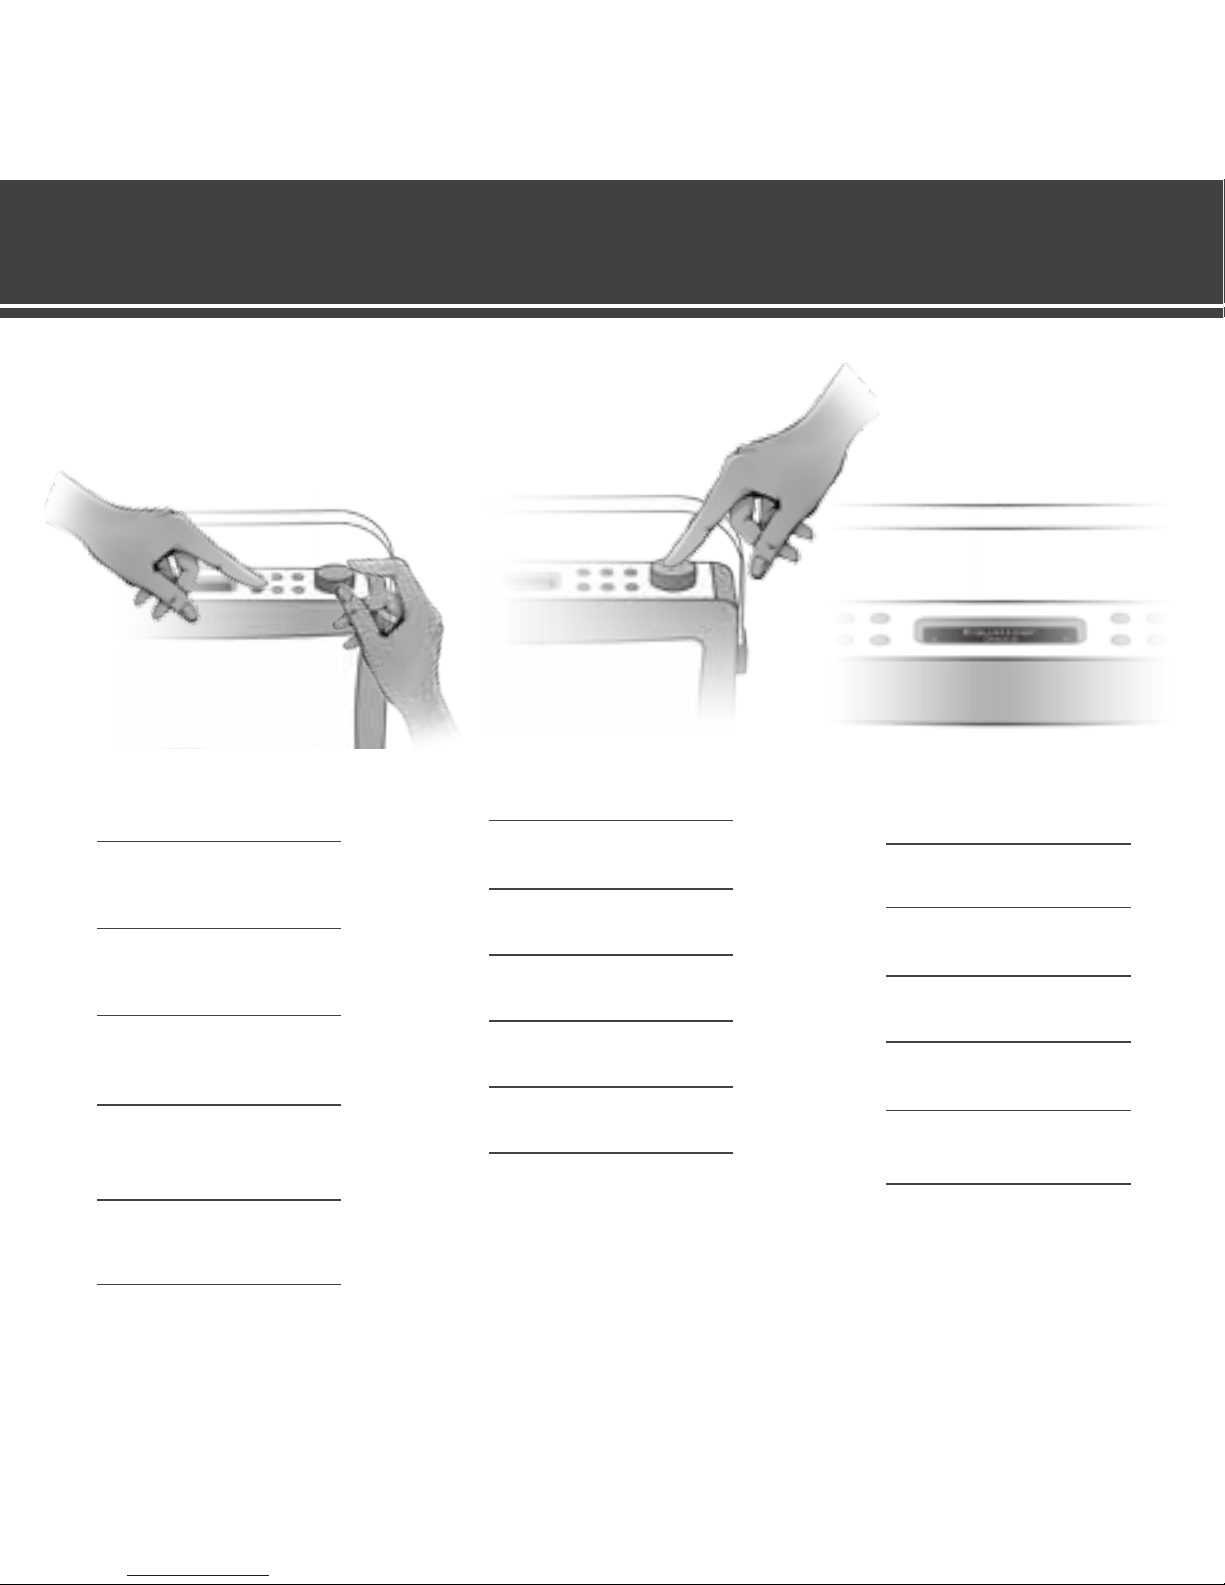
How to set MyEQ
Réglage de MyEQ | MyEQ einstellen| Cómo ajustar MyEQ
1 |
Press the EQ buon & use Tuning
dial to select an EQ prole
Appuyez sur le bouton EQ et ulisez le
bouton de
sélecon pour séleconner un prol EQ
Drücken Sie die EQ-Taste und Bedienen
Sie den Drehknopf, um ein EQ-Prol
auszuwählen
Presione el botón EQ y desplácese con el
mando de sintonización para seleccionar
un perl de ecualización
Prima o botão „EQ“ e use o botão
„Tuning“ (Sintonia)
para selecionar um perl EQ
Druk op de EQ knop & gebruik de
tuningknop om een EQ-proel te
selecteren
Trykk på EQ-knappen og bruk
Tuning-hjulet for å velge en EQ-prol
2 |
Press Tuning dial to conrm
Appuyez sur le bouton de sélecon
pour conrmer votre choix
Durch Drücken des Drehknopfs
bestägen
Presione el mando de sintonización
para conrmar
Prima o botão „Tuning“ (Sintonia) para
conrmar
Druk op de tuningknop om te
bevesgen
Bekre med Tuning-hjulet
3 |
To create your own EQ prole select
“My EQ…”
Séleconnez MyEQ pour créer un prol
EQ personnalisé
Wählen Sie MyEQ, um Ihr eigenes EQ-
Prol zu erstellen
Seleccione MyEQ para crear su propio
perl de ecualización
Selecione „MyEQ“ para criar o seu
perl EQ
Selecteer MyEQ om een eigen EQ-
proel aan te maken
Velg MyEQ for å oppree en egen
EQ-prol
How to set MyEQ
Como regular a função MyEQ | Slik sller du inn MyEQ | MyEQ instellen
4 |
Press Tuning dial to conrm
Appuyez sur le bouton de sélecon
pour conrmer votre choix
Durch Drücken des Drehknopfs
bestägen
Presione el mando de sintonización
para conrmar
Prima o botão „Tuning“ (Sintonia) para
conrmar
Druk op de tuningknop om te
bevesgen
Bekre med Tuning-hjulet

How to set MyEQ
Réglage de MyEQ | MyEQ einstellen| Cómo ajustar MyEQ
3 |
To create your own EQ prole select
“My EQ…”
Séleconnez MyEQ pour créer un prol
EQ personnalisé
Wählen Sie MyEQ, um Ihr eigenes EQ-
Prol zu erstellen
Seleccione MyEQ para crear su propio
perl de ecualización
Selecione „MyEQ“ para criar o seu
perl EQ
Selecteer MyEQ om een eigen EQ-
proel aan te maken
Velg MyEQ for å oppree en egen
EQ-prol
How to set MyEQ
Como regular a função MyEQ | Slik sller du inn MyEQ | MyEQ instellen
4 |
Press Tuning dial to conrm
Appuyez sur le bouton de sélecon
pour conrmer votre choix
Durch Drücken des Drehknopfs
bestägen
Presione el mando de sintonización
para conrmar
Prima o botão „Tuning“ (Sintonia) para
conrmar
Druk op de tuningknop om te
bevesgen
Bekre med Tuning-hjulet
5 |
Turn Tuning dial to select Treble, Bass
or Loudness
Tournez le bouton de sélecon pour
séleconner les aigus, les basses ou le
niveau sonore
Bedienen Sie den Drehknopf, um
Höhen, Bässe oder Lautstärke
einzustellen
Gire el mando de sintonización para
seleccionar Treble, Bass o Loudness
(Agudos, Graves o Loudness)
Rode o botão „Tuning“ (Sintonia)
para selecionar as funções „Treble“
(Agudos), „Bass“ (Graves) ou
„Loudness“ (Volume de Som)
Draai de tuningknop om Treble, Bass of
Loudness te selecteren
Vri Tuning-hjulet for å velge Treble
(diskant), Bass eller Loudness
6 |
Turn and press the Tuning dial to
edit & conrm sengs
Tournez et appuyez sur le bouton de
sélecon pour
modier et conrmer les réglages
Drehen und drücken Sie den
Drehknopf, um Ihre Einstellungen zu
bearbeiten und zu bestägen
Gire y presione el mando de
sintonización para
editar y conrmar ajustes
Rode e prima o botão „Tuning“
(Sintonia) para
editar e conrmar as denições
Draai en druk de tuningknop in om je
instellingen aan te passen en te
bevesgen
Vri og trykk på Tuning-hjulet for å
redigere og bekree innsllingene

7 |
Your EQ sengs are automacally saved
Vos réglages d‘égalisaon sont
automaquement sauvegardés
Ihre EQ-Einstellungen werden
automasch gespeichert
Sus ajustes de EQ se guardan
automácamente
Suas congurações são salvas
automacamente EQ
Uw EQ-instellingen worden automasch
opgeslagen
Dine EQ-innsllinger lagres automask
8 |
Press “EQ” to exit menu
Appuyez sur “EQ” pour quier
Drücken Sie “EQ”, um zu beenden
Pulse el botón „EQ“ para salir
Pressione “EQ” para sair
Druk op “EQ” om af te sluiten
Trykk “EQ” for å avslue
How to set MyEQ
Réglage de MyEQ | MyEQ einstellen| Cómo ajustar MyEQ
How to set an alarm
Réglage de l‘alarme | Wecker einstellen | Cómo jar una alarma
1 |
Press ALARM buon (1x for Alarm 1,
2x for Alarm 2)
Appuyez sur le bouton ALARME (1x
pour l‘alarme 1, 2x pour l‘alarme 2)
Drücken Sie die Taste ALARM (x1 für
Weckruf 1, x2 für Weckruf 2)
Presione el botón ALARM (x1 para
Alarma 1, x2 para Alarma 2)
Prima o botão „ALARM“ (Alarme) (1x
para Alarme 1, 2x para Alarme 2)
Druk op de ALARM knop (1x for Alarm:
1, 2x for Alarm: 2)
Trykk på ALARM-knappen (x1 for alarm
1, x2 for alarm 2)
2 |
Press Tuning dial to acvate ‘Alarm
Wizard’
Appuyez sur le bouton de réglage pour
acver l‘assistant d‘alarme
Drücken Sie den Drehknopf, um den
‘Wecker-Assistenten’ zu akvieren
Presione el mando de sintonización
para acvar 'Alarm Wizard' (Asistente
para alarma)
Prima o botão „Tuning“ (Sintonia) para
avar o „Alarm Wizard“ (Assistente
do Alarme)
Druk op de tuningknop om de ‚Alarm
Wizard‘ te acveren
Trykk på Tuning-hjulet for å akvere
«Alarm Wizard» (alarmveiviser)
3 |
Turn Tuning dial to turn on alarm
Tournez le bouton de réglage pour
acver l‘alarme
Bedienen Sie den Drehknopf, um den
Wecker einzuschalten
Gire el mando de sintonización para
conectar la alarma
Rode o botão „Tuning“ (Sintonia) para
ligar o alarme
Draai de tuningknop om je alarm in
te schakelen
Vri Tuning-hjulet for å slå på alarmen

How to set an alarm
Como acertar a hora de um alarme | Jak nastavit budík | Alarm instellen
4 |
Press Tuning dial to conrm
Appuyez sur le bouton de sélecon
pour conrmer votre choix
Durch Drücken des
Drehknopfs bestägen
Presione el mando de
sintonización para conrmar
Prima o botão „Tuning“
(Sintonia) para conrmar
Druk op de tuningknop
om te bevesgen
Bekre med Tuning-hjulet
5 |
Turn Tuning dial to set hour of alarm
Tournez le bouton de réglage pour
régler l‘heure de l‘alarme
Bedienen Sie den Drehknopf, um die
Weckzeit (Stunden) einzustellen
Gire el mando de sintonización para
ajustar la hora de la alarma
Rode o botão „Tuning“ (Sintonia) para
denir a hora do alarme
Draai de tuningknop om het uur voor
het alarm in te stellen
Vri Tuning-hjulet for å slle
inn alarmden
6 |
Press Tuning dial to conrm
Appuyez sur le bouton de sélecon
pour conrmer votre choix
Durch Drücken des Drehknopfs
bestägen
Presione el mando de
sintonización para conrmar
Prima o botão „Tuning“
(Sintonia) para conrma
Druk op de tuningknop
om te bevesgen
Bekre med Tuning-hjulet
How to set an alarm
Réglage de l‘alarme | Wecker einstellen | Cómo jar una alarma
7 |
Turn Tuning dial to set
minute of alarm
Tournez le bouton de réglage pour
régler minute de l’alarme
Bedienen Sie den Drehknopf, um die
Weckzeit (Minuten) einzustellen
Gire el mando de sintonización para
ajustar la minutos de la alarma
Rode o botão „Tuning“ (Sintonia) para
denir a minuto do alarme
Sla Tuning dial om de minuten van het
alarm instellen
Sving Tuning ringe for å slle minu
av alarm

How to set an alarm
Como acertar a hora de um alarme | Jak nastavit budík | Alarm instellen
6 |
Press Tuning dial to conrm
Appuyez sur le bouton de sélecon
pour conrmer votre choix
Durch Drücken des Drehknopfs
bestägen
Presione el mando de
sintonización para conrmar
Prima o botão „Tuning“
(Sintonia) para conrma
Druk op de tuningknop
om te bevesgen
Bekre med Tuning-hjulet
How to set an alarm
Réglage de l‘alarme | Wecker einstellen | Cómo jar una alarma
7 |
Turn Tuning dial to set
minute of alarm
Tournez le bouton de réglage pour
régler minute de l’alarme
Bedienen Sie den Drehknopf, um die
Weckzeit (Minuten) einzustellen
Gire el mando de sintonización para
ajustar la minutos de la alarma
Rode o botão „Tuning“ (Sintonia) para
denir a minuto do alarme
Sla Tuning dial om de minuten van het
alarm instellen
Sving Tuning ringe for å slle minu
av alarm
9 |
Turn Tuning dial to set
duraon of alarm
Tournez le bouton de réglage pour
régler la durée de l’alarme
Bedienen Sie den Drehknopf, um zu
sterben Weckzeit (Dauer) einzustellen
Gire el mando de sintonización para
ajustar la duración de la alarma
Rode o botão „Tuning“ (Sintonia) para
denir a duração do alarme
Sla Tuning draaiknop om de duur van
het alarm instellen
Sving Tuning ringe å see
varigheten av alarm
8 |
Press Tuning dial to conrm
Appuyez sur le bouton de sélecon
pour conrmer votre choix
Durch Drücken des
Drehknopfs bestägen
Presione el mando de sintonización
para conrmar
Prima o botão „Tuning“ (Sintonia)
para conrma
Druk op de tuningknop om
te bevesgen
Bekre med Tuning-hjulet
How to set an alarm
Como acertar a hora de um alarme | Jak nastavit budík | Alarm instellen
11 |
Turn Tuning dial to select alarm source
Tournez le bouton de réglage pour
régler source d’alarme
Biegen Tuning -Rad
Alarmquelle auswählen
Gire el mando de sintonización para
ajustar de la alarma source
Rode o botão „Tuning“ (Sintonia) para
denir a source do alarme
Sla Tuning kiezen om het
alarm te selecteren
Sving Tuning oppringt
for å velge alarmkilden
10 |
Press Tuning dial to conrm
Appuyez sur le bouton de sélecon
pour conrmer votre choix
Durch Drücken des
Drehknopfs bestägen
Presione el mando de
sintonización para conrmar
Prima o botão „Tuning“
(Sintonia) para conrma
Druk op de tuningknop
om te bevesgen
Bekre med Tuning-hjulet
12 |
Press Tuning dial to conrm
Appuyez sur le bouton de sélecon
pour conrmer votre choix
Durch Drücken des
Drehknopfs bestägen
Presione el mando de
sintonización para conrmar
Prima o botão „Tuning“
(Sintonia) para conrma
Druk op de tuningknop
om te bevesgen
Bekre med Tuning-hjulet
How to set an alarm
Réglage de l‘alarme| Wecker einstellen | Cómo jar una alarma
13 |
Turn tuning dial to select alarm frequency
(Daily, Once, Weekends, Weekdays)
Tournez le bouton de réglage pour régler
fréquence de l’alarme (jour, une fois, week-
ends, jours de la semaine)
Biegen Sie TUNING-Regler, um den Alarm
Frequenz zu wählen (täglich, einmal,
Wochenenden, Wochentage)
Gire TUNING Dial para seleccionar la
frecuencia de alarma (Diario, Una vez, nes
de semana, días de semana)
Vire à anação discar para seleccionar a
frequência do alarme (Daily, Uma vez, ns
de semana, dias da semana)
Sla tuning dial alarm frequene te
selecteren (Daily, Eens, Weekends,
weekdagen)
Sving tuning dial for å velge alarm frekvens
(daglig, en gang, helger, ukedager)


