Do-Right Solar SWS-200 User manual

Owner’s Manual
Copyright November 2015, Do-Right Solar

Important Safety Warnings and Cautions
Warnings
1) The model SWS-200 solar water still has many glass parts, including the
front pane. If the unit is dropped or struck hard, the glass can break,
exposing shards that can cause serious injury. Do not allow children to play
around the unit.
2) The still weighs about 55 lbs, therefore when lifting or carrying it, properly
brace yourself to prevent injury.
3) The glass carboy will break if dropped on a hard surface, exposing shards
that can cause injury.
4) The glass carboy filled with water weighs about 35 lbs, and may require a
handle to safely carry.
5) The front window pane and the water exiting the still can become rather hot,
resulting in a mild risk of a burn if touched.
Cautions
1) When the model SWS-200 solar water still is latched closed and sitting
vertically (for example after transporting it), prevent it from being knocked
over by placing it next to a wall or other support.
2) Avoid installing the still on a slippery surface, as there is a danger of the
whole still sliding off this surface.
3) Avoid installing the still under a tree, as loose twigs can drop down and
break or damage the glass pane.
4) Avoid leaving the still in the sun without water running through it, as this
tends to calcify and fade the wick more quickly. Fold up and store away the
still if you plan on not using it for a period of time.

Introduction
Congratulations on your purchase of Do-Right Solar’s model SWS-200 solar water
still! I have constructed your still with quality materials to last for many years,
delivering you drinking water of exceptional purity. I have also designed it with
convenience in mind, so that it will be an enjoyable experience for you to derive
your regular drinking water from this device.
Please read this manual thoroughly before operation (including safety warnings
and cautions), to understand how your solar water still works, and how to install,
operate, and maintain it. As well, periodically check the website for new video
tutorials and updated versions of this manual.
If you have any questions, please feel free to call or email me. Enjoy your new
solar water still!
Eric Torbet, Owner
Do-Right Solar
(805) 692-5297
sales@Do-Right-Solar.com
http://Do-Right-Solar.com

Know your still
Diagrams


How it works
The SWS-200 solar water still is of a “wick” design, meaning that it works by
having the input source water slowly and continuously wet a black cloth wick. The
sun shines through the front glass pane and heats up the wick, to the point where
water evaporates from it and rises up to the pane where it condenses. The
condensed distilled water runs down the glass pane into a trough where it then runs
out of the still and into a carboy.
Water is fed into the still by way of 1/4″tubing coming from a hose faucet. The
water pressure in this line is set to 10 psi by a regulator located at the faucet. The
flow rate of water is set by the main valve of the still. Water is evenly distributed
on the wick by a manifold inside the still, this manifold being 1/4″tubing with a
series of small pin holes.
After exiting the still and before entering the carboy, the distilled water passes
through a granular activated carbon (GAC) post-filter, in order to remove any
residual organic volatiles. The water finally entering the carboy is highly purified
and ready for drinking as is, or may be remineralized if desired.

Installation
Placement
The spot you choose to place the still should of course receive as much sun as
possible. In the winter, when the sun is lower in the sky, be aware that there may
be more obstructions such as trees and structures.
Place the still at least 2.5 feet off the ground, to allow space for the carboy and
GAC post-filter below (the carboy could sit in a small hole to reduce the still
height). The still can sit on an outdoor table or stand, or some cinder blocks, as
long as this surface is stable, level, not slippery, and able to support 55 lbs. The
optional four leveling feet can help elevate the still so it never sits in a puddle, and
also to make fine leveling adjustments.

In the most typical configuration, azimuthally orient the still to permanently point
South, and change the tilt angle seasonally, so that the still points at the sun at solar
noon (when sun is highest in the sky). The tilt angle is adjusted with the prop
sticks, each labeled with the number of degrees of tilt. For example, if at solar
noon the sun is 60° high in the sky, then you’ll need to tilt the still 30° (90° – 60°).
In a less common configuration, requiring frequent attention, you change both the
azimuth and tilt angle of the still throughout the day, in order to continually point
the still directly at the moving sun. Such an active approach can yield up to 30-
40% more distilled water, but is probably only worth doing in emergencies. In this
case, a Lazy Susan on the ground, which moves the table, still, and carboy
together, would help make the azimuth moves easier.
Input line
In most situations, the still will simply distill tap water, directly from the main
lines provided by the local water district. This water is pressurized, and in fact is
too high of a pressure to hook directly to the still, which employs drip irrigation
fittings. Therefore, your unit comes equipped with a 10 psi regulator which
attaches to an outdoor hose faucet. A small filter is also provided, to screen out
any debris in the line.
If you have also purchased the optional timer, then this is installed onto the faucet
first. This timer allows the water to run only during daylight hours, thereby saving
a little water.

With the aid of a hose-barb adapter, a length of 1/4″drip irrigation tubing then runs
from the regulator to the still. Leaving this tubing above-ground will pre-warm the
water, thereby increasing the efficiency of the still. However, it may be preferable
to bury this tubing, both for aesthetic reasons and for preventing leaching of
harmless but odorous volatiles from the sun-warmed polyethylene tubing material.
Such volatiles can evaporate and end up in the distilled water, though they are
filtered effectively by the GAC post-filter before entering the carboy.The tubing
attaches to the main valve at the top of the still. To attach the tubing to the barbs, it
is helpful to heat the tubing, either by dipping it in hot water or applying hot air to
it.
In an emergency situation, or when there is no pressurized water, then your solar
still can still operate. The source of water simply needs to be elevated above the
level of the main valve. Please see the section on “Emergency Use” for more
details.
Output lines

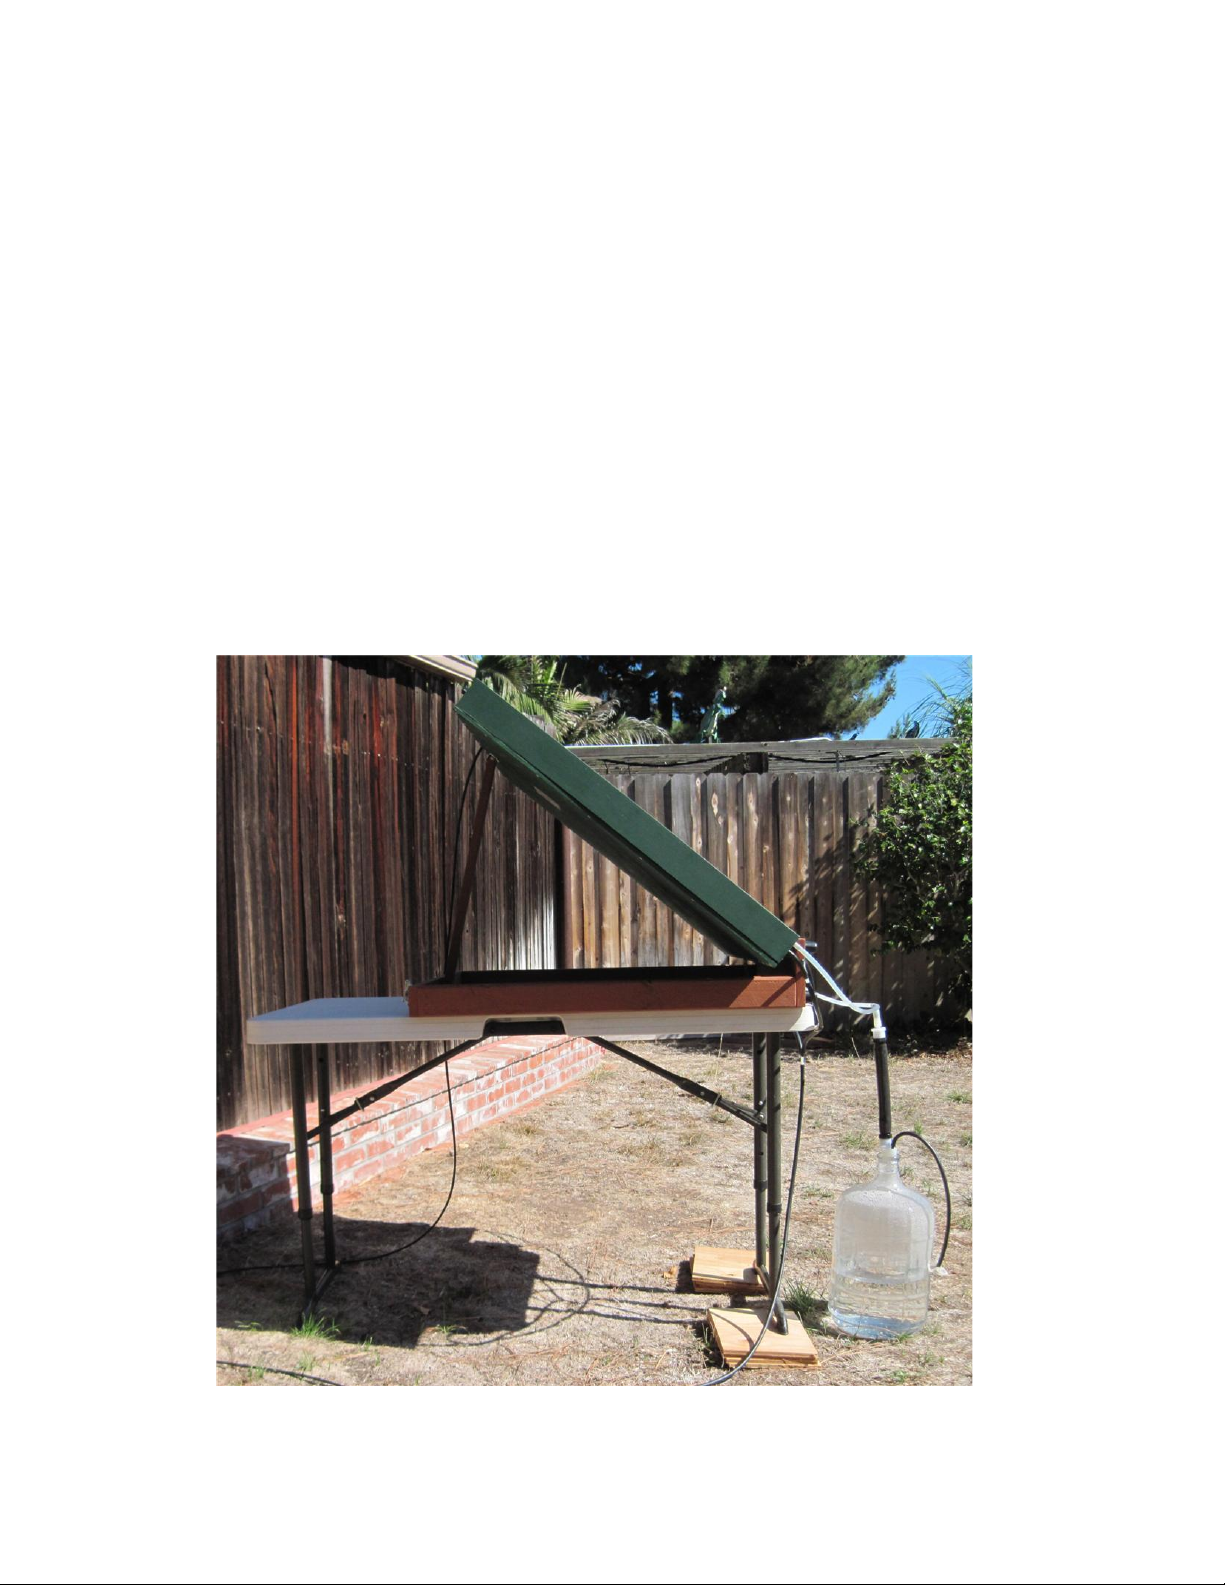
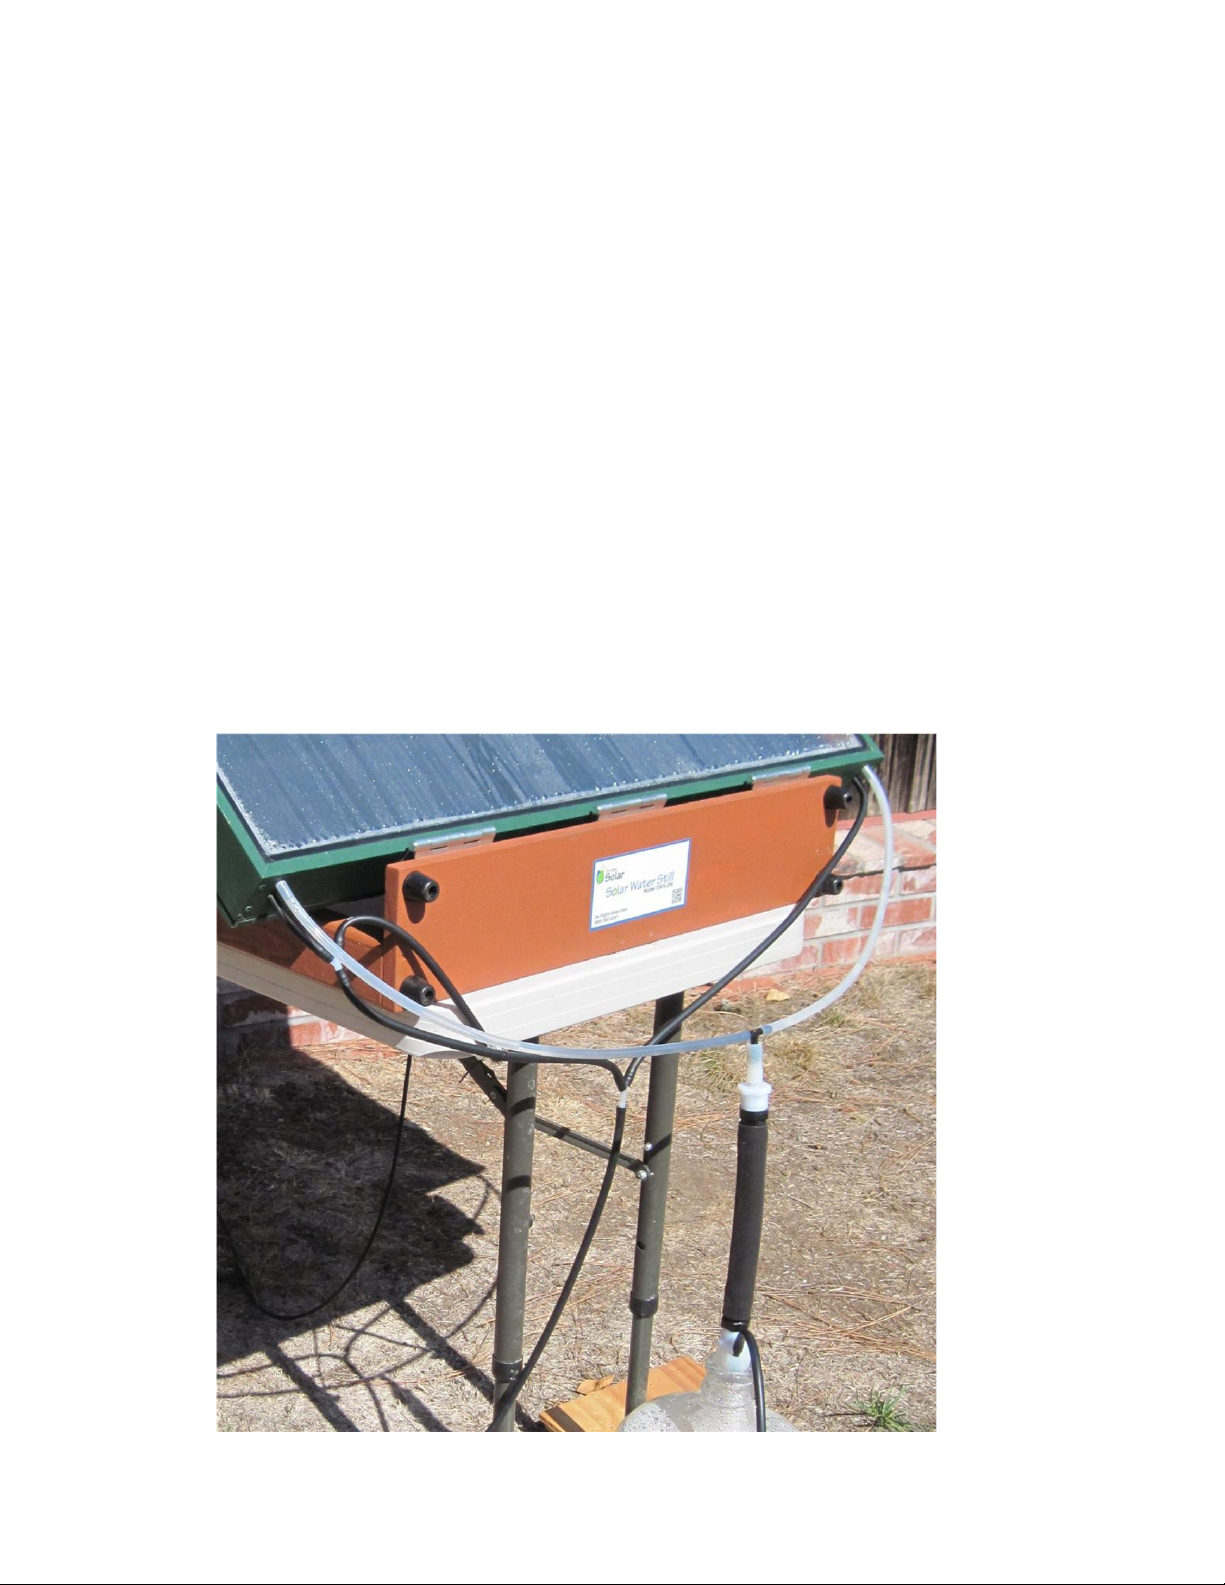
Your still has two output lines, one for the distilled water, and the other for the
excess source water. Two lengths of silicone tubing feeding into a GAC post-filter
attached to a 2-holed silicone carboy bung have been provided. Once you have
your carboy situated, place the bung in the carboy, then cut and attach these two
lengths of tubing to the two stainless steel pipes on either side of the still. The
reason there are pipes on either side is to ensure good drainage from the still, in
cases where the still is not level. The lengths of the tubing should be such as to
allow for smooth downward fall of the distilled water from the still into the GAC
post-filter. The GAC post-filter should be as vertical as possible to provide even
filtration.
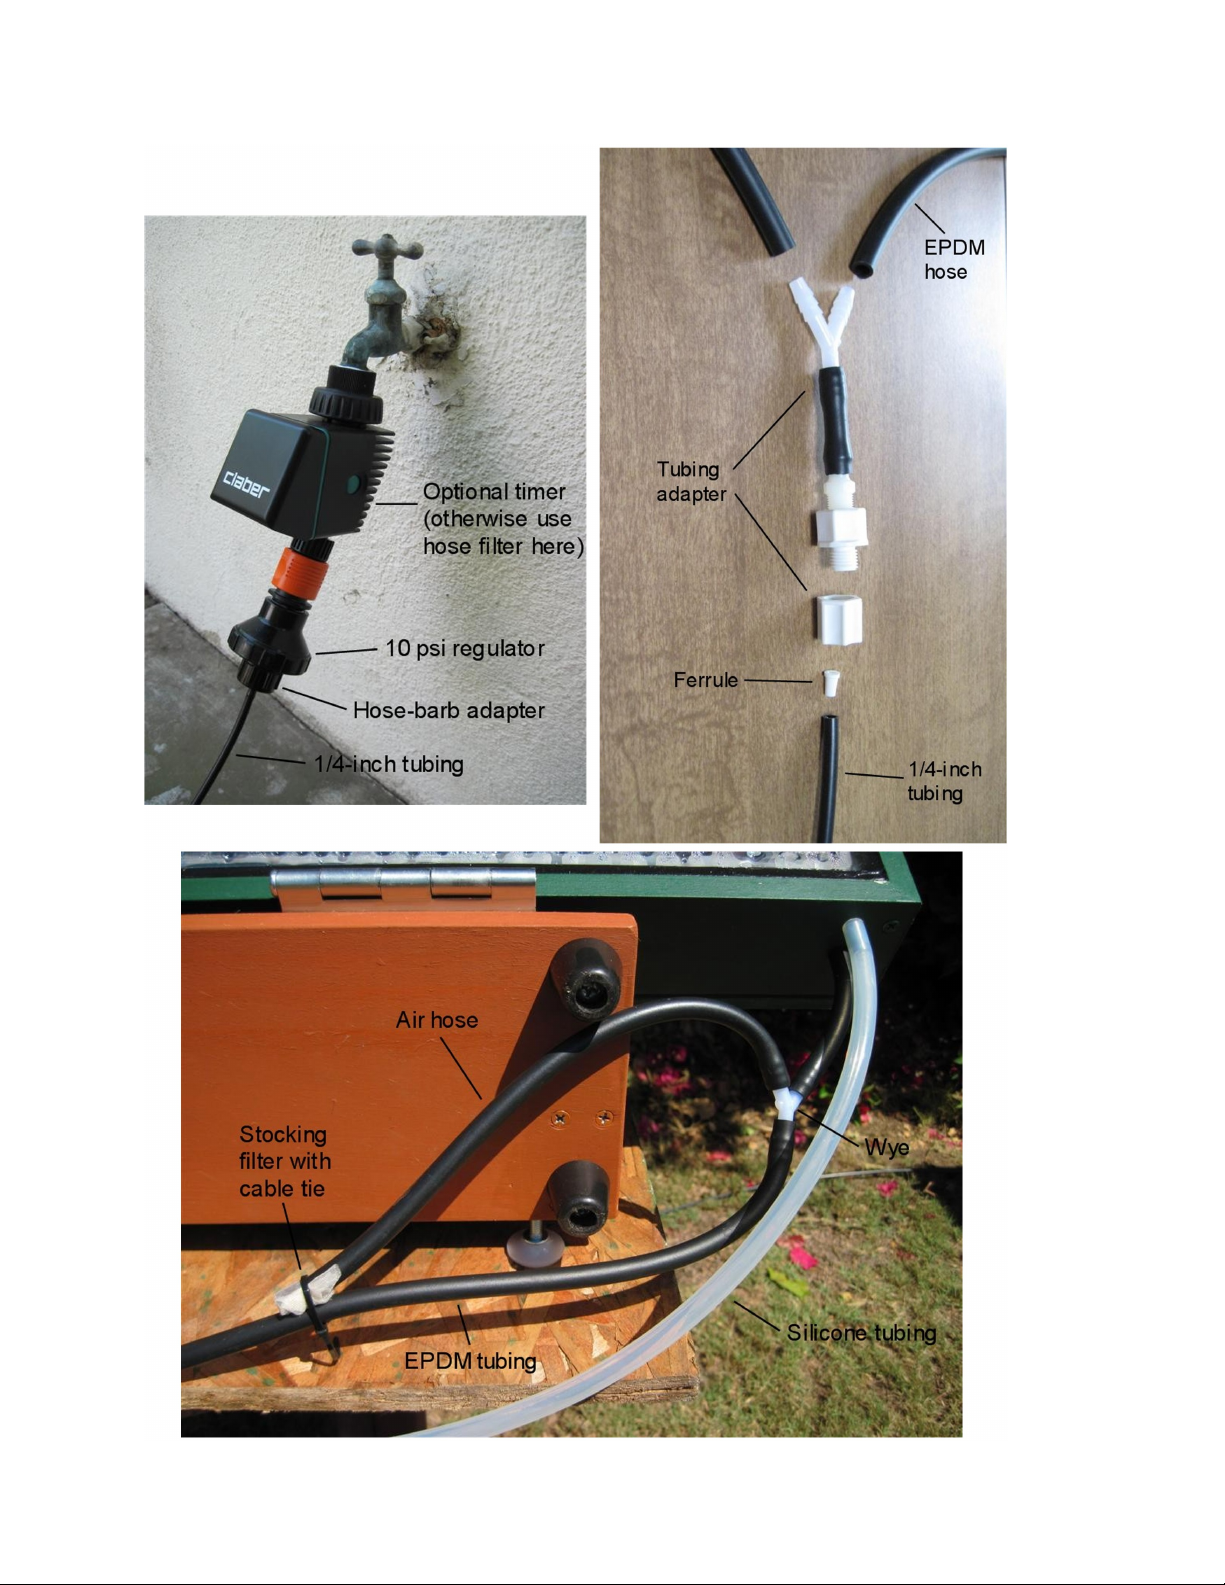
Similarly, there are two copper pipes on either side for the excess source water to
exit. Black EPDM tubing has been provided to attach to these copper pipes. There
is an additional wye in this line to allow for air flow in and out of the still,
necessary to avoid pressure differentials. Attach to this wye a short length of
EPDM tubing with a small piece of stocking on the end to keep bugs from entering
(see photos). This air hose should go up from the wye, but then the stocking end
should point down to prevent dust and rain from coming in. Also, attach the air
hose on the side of the still that is opposite where the water tends to exit (when you
turn on the water later, you’ll see which side the water exits).
There is a second wye for combining the two EPDM tubes together into a single
line. If you choose to collect the excess source water in a pail, then just attach
another short length of EPDM tubing and direct it to the pail. On the other hand, if
you choose to direct the water to a tree or mulch basin, then attach 1/4″drip
irrigation tubing using the tubing adapter that is provided.

Operation
Starting the first time
Before turning on the water for the first time, temporarily detach the two EPDM
tubes from the copper exit pipes, so that you can see the rate of excess water flow
out of the still.
You’ll need to balance the flow rate from the two side valves. Begin by opening
these two valves fully and closing the main valve fully. Then, turn on the main
lines water faucet. If you have the optional timer, then turn it on, too. Next,
slowly open the main valve of the still until you see that the wick is becoming wet.
The water in the wick will slowly move downward, and by examining the different
rates that each side becomes wet, slightly close the valve on the side with greater
flow, in order to balance the flow rates of the two sides.
When the flow rates are balanced and the wick is fully wet, you’ll begin to see
water exit from the copper pipes (usually on one side only). Turn the main valve
to almost closed, so that only a trickle of water exits the excess water pipe. There
will be a delay between turning the main valve and seeing the effect on flow rate,
so this step requires some patience. The goal is just a slow trickle of excess water
(the water may come out in spurts, due to surface tension property of water).If the
excess water flow is too high, then the temperature of the water in the wick will
lower, resulting in lower efficiency (i.e. less output). If there is no flow coming
out at all then this means there are probably dry spots on the wick, again resulting
in lower efficiency. Try to do this tuning of the flow rate at the hottest/sunniest
time of day. When you’re satisfied with the flow rate, re-attach the EPDM tubes,
placing the air hose on the side where the water is not exiting.
Ongoing use
Once the still is operating, then there are a few ongoing tasks and adjustments you
should perform.
1) Replace carboy – The glass carboy that collects the distilled water will fill up,
more frequently in the summer than in the winter. When it becomes full or
near-full, simply remove the bung (stopper) and place in an empty carboy.
Make sure that the new empty carboy is properly sanitized. This is also a good
time to wipe the bung clean, using some isopropyl alcohol. As for the full
carboy, place a clean solid bung in it, and carry it inside. If you have chosen to

remineralize your distilled water, then add some mineral powder to the carboy
and shake it until the minerals dissolve (it’s easiest to shake the carboy by
having it rest on a soft surface and rocking it back and forth). Do-Right Solar
offers an inexpensive house-blend of minerals for sale. Before placing the
carboy in your water crock dispenser, clean off the outside surface well with
alcohol, especially near the opening.You may also choose to pour water from
the carboy into a pitcher. In either case, you may want to perform a final
carbon filtration step, to sweep up any remaining organic volatiles. Do-Right
Solar offers binchōtan sticks for this purpose. These are activated carbon twigs
that you keep in your water crock or pitcher.
2) Adjust flow rate – If the weather becomes very hot and sunny, then distillation
will occur more rapidly, and you may need to increase the flow rate, otherwise
the wick may not stay fully wet. As described earlier, you do this by looking at
the flow rate out of the copper water pipes and adjusting the main valve to
ensure there is some excess water flow (slow trickle is ideal). Conversely, if
the weather turns cold or partially cloudy, then you may need to reduce the flow
rate, in order to allow the wick to become hotter.
3) Turn off water at night – This is optional, but if you wish to save a little water
(about 0.5-1.0 gal/day) then you can turn off the hose faucet at night (and turn it
back on in the morning). If you have the optional irrigation timer, then this can
be done automatically (see step 5).
4) Adjust tilt angle – Efficiency is maximized when the still points directly at the
sun. As the seasons progress, the path the sun takes across the sky changes. If
you have installed the still to permanently point South, then make sure that
when the sun is due south and highest in the sky (“solar noon”), the still points
directly at the sun, by choosing the appropriate tilt angle. It’s probably
sufficient to do this about four times throughout the year. If you’ve chosen to
adjust the still direction azimuthally as well, then you’ll need to use several tilt
angles throughout the day to ensure the still is pointed at the sun. It is usually
sufficient to eyeball the direction of the sun, but the following website may also
be helpful: http://www.timeanddate.com/astronomy/ . Just put in your location
and it provides the path of the sun for any day of the year.
5) Adjust timer – If you have the optional irrigation timer, then as the lengths of
day change throughout the year, you’ll need to adjust the timer accordingly. As
well, if it’s raining then you should manually shut off the flow through the
timer. Aim to have the timer turn on a little before the sun shines on the still,
and to turn off after the sun stops shining on the still.
6) Perform regular maintenance – Please see the next section for the maintenance
tasks you need to perform periodically.

Maintenance
There are some maintenance tasks you’ll need to carry out in order to keep your
SWS-200 solar water still performing optimally. Here are the tasks, ordered from
most to least frequent:
Cleaning the glass pane
The outside surface of the glass pane of the still will accumulate dirt and bug/bird
droppings over time. Clean it in the same way you clean your house or car
windows. For a streak-free window, as a final step try using a microfiber cloth
such as “E-Cloth” with distilled water.
Replacing the GAC
The GAC (granular activated carbon) in the post-filter periodically must be
replaced, especially if you begin to notice a slight taste to the distilled water. The
best GAC to use for filtering small organic volatiles is made from coconut husk.
Inexpensive bags of coconut husk GAC can be ordered online, for example
through Amazon.
The post-filter is easily removed from the barb fittings on either side. Shake out
the old GAC (can go on compost pile), and pour in new material. Note there are
mesh screens on either side to contain the GAC. Put enough GAC in to allow for a
tight fit. Pour some water through before closing it up, to ensure all the carbon
grains are wetted and to wash out any small grains. The two barbs on either side
should be pushed in firmly, so the GAC is well-packed in the tube.
Cleaning the wick
Over time, depending on the mineral content of the source water, the wick will
calcify and accumulate other sediment build-up. This degrades the performance,
because such sediment is less solar absorptive than a clean black wick.
To clean the wick, first turn off the water mains faucet. Next, cut the 1/4″drip
irrigation tubing near the main valve of the still. Try to make a clean cut, because
you’ll later re-attach the tubing to the barb of the valve. Remove the small piece of

tubing still attached to the barb, using a razor blade, taking care not to damage the
barb.
Pull off the output hoses. Remove the tilt angle prop and close and latch the solar
still. Lift the still from the table or stand and set it down vertically on the ground
and allow it to fully drain. It helps to tilt it a little so water runs out one side.
Carry the still inside, and place it glass-pane down on a clean table, floor, or carpet.
Unlatch the still and fold the base fully open (90°). As you do so, you’ll need to
first detach the safety chain.
Remove all the screws of the evaporator panel, either by hand or with an electric
screwdriver/drill. Before you can lift off the evaporator panel, though, you need to
break the suction that has developed in the seals. With the aid of a couple of blade
screwdrivers or chisels, start at one corner of the still and work your way around

the entire perimeter, gently prying open the gap between the black rubber gasket
and the frame of the still. Try not to dig into the gasket with the blades. As you do
this, you’ll hear the suction release.
Using both hands on either side, gently lift the evaporator panel off and set it aside.
Be careful to not touch the glass inside the still, in order to keep it free of
contamination and fingerprints. Close and latch the still (without the evaporator
panel attached, of course) and set it aside, oriented with inside of still facing down
to prevent dust from collecting inside.
Place the evaporator panel on a table, wick side up (with the small aluminum angle
piece hanging off the edge of table). Inspect the two gaskets for any damage. As
well, inspect the wick to be sure it is well-attached to the glass behind it. If you
note any problems, please contact Do-Right-Solar. Next, make the evaporator
panel as level as possible, using some shims.
Pour about 3/4 gallon of distilled vinegar onto the wick. This is enough to fully
immerse the wick. Let it soak a few hours or overnight. With vinegar still on the
wick, use a plastic scrub brush to loosen all sediment from the wick. Use gentle
scrubbing motions, so as not to damage or dislodge the wick. When satisfied, tilt
the evaporator panel toward one corner and pour the vinegar into a bucket. Take
the panel outside and hose off the wick, taking care not to get the foam insulation
too wet. Let the evaporator panel dry in the sun. Inspect the wick again, making
sure all sediment has been removed and the gaskets are clean.
Place the still in the same position as before, with the base open at 90°. Slowly
lower the evaporator panel down onto the still, aligning the holes and seating the
inner gasket. After the panel has been lowered, seat the inner gasket properly by
lifting each side up about an inch or two then lowering back down with the holes
aligned. Do not simply shove the panel sideways to align the holes, as this does
not allow the gasket to seat properly.
Reinsert screws by alternating sides, and starting in the middle of each side and
ending with the corners. This helps to balance the pressure on the gasket, ensuring
that it seats well. Also, don’t tighten the screws down all the way until they’re all
in. Do the last bit of tightening by hand. As you screw down, look at the black
rubber gasket, and stop screwing when you see it squeezed. Do not over-tighten
the screws.

Re-attach the chain, and close and latch the still. Peer inside to see that the inner
gasket is well-seated along the entire perimeter. (If not, then re-open and re-seat it)
Carry the still back outside and set it on its table/stand. Follow the procedure for
“Installation” and “Operation” earlier in this manual.
Replacing the wick
Over time, the wick will slowly fade due to exposure to UV radiation. When you
feel that it has become so faded that the performance of the still has appreciably
degraded, then it is time to replace the wick. New wicks can be purchased at Do-
Right Solar. Follow the procedure above in “Cleaning the wick” for removing the
evaporator panel. Instead of soaking the wick in vinegar, though, you will now
remove it from the glass pane of the evaporator panel. Starting at one corner,
slowly pull the wick off. Use a razor blade underneath to help pry it off.
After the wick is off, use a razor blade to scrape the silicone off the glass, taking
care not to damage the inner gasket on the perimeter of the glass. You do not need
to get all of the silicone off perfectly. Clean the glass so that it is free of all loose
silicone. A microfiber cloth with distilled water works well for a final cleaning.
Make sure the glass is fully dry before proceeding further.
Roll the new wick up and place it on the glass near the top or bottom edge. Your
new wick will also come with a tube of silicone sealant. Starting at one edge
(either top or bottom) of the glass, apply a bead of sealant on the glass. Use a
spackle tool to smooth/flatten out the bead. Place the edge of the wick on the bead,
and gently tamp it down using a flat board. Don’t press it so hard that the sealant
oozes up through the wick. The one exception to this is the corners. Place an extra
dab of sealant under the corners, and press down firmly with your finger.
Place another bead several inches further away, smooth/flatten it as before, then
roll the wick onto the sealant and tamp it down as before. Continue this process
until the final bead of sealant along the other edge of glass (bottom or top). Again,
on the corners use a little extra sealant and pressing. You should have about 7 to 8
beads of caulk for the whole wick.
Allow the sealant to cure for several days. Then, replace the evaporator panel as
described in “Cleaning the wick” and start up the still again as described in
“Installation” and “Operation”.

Emergency Use
You can operate your SWS-200 solar water still even when there is no pressurized
water. This situation may arise in the event of an emergency like a major
earthquake, or simply when you’re in a remote area such as a campsite or on a
boat.Virtually any source of water can work, including seawater or highly
contaminated water.
The source water needs to be elevated above the level of still, in order to create
head pressure. Either a bucket or water-tight bag can be used. You’ll need
appropriate fittings to attach to the still. Please contact Do-Right Solar if you need
help with this.
With the exception of seawater, such emergency water is often rather murky, and
for best results it should be pre-filtered before it is run through the still. The reason
for this is that the input manifold of the still has an array of small holes that
distribute the water over the wick. If the water is murky then these holes are apt to
become plugged.
A good way to pre-filter water is with a sand filter. This is simply a bucket that
has layers of sand and gravel, and some pipe fittings. YouTube has many videos
showing how to construct such a sand filter, for example:
https://www.youtube.com/watch?v=6bqYI1Z68jM
https://www.youtube.com/watch?v=Btg7zh2fpH4
If there is enough demand, Do-Right Solar may eventually offer an “Emergency
Kit”, consisting of the above items.

One Year Limited Warranty
Do-Right Solar warrants this product (including any accessories) against defects in
material or workmanship for a period of one year from the date of purchase.
This guarantee does not cover damage caused by accident, misuse, abuse, normal
wear, or excessive wear due to lack of maintenance.
During the warranty period, and upon proof of purchase, the product will be
repaired or replaced. To obtain these warranty services, please take or send the
product, with a copy of your sales receipt, to Do-Right Solar.
This warranty gives you specific legal rights, and you may also have other rights
which vary from state to state.
Table of contents
Popular Inverter manuals by other brands

Stealth
Stealth ST-INV-T10.0 user manual

Sungrow
Sungrow SG3125HV-20 System manual

Northern Lights
Northern Lights PX-300K1 Series A.C. Generator Operator's & parts manual

Tabuchi Electric
Tabuchi Electric EHW-S55P3B-PNUS user manual

Danfoss
Danfoss VLT AutomationDrive FC 360 quick guide

Sonnen
Sonnen sonnenBatterie eco 8.0 installation instructions