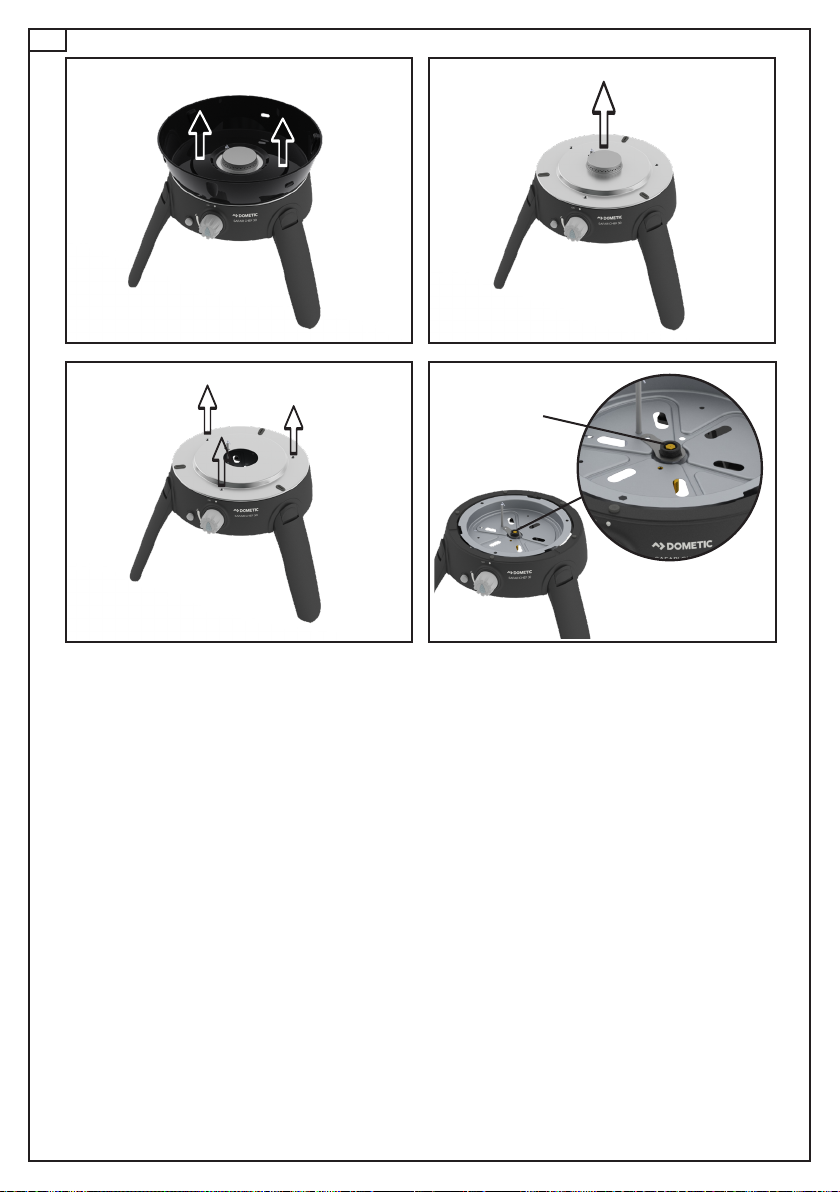
Dometic CADAC SAFARI CHEF 30 User manual

MODEL No: 6540L1
2.75 kPa
SAFARI CHEF 30
503-0829 LEV1
USER INSTRUCTIONS
NOTE! PRODUCT MAY VARY FROM ILLUSTRATIONS
EN
AUSTRALIA AND NEW ZEALAND
GAS SAFETY CERTIFICATION
®
DO NOT REMOVE
AUSTRALIA AND NEW ZEALAND
GAS SAFETY CERTIFICATION
®
DO NOT REMOVE
DO NOT REMOVE
DO NOT REMOVE
AUSTRALIA ONLY
GAS SAFETY CERTIFICATION
DO NOT REMOVE
TM
AUSTRALIA ONLY
GAS SAFETY CERTIFICATION
DO NOT REMOVE
TM
AUSTRALIA ONLY
GAS SAFETY CERTIFICATION
DO NOT REMOVE
TM
AUSTRALIA ONLY
GAS SAFETY CERTIFICATION
DO NOT REMOVE
TM

2
EN
Recycling packaging material! Place the packaging material in the appropriate recycling waste bins wher-
ever possible.
Explanation of Symbols

11
CAUTION
Provide ample ventilation. This gas appliance consumes air (oxygen). Do not use this appliance in an unventilated space to
avoid endangering your life. If still more gas appliances and/or occupants using gas are added to the space, additional ventilation must
be provided.
IMPORTANT
Read these instructions carefully so as to familiarise yourself with the appliance before fitting the appliance to a gas cylinder.
Retain these instructions for future reference.
EN
1. Safety information
• This appliance complies with AS/NZS 2658.
• Gas appliances require ventilation for efficient performance and to ensure the safety of
users and other persons in close proximity, do not use the appliance in an unventilated
area. It is intended for outdoor use only.
• WARNING: ACCESSIBLE PARTS MAY BE VERY HOT. KEEP YOUNG CHILDREN AWAY.
• Read these instructions carefully before using the appliance.
• FOR OUTDOOR USE ONLY!
Assembly and use
• The Safari Chef 30 is designed to utilise various cooking surfaces. Various food types can
be prepared on this appliance.
• Do not use the appliance if it has damaged or worn seals.
• Do not use an appliance that is leaking, damaged or which does not operate properly.
• Always operate the appliance on a firm level surface.
• Ensure that the assembled product is stable and does not rock.
• This appliance is not suitable for installation or connection to a reticulated gas supply.
• This appliance must be kept away from flammable materials during use. Minimum safe
distances are: Above the appliance 1.2m. At the rear and sides 600mm (See fig. 1).
• When using a pot, the minimum recommended pot size is 180mm and maximum recommended size is 250mm.
• Do not use any cooking surface or pot that is larger than the recommended size. Our cooking surfaces have been specifically designed to
allow gas conbustion to escape and the closer of this space could affect the performance of this appliance.
• Do not modify this appliance.
• The unit is supplied with a convenient carry bag.
Hose
• The hose must be checked for wear or damage before every use and before connecting to the gas container.
• Do not use the appliance if it has a damaged or worn hose. Replace the hose.
• The minimum hose length is 600mm and it is recommended that the maximum hose length should not exceed 1.5m.
Gas Container
• Gas is supplied to the unit via a hose and regulator, connected to a gas cylinder not exceeding 9kg.
• Depending on the hose and regulator model you have purchased, this appliance shall only be used with (i) a Type 27 refillable 4.5-9kg
ULPG cylinder certified to AS 2030 and AS 2469, (ii) 1LB Propane cartridge certified to DOT-39, or (iii) 80/20 Butane/Propane cartridge
certified to EN417.
• IT COULD BE HAZARDOUS TO ATTEMPT TO FIT OTHER TYPES OF GAS CARTRIDGES.
• This appliance shall only be used with an approved hose and regulator complying with AS/NZS 1869 and AS 4621.
• Only to be used with a gas cylinder that does not exceed 500mm in height (including the regulator) and 350mm in width.
• Ensure that the gas container is fitted or changed in a well-ventilated location, preferably outdoors, away from any sources of ignition such
as naked flames, pilots, electric fires and away from other people.
• Keep gas containers away from heat and flame. Do not place on a stove or any other hot surface.
• Refillable containers are to be used only in the upright position so as to ensure proper fuel withdrawal. Failure to adhere to this may cause
liquid discharge from the gas container resulting in a dangerous operating conditions.
• Do not try to remove the gas container whilst the appliance is in operation.
• The gas container must be disconnected from the appliance aer use or when in storage.
• Not for use with a remote gas supply.
Light back
• In the event of light back (where the flame burns back and ignites inside the burner or venturi housing), immediately turn off the gas supply
by firstly closing the control valve on the gas cylinder and then the appliance valve. Aer the flame is extinguished, remove the regulator
(when using a hose and regulator) and check the condition of the seal; replace the seal if in doubt. Re-light the appliance.
• Should the flame persistently light back, return the product to your authorized repair agent.
Leaks
• If there is a gas leak on your appliance (smell of gas), immediately turn off the gas supply by turning the control knob clockwise to the “OFF”
position and take it into a flame free location where the gas leak may be detected and stopped. If you wish to check for gas leaks on your
appliance, do it outside. Do not try to detect gas leaks using a flame; use soapy water.
For appliances for use with cylinders
• If there is a gas leak on your appliance (smell of gas), immediately attempt turn off the cylinder valve. Remove the appliance to a well-ventilated
location away from any ignition source. Check for leaks using soapy water. Do not try to detect leaks using a flame.
For appliances for use with cartridges:
• If there is a gas leak from your appliance (smell of gas) and you cannot stop the gas flow, remove the appliance to a well-ventilated location
away from any ignition source. Check for leaks using soapy water. Do not try to detect leaks using a flame.
Fig. 1

2
EN
Country of use AU
Catagory Universal LP Gas
Allowable gases and operating pressure 2.75kPa
Nominal usuage 5.35 Mj/hour
Jet number 0.65
Gas supply sources i) A type 27 refillable 4.5-9kg ULPG gas cylinder certified to AS 2030 and AS 2469
ii) 1LB Propane cartridge certified to DOT-39
iii) 80/20 Butane/Propane cartridge certified to EN417
How to check the appliance is connected to the gas supply in a sound fashion
• The correct way is to smear the joint, i.e. where the gas container connects to the appliance, with soapy water. Turn the appliance control knob
slighty anti-clockwise to turn the gas on. If bubbles form, then there is a gas leak. Immediately turn the gas off and disconnect the gas supply
from the appliance. Check that all the connections are properly fitted. Check that the seal is in place and in good condition before connecting
the gas supply. Re-check with soapy water aer refitting the gas supply.
• If a gas leak persists, return the product to your local dealer for inspection/repair.
• ONLY USE IN WELL VENTILATED AREAS.
• CARBON MONOXIDE HAZARD - USING THIS APPLIANCE IN AN ENCLOSED SPACE MAY CAUSE DEATH. DO NOT USE IN CARAVANS,
TENTS, MARINE CRAFT, CARS, MOBILE HOMES OR SIMILAR LOCATIONS.
• This appliance shall only be used in an above ground open air situation with natural ventilation, without stagnant areas, where gas leakage
and products of combustion are rapidly by wind and natural convection.
• Any enclosure in which the appliance is used shall comply with one of the following:
• An enclosure with walls on all sides, but with no overhead cover. (i)
• Within a partial enclosure that includes an overhead cover and no more than two walls. (ii and iii)
• Within a partial enclosure that includes an overhead cover and more than two walls, the following shall apply: (iv and v)
• At least 25% of the total wall area is completely open.
• 30% or more in total of the remaining wall side, back and front wall areas is open and unrestricted.
• In the case of balconies, 20% or more of the total wall area shall remain open and unrestricted.
• DO NOT OBSTRUCT THE COMBUSTION AIR OPENINGS
2. Fitting and Changing the Gas Supply
Connecting the gas supply
Check that the seals between the appliance and gas container are in place and are in good
condition before connecting the gas container.
• Before connecting the gas supply to the appliance, check that the appliance control knob is in the
“OFF” position.
• Blow out any dust from the gas supply opening to prevent possible blockage of the jet.
• Fit an approved hose and regulator to the appliance (See Fig. 2).
• Use a suitable spanner to tighten the brass nut when connecting the hose to the appliance.
• Only use the hose assembly as supplied with this appliance for connection to the gas supply - DO
NOT USE ADAPTORS.
• Ensure that the gas supply (gas cylinder/gas cartridge) is fitted in a well-ventilated location away
from any source of ignition, such as naked flames and away from other people.
• Avoid twisting the hose whilst connecting the regulator to the gas supply.
• Once hose assembly is complete, and before using your appliance, ensure that a complete gas
seal has been made (check for the smell of gas around the connection joint). Do not check for
leaks with a naked flame. Use warm soapy water only, applied to the joints and connections of
the appliance. Any leakage will show up as bubbles around the leakage area. If you are in doubt,
contact your nearest stockist.
Fig. 2
i ii iii
iv v

33
EN
Fig. 4a
Fig. 4
Piezo
button
3. Operating the Appliance
• When operating this appliance, please take care to ensure that all parts are in good working order
and that you have checked for any gas leaks before lighting the appliance with every use.
• Items can simply be placed on top of each other.
Legs
• WARNING: The legs are spring loaded. Opening and closing of the legs must be done in a
controlled manner to avoid personal injury or damage to your appliance.
• To open the legs, turn the unit upside-down and hold the legs down while liing each leg
individually (Fig. 4a). You will hear a “click“ if the leg(s) has located correctly.
• To fold the legs back, securely hold the leg and push the leg release clip (Fig. 4b). Then push
the legs in-ward to its closed position (Fig. 4a). This needs to be done sequentially to optimize
space. First the right front leg (1), then the le front leg (2), and lastly the rear leg (3) (as seen in Fig.
4b).
Precautions to observe before lighting.
• Use this appliance only on a firm horizontal level surface.
• Aer prolonged storage, inspect the appliance for any insects and webs, which may affect gas
flow.
• Open the hood/dome prior to lighting.
Lighting the appliance using the piezo
• It is recommended to remove any cooking surfaces when trying to light the appliance. This way it
will be easy to see the burner when it is lit.
• To light up the appliance using the piezo igniter, push and turn the control knob 90° in an anti
clockwise direction, then press the piezo button to ignite the gas (see Fig. 4). If the gas does not
ignite on the first spark, turn the control knob back to its “OFF” position. Try again, by pushing
and turning the control knob anti-clockwise and push the piezo button to ignite the gas. If the gas
has not ignited in the first two to three seconds you should close the control valve by turning the
control knob back to its “OFF” position.
• Wait approximately thirty seconds to let any accumulated gas within the burner escape. Repeat
the above process if necessary until the flame ignites. The flame should normally light up within
the first one to two seconds.
Lighting up using a BBQ lighter
• When starting cold, the appliance may be lit from the top prior to fitting the desired cooking
surface onto the fat pan. When lighting up a hot appliance, it is recommended that this be done by
sticking a barbecue lighter through one of the vent holes underneath the burner, until it is in line
with the burner (DO NOT place the BBQ lighter through the large hole directly underneath
the burner). Ignite the BBQ lighter. Whilst the BBQ lighter is lit, push and turn the control knob
anti-clockwise to light the burner.
General
• Once the appliance is lit, the flame intensity may be adjusted by turning the control knob anti-
clockwise to reduce the flame or clockwise to increase the flame.
• When cooking food with a high fat content, flaring may occur if the selected heat setting is too high.
Should this happen, turn the heat down until the flaring ceases.
• Do not move the appliance when in use. It is unsafe practice to move the appliance whilst lit and
may cause flaring.
• Aer use, first close the control valve on the gas cylinder (where applicable). When the flame has
extinguished, close the control valve on the appliance.
• WARNING: Do not use any cooking surfaces on a high flame setting for more than 10 minutes without cooking anything as this can damage
the non-stick coatings.
• WARNING: Avoid boil over and spillage. Do not use as a heater. Not to be used for any other purpose other than cooking. Avoid using near
combustible materials.
Fig. 4b
Release clip
Disconnecting and changing the gas supply
• Aer use, turn the gas cylinder valve off, wait for the flame to go out, then turn the appliance
control valve off.
• When you need to replace your empty cylinder, make sure that the gas is closed at the cylinder
valve.
• Do not smoke while changing the cylinder.
• Remove the regulator from the empty cylinder.
• Attach the regulator to the full cylinder, refer to the instructions above on how to connect the gas
supply.
• Apply the same care and checking procedures as if fitting a new gas cylinder.
How to check if your gas cylinder is empty
• The easiest way to check if you are low on gas is by picking up your gas cylinder.
• If you think your gas cylinder is feeling a little lighter than you’d like, weighing the bottle is a great
way to see how much gas is le. Most cylinders will have the empty weight stamped on either the
neck or footring, and if the weight indicated on the stamp and the weight of your cylinder are the
same, you’re out of gas. You can then approximate the amount of gas you have le by the difference
in weight.
Fig. 3
Regulator
Hose
Cylinder
Valve

4
EN
4. Component List
Pot Stand
Fat Pan
Pot/Dome
BBQ Grid
Flat Pan
Heat Shield
Burner
Piezo Ignition
Control Knob
Included
Sizzle Plate
Fat Pan locators
4
5
Pack into the zipper compartments
located within the lid flap of the carry
bag.
Packing back into the carry bag
• Aer use, allow your appliance to cool and fold legs of the base unit back as per instructions
described above.
• Starting with the base unit first, pack the appliance into the carry bag following the number order
as shown in Fig.5.
• Pack the BBQ Grid and the Flat Grid into the zipper compartments located within the lid flap of the
carry bag.
Fig. 5

55
The following accessories are not included, and are sold separately. Check with your local stockist for
availablity.
Pizza Stone Pro 30 Coffee Pot Stand
BBQ 2 Plancha 30 Paella Pan 30
So Soak 30
EN
5. GreenGrill Cooking Options
GreenGrill Cooking
Most of the cooking surfaces have our GreenGrill coating. This ceramic coating is completely PFOA-free; it contains no toxic substances and
guarantees healthier cooking!
PREPARATION & USE
• ‘Seasoning’: before using the cooking surface for the first time, you can season it to give the cooking surface a thin protective layer that prevents food
from sticking. It is not required but we do recommend it. It’s very easy: lightly rub cooking oil on the surface and then place over medium heat
for 2 - 3 minutes. When it cools, wash the cooking surface with soapy water before use and grease it lightly with some oil (cooking oil of your
choice, e.g. sunflower oil).
It’s ready to go!
• Note: GreenGrill coating conducts heat better than products with a regular (PTFE) non-stick coating. We therefore recommend using only 75% of the
power of what you are used to.
• Never leave the cooking surface on the heat source without oil. Apply a thin layer of oil with a kitchen paper towel or a brush before placing
the cooking surface on the heat source. Make sure you have oiled all parts, so with e.g. a BBQ grid include the raised edges as well.
• We recommend frying in sunflower oil or Rapeseed Oil because of the high burning point. Olive oil can have a relatively low burning point,
which can cause the ingredients to stick to the pan or burn. We therefore do not recommend using olive oil.
Tip: bring meat or fish to room temperature before frying. This will prevent sticking to the cooking surface.
• Always use silicone and/or wooden utensils so that the GreenGrill coating is not damaged. Never use metal utensils as this can damage the
coating.
CLEANING
• Let the cooking surface cool down before cleaning. Extreme temperature changes can cause deformation of the cooking surface.
• The GreenGrill coating is ‘Easy Clean’. Warm soapy water with a so sponge is sufficient for cleaning the cooking surfaces with GreenGrill
coating. Avoid scouring pads or steel wool.
• If the cooking surface has food particles remaining from a previous use they can adhere to the coating, which can lead to brown spots. In
these places, ingredients can stick to the cooking surface because the coating is no longer reached. Make sure that these spots are properly
removed before use.
• For stubborn stains or residues, you can try the ‘vinegar method’ for the paella pan or chef pan: pour a layer of vinegar into the pan and heat
the pan slightly. The vinegar does not have to boil and should certainly not evaporate completely. Pour the vinegar out of the pan, clean the
pan with soapy water and the pan is as good as new. Note: heating vinegar can give off an unpleasant smell.
• The So Soak (sold seperately) is the ideal companion product to facilitate overnight soaking. When using the
So Soak, we recommend placing the cooking surface face down which allows for maximum soaking and
also uses less water.
• Any stubborn stains that remain aer soaking, can be loosened and brushed away using the So Soak Brush
(sold seperately)
• Dry with a so cloth and you’re done!
MAINTENANCE
• We recommend to add a little oil to the cooking surface aer cleaning and spread it with kitchen paper. The oil
seals the surface from the outside air and moisture. It also ensures that the food does not burn into the surface.
• Place the cooking surface in a plastic bag before you put it into its storage bag so you are ensured the storage bag remains clean and oil free.
• The storage bag prevents damage to the GreenGrill coating and your product.
So Soak Brush

6
Barbecuing Frying Oven Dome/Wok
Boiling
EN
Cooking Options
• These are the available cooking options.
Barbecuing: This cooking option is ideal for fat-free barbecuing of chicken, sausages, chops, kebabs, fish
or vegetables.
For this type of cooking, place the fat pan onto the heat shield, and ensure that the sizzle plate is placed
into the fat pan (See Fig. 6) before placing the BBQ grid onto the locators of the fat pan.
Caution: Please note that when cooking fatty meats some fat will drip onto the unit which may cause flare
ups. Please use caution when handling such meats. The cooking temperatures are easily adjusted to suit
your own requirements by turning the control knob to regulate the degree of heat.
Frying: This option is ideal for stir-fries, fish, breakfast, pancakes, prawns, paella and vegetables. For this
type of cooking, place the fat pan onto the heat shield. Place the flat pan onto the locators of the fat pan
Please note that being a shallow pan, it is not suitable for deep-frying.
The easy clean surface encourages the minimum use of fat for healthy cooking.
Oven Dome / Wok: The dome can be used as a wok, a lid to create an oven on the BBQ, or a saucepan.
For wok-style cooking, place the dome upside-down directly onto the pot stand and use to prepare stir-
fries, pasta dishes or paella. To use the dome as an oven lid place the dome over a meal cooking on the
BBQ option for convection style cooking. This is ideal for roasting chicken, lamp, beef or pork. The dome
can also be used as a saucepan, to heat sauces, marinades, boil water, cook rice, pasta etc. Place the dome upside-down directly onto the Pot
Stand.
Boiling: For this type of cooking, place the pot stand in its locator grooves on the heat shield ensuring that it is properly seated. Place a
suitable pot (not less than 180mm diameter and not more than 250mm diameter) or the Safari Chef dome on the pot Stand. The fat pan has
been designed in such a way that it can also be used as a windshield. One liter of water will boil in approximately 6 minutes depending on the
conditions, size of pot used, etc.
Note: When using small sized pots do not attempt to use pots with plastic handles. The pot stand can also be used in the fat pan. (Remove the
Sizzle Plate so that the Pot Stand can be correcly fitted into the Fat Pan)
Pan frying with the Paella Pan: This cooking option is ideal for preparing stir-fries. paellas, risottos, pasta dishes, traditional breakfasts etc.
The Paella Pan 30 is made from a high quality pressed aluminium which allows for excellent heat distribution and retention.
Pizza Baking: For this type of cooking, place the pot stand into the fat pan. The fat pan has been designed in such a way that it can also be
used as a windshield. Place the pizza stone onto the pot stand. Pre-heat your pizza stone before use. Ensure that food is at room temperature
before placing it onto the pizza stone, DO NOT put frozen food onto a heated pizza stone. Put the dome on to create an oven effect for better
heat distribution. For cooking methods when using the pizza stone, please refer to the pizza stone user manual.
Coffee: The ideal option for brewing a cup of coffee. Anytime, anywhere!
Fig. 6

77
EN
7. Storage
• Always allow the unit to cool down and be cleaned before storing.
• Turn off the gas supply to the appliance, disconnect and remove the gas supply from the appliance.
• Never store an appliance with the gas supply connected, this is an unsafe practice.
• Store the appliance and gas supply in a well-ventilated area away from combustible material. Storage of cylinders should preferably be
outdoors and must NOT be in a basement.
8. Maintenance & troubleshooting
Maintenance
• If you clean and maintain your appliance on a regular basis, the life of your appliance will extend and the possibility of problems will
decrease.
• We recommend the service of your appliance to be every twelve (12) months by a service agent to ensure continued efficient operation.
• This appliance must only be serviced by an authorized person.
• Check your gas hose and connections regularly for any signs of leaks and every time the gas cylinder is re-filled or fitted to the appliance
with every use.
Troubleshooting
In the case of a spattering flame or jet blockage:
• Clean your burner ports in case of an over spill.
• We recommend to clean or replace the jets every six (6) months to ensure continued efficient operation of your appliance.
• Should the appliance operate abnormally aer storage and all checks have not isolated the problem, the jet may be blocked. A blocked
jet would be indicated by a weaker yellowish flame or no flame at all in extreme cases. Under these circumstances it will be necessary to
remove and check and thoroughly clean out any foreign matter which may have gathered in the appliance.
• This may be done by removing the jet using standard tools and blow any dirt from the jet, alternatively, you may purchase new jets from
your local store. Do not attempt to clean the jet mechanically.
Replacing a Blocked Jet:
• Your Safari Chef 30 is fitted with a specific size jet to regulate the correct amount of gas.
• Should the hole in the jet become blocked, this may result in a small flame or no flame at all. Do not attempt to clean the jet with a pin or
other such device as this may damage the orifice, which could make the appliance unsafe.
• To replace the jet: Remove the fat pan (Fig. 7). Gently unscrew the burner assembly (Fig. 8). Remove the three screws from the heat shield
plate and remove the heat shield(Fig. 9), taking care not to damage the piezo electrode. The jet can now be removed using a suitable
spanner (Fig. 10). Do not use pliers on the jet as this may damage the jet, making it unusable or impossible to remove. Screw the new jet
into the valve. Do not over-tighten as this may damage the jet.
• Reverse the above procedure to re-assemble the unit.
Replacing the Hose:
• The fitting of a hose is described in Section 2.
Pizza Baking
optional accessory
Pan Frying /Paella
optional accessory
Coffee
optional accessory
6. Cleaning
• Allow the appliance to cool down before you clean it.
• Use a damp cloth wrung out in a solution of soapy water to clean exterior surfaces.
• The grill plate is coated with a tough durable ceramic non-stick coating that has been used with great success on some of the best cookware
in the world. Never the less, taking care of it can help you to enjoy extra years of healthy, easy, non-stick cooking.
• Whilst the ceramic non-stick coating is very durable, it can easily be damaged by the use of metal cooking utensils. It is therefore
recommended that only plastic or wooden utensils be used when cooking.
• Always allow the grill/flat plate to cool before immersing it in water.
• Make sure that no water gets onto the burners or pilot/light area. Wipe the appliance completely dry before use.
• Do not use abrasive cleaners as they may damage the surfaces.
• Clean the appliance aer each use. Aer cleaning recondition the cooking surface with a light wipe of oil.
• Do not use any high-pressure steam equipment or a water jet to clean the appliance.
• Remove the fat from the moat of the fat pan.
• Note: For stubborn stains, oven cleaner may be used.

8
Fig. 7 Fig. 8
Jet
Fig. 9 Fig. 10
unscrew in an
anti-clockwise
direction
unscrew the 3 screws
and carefully remove
the heat shield
EN

99
9. Spares and Accessories
• Always use genuine spares as they have been designed to give optimum performance.
Item Spare No.
6540-SP043
6540-SP042
6540-SP002
6540-SP004
6540-SP003
6540-SP017
6540-SP005-V2
6540-SP019
Item Spare No.
6540-SP022
6540-SP023
6540-SP037
(Valve & Jet 0.65)
6540-SP030
(0.65 Jet)
Front L & R Leg
6540-SP010
Back Leg
6540-SP009
Sizzle Plate
6540-SP061
Item Spare No.
203-100-AU
6540-100-AU
6540-200-AU
6540-600-AU
6540-900-AU
Cover
(300 x 300mm)
6540-800-AU
8640-AU
98425-AU
Spares Accessories
EN

10
10. Dometic Warranty & Service
Dometic Australia Pty Ltd ABN 62086366305
As the purchaser of a new Dometic product you are entitled to full warranty cover under the conditions herein.
TO REGISTER YOUR WARRANTY
Please complete and return this form together with a
copy of your receipt within 60 days of purchase to:
Dometic Australia Pty Ltd
PO Box 2495
BURLEIGH BC QLD 4220
On receipt of these documents your details will be entered into our customer data base. This will make it easier for you in the unlikely event
that you require a warranty repair anywhere in our network of service agents across the country. If you need assistance filling out this form or
making a claim under this warranty please call us on 1800 21 21 21 (Aus) or 09 622 1490 (NZ)
Please note: If you choose not to register
this warranty, you must keep a copy of your
receipt to ensure you will receive warranty
service should it be needed.
Dometic New Zealand Limited
PO Box 12011
PENROSE, AUCKLAND 1642
Name: Signature:
Address:
State: Postcode:
Tel: (home) (mobile)
Email:
Model purchased:
Serial number:
Dateof purchase:
Retailer’s name:
Retailer’s address:
WARRANTY PERIOD DEPENDS ON PRODUCT:
WARRANTY PERIOD PRODUCTS COVERED WARRANTY DESCRIPTION
2 year • Safari Chef 30 Full warranty covering all manufacturing defects
for 2 year from date of purchase
EN

1111
IMPORTANT Please keep this side with a copy of your receipt
DOMETIC WARRANTY
If the product does not work as it should, please contact the manufacturer’s branch in your country (see back page).
For repair and warranty processing, please include the following documents when you send in the device:
• A copy of the receipt with purchasing date
• A reason for the claim or description of the fault
HOW TO SUBMIT A WARRANTY CLAIM
Please call Dometic on 1800 21 21 21 (Aus)
THE WARRANTY DOES NOT COVER
To avoid doubt, your Dometic Warranty does not protect against the following;
1. Any damage caused as a result of misuse or environmental impacts.
2. Any damage from improper preparation before first use, such as weathering your product.
3. Faulty installation or modification made during installation or set up of the product.
4. Cosmetic blemishes or fading that do not affect the operation of the product and could be considered normal wear and tear – or caused by
external or environmental influences.
5. Accidental or malicious damage by misuse, negligence or faults caused by a failure to provide routine maintenance.
6. Faults that have resulted from normal wear and tear, including punctures, tearing, rusting or corrosion.
7. Accessories such as pegs and guy ropes.
8. Repairs carried out by repair agents that are not authorised by Dometic.
9. Products used commercially, or on a permanent site are not covered by the full warranty due to Commercial or permanent static use.
10. Negligence, accidental or deliberate misuse, or alterations to the product not approved by Dometic.
11. Any loss or damage caused by a failure to follow the manufacturer’s instructions for usage, installation, operation or maintenance.
12. Damage/failure to operate caused as a result of improper installation or infestations of vermin, pests or insects.
13. Perceived faults where the product is operating within the normal range of Dometic performance specifications and these performance
specifications were made known to you prior to purchase.
Note: removing screws or otherwise opening the outer case will void the warranty
AUSTRALIA ONLY
Our goods come with guarantees that cannot be excluded under the Australian Consumer Law. You are entitled to a replacement or refund for
a major failure and for compensation for any other reasonably foreseeable loss or damage. You are also entitled to have the goods repaired
or replaced if the goods fail to be of acceptable quality and the failure does not amount to a major failure. The benefits provided to you as the
consumer by this warranty are in addition to other rights and remedies available to you under the law.
NEW ZEALAND ONLY
This warranty policy is subject to the conditions and guarantees which are mandatory as implied by the Consumer Guarantees Act 1993 (NZ).
EN

12
AUSTRIA
Dometic Austria GmbH
Neudorferstraße 108
A-2353 Guntramsdorf
+43 2236 908070
+43 2236 90807060
Mail: [email protected]
BENELUX
Dometic Branch Office Belgium
Zincstraat 3
B-1500 Halle
+32 2 3598040
+32 2 3598050
Mail: [email protected]
BRAZIL
Dometic DO Brasil LTDA
Avenida Paulista 1754, conj. 111
SP 01310-920 Sao Paulo
+55 11 3251 3352
+55 11 3251 3362
Mail: [email protected]
DENMARK
Dometic Denmark A/S
Nordensvej 15, Taulov
DK-7000 Fredericia
+45 75585966
+45 75586307
Mail: [email protected]
FINLAND
Dometic Finland OY
Mestarintie 4
FIN-01730 Vantaa
+358 20 7413220
+358 9 7593700
Mail: info@dometic.fi
FRANCE
Dometic SAS
ZA du Pré de la Dame Jeanne
B.P. 5
F-60128 Plailly
+33 3 44633525
+33 3 44633518
GERMANY
Dometic WAECO International GmbH
Hollefeldstraße 63 · D-48282 Emsdetten
+49 (0) 2572 879-195
+49 (0) 2572 879-322
Mail: [email protected]
HONG KONG
Dometic Group Asia Pacific
Suites 2207-11 · 22/F · Tower 1
The Gateway · 25 Canton Road,
Tsim Sha Tsui · Kowloon
+852 2 4611386
+852 2 4665553
Mail: [email protected]
HUNGARY
Dometic Zrt. Sales Office
Kerékgyártó u. 5.
H-1147 Budapest
+36 1 468 4400
+36 1 468 4401
Mail: [email protected]
ITALY
Dometic Italy S.r.l.
Via Virgilio, 3
I-47122 Forlì (FC)
+39 0543 754901
+39 0543 754983
Mail: [email protected]
JAPAN
Dometic KK
Maekawa-Shibaura, Bldg. 2
2-13-9 Shibaura Minato-ku
Tokyo 108-0023
+81 3 5445 3333
+81 3 5445 3339
Mail: [email protected]
MEXICO
Dometic Mx, S. de R. L. de C. V.
Circuito Médicos No. 6 Local 1
Colonia Ciudad Satélite
CP 53100 Naucalpan de Juárez
Estado de México
+52 55 5374 4108
+52 55 5393 4683
Mail: [email protected]
NETHERLANDS
Dometic Benelux B.V.
Ecustraat 3
NL-4879 NP Etten-Leur
+31 76 5029000
+31 76 5029019
Mail: [email protected]
NEW ZEALAND
Dometic New Zealand Ltd.
P O Box 12011
1642 Penrose, Auckland
+64 9 622 1490
+64 9 622 1573
Mail: [email protected].nz
NORWAY
Dometic Norway AS
Østerøyveien 46
N-3232 Sandeord
+47 33428450
+47 33428459
Mail: fi[email protected]
POLAND
Dometic Poland Sp. z o.o.
Ul. Puławska 435A
PL-02-801 Warszawa
+48 22 414 3200
+48 22 414 3201
Mail: [email protected]
PORTUGAL
Dometic Spain, S.L.
Branch Office em Portugal
Rot. de São Gonçalo nº 1 – Esc. 12
2775-399 Carcavelos
+351 219 244 173
+351 219 243 206
Mail: [email protected]
RUSSIA
Dometic RUS LLC
Komsomolskaya square 6-1
RU-107140 Moscow
+7 495 780 79 39
+7 495 916 56 53
Mail: [email protected]
SINGAPORE
Dometic Pte Ltd
18 Boon Lay Way 06–140 Trade Hub 21
Singapore 609966
+65 6795 3177
+65 6862 6620
Mail: [email protected]
SLOVAKIA
Dometic Slovakia s.r.o. Sales Office Bratislava
Nádražná 34/A
900 28 Ivánka pri Dunaji
/ +421 2 45 529 680
Mail: bratislava@dometic.com
SOUTH AFRICA
Dometic (Pty) Ltd.
Regional Office
South Africa & Sub-Saharan Africa
2 Avalon Road
West Lake View Ext 11
Modderfontein 1645
Johannesburg
+27 11 4504978
+27 11 4504976
Mail: [email protected]
SPAIN
Dometic Spain S.L.
Avda. Sierra del Guadarrama, 16
E-28691 Villanueva de la Cañada
Madrid
+34 902 111 042
+34 900 100 245
Mail: [email protected]
SWEDEN
Dometic Scandinavia AB
Gustaf Melins gata 7
S-42131 Västra Frölunda
+46 31 7341100
+46 31 7341101
Mail: [email protected]
SWITZERLAND
Dometic Switzerland AG
Riedackerstrasse 7a
CH-8153 Rümlang
+41 44 8187171
+41 44 8187191
Mail: [email protected]
UNITED ARAB EMIRATES
Dometic Middle East FZCO
P. O. Box 17860
S-D 6, Jebel Ali Freezone
Dubai
+971 4 883 3858
+971 4 883 3868
Mail: [email protected]
UNITED KINGDOM
Dometic UK Ltd.
Dometic House, The Brewery
Blandford St. Mary
Dorset DT11 9LS
+44 344 626 0133
+44 344 626 0143
Mail: [email protected].uk
USA
Dometic RV Division
1120 North Main Street
Elkhart, IN 46515
+1 574-264-2131
AUSTRALIA
Dometic Australia Pty. Ltd.
3B McLaren Drive,
Clayton South, VIC 3169, Australia
1800 212121 · +61 7 55076001
dometic.com
Other manuals for CADAC SAFARI CHEF 30
2
This manual suits for next models
1
Table of contents
Other Dometic Grill manuals

Dometic
Dometic CADAC CITI CHEF 40 User manual

Dometic
Dometic CSO103 User manual

Dometic
Dometic PI7093 Technical specifications

Dometic
Dometic Classic 1 User manual

Dometic
Dometic CADAC CITI CHEF 40 User manual

Dometic
Dometic CADAC CITI CHEF 40 User manual

Dometic
Dometic CADAC SKOTTEL BRAAI 50 User manual

Dometic
Dometic CADAC SAFARI CHEF 30 User manual

Dometic
Dometic Classic1 User manual

Dometic
Dometic CE 88-ZF + User manual