domoova DHV40 User manual

EN
Stick vacuum cleaner
User Manual
DHV40

EN
User Manual
Thank you for choosing DOMOOVA! We hope you are fully satised
using your appliance as part of your cleaning routine.
If you should encounter situations that have not been properly
addressed in this User Manual or were to have any queries, do not
hesitate to contact us and a member of our Technical Customer
Service Department will be more than happy to answer your
questions.
For more information, you can visit the ocial DOMOOVA website:
www.domoova.com
We reserve the right to make technical alterations to the appliance
without prior notice with the objective of continually improving our
products and customer satisfaction.
Please carefully read all instructions in this manual before using this
appliance. DOMOOVA will not be liable for damage due to incorrect
use.

1
Contents
EN
Recommendations ............................................................. 2
Product overview................................................................ 3
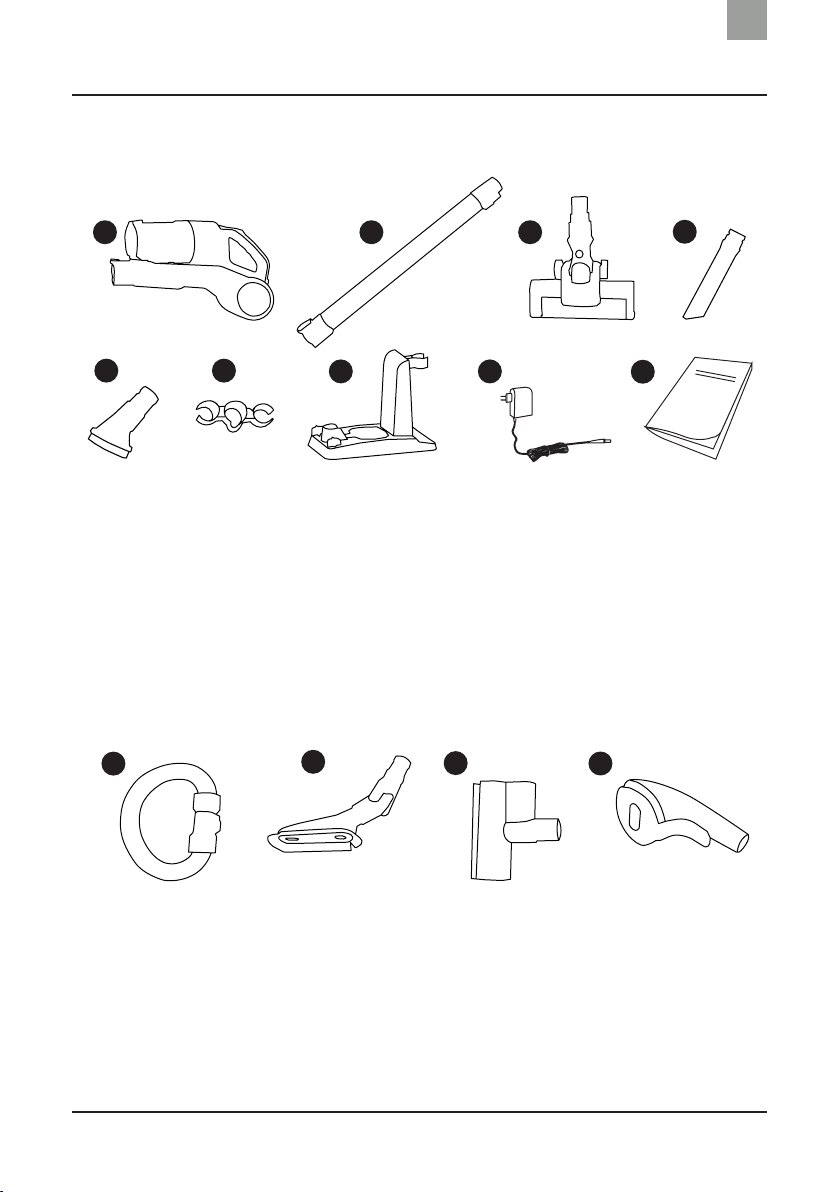
Product contents..................................................................................... 3
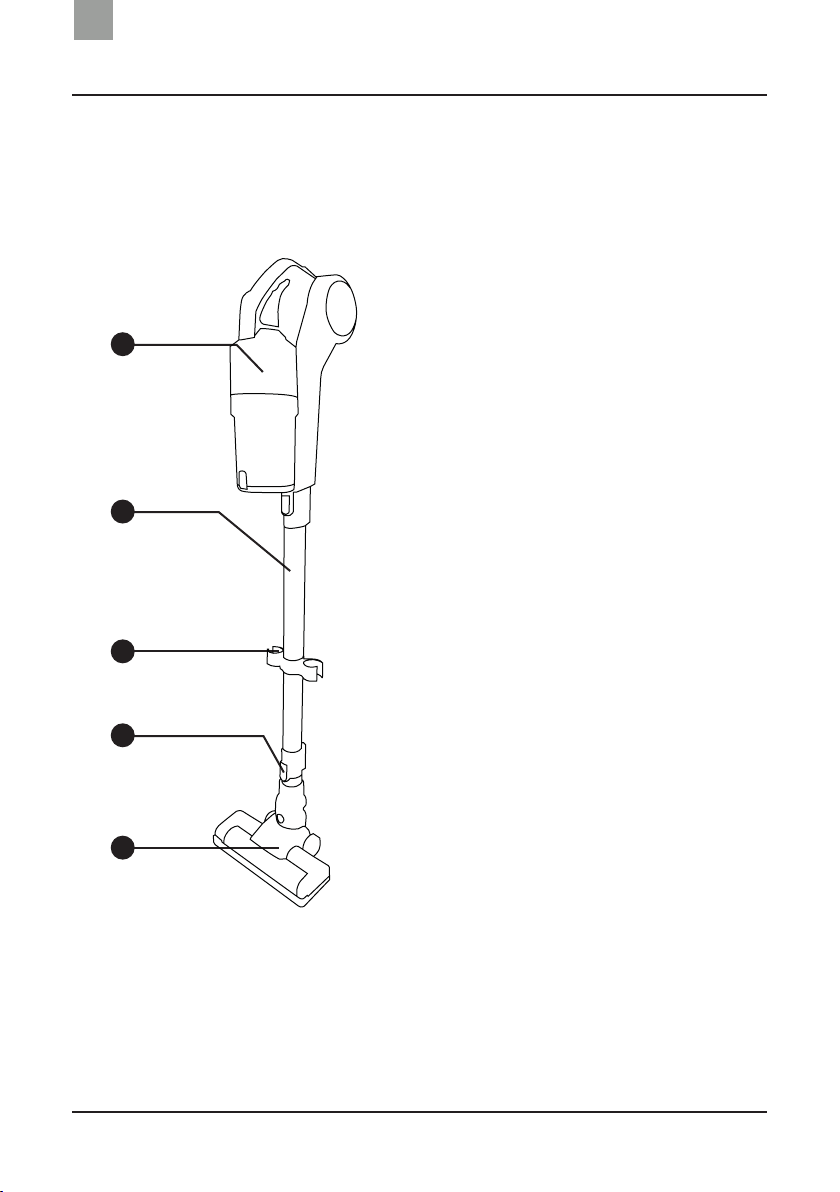
Product diagram ..................................................................................... 4
Operating the vacuum ...................................................... 9
Charging the battery............................................................................... 9
Starting the vacuum ............................................................................. 10
Operating modes.................................................................................. 11
Stopping the vacuum ........................................................................... 12
Maintenance......................................................................13
Dust bin, motor unit and lters........................................................... 13
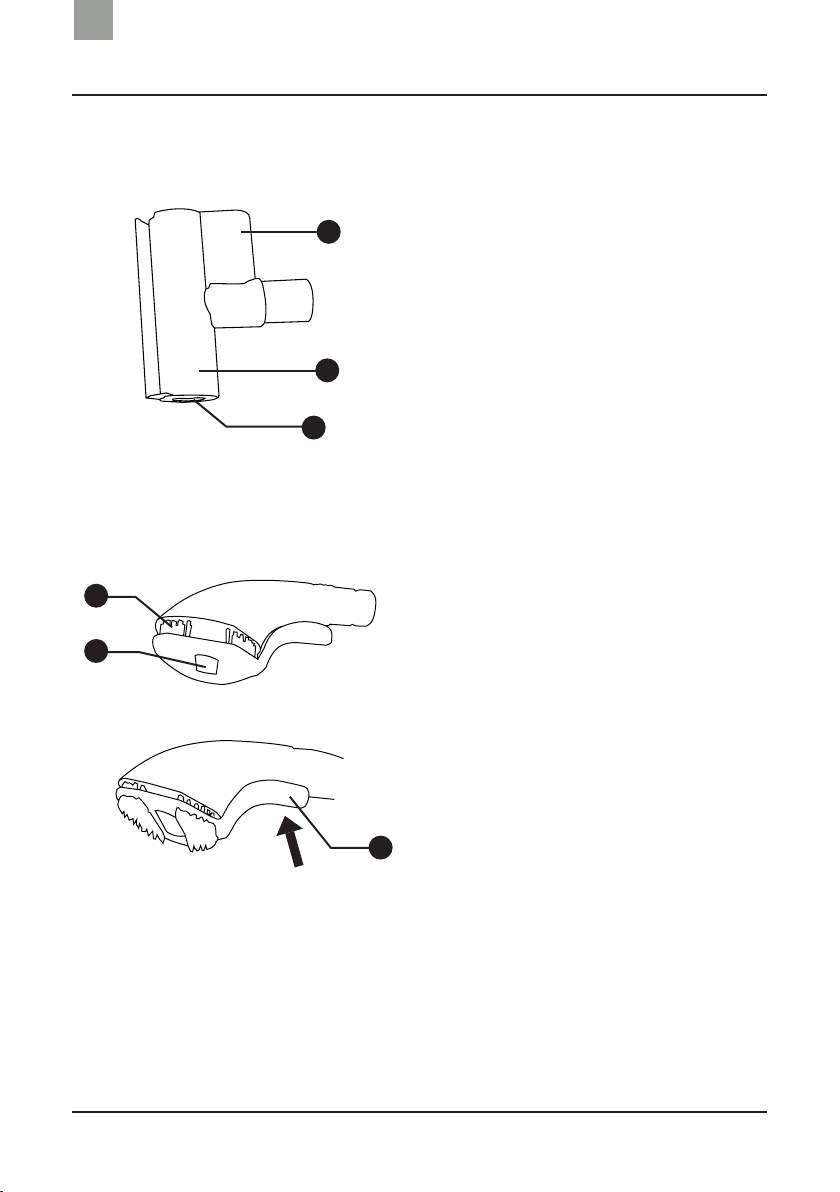
Turbo Brush........................................................................................... 14
Suction pipes ......................................................................................... 14
Accessories ............................................................................................ 14
Indicator lights ..................................................................15
Troubleshooting................................................................ 16
Table: Malfunctions and possible causes .......................................... 16
Warranty and after-sales service.................................. 18
Technical specications ..................................................19
Safety instructions and precautions............................20
Operating conditions............................................................................ 20
Recycling instructions .....................................................22

2
Recommendations
EN
• Before using DHV40 for the rst time, it must be charged for 5
hours.
• DRV40 is designed to be used inside.
• DHV40 is designed for household use only.
• DHV40 must be unplugged before it is used.
• The DHV40 Turbo Brush is not designed to be used on long-pile
carpets, which could block or damage the appliance.
• DHV40 is not designed to vacuum water or other liquid products.
• Do not use the appliance on wet surfaces.
• Please switch o the appliance before handling it (maintenance,
storage).
• Empty the dust bin every time the vacuum completes a cleaning
cycle.

3
Product overview
EN
Product contents
1 2 3 4
85 6 9
1. Motor unit
2. Cleaning wand
3. Turbo Brush
4. Crevice head
5. Small brush head
6. Accessory holder
7. Charging dock
8. Power adapter
9. User manual
7
Optional tools
11 1210 13
10. Suction hose
11. Flexible soft brush
12. Animal care brush
13. Grooming brush

4
Product overview
EN
Product diagram
Whole vacuum
1. Motor unit
2. Cleaning wand
3. Accessory holder
4. Cleaning wand release
button
5. Turbo Brush
1
2
3
4
5

5
Product overview
EN
Motor unit
1. ON/OFF button
2. Suction control button
3. Indicator light
4. Dust bin
5. Cyclone technology
6. Release button
7. Dust bin release button
8. Battery case
9. Ergonomic handle
10. Power plug
1
2
3 5
4
7
6
9
10
8
1. Notch to attach the motor
unit
2. Dust bin release button
3. Dust bin cover
4. Dust bin dirt tube
5. Dust bin fastening notches
6. Check valve
1
2
3 4
5
6
Dust bin and cyclone system

6
Product overview
EN
Filters
Turbo Brush
1 2
3
4
5
1. Filter housing
2. HEPA 10 lter attachment
3. HEPA lter release button
4. HEPA 10 lter
5. Protection lter
1. Side wheels
2. Brush pivot
3. Rotating brush release latch
4. Rotating cylinder brush
1
2
3
4

7
Product overview
EN
Charging dock
2
11. Motor unit power supply
2. Cleaning wand and turbo
brush holder
Suction hose (optional)
1
2
1. Suction hose
2. Accessory connector head
(brushes and tool)
Flexible soft brush (optional)
1
2
1. Brush pivot
2. Soft bristles
3. Lining for furniture and
delicate surfaces
3

8
Product overview
EN
Animal care brush (optional)
1. Motor unit
2. Electric rotating brush
3. Pivoting head
1
3
2
Grooming brush (optional)
1. Rubber brush
2. Vacuum nozzle
3. Anti-tangle button
1
2
3

9
Operating the vacuum
EN
Charging the battery
Detach the motor unit from the cleaning wand and place it on
the charging dock. Make sure it is connected to the power supply
correctly.
Attach the cleaning wand and Turbo Brush to the holder on the
charging dock. You can attach the accessory holder to the cleaning
wand to store the crevice and small brush heads.

10
Operating the vacuum
EN
Dierent light indicators are displayed while the appliance is
charging.
When the battery is low, the handle indicator light is continuous red.
When the battery is charging, the indicator light is orange. When the
battery is fully charged, the indicator light is green.
NOTES:
• The stick vacuum battery may already be charged when you receive it. However,
you are recommended to charge the appliance for 5 hours (usual charge time)
before using the appliance.
• If the vacuum is not used for a long period of time, you are recommended to
fully charge the battery, unplug it and store it in a cool, dry place.
• The power cable can be connected directly to the stick vacuum. Turn the
charging dock over and unscrew the two screws on the underneath to access
the power plug. Remove it and connect it to your appliance.
Starting the vacuum
After attaching the cleaning head of your choice to the vacuum, press
the ON/OFF button on the top of the handle to switch the appliance
on.
NOTES:
• Unplug the stick vacuum before you use it.
• Do not use the Turbo Brush on long-pile carpets to prevent damaging the
appliance.

11
Operating the vacuum
EN
Power modes
The stick vacuum has two power modes. Press on the power mode
button on the vacuum handle to increase or decrease the power (see
motor diagram on page 5).
NOTES:
• The indicator light is green when using the low power mode. The indicator light
is orange when using the high power mode.
• The battery lasts for 25 minutes in low power mode and 40 minutes in high
power mode.
Operating modes
Stick vacuum
Connect the cleaning wand to
the vacuum unit and attach
the Turbo Brush or one of the
accessories.

12
Operating the vacuum
EN
Handheld vacuum
When using the handheld
vacuum, you can connect the
Turbo Brush or one of the
accessories directly to the
appliance's motor unit.
NOTE: Regularly check the state of the Turbo Brush and accessories to prevent
them from damaging ooring and furniture.
Stopping the appliance
Press the ON/OFF button to turn the appliance o.

13
Maintenance
EN
Dust bin, motor unit and lters
Dust bin
Empty the dust bin after each use.
Check that the vacuum is turned o and unplugged. Open the dust
bin cover to empty it quickly and easily (see dust bin diagram on
page 5)
NOTE: Take care when opening the cover as the dust could fall out on to the oor.
Motor unit and lters
To clean the motor unit and lters, press on the release button to
remove the dust bin (see the motor unit diagram on page 5).
Lift o the protection lter and unlatch the HEPA lter (see the lter
diagram on page 6), then shake them outdoors to remove the dust
particles that have accumulated. Clean the protection lter with
clean water. Then pull out the cyclone system and clean it with a soft
cloth to remove all of the dust.
NOTES:
• Make sure the protection lter is dry before you put it back in the dust bin.
• The HEPA lter cannot be cleaned, otherwise it would become damaged. You
are recommended to change the HEPA lter regularly to maintain optimum
performance.
• When inserting the cyclone system into the dust bin, make sure the check valve
is in line with the dirt tube.
• Check the locking instructions on the top to reposition the HEPA lter.

14
Maintenance
EN
Turbo Brush
Please make sure to clean the brush regularly for optimum
performance.
Release the latch under the Turbo Brush, then remove the rotating
cylinder brush (see the Turbo Brush diagram on page 6).
Remove debris (hair, dust) buildup on the brush and reattach the
brush. Make sure you reposition the release latch correctly.
NOTE: To reattach the brush, rst insert the left side into the notches and then the
right side.
Suction pipes
Cleaning wand
Regularly check that the cleaning wand is not blocked by dust
buildup or other debris.
Hose (optional)
Check that the hose is not blocked by dust buildup or other debris.
Accessories
Crevice head, small brush head and optional accessories must be
checked and cleaned regularly to maintain optimum performance.
NOTE: If the accessories are not cleaned regularly, the vacuum's performance could
deteriorate.

15
Indicator lights
EN
Appliance status Indicator
Charging (low battery) Continuous red light
Charging (in progress) Continuous orange light
Charging nished Continuous green light
Low suction power Continuous green light
High suction power Continuous orange light
Low battery Flashing red light

16
Troubleshooting
EN
Please contact DOMOOVA technical department in the following
cases:
• If the appliance has been dropped, damaged or come into
contact with water.
• If the power cable is damaged.
• If the battery is defective.
Table: Malfunctions and possible causes
To prevent breakdowns, regularly empty and clean the dust bin and
check the accessories.
No Malfunction Cause Solution
1
The appliance
does not
respond.
1. Overheating.
2. The appliance is in
safety mode.
1. Clean the dust bin. Check
that nothing is blocking the
accessories.
2. Wait a few minutes so that
vacuum returns to a normal
temperature.
2
The appliance
will not turn
o.
1. Battery level is low.
2. Overheating.
1. Charge the appliance.
2. Wait for the appliance to
return to a normal temperature.
3
The appliance
will not
charge.
1. The appliance is not
correctly connected to
the charging dock.
1. Lift and reposition the motor
unit on the charging dock,
making sure the power supply
is connected to the vacuum and
the mains.

17
Troubleshooting
EN
If none of the above-mentioned steps provide a solution for your
problem, please contact the DOMOOVA after-sales department.
4Loss of
suction.
1. The dust bin is full.
2. There is a blockage
in the vacuum nozzle or
accessories.
1. Empty the dust bin and clean
the cyclone and the lters.
2. Remove any hair and debris
from the rotating brush and
accessories. Check that the
cleaning wand is not blocked.
Make sure the check valve is in
line with the dust bin's dirt tube.
5
The rotating
brush does
not rotate or
rotates slowly.
1. The brush has a
buildup of hair and
dirt preventing it from
working correctly.
1. Clean the brush and remove
any hair caught on it.

18
Warranty and after-sales service
EN
DOMOOVA help desk
Our DOMOOVA customer service department is ready to help you:
By email: [email protected]
NOTE: The warranty does not cover damage caused by rusting, a collision or misuse.
Accessories are not covered by the warranty.
Table of contents
Languages:
Other domoova Vacuum Cleaner manuals

domoova
domoova DRV50 User manual

domoova
domoova DBV60 User manual

domoova
domoova DRV20 User manual

domoova
domoova DHV61 User manual

domoova
domoova DHV50 User manual

domoova
domoova DTV20 User manual

domoova
domoova DHV60 User manual

domoova
domoova DHV41 User manual

domoova
domoova DRV80 User manual

domoova
domoova DHV51 User manual