domoova DRV50 User manual

EN
Vacuum cleaning robot
User Manual
DRV50
CLEAN

EN
User Manual
Thank you for choosing DOMOOVA! We hope you are fully satised
using your robot as part of your cleaning routine.
If you should encounter situations that have not been properly
addressed in this User Manual or were to have any queries, do not
hesitate to contact us and a member of our Technical Customer
Service Department will be more than happy to answer your
questions.
For more information, you can visit the ocial DOMOOVA website:
www.domoova.com
We reserve the right to make technical alterations to the appliance
without prior notice with the objective of continually improving our
products and customer satisfaction.
Please carefully read all instructions in this manual before using this
appliance. DOMOOVA will not be liable for damage due to incorrect
use.

1
Contents
EN
Recommendations ............................................................. 3
Product overview................................................................ 4
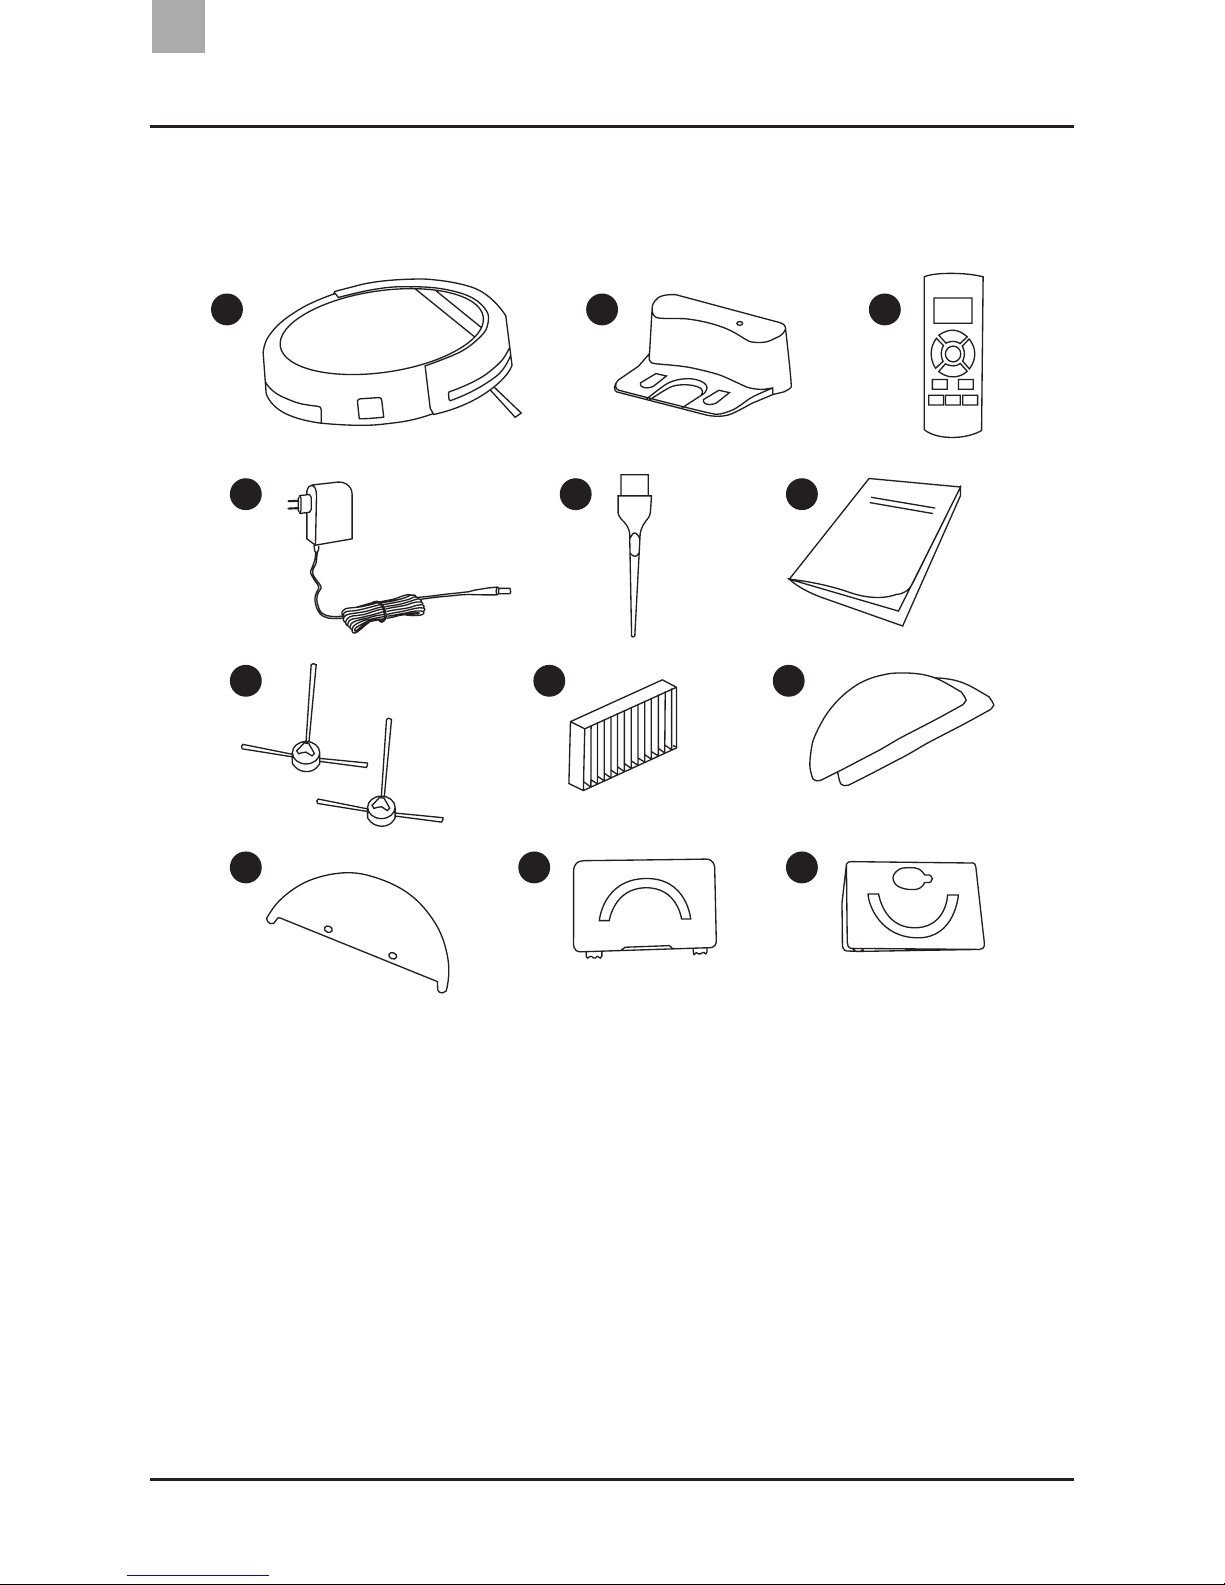
Product contents..................................................................................... 4
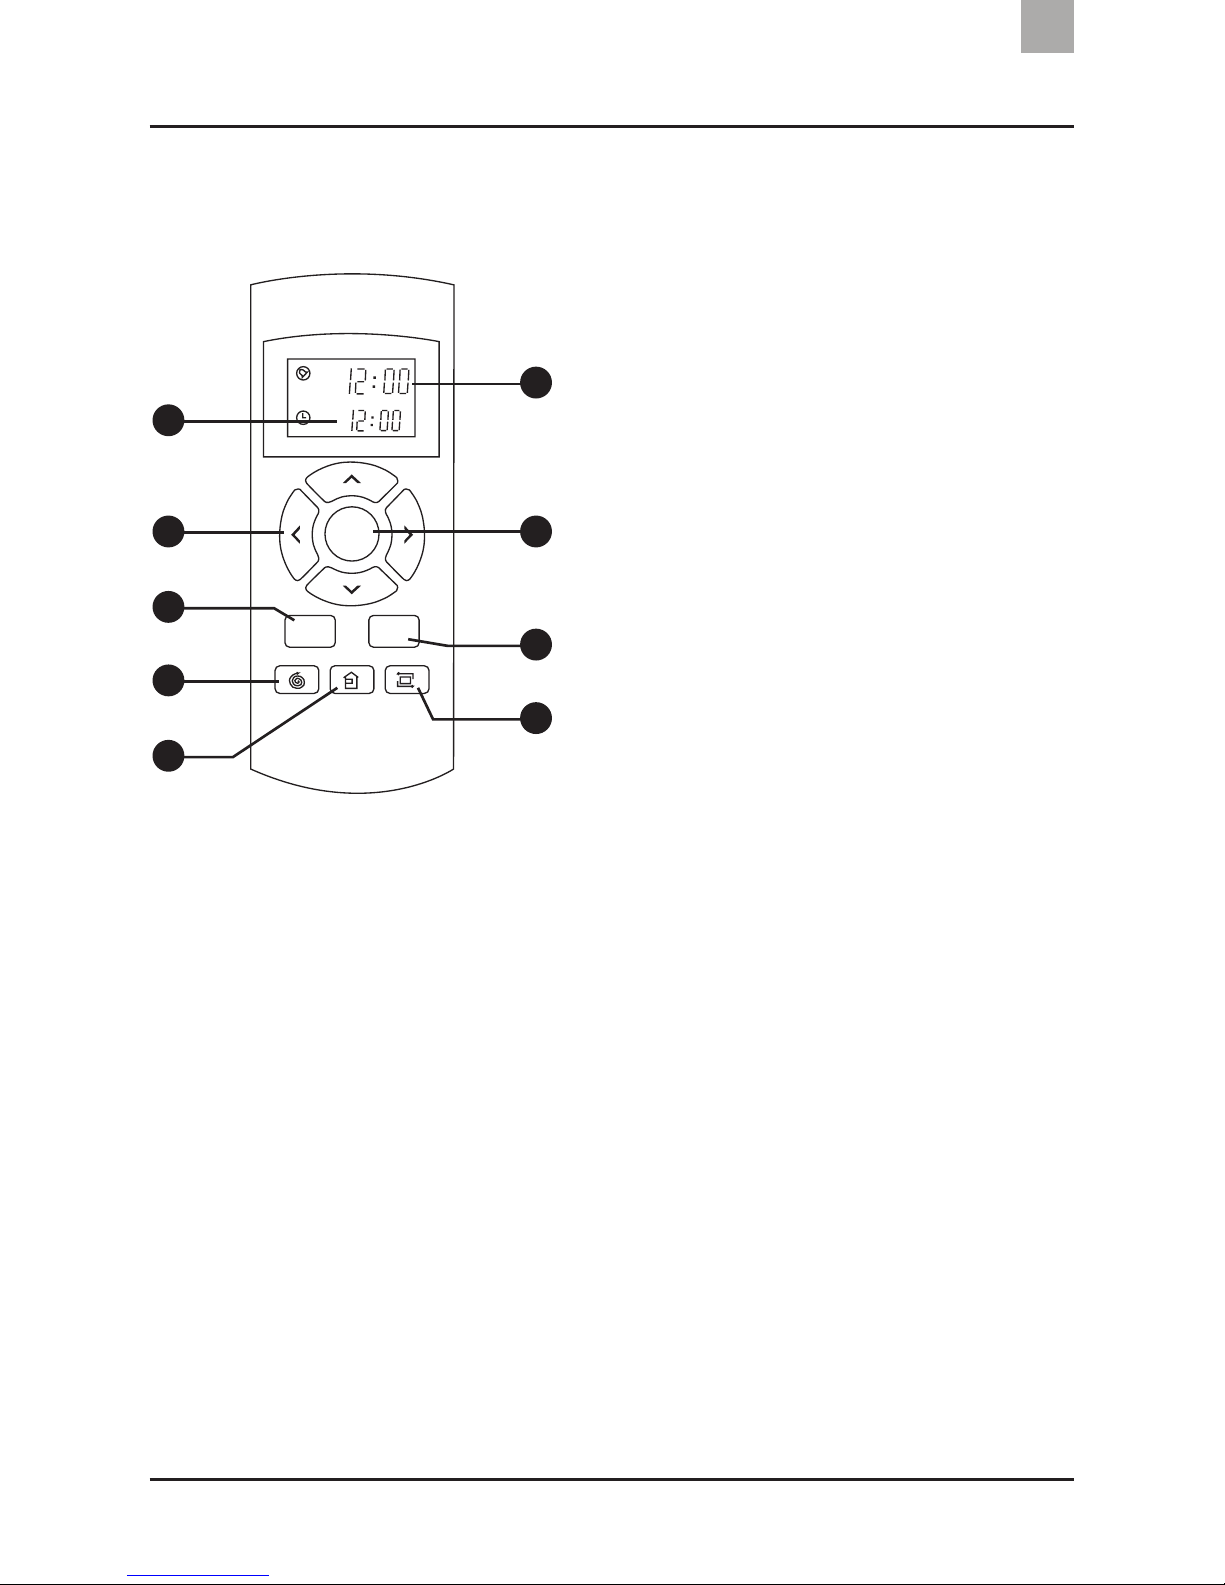
Product diagram ..................................................................................... 5
Operating the robot........................................................... 8
Safety - Notes before use....................................................................... 8
Charging the battery............................................................................... 9
Vacuum mode (dust bin)...................................................................... 11
Cleaning mode (water compartment) ................................................ 11
Starting the robot ................................................................................. 13
Scheduling the robot............................................................................ 14
Cleaning routes ..................................................................................... 16
Pausing the robot ................................................................................. 18
Stopping the robot................................................................................ 18
Maintenance......................................................................19
Side brushes and compartments........................................................ 19
Filters...................................................................................................... 20
Sensors, nozzles and cleaning pad..................................................... 21
Indicator lights ..................................................................22
Troubleshooting................................................................ 23
Table: malfunctions and possible causes .......................................... 23
Warranty and after-sales service.................................. 24
Technical specications ..................................................25

2
Contents
EN
Safety instructions and precautions............................ 26
Operating conditions............................................................................ 26
Recycling instructions .....................................................27

3
Recommendations
EN
• DRV50 needs a headway of at least 8cm so that it can go under
furniture.
• DRV50 can go over threshold strips of a maximum thickness of
1cm, otherwise it automatically stops or reverses.
• DRV50 is not designed to be used on long-pile carpets, which
could cause the robot to automatically stop or reverse.
• DRV50 is designed for a maximum surface area of 100m2.
• If the robot could come across a gap while cleaning, please check
that the gap sensors are clean before using the robot.
• DRV50 is designed for routine oor cleaning. The appliance is not
intended to replace heavy-duty cleaning.
• Do not use the appliance on damp oors.
• DRV50 must be used on at surfaces.

4
Product overview
EN
Product contents
1 2 3
4
7
10
5 6
8 9
11 12
1. Domoova DRV50 Robot
2. Home base
3. Remote control (batteries
not included)
4. Power adapter
5. Cleaning tool
6. User manual
7. 2 spare side brushes
8. 1 spare HEPA lter
9. 2 microbre cleaning pads
10. Microbre cleaning pad
attachment
11. Dust bin
12. Water compartment

5
Product overview
EN
Product diagram
Robot top view
CLEAN
1
2
3
4
7
6
5
1. Bumper
2. CLEAN button
3. Indicator lights
4. Bin cover
5. Bin
6. Power plug
7. ON/OFF button
Robot bottom view
8
7
1
6
2
4
5
3
4
1. Gap sensors
2. Castor
3. Charge contacts
4. Side brushes
5. Battery cover
6. Vacuum nozzle
7. Right and left wheels
8. Drip nozzles

6
Product overview
EN
Dust bin
1
2
3
4
1. Main lter
2. Dust bin cover
3. HEPA lter
4. HEPA lter attachment
Water compartment
1 2 3
1. Water compartment sensor
2. Rell nozzle
3. Drip nozzles
Home base
1
2
3
4
1. Power indicator light
2. Cover
3. Power plug
4. Charging poles

7
Product overview
EN
Remote control
AM
PM
AM
PM
PLAN
CLOCK
CLEAN
1
2
3
4
5
6
7
8
9
1. Time
2. Directional arrows
3. PLAN button (schedule)
4. SPOT button
5. Back to home base button
6. Scheduled time
7. CLEAN button
8. CLOCK button (setting the
clock)
9. WALL button (length of wall)

8
Operating the robot
EN
Safety - Notes before use
• DRV50 is designed to be used inside.
• To reduce the risk of electrical shock, do not place the appliance
near water or other liquids, other than using the water
compartment.
• Do not touch the power plug or the appliance with wet hands.
• Do not pull on the appliance's power cable to avoid causing
possible damage.
• Keep the power cable away from sources of heat.
• Do not use the appliance if the power cable or plug are damaged.
• WARNING: Only use the power cable supplied by the manufacturer
to charge the battery.
• The remote control requires 2 x LR03-type batteries (AAA). They
are not supplied with the robot.
• Please switch o the appliance before handling it (manually
moving it, maintenance, cleaning).

9
Operating the robot
EN
Charging the battery
Assembling the home base
1m
1m
2m
Plug in the home base using the power cable.
Place the home base on a level surface next to a wall. Keep a space
of 2m in front of the home base and 1m at either side.
NOTE: When the DOMOOVA robot is on its home base, make sure that the home
base power light is on.
Switching the robot on
Turn the switch on the side of the robot to ON. "I" is ON and "O" is
OFF. The robot is ready to be charged.

10
Operating the robot
EN
Charging the battery
Figure 1 Figure 2
There are two ways to charge the battery:
• using the home base (Figure 1).
• using the power adapter (Figure 2).
NOTE:
• Before using DOMOOVA for the rst time, you must charge it for at least 12
hours. The battery will only need to be charged for 200 or 300 minutes there-
after.
• The robot must be switched on while it is being charged.
• The robot is charging when the 6 blue lights ash from bottom to top.
• The battery is charged when the indicator lights are continuous blue.
• When the battery is charged, the robot switches to stand-by after around 50
seconds.
• If the battery is weak while the robot is cleaning, it returns to its home base. The
home base must therefore be switched on (Figure 1).
• If the robot is not used for a long period of time, you are recommended to fully
charge the battery, switch o the robot and store it in a cool, dry place.

11
Operating the robot
EN
Vacuum mode (dust bin)
To use the vacuum mode, insert the dust bin in the corresponding
space.
Cleaning mode (water compartment)
Figure 1
Figure 3
Figure 2
Attaching the cleaning pad
Dampen the cleaning pad and
attach it to the Velcro area
(Figure 1). Then turn over the
robot and clip on the cleaning
pad attachment (Figures 2 and
3).

12
Operating the robot
EN
To ll the water compartment,
open the cap and carefully pour
in clean water with a few drops
of oor cleaning product.
NOTE: The compartment must contain
between 50 ml (minimum) and 250ml
(maximum) of liquid for optimum
performance.
Figure 1
Figure 2
Insert the compartment in the
robot and close the cover.
The robot automatically detects
the water compartment due to
its compartment sensor (Figure
2). The appliance is ready to start
its cleaning cycle.
Preparing the water compartment
Inserting the water compartment

13
Operating the robot
EN
The vacuum mode stops when the cleaning mode is selected; the
vacuum stops when the robot detects the water compartment.
NOTE:
• Please refer to the vacuum mode section to nd out how to use the robot's
vacuum mode (page 11).
• Do not use the cleaning mode on rugs or carpets.
• Do not charge the robot when the water compartment is inserted in the robot.
Starting the robot
After choosing the vacuum or cleaning mode and switching the robot
on, you can start the robot. Press the CLEAN button on the robot or
the remote control.
AM
PM
AM
PM
PLAN
CLOCK
CLEAN

14
Operating the robot
EN
Scheduling the robot
The schedule function can be used to programme the robot to clean
at the same time every day of the week. The time and scheduled
time can be reset via the remote control.
Setting the time
AM
PM
AM
PM
PLAN
CLOCK
CLEAN
AM
PM
AM
PM
CLOCK
AM
PM
AM
PM
PLAN
CLOCK
CLEAN
AM
PM
AM
PM
AM
PM
AM
PM
PLAN
CLOCK
CLEAN
AM
PM
AM
PM
CLOCK
Press the CLOCK button on the
remote control (Figure 1). The
time ashes; use the arrows to
modify the hour and minutes
(Figure 2). Press CLOCK to
validate the time (Figure 3).
Figure 1 Figure 2
Figure 3
Setting a schedule
NOTE: Scheduled cleaning only works when the dust bin is inside the robot and the
vacuum mode is on (see page 11).

15
Operating the robot
EN
AM
PM
AM
PM
PLAN
CLOCK
CLEAN
AM
PM
AM
PM
PLAN
AM
PM
AM
PM
PLAN
CLOCK
CLEAN
AM
PM
AM
PM
AM
PM
AM
PM
PLAN
CLOCK
CLEAN
AM
PM
AM
PM
Figure 1 Figure 2
Figure 3
Press the PLAN button on the
remote control (Figure 1). The
schedule time ashes; use the
arrows to modify the hour and
minutes (Figure 2). Press PLAN
to validate the scheduled clean
time (Figure 3).
NOTE:
• The robot will perform the scheduled clean within a period of 15 minutes of the
programmed time.
• To cancel a schedule, set the PLAN time to "0" (Figure 4).
Warning: Scheduled cleaning and the remote control times are lost when the
batteries are changed. Reset the time and scheduled cleaning time as above.
AM
PM
AM
PM
PLAN
CLOCK
CLEAN
AM
PM
AM
PM
AM
PM
AM
PM
Figure 4
PLAN

16
Operating the robot
EN
Cleaning routes
The robot has four cleaning routes. These routes can be selected
using the remote control.
AUTO mode
AM
PM
AM
PM
PLAN
CLOCK
CLEAN
AM
PM
AM
PM
PLAN
CLOCK
CLEAN
AM
PM
AM
PM
PLAN
CLOCK
CLEAN
CLEAN
With the AUTO mode, the robot
alternates its route during the
cleaning cycle.
SPOT mode
Wall mode
This mode is the most eective
when cleaning a particularly
dirty area. With the SPOT mode,
the robot will move in a spiral to
concentrate vacuuming over the
required area.
This mode eciently cleans
dicult to reach areas, i.e. along
walls, skirting boards, beneath
objects placed on the oor.
NOTE: Press the CLEAN button before
starting SPOT or wall modes.

17
Operating the robot
EN
Home base mode
AM
PM
AM
PM
PLAN
CLOCK
CLEAN
If you wish to charge the robot
at any time during its cleaning
cycle, you can do so by pressing
the "Home Base" button on the
remote control. The robot will
automatically go back to home
base after searching (search
time depends on the distance
between the home base and if there are any objects along its route).
NOTE: For more details about the remote control buttons, please refer to page 7.

18
Operating the robot
EN
Pause
To pause the robot, press the CLEAN button on the robot or on the
remote control.
NOTE: After around 15 seconds, the robot automatically switches to stand-by. After
an additional 15 seconds, the robot goes back to home base. When the robot is on
stand-by it can be switched on by pressing CLEAN at any time.
Stop
When the robot nishes its cleaning cycle, it goes back to home
base. To manually stop the robot, press the CLEAN button on the
robot or the remote control.
Switch o
Turn the switch on the side of the robot to "O". The robot is switched
o.
Table of contents
Languages:
Other domoova Vacuum Cleaner manuals

domoova
domoova DHV51 User manual

domoova
domoova DHV61 User manual

domoova
domoova DHV50 User manual

domoova
domoova DHV60 User manual

domoova
domoova DHV41 User manual

domoova
domoova DBV60 User manual

domoova
domoova DRV80 User manual

domoova
domoova DHV40 User manual

domoova
domoova DRV20 User manual

domoova
domoova DTV20 User manual