Doro DECT 4055 User manual

DECT 4055
Caller display compatible
digital cordless phone
This equipment is not designed for making emergency telephone calls when the power fails.
Alternative arrangements should be made for access to the emergency services.
User guide

DORO DECT 4055 CONTENTS
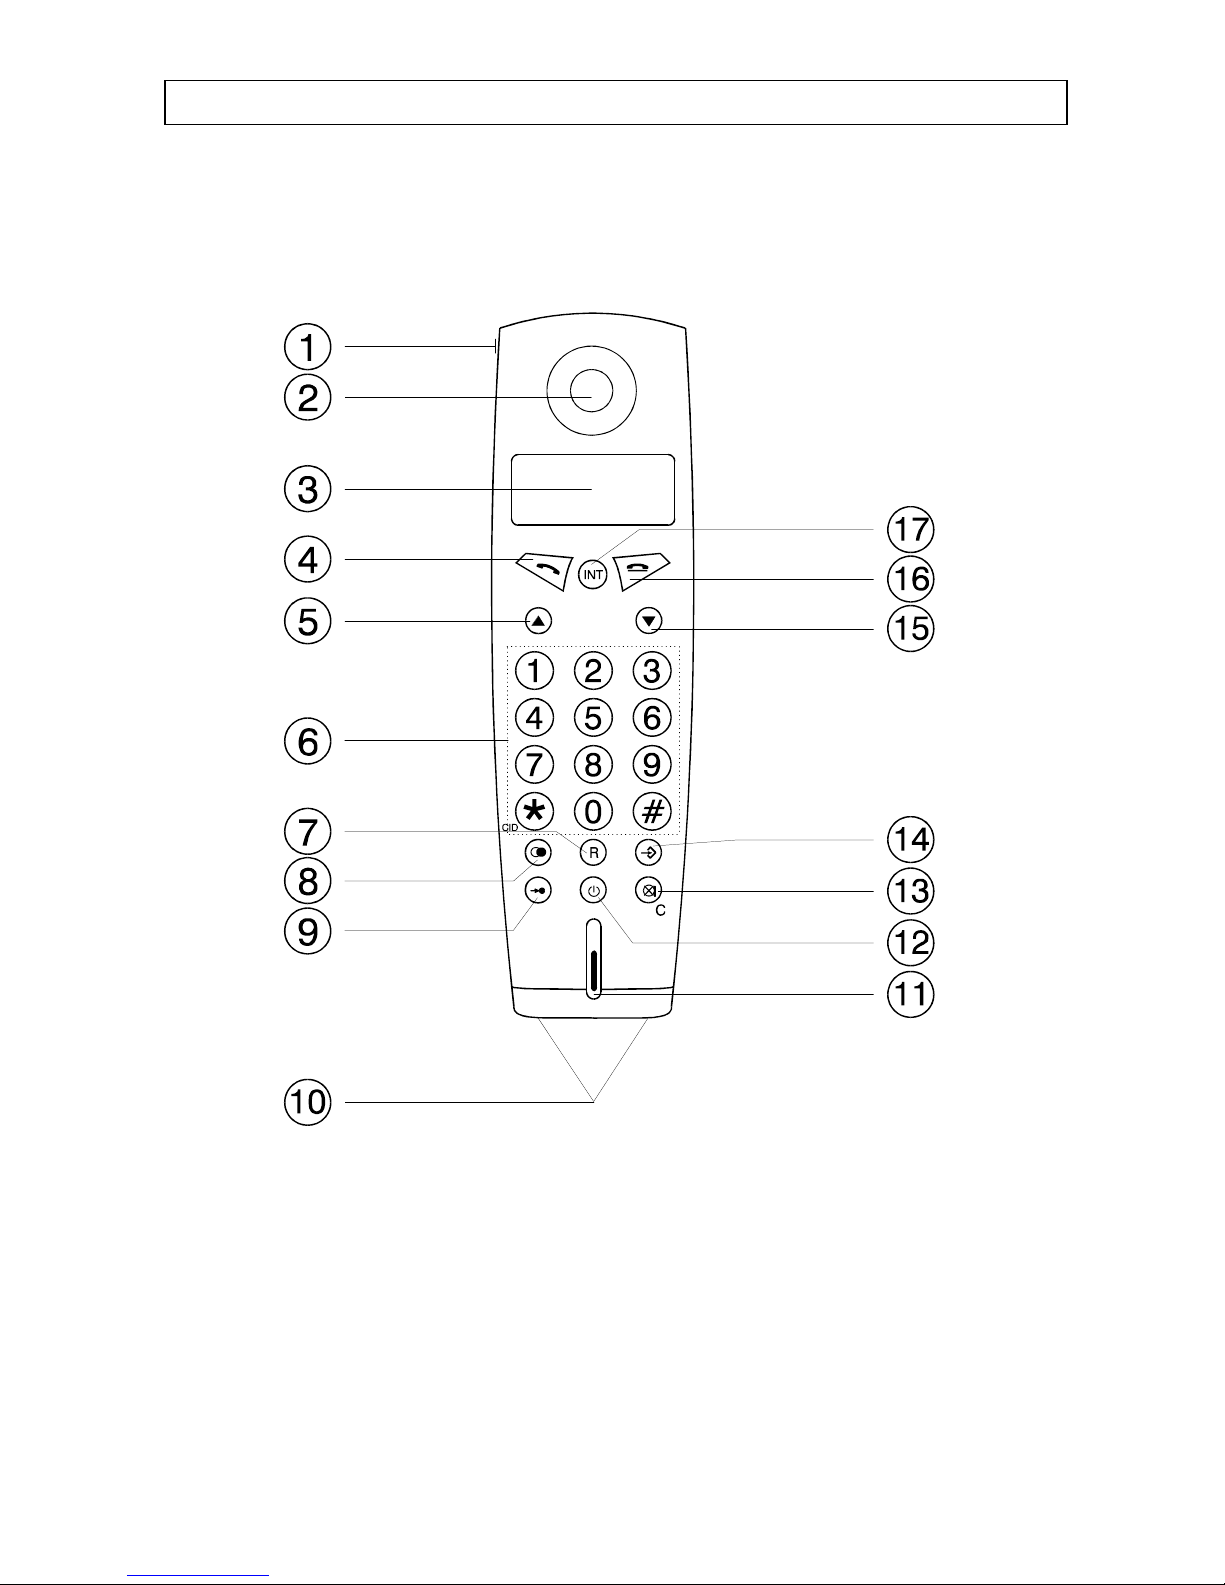
Location of Controls ...........2Handsets menu ..............16
Handset ...................2Handset ringer volume level 16
Base unit ..................3Handset ringer melody .....16
Unpacking .................3Display information .......17
Handset keypad sound .....17
Installation ...................4Auto answer .............18
Location the base unit .......4Baby call ................18-19
Getting connected ...........4Select base unit ...........19
Handset battery care .........5Handset PIN code .........20
Handset battery indicator .....5Register ..............20
On/Off button ..............5Reset ...................21
Belt clip ...................6
Range warning .............6Base units setting ............22
In-use time. ................6 Ringer volume level .......22
Headset socket .............6Ringer melody ...........22
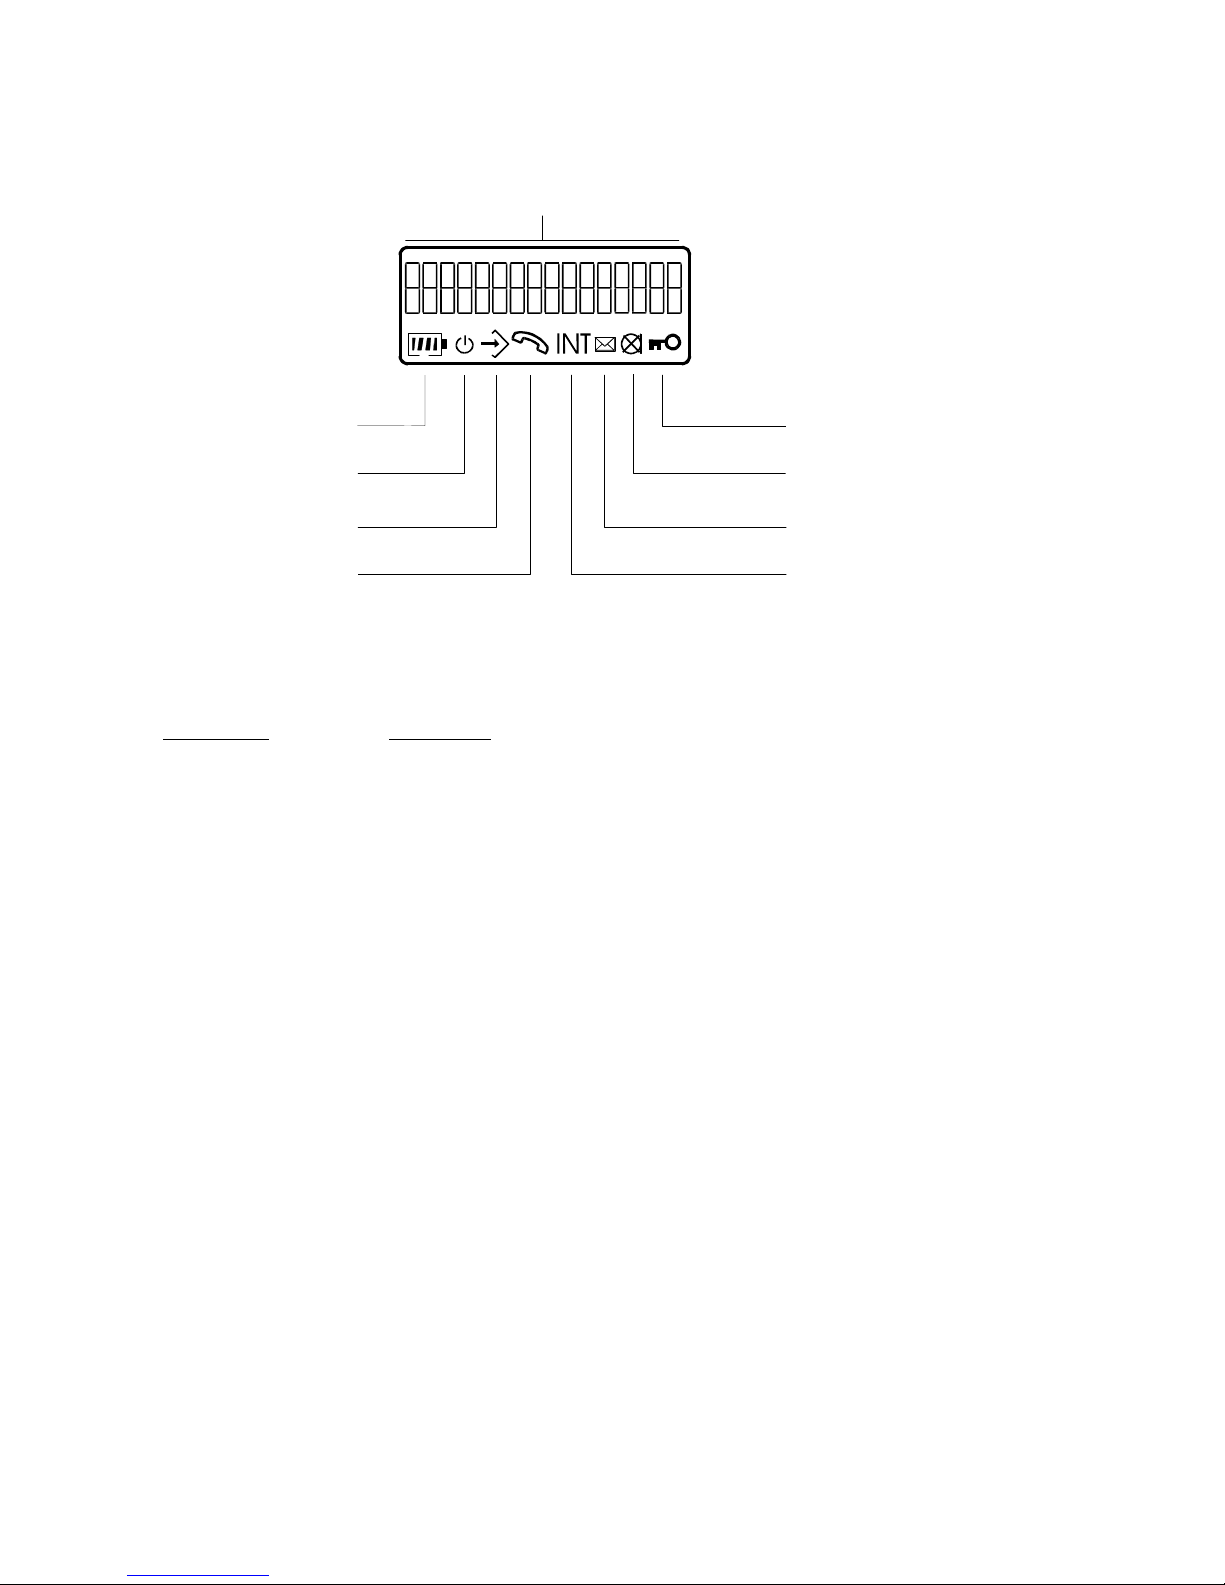
Handset display ............7Priority ringing ...........23
.........................Ring count ..............23
Use ..........................8PABX usage .............24
Standby mode ..............8Emergency number ........25
Answering incoming calls ....8Call barring ..............25-26
Do not disturb ...............8 Least cost routing .........27
Making an external call ......8PIN code ................28
Call timer .................9Deregister ...............28
Last number redial ..........9Reset ...................28
Mute .....................9
Page/Find handset ...........9
Keypad lock ...............9Extending ..................29
Earpiece volume control ......10 Additional base units ......29
Memory numbers ...........10 Additional handsets .......30
Additional network service ...10 Internal call ..............31
.........................Transferring calls .........31
Caller display .................11 Paging all handsets ........31
Viewing caller display numbers 12-13
Deleting a number from the list 14 Miscellaneous ...............32
Deleting all numbers ........14 Show IPEI number ........32
Direct dialling from the call list 14 Interference ..............32
.....................Fault finding .............32-33
Menu settings .................15 Approved use ............34
.........................Technical data ............34

1
LOCATION OF CONTROLS DECT 4055
HANDSET
1Headset socket (on the side) 10 Charging contacts
2Earpiece 11 Microphone
3Display 12 On/Off-button
4Talk button 13 Mute/Cancel button
5Scroll button UP 14 Programming button
6Keypad button 0-9, *, # 15 Scroll button DOWN
7Recall button 16 End call button
8Redial button 17 Intercom call button
9Memory button

2
BASE UNIT
18 Power supply socket 21 In use indicator
19 Line cord socket 22 Charge indicator
20 Charging contacts 23 Paging button
UNPACKING
In the box you should find the following items:
nHandset nPower supply
nBase unit nLine cord
n2 NiMh batteries (re-chargeable types) nUser guide
nBelt clip

3
INSTALLATION DECT 4055
LOCATING THE BASE UNIT
It is essential to the overall range and performance that the base unit and handset can
receive and transmit good radio signals.
Place the base unit close to:
na telephone network socket
na 13 Amp mains socket
The best location is in an upstairs room and central to the area to be covered. If you
experience poor range, try re-siting the base unit.
nDo not locate in: direct sunlight, damp or high humidity locations.
nDo not locate close to: electrical equipment such as TV's, computers, fridges, etc.,
or close to radiators, metal pipes or window frames.
GETTING CONNECTED
nRemove the battery cover from the bottom of the handset by applying gentle pressure
to the bottom of the cover and pushing away from the unit. Insert the battery
(supplied), observing correct polarity. Replace the battery cover.
nConnect the power adaptor plug to the rear of the base unit and to a 13 Amp mains
socket.
n Connect the telephone line to the rear of the base unit and to a telephone network
socket
nPlace the handset onto the base unit (face up or down). Switch mains power on
and leave for 8 hours.

4
HANDSET BATTERY CARE
nAfter initial charging the power adaptor must remain connected to the mains & base
unit and mains power switched on. It is recommended that the handset is left on
charge overnight to ensure maximum in-use time. The batteries should hold their
charge for 110 hours, depending on use.
nIf the phone is not to be used for a substantial period of time, i.e. holidays,
disconnect the mains power adaptor, when power is reconnected it will be
necessary to recharge the handset for 8 hours.
nThe batteries will need replacing if there are signs of leakage, the batteries will not
hold a charge for more than two hours.
nThe rechargeable batteries (NiMH) are cadmium-free and should be disposed of in
a responsible and environmentally friendly manner.
IMPORTANT!
From new, the batteries (supplied) must be charged for 8 hours without interruption.
You can obtain your replacement batteries from:
Consumer support department, Doro Audioline Ltd, 22 Walkers Road, North Moons
Moat, Redditch, Worcestershire, B98 9HE. Price available on request:
Telephone 01527 583800
The guarantee will be invalid if any problems arise as a result of the use of an
incorrectly specified battery.
HANDSET BATTERY INDICATOR
When the battery is empty, calls cannot be made or received. When the battery is nearly
empty the indicator will begin to flash and a warning tone will be heard.
Fully charged
High charge
Half charge
Low battery
Empty battery. A warning beep will be heard.

5
ON/OFF BUTTON
The On/Off button is used to switch the handset on or off. When the handset is
switched off, battery power is conserved and calls cannot be made or received.
To switch off, press & hold the button until the handset beeps, then release.
To switch on, press & hold the button until the handset beeps, then release.
BELT CLIP
Abelt clip is provided with the product. This item can be connected easily to the rear
of the handset by fitting it to the small rectangular holes on the sides.
RANGE WARNING
If you are on a call and accidentally walk out of range of the base unit, the sound quality
in the earpiece will de-grade and warning beeps will be heard.
IN-USE TIME
When the battery is fully charged will the in-use time be 11 hour standby or 13 hours
talk time. The times are approximately and it assume normally temperature, the battery
is correct and fully charged
HEADSET SOCKET
Aheadset can be attached to the headset socket on the left hand side. When a headset
is connected, sound will not be audible through the handset microphone.
Compatibleheadsets can be ordered via the Consumer Support department on
01527 583800.

6
HANDSET DISPLAY
Numeric/alpha display
Battery status Barred
Range Mute
Programming New number
External call Internal call
Indicator Function
Battery status - indicates the battery power status.
Range - is on when the handset is switched on and within range.
-flashes when the handset is out-of-range of the base unit.
Programming - is on when programming.
External call - is on when an external call is in progress.
- flashes when an external call is received.
Internal call - is on when an internal call is in progress.
- flashes when an internal call is received.
New number - is on when there is new number in the caller display memory.
Mute - is on when the mute function is activated.
Barrier -is on when calls are barred/baby call is implemented.

7
DECT 4055 USING THE PHONE
STANDBY MODE
When the handset is not in-use (standby mode) the LCD display will show the handset
identity number and the battery status.
ANSWERING INCOMING CALLS
When an external call is received, the base unit will ring first and the in-use LED will
flash.
#To take the call, press and release the button when the handset rings. When
aphone call is received the handset symbol will appear on the display. The ringer
sound can be changed to personal preferences (see page 16).
To finish the call either replace the handset on the base unit or press the
button. The handset can also be programmed to connect with a call automatically
when lifted off the base unit, if required (see page 18).
DO NOT DISTURB
If you receive an incoming call, but do not want to be disturbed - press and release the
button. The handset ringer will be switched off. The ringer will be re-instated
automatically when a new call is received. Note: The base ringer will continue to ring.
MAKING AN EXTERNAL CALL
Two methods are available:
Method A
nDial the telephone number that you wish to call (the number will be visible on the
display). If you dial an incorrect digit, use the Cbutton to erase it.
nPress (the number will be dialled automatically).
nTo terminate the call, press .
Method B
nPress the Talk button.
nDial the phone number (the number will be visible on the display).
nTo terminate the call, press the button.

8
CALL TIMER
The length of outgoing and incoming calls will be shown on the display approximately
10 seconds after a call is connected.
LAST NUMBER REDIAL
The last four numbers dialled are stored automatically in the memory. One or all of the
numbers can be re-dialled as required.
nPress the button until the number you want to call is visible on the display.
nPress the button (the number will be dialled automatically).
MUTE
If during a telephone conversation, you which to talk privately to a third party without
the caller overhearing, press the button (the mute symbol will appear on the
display). To resume the conversation, press the button again.
PAGE/FIND HANDSET
To page or locate a missing handset, press the button on the base unit. The handset
will ring for 30 seconds approximately.
To terminate this action, press the button or the button on the handset.
KEYPAD LOCK
The keypad can be locked to prevent accidental operation when the handset is being
carried.
1. Press- and hold - button #for about 1 second.
The display shows:
2.Press and hold down the #button for about 1 second to terminate the keypad lock.
If you receive an incoming call in this mode, press the talk button to answer. When the
call is terminated, the keypad will revert to the locked position.

9
EARPIECE VOLUME CONTROL
When on a call, the volume level in the earpiece can be increased or decreased on three
levels using the and buttons.
MEMORY NUMBERS
Ten of your most frequently used telephone numbers can be stored in the direct memory,
using the kaypad digits 0-9 as the storage locations.
STORING MEMORY NUMBERS
nPress the button, and then button. The display shows "_".
nSelect the memory location number (Keypad 0-9) or scroll with button.
nDial the number you which to store (max 20 digits).
nPress the button.
nContinue to store other numbers, or press the button to finish.
If you insert an incorrect digit, you can erase it by pressing the Cbutton. To insert a
pause, press the button.
DIALLING MEMORY NUMBERS
nPress the button and then the appropriate memory location number, keypad
digit 0-9 or scroll with button.
nPress the button, the number will be dialled automatically.
You can also press the talk button first and then select a memory number.
ADDITIONAL NETWORK SERVICES
The R (Recall) button can be used to access additional network services. Contact your
network operator for further details.

10
DECT 4055 CALLER DISPLAY
Caller display allows you to see who is calling before you answer a call and to see who
has called in your absence. When the service is implemented on your telephone line,
seconds before your telephone rings the number of the incoming caller will appear on
the display. Up to 39 incoming numbers can be stored in the call list. When the list is
full, the oldest number will be deleted automatically.
It is not possible to view the call list and take a new call at the same time.
WARNING!
Caller display is an optional telephone Network service. This telephone will provide
Caller Display information provided the service is available on the telephone
Network and any subscription charges (if required) have been fulfilled. Check with
your telephone Network operator for full details.
If the Caller display service is not implemented on your telephone line, incoming call
information will not be displayed.
If the handset is registered to a different base unit, any information in the call list will
be lost.

11
VIEWING CALLER DISPLAY NUMBERS
The in-use indicator on the base unit will flash and the symbol will appear
on the handset display when a new call(s) is received. Once the number(s) has been
reviewed the indicator will stop flashing and symbol will not be visible on the display.
When an incoming number is received it is assigned a call sequence number which
appears on the left hand side of the display, commencing with 01 ( oldest call) up to 39
(latest call).
1. Press and hold the *button until the display shows the number of new calls and the
total number of calls, then release.
1 new phone number A total of 4 phone numbers
on the call list on the call list
3. Press the button to show new, unread number(s).
4. Scroll between the number with button and .
Button scrolls "down" to the oldest number.
Button Scrolls "up" to latest number.
nTo terminate the review procedure, press the button.

12
The display will also provide the following information:
The list has been reviewed to the oldest number.
The list has been reviewed to the latest number.
Call information is not available. It could be an
international call.
The caller has withheld their number or the number
cannot be transmitted.
There is a message waiting. this information is available
only with compatible telephone network service.

13
DELETING A NUMBER FROM THE LIST
nEnsure the number you want to erase is on the display.
nPress the C.button twice. The display will show "ErASE" and the phone number
will be erased.
DELETING ALL NUMBERS FROM THE LIST
nEnsure a call list number is on the display
nPress and hold the Cbutton, until the display shows "ErASE ALL" then release..
nPress the C button again, all phone numbers will be erased.
IF THE LIST IS FULL
Up to 39 incoming numbers can be stored in the call list (including "Out oF
arEa"and "SecrEt" information). When the list is full, the oldest number will be
deleted automatically.
DIRECT DIALLING FROM THE CALL LIST
It is possible to dial any of the numbers stored in the call list quickly and easily.
nEnsure the number you want to dial is present on the display.
nPress the button, the number will be dialled automatically.

14
DECT 4055 MENU SETTINGS
The DECT 4055 has a simple menu system which is controlled by five buttons:
The and buttons are used to scroll through the menus.
The button is used to enter the menu system and confirm a setting.
The button can be used to revert back to standby mode without saving.
The Cbutton is used to erase.
THE MENU CONSISTS OF TWO MAIN GROUPS:
Handset menu
Used to set the handset to personal preferences.
To enter: Press followed by either of the scroll buttons.
Base unit menu
Used to set the base unit to personal preferences.
To enter: Press followed by #.

15
HANDSET MENU DECT 4055
To enter the handsets menu, press and then either or .
HANDSET RINGER VOLUME LEVEL (BELL LOUD)
You can change the ringer volume level in four levels: off, low, normal and high.
nPress followed by .
nScroll to "bELL Loud". Press .
nThe display shows the current setting (oFF = off, 3 =highest level).
nScroll to desired setting with and buttons.
nPress to store your setting.
In order to hear the correct setting while programming , the key beep must be activated.
HANDSET RINGER MELODY (BELL TYPE)
You can choose from six different melodies for the telephone ringer.
nPress followed by .
nScroll to "bELL tYPE". Press .
nThe display shows the current setting (1 = Type 1, 2 = Type 2 etc).
nScroll to desired setting with and buttons.
nPress to store your setting.
In order to hear the correct setting while programming , the key beep must be activated.

16
DISPLAY INFORMATION (BS/HS-DISP)
When the unit is in standby mode it can display the handset (hS-diSP) and base (bS-
diSP) identity numbers. This information can be switched on or off.
Base unit Handset number
number
nPress followed by .
nScroll until the display shows "bS dISP".or "hS dISP". Press .
nThe display shows the current setting (on or oFF).
nScroll to desired setting with or buttons.
nPress to store the setting.
HANDSET KEYPAD SOUND (BEEP)
From new, the handset keypad is programmed to emit a confirmation beep every time
a key is pressed. This beep can be turned off as desired.
nPress followed by .
nScroll until the display shows "bEEP". Press .
nThe display shows the current setting (on or oFF).
nScroll to desired setting with or buttons.
nPress to store the setting.

17
AUTO ANSWER (AUTO ACCEPT)
If the handset is on the base unit, this feature allows the handset to connect with a call
automatically when lifted off the base unit, without the need to press the Talk button.
nPress followed by .
nScroll until the display shows "Auto AccEPt". Press .
nThe display shows the current setting (on or oFF).
nScroll to desired setting with or .
nPress to store the setting.
BABY CALL (DIRECT NR/SET)
This feature enables the handset to be pre-programmed with an emergency number
which can be dialled automatically by pressing any button (except the programming
button). It is possible to answer calls even if this feature is implemented. .
STORE THE BABY CALL NUMBER
nPress followed by .
nScroll until the display shows "dirEct nr". Press .
nEnter the handsets PIN-code (0000 from new).
nThe baby call number will be shown in the display.
nEnter the number (max 20 digits). If you enter an incorrect digit, press the Cbutton
to erase it.
nPress to store the setting.
Baby call is now activated. The display will show the keypad locked symbol.

18
ACTIVATE/DEACTIVATE BABY CALL
nPress followed by .
nScroll until the display shows "dirEct SEt ". Press .
nEnter the handsets PIN-code (0000 from new).
nThe display shows the current setting (on or oFF).
nScroll to desired setting with or .
nPress to store the setting.
SELECT A BASE UNIT (SELECT BS)
If the handset is registered to more than one base unit, you can select one base unit as
a special base unit irrespective of how many base units are registered.
nPress followed by .
nScroll until the display shows "SELEct bS". Press .
nThe display shows the current setting.
nEnter desired setting/base unit using the keypad digits.
Setting "0" means that the handset automatically select a base unit in the range.
nPress to store the setting.
Table of contents
Other Doro Telephone Accessories manuals
Popular Telephone Accessories manuals by other brands

AT&T
AT&T TL7000 user manual

Dynamix
Dynamix hp-52m quick start guide

make it real
make it real 3C 4G TECH ACCESSORIES SET instructions

BELGACOM
BELGACOM Twist 610 user manual

Toshiba
Toshiba STRATA CTX DKT3014-SDL Quick reference guide

Grandstream Networks
Grandstream Networks HT814V2 Quick installation guide