DOT DOTH-300 Instructions for use

DOTH-300
APPLICATION
MANUAL
Date
2013-07-15
Rev
1.04
Page
1-1
Application Manual
for DOT-H300 Windows Mobile computer
D.O.Tel

DOTH-300
APPLICATION
MANUAL
Date
2013-07-15
Rev
1.04
Page
1-2
Document Revision History
Doc ver.
Release date
Description of change
1.00
2012/08/06
1st Release of this document
1.01
2012/10/09
H300WM_KIOSK_R0103 Added
H300WM_KeyWedge_R0107 updated
H300WM_SetUpDeviceCtrl_R0103 updated
1.02
2012/11/30
H300WM_KeyWedge_R0203 updated
1.03
2013/02/25
H300WM_KeyWedge_R0303 updated
H300WM_Demo_R0302.CAB
1.04
2013/04/23
H300WM_KeyWedge_R0308 updated
H300WM_SetUpDeviceCtrl_R0106.CAB
H300WM_KIOSK_R0105.CAB
H300WM_Demo_R0307.CAB
1.05
2013/07/31
2013/08/01
H300WM_KeyWedge_R0312 updated
H300WM_DEMO_R0312.CAB updated

DOTH-300
APPLICATION
MANUAL
Date
2013-07-15
Rev
1.04
Page
1-3
Version Information
Module
Program
Version
Date
Start Up
H300WM_SetUpDeviceCtrl_R0106.CAB
R0106
2012-12-21
KeyWedge
H300WM_KeyWedge_R0312.CAB
R0308
2012-07-26
Demo
H300WM_DEMO_R0312.CAB
R0312
2013-08-01
App Center
H300WM_KIOSK_R0105.CAB
R0105
2013-03-21

DOTH-300
APPLICATION
MANUAL
Date
2013-07-15
Rev
1.04
Page
1-4
Contents
Before You Begin .................................................................................................................................6
About This Document...........................................................................................................................6
Chapter 1: Guide to StartUp Management............................................................................................7
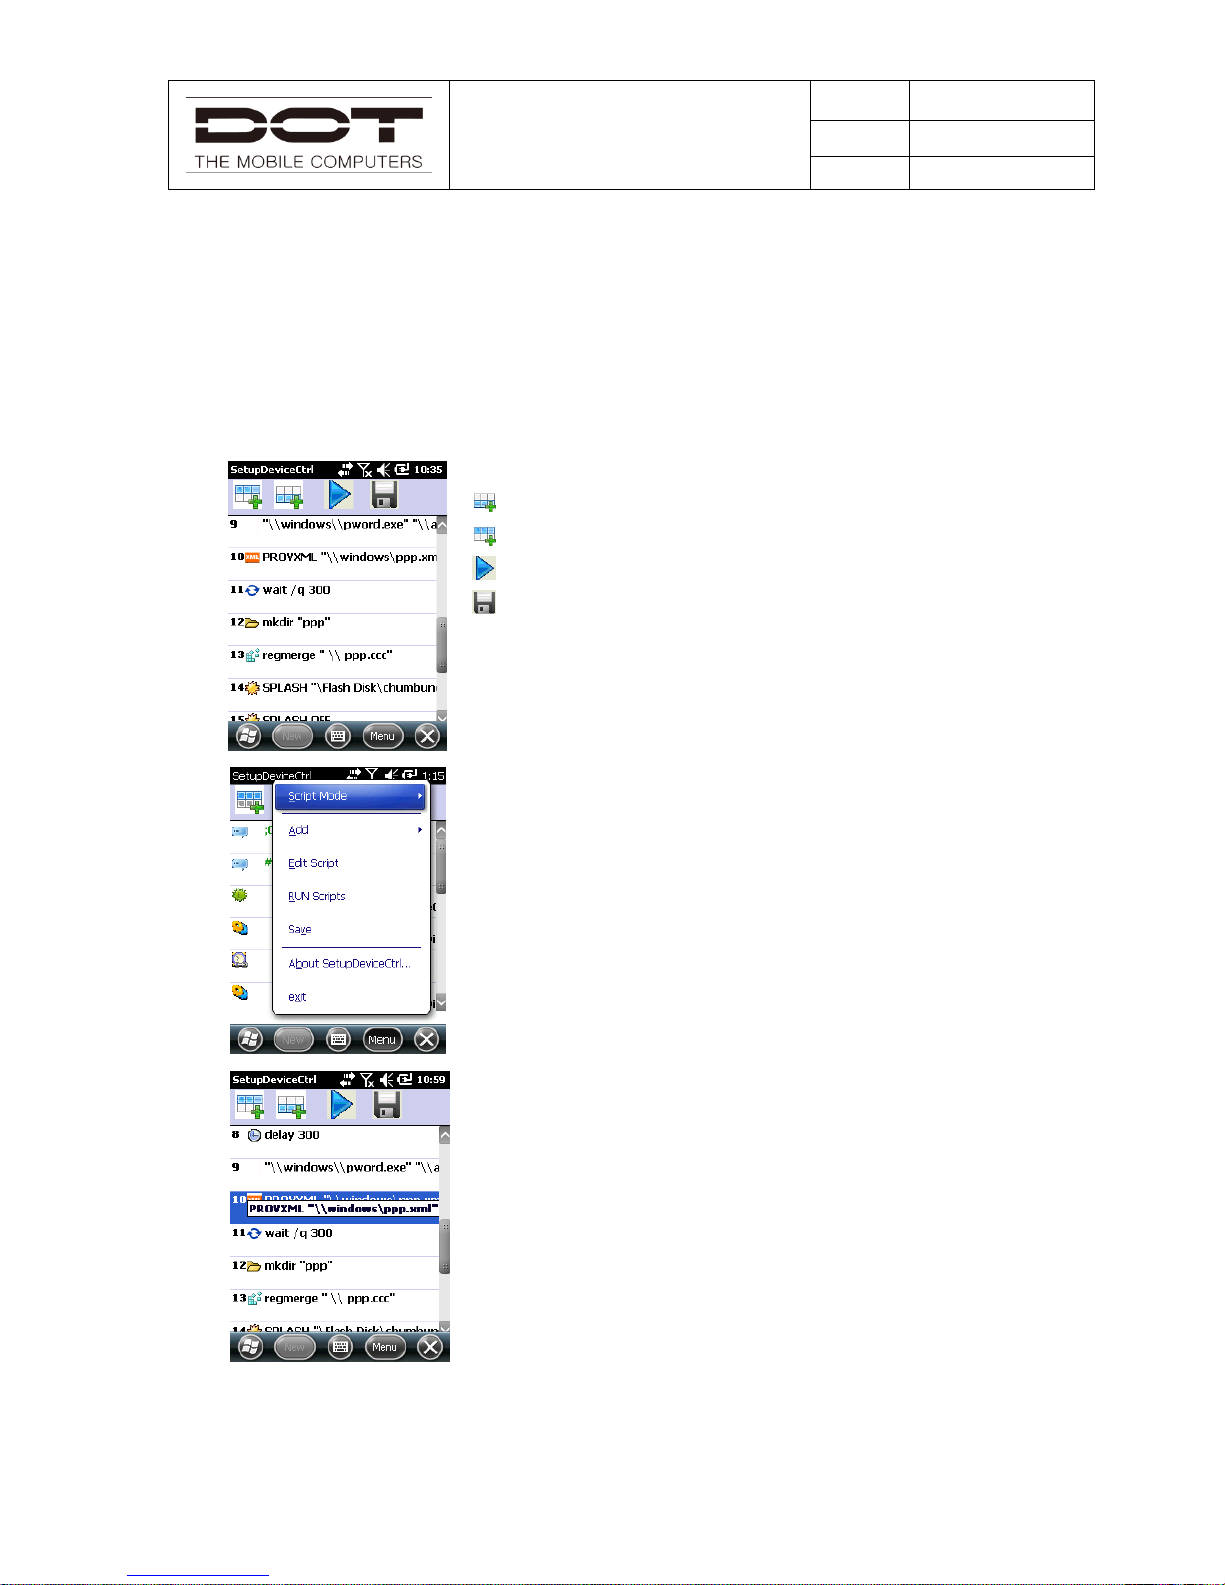
1.1 SetupDeviceCtrl..........................................................................................................................7
1.2 ProcessINI.................................................................................................................................11
1.3 OsUpdateManager.....................................................................................................................14
Chapter 2: KeyWedge.....................................................................................................................16
2.1 KeyWedgeTray.........................................................................................................................18
2.2: KeyWedge Home Screen.........................................................................................................18
2.3 KeyWedge Option.....................................................................................................................21
2.4 Scanner KeyWedge Option.......................................................................................................25
2.5 HF RFID KeyWedge Option.....................................................................................................25
2.6 UHF RFID KeyWedge Option..................................................................................................30
Chapter 3: Camera...............................................................................................................................32
Chapter 4: Bluetooth...........................................................................................................................35
Chapter 5: Wireless LAN (WLAN)....................................................................................................37
Chapter 6: Features Demo...................................................................................................................41
6.1 1D Scanner Demo .....................................................................................................................41
6.2 2D Scanner Demo .....................................................................................................................45
6.3 HF RFID Demo.........................................................................................................................49
6.4 UHF RFID Demo......................................................................................................................53
Chapter 7: Windows Mobile Dialer ....................................................................................................60

DOTH-300
APPLICATION
MANUAL
Date
2013-07-15
Rev
1.04
Page
1-5
7.1 Making a Phone Call.................................................................................................................60
7.2 Answering a Call.......................................................................................................................63
7.3 Missed Call................................................................................................................................64
7.4 Using a Speed Dial....................................................................................................................64
Chapter 8: KIOSK Manager................................................................................................................66

DOTH-300
APPLICATION
MANUAL
Date
2013-07-15
Rev
1.04
Page
1-6
Before You Begin
This document is helpful for the person who is responsible for demonstrating the functions and features of
DOT mobile computer. Before you work with this document, you should be familiar with your network
environment and general networking terms.
About This Document
This document guides you to explore the functions of a DOT mobile computer. You can utilize these
applications to experience functions as follows:
▪Control Setup-Device, Configure Device Default Value and update OS image
▪Scanning bar codes (1D/2D)
▪Reading a HF RFID Cards and Tags
▪Reading a UHF Tags
▪Emulate a Key-wedge function
▪Taking a picture with an integrated camera
▪Pairing a Bluetooth accessories
▪Connecting with WLAN AP
▪Making a phone call with an integrated phone
For more information about which functions are supported by your DOT mobile computer, see each chapter’s
beginning .

DOTH-300
APPLICATION
MANUAL
Date
2013-07-15
Rev
1.04
Page
1-7
Chapter 1: Guide to StartUp Management
This chapter describes SetupDeviceCtrl.exe for initializing the mobile computer, Process.INI for setting initial
default value of the mobile computer and OsUpdateManager.exe for safe OS image updates.
Installing SetupDeviceCtrl folder
H300WM_SetupDeviceCtrl_R01xx.CAB;
My Device > Flash Disk > CAB > H300WM_SetupDeviceCtrl_R01xx.CAB
Tap H300WM_SetupDeviceCtrl_R01xx.CAB to install to SetupDeviceCtrl folder.
Generated folder and files; ~My Device/Flash Disk/SetupDeviceCtrl/~
Supported Model
OS
Type
DOTH-300S(Q)
DOTH-300C(Q)
Windows Embedded Handheld 6.5
SetupDeviceCtrl.exe
Scripts
ProcessINI.exe
1.1 SetupDeviceCtrl
SetupDeviceCtrl (DOS batch file type script) is used for initializing the mobile computer.
▪SetupDeviceCtrl.exe; located in [Flash Disk/SetupDeviceCtrl/]
▪Scripts ( OnCleanStart.txt , OnResetStart.txt)
SetupDeviceCtrl runs automatically at Clean Boot or Reset. If you want to have your own, you can
manually execute this script through User Interface window which can be edited and saved.
Auto run of SetupDeviceCtrl
During Clean Boot,
[Flash Disk/SetupDeviceCtrl/OnCleanStart /OnCleanStart.txt] is executed.
If SetupDeviceCtrl.exe exists in [Storage Card/SetupDeviceCtrl/],
[Storage Card/SetupDeviceCtrl/OnCleanStart /OnCleanStart.txt] is executed.
During Reset,

DOTH-300
APPLICATION
MANUAL
Date
2013-07-15
Rev
1.04
Page
1-8
[Flash Disk/SetupDeviceCtrl/OnEveryReset /OnResetStart.txt] is executed.
If SetupDeviceCtrl.exe exists in [Storage Card/SetupDeviceCtrl/],
[Storage Card/SetupDeviceCtrl/OnEveryReset/OnResetStart.txt] is executed.
Manual run of SetupDeviceCtrl
You can manipulate scripts through UI edit window.
: Add new line after the current line
: Add new line before the current line.
: Executes all scripts.
: Save all edited scripts.
Besides buttons, you can edit, run and save scripts through Menu. Tap
Menu on the system tray.
▪Script Mode > Clean Start; Scripts of the OnCleanStart.txt will be
displayed.
▪Script Mode > Reset Start; Scripts of the OnResetStart.txt will be
displayed.
▪Add > Add After….; Add new line after the current line.
▪Add > Add Before….; Add new line before the current line.
▪Edit Scripts; will enter the edit mode of the current line.
* When you want to edit the current line, tap the line one more time. Then,
it will enter the edit mode of the line that you want to edit.
▪Run Scripts; will run all scripts.

DOTH-300
APPLICATION
MANUAL
Date
2013-07-15
Rev
1.04
Page
1-9
▪Save; will save what you edited.
Script Format
Following table shows script command, parameter set for reference.
Function
Command
Parameter
Remarks
Comment
<;> or <//>
Ex> //comment 1
Copy
Copy
“src” “dest”
Ex> copy "\Flash Disk\test.txt" "\Flash Disk\CopyFile.txt"
Move
Move
“src” “dest”
Ex> move "\Flash Disk\test.txt" "\Flash Disk\MoveFileOk.txt"
Delete
Delete
“target”
Ex> delete "\Flash Disk\test.txt"
Make Shortcut
Shortcut
“src” ”shortcut”
Ex> shortcut "\Windows" "\Flash Disk\WindowsShortcutOk.lnk"
Rename
Rename
“origin” ”new”
Ex> rename "\Flash Disk\test.txt" "\Flash Disk\Rename.txt"
Make Folder
Mkdir
“name”
Ex> mkdir "\Flash Disk\TestMkDir"
Make Delay
Delay
[seconds]
Ex> delay 3
Make Delay
Wait
/c<or /q> [seconds]
Seconds : will wait the end of the
previous process during [seconds]
/q : will not execute hereafter script
at timeout
/c : will execute hereafter script even
at timeout
Ex> wait /c 10
Install
Provisioning
XML
Provxml
“xml file path”
Can configure WiFi / Proxy and so
on.
Ex1> PROVXML "\Flash Disk\test.xml"
Ex1>XML 예시
<wap-provisioningdoc>
<characteristic type="Wi-Fi">
<characteristic type="access-point">
<characteristic type="linksys">

DOTH-300
APPLICATION
MANUAL
Date
2013-07-15
Rev
1.04
Page
1-10
<parm name="DestId" value="{436EF144-B4FB-4863-A041-
8F905A62C572}"/>
<parm name="AdHoc" value="0"/>
<parm name="Authentication" value="7"/>
<parm name="Encryption" value="6"/>
<parm name="KeyProvided" value="0"/>
<parm name="NetworkKey" value="1234567890"/>
<parm name="KeyIndex" value="1"/>
<parm name="Use8021x" value="-1"/>
<parm name="EAPType" value="13"/>
</characteristic>
</characteristic>
</characteristic>
</wap-provisioningdoc>
Import Registry
Regmerge
“reg file path”
DOT’s own format
regmerge "\Flash Disk\test.reg"
IdleTimerReset
IdleTimerReset
[Period]
Will not enter Auto Sleep during this
period
Ex> idletimerreset 1000
Splash Screen
Splash
“bmp path”
Off
Will display Bitmap on screen
Off: will end displaying Splash
Screen
Ex1> SPLASH "\Flash Disk\test.bmp" Ex2> SPLASH OFF
Soft Reset
Reset
None
Only supported at OnCleanStart.txt
Ex> reset
Run file
“exe path”
“exe parameter”
->“option “file path””
Can run execution file like
installing Cab file
"\windows\wceload.exe" "/noui /nodelete "\Flash Disk\test.CAB""

DOTH-300
APPLICATION
MANUAL
Date
2013-07-15
Rev
1.04
Page
1-11
1.2 ProcessINI
ProcessINI is used for setting initial default value of the mobile computer and it is executed at the beginning
of [Flash Disk/SetupDeviceCtrl/OnCleanStart/OnCleanStart.txt] script run.
▪ProcessINI.exe; located in [Flash Disk/SetupDeviceCtrl/]
When the user run ProcessINI manually, user-created INI file is applied.
Following table shows INI format for reference.
Section
Key
Value
비고
Key Remapping
Mode
0 / 1 / 2
Not Use / Used to Virtual
Key Used to Program
Execute
For 19 Keys
VKcode
Hexadecimal value
Virtual Key Code
Path
String
Program Path
Ex>
\windows\taskmgr.exe
SUSPEND TIMEOUT
Setting
0 / 1
Setting Disable / Enable
CheckBatTimeout
0 / 1
Not Use / Use
OnBatTimeout
1~5
Minute
CheckACTimeout
0 / 1
Not Use / Use
OnACTimeout
1, 2, 5, 10, 15, 30
Minute
BACKLIGHT
Setting
0 / 1
Setting Disable / Enable
CheckBatTimeout
0 / 1
Not Use / Use
OnBatTimeout
10, 30, 60, 120, 180,
240, 300
Seconds
CheckACTimeout
0 / 1
Not Use / Use
OnACTimeout
1~10
Minute
AcLevel
0~9
Brightness Level
BatLevel
0~9
Brightness Level
CPU Mode
Setting
0 / 1
Setting Disable / Enable
Mode
0, 1, 2
0 : Turbo Mode

DOTH-300
APPLICATION
MANUAL
Date
2013-07-15
Rev
1.04
Page
1-12
1 : Normal Mode
2 : Save Mode
Screen Off
Setting
0 / 1
Setting Disable / Enable
Enable
0 / 1
ScreenOff Mode
Disable / Enable
SuspendEnable
0 / 1
ScreenOff Suspend Mode
Disable / Enable
SuspendTimeOut
5, 10, 15, 20
Minute
IE
Setting
0 / 1
Setting Disable / Enable
HomePage
String
Internet Explorer
Default URL
WIRELESS MANAGER
Setting
0 / 1
Setting Disable / Enable
PhonePower
0 / 1
Off / On
BTPower
0 / 1
Off / On
MANUFACTURE
Name
Setting
0 / 1
Setting Disable / Enable
Name
String
Ex>
DOTEL Co., Ltd
VOLUME
Setting
0 / 1
Setting Disable / Enable
Mode
0, 1, 2
0 : Normal
1 : Vibrate
2 : Off
SystemVol
0~5
Volume Level
PhoneVol
0~5
Volume Level
INI Sample
[SUSPEND TIMEOUT]
Setting=1
CheckBatTimeout=1
OnBatTimeout=5
CheckACTimeout=1
OnACTimeout=5

DOTH-300
APPLICATION
MANUAL
Date
2013-07-15
Rev
1.04
Page
1-13
[BACKLIGHT]
Setting=1
CheckBatTimeout=1
OnBatTimeout=60
CheckACTimeout=1
OnACTimeout=5
AcLevel=4
BatLevel=4
[CPUMODE]
Setting=1
Mode=0
[SCREENOFF]
Setting=1
Enable=1
SuspendEnable=1
SuspendTimeOut=5
[IE]
Setting=0
HomePage=http://www.naver.com/
[WIRELESS MANAGER]
Setting=1
PhonePower=1
BTPower=1
[VOLUME]
Setting=1
Mode=2
SystemVol=5
PhoneVol=5
[MANUFACTURE]
Setting=0
Name=DOTEL Co., Ltd
[CENTER APP KEY]
Mode=2
VKcode=98
Path=\windows\taskmgr.exe

DOTH-300
APPLICATION
MANUAL
Date
2013-07-15
Rev
1.04
Page
1-14
1.3 OsUpdateManager
Supported Model
OS
Type
DOTH-300S(Q)
DOTH-300C(Q)
Windows Embedded Handheld 6.5
OsUpdateManager.exe
OSUpdateManager will help you update OS safely without losing or changing configuration file in /Flash
Disk.
▪OsUpdateManager.exe; should be located at same folder, or SD root as which there are OS
image to be updated. This file will be distributed together with new OS image.
▪OsUpdateManager.ini; Created and exists only when Backup > Restore
OS Update & Backup
Before doing OS update, make sure that OS image to be updated is in storage card.
It is recommended to update the mobile computer with AC-plugged or fully charged battery to avoid
unwanted situation.
Run OsUpdateManager.exe .
If Total OS image is found in storage card, you will see the screen as follows.
▪Backup and Restore; Check it if you want to backup & restore
your previously defined configuration.
▪Flash Disk; Check it if you want backup of previous configuration
data which is in Flash Disk. All files in Flash Disk will be saved.
To quit this application without update, tap Exit.
To begin OS update, tap Start. Following screen appears. This figure
shows an example which user checked Flash Disk to save previous files
in Flash Disk.
OsUpdateManager creates folder, “Backupdata” in storage card and makes backup files.

DOTH-300
APPLICATION
MANUAL
Date
2013-07-15
Rev
1.04
Page
1-15
Another figure shows the screen which completed backup operation. After completing backup, the mobile
computer resets automatically within 5 seconds and begins installing OS.
After installing OS, OsUpdateManager checks whether “\Storage Card\OsUpdateManager.ini” exists. If it is
there, following screen appears which indicates being on the restore process. If it is not there, it will show
“Welcome” screen.
When OsUpdateManager completes restoring the backup Flash Disk, it will do Clean Boot automatically and
restart the mobile computer. Then entire OS update process is done.

DOTH-300
APPLICATION
MANUAL
Date
2013-07-15
Rev
1.04
Page
1-16
Chapter 2: KeyWedge
You can enable/disable keyboard wedge for barcode scanner and HF, UHF RFID reader. Also you can
specify each peripheral’s scan(reading) condition as what you want.
Once Keyboard Wedge Tray is launched, you can set and modify all keyboard wedge settings on Keyboard
Wedge Tray.
About KeyWedgeTray
You can set scanner keyboard wedge and RFID keyboard wedge through KeyWedgeTray.exe and select wedge
conditions through KeyWedgeOpt.exe
Supported Model
OS
Type
DOTH-300S(Q)
DOTH-300C(Q)
Windows Embedded Handheld 6.5
KeyWedgeTray.exe
KeyWedgeOpt.exe
DOTH-300S(Q)
DOTH-300C(Q)
Windows Embedded Handheld 6.5
ScannerOpt.exe
DOTH-300S(Q)
Windows Embedded Handheld 6.5
HFOpt.exe
DOTH-300C(Q)
Windows Embedded Handheld 6.5
UHFOpt.exe
Installing KeyWedge
Copy the latest version of H300wM_KeyWedge_Rxxxx.CAB to the DOT Mobile Computer. Run
H300WM_KeyWedge_Rxxxx.CAB on the DOT mobile computer to install KeyWedge. After the installation
is complete, KeyWedge will run automatically.

DOTH-300
APPLICATION
MANUAL
Date
2013-07-15
Rev
1.04
Page
1-17
Uninstalling KeyWedge
Go to Start > Settings > System to open the System window. Tab the Remove Programs applet.
Select KeyWedge from the list of installed programs and tap the Remove button. Tap the Yes button when the
Remove Program dialog appears to uninstall KeyWedge from the DOT mobile computer.
Tab the Yes button when you delete the user registry information. Otherwise, tab the No button.
¶ NOTE. IF you delete user information, set by default when you reinstall KeyWedge.
KeyWedge Upgrade

DOTH-300
APPLICATION
MANUAL
Date
2013-07-15
Rev
1.04
Page
1-18
▪Refer to Uninstalling Keywedge, uninstall KeyWedge from the DOT mobile computer.
▪Refer to Installing Keywedge, on the DOT mobile computer to install KeyWedge.
¶ NOTE. For proper operation, you must remove the previous program, and then install it.
2.1 KeyWedgeTray
Start KeyWedge Tray
▪Go to Start > KeyWedge applet or Tab Tray icon > Options…
▪Change the KeyWedge ON state and press the OK button.
¶ NOTE. If KeyWedge the OFF status or Tray Icon HIDE status, the Tray icon does not appear.
2.2: KeyWedge Home Screen

DOTH-300
APPLICATION
MANUAL
Date
2013-07-15
Rev
1.04
Page
1-19
KeyWedge Home Screen register
▪Go to Start > Settings > Home to open the Home window. Tab the Items. Select ( ) KeyWedge from the
list of Home Screen and tag the OK button.
▪Registration is complete, KeyWedge On/Off status is displayed.
▪Tab KeyWedge Home Screen, KeyWedge Option is executed.
KeyWedge Home Screen unregister
▪Go to Start > Settings > Home to open the Home window. Tab the Items. Select ( ) KeyWedge from the
list of Home Screen and tag the OK button.
▪Deregistration is complete, KeyWedge will be removed from Home Screen.

DOTH-300
APPLICATION
MANUAL
Date
2013-07-15
Rev
1.04
Page
1-20
¶ NOTE. KeyWedge Home Screen function is supported in the following versions and above.
- KeyWedge CAB Ver: H300WM_KeyWedge_R0201.CAB
- Windows Mobile OS Ver: WMH300XXXXXXX05AX
Other manuals for DOTH-300
3
Table of contents
Other DOT PDA manuals