Baby Lock Destiny BLDY-U Technical manual


ABOUT THIS MANUAL
1
This manual provides details on the functions added/upgraded ( Note: This symbol next to the title
denotes a new or enhanced feature, within the Upgrade Kit .)
Before using this manual, upgrade your machine according to the procedure in the KIT Installation
Guide. Before using the functions described in this manual, read the Instruction and Reference Guide
included with the machine.
ABOUT THIS MANUAL

2
CONTENTS
ABOUT THIS MANUAL .......................................................................................................... 1
ABOUT IQ DESIGNER ............................................................................................................ 3
Basics: Creating a Pattern................................................................................................................................ 3
PATTERN DRAWING SCREEN ................................................................................................ 6
■Key functions....................................................................................................................................................... 7
Before Creating Designs ................................................................................................................................. 8
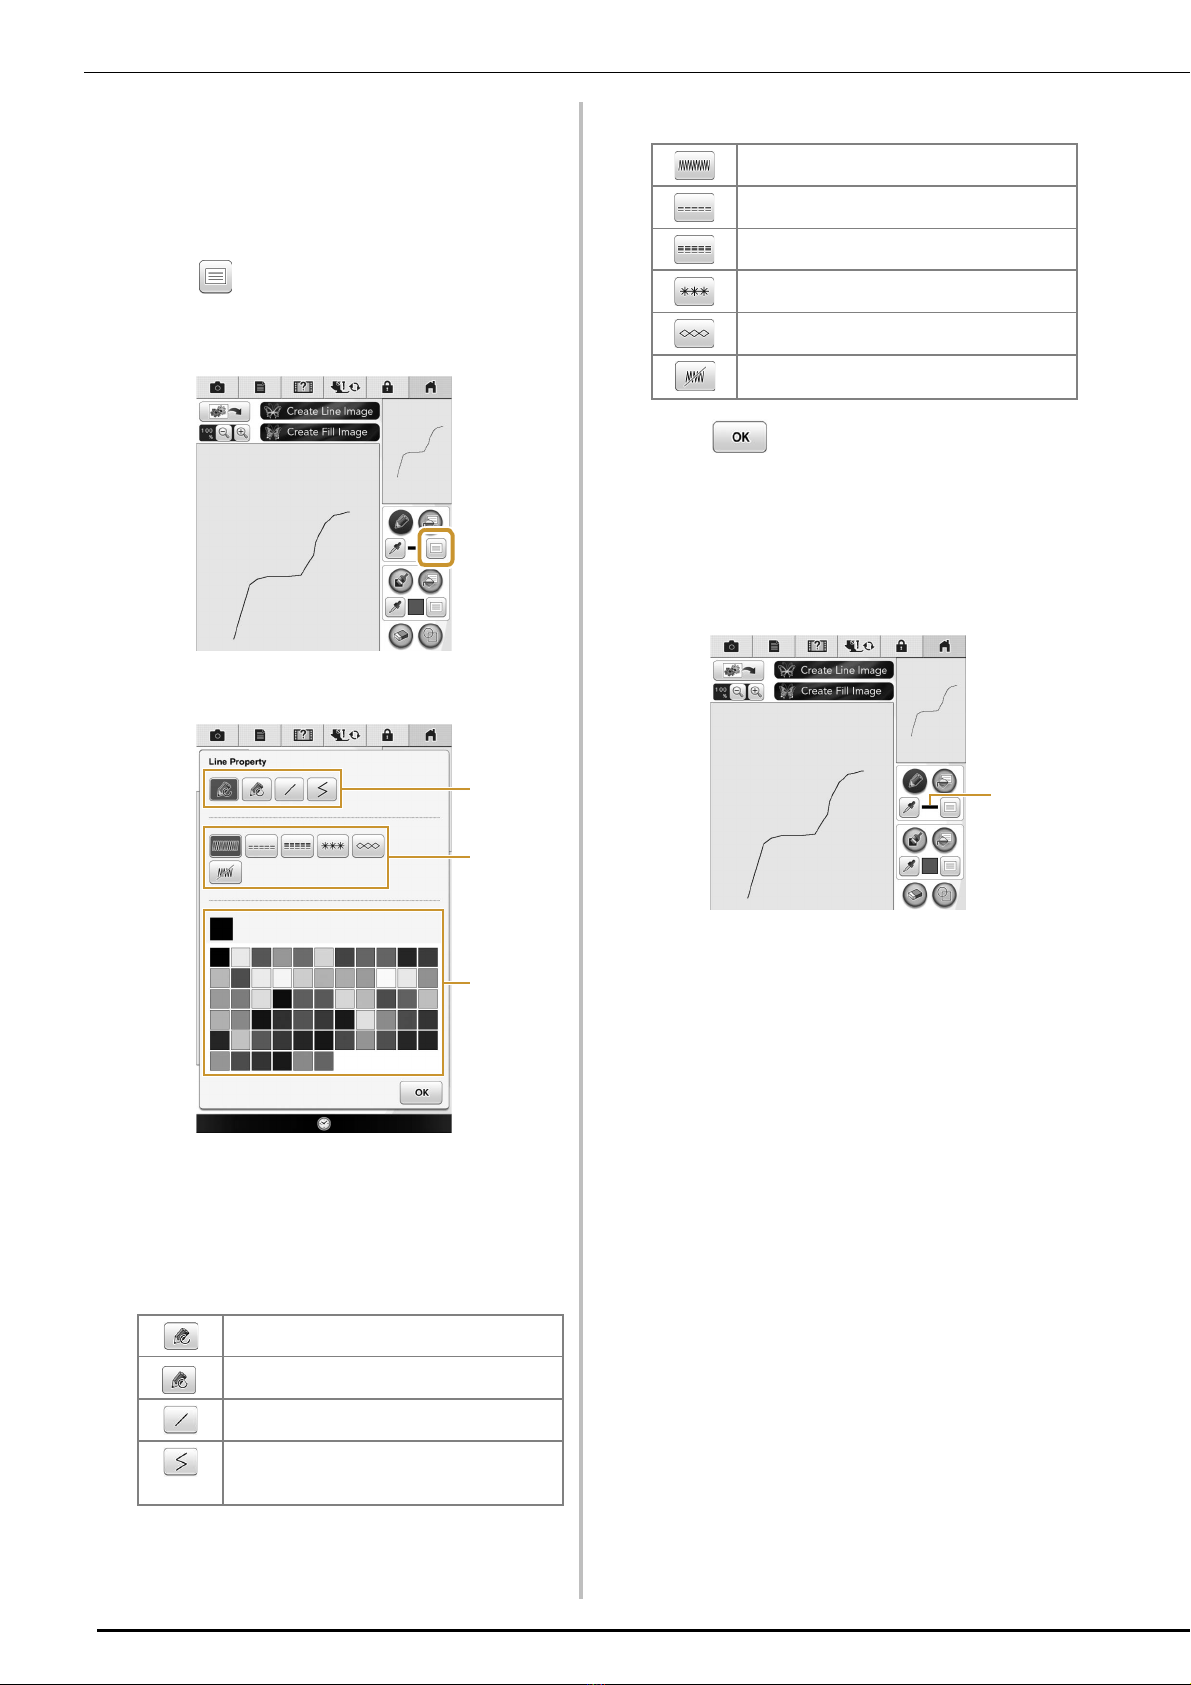
Drawing Lines ................................................................................................................................................ 8
■Setting the line types, stitch types and colors ...................................................................................................... 9
Drawing Regions .......................................................................................................................................... 10
■Setting the brush types and fill colors................................................................................................................ 10
Using the stamp key ..................................................................................................................................... 11
Using the erase key ....................................................................................................................................... 12
Using the select key....................................................................................................................................... 13
STITCH SETTINGS SCREEN................................................................................................... 14
Specifying individual stitch settings .............................................................................................................. 14
■Line settings....................................................................................................................................................... 14
■Region settings .................................................................................................................................................. 15
Specifying global stitch settings .................................................................................................................... 16
After specifying the settings .......................................................................................................................... 16
EMBROIDERY IMAGE PREVIEW SCREEN ............................................................................. 17
IQ DESIGNER WITH SCAN .................................................................................................. 18
Using the Scan Frame.................................................................................................................................... 18
■Scanning with an Embroidery Frame ................................................................................................................. 19
Scanning to Trace Background Image .......................................................................................................... 19
■Importing the Background image ...................................................................................................................... 21
CREATING LINE IMAGE ...................................................................................................... 22
Using the Scanning Frame to Create a Pattern with Line Scan ..................................................................... 22
ILLUSTRATION SCAN ......................................................................................................... 25
Using the Scanning Frame to Create a Pattern with Illustration Scan ........................................................... 25
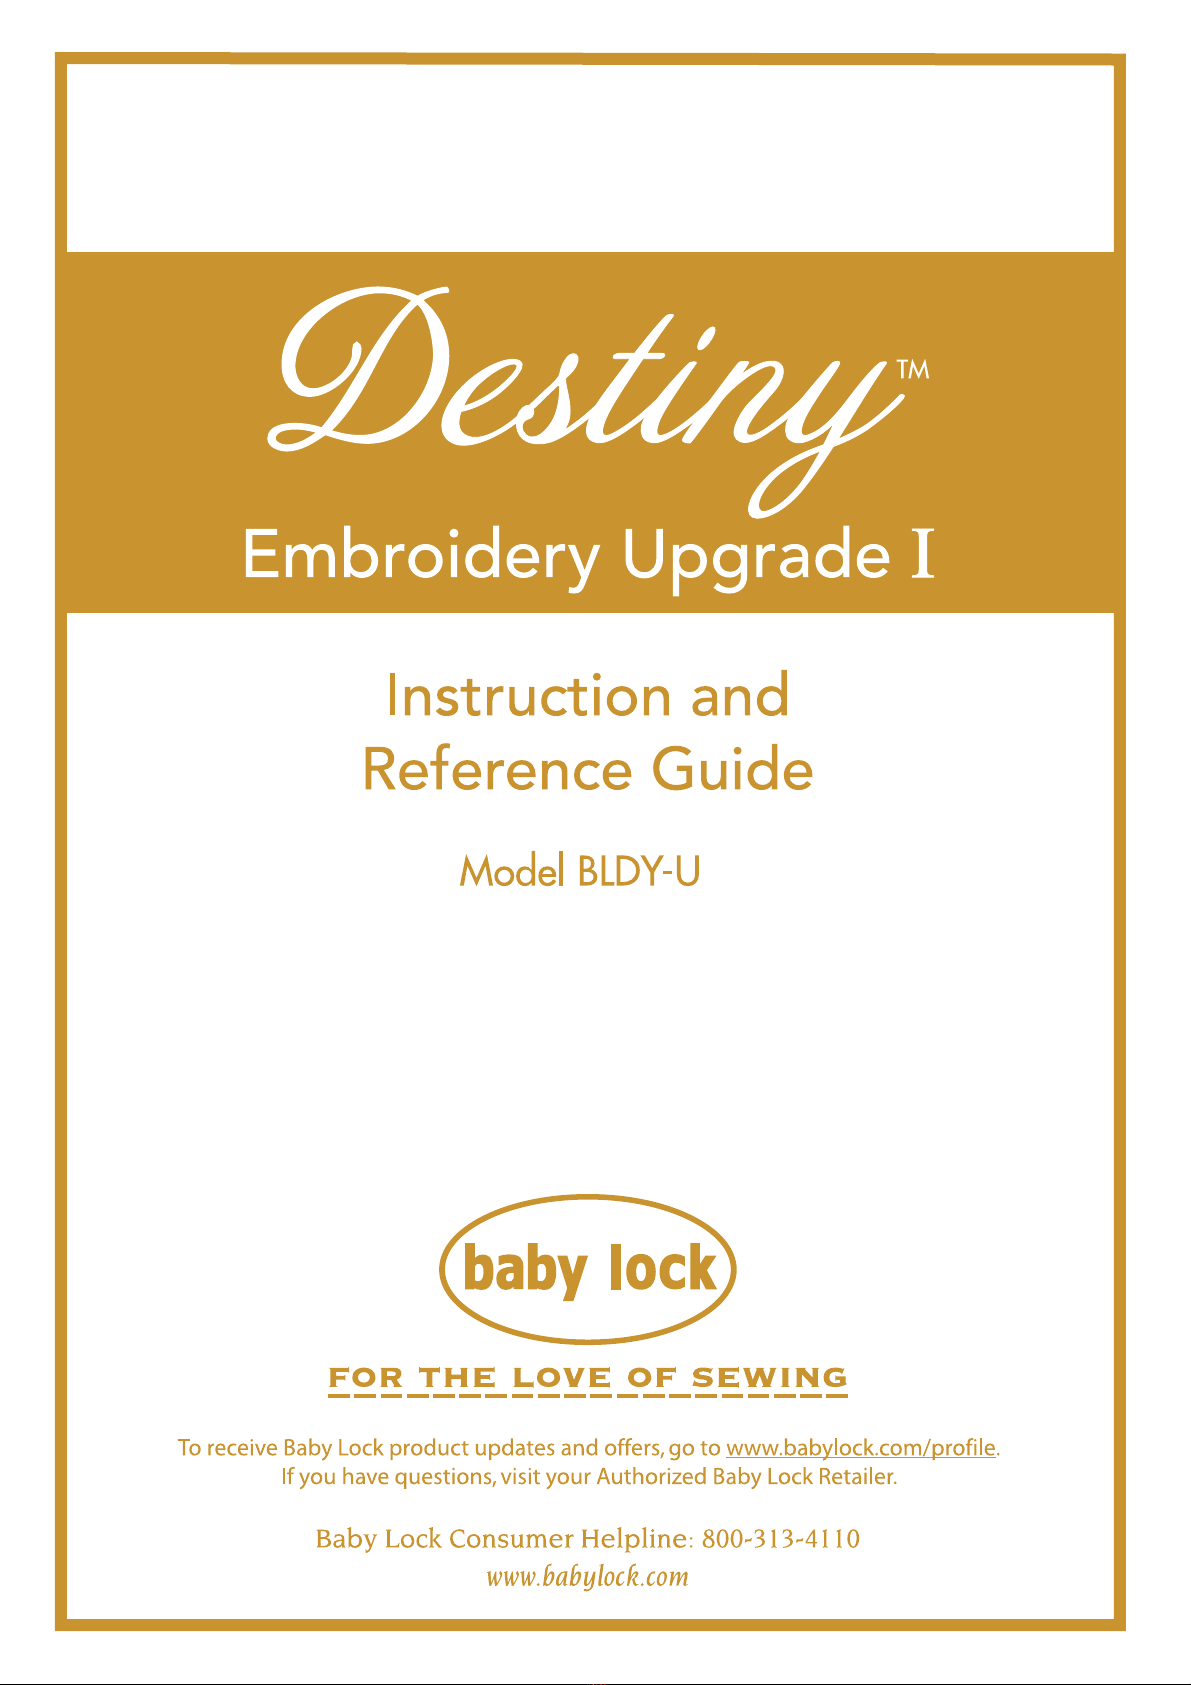
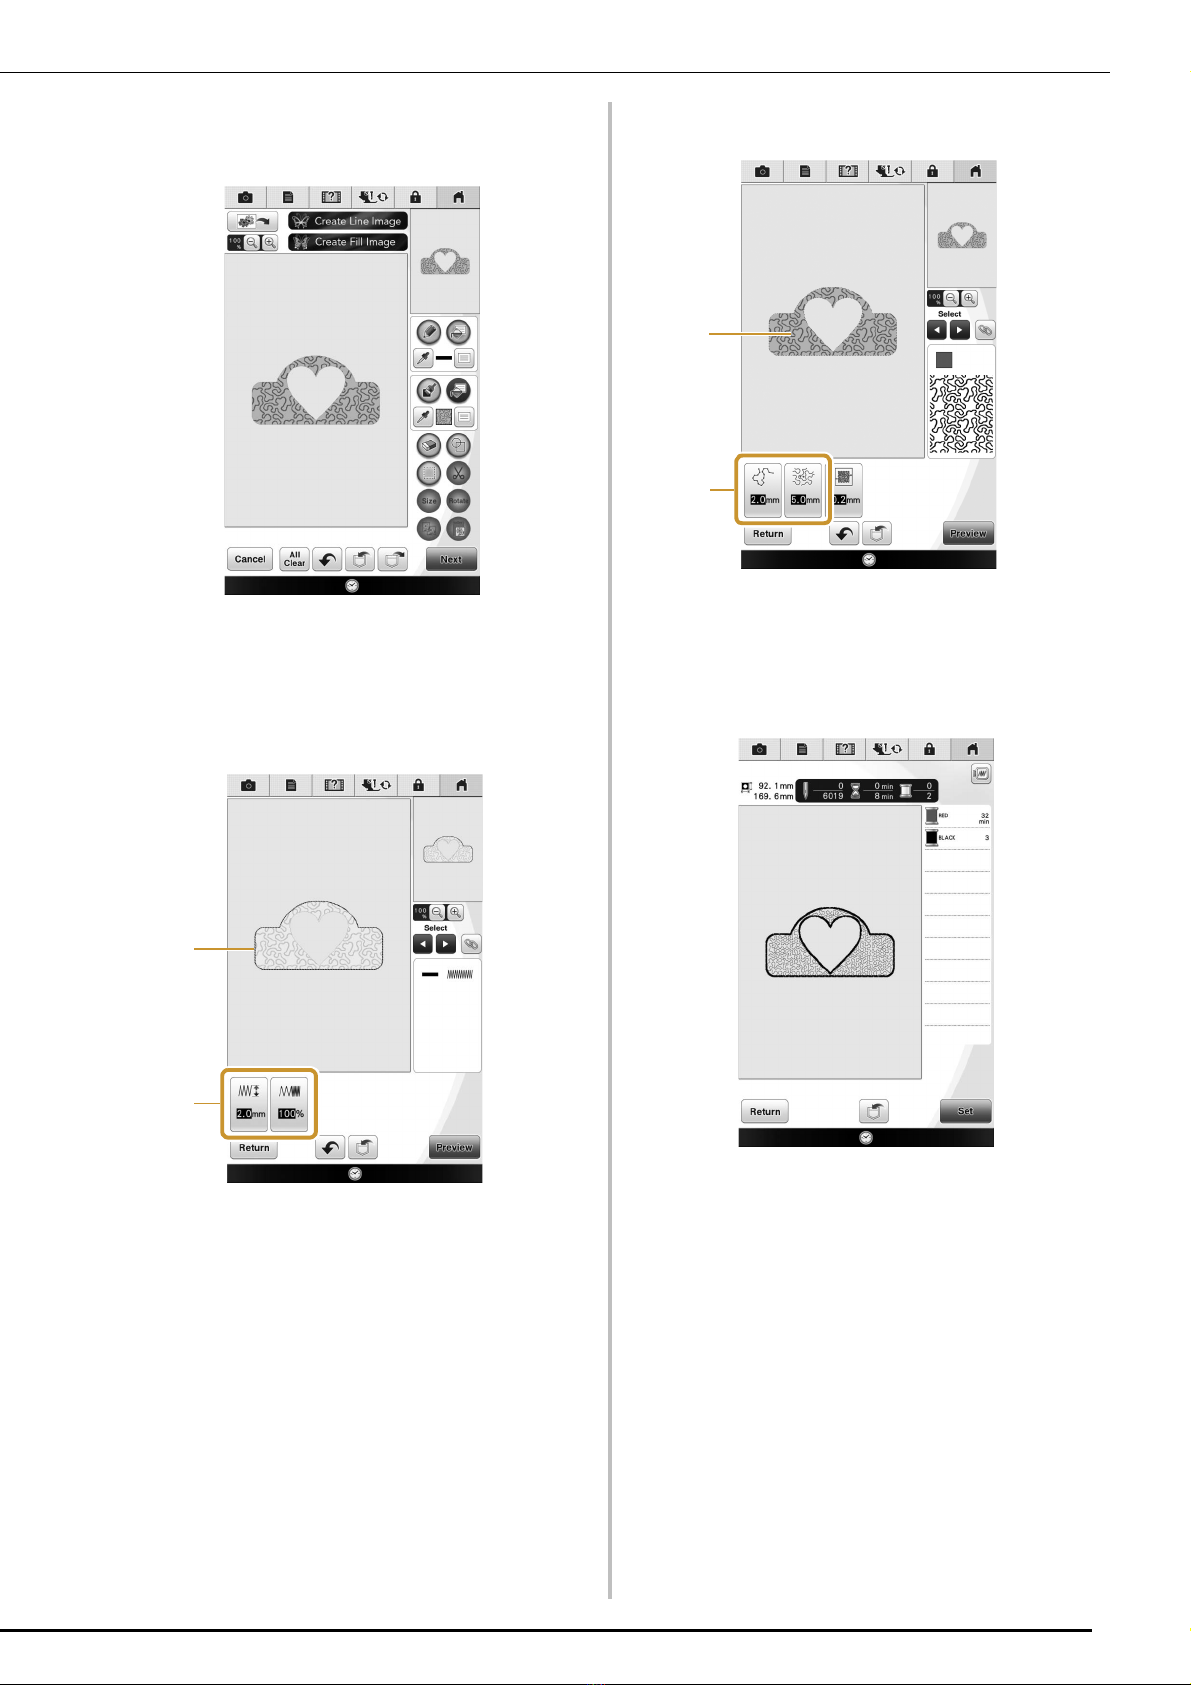
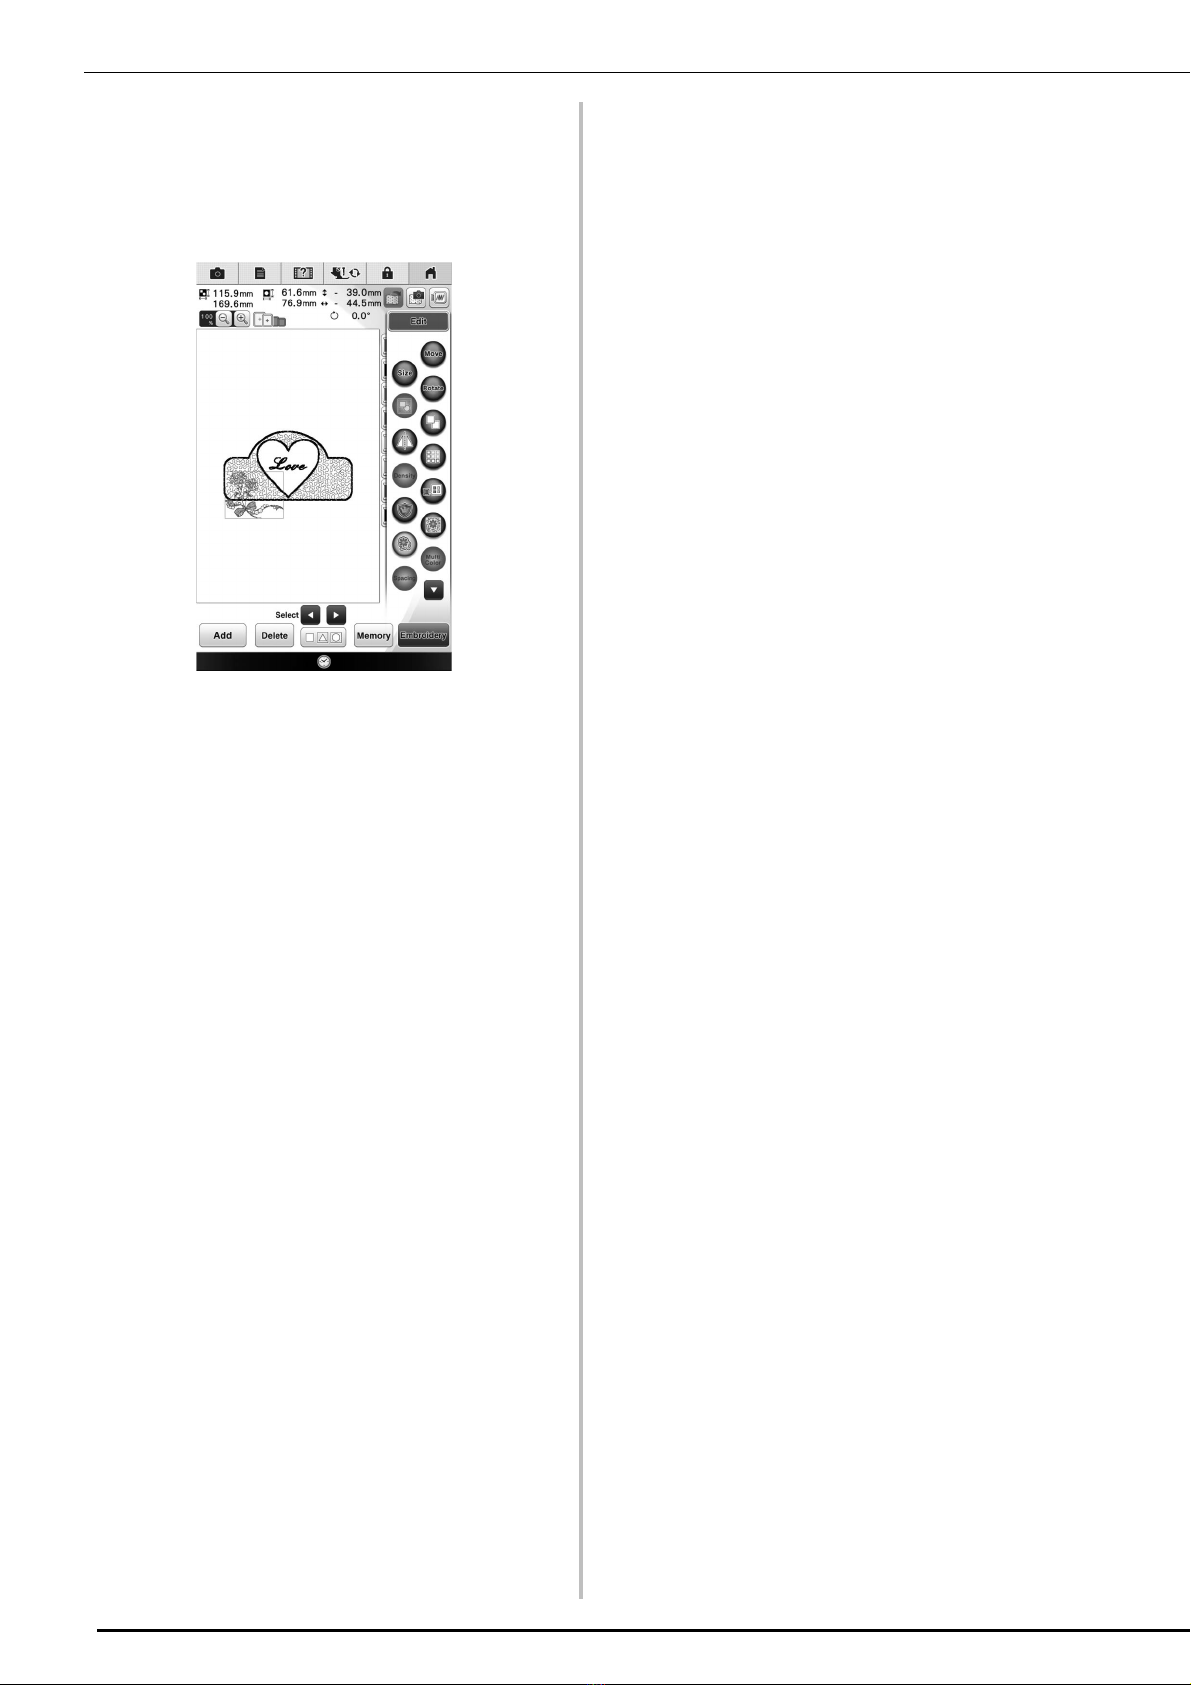
STIPPLING ............................................................................................................................ 28
Basic Stippling with IQ Designer................................................................................................................... 28
Scanning Drawing to Create Stippling Pattern .............................................................................................. 31
Scanning Fabric and Stippling ....................................................................................................................... 35
Embellishing around a pattern in embroidery (a quilting function) .............................................................. 38
Stippling Without Using IQ Designer ................................................................................... 42
Other Useful Functions ........................................................................................................ 43
Additional built-in patterns ........................................................................................................................... 43
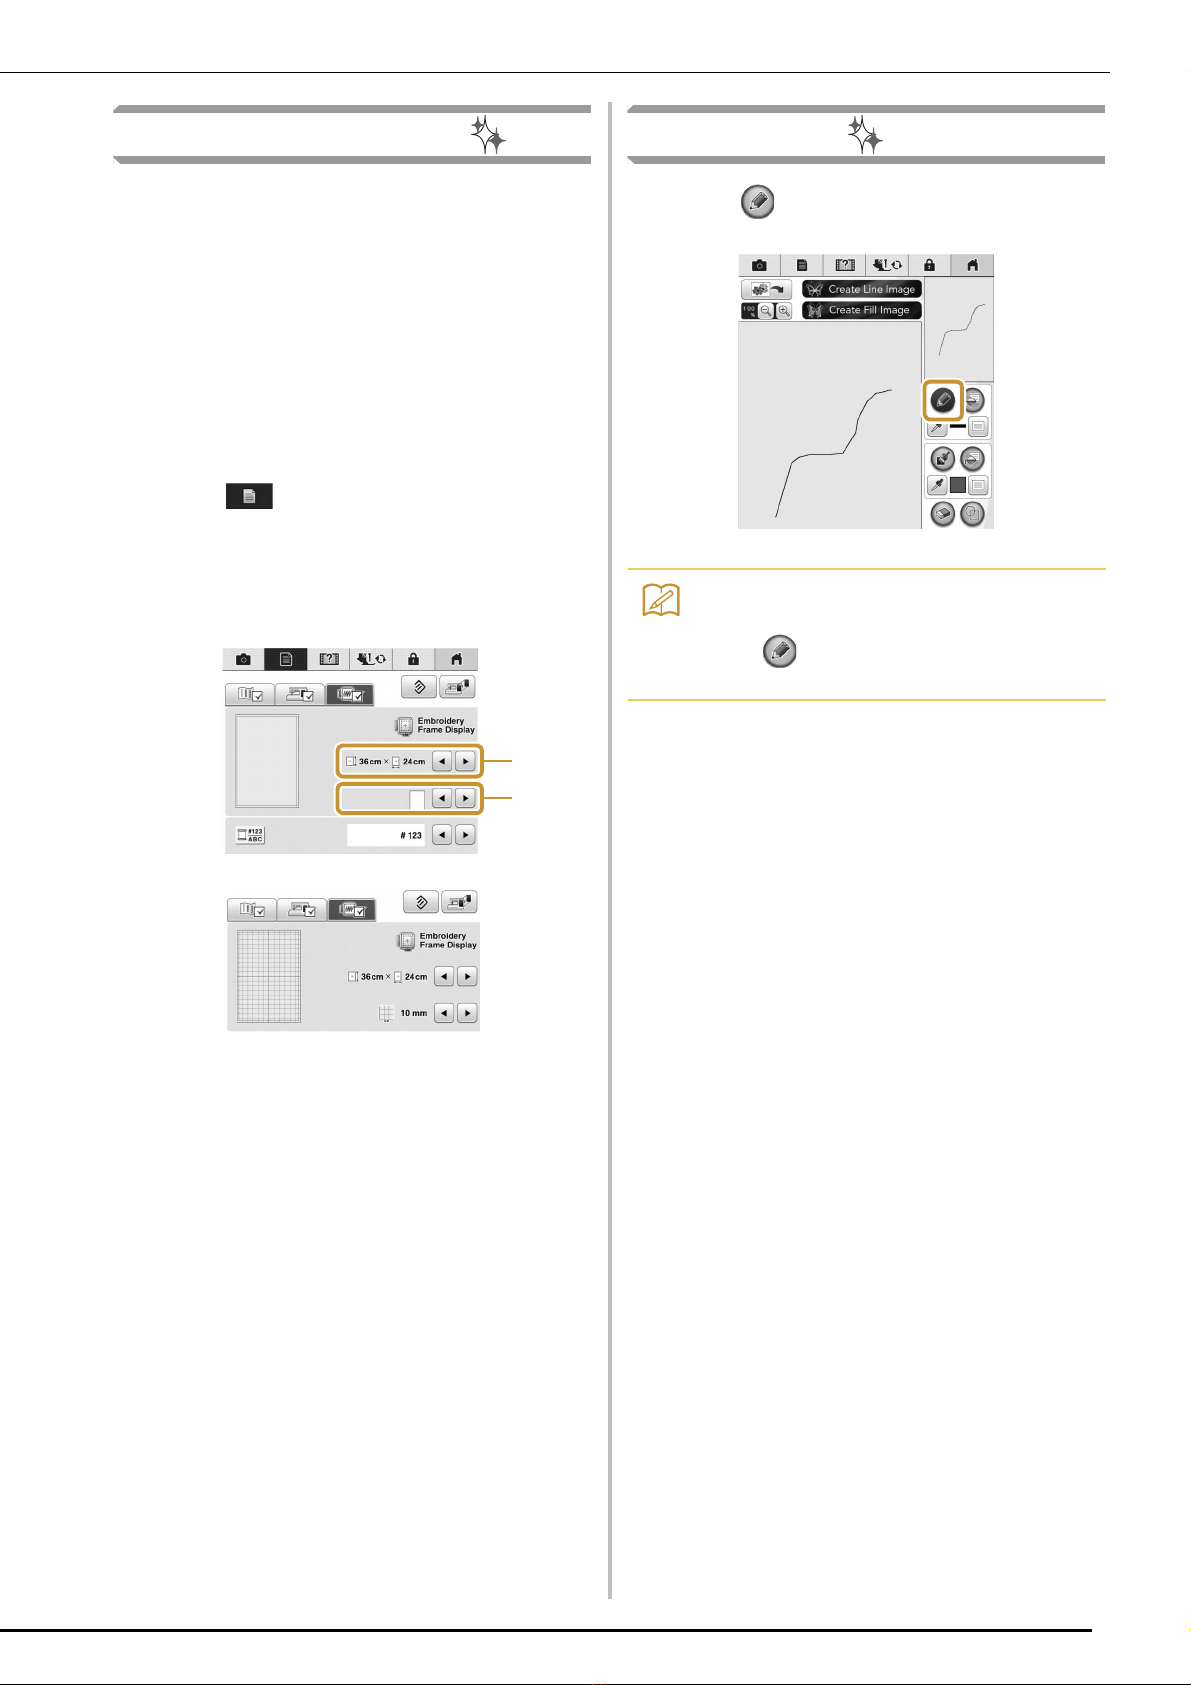
Addition of 24 cm × 24 cm frame ................................................................................................................. 43
Specifying individual appliqués ..................................................................................................................... 43
Combining bobbin work patterns .................................................................................................................. 44
Thread color sorting...................................................................................................................................... 44
Adding line feeds and inserting new embroidery character patterns............................................................. 45
■Line feeding ....................................................................................................................................................... 45
■Inserting ............................................................................................................................................................ 45
Character alignment...................................................................................................................................... 46
Selecting multiple patterns at the same time................................................................................................. 46
Grouping multiple selected patterns ............................................................................................................. 47
Saving/deleting multiple patterns .................................................................................................................. 48
CONTENTS

ABOUT IQ DESIGNER
3
With IQ Designer, you can use the functions listed below:
• Hand-drawn functions - creating embroidery patterns by drawing on the LCD screen
• Scanning functions - creating embroidery patterns by not only scanning object with built-in camera, but also
imported data from USB media, SD card or computer.
You can also combine patterns that you have created with the machine’s built-in patterns.
Start IQ Designer by pressing in the home page screen or pressing in the embroidery
pattern selection screen.
Basics: Creating a Pattern
1. Draw a line drawing in the pattern drawing
screen. (page 8)
2. Add color to the pattern.
ABOUT IQ DESIGNER
CAUTION
• Only touch the screen with your finger or the pen (stylus) included with the sewing machine. Do not use a
mechanical pencil, screwdriver or any other hard or sharp object. In addition, do not press the screen
with extreme pressure. Otherwise the screen may be damaged.
• All or part of the screen may sometimes become darker or lighter due to changes in the surrounding
temperature or other changes in the environment. This is not a sign of a malfunction. If the screen is
difficult to read, adjust its brightness.

ABOUT IQ DESIGNER
4
3. Select colors, fill stitches and desired patterns
to complete your design.
4. Specify stitch settings. (page 14)
* Further customize your pattern by specifying
embroidery stitch settings, such as satin stitch width
and density.
aShows the stitch settings for the selected line.
bShows the stitch settings for the selected region.
5. Convert image data to embroidery data.
The embroidery image preview screen appears.
(page 17)
a
a
b
b

ABOUT IQ DESIGNER
5
6. Edit the pattern in the embroidery edit screen,
for example, by combining it with the machine’s
built-in patterns.
* For details on how to edit the pattern, refer to
“EDITING PATTERNS” in the Instruction and
Reference Guide.
Embroidering begins.

PATTERN DRAWING SCREEN
6
aPattern drawing area
bPattern preview area
PATTERN DRAWING SCREEN
Memo
• The actual dimension of the pattern area is the size of the embroidery frame, which is 36 cm × 24 cm
(approx. 14 inches × 9-1/2 inches). The pattern you drew may be bigger than you expected. Please
resize the pattern after converting the design to the embroidery pattern.
• When the pattern is enlarged so that only a part of it appears in the pattern drawing area, the entire
pattern is displayed in the pattern preview area. The red frame in the pattern preview area indicates
the part of the pattern displayed in the pattern drawing area. Move the red frame in the pattern
preview area with the touch pen or your finger to display the corresponding area in the pattern
drawing area.
g
c
v
i
e f
q
h
jk
lm
n
u t s r
p
a
d
b
o

PATTERN DRAWING SCREEN
7
■Key functions
No. Display Key Name Explanation Page
cMagnify key Press this key to magnify the pattern. 10
dImage scan key Press this key to scan the attached frame and display on the screen as
the background while using the IQ Designer. You can scan the fabric
as the background or scan the picture as the reference when creating
the pattern.
—
eLine design key Press this key to scan the line drawing to edit and convert to the
embroidery data using the built-in camera. You can also import the line
drawing image from USB media, computer or SD card and create the
embroidery design.
22
fIllustration design key Press this key to scan the illustration to edit and convert to the
embroidery data using the built-in camera. You can also import the
illustration from USB media, computer or SD card and create the
embroidery design.
25
gLine tool key Draw lines and set the color. You can select the line type, stitch type
and color as you need.
Press to pick up the color from a line in the pattern within the
pattern drawing area. The picked up color is shown as the currently
selected line color beside the button and as the selected color in the
Line Property screen.
8
hBrush tool key Paint with brush and set the color. You can select the brush type, fill
type and color as you need. Painted lines and areas will be converted
to the pattern embroidered with fill stitch.
Press to pick up the color from a region in the pattern within the
pattern drawing area. The picked up color is shown as the currently
selected region color beside the button and as the selected color in the
Region Property screen.
10
iStamp key Press this key to select the stamp shape for pattern drawing. 11
jErase key Press this key to erase lines and shapes that have been drawn. You
can select the size/shape of the eraser.
12
kCut key Press this key to cut out the selected section. 13
lSelect key Press this key to select a section for moving by finger or pen, copying,
deleting, changing size and rotating lines and shapes that have been
drawn.
13
mRotate key Press this key to rotate the selected section. 13
nSize key Press this key to change the size of the selected section. 13
oPaste key Press this key to paste in the selected section duplicated with the
duplicate key or a selected section using the cut key.
—
pDuplicate key Press this key to duplicate the selected section. The temporarily
positioned section can immediately be rotated, enlarged, reduced or
moved.
—
qNext key Press this key to continue to the stitch settings screen. —
rRecall key Press this key to recall image data created with IQ Designer from the
machine’s memory, USB media, SD card or the computer.
—
sStore key Press this key to store the pattern being created. —
tUndo key Press this key to undo the last operation that was performed and
return to the previous state. Each press of this key will undo one
operation.
—
uAll Clear key Press this key to clear all the lines and shapes and start from the
beginning. The background image is also cleared.
—
vCancel key Press this key to exit from the IQ Designer. All lines and shaped are
erased when you press this key.
—

PATTERN DRAWING SCREEN
8
Before Creating Designs
The pattern preview displays the design smaller
than the actual size. You can view the actual
pattern size by setting the “Embroidery Frame
Display”.
With “Embroidery Frame Display” in the settings
screen, the embroidery frame and grid can be
specified separately. For details on the types of
embroidery frames and grids available, refer to
“Changing the Embroidery Frame Display” in the
Instruction and Reference Guide included with the
machine.
aPress .
bSelect the grid line of the “Embroidery
Frame Display”.
aEmbroidery frame types
bGrid types
* Select the grid size 10 mm (3/8 inch) or 25 mm
(1 inch).
Drawing Lines
aPress and draw lines.
a
b
Memo
• All the regions will be displayed in pale,
when is pressed, to clarify the drawing
lines on the screen.

PATTERN DRAWING SCREEN
9
■Setting the line types, stitch types
and colors
You can set or change the line types, stitch types
and colors anytime. You can also specify the line
types, stitch types and colors before drawing lines.
aPress to set the line types, stitch types
and colors.
The settings screen appears.
aLine types
bStitch types
cLine color selection: touch the color palette to
activate the drawing pen color.
Line types
Stitch types
bPress to return to the pattern
drawing screen.
The color bar on the line tool key is changed to the
selected color.
* The appearance of the line does not change even if
the line type was changed. The specified line type
can be checked in the stitch settings screen.
aColor bar
Freehand line with the end open.
Freehand line closing the end automatically.
Straight line with one stroke
Straight line changing directions to the point
you select. If the end point is created near the
start point, a closed object will be created.
a
c
b
Zigzag stitch
Running stitch
Triple stitch
Candlewicking stitch
Chain stitch
Line without stitch for creating a region.
Created region will be defined by the gray line.
a

PATTERN DRAWING SCREEN
10
cPress then press on the line to change
its color.
The connected line will be changed to the selected
color included with the machine.
Drawing Regions
aPress and draw with brush.
■Setting the brush types and fill colors
aPress to set the brush types and fill
colors.
aBrush types
bFill stitch types
cFill color selection: touch the color palette to
activate the paint brush color.
Brush shapes/sizes
Fill stitch types
Select when you don’t want fill stitch.
Memo
• Press to magnify the image when you
cannot press on the line correctly. For
details on magnify the image, refer to
“Displaying Patterns in the Screen
Magnified” in the Instruction and Reference
Guide included with the machine.
• Press , and then select a color within
the pattern drawing area to apply the same
color to other lines or parts of the pattern.
aUse to select the line color.
bPress for changing the line color, and then
select the pattern to be changed.
a
b
Square brush
Round brush
Small brush
Medium brush
Large brush
Fill stitch pattern
Stippling pattern
Select decorative fill patterns
Displays a fill pattern selection screen, where
can be pressed to select a pattern.
c
a
b

PATTERN DRAWING SCREEN
11
bPress to return to the pattern
drawing screen.
The color bar on the brush tool key is changed to the
selected color.
aColor bar
* If a stippling pattern or decorative fill pattern has
been specified, the settings are displayed.
cPress and press on the brush line to
change color and fill stitch types. You can
also set the fill color, stitch type and fill
pattern of a closed area made of the lines
and brush lines.
Using the stamp key
aPress .
bSelect a stamp type and stamp shape.
aStamp shapes
bStamp types
cSaved outlines
dFrame embroidering areas
Memo
• Press to magnify the image when you
cannot press on the fill correctly.
• Press , and then select a pattern color in
the pattern drawing area to apply that fill
color to other patterns.
aUse to select the fill color.
bPress for changing the fill color, and then
select the pattern to be changed.
a
a
b
c
b
d
a

PATTERN DRAWING SCREEN
12
Stamp shapes
Stamp types (Only for Basic shapes)
* Select the outline ( ), fill stitch ( ), or outline
and fill stitch ( ) of a basic shape.
Saved outlines
Frame embroidering areas
* Press to return to the pattern drawing
screen.
cPress to set the selected stamp.
The pattern drawing screen is displayed.
* You can change size of, rotate or move the shape
right after you create it by pressing or .
Using the erase key
aPress .
bSelect the size and shape of the eraser.
* If the selected key will be used, press .
The pattern drawing screen is displayed.
cDrag along the area or line that you want to
erase while the key appears as .
Basic shapes
Closed shapes
Open shapes
Outline
Fill stitch
Outline and fill stitch
Embroidery pattern outlines can be registered
as stamp shapes. When registering stamp
shapes, select from the last six embroidery
patterns used. If more than six shapes are
registered, the oldest one is automatically
erased. For details on registering a stamp
shape, refer to “Embellishing around a pattern
in embroidery (a quilting function)” on page 38.
Select an embroidering area in order to
arrange the pattern to fit an embroidery frame.

PATTERN DRAWING SCREEN
13
Using the select key
You can select the part of the design to move and/
or edit. Some keys are available only after you
select the part.
aPress .
bSelect the area you want to edit.
* To select an area you want to edit, hold the stylus at
a point on the screen and drag the stylus to create
the red box around your selected area to be edited.
cWhen is pressed, the pattern size is
displayed in the screen.
aShows the size for the selected part.
bReverts to the original size.
dWhen is pressed, the pattern rotation
angle is displayed in the screen.
cShows the angle for the selected part.
eEdit the design with available keys. (See
“Key functions” on page 7 for the details of
each key function.)
fPress , and then specify the stitch
setting.
a
b
c

STITCH SETTINGS SCREEN
14
Before creating the embroidery pattern, specify the stitch settings. Lines of the design are sewn with
various stitches and areas are sewn with fill stitches or stippling stitches. Stitching of the areas were
already selected in “Drawing Regions” on page 10, so specify values of detailed settings.
After specifying the settings, press to create the embroidery pattern.
If the design data is saved, the settings can be changed after a trial embroidering.
Specifying individual stitch
settings
Select a pattern in the stitch settings screen to
specify its line and region stitch settings. If multiple
patterns are selected, the settings are applied to
those patterns.
■Line settings
aShows the stitch type and color for the selected
line.
bShows the stitch settings for the selected line.
Line sew stitch settings
Select the type of stitching you want applied to your
line art, from zigzag stitch ( ), running stitch
( ), triple stitch ( ), candlewicking stitch
or chain stitch .
Zigzag stitch
Running stitch /Triple stitch
* Both includes an under sewing.
Candlewicking Stitch
Chain stitch
STITCH SETTINGS SCREEN
a
b
Zigzag width Specifies the width of the zigzag stitches
used to sew the lines of the design.
Density Specifies the density of the zigzag stitches
used to sew the lines of the design.
Run pitch Specifies the length of the straight stitch of
the design.
Size Increases/reduces the size of the pattern.
Spacing Specifies the spacing of the candlewicking
stitch.
Size Increases/reduces the size of the pattern.
Repetition Sets repeated sewing at the same part.

STITCH SETTINGS SCREEN
15
■Region settings
aShows the stitch type and color for the selected
region.
bShows the stitch settings for the selected region.
Fill stitch settings
Stippling stitch settings
Decorative fill
aUse to select the line or region to be
changed.
Each press of moves the highlighting of the
selected pattern in order.
bSelect the setting to be changed, and then
change the setting in the screen that
appears. (In this example, the sewing
direction will be changed.)
The setting screen appears.
cPress , and then use to change the
direction.
dPress to apply the setting.
*appears on the tab for setting currently being
changed.
* Change other settings in the same way.
Direction Specifies the sewing direction. Select
“Manual” to change to the desired direction
of fill stitch.
Density Specifies the stitch density of fill stitch.
Pull
compensation
Specifies to correct the shrinkage of the
pattern by slightly shortening or lengthening
the stitching. Change the setting after you
embroider the pattern and can check the
shrinkage.
Under
sewing
Select if you need or do not need the under
sewing for the stabilized fabric.
Run pitch Specifies the length of a stitch of the
stippling stitch.
Spacing Specifies the spacing between the stitches
when embroidering the stippling stitch.
Distance Specifies the offset from the pattern outline.
Size Increases/reduces the size of the pattern.
Direction Specifies the rotation angle of the pattern.
Outline The outline will be converted to embroidery
data whether “ON” or “OFF” is selected. If
“ON” is selected, the number of thread
jumps can be reduced.
a
b

STITCH SETTINGS SCREEN
16
Specifying global stitch settings
The same stitch settings can be changed at the
same time for multiple patterns of the same type.
a
Use
to select the stitch whose settings
are to be changed, and then press .
The same stitch type areas will be selected at the
same time.
bFollow steps bthrough din “Specifying
individual stitch settings” on page 15 to
change the settings.
After specifying the settings
Press to create the embroidery pattern.

EMBROIDERY IMAGE PREVIEW SCREEN
17
You can check the total stitch number, embroidery time and spool thread color number to embroider the
pattern. Press to check the pattern image within the embroidery frame.
Press to proceed to the embroidery edit screen.
Press to save the pattern as the embroidering data.
Press to return to the stitch settings screen.
EMBROIDERY IMAGE PREVIEW SCREEN
Note
• Once you proceed to the embroidery edit screen, you cannot return to the IQ Designer.

IQ DESIGNER WITH SCAN
18
Using the Scan Frame
aPrepare the desired drawing/illustration.
bPlace the paper to be scanned in the
scanning frame, and then secure the paper
in place with the magnets.
* Place the magnets at six locations around the paper
to secure it, making sure that the line drawing is not
covered.
IQ DESIGNER WITH SCAN
CAUTION
• Do not set the fabric, the paper with crease or
luster or the paper that is too thick or rolled up
to the scan frame. Otherwise, the frame may
strike the embroidery foot, and possibly cause
injury.
Memo
• Only one sheet of paper can be placed in
the scanning frame per scan.
Note
• When placing the paper in the scanning
frame, make sure that the white balance
area is not hidden; otherwise, the drawing
cannot be scanned correctly. At the same
time, be sure to place the scan image within
the scan area. The image out of the scan
area will not be scanned.
aWhite balance area
bScan area
• Make sure that the white balance area or
the scan area is not dirty or scratched;
otherwise, the image cannot be scanned
correctly.
• Be sure to use the magnets which are
included with the scanning frame. If any
other magnets are used, they may become
attached to the machine during scanning, or
other problems, such as a misaligned scan
image, may occur.
• Be sure to place the magnets so that they
secure the paper firmly. If the paper is
placed unevenly, the image cannot be
scanned correctly.
• If the scanning frame is dirty, wipe it with a
cloth dampened with a diluted neutral
detergent solution.
Memo
• If you want to scan an image from a small
piece of paper that can't be held with the
magnets, copy that image onto a larger
piece of paper, to then be placed on the
scanning frame.

IQ DESIGNER WITH SCAN
19
cAttach the embroidery unit to the machine,
and then turn on the machine.
* Refer to “Attaching the Embroidery Unit” in the
Instruction and Reference Guide included with the
machine.
dPress the “Presser Foot Lifter” button to
raise the presser foot, and then press the
“Needle Position” button to raise the
needle.
* The presser foot is not raised high enough when
raised with the presser foot lever.
eAfter attaching the scanning frame to the
embroidery unit, swing the frame-securing
lever toward you to secure the frame.
* Refer to “ATTACHING THE EMBROIDERY FRAME”
in the Instruction and Reference Guide included
with the machine.
■Scanning with an Embroidery Frame
Drawings and illustrations can also be scanned
using an embroidery frame. Hoop the embroidery
frame with fabric larger than the frame. Place the
paper to be scanned on the fabric, and then secure it
with tape.
When not using the scanning frame, prepare a line
drawing that can easily be scanned.
aFabric
bTape
Scanning to Trace Background
Image
If you have a favorite picture or drawing, it can
easily be traced on the scanned background image
and you can create your own pattern.
aPress .
The image display screen appears.
Note
• Unthread the machine to avoid having the
thread slipping out of the needle or getting
caught on the embroidery frame.
CAUTION
• Make sure that presser foot and needle are
fully raised. If scanning is started with the
presser foot and needle lowered, the scanning
frame may hit the machine, causing damage.
Note
• Be sure not to attach any presser foot other
than the embroidery foot “W+” or “W”,
otherwise the presser foot will be scanned.
Table of contents
Other Baby Lock PDA manuals

Baby Lock
Baby Lock enlighten User manual

Baby Lock
Baby Lock Aventura BLMAV Guide

Baby Lock
Baby Lock Unity BLTY User manual

Baby Lock
Baby Lock Endurance II BND9-2 Installation and operating instructions

Baby Lock
Baby Lock Valiant BMV10 Technical manual

Baby Lock
Baby Lock ellegante 3 BLG3 Installation and operating instructions