manuals.online logo
Brands
  1. Home
  2. •
  3. Brands
  4. •
  5. Douglas Dynamics
  6. •
  7. Snow Blower Accessories
  8. •
  9. Douglas Dynamics Western 74528 User manual

Douglas Dynamics Western 74528 User manual

Popular Snow Blower Accessories manuals by other brands

Avantco A36123 Operator's manual for Attachment

Avantco

Avantco A36123 Operator's manual for Attachment

Meyer Drive Pro EZ Build 41130 Assembly and installation

Meyer

Meyer Drive Pro EZ Build 41130 Assembly and installation

EGO SSA1200 Operator's manual

EGO

EGO SSA1200 Operator's manual

Meyer EZ-Mount Plus Operation and maintenance manual

Meyer

Meyer EZ-Mount Plus Operation and maintenance manual

Mahindra BERSB60R owner's manual

Mahindra

Mahindra BERSB60R owner's manual

Toro 108-7325 installation instructions

Toro

Toro 108-7325 installation instructions

SNOWJOE iON15SB-CT Operator's manual

SNOWJOE

SNOWJOE iON15SB-CT Operator's manual

Meyer Drive Pro Assembly instructions

Meyer

Meyer Drive Pro Assembly instructions

LANDY S-SPE Operator's manual

LANDY

LANDY S-SPE Operator's manual

Bercomac 700525-2 instructions

Bercomac

Bercomac 700525-2 instructions

Boss Snowplow MSC23000 owner's manual

Boss Snowplow

Boss Snowplow MSC23000 owner's manual

Briggs & Stratton 1696092-00 Operator's manual

Briggs & Stratton

Briggs & Stratton 1696092-00 Operator's manual

Cub Cadet 190-401-100 owner's manual

Cub Cadet

Cub Cadet 190-401-100 owner's manual

Polaris 2882798 manual

Polaris

Polaris 2882798 manual

Boss Snowplow SNR24040 owner's manual

Boss Snowplow

Boss Snowplow SNR24040 owner's manual

Meyer CP7.5 Parts & Installation Instructions

Meyer

Meyer CP7.5 Parts & Installation Instructions

PRONAR PUV-3600HD Operator's manual

PRONAR

PRONAR PUV-3600HD Operator's manual

Boss Snowplow SNR24024 owner's manual

Boss Snowplow

Boss Snowplow SNR24024 owner's manual

manuals.online logo
manuals.online logoBrands
  • About & Mission
  • Contact us
  • Privacy Policy
  • Terms and Conditions

Copyright 2025 Manuals.Online. All Rights Reserved.

74528
A DIVISION OF DOUGLAS DYNAMICS, LLC
CAUTION
Use standard methods and practices when
attaching snowplow and installing accessories,
including proper personal protective safety
equipment.
CAUTION
Read this document before installing the
blade stop kit.
WARNING
Do not exceed GVWR or GAWR, including
blade and ballast. The rating label is found on
the driver-side vehicle door cornerpost.
Blade Stop Kit
PARTS LIST
74528 Blade Stop Kit
Item Part Qty Description Item Part Qty Description
174523 2Outrigger ns 11809 1 Bolt Bag
274527 2On-Blade Bracket
11809 Bolt Bag
3 2 3/8-16 x 3 Hex Cap Screw G8 5 16 3/8 Flat Washer SS
4 6 3/8-16 x 4 Hex Cap Screw G8 6 8 3/8 x 16 Hex Locknut GB
ns = not shown G = Grade
May 1, 2020
Lit. No. 74520, Rev. 00
1
6
2
3
4
4
5
5
5
6
6
74528
Lit. No. 74520, Rev. 00 2 May 1, 2020
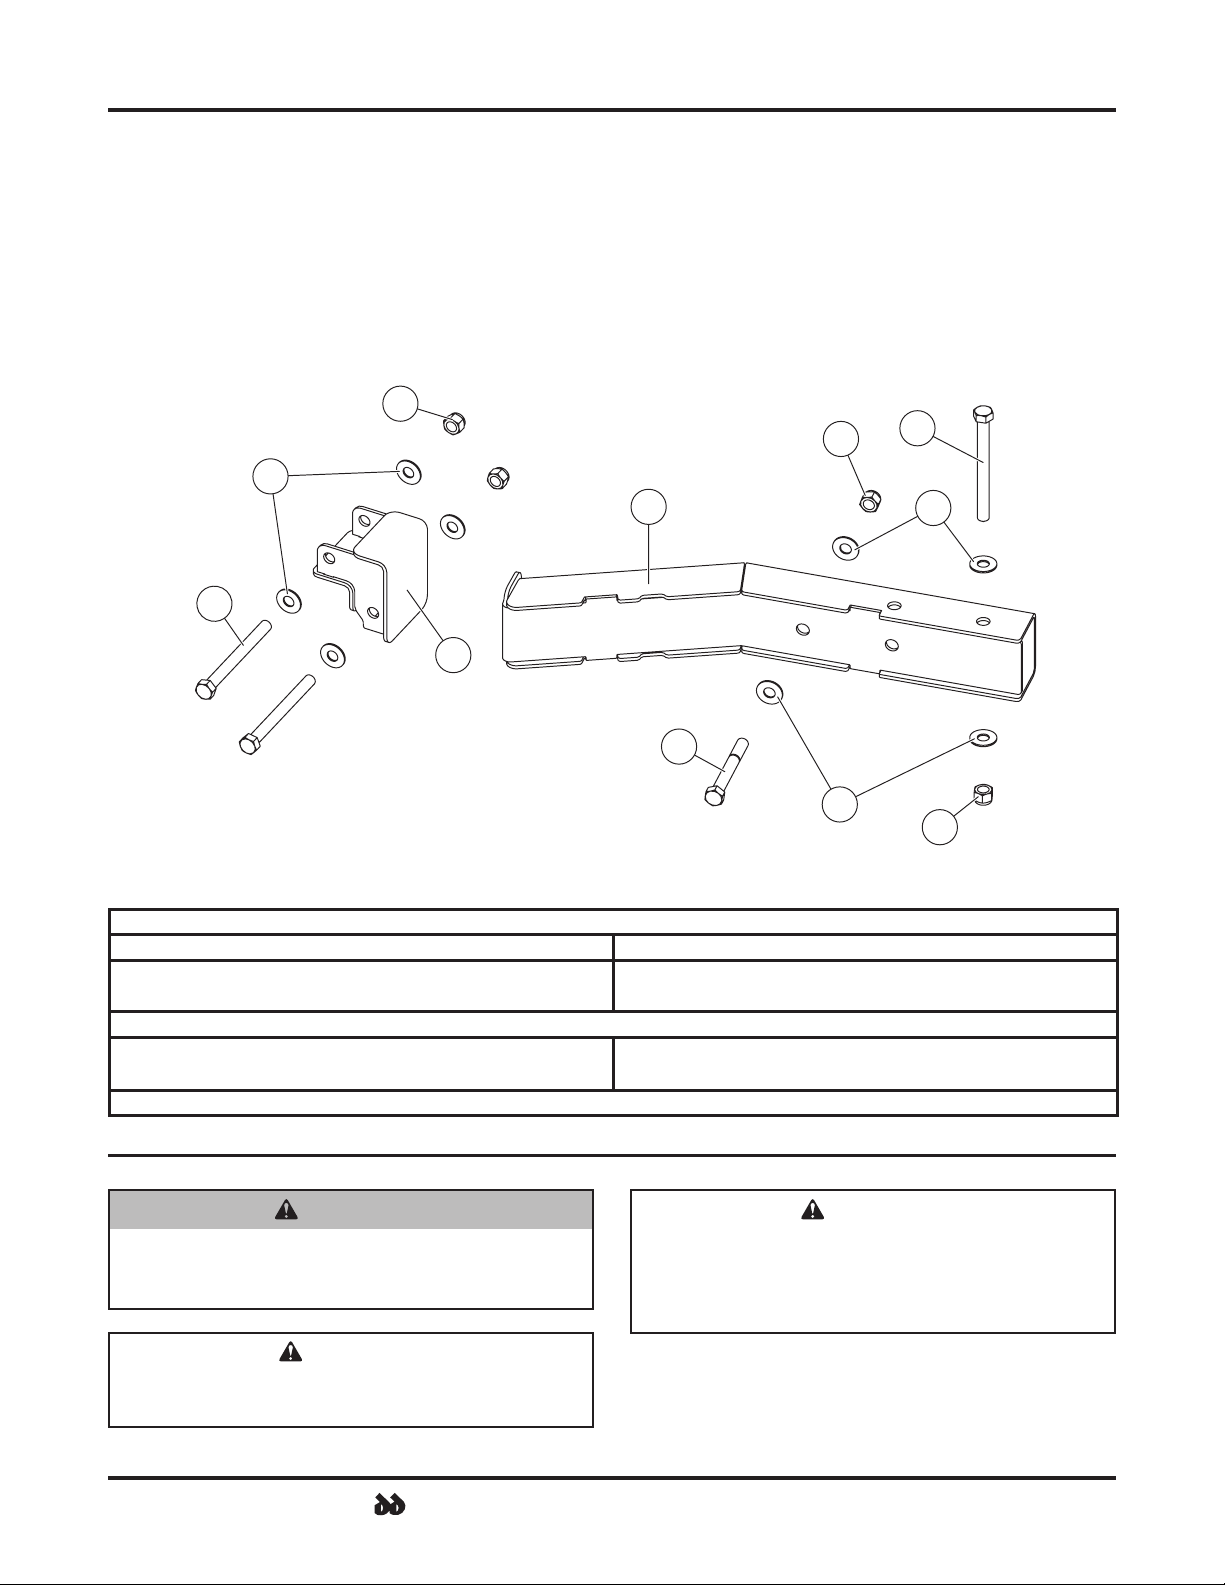
2. Slide an outrigger into one opening of the T-frame
and align the mounting holes. The outrigger must
angle outward, as shown.
3. Install the outrigger using the previously
determined mounting holes. Insert a 3/8" x 4" cap
screw with 3/8" washer through the top mounting
holes, and a 3/8" x 3" cap screw with 3/8" washer
through the side holes. Add a second washer
and a 3/8" locknut on each fastener to secure the
outrigger in place. (Illustration shows outrigger
installed in rearward position.)
4. Tighten the fasteners to 31 ft-lb.
5. Repeat on the other side.
INSTALLATION INSTRUCTIONS
Park the vehicle on a smooth, level, hard surface,
such as concrete. Lower the blade to the ground and
turn the control OFF. Disconnect the snowplow from
the vehicle, or turn the vehicle ignition to the "OFF"
position and remove the key.
Outrigger to T-Frame
1. Determine which outrigger mounting holes to use
by observing the angle ram attachment points:
T-Frame
Outrigger
3/8" x 3"
Cap Screw
3/8" x 4"
Cap Screw
3/8" Flat
Washer
3/8" Locknut
3/8" Flat
Washer
3/8" Locknut
If angle rams
attach here,
use these holes for
mounting outrigger.
If angle rams
attach here,
use these holes for
mounting outrigger.
— OR —
74528
Lit. No. 74520, Rev. 00 3 May 1, 2020
On-Blade
Bracket
3/8" x 4"
Cap Screw
3/8" Flat
Washer
3/8"
Locknut
On-Blade Bracket to Blade
1. On one blade wing, align an on-blade bracket with
the mounting holes on blade rib, as shown.
2. Insert two 3/8" x 4" cap screws with 3/8" washers
through the bracket and rib mounting holes.
Add another washer and a 3/8" locknut on each
fastener, as shown.
3. Tighten the fasteners to 31 ft-lb.
4. Repeat on the other blade wing.
74528
Lit. No. 74520, Rev. 00 4 May 1, 2020
Copyright © 2020 Douglas Dynamics, LLC. All rights reserved. This material may not be reproduced or copied, in whole or in part, in any
printed, mechanical, electronic, lm, or other distribution and storage media, without the written consent of the company. Authorization to
photocopy items for internal or personal use by the company's outlets or snowplow owner is granted.
The company reserves the right under its product improvement policy to change construction or design details and furnish equipment when
so altered without reference to illustrations or specications used. This equipment manufacturer or the vehicle manufacturer may require or
recommend optional equipment for snow removal. Do not exceed vehicle ratings with a snowplow. The company o󰀨ers a limited warranty for
all snowplows and accessories. See separately printed page for this important information.
Printed in U.S.A.