Douglas Oryx 4 User manual

DouglasInstrumentsLtd.
HardwareManual
Description andConfiguration
Revision5.3,August2006
CompiledbyPatrick ShawStewart,PeterBaldock and JamesSmith
Copyright1991-2006,Douglas InstrumentsLtd.
Douglas InstrumentsLimited
Douglas House ¨East Garston ¨Hungerford ¨Berkshire,RG177HD ¨UK
http://www.douglasinstruments.com

2
Warnings
Always turnofftheMCC and disconnect
thepowercordfromthemainssupply
beforedisassembling anypartsofthe
machineorunplugging theleadsforthe
ChassisorPlateloader
For indooruseonly withinthetemperature
rangeof4-30ºC0-75%RH(Non-condensing)
Oryx ProteinCrystallization machinesare
designedforusewith non-hazardous
matterialsonly.Shouldthe userchooseto
process hazardousmaterialsitwouldbe the
user’sresponsibilitytoobserveanyspecial
handlingprocedures.
The
Red stopbutton
onthe MCCwill
terminateanymovementof theplateloader,
armsandsyringes. Thepurposebeingto
avoidspillageorotherloss ofoil,proteinor
reagents.The machinecomplieswithall
EssentialHealthandSafetyRequirementsof
the EUMachineryDirectiveforCE Marking
Specifications
Power: 100-240 VacUniversalInput; 5A: 50Hz~60Hz
Continuoussound pressurelevelinnormaloperationatthe
operator’sworkstation:below70dB(A) –earprotection neednot
be worn.
Manufacturedby:DouglasInstrumentsLtd.
DouglasHouse,RG177HD,UK
http://www.douglas.co.uk
Type:ORYXCRYSTALLIZATIONMACHINE

3
CONTENTS
SETTINGUPTHESYSTEM 4
SoftwareInstallation.................................................................................................................. 4
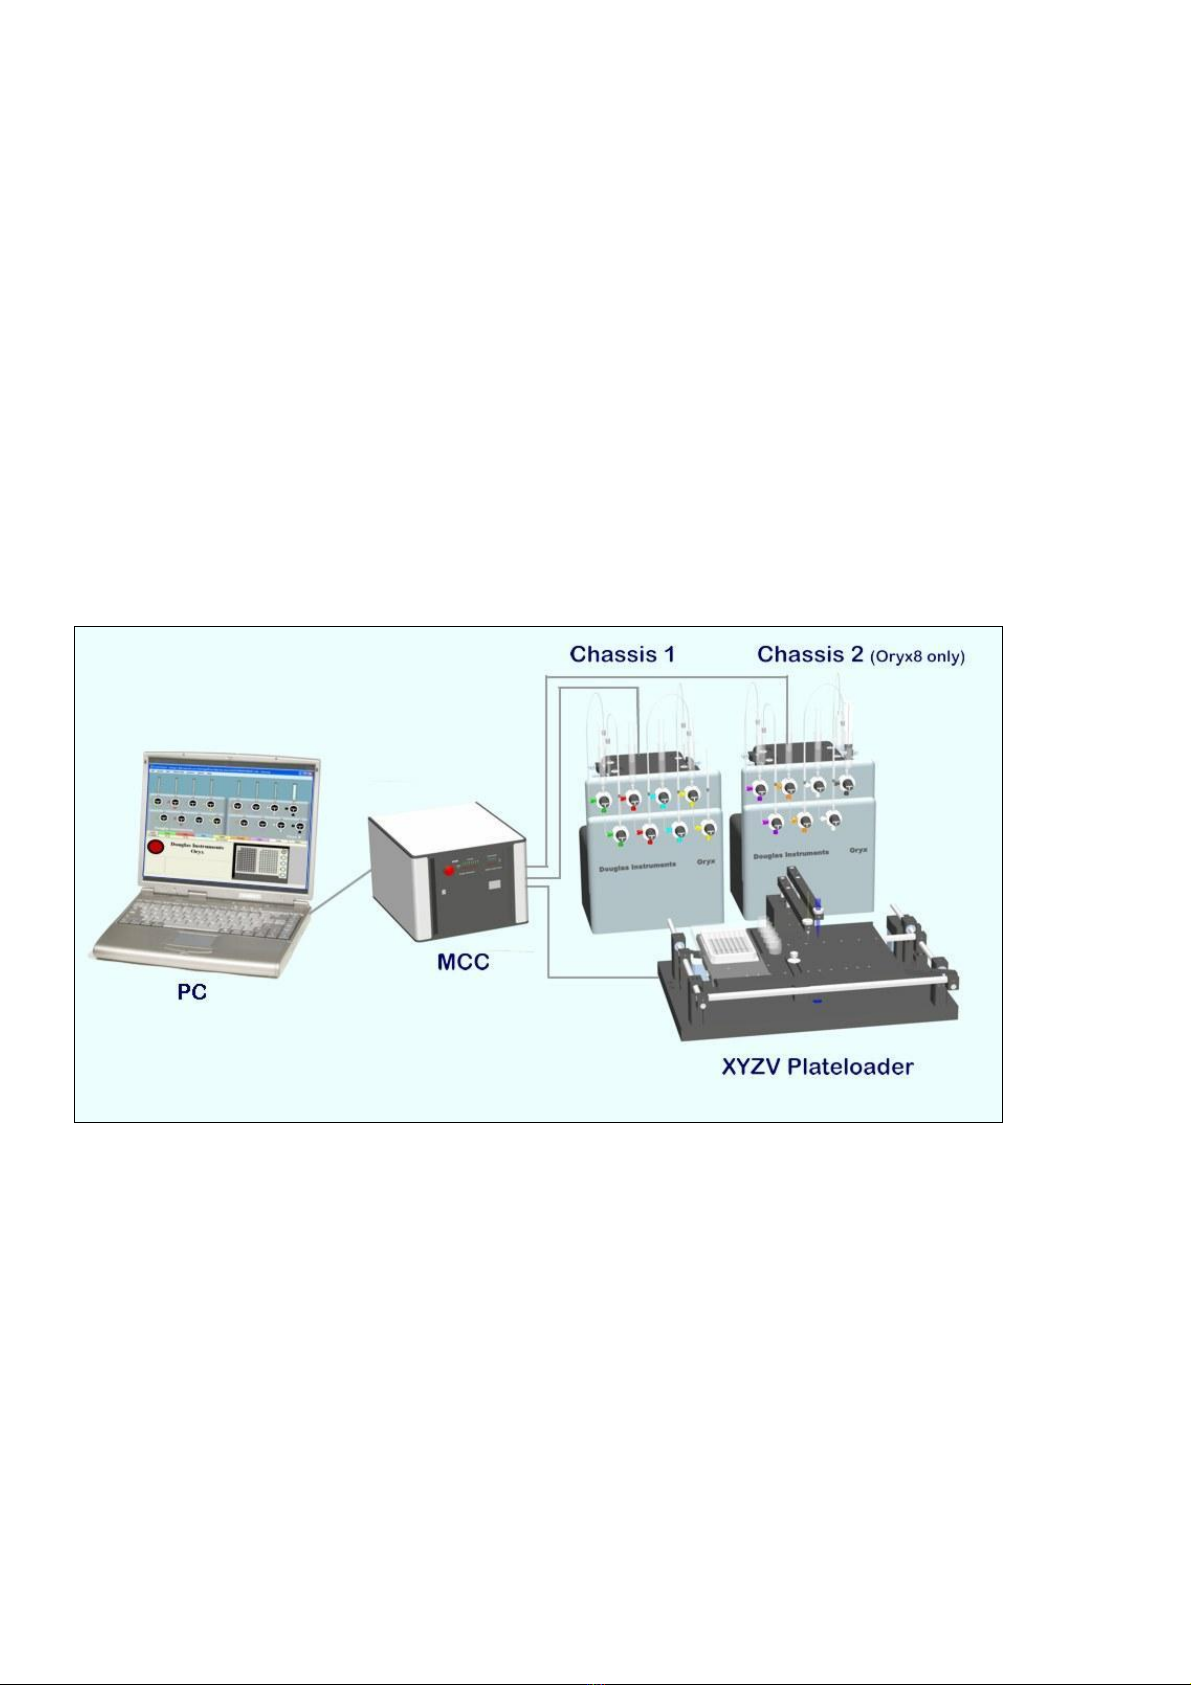
Layout ofthe Hardware.............................................................................................................4
Recordingthe Positionsof Motors............................................................................................ 5
Unpacking.................................................................................................................................5
ElectricalConnection ................................................................................................................ 5
Installing theZandVArms....................................................................................................... 5
RezeroingMotorizedSyringeDrivers.......................................................................................6
Mounting 100 mlGas-Tight SyringesonMotorizedSyringeDrivers,and
Fillingthem withWater.............................................................................................................. 6
Installing 2.5 mlsyringe.............................................................................................................8
Testing the Performanceof the Plateloader.............................................................................. 9
RealigningthePlateloader........................................................................................................9
Rezeroing all Motorsofthe Plate Loader.................................................................................. 10
FRONTPANELMENU ITEMS 11
USEANDMAINTENANCEOFTHEHARDWARE 15
Installing Microtips.....................................................................................................................15
Use ofLiquidHandling SystemIncluding ValvePositions........................................................15
Refilling100mlGas-TightSyringeswith Water....................................................................... 15
Debubbling ............................................................................................................................. 15
FlushingTubing betweenValves............................................................................................ 16
FillingMicrotipwith Solution................................................................................................... 16
Dispensing Experiments.........................................................................................................16
Attachthe EvaporationshieldforVaporDiffusion Experiments................................................ 17
FlushingMicrotipafterUse....................................................................................................... 18
Alwayswearprotective goggleswhenhandling causticmaterials............................................18
Protein Coatingsof Microtip...................................................................................................... 18
Blockages.................................................................................................................................. 18
ChemicalInertness................................................................................................................... 18
TubingConnections.................................................................................................................. 18
Lubrication of SyringeDrivers andPlateLoader....................................................................... 20
Lubrication of Shafts............................................................................................................... 20
Lead-screws........................................................................................................................... 20
Spillages.................................................................................................................................20
XYZVPlate Loader................................................................................................................... 20
Adjustmentof XYZVPlate Loader.......................................................................................... 20
HARDWARECONFIGURATIONAND CONTROL 21
UsingDifferent Syringeswith the System................................................................................. 21
ChangingPlates........................................................................................................................21
WASPandASPRUN.............................................................................................................. 21
PickAndMix........................................................................................................................... 21
XSTEP– ChangingPlates..................................................................................................... 21
AddingFurtherPlatesto PLATES.DAT.................................................................................... 21
HardwareConfiguration Files.................................................................................................... 22
HARDWARE.CFG.................................................................................................................. 22
HARDWARE.FTH .................................................................................................................. 22
Specifications............................................................................................................................ 24
INDEXOFMANUAL 25

SETTING UP THE SYSTEM
SoftwareInstallation
Followthe instructions inthedocumentontheCD calledInstallation Instructions (Long).rtf
entitled“InstallationofDouglasInstrumentsCrystallizationSoftware”toinstall the
crystallizationsoftware.
Layout oftheHardware
The layoutof Oryx4and Oryx8isshowninthefigurebelow.The systemisdrivenbyaPC,which
isconnectedtotheMCC(MotionControlCenter).The motorizedsyringes andthe XYZV
Plateloaderareinturndrivenbythe MCC using stepper motors. The MCC isacomputerthat
generates thestepsfor thesteppermotors,logs theirpositionsetc. It drivesthemotorsusing 3
DB6steppermotor driver cards.
OryxHardwarelayout

5
RecordingthePositionsofMotors
When thesystemisfirst set up, themotorsmustberezeroed usingthe FrontPanel program,as
describedbelow.
Afterthis, the softwarewill automaticallylogthe positions ofallofthe motorsinthe systemand it
will savethesepositions todisk at the endofeachrun. Thismeansthat it isnotnecessaryto
rezerothe motorseach timethecomputerisswitched on. Onlyrezeroifyou havesomereason
tobelievethat thesystemmaybe incorrectlypositioned.However, youmustnot switch off the
computerwithoutquitting allcrystallizationsoftware.If you do this, youwillbeforcedtorezero
the nexttimethat youusethe system.
Unpacking
Take the Chassis, MCC Motion ControlCenter,and theXYZVPlateloader outoftheir packaging.
UnwraptheZ- andV-arms. Take the motorized syringes andground-glass syringesoutoftheir
packaging.
ElectricalConnection
1.Allcablesareindividuallylabeled. Usethe long9-wayD-typecable toconnecttheport
labeled“serialport”ontheMCC totheserialport(COM1)ofthe computer.
2.Followthe labelingtoconnectMCC tothe ChassisandPlateLoaderusingthe three 37-
wayD-type cables
The MCC also possessesoutputsforascreenand keyboard.Thesecan be usedtodiagnose
malfunctions.
InstallingtheZandVArms
NowinstalltheZ-armas follows:
1.UnwraptheZ-arm.
2.Removethe cardboardorplasticprotectivesleeving fromaround theZlead-screw.
3.Lowerthe Z-armintoposition and allowtheleadscrewtosettleonthecentreof the motor
insidetheZV-box.Thearmwillautomaticallybe pulled intothecorrect position onthe
firstrezeroofthetable.
4.Repeatsteps1–3toinstallthe V-arm.

6
RezeroingMotorizedSyringeDrivers
1.SwitchontheMCC.Waitforaround20stoallowittofullybootup(Allred and green
lightsshouldgoout). Switchonthehost PC,andallowit tobootup.
2.OnthePC, click onthestart button, then ProgramFiles |DouglasInstruments|Front
Panel.Allow FrontPanel toload.
3.Click on Actions |Rezero.
4.Makesurethat thecheckboxesarechecked forall of thesyringes, and click on continue.
5.If the100 mlsyringes arealreadyinstalled, turnthetop rowofvalves asindicated. Click
Rezero
6.Wait foraround 30seconds whilethesyringedriversmovetotheirlowestpositions.
The motorizedsyringe driversshouldnowbeintheir lowest positions.When theyreach the end
oftheir travel, the syringedriveswill missstepsandmake arattling noise. Thiswillnotharmthe
syringedriversinanyway.Whenyouaresurethat all ofthe syringedrives havereached their
lowestpositions,youcan savetimebyclicking on thelarge red stop button toendthe procedure.
Mounting100 mlGas-TightSyringes onMotorizedSyringe
Drivers,and FillingthemwithWater
1.Prepareabout250mlofdegassed purewater.Thiswillpreventbubblesforming,andis
essentialfor accuratedispensing.
2.Rezerosyringe drivesasdescribed above.
3.PlaceaHamilton Gas-Tightsyringeinpositiononthefirst motorized syringe driver.
Looselyclampthe barrelwiththe barrelclamp.
4.Placethe plunger of thegas-tightsyringe inthe button clamp andtightenthe grub-
screwtofixtheplunger.
Barrelof
gas-
tight
Barrel clamp
Button clamp
Plungerof
gas-tight
syringe
Tighten
grub-screw
Loosely
tighten

7
5.Connectthe needleofthegas-tight syringetotheupper valvebypressingtheconnecting
tubing ontoit as far asthegripperfitting.
6.Fill aground-glass syringewithdegassed purewaterand place itinthe femaleLuer
connection on theupper valve.
7.Release the barrel clamp,andremovethebarrel ofthe gas-tightsyringe,leaving the
plungerinposition.
8.Placethebarreloverawastecontainer,andflush all airand bubblesoutofthe
connecting tubingandgas-tightsyringe.Toensurethatno bubblesareleft intheupper
valve, taptheplungerofthe ground glass syringe afewtimes.Flush awayanybubbles
thatappearintothe wastecontainer.
Leaveplungerof
gas-tightsyringe
inplace
Barrelofgas-tight
syringe
Flush barrelusing
ground-glass syringe
Waste
Press the connecting
tubingontoneedleas
far as the gripper fitting
Gripperfitting Fillground-glass
syringewithdegassed
purewater
Uppervalve

8
9.Mountthe gas-tightsyringeontothemotorized syringedriverasfollows:
a.Slacken theflangeclamp–labeledbelow
b.Feed the plunger back intothe syringebarrel
c.Placethebarrelintothe Vonthetop ofthesyringe drivernose, ensuringthatthe
flange ofthesyringe barrelisbetweenthenoseand theflangeclamp
d.Tightenthe barrelclamp
e.Tightenthe flange clamp.The flangeclampandthebarrelclampshouldbedone
upfinger-tightonly.
10.Turntheuppervalvetotheflush position ( ),and thelowervalvetothedispense
position(┬). Place awastebeakerunderthelowervalve.Flushair and bubblesoutof
the connectingtubing between the upperandlowervalves.
11.Repeatsteps1-8forthe remaininglowvolumechannels.
Installing2.5mlsyringe
Undothe twoclamps on thelastsyringedriver and installthe 2.5ml syringe.Doupthetwo
thumbscrewstightly.Connectthe correspondingend-fitting tothe last valve.
Flange clamp-
ensure
thatit isunderthe syri
nge
Do upbarrel
clampfinger
-
tight
Do up flange
clampfinger-tight

9
Testing thePerformanceofthePlateloader
1.Start Front Panel
2.Click Options | Advanced Menu Items -toturnonAdvanced Menu Items
3.Click Options |AdministratorMode –toturnon Administratormode
4.Click PlateLoader|Diagnostics|TestAxis
5.Set Axis toX, Speedfactor to1.3, Amplitude (mm)to10, Oscillations to10, Placestotest
to5,and Starting at to0.0.Click Test.
6.If thePlateLoadermisses steps,informDouglas Instrumentsofthe problem.Then
reduce the Speedfactor to1.2andrepeatstep 4(again,tryfivetimes). Ifthisfails,
continuereducingthespeed.
7.Followasimilarprocedureforthe Y,Zand Vaxes.If the PlateLoadermisses steps,
reduce thespeed.
8.Click Options |AdministratorMode –toturnoff Administratormode
9.Click Options | Advanced Menu Items -toturnoffAdvanced Menu Items
RealigningthePlateloader
1.Followsteps1-3abovetoturnon Administrator mode
2.Click PlateLoader|ClearTipOffsets -thisclearsanyadjustmentmade tothe tip
position.
3.Install the‘mountedneedle’intothe Z-arm(youshouldfind thisinthered plasticbox)
4.Click PlateLoader|Diagnostics|Align TableandArm…
5.Firstrun the ‘FindIndexPositions’option.–Thiswilljigglethetablemanytimes whileit
finds theoptimumoffsetsforthehomeposition.
6.Nowdo‘Align PointerwithTableDowel’youcanadjustthe tableleft/right.forward/back
toget theneedleinthecentreofthedowel inthe tableThisisastainless pinnearthe 4
screwsinthetable,it shouldbe obviouswhen itgoesthereas it shouldnot be outby
morethan about1.5mm. Ifit isoutbyalot,thePlateloadermayhavehad aheaveknock
duringshipping andthez-boxmayhaveshifted.
7.Do notadjustthe armupanddownatthispoint (you mayusethe‘Lower’ /‘Raise’
buttons, butdon’ttrytomake theneedletouch thedowel using thearrowbuttons)
8.When theneedleiscentered,andwiththearminthe ‘lowered’position,click‘Save’. Add
acommenttothe endofthemessagedisplayedifyou wish.
9.Your tableshouldnowbe aligned properly.

10
10.Click Options |AdministratorMode –toturnoff Administratormode
11.Click Options | Advanced Menu Items -toturnoffAdvanced Menu Items
Please note:
When you alignthe tipon the destination plateinan experimentthese offsetsareused on all
otherplates. Ifthe tipisbentandthe endofthetipisfar awayfromthecentreof thecollet
thenit mayappeartobe off centrewhen it loadsprotein.If youlookcloselyyou shouldsee
that theend ofthe tipisinthe centreof the proteintubewhenitstartstogo down,but the
colletmaybe so faroffcentrethatithitsthe side ofthe tube.
It isbesttotrytostraightenthetipbyhand or toadjust thetipintheguideloop tobe pointing
straightdown andinthecentreofthe colletbeforestarting anexperiment.
RezeroingallMotorsofthePlateLoader
1.SwitchonPC andMCC,and start the program FrontPanel as described above.
2. Actions|Rezero. Followinstructions torezeroSyringe Drives,Z,V, XandYmotors.
The Zand Vmotorswillmakealoud rattlingnoisewhentheyarerezeroed.Thisnoise iscaused
bythe motorsmissingsteps. Thiswillnotharmthesysteminanyway. When theloudnoise
startsit canbecut shortbypressingthered StopButton (or byclickingonthered StopButtonon
the screen).
If thisrezeroingroutineisnotcorrectlycarried out, mechanical errorsmayoccur(e.g. themicrotip
maybedamaged,and thegas-tightsyringes maybebroken). However,it needonlybe carried
outduring theinitialsetup,orifthereseemstobean errorwiththemotorpositions.Normallythe
motorpositions aresaved todisk afteruseof the system,andrezeroingisnotnecessary.

11
FRONT PANEL MENU ITEMS
FileMenu
AddComment to Log
Use thisCommandtoadd acommenttothecurrentapplicationlog file.
Mostlyused fordebuggingproblems.
ResetApplication Link
Used toreestablish alinkwithanother application i.e. XStep.
Mostlyused for debugging.
Resume Experiment
ResumeCurrent Experiment.
AbortExperiment
Abort Current Experiment.
Exit
Exit FrontPanel.
ActionsMenu
Alloftheseitemscan also be found inothermenusbut aregrouped herefor
convenienceand forinexperiencedusers:If‘AdvancedMenu Items’isturned offin
‘Options’menu then onlythe ‘ActionsMenu’will be displayed.
Debubble
Run the Debubblewizardtoremoveair fromthetubingabovethetop valves.
Install orAdjustTip
Runsthe InstallandAdjust tipwizard.

12
RecoverProtein
Runsawizardtorecoverproteintoaplateortube.
Rezero
Runsawizardtorezerothe syringes and/ ortableif theyhavebeen obstructed.
MCC Menu
TestMCC Response
Sendsatestsignaltothe MCC which shouldreturnthe MCC infomessage for
diagnostics.
RezeroAllMotors
Forces arezeroofall motorstorecalibratestart positions –useincasesyringes
orPlateloader wasobstructedduringuse.
PowerDownallmotors
Turns off powertoallmotorstoallowmanualpositioningofthetableor tostop
thenoise produced bythesyringedrives.Tablewillautomaticallyrezerobefore
nextmove.
SetPowerDownDelay
Setsthe delaybeforethe powerisautomaticallyturnedoffwhenthe tableisin
the Home position.
PlateloaderMenu
Install Tip
Startsawizardtoinstalladifferent tipincludingthe initial heightsettingforanew
tip

13
ClearTipOffsets
Setsthe X, YandZ/Voffsetsused in‘Test and AdjustTipPosition’back toall
Zeros.
TestandAdjustTipPosition
Startsawizardtoalignthe tiptoawell on thetargetplate.
Home
Movesthetabletothe Homeposition.
SetHomeTimeOut
Setsthe delaybeforethe tableautomaticallygoes tothe Home position andthe
PowerDownTimerstarts.
RezeroTable
RezerosthePlateloadertable
SolutionsMenu
Debubble
Run the Debubblewizardtoremoveair fromthetubingabovethetop valves.
Protein
LoadProteinvia Tip
Manuallyload protein
SetAvailableVolume
Overridecurrent availablevolume–foradvanceduse
RecoverProteinvia Tip
Runsawizardtorecoverproteintoaplateortube.
RezeroSyringeDrives
Force arezerooftheSyringe Drives if itisbelievedthat theyareoutofposition
orhavebeen obstructed during use.

14
OptionsMenu
CollectDestinationPlateBarcodes
On/Off-Requirebarcodes fornew plates.Default =off
AllowFrontPanelto StealFocus
On/Off-AllowsFront Panelto‘jump’ tothe front when called –overrides default
Windowsbehaviorofflashing thetaskbar toget attention.Default =On
Use MCC
On/Off-LetsFrontPanel communicatewiththeMCC.Default =On.Usedfor
diagnostics
ExecuteinBackground
AllowsFrontPaneltoexecuteinthebackground whileusingotherapplications.
Default=Off
AdvancedMenuItems
On/Off-EnablesMenu Itemsforadvancedusers.Default =On
AdministratorMode
On/Off-EnablesAdvanced anddiagnosticmenusforAdministratoruseonly.
These menuitemsarenotdescribed inthismanualandaregenerallyonlyused
byinstallerstosetup and calibratethesystem.Default=Off
HelpMenu
About Front Panel
DisplaysFrontPanelVersionInformationand Douglas Instrumentscontact
information.

15
USE AND MAINTENANCE OF THE HARDWARE
InstallingMicrotips
Simplyscrewthe colored end-fittings intothe portson thebottomofthe lower valves, following
the color-coding.The2-boreMicrotips aregenerallyused for screeningexperiments,whilethe 7-
boreMicrotips aregenerallyfor optimization experiments.
Take alittletroublewhen installing Microtips. Youwill find thateachtube hastwo“natural”
positions (thetube runsback and then tothe side,or, alternatively,tothe sideand thenback).
One of these naturalpositionsallowsthe tube toclear thePlateLoader, whereasthe other
positioncausesthe tube tocollidewiththePlateLoader. Choosethe former.
Use ofLiquidHandlingSystemIncludingValvePositions
Refilling100mlGas-TightSyringeswithWater
The 100ml syringes containonlydegassedpurewater. Thismeans thatthereisno need toflush
themwhenthestocksolutions arechanged. Degassing isveryhelpfulinreducingbubbles.
When amotorized syringe isalmost empty,the softwarewilldetect that itisnecessarytorefill the
syringewithwater. Followinstructions,including turningthe upper valvetotherefill position(┴)
asindicated.
The refillvalveposition(┴) isalsousedforrezeroing motorsanddebubbling.
Debubbling
It isessential thatall tubingon channels1–3(1-7onOryx8)iscompletelyfilledwithwater, and
that therearenoairbubbles.Anyair bubbles willcausesignificant inaccuracyindispensing.
The motorizedsyringes containonlydegassed purewater.(If youdo not usedegassedwater
youmayhavetodebubbleup totwiceaday.)
Todebubble,selectthe debubble option(undereither syringes or execute on themainmenu)
and followinstructions.
Plungerwill be
withdrawn

16
FlushingTubingbetweenValves
It willoccasionallybe necessarytoremovebubblesortoflush debrisoutof theshortlengthof
tubing between the upperandlowervalves.Turntheupper valvetotheflush position ( ) andthe
lowervalvetothefill position(┴). Flushwaterfromthe groundglasssyringe tothe disposable
syringe. Thispreventsdebrisfrombeing flushed out ofthe microtip,which couldcause
blockages.
FillingMicrotipwithSolution
Softwarewilltell you when tofillthe Microtipwithstock solution or water. Followinstructions,
including turning the lower valvetotheflush position( ).
DispensingExperiments
Followinstructionsandturnall valves tothe dispenseposition (┬)asshown:
Disposable
syringe
Microtip
Disposable
syringe
Ground glass
syringe
Tubing
betweenupper
and lower
valves

17
AttachtheEvaporationshieldforVaporDiffusionExperiments
1.Moveslidertobe next tothe plateand undothe clampknob tocreateagapfor the
shield:
2.Placetheshieldontotheplatewiththegroveonthe side slidingover thescrewinthe
slider:
3.Putlightpressureonthe shieldabovethe platewithonehand and tightenthe knobwith
the other:
4.Nowleavethe shieldwiththe largeslotsomewhereover the plateand themachine will
finditinthenext step.

18
FlushingMicrotipafterUse
The Microtipshouldbethoroughlyflushedaftereachsession.Place a1ml syringecontaining
distilledwaterineachvalveinthe lowerrow,turnthe valve,and pressintheplungerfirmly.
Repeatthisthree times.Finish bypassingairthroughthe Microtipand disconnecting.Storeit
coiledup and flattoavoidbending ofthe tip.
Alwayswearprotectivegoggleswhenhandlingcaustic
materials
ProteinCoatingsofMicrotip
Certainproteins mayhaveatendencytocoattheinsideofamicrotip. Thismaycause the air
bubble(that isusedtoseparatethe proteinsamplefromthe water inthe microtip)tobecome
stuckor tobreakup.Tips thatarecoated withproteincan becleanedbyflushing first with1M
NaOH,then withbuffer solution togetridofthealkali. Ifthisproceduredoesnotwork, tryconc.
HCl mixed withan equalvolumeofmethanol (againfollowed withbuffer toremovetheacid).
Blockages
Keepsyringes inallvalves when not inusetoavoidtheingressofdust. Never allowprecipitantto
comeintocontactwithtubingthathas previouslycontained proteinunless ithasbeen cleaned
usingalkalioracid–seeabove. Filter allsolutions using a0.45 mmfilterorequivalent, and
refilteranysolutions thatbecomecloudyorcontaindebris.
Unblocking Microtips
1.First tryforcing the debrisout ofthetipwithhighpressure.Thismethodisonlypossiblewhen
the Microtipisfullof liquid. Filla100 mlgas-tight syringewithwater. Attachapointed 0.7mm
needletoit(thisisthetype ofneedlethat sparesyringescomewith). Pushthisintothe blocked
boreof theMicrotipatthe End-Fitting. Press intheplungerof thesyringe. Upto100
atmospherescan be generatedbythismethod.
If thisdoesnot workwerecommend that the tipisreplaced withanewtip
ChemicalInertness
Allsurfacesthat comeintocontact withsolutions arechemicallyinert fluorocarbonpolymers
including FEPand PTFE.Onlywatercomes intocontactwiththestainless steelneedles ofthe
gas-tightsyringes.
TubingConnections
The needles ofthegas-tightsyringesareconnected totheFEPtubing byenlarging theboreat
the endofthetubingandpressingontotheneedle.Ifanysyringes needtobereplacedretainthe
special needles.
Allotherconnections aremadeusinggripperfittings. These arefittedasfollows:

19
1. Taper thetubing withascalpel bycutting it atanacuteangle.
2. Pass the end through thetube end fitting andfeedintothe stainlesssteelsideofthe
gripperfitting.
3. Gripthe end of thetubewithapairofpliersand pull thetubethrough thegripper fitting
beyond the tapered portionofthe tubeontoitsfull diameter, and rotatetwice togripthe
tube.
4. Pullthetubeendfittingdowntomeet thegripper.
5. Trimthe tube flushtotheTeflonface of thegripper withascalpel.
Gripper
fitting
Tube end
fitting
10m
m
cut
2mm

20
LubricationofSyringeDriversandPlateLoader.
Lubrication ofShafts
No lubrication willberequired inthefirstyear.Thereafter,inspect theshaftsofthePlateLoader
and theSyringe Driversonce ayear.If theyappear tobedry, lubricatethemwithoneor two
dropsofhypoidgearoil -SAE80W-90orEP80W-90or similar. (Thisoil isusedine.g. car
differentialgears.) Thiswillcontributetothesmoothrunningofmoving parts,and protectfrom
air-bourncorrosivematerialssuchasarefoundinlaboratories.(Allpartsarestainless steelor
anodized aluminum,which will not generallycorrodeinthepresence ofmoisturealone.)
Lead-screws
Lead-screwsmust not be lubricated withoil,as thismayclogup the motors. Lead-screws
aresparinglylubricated byDouglas Instrumentswithspecialcompound forlubricating plastic.
Please contactDouglasInstrumentsifyou feel thatyour lead-screwsneed tobelubricated orif
theybecomecorroded.
Spillages
If large amountsofliquidsarespilt onanyofthe electricmotors, thesystemshouldbeturnedoff.
Salt, acidor alkaliwill cause corrosionofmotorsandstainless parts, andmust be washed offwith
water. Allowthesystemtodryout beforereusing. The motorsand theirconnectionsare
electricallysafesince theyrunat12V.
XYZV PlateLoader
AdjustmentofXYZVPlateLoader
The XYZVPlateLoaderisadjusted sothatit accuratelymoves tothe centerofwellson plates.
Douglas Instrumentsperformsthisadjustmentbeforeshipping.If the PlateLoaderissubjectedto
shock orifscrewsareslackened,it mayneedtobereadjusted.The adjustmentcan be made in
eitherhardwareorsoftware.
If youbelievethatthePlateLoaderisinneedofadjustment,please contact Douglas Instruments.
Please do notattempt tomake adjustmentswithoutconsulting the company,since thereare
hidden complications inthisprocedure.
It ispossible, however, toadjustthe alignmentofan individual microtipusing Front Panel,
providing the misalignment islessthan about2mm.
This manual suits for next models
1
Table of contents
Popular Laboratory Equipment manuals by other brands

Brooks
Brooks MagnaTran LEAP user manual

Witeg
Witeg WiseStir HS-30E operating manual

Thermo Scientific
Thermo Scientific Dionex AutoTrace 280 Installation and operation manual

IKA
IKA HB ECO operating instructions

OHAUS
OHAUS Pioneer PXP Series instruction manual

Pacific Sun
Pacific Sun CalcFeeder PRO user manual