manuals.online logo
Brands
  1. Home
  2. •
  3. Brands
  4. •
  5. Downeaster
  6. •
  7. Measuring Instrument
  8. •
  9. Downeaster Wind & Weather Medallion Series User manual

Downeaster Wind & Weather Medallion Series User manual

This manual suits for next models

1

Other Downeaster Measuring Instrument manuals

Downeaster Wind & Weather Medallion Series User manual

Downeaster

Downeaster Wind & Weather Medallion Series User manual

Downeaster Wind & Weather Medallion Series User manual

Downeaster

Downeaster Wind & Weather Medallion Series User manual

Popular Measuring Instrument manuals by other brands

Suaoki D40 user manual

Suaoki

Suaoki D40 user manual

Elster BK-G1.6 operating instructions

Elster

Elster BK-G1.6 operating instructions

Endress+Hauser Deltabar FMD71 technical information

Endress+Hauser

Endress+Hauser Deltabar FMD71 technical information

Duratool D03128 manual

Duratool

Duratool D03128 manual

Vega VEGAPULS 65 Quick setup guide

Vega

Vega VEGAPULS 65 Quick setup guide

Tonghui TH2618B Operation manual

Tonghui

Tonghui TH2618B Operation manual

Tenmars TM-801 user manual

Tenmars

Tenmars TM-801 user manual

MSR 145 user manual

MSR

MSR 145 user manual

TPS WP-82 manual

TPS

TPS WP-82 manual

PCB Piezotronics 003C30 Installation and operating manual

PCB Piezotronics

PCB Piezotronics 003C30 Installation and operating manual

Tenma 72-10465 manual

Tenma

Tenma 72-10465 manual

Endress+Hauser Proline Promag 50 Brief operating instructions

Endress+Hauser

Endress+Hauser Proline Promag 50 Brief operating instructions

Siemens SITRANS F Coriolis FCT030 Function manual

Siemens

Siemens SITRANS F Coriolis FCT030 Function manual

KLINGER CMF V Series instruction manual

KLINGER

KLINGER CMF V Series instruction manual

Keysight M8290A Getting started guide

Keysight

Keysight M8290A Getting started guide

Acterna MS1400 Operation manual

Acterna

Acterna MS1400 Operation manual

R&S ZPH manual

R&S

R&S ZPH manual

Datacolor ColorReader DC10-2 user guide

Datacolor

Datacolor ColorReader DC10-2 user guide

manuals.online logo
manuals.online logoBrands
  • About & Mission
  • Contact us
  • Privacy Policy
  • Terms and Conditions

Copyright 2025 Manuals.Online. All Rights Reserved.

Warranty Informatio n
5-Year Limited Warranty
Cape Cod Wind & Weather warrants all instruments it manufactures
to be free from defects in materials and workmanship for a period of
five (5) years from the time of purchase. This warranty does not cover
damages or malfunctions not resulting from defects in material or
workmanship including, but not limited to, unauthorized repair or
disassembly, modification, accident, improper installation, lightning
or other power surges, or natural disasters. Any defective instrument
returned to Cape Cod Wind & Weather during the warranty period
will be repaired or replaced at the option of Cape Cod Wind &
Weather free of charge. Cape Cod Wind & Weather does not accept
liability for incidental or consequential damages, including without
limitation any liability for products not being available for use. Cape
Cod Wind & Weather disclaims all other warranties, either expressed
or implied, including, but not limited to, implied warranties of
merchantability and fitness for a particular purpose.
Please contact us before sending any item for repair; we
may be able to resolve your problem over the phone.
Phone: 877-438-2294 or 508-432-0970.
Email: [email protected]
Website: www.downeaster.com
Cape Cod Wind & Weather
189 Route 28, Unit 1
West Harwich, MA 02671
Downeaster
Wind & Weather
“For the best in weather”
Instruction Manual
Wind Direction Instrument
—Medallion Series—
Model #3010
Wind Direction Instrument
-Medallion Series (#3010)-
The Wind Direction Vane should be mounted on the peak of the
roof where it will receive the greatest exposure to the wind. Keep
away from any obstructions if possible. Be sure to install the mast
securely and vertically to prevent uneven wear.
TO INSTALL:
Do not plug in the instrument until ALL connections
have been made.
1 –Attach the L-shaped bracket to the roof or rake boards with the
included lag bolts. The unit can also be attached to a chimney using
a masonry drill and screw anchors.
2 –Using the included U-bolts, attached the bottom of the curved
mast to the bracket.
3 –Before tightening the hose clamps, rotate the curved mast until
the “N” inscribed on the body of the Direction Vane Assembly faces
North.
4 –Run the 5/conductor cable into the house to the location where
the meter will be mounted.
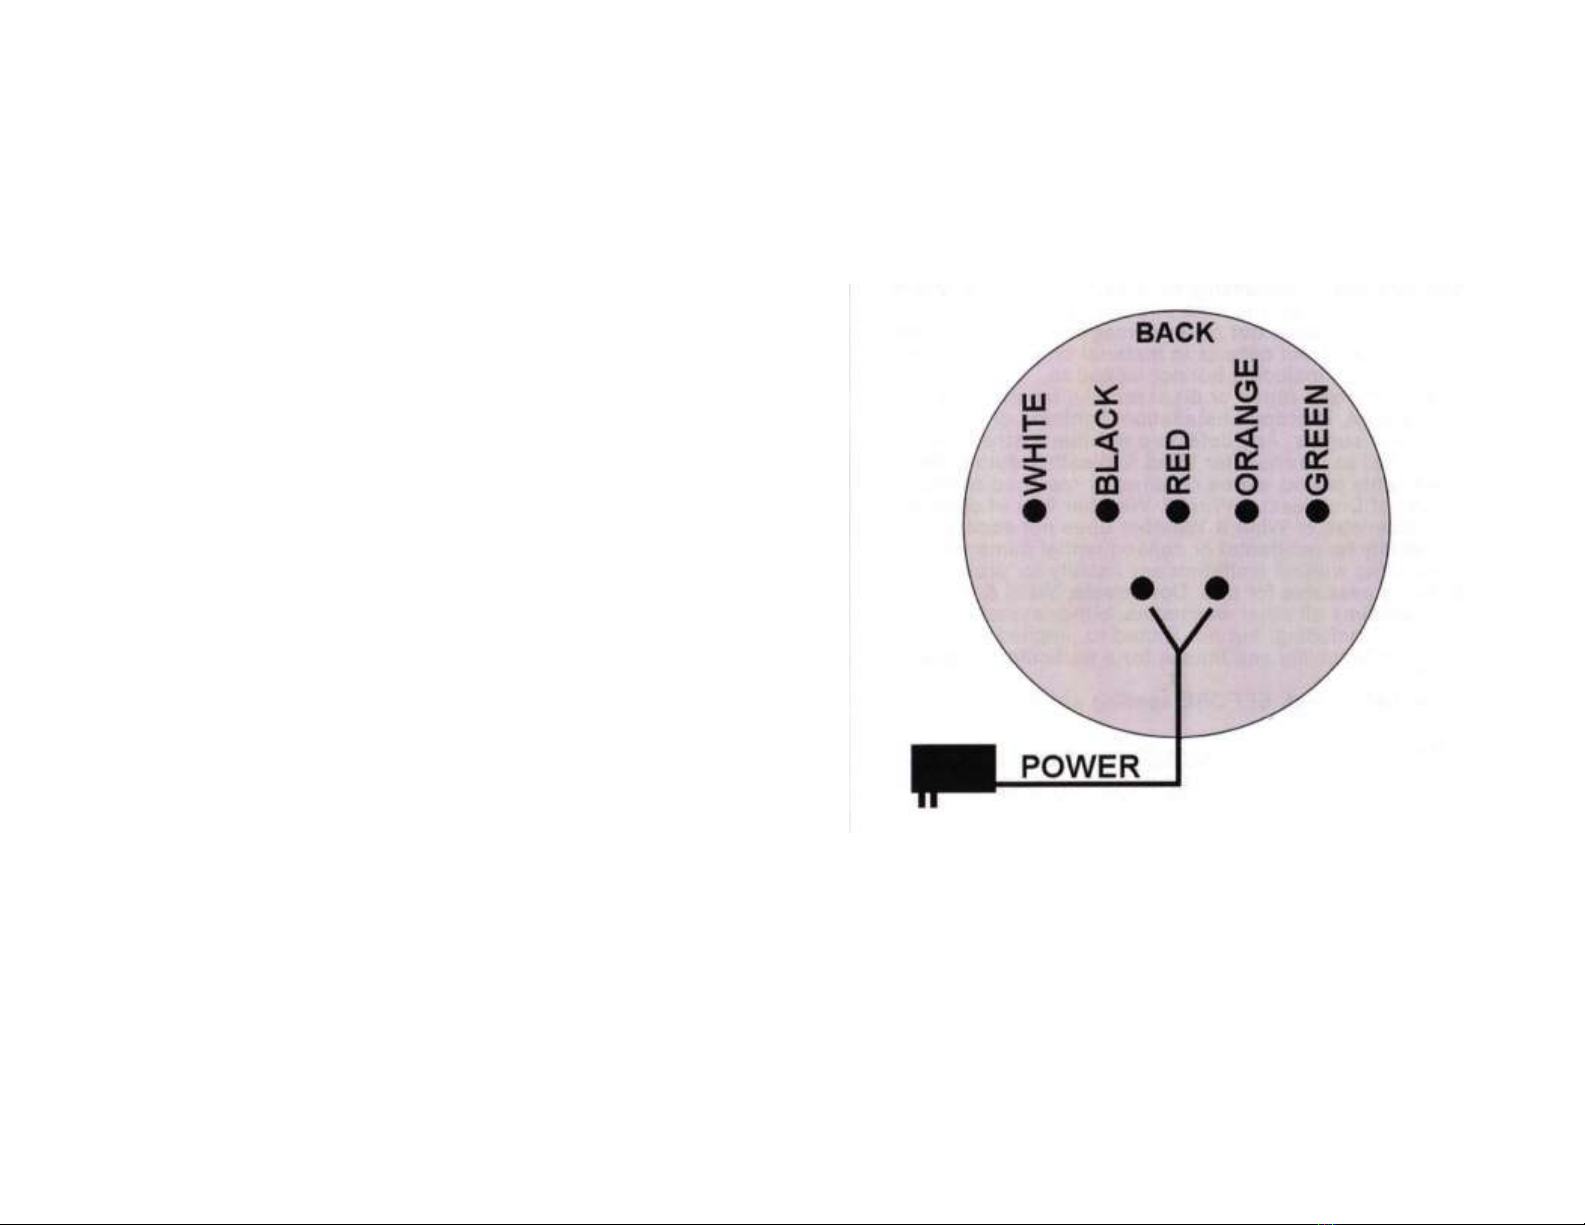
5 –At the back of the meter, attach the five wires to the TOP five
terminals, matching color to color (see diagram)
(On some older models, an ORANGE wire is used instead of
BROWN.)
6 –Attach the two wires from the power supply to the BOTTOM
two terminals on the rear of the instrument (either wire to either
terminal –the polarity does not matter).
7 –Plug in the Adapter Plug.
When powered, the dial will display the direction the wind is
coming from. When the direction is between two compass points,
both LEDs will llght.
Altering this instrument in any way will void the warranty.
Please call with any questions regarding installation or operation.
BOX CONTENTS:
1 –Wind Direction Dial
1 –Curved Mast w/Direction Vane Assembly with 50 feet of
5/conductor Wire attached
1 –Mounting Bracket w/2 Lag Bolts and 2 U-Bolts
1 –6 Volt AC Power Adapter