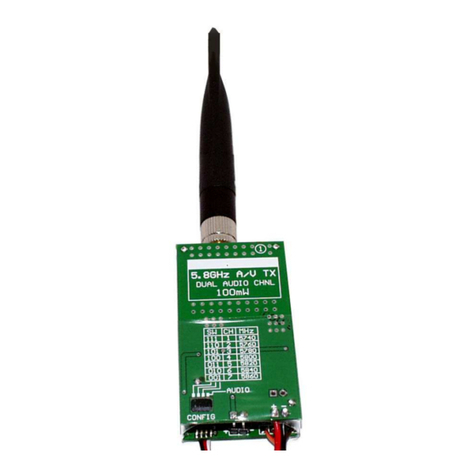
DPCAV AV681TX User manual

AV681TX-Kit, Rev C Page 1 © Nov-03-2008
AV681TX 5.8GHZ A/V TRANSMITTER KIT
Rev-C Hardware
INTRODUCTION
This 5.8Ghz 100mW A/V transmitter kit provides a custom printed circuit
board set and quality electronic components. All you need to add is an
antenna of your choice and about three hours of your time.
NOTICE: This kit involves precision SMD soldering and it is NOT intended for
beginners to assemble. It is suitable for amateur radio hobbyists and RF
technicians. The builder must have good quality soldering tools, an anti-static
work environment, and electronic assembly experience.
Note: This transmitter will require a ham radio license for hobby applications. Some
countries may prohibit use. Please consult your government’s spectrum regulations
before using this device.
BILL OF MATERIALS
QTY DESCRIPTION DESIGNATOR NOTES
==== =================== ============ =========================
3 .1uF Cap C1, C3, C8 0805 pkg.
4 47uF 6V Cap C6, C7, C20, C22 Observe polarity. 3528-21pkg.
1 47uF 16V Cap C21 Observe polarity. 6032-28 pkg.
3 330uF Cap C2, C4, C5 Observe polarity. 7343-31 pkg.
3 2.2K Resistor R1, R2, R3 0805 pkg.
1 22uH Inductor L1 3225 pkg.
1 DL4001 Diode D20 Observe polarity. MELF pkg.
2 KF50BDT U20, U21 TO-252 pkg.
1 DIP Switch S1 SOIC Package
1 SMA-RP Connector N/A Antenna connector
1 Tall Post Header, 4-pin PCB Assy Cut into one 2-pin and two 1-pin
1.75" Heatshrink, 2" Size N/A See text
1 Double-sided foam pad N/A See text
1 AWM681TX Module #AWM681TX Static sensitive, handle with care.
1 Printed Circuit Board Set PCB, Rev-C 2-piece PCB set
The following accessories are available separately. You may use our recommendations or any
suitable equivalent:
AVAILABLE ACCESSORIES
5.8GHz 8dBi Patch Antenna, #HG5808P-SMA and Coax Cable #CSR400 or #CSR316.
5.8GHz 5dBi Patch Antenna, #AWM5.8ANT
5.8GHz 4dBi Dipole Antenna, #ANTDRP-5.8.
5.8GHz 2dBi Dipole Antenna, #ANTTRP-5.8.
Tiny-Mic Amplified Microphone, #MIC-001

AV681TX-Kit, Rev C Page 2 © Nov-03-2008
Figure 2, Side ã
Figure 3, Side ä
ASSEMBLY INSTRUCTIONS
1 GENERAL NOTES
1.1 These instructions are for the Rev-C hardware release. Before starting, be sure
to confirm your kit is identified as Rev-C.
1.2 The top and bottom sides of the two PCB’s are labeled with a circled number
(e.g., âãäå). The instructions will reference the numbered side that is being
assembled.
2 SIDE ã
ãã
ã,COMPONENTS: See Figure 2.
92.1 Install C20 and C22 (47uF/6V caps).
92.2 Install C21 (47uF/16V cap).
92.3 Install D20 (diode).
92.4 Install U20 and U21 (Vreg IC).
3 SIDE ä
ää
ä,COMPONENTS: See Figure 3.
93.1 Install C1 and C3 (.1uF caps).
93.2 Install C6 and C7 (47uF/6V caps).
93.3 Install C2, C4, and C5 (330uF caps).
93.4 Install L1 (inductor).
93.5 Install S1 (4-position switch). Orient it so that the
“1234" text is at the front edge.

AV681TX-Kit, Rev C Page 3 © Nov-03-2008
Figure 4, Side å
Figure 5, Stand-Off Posts
4 SIDE å
åå
å,COMPONENTS: See Figure 4.
94.1 Install R1, R2, and R3 (2.2K resistors).
94.2 Install C8 (.1uF cap).
5 SIDE ä
ää
ä,POST INSTALLATION: See Figure 5.
95.1 Carefully cut the standoff post header so that
you have one piece that is 2-pins and two pieces
that are 1-pin.
95.2 Install the 2-pin POWER post at J1.
95.3 Install a 1-pin GND post at the hole next to C1+ .
95.4 Install a 1-pin GND post at the hole next to C7+.
6 SIDE ã
ãã
ã,POWER CABLE INSTALLATION AND VREG TEST.
96.1 Install your preferred DC power cable/connector (such as a female BEC) to the
DC-IN pads. Be sure to observe the marked polarity. Label the cable “6.5-
8.5VDC BAT-IN.”
96.2 If you will be powering your 5VDC camera from the transmitter then install your
camera’s power cable to the CAM PWR pads (observe marked polarity). Label
the cable “5VDC @150mA CAM-OUT.”
96.3 Visually inspect side ãfor assembly errors and solder issues. Correct all
problems before proceeding.
96.4 Temporarily apply power (6.5VDC to 8.5VDC) to the DC-IN cable. Using a digital
voltmeter, verify 5.0VDC (±0.15V) at the P1 pads and the CAM-PWR cable.

AV681TX-Kit, Rev C Page 4 © Nov-03-2008
Figure 6, RF Module Installation
Figure 7, SMA-RP Top Side Figure 8, SMA-RP Bottom Side
7 RF MODULE INSTALLATION: See Figure 6.
Note: The RF Module and the SMA-RP installation have changed with the Rev-C
release.
97.1 Place the AWM681TX module on the PCB (Side ä). It will have a gap between it
and the PCB. It does NOT sit flush. See Figure 6 for details.
97.2 Before soldering the RF module in place, temporarily slide the SMA-RP
connector onto the module’s RF output. See Figure 7. Adjust the module’s
placement on the PCB until the center pin of the SMA-RP is centered on top of
the module’s RF output trace. Once positioned, solder the module’s four corners
and its ten pins. Do not solder the SMA-RP at this time.
8 SMA-RP INSTALLATION: See Figures 7 and 8.
98.1 Slide the SMA-RP connector onto the RF output. See Figure 7. Do not allow the
connector’s center pin to short to the module’s metal case (allow 50 mils
clearance).
98.2 While holding it straight and parallel with the PCB, carefully solder the SMA-RP
center pin and all four ground legs (top and bottom). Clean off ALL flux, even if
no-clean solder was used. Do a visual inspection for solder shorts (do not use an
ohmmeter).

AV681TX-Kit, Rev C Page 5 © Nov-03-2008
Figure 9, A/V Cables
98.3 If the RF module is expected to be used in an application that has vibration then
it is helpful to solder two diagonal corners of the RF module’s top tin lid to the tin
metal base. This will help prevent video noise.
9 SIDE å
åå
å, A/V CABLE INSTALLATION: See Figure 9.
99.1 Install your audio/video wires to the AV-IN pads as follows:
G= A/V GND
R= RIGHT AUDIO
L= LEFT AUDIO
V= VIDEO
99.2 If a line-level microphone will be used (our Tiny-Mic is highly recommended) then
install it at the MIC pads as follows:
Mic Audio = S
5V Power = +
Mic Gnd = G
Note: The MIC input feature uses the right audio channel. Do not use the right
channel on the A/V-IN input if a Microphone is installed on the MIC input.

AV681TX-Kit, Rev C Page 6 © Nov-03-2008
Figure 10, Foam Pad
Figure 11, Heatshrink
10 FINAL ASSEMBLY: JOIN THE TWO PCB’s TOGETHER
910.1 Using an approved PCB cleaner, remove the flux
from ALL soldered connections. Flush trim all the
component leads from sides âand å.
910.2 Inspect your work. Now is the time to find errors --
once the boards are joined it will be very
inconvenient to do this.
910.3 See Figure 10. Cut the double-sided foam pad in
half. Stack the two pieces together to form a thicker
pad. Install the pad on the RF end of the Airwave
module.
910.4 Stack the two PCB’s with sides ãand äfacing each other. The four posts will
mate with the corresponding holes on side ã.
910.5 While lightly squeezing the foam pad end, ensure that the
two boards are parallel and close together. There should
be a slight air space between the Vreg IC’s and the top of
the Airwave module. Hold this position while you solder
the four posts. Trim the excess leads.
910.6 See Figure 11. Slide a 1.75 inches (45mm) long piece of
heatshrink over the transmitter so that it covers the end
with the exposed electronics. About 0.25 inches (6mm)
should hang over the end that has all the wires. Airflow is
needed so do NOT totally cover the end. Use a heat gun
or hot hair dryer and neatly shrink the tubing. Matches
and lighters are not recommended.
11 FREQUENCY CONFIGURATION
11.1 The DIP switch is used to change the transmitted frequency. The transmitter and
receiver must both be on the same channel. The three switches are set as
follows:
CH MHz SW1 SW2 SW3
OFF = switch open
(Front position)
ON = switch closed
(Back position)
1 5740 ON ON ON
2 5760 ON ON OFF
3 5780 ON OFF ON
4 5800 ON OFF OFF
5 5820 OFF ON ON
6 5840 OFF ON OFF
7 5860 OFF OFF ON

AV681TX-Kit, Rev C Page 7 © Nov-03-2008
NOTICE
Digital Products Company, or their distributors, have no control over the assembly and use of this
A/V RF system. As such, no liability may be assumed, nor will any liability be accepted, for any
damages resulting from the use of this product. Under no circumstances will the buyer be entitled to
consequential or incidental damages. By act of using it, the buyer accepts all resulting liability.
12 AUDIO CONFIGURATION
12.1 DIP Switch position four is used to control a special audio feature. When ON
(SW-4 closed), it will bridge the left and right audio channels together. This is
used to transmit mono sound with both channels. For independent audio
channels you must turn it OFF (SW-4 open).
13 TECHNICAL INFORMATION
For complete technical information, please consult the AWM681TX data sheet
(available from dpcav.com’s web site) and the attached schematic.

1 2 3 4
A
B
C
D
4321
D
C
B
A
1 1
5.8Ghz TX KIT
AV-681TX C
Title:
Size:
Date:
Revision:
Sheet of
Letter
DPC A/V
AUDIO VIDEO
www.dpcav.com
Copyright:
NOV-03-2008
2008
GND
1
N/A
2SW2
3
AUD-L
7
SW1
4SW0
5AUD-R
6VID
8
GND 11
GND 13
ANT 12
VCC 9
BYPASS 10
U1
AWM681TX1
2
J1
HDR2P
+C2
330uF
+
C21
47uF 16V
+C22
47uF 6V
6.5VDC MIN
8.5VDC MAX
IN
1OUT 3
GND
2
U21
KF50BDT
D20
DL4001
+
C4
330uF
1
2
DC-IN
PWR
AIRWAVE AWM681 TX
+5
C8
.1uF
+5
1
2
3
4
AV
HDR4P
AUD-R
AUD-L
VID-IN
R1
2.2K
L1
22uH
R2
2.2K
R3
2.2K
GND
1
2
3
4
8
7
6
5
S1
SW DIP-4
VCC
+
C6 47uF 6V
+
C7 47uF 6V
+
C5 330uF
1
2P1
HDR2P
GND1 GND2 GND3
GND PADS
C1
.1uF
C3
.1uF
VCC
1
2CAM
HDR2P GND4
GND1V GND2V GND3V
GND PADS GND4V
+C20
47uF 6V
IN
1OUT 3
GND
2
U20
KF50BDT
CAMERA POWER (5VDC)
TX
CAM5+
TX5+
BIT2
BIT1
BIT0
1
2
3
MIC
HDR3P
VCC
PC BOARD #2, SIDES 3-4
PC BOARD #1,
SIDES 1-2
Table of contents
Other DPCAV Transmitter manuals
Popular Transmitter manuals by other brands

Inovonics
Inovonics EN1702 installation instructions

Michell Instruments
Michell Instruments DT722 user manual

AMX
AMX SoftKey TX-SK+ instruction manual

Extron electronics
Extron electronics PowerCage MTP AV Series user guide

Extron electronics
Extron electronics DTP2 T/R 211 user guide

M-system
M-system M5XTR instruction manual