Dr. Trust BP Check Pro - 124 User manual

ABOUT US
Driven by the passion for innovation, we at Dr Trust endeavour to provide our customers with the
latest medical inventions with an objective to promote good health and wellness all around the world.
All the medical devices and health monitors provided by Dr Trust are supported by accurate, latest
and ground breaking technologies, innovated at our headquarter in NY, USA. All our products adhere
to the most stringent CE and FDA guidelines and are strongly recommended by doctors and health
practitioners. Our products are designed in the utmost exemplary ways to ensure that their accuracy
and convenience are unrivalled. The ease of their use and operation makes them even more suitable
for users of all age groups.
Dr Trust strives to enhance the quality of lifestyle by providing with the most trusted and innovative
health care and wellness products. Being a renowned global leader in health care products, Dr Trust
ensures that our technically ecient team works dynamically and tirelessly to provide the best of the
medical devices to our clients. The products that we have to offer are suitably designed for use at
homes, laboratories and hospitals.
Our ground breaking solutions allow you to monitor your health in the easiest ways possible. In
today's era when all of our lives are too hassled to handle, it becomes a bit dicult to pay aention to
our health. But it has now become easier with the coming of the monitoring devices which can be
conveniently used at homes and even on the go.
We bring to you a variety of best self medical devices, trusted and used by Doctors, medical
professionals and home users all over the world.
Dr Trust
BP Check Pro - 124
QUICK STARTUP GUIDE
Step 1
If using it for the first time, get started by
downloading the “Dr Trust 360 App” on your
phone/device (on Android and iPhone) from the
Play Store. Or Download app using the QR code
shared here.
Step 2
Open the app and register yourself as a user by
sharing some basic information about yourself.
Step 3
Turn on Bluetooth and location to initiate pairing
your phone with the BP monitor. At the same
time, tap the Bluetooth buon located on your
device.
Step 4
Put on the cuff with the height of your heart.
Press the power buon and wait until the
monitor automatically transfers the data to the
app.
Step 5
When the measurement is complete, the app
will show results automatically.
Step 6
Save and share your measurements as per your
choice.
36 1
124

TABLE OF CONTENTS
1. INTRODUCTION
1.1. Features of the Dr Trust BP Check Pro-124
1.2. Important information about self-measurement
2. IMPORTANT INFORMATION ON THE SUBJECT OF BLOOD-PRESSURE
AND ITS MEASUREMENT
2.1. How does high/low blood-pressure arise?
2.2. Which values are normal?
3. THE VARIOUS COMPONENTS OF BLOOD-PRESSURE MONITOR
4. PUTTING THE BLOOD-PRESSURE MONITOR INTO OPERATION
4.1. Inserting the baeries
4.2. Reading the set date
4.3. User selection and seing the time / date
5. CARRYING OUT A MEASUREMENT
5.1. Before the measurement
5.2. Common sources of error
5.3. Fiing the cuff
5.4. Measuring procedure
5.5. Discontinuing a measurement
5.6. Memory – storage and recall of the measurements
5.7. Memory– cancellation of all measurements
5.8. Bluetooth function (Dr Trust 360⁰ app)
2 3
6. APPEARANCE OF THE HEART ARRHYTHMIA INDICATOR FOR EARLY DETECTION
7. ERROR MESSAGES /MALFUNCTIONS
8. CARE AND MAINTENANCE, RECALIBRATION
9. BATTERY LIFE
10. SAFETY, CARE AND DISPOSAL
11. REFERENCE TO STANDARDS
12. REMARK
13. TECHNICAL SPECIFICATIONS
14. MANUFACTURER'S DECLARATION
15. CONTACT US
16. ABOUT US
124
19
19
22
22
22
24
24
25
27
34
36
5
8
9
11
4

1.1. Features of the Dr Trust BP Check Pro-124
The blood-pressure monitor Dr Trust BP Check Pro- 124 (with integrated time/date display) is a fully
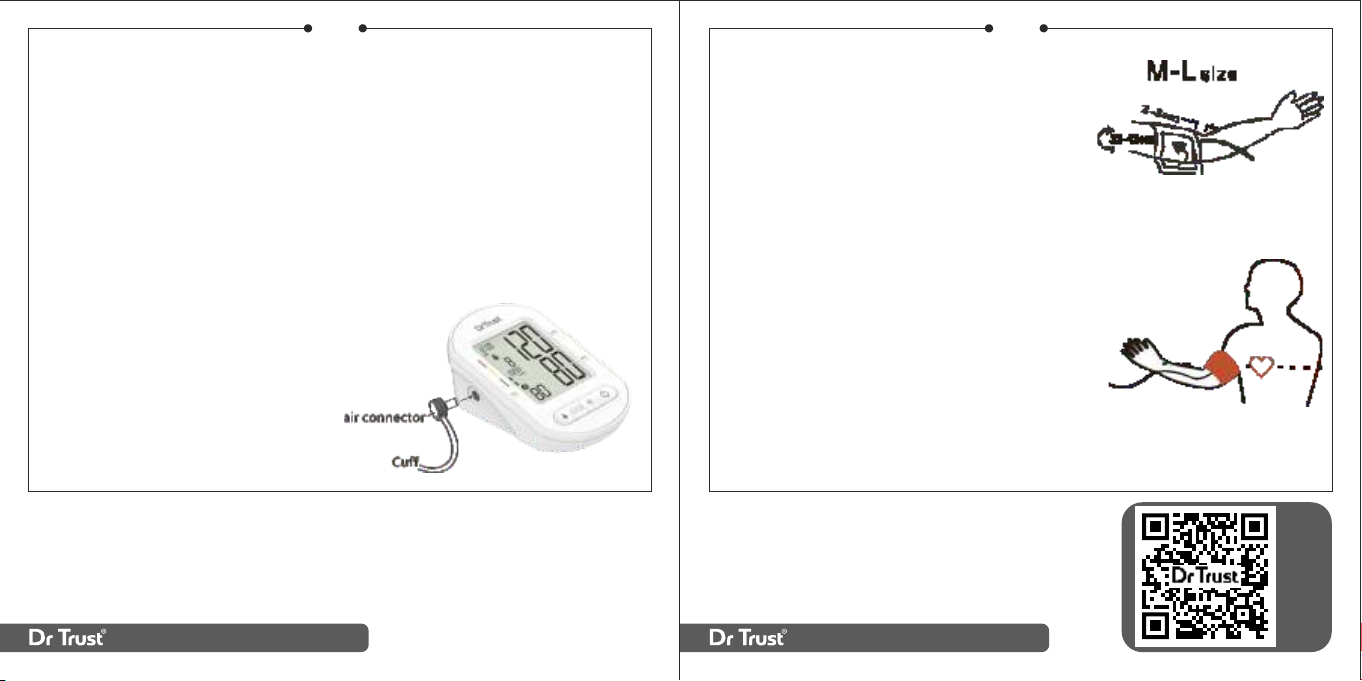
automatic, digital blood-pressure measuring device for use on the arm, which enables very fast and
reliable measurement of the systolic and diastolic blood-pressure as well as the pulse frequency by
way of the oscillometric method of measurement. Detailed results and recommended values are
displayed in the Dr Trust 360 app.
The device offers very high and clinical tested measurement accuracy and has been designed to
provide maximum of user-friendliness.
Before using, please read this instruction manual carefully and keep it in a safe place. For further
questions on the subject of blood-pressure and its measurement, please contact your doctor.
4 5
ŸThe need to check that operation of the automated sphygmomanometer does not result in
prolonged impairment of patient blood circulation.
ŸNot intended to be used together with HF surgical equipment.
ŸDo not forget: self-measurement means control, not diagnosis or treatment. Unusual values
must always be discussed with your doctor. Under no circumstances should you alter the
dosages of any drugs prescribed by your doctor.
ŸThe pulse display is not suitable for checking the frequency of heart pacemakers!
ŸIn cases of cardiac irregularity (Arrhythmia), measurements made with this instrument should
only be evaluated aer consultation with the doctor.
1. INTRODUCTION
Aention
1.2. Important information about self-measurement
ŸSubstitution of a different component might result in measurement error.
ŸCuff is replaceable only by an original.
ŸDo not use with neonatal patients.
ŸIt will cause harmful injury to the patient or effect the blood pressure due to connection tubing
kinking.
ŸToo frequent measurements can cause injury to the patient due to blood flow interference.
ŸThe application of the cuff over a wound can cause further injury.
ŸThe application of the cuff and its pressurization on any limb where intravascular access or
therapy, or an arteriovenous (A-V) shunt, is present because of temporary interference to blood
flow and could result in injury to the patient.
ŸDo not let the cuff and its pressurization on the arm on the side of a mastectomy
Electromagnetic interference
The device contains sensitive electronic components (Microcomputer). Therefore, avoid strong
electrical or electromagnetic fields in the direct vicinity of the device (e.g. mobile telephones,
microwave cookers). These can lead to temporary impairment of the measuring accuracy.
2. IMPORTANT INFORMATION ON THE SUBJECT OF
BLOOD-PRESSURE AND ITS MEASUREMENT
2.1. How does high/low blood-pressure arise?
The level of blood-pressure is determined in a part of the brain, the so-called circulatory center, and
adapted to the respective situation by way of feedback via the nervous system. To adjust the blood-
pressure, the strength and frequency of the heart (Pulse), as well as the width of circulatory blood
vessels is altered.
124

The laer is affected by way of fine muscles in the blood-vessel walls. The level of arterial blood-
pressure changes periodically during the heart activity: During the «blood ejection» (Systole) the
value is maximal (systolic blood-pressure value), at the end of the heart’s «rest period» (Diastole)
minimal (diastolic blood-pressure value). The blood-pressure values must lie within certain normal
ranges in order to prevent particular diseases.
6 7
2.2. Which values are normal?
Blood pressure is too high if at rest, the diastolic pressure is above 90 mmHg and/or the systolic
blood-pressure is over 160 mmHg. In this case, please consult your doctor immediately. Long-term
values at this level endanger your health due to the associated advancing damage to the blood
vessels in your body.
Should the systolic blood-pressure values lie between 140 mmHg and 160 mmHg and/or the diastolic
blood-pressure values lie between 90 mmHg and 100 mmHg, likewise, please consult your doctor.
Furthermore, regular self-checks will be necessary.
With blood-pressure values that are too low, i.e. systolic values under 100 mmHg and/or diastolic
values under 60 mmHg, likewise, please consult your doctor. Even with normal blood-pressure values,
a regular self-check with your blood-pressure monitor is recommended. In this way you can detect
possible changes in your values early and react appropriately. If you are undergoing medical
treatment to control your blood pressure, please keep a record of the level of your blood pressure by
carrying out regular self-measurements at specific times of the day. Show these values to your doctor.
Never use the results of your measurements to alter independently the drug doses prescribed by
your doctor.
Table for classifying blood-pressure values (unit: mmHg) according to World Health Organization:
Range Systolic
Blood pressure
Diastolic
Blood-pressure
Measures
optimum between 100 and 120 between 60 and 80 Self-check
normal between 120 and 129 between 80 and 84 Self-check
high to normal between 130 and 139 between 85and 89 Consult your doctor
slight hypertension between 140 and 159 Between 90and 99 Seek medical advice
medium hypertension between 160 and 179 Between 100and 109 Seek medical advice
strong hypertension Higher than 180 Higher than 110 Urgently seek
medical advice!
Further information
ŸIf your values are mostly standard under resting conditions but exceptionally high under
conditions of physical or psychological stress, it is possible that you are suffering from so-called
«labile hypertension». Please consult your doctor if you suspect that this might be the case.
ŸCorrectly measured diastolic blood-pressure values above 120mmHg require immediate medical
treatment.
124

8 9
4.1. Inserting the baeries
a) Insert the baeries (4 x size AAA1.5V), thereby observing the indicated polarity.
b) If the baery warning icon appears in the display, the baeries remain 20% power to warn user
the baeries will be run out.
c) If the baery warning icon appears in the display, the baeries are empty and must be replaced
by new ones
Aention! • Aer the baery warning icon appears, the device is blocked until the baeries have
been replaced.
ŸPlease use «AAA» Long-Life or Alkaline 1.5V baeries. The use of 1.2V Accumulators is not
recommended.
ŸIf the blood-pressure monitor is le unused for long periods, please remove the baeries from the
device.
3. THE VARIOUS COMPONENTS OF THE BLOOD-PRESSURE MONITOR
User
Buon
Seing Buon/ Bluetooth buon
Memory buon
On/Off buon
Bl uet oot h
4. PUTTING THE BLOOD-PRESSURE MONITOR INTO OPERATION
4.2. Reading the set date
Please press the TIME buon and the date will be shown in the display.
4.3. User selection and seing the time / date
User selection: This advanced blood pressure monitor allows you to track blood pressure readings
for 2 individuals independently
a) Before measurement, make sure you set the unit for the intended user. The unit can track
results for 2 individuals. (User 1, User 2)
b) Press the user buon. The display now indicates the set user, during which the set user blink,
to confirm, press ON/OFF buon
c) We suggest the first person to take their pressure to be User 1.
124

Seing the time, date
This blood-pressure monitor incorporates an integrated clock with date display. This has the
advantage, that at each measurement procedure, not only the blood-pressure values are stored,
but also the exact moment of the measurement. Aer new baeries have been inserted, the clock
begins to run TIME12:00andDATE1-01. You must then re-enter the date and current time. For this,
please proceed as follows.
10 11
14. Now aer all seings have been made, press the TIME buon once again. The date is briefly
displayed and then the time. The input is now confirmed and the clock begins to run.
Further Information
With each press of the buon (TIME, MEMORY) one input is made (e.g. switching over from hours to
minutes mode, or altering the value by +1). However, if you keep the respective buon depressed, you
can switch more quickly to find the desired value respectively.
Aention
1. Press the TIME buon for at least 3 seconds firstly, user icon will blink. Then press TIME buon
again the display now indicates the set year, during which the four characters blink.
2. The correct year can be entered by pressing the MEMORY buon
3. Press the TIME buon again. The display now switches to the current date, during which the first
character (month) blinks.
4. The corresponding month can now be entered by pressing the MEMORY buon.
5. Press the TIME buon again. The last two characters (day) are now blinking
6. The corresponding day can now be entered by pressing the MEMORY buon.
7. Press the TIME buon again. The display now switches to the current time, during which the first
character (Hour) blinks
8. The corresponding hour can now be entered by pressing the MEMORY buon.
9. Press the TIME buon again. The last two characters (Minutes) now blink.
10. The exact time can now be entered by pressing the MEMORY buon
11. Press TIME buon: the unit of measurement will flash.
12. Press the "MEMORY to set the unit of measurement (mmHg or kPa)
13. Once you have made your seings, press the TIME buon (or TIME / DATE or TIME). The seing is
confirmed and the clock starts running.
5. CARRYING OUT A MEASUREMENT
5.1. Before the measurement
ŸAvoid eating, smoking as well as all forms of exertion directly before the measurement. All these
factors influence the measurement result. Try and find time to relax by siing in an armchair in a
quite atmosphere for about ten minutes before the measurement.
ŸMeasure always on the same arm (normally le).
ŸAempt to carry out the measurements regularly at the same time of day, since the blood-
pressure changes during the course of the day.
5.2. Common sources of error
ŸNote: Comparable blood-pressure measurements always require the same conditions! These are
normally always quiet conditions.
124

ŸAll efforts by the patient to support the arm can increase the blood-pressure. Make sure you are
in a comfortable, relaxed position and do not activate any of the muscles in the measurement
arm during the measurement. Use a cushion for support if necessary.
ŸThe performance of the automated sphygmomanometer can be affected by extremes of
temperature, humidity and altitude.
ŸAvoid compression or restriction of the connection tubing.
ŸA loose cuff causes false measurement values.
ŸWith repeated measurements, blood accumulates in the respective arm, which can lead to false
results. Correctly executed blood-pressure measurements should therefore first be repeated
aer a 5 minutes pause or aer the arm has been held up in order to allow the accumulated blood
to flow away (aer at least 3 minutes).
12 13
a) The distance between the edge of cuff and the elbow
should be approx. 2~3cm
Aention
5.3. Fiing the cuff
Insert air connector into air outlet shown in
le photo and please make sure the fiing of
the air connector completely and properly to
avoid air leakage.
b) Secure the cuff with the Velcro fastener, so that it lies comfortably and not too tight, whereby 2
finger space should remain between the cuff and the arm.
c) Lay the arm on a table, with the palm upwards. Support the
arm a lile with a rest (cushion), so that the cuff rests at
about the same height as the heart. Take care, that the cuff
lies free. Remain so for 2 minutes siing quietly, before
beginning with the measurement.
d) Let legs uncrossed, feet flat on the floor, back and arm
supported.
124

5.4. Measuring procedure
Aer the cuff has been appropriately positioned, the
measurement can begin:
a) Press the ON/OFF buon, the pump begins to inflate the cuff
In the display, the increasing cuff-pressure is continually
displayed.
14 15
The measurement results are displayed, until you switch the device off. If no buon is pressed for 3
minutes, the device switches automatically off, to save the baeries.
Aention
5.5. Discontinuing a measurement
If it is necessary to interrupt a blood pressure measurement for any reason (e.g. the patient feels
unwell), the “ON/OFF” power buon can be pressed at any time. The device then immediately lowers
the cuff-pressure automatically.
b) Aer reaching the inflation pressure, the pump stops and the
pressure slowly falls away. The cuff-pressure is displayed
during the measurement. When the device has detected the
pulse, the heart symbol in the display begins to blink and for
every pulse beat.
The measured systolic and diastolic blood-pressure values as well
as the pulse frequency are now displayed.
Example (Fig.): Systole 126, Diastole 85, Pulse 78
5.6. Memory – storage and recall of the measurements
The blood-pressure monitor automatically stores each of the last 120 measurement values. By
pressing the MEMORY buon, an average value of the last 3 measurements as well as the last
measurement and the further last 120 measurements (MR119, MR118, …, MR1) can be displayed one
aer the other
(MR1: Values of the last measurement) (MR2-MR120: Values of the measurement before MR1)
124

5.7. Memory– cancellation of all measurements Aention!
Before you delete all readings stored in the memory, make sure you will not
need refer to the readings at a later date. Keeping a wrien record is prudent
and may provide additional information for your doctor’s visit. In order to
delete all stored readings, press the MEMORY buon for at least 5 seconds,
the display will show the symbol «CL» and then release the buon. To
permanently clear the memory, Press the MEMORY buon while «CL» is
flashing.
16 17
5.8. Bluetooth function (Drtrust 360 app
Connectivity)
1. For first-time use: Download the Dr Trust
360 app on your phone or any other smart
device.
2. Open the app and register yourself as a
user by sharing some basic information
about yourself.
1 2 3
4
124
4. At the same time, tap the Bluetooth buon
located on your device and it will be ready for
pairing.
5. Once the BP monitor and mobile phone
are connected successfully, the app will
switch to the test interface automatically.
5 6
3. Choose the type of device (BP monitoring) and enable
location services to turn on Bluetooth connectivity.

18 19
6. APPEARANCE OF THE HEART ARRHYTHMIA
INDICATOR FOR EARLY DETECTION
The Symbol indicates that certain pulse irregularities were detected during the measurement.
In this case, the result may deviate from your normal blood pressure – repeat the measurement. In
most cases, this is no cause for concern. However, if the symbol appears on a regular basis (e.g. several
times a week with measurements taken daily) we advise you to tell your doctor. Please show your
doctor the following explanation Information for the doctor on frequent appearance of the
Arrhythmia indicator This instrument is an oscillometric blood pressure monitor that also analyses
pulse frequency during measurement. The instrument is clinically tested. The arrhythmia symbol is
displayed aer the measurement, if pulse irregularities occur during measurement. If the symbol
appears more frequently (e.g., several times per week on measurements performed daily) we
recommend the patient to seek medical advice. The instrument does not replace a cardiac
examination but serves to detect pulse irregularities at an early stage.
7. ERROR MESSAGES /MALFUNCTIONS
If an error occurs during a measurement, the measurement is discontinued and a corresponding error
code is displayed.
Error No. Possible cause(s)
ERR 1 No pulse has been detected.
ERR 2 Unnatural pressure impulses influence the measurement result. Reason: The arm
was moved during the Measurement (Artifact).
ERR 3 The inflation of the cuff takes too long. The cuff is not correctly seated.
124
6. Aer the completion of measurement, the “Dr Trust 360 app” displays the results automatically.
7. Choose to save and share your
measurements as per your choice.

20 21
ERR 4 The measured readings indicated an unacceptable difference between systolic and
diastolic pressures. Take other reading following directions carefully. Contact you
doctor if you continue to get unusual readings.
ERR 5 Pressure in cuff is over 290mmHg
Further Information - The level of blood-pressure is subject to fluctuations even with healthy people.
Important thereby is, that comparable measurements always require the same conditions (Quiet
conditions)! If, in spite of observing all these factors, the fluctuations are larger than 15mmHg, and/or
you hear irregular pulse tones on several occasions, please consult your doctor. For licensing, the
device has been subjected to strict clinical tests, by which the computer program used to measure
the blood-pressure values was tested by experienced specialist doctors in Germany. The same
computer program is used in every individual device and has thus also been clinically tested. The
manufacture of the devices takes place according to the terms of the European standard for blood-
pressure measuring devices (see technical data) You must consult your specialist dealer or chemist if
there are technical problems with the blood-pressure instrument. Never aempt to repair the
instrument yourself!
Other possible malfunctions and their elimination
If problems occur when using the device, the following points should be checked and if necessary, the
corresponding measures are to be taken:
Malfunction Remedy
The display remains empty when the
instrument is switched on although the
baeries are in place.
1.Check baeries for correct polarity and if necessary
insert correctly.
2.If the display is unusual, re-insert baeries or
exchange them.
The device frequently fails to measure the
blood pressure values, or the values
measured are too low (too high).
1. Check the positioning of the cuff.
2. Measure the blood-pressure again in peace and
quiet under observance of the details made in the
user manual.
Every measurement produces a different
value although the instrument functions
normally and the values displayed are
normal
1. Please read the following information and the
points listed under «Common sources of error».
Repeat the measurement.
Please note: Blood pressure fluctuates continually so
successive measurements will show some variability.
Blood pressure measured differs from those
values measured by the doctor.
1. Record the daily development of the values and
consult your doctor. Please note: Individuals visiting
their doctor frequently experience anxiety which can
result in a higher reading at the doctor than obtained
at home under resting conditions.
124

a) Do not expose the device to either extreme temperatures, humidity, dust or direct sunlight.
b) The cuff contains a sensitive air-tight bubble. Handle this carefully and avoid all types of
straining through twisting or buckling.
c) Clean the device with a so, dry cloth. Do not use petrol, thinners or similar solvent. Spots on
the cuff can be removed carefully with damp cloth and soapsuds. The cuff must not be
washed!
d) Do not drop the instrument or treat it roughly in any way. Avoid strong vibrations.
e) Never open the device! Otherwise the manufacturer calibration becomes invalid!
22 23
ŸProtect it from water and moisture, extreme temperatures, impact and dropping, contamination
and dust, direct sunlight, heat and cold
ŸThe cuffs are sensitive and must be handled with care
ŸOnly pump up the cuff once fied
ŸDo not use the instrument close to strong electromagnetic fields such as mobile telephones or
radio installations
ŸDo not use the instrument if you think it is damaged or notice anything unusual.
ŸIf the instrument is not going to be used for a prolonged period the baeries should be removed.
Ÿ Read the additional safety instructions in the individual sections of this booklet. Ensure that
children do not use the instrument unsupervised: some parts are small enough to be swallowed
ŸMust use the recognized accessories, detachable parts and materials, if the use of other parts or
materials can degrade minimum safety
ŸA warning to remove primary baeries if the instruments is not likely to be used for some time
8. CARE AND MAINTENANCE, RECALIBRATION
1000 times measurement with 4- size “AAA” alkaline Baeries
9. BATTERY LIFE
ŸThis instrument maybe used only for the purpose described in this booklet. The manufacturer
cannot be held liable for the damage caused by incorrect application.
ŸThis instrument comprises sensitive components and must be treated with caution. Observe
the storage and operating condition described in the “Technical specifications” section!
10. BATTERY LIFE
Safety and protection
Instrument care
Clean the instrument only with a so, dry cloth
Disposal
Baeries and electronic instruments must be disposed of in accordance with the locally
applicable regulations, not with domestic’s waste.
124

Device standard: Device corresponds to the requirements of the European standard for non-invasive
blood- pressure monitor
24 25
11. REFERENCE TO STANDARDS
Standard
IEC60601-1-6:2010+A1:2013/ EN60601-1-6:2010+A1:2015
IEC60601-1:2005+A1:2012/EN60601 1:2006+A11:2011+A1:2013+A12:2014
IEC60601-1-2:2014/ EN60601-1-2:2015
IEC/EN60601-1-11:2015
IEC80601-2-30:2009+A1:2013/EN80601-2-30:2010+A1:2015
Some electrical and electrical
equipment forbid to abandon
and disposal at will
12. REMARK
Some electrical and electrical
equipment forbid to abandon
and disposal at will
Reading Instruction Book
before use
Manufacturer ’s name and
address
Inapplicable baby Type BF equipment
Keep Dry
Cuff Connector
M e d N e t E C - R E P G m b H ,
Borkstrasse 10, 48163 Münster,
Germany
A e n t i o n c o n s u l t
accompanying documents
I n a p p l i c a b l eb a b y
13. TECHNICAL SPECIFICATIONS
Measurement Procedure: Oscillometric, corresponding to Korotkoff method: Phase I:
systolic, Phase V: diastolic
Display: Digital display
Measuring range: SYS/DIA: 30 to 280 mmHg (in 1 mmHg increment)
Pulse: 40 to 199 beat/minute
Static accuracy: SYS/DIA: ±3mmHg / Pulse: ±5% of reading
124

26 27
14. MANUFACTURER'S DECLARATION
The Dr Trust BP Check Pro - 124 is intended for use in the electromagnetic environment specified
below. The customer or the user of the Dr Trust BP Check Pro - 124 should assure that it is used in such
an environment.
Measuring resolution: 1mmHg
Inflation: Automatic inflation by internal pump
Memory function: SYS/DIA: 30 to 280 mmHg (in 1 mmHg increment)
Pulse: 40 to 199 beat/minute
Static accuracy: 2 x 120 memories for 2 users (SYS, DIA, Pulse)
Decompression: Constant exhaust valve system
Power source: 4- size “AAA” alkaline baeries
Operation temperature: 5~40°C/41~104°F
Operation humidity: 15%~80%RH maximum
Storage temperature: -20~+55°C/-4~+131°F
Storage humidity: 10%~95%RH maximum
Dimensions: 148 x 94 x 60 ±1.0 mm
Weight: 373 g±5g (including baeries and cuff)
Cuff pressure display
range:
0~290mmHg/0~38.7KPa
Electrical shock
protection:
Internal power unit
Safety classifications: Type BF equipment
Protection against ingress
of water:
Ip22
Accessories: M-L Size Cuff, 4 “AAA” baeries, instruction manual
Electromagnetic Emissions: (IEC60601-1-2)
Emission Test Compliance Electromagnetic Environment
RF emission CISPR 11 Group 1 The Dr Trust BP Check Pro - 124 uses RF energy
only for internal functions. Therefore, this RF
emission is extremely weak and there is lile
chance of it creating any kind of interference
whatsoever with nearby electronic equipment.
124

28 29
Emission Test Compliance Electromagnetic Environment
RF emissions CISPR 11 Class B The Dr Trust BP Check Pro - 124 is suitable for use
in all establishments, including domestic
establishments and those directly connected
to the public low voltage power supply network
that supplies buildings used for domestic
purposes.
Harmonic emissions IEC
61000-3-2
Not applicable
Voltage fluctuations/flicker
IEC 61000-3-3
Not applicable
Electromagnetic Immunity: (IEC60601-1-2)
Immunity test
Electrostatic discharge
(ESD) IEC 61000-4-2
IEC60601-1-2 test level Compliance level Electromagnetic
environment -guidance
±6 kV contact
±8 kV air
±6 kV contact
±8 kV air
Floors should be wood,
concrete or ceramic tile.
If floors are covered with
synthetic material, the
relative humidity should
be at least 30 %.
Electric fast transient/
burst IEC 61000-4-4
±2 kV for power supply
lines
±1 kV for input/output
lines
Not applicable Mains power quality
should be that of a
typical commercial
or hospital environment.
Surge IEC 61000-4-5 ±1 kV differential mode
±2 kV common mode
Not applicable Mains power quality
should be that of a
typical commercial or
hospital environment.
Voltage dips, short
interruptions and
voltage variations on
power supply input
lines IEC 61000-4-11
<5 % UT95% dip in
UT. for 0.5 cycle
40 % UT60% dip in
UT for 5 cycles
70 % UT (30% dip in
UT) for 25 cycles
<5 % UT95% dip in
UTfor 5 sec.
Not applicable Mains power quality
should be that of a
typical commercial or
hospital environment.
If the user of the upper
arm style requires
continued operation
during power mains
interruptions, it is
recommended that the
Dr Trust BP Check Pro -
124 be powered from an
uninterruptible power
supply or a baery.
Power frequency (50/
60 Hz) magnetic field
IEC 61000-4-8
3 A/m Not applicable Not applicable
Note: UT is the a.c. mains voltage prior to application of the test level.
124

30 31
Immunity test
Conducted RF IEC
61000-4-6
IEC60601-1-2 test level IEC60601-1-2 test level Electromagnetic
environment -guidance
3 Vrms 150 kHz to 80
MHz 80% AM (2Hz)
3 Vrms
Portable and mobile RF
communications
equipment should be
used no closer to any
part of the Dr Trust BP
Check Pro - 124 ,
including cables, than
their commended
separation
distance calculated from
the equation applicable
to the frequency of the
transmier.
Recommend separation
distance
3V
d = 1.2×p1/2 80Mhz to
800 MHz
d = 2.3×p1/2 MHz to 2.5
GHz
where P is the maximum
output power rating of
the transmier in was
(W) according to the
transmier
manufacturer
Radiated RF IEC
61000-4-3
3 Vrms 80 MHz to 2.5
GHz 80% AM (2Hz)
3 V/m
and d is the
recommended
separation distance in
meters (m).
Field strengths from
fixed RF transmiers as
determined by an
electromagnetic site
surveya, should be less
than the compliance
level in each frequency
rangeb. Interference
may occur in the vicinity
of equipment marked
with the following
symbol:
Note1: At 80 MHz and 800 MHz, the higher frequency range applies.
Note2: These guidelines may not apply in all situations. Electromagnetic propagation is affected by
absorption and reflection from structures, objects, and people.
124

32 33
a Field strength from fixed transmiers, such as base stations for radio (cellular/cordless)
telephones and land mobile radios, amateur radio, AM and FM radio broadcast and TV broadcast
cannot be predicted theoretically with accuracy. To assess the electromagnetic environment
due to fixed RF transmiers, an electromagnetic site survey should be considered. If the
measured field strength in the location in which the Dr Trust BP Check Pro - 124 is used exceeds
the applicable RF compliance level above, the Dr Trust BP Check Pro - 124 should be observed to
verify normal operation. If abnormal performance is observed, additional measures may be
necessary,
b Over the frequency range 150 kHz to 80MHz, field strengths should be less than 3 V/m.
Recommended Separation Distances:
Recommended separation distance between portable and mobile RF communications equipment
and the Dr Trust BP Check Pro - 124
The Dr Trust BP Check Pro - 124 is intended for use in an electromagnetic environment in which
radiated RF disturbances are controlled. The customer or the user of the Dr Trust BP Check Pro - 124
can help prevent electromagnetic interference by maintaining a minimum distance between portable
and mobile RF communications equipment (transmiers) and the Dr Trust BP Check Pro - 124 as
recommended below, according to the maximum output power of the communications equipment.
Rated maximum output
power of transmier (W)
Separation distance according to frequency of transmier m
150 kHz to 80 MHz
d = 1.2×p1/2
80 MHz to 800 MHZ d
= 1.2×p1/2
800 MHz to 2.5 GHz
d = 2.3×p1/2
0.01 0.12 0.12 0.23
0.1 0.38 0.38 0.73
11.2 1.2 2.3
10 3.8 3.8 7.3
100 12 12 23
For transmiers rated at a maximum output power not listed above, the recommended separation
distance d in metres (m) can be determined using the equation applicable to the frequency of the
transmier, where P is the maximum output power rating of the transmier in was (W) according to
the transmier manufacturer.
Note1: At 80MHz and 800MHz, the separation distance for the higher frequency range applies.
Note2: These guidelines may not apply in all situations. Electromagnetic propagation is affected by
absorption and reflection from structures, objects and people.
124

34 35
15. CUSTOMER SUPPORT
CONTACT ADDRESS
USA
Nureca INC.USA
276 5th Avenue, Suite 704-397,
New York (NY) - 10001, USA
INDIA
Corporate Oce (Mumbai)
Nureca Limited
101, 1st Floor, Udyog Bhavan, Sonawala Lane,
Goregaon East, Mumbai, Maharashtra - 400063.
Contact us
India: +91-7527013265 /+91-9356658436
Website: www.drtrust.in
Corp Website: www.nureca.com
Email: customercare@nureca.com
Connect with us on social networks
Facebook: @drtrust
Instagram: @drtrustisin
Youtube: NurecaUsa
COPYRIGHT 2021 NURECA LTD ALL RIGHTS RESERVED
Scan to View
Product Demo Video
www.drtrustusa.com/124
Table of contents
Other Dr. Trust Blood Pressure Monitor manuals