Dramm BP-4Li Owner's manual

MS40Li
Owner's/Operator's Manual
Manual del usuario/operador
Manuel de l’utilisateur/opérateur
Model
Dimensions (L x W x H)
Weight
Chemical Tank Capacity
Pump
Pressure
Suction
Motor
Fuse
MS40Li (MUS)
9.8X14.6X22in (250X370X550mm)
11.7lb (5.3Kg)
4gal (15 L)
Uniflow pump (Differential type)
145psi (1.0 MPa)
0.39gal/min (1.5 L/min)
DC
10 A
Lance
Nozzle Head
Recharging Unit
Operators manual
Accessory
Description
Battery
Continuous Spray Time
Recharging Time
18 V 3.0 Ah
45min (high pressure mode), 120min (medium pressure mode)
22minutes
1 (122933)
Tandem 1 (117958), Variable 1 (127460)
1 (133552)
1 (133562)
Description
●These specifications may be modified without prior notice.
Specifications
Modelo
Dimensiones (L x A x A)
Peso
Capacidad del tanque del producto químico
Bomba
Presión
Succión
Motor
Fusible
MS40Li (MUS)
250X370X550mm
5.3Kg
15 L
Bomba unidireccional (tipo diferencial)
1.0 MPa (10 kgf/cm2)
1.5 L/min
DC
10 A
Lanza
Cabezal de la boquilla
Recargador
Manual de operación
Accesorio
Descripción
Batería
Duración continua en servicio
Duración de la recarga
18 V 3.0 Ah
45min (high pressure mode), 120min (médium pressure mode)
22minutes
1 (122933)
Tándem 1 (117958), Variable 1 (127460)
1 (133552)
1 (133562)
Descripción
●Estas especificaciones pueden ser modificadas sin previo aviso.
Especificaciones
Modèle
Dimensions (L x L x H)
Poids
Capacité du réservoir de produits chimiques
Pompe
Pression
Aspiration
Moteur
Fusible
MS40Li (MUS)
250X370X550mm
5.3Kg
15 L
Pompe unidirectionnelle (type différentiel)
1.0 MPa (10 kgf/cm2)
1.5 L/min
DC
10 A
Lance
Tête de pulvérisation
Unité de réalimentation
Manuel de l’utilisateur
Accessoire
Description
Batterie
Durée continuelle de service
Durée de la réalimentation
18 V 3.0 Ah
45min (mode de haute pression), 120min (mode de moyen pression)
22minutes
1 (122933)
En tandem 1 (117958), Variable 1 (127460)
1 (133552)
1 (133562)
Description
●Ces caractéristiques techniques sont sujettes à modification sans préavis.
Caractéristiques techniques
1

2
Maruyama U.S., Inc.
4770 Mercantile Drive, suite100,
Fort Worth, TX 76137 U.S.A.
940-383-7400
www.maruyama-us.com
BATTERY BATTERY 133560 GRIP ORING 124612
TANKSTAND FUSE 115385 GRIP ORING 14194
TANKSTAND HARNESS 131445 LANCE LANCE 122933
BRACKET(SIDE) BATTERYCHECKER 124384
TANDEMNOZZLEHEAD TANDEMNOZZLEHEAD
117958
PUMPSEALSET SEALSET 641930
VARIABLENOZZLEHEAD VARIABLENOZZLEHEAD
127460
PUMP
SEALPACKINGRETAINER
123256 CHEMICALTANK CHEMICALTANKLID 125876
PUMP CAP(YELLOW) 116128 CHEMICALTANK STRAINER 125878
PUMPA-BLOCK PISTONPACKING 121434
BACK-CARRYINGBAND BACK-CARRYINGBAND
130219
PUMPB-BLOCK BBLOCKASSY 599680 BACKPAD BACKPAD 131461
PRESSURE-REGULATINGVALVE
ORING 14180 RECHARGINGUNIT RECHARGINGUNIT 133552
PARTSPOSITION PARTSNAME
PARTSNUMBER
PARTSPOSITION PARTSNAME
PARTSNUMBER
CONSUMPTIONPARTSLIST
BATTERÍE
PERCHERO DEL TANQUE
PERCHERO DEL TANQUE
SOPORTE (LATERAL)
SELLO DE LA BOMBA
BOMBA
BOMBA
BLOQUE DE LA BOMBA A
BLOQUE DE LA BOMBA B
VÁLVULA REGULADORA DE LA PRESIÓN
BATERÍA
FUSIBLE
ARNÉS
VERIFICADOR DE LA BATERÍA
SELLO
RETÉN DE LA EMPAQUETADURA DEL SELLO
TAPA (AMARILLA)
EMPAQUETADURA DEL PISTÓN
CONJUNTO DEL BLOQUE B
ANILLO O
133560
115385
131445
124384
641930
123256
116128
121434
599680
14180
EMPUÑADURA
EMPUÑADURA
LANZA
CABEZAL DE LA BOQUILLA EN TÁNDEM
CABEZAL VARIABLE DE LA BOQUILLA
TANQUE PARA EL PRODUCTO QUÍMICO
CORREA PORTAMOCHILA
MOCHILA
RECARGADOR
ANILLO O
ANILLO O
LANZA
CABEZAL DE LA BOQUILLA EN TÁNDEM
CABEZAL VARIABLE DE LA BOQUILLA
TAPA DEL TANQUE PARA EL PRODUCTO QUÍMICO
FILTRO
CORREA PORTAMOCHILA
MOCHILA
RECARGADOR
124612
14194
122933
117958
127460
125876
125878
130219
131461
133552
UBICACIÓN DE LAS PARTES
NOMBRE DE LA PARTE
NÚMERO DE PARTE
UBICACIÓN DE LAS PARTES
NOMBRE DE LA PARTE
NÚMERO DE PARTE
LISTA DE REPUESTOS
BATTERIE
SUPPORT DU RÉSERVOIR
SUPPORT (LATÉRAL)
ensemble de joints de la pompe
pompe
pompe
BLOC POMPE “A”
BLOC POMPE “B"
VALVE DE RÉGLAGE DE PRESSION
BATTERIE
FUSIBLE
SANGLE
CONTRÔLE DE LA BATTERIE
SEAL SET ENSEMBLE DE JOINTS
FIXATION DE L’EMBALLAGE DES JOINTS
BOUCHON (JAUNE)
EMBALLAGE DU PISTON
BLOC POMPE “A”
JOINT TORIQUE
133560
115385
131445
124384
641930
123256
116128
121434
599680
14180
POIGNÉE
POIGNÉE
LANCE
TÊTE DE PULVÉRISATION EN TANDEM
TÊTE DE PULVÉRISATION VARIABLE
RÉSERVOIR DE PRODUITS CHIMIQUES
BANDOULIÈRE DE PORTAGE AU DOS
PROTÈGE-DOS
APPAREIL DE RÉALIMENTATION
JOINT TORIQUE
JOINT TORIQUE
LANCE
TÊTE DE PULVÉRISATION EN TANDEM
TÊTE DE PULVÉRISATION VARIABLE
COUVERCLE DU RÉSERVOIR DES PRODUITS CHIMIQUES
FILTRE
BANDOULIÈRE DE PORTAGE AU DOS
PROTÉGÉ-DOS
APPAREIL DE RÉALIMENTATION
124612
14194
122933
117958
127460
125876
125878
130219
131461
133552
PARTS POSITION NOMS DES PIÈCES
NUMÉROS DES PIÈCES
PARTS POSITION NOMS DES PIÈCES
NUMÉROS DES PIÈCES
LISTE DES PIÈCES DE CONSOMMATION

English
3
Contents
Preface
Thankyouforpurchasingthisproduct.
Thisoperationmanualexplainsthecorrecthan-
dlingmethod,simplechecksandmaintenanceof
thisproduct.
Pleasereadthisoperationmanualcarefully,
understanditscontents,anduseittomaintain
thesuperiorperformanceofthisproduct.
Keep this manual carefully after you read it and
useitforextendedoperationofthisproduct,Note
thatdiscrepanciesbetweenthe actualproduct
andthe contentofthismanual maybefoundas
wearecontinuallymakingimprovementsto
providebetterqualityproductstoourcustomers.
Please send any inquiries about this product to
yournearestsalesoutletoursalesoffice.
・Pleasekeepthisoperationmanualcarefully.
・lf you lose this operation manual, purchase a
replacementatyournearestsalesoutletorour
salesoffice.
・Modifyingthisproductpreventssafeand
comfortableoperation,andisverydangerous.
Warnings
Inthismanual,importanthandlingcautionsareindicatedasfollows:
kDeathorseriousinjurymayoccurwhennotcomplyingwiththewarning.
kPossiblydeathorseriousinjurymayoccurwhennotcomplyingwiththewarning.
kPossiblyinjurymayoccurwhennotcomplyingwiththewarning
kMachinewillpossiblybedamageditnotcomplyingwiththewarning
DANGER
WARNING
CAUTION
CAUTION
kWarninglabel
・Alwaysremovedirtormudtomaketheindicationslegible.
・Thefollowingalarmlabelsareattached.
Readoperationmanualthoroughly
Makesureyoureadtheoperation
manualthoroughlypriortouse.
Wearpersonalprotectiveequipment
Wearprotectorssuchashat,safety
glasses,earplugsduringwork.
Prohibitionoffire
Donotputanakedflameclosetoaplace
wherestoremachineordoingmaintenance.
Cautionsforelectricalshock
Therearedangerofelectricshockduring
operation,sodonottouchthe
electricparts.
4
4
4
4
5
5
6
6
6
7
7
7
8
8
8
To stop
Method for using the measuring cup
How to remove the strainer
3. Cleaning, Recharging, and Storage
Cleaning the inside of chemical tank
Cleaning the pump inside with water
Cleaning the strainer
Water draining
Recharging the battery
How to switch the charging completion melody
Cooling systems
Automatic maintenance function
The battery
To keep the battery long
4. Troubleshooting and remedies
8
9
9
9
9
9
9
9
10
11
12
12
13
13
14
1. In order to work safety
Cautions prior to work
Confirmation of standard parts
Name of each part
Cautions when using this product
Check prior to work
Cautions during operation
Precautions after use
Functions of the operating section
2. Handling and operating methods
Nozzle assembling
Battery remainder determination method
Dispensing chemicals
Prior to operation
Starting/Operation

English 4
1.kInordertoworksafely
Cautionspriortowork
Wearproperworkclothesandprotective
gear.
Asprayingoperatorwearingproperwork
clothesandgear
Donotallowthefollowingpersonsto
performspraying:
–
Apersonwhocannotperformnormalspraying
operationbecauseofextremefatigueduetooverwork,
disease,drugaftereffect,oranyothersimilarreason.
–Drunkperson
–Pregnantwoman
–Personsnotresponsibleforthesprayingwork.
Hat
Protective
goggles
Protective
mask
Ear plugs
(for noisy working
environment)
Protective
clothes
(neat cuffs)
Protective
gloves
Work shoes
(Boots or
rubber-soled
Japanese footgear)
kWARNING
Regularlyinspectandmaintaintheseprotectiveitems toensurethattheycanworknormallyand
usethemproperly.
I-003
Confirmationofstandardparts
Afteropeningthepackage,confirmthatallaccessoriesarepresent.
Ifaccessoriesaremissingordamaged,informthesalesoutletwhereyoupurchasedtheproduct.
No. Description Quantity
①
②
③
④
⑤
⑥
⑦
Lance
TandemnozzleHead
VariablenozzleHead
Battery
RechargingUnit
OperationManual
WarrantyCard
1
1
1
1
1
1
1
①
②
④
⑦
⑥
⑤
③
Nameofeachpart
Chemicaltanklid
Draincap
Warninglabel
Chemicaltank
Powerswitch
Pressure-
regulatingvalve
Batterychecker
A
Shoulderband
Chestsling
Cap
Productnumberlabel
Nozzle
Grip
Griplever
A→

English
5
Checkpriortowork
(1)Whentransportingtheunitbyvehicle,take
necessarymeasurestopreventfallingofit.
(2)Whenloading and unloadingheavy objects,
neither act in an unnatural posture nor work
alone.
(3)Conductinspection,maintenanceservices
andcleaninginaflatarea.
(4)Ensure that each joint is free from loosened
boltsandnutsanddamage.
(5)Properlymounteveryremovedcoverfor
rotatingpartandthelikeforinspectionand
maintenanceservices.
(6)Connecteachconnectorforelectricwiring
andtakenecessarymeasurestopreventthe
wiresfrombeingrubbed.
(7)Protectelectricwiringfromoil,water,andfire.
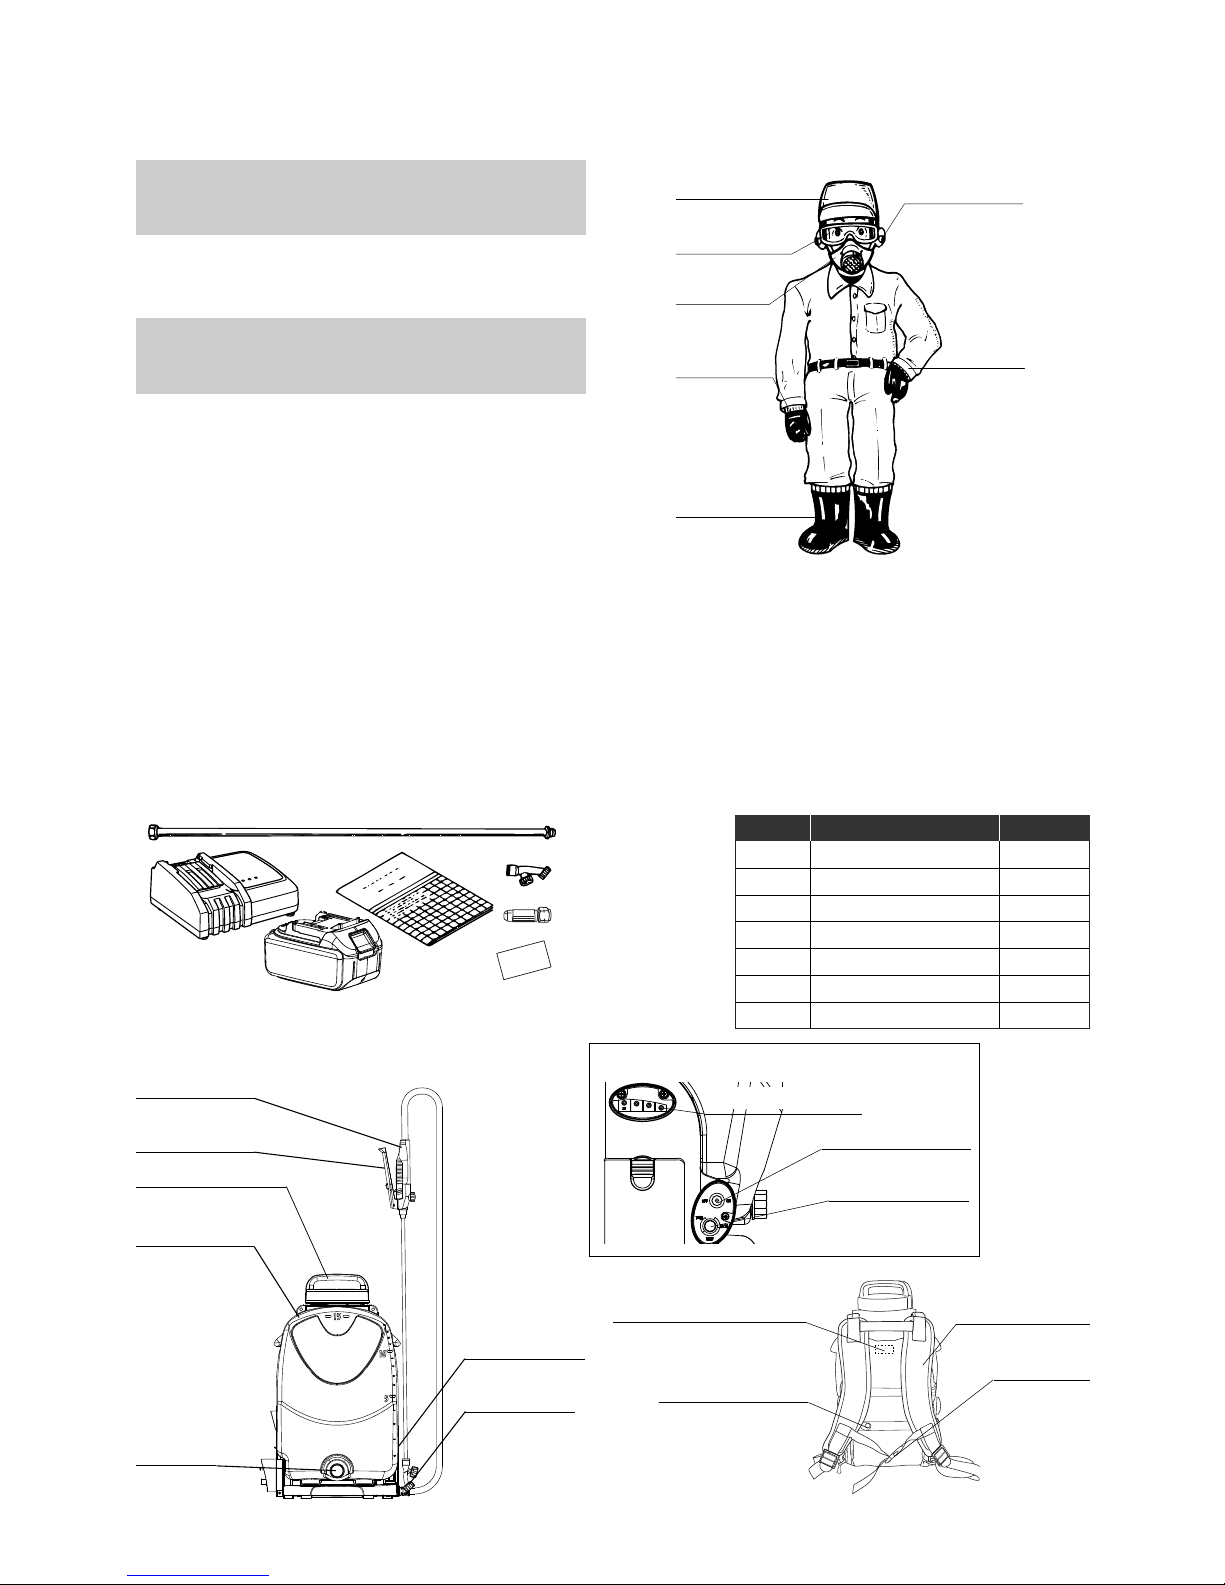
(8)Holdthe gripsonthe sidesorthehandleon
thelidofthechemicaltanktolifttheunit.
Holdingthelowerpartofthechemicaltankor
thestandmayresult in hands being caught
betweenthechemicaltankandthestand.
k
•Donotusethismachinewhentherearepeople,especiallychildren,nearthesite.
•Becausethetankwhencompletelyfilledwiththechemicalisveryheavy,paycarefulattentionnot
tohurtyourlowerbackwhencarryingit.
•Alwaysadoptasateworkingposturewhencarryingthetank.
Donotworkatelevatedsitesusingstairsorladderswhilecarryingthetank.
Thisproductcanbeusedforthefollowing
agriculturalwork. Avoid use for purposes other
thanthefollowing.
1)Sprayingchemicals for blight or harmful
insectsongeneralfarmcrops
2)Sprayingchemicals for blight or harmful
insectsonfruittrees
3)Sprayingchemicals for blight or harmful
insectsoncropscultivatedingreenhouse
4)Sprayingchemicals for blight or harmful
insectsonflowers
5)Spraying disinfecting liquid or insecticide
onfarmhouseorchickenhouse
6)Sprayingchemicalsandwaterforblightor
harmfulongardentrees,bonsai,orlawns
7)Sprayingdisinfectingliquidandinsecticide
forurbansanitation
8)Sprayingchemicals for blight or harmful
insectsonflowerbedsandinparks
9)Sprayingweedkillertocontrolweeds
10)Cleaning and spraying water for
vegetablesorrootvegetables
Whentransportingbyautomobile,takeactionto
preventthemachinefromfalling.
Cautionswhen
usingthisproduct
Chemicals
–Readlabelsofchemicalstobeusedcarefully,
andunderstandthemethodof use and cau-
tions.When spraying quantity per tank (1000
㎡) or if the chemical is mistaken, agricultural
chemicalscancausedamage.
–Storechemicalsinasafeplace,andbecareful
nottobreakopentheircontainersduringtrans-
portation.
–Treatchemicalcontainerstoensuresafety.
–Payattentiontothehandlingofchemicals.Ifa
chemicalentersintoeyeormouth,washitoff
withwaterimmediately.
–lfyoufeelill,seeadoctorimmediately.
–Accordingtowinddirection,changethespray-
ingmethodtoprotectworkersandhouses.
Whensprayingchemicals,workfromupwindto
downwind.Also give consideration toprevent
chemicals from drifting or scattering on crops,
enclosures,fish-breedingponds,andhouses
nearby.
–When working in and greenhouse, pay
attentiontoventilation.
–Whenpreparingchemicals,preparethe
necessaryamountonlyinaccordancewiththe
established spraying plan, lf too much
chemicalsareleftover,actionisdifficult.
–DonotspraythesolventThesolventmake
failureseveralparts. Clean this sprayerwith
toomuchwateraftersprayingwhenyou
unavoidablyspraythesolvent.
CAUTION

Cautionsduringoperation
(1)Innormaloperation,avoidacontinuouswork
fora stretch of 2hours or more to maintain
health.
(2)An operatingBattery-drivenSprayerunit
loadedwithasolutionofchemicalsisaheavy
object.Tidy up the farm field and avoid any
dangerousobsracles.
(3)Payattentiontoclothes,fieldconditions,and
thedirection of wind toprevent exposure to
agrochemicalsandenvironmentalsolution.
(4)Duringoperation,donotallowanyunauthorized
persontoapproachthesprayingsite.
(5)Ensurethat the gasket on the chemical tank
istightandthelidsecuresothatitkeepsthe
solutionfromspoutingout.
(6)Neverpointthe solution-spraying nozzleto
anyperson.
(7)Before takinga breakor meal, garglewater
thenwashhandsandfacewithsoapand
water.
(8)Ifapersonfeelsphysicallysick,allowhim/her
toreceivedoctor'sattention.
Precautionsafteruse
–Thoroughlyremovetheremnantsolutioninthetank,putitintheoriginalcontainer,andstowaway
fromthereachofinfants.Alsocleanlyremovetheresidualsolutiondepositonthemachinesurface.
Otherwisetheresiduewillcauserustingandfailures.
–Cleantheinsideofchemicaltank,sprayinghoseandnozzlewithcleanwater.
–Ifanyareais damaged,repairitbeforestorage. Use thespecifiedgenuinepartsand supplies
availablefromMaruyamaUS,Inc.
–Keepthestorageplacefromhumidity,dustandotherforeignmatters.
Whentheunitistobestoredforalongperiodoftime,exercisetherechargeanddischargeof
thebatterytopreventitfromperformancedegradation.
English 6
–GrippingthegripleverturnstheswitchON,
opensthevalve,andthussprayingstarts.
–ReleasingthegripleverturnstheswitchOFF,
closesthevalve,andthussprayingstops.
–Slidingthe modeselectleverallows youto
selectcontinuoussprayingorspotspraying.
(1)modeselectleverinspotsprayingposition
–Grippingthegripstartsthespraying.
–Releasingthegripstopsthespraying.
–Pushingthereleasebutton releasesthegrip
leverandstopsthespraying.
(2)modeselectleverincontinuousspraying
position
–Grippingtheleverholdstheleverclosedposition
andstartscontinuousspraying.
Griplever
releasebutton(black)
Griplever modeselectlever(blue)
Spotspraying Continuousspraying
Functionsoftheoperatingsection
1.Grip

English
7
2.Shoulderband
Nozzleassembling
Firstensurethatthegasketisputinplace,
screwthelanceintothegrip,andtandemnozzle
headintothelance.Inthatstep,checkthe
gasketinplacetopreventwaterleakage,and
thentightenthescrewsecurely.Besureto
tighten it while refraining the excessive
tightening,which will cause the gaskettostick
out.
2.handlingandoperatingmethod
Adjustthebandlengthasfollows:
(1)Toshortentheband
Pulltheslingdownwardalongthefronthangingband.
(2)Tolengthentheband
insertthefronthandingbandupward.
Checkingthebatteryremainder
Batteryremainderdeterminationmethod
1.Pourapproximately1literofwaterintothechemicaltank.
2.Turnthe switch ON, wait until the pumpsuckswatertoraisethe pressure, and then check the
graduationofthebatterybalancemeter.
Lance
Gasket (Lance end)
Gasket (Grip end)
Grip
Tandem
nozzle head
Green
Yellow
Red
Operationready.2lampsturn onwithbattery
fullycharged.Thelampwillchangefromon,
flashing,to off as theremaining battery charge
depleted.
Rechargethebattery.
Automaticstoppage.Rechargethebattery.
–Besuretopourwaterinthechemicaltankbeforeinspection.Otherwise,thepumpruns
withoutloadandcausesafailure.
–Makeitaruletorechargethebatteryifthepointerapproachestheyellowzone,evenifitis
stillinthegreenzone.
CAUTION
Green Yellow Red
Full

English 8
Insertafingerintotheholeanddepresstheyellowcapforoneortwo.
Hole
Cap(yellow)
Note:Measuresrequiredwhenthepumpfailstosuckwaterafteralongtimeofstorage
グリップレバー
Griplever
modeselectlever
releasebutton
Cap
finger
Dispensingchemicals
–Carefullyreadinadvancetheinstructionsheetofthechemicaltobeused,andfollowthespecified
dispensingmethodandprecautionsforusingit.
–Whenusingahydratechemical,firstdispenseatitsspecifiedproportion,putitinabucketorother
containerandallowittodissolvewellbeforehand.
–Whenpouringthesolutioninthetank,besuretousethestrainerprovided.
CAUTION
Priortooperation
1.Makesurethatthebatteryischarged.(Referto
P.10andP.12forhowtochargethebattery.)
2.Confirm that the grip lever is open (switch off,
valveclosed).
Starting/Operation
1.Push the power switch on the control panel to
theright toturnonpower. (Thelampof the
batterycheckerturnson.)
2.Holdthe gripleverto turnontheswitchand
openthevalve.Thepumpwillstart.
3.
Turnthepressure-regulatingvalveonthecontrol
panelclockwise to increase pressure. *Immediately
afterpoweristurnedonforthefirsttime,pressureis
settotheminimum.(Thefactorydefaultsetting)
4.Adjust pressure using the pressure-regulating
valvewhileobservingthesprayfromthenozzle.
Continuousspraying
Spotspraying
Tostop
1.Whenthemodeselectleverissettospot
straying,releasethe grip lever toturnoffthe
switchandclosethevalve,andsprayingstops.
2.Whenthemodeselectleverissettocontinuous
spraying,pressthelocklevertoreleasethegrip
leverlock,returnthegriplevertotheoriginal
position,turnofftheswitch,andclosethevalve,
andsprayingstops.
3.Push the power switch on the control panel to
thelefttoturnoffpower.(Thelampofthe
batterycheckerturnsoff.)

English
9
Cleaningtheinsideofchemicaltank
3.Cleaning,Recharging,andStorage
–Afterrecoveringtheremnantsolution,cleantheinsideofchemicaltankbyusingcleanwater.
k
Beforecleaning,inspectionandrecharging,makesureunitisturnedoff.
CAUTION
Cleaningthepumpinsidewithwater
CAUTION
After cleaning the inside of chemical tank, pour water into the tank again, run the pump, and clean the
pump inside and the nozzles until the sprayed mist of chemical solution is completely replaced with
clean water.
Leaving the pump inside without it being water-cleaned will cause failure of the pump and nozzles.
Cleaningthestrainer
–Cleanthestrainer.
Waterdraining
–Donotfailtodrainthetank.Otherwisethefreezingofwatermaydamagethepumpinwinter.
–Afterdrainingthechemicaltank,gripthegriplevertorunthepumpwithoutloadasfarastheremaining
waterinthetankiscompletelydischarged.Nevercontinuetheno-loadrunofthepumpforlongerthan1
minute.Otherwisethepumpmaybedamaged.
CAUTION
Methodforusingthemeasuringcup
Themeasuringcupis onthebacksideofthe
chemicaltanklid.(Themeasuringcupis
detachablefromthechemicaltanklid.)
Tokeepthesolutionfromcontamination,be
sure to dissolve the chemical in another
containerandfilterthesolutionwiththestrainer
beforepouringitintothechemicaltank.
Howtoremovethestrainer
Setthe ribsontheboth sideoftheinner strainer
horizontalorverticaltothechemicaltankto
removethestrainer.
Withtheribsonthebothsidesoftheinnerstrainer
horizontalorverticaltothechemicaltank,turnthe
ribsby45degrees to semifix the strainer to the
chemicaltank.Doingsopreventsthestrainerfrom
risingwhenusingfoamingchemicals.
100X
200X
500X
Figures in the chart are rough estimate for the dilution
strength.
150
75
30
50X 300 (mL)
Use the gauge for 15 liters.
ribs
strainer
chemicaltank

English 10
Rechargingthebattery
1.Removethebatteryfromtheunit.
(1)Openthecassettecoverontheunit.
*Toremovethebatteryfromtheunit,
(2)placeyourrighthandonthesideofthebattery,andwhilepushingtheleveronthefrontfaceof
thebatterydownward,
(3)slidethebatteryinthediagonallyupward(directionisindicatedwithanarrow)toremove.
2.Insertthepowerplugofthebatterychargerintothe120Vpoweroutlet.Thechargingindicationgreen
lampflashes.
3.Pushthebatterytotheendalongtheinsertguideofthecharger.Whenthebatteryisinserted,the
chargercoveropensandcloses.Whenthebatteryisinserted,thechargingindicationredlampturns
on,theconfirmationtone,andchargingcompletionmelodyissetwillsoundforashortperiodoftime,
aschargingstarts.
4.Whenthebatteryisfullycharged,thegreenlampturnsonandthechargingcompletionmelodyand
theelectricbuzzersound.Ifthebatteryiskeptinthecharger,tricklechargeisconductedfor24hours
whilecoolingdownthebattery.Chargingtimevariesdependingontheambienttemperature(10℃ to
40℃)andthebatterycondition(new,storedforlongtime,orclosetothelifeofbattery).Ifthebattery
isnotusedrightaftercharging,werecommendkeepingthebatteryinsertedinthechargertocool
downthebattery.
5.Remove the battery from the charger, and pull out the power plugof the charger from the power
outlet.
6.Insertthebatterytotheend.
(1)Insertthebatterytotheendalongthegrooveontheunit.Iftheredsectionattheupperleveris
visible,thebatteryisnolocked.Pushthebatterytotheendsothattheredsectionisnolonger
visible.
(2)Closethecassettecoverfirmly.
yellow
green
red
battery
Terminalcover
Chargingindicationlamp
lever
cassettecover

11
(※)Electric buzzer is factory default setting.
Electricbuzzer
Melody1 Melody2
Silentmode Melody4 Melody3
(※)
One green lamp flashes before charging. The charger is connected to the power
supply.
One red lamp flashes during cooling down. The battery is hot. After cooling
down, charging automatically starts.
One red lamp flashes during charging. Battery level is approximately 80 to
100%.
One red lamp and one green lamp turn on during charging. Battery level is
approximately 80 to 100%.
One green lamp turns on when charging is completed. Electric buzzer or
melody.
Yellow lamp turns on for automatic maintenance. Charging time becomes longer
to prevent the battery life from being reduced.
One red lamp and one green lamp turns on alternatively to indicate that the battery is unable to
be charged. Due to the end of battery life or clogging, the battery is unable to be charged.
Yellow lamp flashes to indicate the cooling system error. The cooling fan is
malfunctioning or cooling is not sufficient.
Howtoswitchthechargingcompletionmelody
1.Whenthebatteryisinsertedinthecharger,theconfirmationtoneiscurrentlysettocharginga
completionmelodysoundsforashorttimeofperiod.
2.Reinsertthebatteryquicklyatthistimetochangetheconfirmationsoundofthechargingcompletion
melody.
3.Repeatreinsertingthebatteryquicklytochangetheconfirmationsoundofthechargingcompletion
melodyinturn.
4.Whenyouheartheconfirmationsoundofthechargingcompletionmelody,andiscorrectlysetkeep
thebatteryinsertedtostartcharging.Whenyouselectthemode,the"2shortbeep"soundwillno
longersoundwhenchargingiscompleted.(Silencemode)
5.Whenchargingiscompleted,thechargingindicationgreenlampturnson,andtheselectedcharging
completionmelody ortheelectricbuzzer sounds.Ifthesilence modeisselected,no soundis
generatedwhenchargingiscompleted.
6.Theselectedchargingcompletionmelodyissavedevenafterthepowerplugofthechargerispulled
out.
The indication lamp
meaning of indication
Chargingindicationlamp

–DC18RCisachargerexclusivelyusedforMakitabatteries.Donotuseitforotherpurposes.
–Whenthebatteryischargedrightaftertheuseorthebatteryleftforalongperiodoftimeina
placeexposedtodirectsunlightischarged,thechargingindicationredlampmayrepeatflashing.
Inthatcase,startchargingthebatteryaftercoolingdownbythecoolingfanbuiltinthecharger.-
whenthe chargingindicationredand greenlampsrepeatflashing inturnaftercharting the
chargingandelectricbuzzerbeepsforabout20seconds,thebatterycannotbechargeddueto
theendofthebatterylifeorclogging.
–Whenthebatteryiscontinuouslycharged,thechargingtimemaybeprolonged.
–Withtheautomaticmaintenancefunction,thechargingtimevariesdependingontheambient
temperature(10℃ to40℃)orthebatterycondition.
–If the following case occurs, the charger or the battery may bemalfunctioning.Pleasetakeboththe
chargerandthebatterytothedistributor.
×Whenthechargerplugisconnectedtothe120Vpowersupply,theindicationgreenlampdoesnot
flash.
×Whenthebatteryisinsertedinthecharger,theindicationredlampdoesnotturnonorflash.
×Chargingisnotcompletedaftermorethan1houraftertheindicationredlampturnson.(TheCoolingsystem)
–Non-rechargeablebatteriescannotbechargedwiththisbatterycharger.
–Donotchargethebatterycartridgeinpresenceofflammableliquidsorgases.
–Donotexposechargertorainorsnow.
–Nevercarrychargerbycordoryankittodisconnectfromreceptacle.
–Afterchargingorbeforeattemptinganymaintenanceorcleaning,unplugthechargerfromthepowersource.
Pullbyplugratherthancordwheneverdisconnectingcharger.
–Makesurecordislocatedsothatitwillnotbesteppedon,trippedover,orotherwisesubjectedtodamagedor
stress.
–Youngchildrenshouldbesupervisedtoensurethattheydonotplaywiththebatterycharger.
–Donotattempttouseastep-uptransformer,anenginegeneratororDCpowerreceptacle.
–Donotallowanythingtocoverorclogthechargervents.
CAUTION
–Thisisasystemtoefficientlycoolthebatterywiththecoolingfanbuiltinthechargerinordertohavethe
batteryfullyexercise.Thefanmaysound,butitisnotbroken.
–When sufficientcoolingis not conducted due tomalfunction of the cooling fanorthe clogged charger or
battery,theyellowlampflashestoindicatethecoolingsystemerror.Chargingcanbeperformedduringthe
coolingsystemerror,chargingtimemaybecomelonger.Inthiscase,checkiftheairventofthechargerand
thebatteryisblockedortheairblowingsoundisheard.
–Airblowingsoundmaynotbeheardduringcharging,butiftheyellowlampisnotflashing,thecoolingfan
isnotmalfunctioning.Chargingissometimesconductedwiththecoolingfanstopped.
–Donotblocktheairventofthechargerandthebattery.
–Iftheyellowlampfrequentlyflashes,contactusforinspectionorrepair.
12
Cooling systems
–Theadvantageofthisfunctionistoperformoptimalchargingdependingonthebatteryusagestateso
thatthebatterylifeiskeptlong.
–Whenthefollowing1to4conditionoccurs,batterylifemaybereduced.Therefore,theyellowlampturns
onduringcharging,andchargingtimemaybeprolonged.
1.Repeatingchargingathottemperature
2.Repeatingchargingatlowtemperature
3.Repeatingchargingthefullychargedbattery
4.Repeatingoverdischarge (Overdischargeisa conditionthattheunitisusedaftersprayingpower
becomesweak.)
Automatic maintenance function

English
13
Thebattery
■Besuretoobservethefollowing.Otherwiseelectrolyteleakage,heatgeneration,orrupturemayoccur.
–Donotdisassembleorremodelthebattery.
–Donotusesolderingtothebattery.
–Donotuseanyunauthorizedrechargingunit,butthededicatedone.
–Donotputthebatteryinfireorheatitup.
–Donotconnecttheterminals+and-togetherwithmetalobject.
–Donotconnectanystrangeunit,butthespecifiedone.
–Ensurethatterminals+and-arecorrectlyconnectedwiththecorrespondingonesofthebatteryand
otherunits.
–Donotdirectlyconnectthebatterywiththereceptacleofpowersupplyandcigarettelighterofa
vehicle.
■Ifthebatteryelectrolytegetsinyoureye,rinseitwithcleanwaterwithoutrubbingitandimmediately
receiveadoctorsexamination,Otherwiseyoumayloosesight.
kDANGER
■Donot allow the battery to be immersed in or wetwith sea water,Otherwise it may be heatedor
rusted.
■Donotscratchtheoutersurfaceofthebatteryorremovethetube.Otherwiseelectrolyteleakage,heat
generation,orrupturemayoccur.
■lfthebatteryelectrolyteisdepositedonhumanskin・orclothes,rinseitoffwithcleanwater
immediately.Otherwiseskindisordermayresult,
■Ifoperatingtimehasbecomeexcessivelyshorter,stopoperatingimmediately.Itmayresultinariskof
overheating,possibleburnsandevenanexplosion.
kWARNING
■Donotgiveastrongshocktothebatteryorthrowanobjecttoit.Otherwiseelectrolyteleakage,heat
generation,orrupturemayoccur.
■Donotuseor leavethebatteryin anenvironmentata hightemperature.Otherwiseelectrolyte
leakage,heatgeneration,orrupturemayoccur.
■Storethebatteryinaplacebeyondthereachofbabiesandinfants.
kCAUTION
■Donotstorethebatteryinsuchaplacewhereitissubjectedtodirectsunlightorinahigh-temperature
andhigh-humidityambience.Otherwisethebatteryservicelifewillbeshortened.
CAUTION
■Therechargeablebatteryisavaluablerecyclableresource.
■Obstructendofterminalofbatterywhenyoudisposethisrechargeablebattery.
■Obeylocallawsandregulationswhenyoudisposethisrechargeablebattery.
Recyclingthebattery
–Stopusingtheunitwhenyoufeelthatsprayingpowerbecomesweak,andchargethebattery.
–Donotrechargethefullychargedbattery.
–Chargethebatteryatambienttemperature10℃ to40℃.
–Werecommendthatyouinsertthehotbatteryrightafteruseinordertocooldownbeforecharging.
–Asforthelithiumionbattery,werecommendthatyouchargeandstoreitwhenyouintendnottouseitfor
alongperiodoftime(6monthsorlonger).
To keep the battery long

English 14
–Ifspraymistabnormality,rechargefailure,orfuseblown-offoccurs,thefollowingdisordersshouldbe
suspected.
–Fortheitemsmarkedwithawhiteasterisk"☆",contactthedistributorthatdeliveredthebatteryto
youoroursalesofficeforadjustmentorrepair.
4.Troubleshootingandremedies
SprayFailure
Abnormality Cause Remedy
Themotorfailstorun.
Althoughthe
motorruns,
Sprayis
stopped.
Connectordisengagement ────────── Connectproperly.
Malfunctionofcontroller ────────── Replaceit.
Switchmalfunction ────────────── Replaceit.
Opencircuitofwiring ───────────── Replaceorrepairit.
Fuseblown-off ───────────────── Replaceit.
Motordisconnection────────────── Replaceit.
Motorwindingburnout ──────────── Replaceit.
Batteryvoltagedrop────────────── Rechargeorreplaceit.
Pumpblockagebyforeignmatter ───── Replacementofpump.
Pistonsealsticking ────────────── Replaceit.
Nozzleclogging ──────────────── Cleanit.
Wearofpistonpacking ──────────── Replaceit.
Watersuctionvalvesticking ───────── Manipulatethecap
(yellow)orcleanit.
Pumpvalveclogging ───────────── Cleanit.
Watersuctionhosecloggingorcollapsing─Cleanorrepairit.
Pressure
failstorise.
Malfunctionofcontroller ────────── Replaceit.
Wearofpistonpacking ─────────── Replaceit.
Pumpvalveclogging ───────────── Cleanit.
Pressure-regulatingvalveclogging ───── Cleanit.
Pressure-regulatingvalveabrasion ───── Replaceit.
Nozzletipabrasion ────────────── Replaceit.
Watersuctionhosecloggingorcollapsing ─Cleanorrepairit.
Batteryvoltagedrop────────────── Replaceit.
☆
☆
☆
☆
☆
☆
☆
☆
☆
☆
☆
☆
☆
☆
☆
☆
☆
RechargeFailure
Abnormality Cause Remedy
Thebatterycannotbe
recharged.
Batteryabnormality ────────────── Replaceit.
Rechargingunitabnormality ───────── Replaceit.
Connectorconnectionfailure ──────── Connectproperly.
Opencircuitofwiring ───────────── Replaceorrepairit.
☆
☆
☆
Thebatterycapacity
recovered.
Rechargingtimeshortage ────────── Replaceit.
Batteryabnormality ────────────── Replaceit.
Rechargingunitabnormality ───────── Replaceit.
☆
☆
FuseBlown-off
Abnormality Cause Remedy
Thepumpfailstorun.
Pistonsealsticking ────────────── Replaceit.
Switchcontactfailure ───────────── Replacetheswitch.
Motorrotationisslow. ──────────── Replacethemotor.
☆
☆
☆
Theindicationlampdoesnot
change.
Theindicationredlampdoesnotturnonorflashwhen
thebatteryisinserted.(Batteryorwiringerror)
─── Replaceit.
Theindicationlampdoesnotturnon.──── Replaceit.
Theindicationlampdoesnotchangefromredtogreen.
─Replaceit.
☆
☆
☆

Spanish
15
Contenido
Prefacio
Gracias por comprar este producto.
Este manual de operación explica el método para
utilizarlo de manera correcta, para realizar
verificaciones sencillas y el mantenimiento del mismo.
Por favor lea este manual con cuidado, asegúrese
de comprender su contenido y utilícelo para lograr
el mejor rendimiento del producto.
Guárdelo cuidadosamente después de leerlo y
úselo para ampliar las operaciones del mismo.
Pueden existir discrepancias entre el producto y el
contenido de este manual ya que, de manera
constante, estamos haciendo mejoras para ofrecer
productos de mejor calidad a nuestros clientes.
Por favor envíe cualquier duda sobre este
producto al puesto de venta más cercano o a
nuestra oficina de ventas.
・Por favor guarde este manual de operación
con cuidado.
・Si lo pierde, compre otro en el puesto de
ventas más cercano o en nuestras oficinas de
ventas.
・Modificar el producto hace que se torne
inseguro y su funcionamiento sea poco
práctico, por otro lado, resulta muy peligroso.
¡Advertencias!
A continuación, se indican en este manual importantes medidas de precaución para su manejo:
k
Es posible que ocasione la muerte o que se produzca una lesión seria si no se cumple esta advertencia.
k
Es posible que ocasione la muerte o que se produzca una lesión seria si no se cumple esta advertencia.
kEs posible que se produzca una lesión seria si no se cumple esta advertencia.
kEs posible dañar la máquina si no se cumple esta advertencia.
PELIGRO
ADVERTENCIA
PRECAUCIÓN
PRECAUCIÓN
kRótulo de advertencia
・Siempre elimine la suciedad o el lodo para que sea posible leer las indicaciones.
・Se incluyen los siguientes rótulos de alarma.
Lea el manual de operaciones en detalle.
Asegúrese de leer el manual de operaciones
en detalle antes de utilizarlo.
Utilice equipo de protección personal.
Use elementos de protección como gorro, anteojos de
seguridad, protección para los oídos durante la tarea.
Prohibición de hacer fuego
No coloque una llama abierta cerca del sitio donde
guarda la máquina o realiza tareas de mantenimiento.
Precaución a tener en cuenta para evitar descargas eléctricas
Existe el peligro de una descarga eléctrica durante la
operación, por esta razón no toque las partes eléctricas.
16
16
16
16
17
17
18
18
18
19
19
19
20
20
20
Para parar
Método para utilizar la taza medidora.
Cómo extraer el colador
3.Limpieza, recarga y almacenamiento
Limpieza del interior del tanque para productos químicos.
Limpieza de la bomba interna con agua.
Limpieza del filtro.
Drenaje del agua.
Recarga de la batería.
Cómo cambiar la melodía de recarga completa
Para una larga conservación de la batería
Función de mantenimiento automático
La batería
Para una larga conservación de la batería
4.Identificación y solución de fallas
20
21
21
21
21
21
21
21
22
23
24
24
25
25
26
1. Para trabajar con seguridad.
Precauciones a tomar antes de trabajar.
Verificación de las partes estándar
Nombre de cada parte
Precauciones a tener en cuenta al utilizar este producto
Controles a realizar antes de comenzar a trabajar
Precauciones durante la eperación
Precauciones después del uso
Funciones de la sección sobre operación.
2. Métodos de manejo y operación
Armado de la boquilla
Método para determinar la carga restante de la batería
Aplicación de los productos químicos
Antes de la operación
Arranque/Operación

Spanish 16
1. kPara trabajar de manera segura
Precauciones a tener en cuenta antes de comenzar la tarea
Vista ropa de trabajo apropiada y
dispositivos de protección.
Operador que realiza la pulverización vistiendo ropa
adecuada y utilizando dispositivos de protección.
No permita que las siguientes personas
realicen la tarea de pulverización:
–
Una persona no puede realizar las tareas de pulverización
debido a fatiga extrema por exceso de trabajo, por
padecer los efectos de drogas o cualquier razón similar.
–
Persona ebria.
–
Mujer embarazada.
–
Personaos que no tienen la responsabilidad de
realizar las tareas de pulverización.
Casco
anteojos de
protección
máscara de
seguridad
Ropa de
protección
(puños libres)
Guantes de
protección
Calzado de trabajo
(botas o calzado de
seguridad japoneses
con suela de caucho)
Protección para los oídos
(en ambientes de trabajo
ruidosos).
kADVERTENCIA
En forma periódica, revise y realice el mantenimiento de los elementos de protección para
garantizar que funcionen en forma normal y utilícelos de modo adecuado.
I-003
Verificación de las partes estándar
Después de abrir el paquete, verifique que todos los accesorios estén presentes.
Si faltaran accesorios o estuvieran dañados, infórmelo al puesto de ventas donde compró el producto.
①
②
④
⑦
⑥
⑤
③
Nombre de cada parte
Tapa del tanque para el
producto químico
Tapadedrenaje
Etiquetadeadvertencia
Tanque para el
producto químico
interruptor
válvula reguladora
Verificador de la batería
A
Correa para el hombro
eslinga al pecho
Tapa
Etiqueta con número
del producto
Cabezal
Empuñadura
Palanca de la
empuñadura
A→
No. Descripción Qantidad
①
②
③
④
⑤
⑥
⑦
Lanza
Cabezal de boquilla en tándem
Cabezal de boquilla variable
batería
Recargador
Manual de operación
Tarjeta de garantía
1
1
1
1
1
1
1

Spanish
17
Controles a realizar antes de comenzar a trabajar
(1) Cuando transporte la unidad en vehículo,
tome las medidas necesarias para evitar que
se caiga.
(2)
Al cargar o descargar objetos pesados, no
realice posturas poco naturales ni trabaje solo.
(3)
Realice la inspección, tareas de mantenimiento
y limpieza en una superficie plana.
(4)
Asegúrese de que cada junta tenga los pernos
y tuercas ajustados y que no estén dañados.
(5)
Coloque adecuadamente cada tapa que retiró
de la parte giratoria y similares cuando realice
las tareas de inspección y mantenimiento.
(6) Conecte cada terminal del cableado eléctrico
y tome las medicas necesarias para evitar
que los cables se toquen entre sí.
(7) Proteja el cableado eléctrico del aceite, agua
y fuego.
(8) Sujete las empuñaduras a los costados del
mango en la tapa del tanque para productos
químicos para levantar la unidad. Sujetar la
parte inferior del tanque para productos
químicos o del perchero podría ocasionar que
las manos queden pinchadas entre el tanque
para productos químicos y el perchero.
k
•No utilice el equipo cuando haya gente, en especial niños, cerca del área.
•Como el tanque es muy pesado cuando está completamente lleno, tenga cuidado de no
lastimarse la cintura cuando lo cargue.
•Cuando cargue el tanque, siempre adopte una postura segura para realizar la tarea.
No trabaje en áreas elevadas usando escaleras o escaleras de mano mientras esté cargando el
tanque.
Este producto puede utilizarse para realizar las
siguientes tareas de agricultura. No lo utilice
para fines distintos a los mencionados.
1) Pulverización de productos químicos para
eliminar insectos que dañan o infectan los
cultivos del campo en general.
2) Pulverización de productos químicos que
exterminan insectos que dañan o infectan
los árboles frutales
3) Pulverización de productos químicos para
eliminar insectos que dañan o infectan los
cultivos del invernadero
4)
Pulverización de productos químicos para
eliminar insectos que dañan o infectan las flores
5) Pulverización de líquido desinfectante o
insecticida en la hacienda o gallinero
6)
Pulverización de productos químicos y agua
para eliminar insectos que dañan o infectan
los árboles del jardín, bonsái o césped.
7) Pulverización de líquido desinfectante o
insecticida para desinfección urbana
8) Pulverización de productos químicos para
eliminar insectos que dañan o infectan los
canteros y parques
9) Pulverización de herbicidas para el
control de las malezas
10) Limpieza y pulverización de agua sobre
los vegetales o sus raíces
Cuando lo transporte en automóvil, tome
precauciones para evitar que el equipo se caiga.
Precauciones a tener en cuenta al
utilizar este producto
Productos químicos
–
Lea detenidamente los rótulos de los productos
químicos que va a utilizar y asegúrese de comprender
el método de aplicación y precauciones.
Si aplica mayor cantidad por tanque (1000m
2
) o si el
producto químico no es el correcto, los agroquímicos
pueden provocar daños.
–Conserve los productos químicos en un lugar
seguro y tenga cuidado de que no se abran los
contenedores al ser transportados.
–Trate los contenedores de los productos
químicos de modo de garantizar la seguridad.
–
Preste atención cuando manipule los productos
químicos Si un producto entra en contacto con los
ojos o boca, enjuague con agua de inmediato.
–Si se siente enfermo, concurra al médico de
inmediato.
–
Dependiendo de la dirección del viento, cambie
el método de pulverización para proteger a los
trabajadores y las casas.
Cuando pulverice químicos, trabaje con el viento
a favor. Además, tenga cuidado de que los
productos químicos no caigan y se dispersen
sobre los cultivos, recintos, estanques para criar
peces o casas en los alrededores.
–Cuando esté trabajando en un invernadero,
preste atención a la ventilación.
–
Al preparar los productos químicos, prepare sólo
la cantidad necesaria según establece el plan de
pulverización establecido. Si quedara demasiado
producto químico, la acción resultaría dificultosa.
–
No pulverice solvente. El solvente puede provocar
la falla de varias partes. Limpie este pulverizador
con mucha agua después de la aplicación si es
inevitable que deba pulverizar solvente.
PRECAUCIÓN

Precauciones durante la operación
(1) En normal funcionamiento, evite trabajar en
forma continua durante más de 2 horas para
proteger la salud.
(2)
Una unidad pulverizadora a batería cargada con
una solución de productos químicos es un objeto
pesado. Limpie el campo a tratar y evite realizar
un trabajo duro que no sea estable y razonable.
(3)
Preste atención a su ropa, condiciones del campo
y a la dirección del viento para evitar la exposición
a los agroquímicos y a la solución en el ambiente.
(4) Durante la operación, no permita que ninguna
persona que no esté autorizada se acerque al
área donde se realiza la pulverización.
(5)
Asegúrese que la empaquetadura de la tapa del
tanque para productos químicos esté bien
ajustada de modo que evite que salpique solución.
(6) Nunca apunte con la boquilla pulverizadora
hacia una persona.
(7)
Antes de tomarse un descanso o decida detenerse
para comer, realice muchas gárgaras y lave bien
sus manos y rostro con agua y jabón.
(8) Si una persona siente algo anormal en su
condición física, permita que lo examine un
médico.
Precauciones después del uso
–Retire cuidadosamente la solución que queda en el tanque, colóquela en el contenedor original y
guárdela lejos del alcance de los niños. Además, retire todo depósito de solución residual de la
superficie de la máquina. De lo contrario, el residuo podrá provocar oxidación y fallas.
–
Limpie el interior del tanque para productos químicos, la manguera y boquilla pulverizadora con agua limpia.
–Si presentaran algún área dañada, repárelo antes de guardarla. Utilice únicamente las partes y
suministros originales especificados que nosotros podemos proveerle.
–Mantenga el lugar de guardado libre de humedad, polvo y demás materiales extraños.
Cuando se deba guardar la unidad por un período prolongado, realice la recarga y descarga
de la batería para evitar la degradación de su desempeño.
Spanish 18
–Tomar la palanca de la empuñadura activa el
interruptor, abre la válvula y de esta manera
comienza la pulverización.
–Liberar la palanca de la empuñadura apaga el
interruptor, cierra la válvula y de esta manera
la pulverización se detiene.
–Deslizar la palanca para seleccionar el modo
de pulverización le permite seleccionar una
aplicación continua o selectiva.
(1) Palanca para la selección de modalidad en
posición de pulverización selectiva
–
Sostener la empuñadura inicia la pulverización.
–
Liberar la empuñadura detiene la pulverización.
–Presionar el botón de liberación libera la
palanca de la empuñadura y detiene la
pulverización.
(2) Palanca para la selección de modalidad en
posición de pulverización continua.
–Sostener la palanca la mantiene cerrada y
comienza la pulverización continua.
Palanca de la empuñadura
Botón de liberación (negro)
Palanca de la
empuñadura
Palanca de selección de modalidad (azul)
Pulverización selectiva
Pulverización continua
Funciones de la sección sobre funcionamiento.
1. Empuñadura

Spanish
19
2. Correa que sujeta al hombro
Armado de la boquilla
Primero, asegúrese de que la empaquetadura esté
en su lugar, enrosque la lanza en la empuñadura y
el cabezal de la boquilla en tándem en la lanza. En
dicho paso, verifique que la empaquetadura esté
en su lugar para evitar la pérdida de agua y luego,
ajuste firmemente la rosca. Asegúrese de ajustarla
pero evite el ajuste excesivo que puede causar que
la empaquetadura se adhiera.
2. Método de manejo y operación
Ajuste la longitud de la tira de la siguiente manera:
(1) Para acortarla
Tire de la eslinga hacia abajo a lo largo de la tira soporte delantera.
(2) Para alargarla
Introduzca la tira delantera hacia arriba.
Verificación del resto de la carga de la batería
Método para determinar la carga restante de la batería
1. Vierta alrededor de 1 litro de agua en el tanque para el producto químico.
2. Encienda el interruptor (ON), espere hasta que la bomba absorba el agua para elevar la presión y
luego verifique la graduación en el medidor de carga de la batería.
Lanza
Empaquetadura (extremo de la lanza)
Empaquetadura
(extremo de la
empuñadura)
Empuñadura
Boquilla
en tándem
–Asegúrese de colocar el agua en el tanque para el producto químico antes de realizar la
inspección. De lo contrario, la bomba funcionará sin carga y se producirán fallas.
–Tómese por costumbre recargar la batería si el indicador se acerca a la zona amarilla,
aunque todavía se encuentre en la zona verde.
PRECAUCIÓN
verde
amarilla
roja
Listo para la operación. 2 luces indicadoras se encienden
con la batería completamente recargadas. La luz
indicadora se encenderá y apagara de forma intermitente
conforme la recarga de la batería se haya agotado.
Recargue la batería.
Paro automático. Recargue la batería.
verde
amarilla
roja
Full

Spanish 20
グリップレバー
Palanca de la empuñadura
Palanca de selección
de modalidad (azul)
Botón liberador
–Cuando utilice un producto químico que requiere de hidratación, primero coloque la proporción
especificada en una cubeta u otro recipiente y permita que se disuelva bien antes de utilizarlo.
–Al verter la solución en el tanque, asegúrese de utilizar el filtro provisto.
PRECAUCIÓN
Pulverización continua
Pulverización selectiva
Insertafingerintotheholeanddepresstheyellowcapforoneortwo.
Perforación
Tapa (amarilla)
Nota: Medidas a tomar cuando la bomba no succiona agua después de largo tiempo de haber estado guardada.
Tapa
Dedo
Aplicación de los productos químicos
–Con detenimiento, lea la hoja de instrucciones del producto químico antes de utilizarlo y siga el
método específico de aplicación y precauciones para su uso.
Antes de la operación
1.
Asegúrese de que la batería esté recargada. (Refiérase a
la Págs. 22 y 24 sobre cómo recargar la batería.)
2. Confirme que la palanca de la empuñadura
esté abierta (apagado, válvula cerrada).
Arranque/Operación
1.
Presione el interruptor de encendido en el panel de
control a la derecha para encender. (La luz
indicadora del verificador de batería se encenderá.)
2.
Sujete la palanca de la empuñadura para girar el
interruptor y abrir la válvula. El bombeo comenzará.
3.
Gire la válvula reguladora de la presión en el panel de control
en sentido de las agujas del reloj para incrementar la presión.
*Inmediatamente tras el encendido por vez primera, la presión
se ajusta al valor mínimo. (Ajuste predeterminado de fábrica.)
4.
Ajuste la presión mediante la válvula reguladora de la
presión mientras observa el rociado desde la boquilla.
Paraparar
1.
Cuando la palanca del modo de función se ajusta para parar de
rociar, suelte la palanca de la empuñadura para apagar el
interruptor y cerrar la válvula, parando así el rociado.
2.
Cuando la palanca del modo de función se ajusta para un
rociado constante, presione la palanca de bloqueo para liberar
el bloqueo de la palanca de la empuñadora, regresando la
palanca de la empuñadura a su posición original, apagando el
interruptor, cerrando la válvula y parando así el rociado.
3.
Presione el interruptor de encendido en el panel
de control a la izquierda para apagar. (La luz
indicadora del verificador de batería se apagará.)
Table of contents
Languages:
Other Dramm Paint Sprayer manuals

Dramm
Dramm FM20 User manual

Dramm
Dramm CHEMDOSE CD-120 User manual

Dramm
Dramm pulsFOG Turbo Owner's manual

Dramm
Dramm Autofog MLVH-10A User manual

Dramm
Dramm HYDRA User manual

Dramm
Dramm MS071EH Owner's manual

Dramm
Dramm Hydra SprayTrax User manual

Dramm
Dramm MS75E Owner's manual

Dramm
Dramm BP-4 User manual