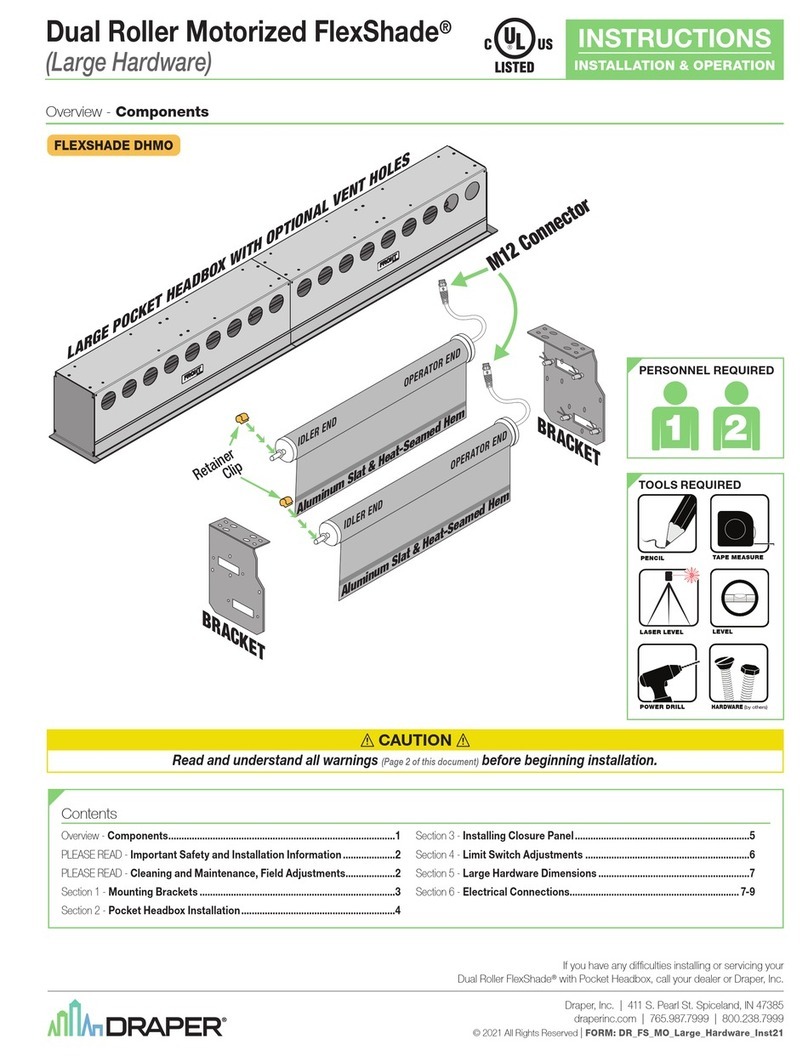
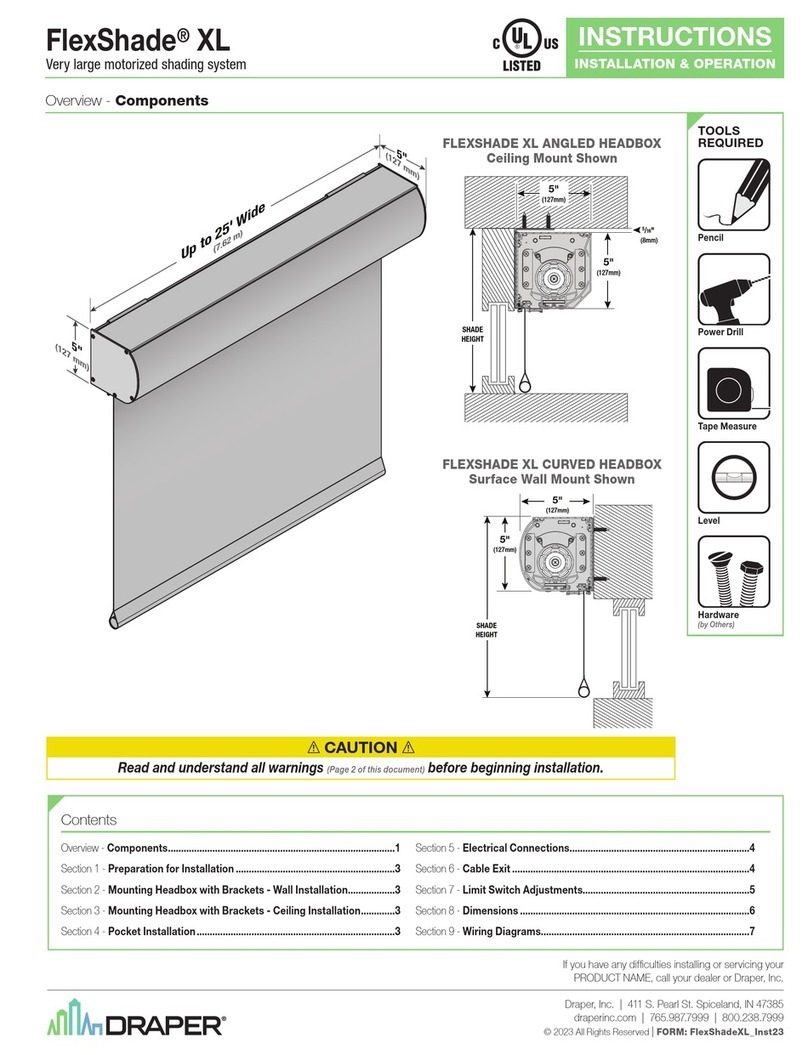
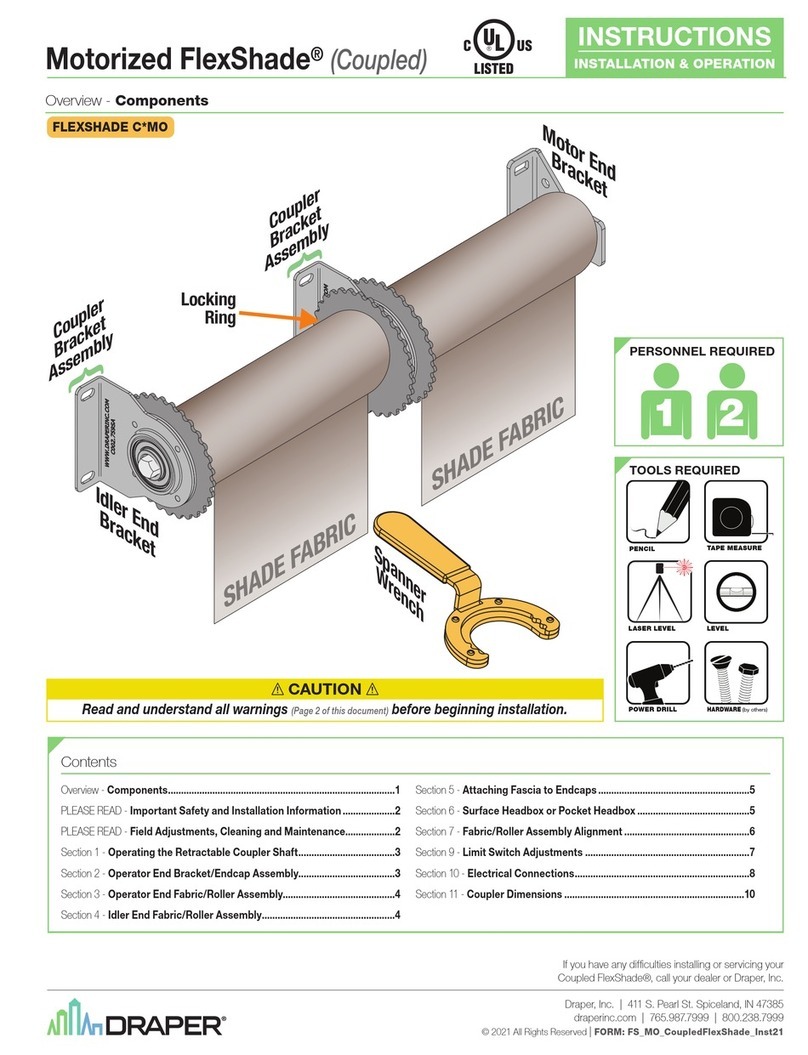
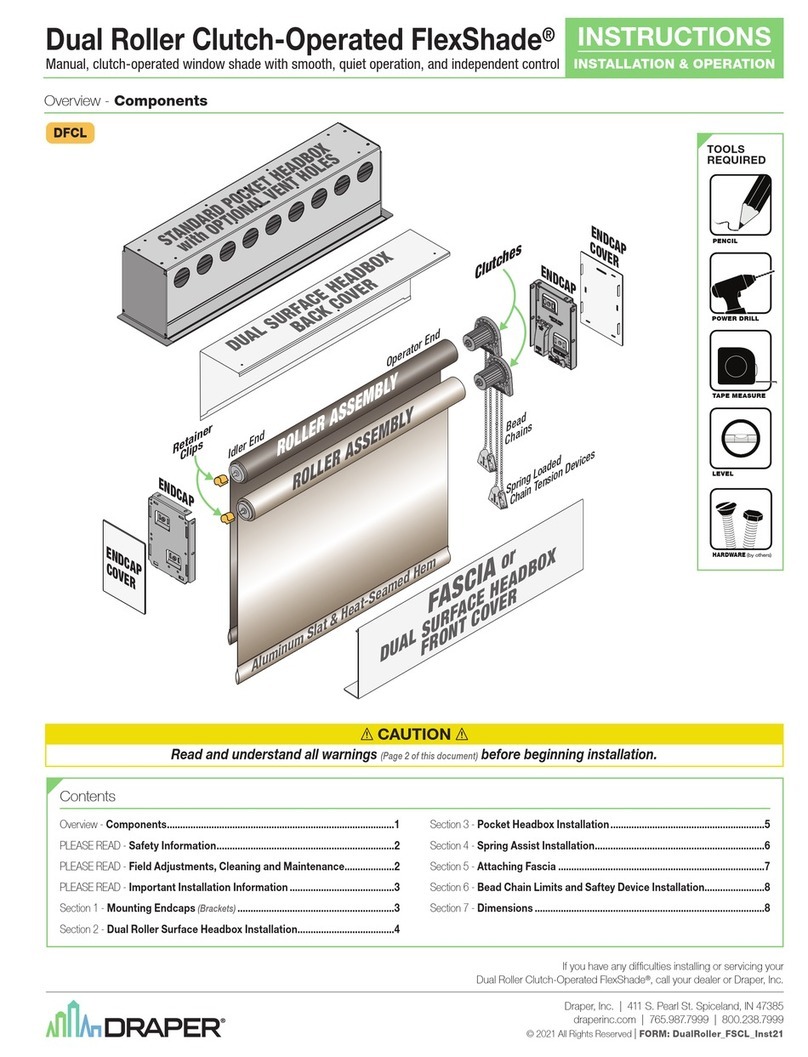
manuals.online logo
Brands
  1. Home
  2. •
  3. Brands
  4. •
  5. Draper
  6. •
  7. Window Blind
  8. •
  9. Draper FlexShade Programming manual

Draper FlexShade Programming manual

CAUTION
Read and understand all warnings before beginning installation.
TOOLS REQUIRED
POWER DRILL
PENCIL
TAPEMEASUR E
SCREWDRIVER
LEVEL
CORDLESS FLEX
PLEASE READ: Getting Started:
Please Note: Mounting Brackets are included.
Please Note: Brackets must be securely attached to the mounting surface.
Installer is responsible for selecting mounting hardware appropriate for
site conditions.
Caution: According to the Window Covering Manufacturers Association Inc.,
all labels must not be removed from the product.
Caution: Mount shade to a level surface. If shade does not sit level, the fabric
will not roll up evenly and damage the edges of the fabric.
INSIDE MOUNT OUTSIDE MOUNT
Screw
Opening
PlasticT
ab
Back of
Bracket
Front of
Bracket
MOUNTING BRACKET
Components
Aluminum Slat & Heat-Seamed Hem
Single
Spring
Bracket
Single
Spring
Bracket
Mounting
Bracket
(Single Spring)
Mounting
Bracket
(Single Spring)
Spring
Stop
Spring
HEADRAIL
ALUMINUM TUBE
SHADE FABRIC
1

"w x 2

"h
44mm x 70mm
Draper, Inc. | 411 S. Pearl St. Spiceland, IN 47385
draperinc.com | 765.987.7999 | 800.238.7999
© 2021 All Rights Reserved | FORM: FlexShade_Cordless_Inst21
Cordless FlexShade®
Cordless, manual roller shade with decorative headrail
INSTRUCTIONS
INSTALLATION & OPER ATION
If you have any difficulties installing or servicing your
Cordless FlexShade®, call your dealer or Draper, Inc.
WARNING
Improper installation and use of the Cordless FlexShade®can result in serious injury or death. Primarily, injuries can occur if the unit falls due to imprecise
installation, mishandling of the shade during installation, or installation on an insufficient wall or ceiling structure. Please use extreme care.
1.
Please read the following installation guidelines thoroughly and follow them
carefully. Failure to do so may cause product to fall or otherwise fail, and could
result in serious injury.
2.
Installation and calibration of the shade should only be performed by an
authorized, qualified, and experienced professional.
3.
Do not affix the unit to wall or ceilings that have inadequate strength to
permanently hold the unit during use. It is the owner’s and installer’s
responsibility to confirm the wall or ceiling to which the unit attaches is
sufficient to permanently hold the weight and stress loads of the unit at all
times. Draper®, Inc., is not responsible for improper installation, application,
testing, or workmanship related to the product at place of installation.
4.
It is the installer’s responsibility to make sure appropriate fasteners are
used for mounting.
5.
All brackets, fascia, headboxes, pockets, wall clips, and other hardware
must be installed level. Shade unit must be level and square.
6.
Before testing or operation, carefully inspect the entire area and path
of the shade and areas underneath the shade to be sure no persons
or objects are in the area.
7.
During testing or operation, carefully watch the surrounding area for any
potential safety concerns including nearby persons or objects.
8.
After installation, the entire system should be carefully tested to ensure safe
and normal operation. Extreme care should be taken during testing to remain
clear of moving parts to avoid possible injury.
9.
Operation of shade should be performed only by authorized and qualified
personnel, who have been trained in the safe and effective operation of the
shade and understand its safety features.
10.
The safety features of the shade should never be disabled, bypassed, or
overridden. The system should not be operated until all safety features are
properly and completely installed, calibrated, and tested.
11.
Shade may need to comply with local, state, or district rules and regulations, in
particular when installed in schools. All applicable rules and regulations should
be reviewed before installation and use.
12.
Failure to precisely follow installation guidelines invalidates all warranties.
13.
Custom products/installations may not be reflected in this manual.
Call Draper, Inc., if you have questions regarding your installation.
Important Safety Information Important Safety Information
Before Beginning Installation
1.
Look for any job site conditions that could interfere with installation or
operation of the system.
2.
Read carefully and be sure to understand all installation instructions and all
related operations manuals. These instructions are intended to serve as a guide
for the installer and owner. They should be followed closely and combined with
the expertise of experienced qualified installers. Draper, Inc., is not responsible
for improper installation, application, testing, or workmanship related to the
product at place of installation. Please retain all instructions for future use.
3.
Open cartons lengthwise, taking care not to cut into cardboard shipping
container.
4.
Locate and lay out all pieces.
5.
Inspect all boxes to make sure you have received the proper shade and parts.
Controls may be shipped separately, or in same carton as shade.
6.
If you have any difficulties with installing, servicing, or operating your shade,
call your dealer or Draper, Inc., 765-987-7999.
PLEASE READ - Important Safety Information
Caution:
1.
Inspect all boxes to make sure you have
received the proper shades and parts.
Controls may be shipped separately, or in
same carton as shades.
2.
Open cartons lengthwise, taking care not
to cut into cardboard shipping container.
3.
Before mounting shades, verify
measurements on label provided with shade,
and ensure unit is installed at correct width.
4.
All hardware must be installed level. Shades
must be level and square.
PLEASE READ - Important Installation Information
5.
Read the following installation guidelines
thoroughly and follow them carefully.
Failure to do so may cause product to fall or
otherwise fail, and invalidates warranty.
6.
Installer is responsible for selecting mounting
hardware appropriate for site conditions.
PLEASE READ - Field Adjustments
Each Draper Solar Control Shade is tested to ensure
proper operation. Even with this testing, some field
adjustments may be needed for telescoping.
If the shade is telescoping, place a piece of high
quality gaffer tape about 1"
(25mm)
wide on the
exposed roller
(where the fabric will cover it)
on the side
that the fabric will be drawn toward. For example: if
the fabric is tracking to the left, place the tape on the
right side.
PLEASE READ - Cleaning and Maintenance
Window covering products manufactured by Draper, when properly installed, should require no
operational maintenance or lubrication.
Most standard Draper fabrics may be cleaned at the window by vacuuming with a soft brush
attachment. They also may be cleaned by using a sponge or soft cloth and mild solution of warm soapy
water. A mild dishwashing liquid is recommended. A clean dry cloth is recommended for the metal finish.
Please Note: Exceptions are GreenScreen Evolve, GreenScreen Revive, Flocké, and Phifer SW7000
fabrics, which must be cleaned with a dry art sponge.
(Flocké®is a registered trademark of Mermet®USA.
GreenScreen Revive®, GreenScreen Evolve®are registered trademarks of Phifer®Incorporated.)
page 2 of 4
Cordless FlexShade®
Section 1 - Installing Brackets
Caution: Before mounting shades, verify measurements on label provided with shade, and ensure unit is installed at correct width.
Please Note: Installer is responsible for selecting mounting hardware appropriate for site conditions.
Installing Inside Mount Brackets
1.
Attach brackets to the top of the
window frame
(or ceiling)
as shown.
2.
Install outermost brackets
approximately 2"
(51mm)
in from
the edge of the window frame.
Evenly space any remaining
brackets in between the
outermost brackets.
3.
Before drilling the screw in and
securely tightening the bracket
to the mounting surface, ensure
that the plastic tab on the bracket
is facing toward the back of the
window.
Installing Outside Mount Brackets:
1.
Attach brackets above the
window frame as shown.
2.
Install outermost brackets
approximately 2"
(51mm)
in from
the edge of the window frame.
Evenly space any remaining
brackets in between the
outermost brackets.
3.
Before drilling the screw in and
securely tightening the bracket
to the mounting surface, ensure
that the plastic tab on the
bracket is facing upward, toward
the ceiling.
Section 2 - Inserting Shade Into Brackets
Installing Inside Mount
1.
Insert the rail into the front of the bracket.
2.
Rotate shade until the back side of shade snaps into the back
of the bracket.
Installing Outside Mount:
1.
Insert the rail into the bottom of the bracket.
2.
Rotate shade until back side snaps into the back
of the bracket.
Push Tab
Push Tab
Section 3 - Removing Shade from Brackets
CAUTION: Before attempting, hold shade securely to prevent falling.
Removing Inside Mount
1.
Press the tab of the bracket in, either with fingers or
a flat head screwdriver.
2.
Rotate shade in
(toward the room)
until fully removed
from the bracket.
Removing Outside Mount:
1.
Press the tab of the bracket down, either with fingers
or a flat head screwdriver.
2.
Once the tab has been pressed down, rotate shade down
until fully removed from the bracket.
Push Tab
Push Tab
page 3 of 4
Cordless FlexShade®
Section 4 - Adjusting Shade Tension
Please Note: If shade has too much tension
(springs up too quickly)
or too
little
(does not reach the top)
, tension level can be adjusted.
1.
Locate the acrylic tension or adjustment screws on shade’s headrail.
2.
If shade is in a metal valance, first remove the endcap on the valance.
3.
If shade is in an upholstered valance, it may be necessary to first
remove the shade from the valance
(Section 3)
.
Regular Roll:
Please Note: Adjustments can be made to the
screw to the LEFT hand side of shade.
1.
Using a cross head or flat head screwdriver,
turn the screw until the desired tension is
reached.
2.
Turning clockwise will LOWER the upper
limit.
3.
Turning counter clockwise will RAISE the
upper limit.
Reverse Roll:
Please Note: Adjustments can be made on the
screw to the RIGHT hand side of shade.
1.
Using a cross head or flat head screwdriver,
turn the screw until desired tension is
reached.
2.
Turning clockwise will INCREASE tension.
3.
Turning counter clockwise will DECREASE
tension.
Section 5 - Adjusting Shade Upper Limit
Please Note: Upon retracting shade, if it does not stop at a satisfactory
upper limit, the upper limit can be adjusted.
1.
Locate the acrylic tension or adjustment screws on shade’s headrail.
2.
If shade is in a metal valance, first remove the endcap on the valance.
3.
If shade is in an upholstered valance, it may be necessary to first
remove the shade from the valance
(Section 3)
.
Regular Roll:
Please Note: Adjustments can be made to the
screw to the RIGHT hand side of shade.
1.
Using a cross head or flat head screwdriver,
turn the screw until the desired tension is
reached.
2.
Turning clockwise will LOWER the upper
limit.
3.
Turning counter clockwise will RAISE the
upper limit.
Reverse Roll:
Please Note: Adjustments can be made on the
screw to the LEFT hand side of your shade.
1.
Using a cross head or flat head screwdriver,
turn the screw until desired tension is
reached.
2.
Turning clockwise will LOWER upper limit.
3.
Turning counter clockwise will RAISE
upper limit.
page 4 of 4
Cordless FlexShade®
Other manuals for FlexShade

9

Other Draper Window Blind manuals

Draper LightBloc FlexShade User manual

Draper

Draper LightBloc FlexShade User manual

Draper Clutch-Operated FlexShade User manual

Draper

Draper Clutch-Operated FlexShade User manual

Draper SHADE SP Installation instructions

Draper

Draper SHADE SP Installation instructions

Draper FlexShade DHMO User manual

Draper

Draper FlexShade DHMO User manual

Draper FlexStyle C MO Series Installation instructions

Draper

Draper FlexStyle C MO Series Installation instructions

Draper Motorized FlexShade Installation instructions

Draper

Draper Motorized FlexShade Installation instructions

Draper FlexShade Programming manual

Draper

Draper FlexShade Programming manual

Draper FlexShade F MO Series Installation instructions

Draper

Draper FlexShade F MO Series Installation instructions

Draper FLEXSHADE 2 Installation instructions

Draper

Draper FLEXSHADE 2 Installation instructions

Draper FlexShade D MO Series Installation instructions

Draper

Draper FlexShade D MO Series Installation instructions

Draper FlexStyle Ascend User manual

Draper

Draper FlexStyle Ascend User manual

Draper FlexShade XL User manual

Draper

Draper FlexShade XL User manual

Draper FlexShade Programming manual

Draper

Draper FlexShade Programming manual

Draper FlexShade Ascend User manual

Draper

Draper FlexShade Ascend User manual

Draper FlexShade NEXD Programming manual

Draper

Draper FlexShade NEXD Programming manual

Draper Crank-Operated FlexShade Programming manual

Draper

Draper Crank-Operated FlexShade Programming manual

Draper FlexShade DFMO User manual

Draper

Draper FlexShade DFMO User manual

Draper FlexShade NEXD Programming manual

Draper

Draper FlexShade NEXD Programming manual

Draper FlexShade NEXD User manual

Draper

Draper FlexShade NEXD User manual

Draper FlexShade C MO Series Installation instructions

Draper

Draper FlexShade C MO Series Installation instructions

Draper FlexShade User manual

Draper

Draper FlexShade User manual

Draper FlexShade ZIP XL User manual

Draper

Draper FlexShade ZIP XL User manual

Draper FlexShade Installation instructions

Draper

Draper FlexShade Installation instructions

Draper FlexShade User manual

Draper

Draper FlexShade User manual

Popular Window Blind manuals by other brands

HunterDouglas 5-151 Installation instruction

HunterDouglas

HunterDouglas 5-151 Installation instruction

SOMFY Sonesse Ultra 50 RTS Quick programming guide

SOMFY

SOMFY Sonesse Ultra 50 RTS Quick programming guide

Plissees VS4 Slope Assembly and operating instructions

Plissees

Plissees VS4 Slope Assembly and operating instructions

Rollo Rieper DFS Assembly instruction

Rollo Rieper

Rollo Rieper DFS Assembly instruction

rollease acmeda WireGuide Skylight installation manual

rollease acmeda

rollease acmeda WireGuide Skylight installation manual

curtain & blind Eco PVC Shutter Installation

curtain & blind

curtain & blind Eco PVC Shutter Installation

Era Inn E ACTION SI 332 AC quick guide

Era Inn

Era Inn E ACTION SI 332 AC quick guide

Bouclair 9396033 Installation & maintenance instructions

Bouclair

Bouclair 9396033 Installation & maintenance instructions

Plissees DF20 Assembly and operating instructions

Plissees

Plissees DF20 Assembly and operating instructions

3 Day Blinds Faux Wood 1 Getting started

3 Day Blinds

3 Day Blinds Faux Wood 1 Getting started

Project Source CDLF2342W quick start guide

Project Source

Project Source CDLF2342W quick start guide

weinor VertiTex ZipR Maintenance Instructions and Directions for use for the end user

weinor

weinor VertiTex ZipR Maintenance Instructions and Directions for use for the end user

YewdaleDefiant VL31 Split Draw Manufacturing Instructions

YewdaleDefiant

YewdaleDefiant VL31 Split Draw Manufacturing Instructions

MHZ 11-7122 Installation and operating instructions

MHZ

MHZ 11-7122 Installation and operating instructions

SLIDE 534000 Important information

SLIDE

SLIDE 534000 Important information

Cosiflor VS 2 Assembly instruction

Cosiflor

Cosiflor VS 2 Assembly instruction

Victoria M Roller Blind Duo installation instructions

Victoria M

Victoria M Roller Blind Duo installation instructions

Hella TOP FOAM RvU Installation instructions and instructions for use

Hella

Hella TOP FOAM RvU Installation instructions and instructions for use

manuals.online logo
manuals.online logoBrands
  • About & Mission
  • Contact us
  • Privacy Policy
  • Terms and Conditions

Copyright 2025 Manuals.Online. All Rights Reserved.