dreo DR-KAF001 User manual


Thank You
for Choosing Dreo!
We hope you enjoy our air fryer as much as we did creating it
Scan or visit dreo.com/warranty
to extend your warranty by registering your product. If you need
any help, don't hesitate to email us to get expert support!
Your support means the world to us .
.
Mon - Fri, 9:00 am-5:00 pm PST/PDT

Contents
Important Safety Instructions
Getting to Know Your Air Fryer
Package Contents & Specifications
Product Diagram
Control Panel
Display Messages
Using Your Air Fryer
Before First Use
Initial Use
01
04
04
05
06
08
08
08
08
10
11
12
13
14
15
17
19
Preheating
Cooking Functions
Preset Default Settings
Start Cooking
More Functions
Cleaning and Maintenance
Troubleshooting
Warranty and Service

01 02
Important Safety Instructions WARNING
BEFORE USING THIS APPLIANCE READ
ALL INSTRUCTIONS AND CAUTIONARY
MARKINGS IN YOUR USER GUIDE AND
ON THE APPLIANCE
When using an electrical appliance, basic precautions should
always be followed, including the following:
DO NOT block any ventilation openings.
Hot steam is released through air outlet.
Keep your hands and face clear of
openings.
This appliance is not intended for use by persons (including children) with
reduced physical, sensory or mental capabilities, or lack of experience and
knowledge, unless they have been given supervision or instruction concerning
the use of the appliance by person responsible for their safety.
Check if the voltage indicated on the appliance corresponds to the local
main voltage before you connect the appliance.
DO NOT operate the appliance if the plug, the main cord or the appliance itself
is damaged. Always make sure that the plug is inserted properly into a wall
outlet.
Close supervision is necessary when any appliance is used by or near
children. Children should be supervised to ensure that they do not play with
the appliance. Cleaning and user maintenance shall not be done by children
unless they are older than 8 and supervised.
DO NOT let the power cord hang over the edge of table or counter. Keep away
from hot surfaces.
DO NOT plug in the appliance or operate the control panel with wet hands.
Never connect this appliance to an external timer switch or separate remote-
control system in order to avoid a hazardous situation. To disconnect, turn off
the appliance, then remove plug from the wall outlet.
Keep your air fryer away from flammable materials (curtains,tablecloth, etc.).
Use on a flat, stable, heat-resistant surface away from heat sources or liquids.
DO NOT place on a stove, near gas or electric burners, or in a heated oven.
DO NOT use the appliance for any other purpose than described in this User
Guide. The use of accessory attachments not recommended by the appliance
manufacturer may cause injuries.
DO NOT leave the appliance unattended while in use. Extreme caution must
be used when moving an appliance containing hot oil or other hot liquids.
01.
02.
03.
04.
05.
06.
07.
08.
09.
10.
11.
To protect against electrical shock, do not
immerse the appliance, cord, or plug in water or
other liquid.
DO NOT touch hot surfaces. Use
handle.
DANGER!
Important Safety Instructions WARNING

03 04
DO NOT use outdoors.
DO NOT place anything on top of your air fryer. DO NOT store anything inside
your air fryer.
After using the appliance, the metal cover inside is very hot, avoid contact
with it after cooking. Unplug from outlet when not in use and before cleaning.
Allow to cool before putting on or taking off parts, and before cleaning the
appliance.
Immediately unplug the appliance if you see dark smoke coming out of the
appliance. Wait for the smoke emission to stop, before you remove the pan
from the appliance.
This appliance has a polarized plug (one prong wider than the other). To
reduce the risk of electric shock, this plug is intended to fit into a polarized
outlet only one way. If the plug does not fit fully in the outlet, reverse the plug.
If it still does not fit, contact a qualified electrician. DO NOT attempt to modify
the plug in any way.
DO NOT place the appliance against a
wall or other appliances. Leave at least
4 inches of free space on the back and
sides and 4 inches of free space above
the appliance. DO NOT place anything on
top of the appliance.
Model DR-KAF001
Voltage AC 120V, 60Hz
Power 1500W
Capacity 6.8 Quart
Temperature Range 100°F~450°F℉
1 x 6.8-Quart Air Fryer
1 x Non-Stick Plate
1 x Cookbook
1 x Quick Reference Guide
1 x User Guide
12.
13.
14.
15.
16.
17.
FOR HOUSEHOLD USE ONLY
READ AND SAVE THESE INSTRUCTIONS
Package Contents
Specifications
Getting to Know Your Air Fryer
WARNING Getting to Know Your Air Fryer
4 inches
4
inches
4
inches

05 06
Product Diagram Control Panel
Function Buttons:
AIR FRY: Use this function
to make your food crispy and
crunchy, with little or no oil.
BAKE: Use this function to bake
cakes, cupcakes, breads and
doughnuts.
ROAST: Use this function to roast
your vegetables or meat like you
roast them in the oven.
BROIL: Use this function to broil
your food with high, direct heat
like a grill.
DEHYDRATE: Use this function
to remove moisture in your fruits,
vegetables, or low-fat meats and
seafood.
MENU: Use this function to select
a preset program.
PREHEAT: Use this function to
preheat your air fryer.
Food-Grade Silicone
Non-Stick Plate
Basket Release Button
Basket Handle
Non-Stick Basket
Air Inlet
Control Panel
Viewing Window
Power Cord
Air Outlet
01.
02.
03.
04.
05.
06.
07.
Operating Buttons:
TEMP + / TEMP -
Press and to adjust
the cooking temperature in 5°F
increments before or during
cooking.
TIME + / TIME -
Press and to adjust
the cooking time before or during
cooking.
LIGHT
Press the light button to turn
on/off the light in the cooking
chamber. The light automatically
turns off after 1 minute.
START / PAUSE
Press to start or pause
cooking after a function is
selected.
POWER
Press the power button to turn on/
off the air fryer.
01.
02.
03.
04.
05.
Product Diagram Control Panel

07 08
DISPLAY MESSAGE MEANING INDICATION DURATION
20 MIN
380°F Time and temperature. The entire cooking
process
READY
Preheating is done and
the air fryer is ready to
add food.
Flashes for 20
seconds
OPEN The basket is not in
position.
Remains until the
basket is back in
position
PAUSE The air fryer has been
put on pause.
Remains until
START/PAUSE is
pressed again
END The cooking is finished. Flashes for 20
seconds
SHAKE The air fryer is ready for
shaking or flipping.
Flashes for 20
seconds
OFF
The air fryer is turning off
and going into standby
mode.
Flashes for 20
seconds
Display Messages
Before First Use
Initial Use
Using Your Air Fryer
There’s plastic inside! Make sure to remove all plastics.
Wash the nonstick basket and plate in warm, soapy water, then wipe dry.
Place the non-stick plate into the basket and place the basket back into the air
fryer.
Before first use of your new air fryer, we recommend you to heat the
air fryer at 400°F for 15 minutes to remove any remaining odor.
NOTE: Do not immerse the main unit in water or any other liquids.
01.
02.
01.
Step1:
Step1:
Step2:
Step2:
Step3:
Step3:
Display Messages Using Your Air Fryer

09 10
02. Plug into the electrical outlet.
Press to turn on.
04. Press START/PAUSE to start and
wait for 15 minutes.
03. Adjust to 400°F and 15 minutes.
The basket and plate will
become very hot after the
heating. Allow them to
cool before taking them for
cleaning.
05. The display will show “END” when
the time is finished.
Note: It is recommended to wash the
basket and plate again for complete odor
removal.
CAUTION
Preheating
It is recommended to preheat before placing food into the air fryer
unless your air fryer is already hot. Food will not cook thoroughly
without preheating.
Initial Use
02. Press START/PAUSE to start
preheating.
03. When preheating is finished, the
air fryer will beep 3 times and “READY”
will flash on the display. Now the air
fryer is ready to add food.
Note: “READY” will flash for 20 seconds
if no action is taken by the user.
Note: You can press TEMP+ or TEMP- to
change the cooking temperature, the time
will adjust accordingly.
01. Press to turn the air fryer on.
Press PREHEAT and the display will
show 400˚F and 3 minutes by default
(make sure the non-stick plate is
already inside the basket).
Initial Use Preheating

11 12
Cooking Functions Preset Default Settings
This air fryer uses special air circulating technology to cook the food.
Every cooking function is programmed with a default time and
temperature.
For general users, using a preset menu is the easiest way to cook
some certain foods. Preset menus are programmed with a default
time and temperature.
Function
Default
Temperature
(°F)
Adjustable
Temperature
(°F)
Default
Time (Min)
Adjustable
Time (Min)
Shake
Reminder
AIR FRY 385 180-400 15 1-60 Y
BAKE 365 180-400 30 1-60 --
ROAST 380 180-400 18 1-60 Y
BROIL 450 350-450 10 1-60 --
DEHYDRATE 125 100-175 1h 1-72h --
Note:
01. Cooking time may vary depending on your desired flavor or thickness of ingredients, etc.
02. You can check the food through the visible window or by pulling out the basket anytime during
the cooking process. Note:
01. Cooking time may vary depending on your desired flavor or thickness of ingredients, etc.
You can check the food through the visible window or by pulling out the basket anytime during the
cooking process.
02. Shake reminder will alert you when 60% of the cooking time has passed, which is ideal for
evenly cooking both sides of your food. The LED display will show “SHAKE”.
Preset
Default
Temperature
(°F)
Adjustable
Temperature
(°F)
Default
Time (Min)
Adjustable
Time (Min)
Shake
Reminder
FRIES 380 180-400 20 1-60 Y
POULTRY 380 180-400 20 1-60 Y
STEAK 400 180-450 10 1-60 --
SEAFOOD 350 180-400 10 1-60 --
BACON 350 180-400 8 1-60 --
VEGETABLE 300 180-400 10 1-60 Y
Cooking Functions Preset Default Settings

13 14
Start Cooking
01. Preheat your air fryer. Add food when
“READY” shows on the display (see page
10).
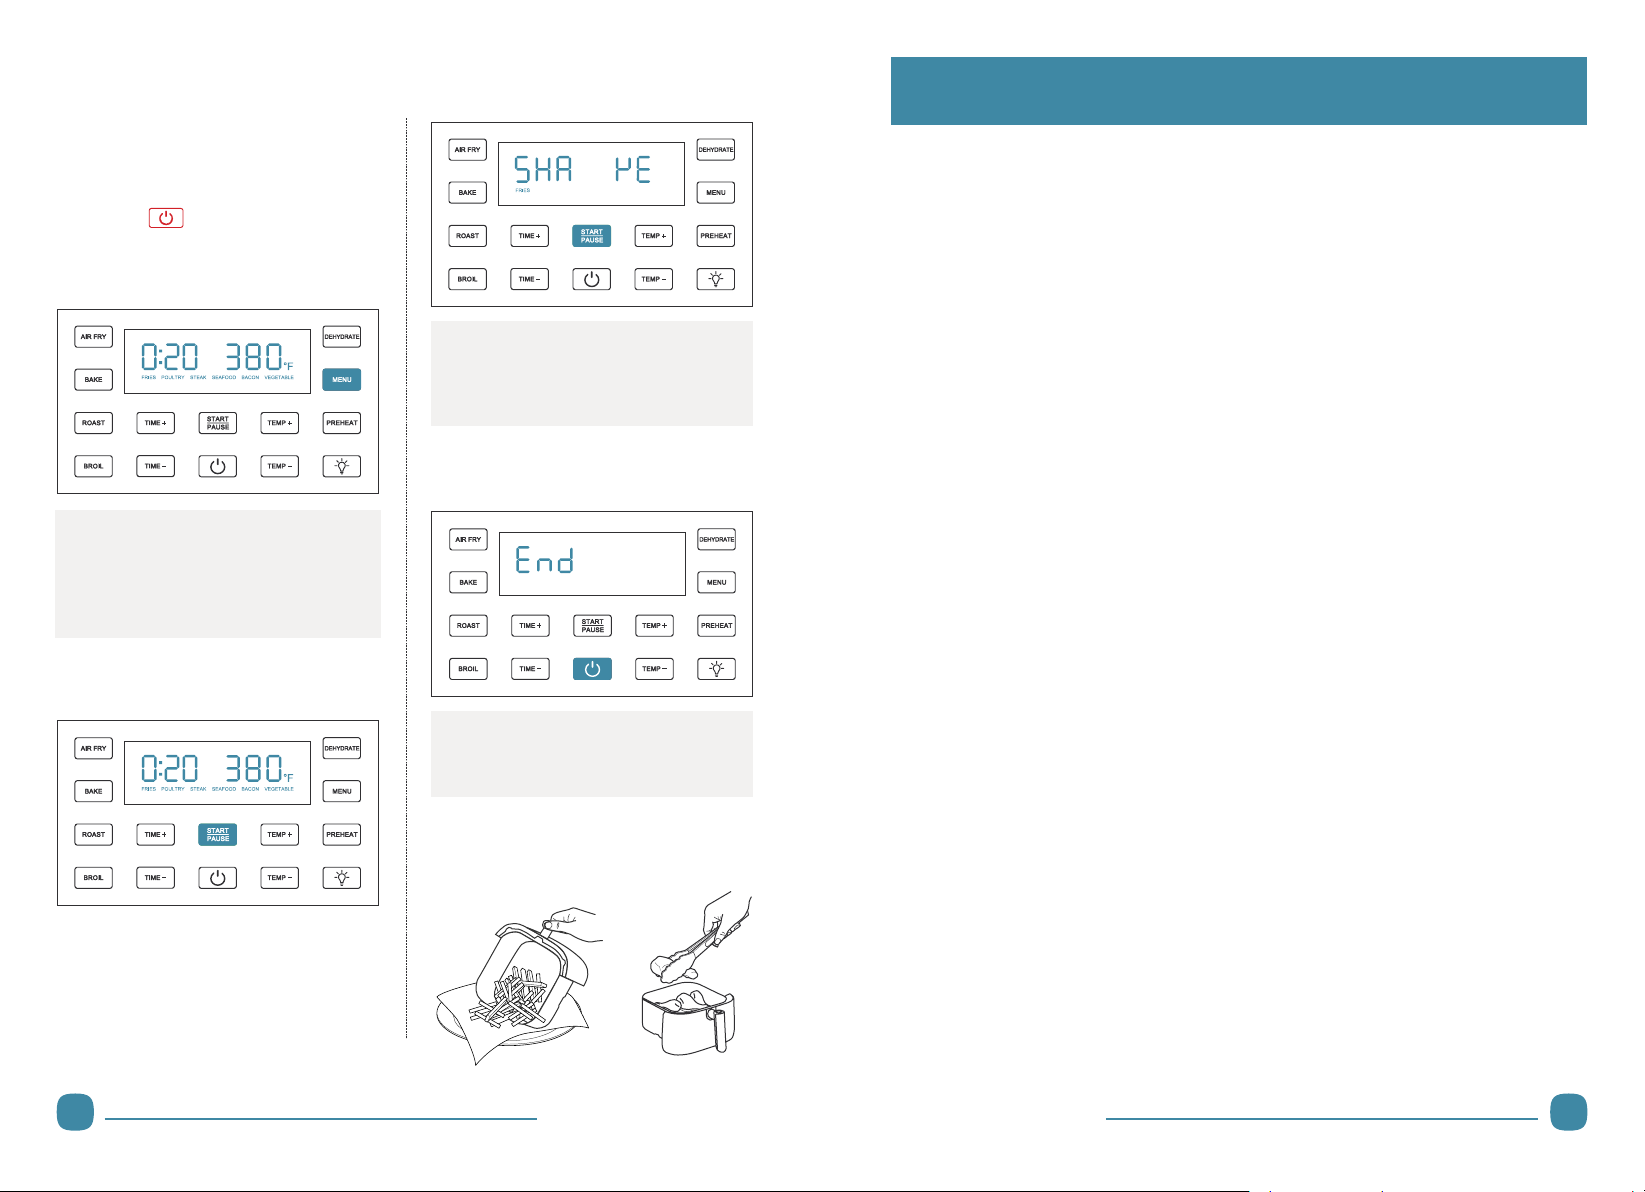
03. Press START/PAUSE to start
cooking.
04. Shake or flip the food following the
prompt of the air fryer if a preset with
shake reminder is selected (FRIES,
POULTRY, VEGETABLE). The LED
display will flash “SHAKE” when 60% of
the cooking time has passed.
05. Once the cooking is finished, the
display will show “END”.
06. Remove the food by tilting the
basket gently or by using heat-resistant
mitts /tongs.
02. Press to wake up the control
panel and select a cooking function or
preset menu. The default temperature
and time will show on the display.
Note:You can adjust temperature and time
based on your desired flavor or thickness of
ingredients by pressing TEMP + / TEMP- and
TIME + / TIME - before or during cooking.
Note:
When the air fryer displays "SHAKE", it
will continue cooking if no action is taken
by the user in 20 seconds.
Note:
"END" will flash for 20 seconds if no action is
taken by the user.
Don’t overfill the basket, or the food will cook unevenly.
Pat dry liquid-marinated food with a paper towel before air frying.
To make your food crispier, you can spray or brush a small amount of oil on both
sides of the food.
Use presets with shake reminder for tossing ingredients or for foods that need
shaking/flipping during cooking.
Checking food during the cooking
1). Press the light button to turn on the light inside the cooking chamber. Check the
food through the viewing window.
2). Take out the air fryer basket and check the food. The air fryer will automatically
pause. Place the basket back and the air fryer will resume the cooking.
Cook time and temperature can be adjusted at any time during cooking. Simply
press TIME +/TIME - or TEMP +/TEMP - to adjust the time or temperature.
To convert recipes from a conventional oven, reduce the temperature by 25°F and
cooking time by 20%. Please check food frequently to avoid overcooking.
An instant-read thermometer is recommended to use to monitor the internal
temperature of the food. After the cooking time is complete, remove food
immediately to avoid overcooking.
1.
2.
3.
4.
5.
6.
7.
8.
Cooking Guide
Overheat Protection
When the interior temperature of the air fryer reaches a certain level, overheat
protection will be triggered with error code E3 shown on the display. Please let the
air fryer cool down to room temperature before turning it on again.
Memory Function
1). If the air fryer loses power during the cooking, it will return to its last status once
connected to the power source again within 2 hours.
2). If the basket is drawn out of the cooking chamber, the air fryer will resume
cooking once the basket is inserted back within 2 hours.
1.
2.
More Features
Start Cooking More Features

15 16
1). Use dishwasher for cleaning, or wash with warm, soapy water and a non-
abrasive sponge. Soak if necessary.
2). Wipe dry.
Use a soft brush to clean the heating
element.
Use a slightly moist, non-abrasive sponge or
cloth to clean the inside of the air fryer. Do
not immerse in water.
Cleaning and Maintenance
Non-Stick Plate & Air Fryer Basket
Heating Element
Dry Before Next Use
Inside of the Air Fryer
Unplug your air fryer and let it
cool down before cleaning.
Note:
•Remove and clean after each use.
•Ensure all grease and food debris are fully removed.
Note:
It is recommended to use degreaser for efficient cleaning of remaining residue.
Step1:Step2:
Cleaning and Maintenance Cleaning and Maintenance
OR

17 18
Problem Possible Solution
The air fryer will not turn on.
Make sure the air fryer is plugged in.
Push the basket securely into the air fryer.
Foods are not completely
cooked.
The basket is overfilled. Divide the food into smaller
batches.
Increase cooking temperature or time.
Foods are cooked unevenly.
Ingredients that are stacked on top of each other or
close to each other need to be shaken during cooking.
The non-stick plate should be placed in the basket.
Foods are not crispy after
air frying.
Spraying or brushing a small amount of oil on foods
can increase crispiness (see page 14).
Temperature won’t go any
higher.
Each cooking function and preset menu have their
max temperature. Please refer to page 11-12.
White smoke is coming out
of the air fryer.
The air fryer may produce some white smoke when you
use it for the first time. This is normal.
Make sure the basket and the non-stick plate is
cleaned properly and not greasy.
Frying greasy foods will cause oil to leak into the basket.
This oil will produce white smoke. This is normal and
should not affect cooking.
Problem Possible Solution
Dark smoke is coming out
of the air fryer.
Immediately unplug your air fryer. Food is burning. Wait
for smoke to clear before pulling the basket out.
How do I pause or stop the
cooking?
Remove the basket from the unit to pause the cooking
and place it back to resume, OR press START/PAUSE
to pause.
Is the basket safe to put on
my countertop?
Use caution when handling, and place on heat-safe
surfaces only.
The display shows error
code “E1”.
There is an open circuit in the temperature sensor.
Contact Customer Support.
The display shows error
code “E2”.
There is a short circuit in the temperature sensor.
Contact Customer Support.
The display shows error
code “E3”.
Overheat protection has been triggered. Please let it
cool down before turning it on again.
Troubleshooting Troubleshooting
If your problem is not listed or still persists, contact our Customer Support at

19 20
Warranty and Service
Accident, misuse, or repairs performed by unauthorized personnel.
Any unit that has been tampered with or used for commercial purposes.
Normal wear and tear of wearable parts.
Use of force, damage caused by external influences.
Damage caused by non-observance of the User Guide, e.g. connection to an
unsuitable mains supply or non-compliance with the instructions.
Partially or completely dismantled appliances.
Defects caused by or resulting from damages from shipping or from repairs,
service, or alteration to the product or any of its parts that have been performed
by a repair person not authorized by DREO.
1.
2.
3.
4.
5.
6.
7.
Default 12-Month Warranty
Extend Your Warranty
We can only provide after-sales service for products that are sold
by DREO or DREO authorized retailers and distributors. If you have
purchased your unit from a different place, please contact your
seller for return and warranty issues.
The warranty will not apply in cases of:
Thanks for choosing DREO air fryer. This product is covered with DREO product and
labor warranty for 12 months from the date of its original purchase.
Extend your warranty by registering your new product on our website
https://www.dreo.com/warranty.
Warranty and Service Warranty and Service
Customer Support
We’re Here to Help!
Intertek
5012531
MADE IN CHINA
If you encounter any issues or have any questions regarding your new product,
please contact our helpful Customer Support Team.
Your satisfaction is our goal!
* Please have your order confirmation number ready before contacting Customer Support.
US
Mon - Fri, 9:00 am-5:00 pm PST/PDT
Scan or visit us on Facebook
to connect with us and explore top tips, latest recipes and new
ideas. Ask us anything and we’re always ready to help.
@Dreo
Table of contents
Other dreo Fryer manuals