manuals.online logo
Brands
  1. Home
  2. •
  3. Brands
  4. •
  5. Drieaz
  6. •
  7. Dryer
  8. •
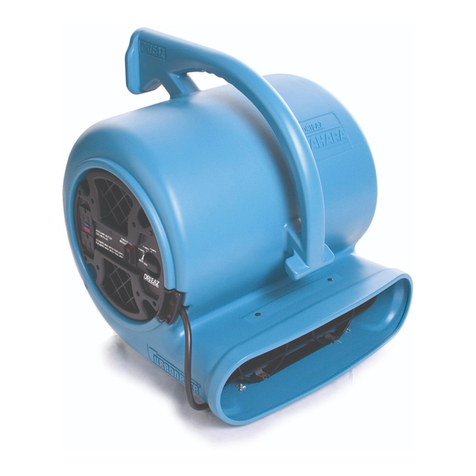
  9. Drieaz TurboDryers Sahara Pro X3 User manual

Drieaz TurboDryers Sahara Pro X3 User manual

1
DRI-EAZ PRODUCTS, INC.
15180 Josh Wilson Road, Burlington, WA USA 98233
Fax: (360) 757-7950 Phone US: (360) 757-7776
www.dri-eaz.com
Owner’s Manual – Dri-Eaz TurboDryers®
115-V Model: Sahara Pro X3
READ AND SAVE THESE INSTRUCTIONS
Use and Operation
Dri-Eaz TurboDryers are high-performance airmovers that promote
the evaporation of moisture from materials in order to speed the dry-
ing process. They are durable and easy to operate, utilizing an effec-
tive balance of static pressure and airflow.
PLACING YOUR TURBODRYERS
When drying the interior of a building, use at least one TurboDryer
per water-damaged room, or one every 200 square feet. Try to get
airflow to all wet surfaces. Open interior doors to improve air circula-
tion, and brace doors to prevent them from blowing shut.
Do not move or carry a TurboDryer while under operation. When the unit
is in motion, the powerful airflow is hard to control, and can produce
rapid and unpredictable movement.
Do not allow children to play with or around TurboDryers. If they lift or
get a unit off balance, the powerful airflow can cause the TurboDryer to
move rapidly, risking injury.
OPERATING YOUR TURBODRYER
1.Locate the electrical cord and plug into a standard 3-prong outlet.
2.Set the switch to the desired speed, based on amp draw as listed
by the switch on the side control panel.
THE AUXILIARY OUTLET
You can “daisy chain” or interconnect up to three Sahara Pro X3 units
to customize your drying needs. The unit can conduct a maximum of
12 amps when it is turned off or 8 amps when it is turned on.
RED CIRCUIT BREAKER SWITCH
The primary purpose of the circuit breaker is to protect the machine. It
turns the unit off when more than 12 amps are run through the on-unit
circuit.
GROUND FAULT CIRCUIT INTERRUPTER
The GFCI protects the user. Should it detect a sudden “ground fault,”
the GFCI will interrupt the electric current. The GFCI will also trip
when a short circuit or overload occurs. If the GFCI “trips,” unplug the
unit and look for potential hazards (standing water, frayed cord, etc.)
that might cause an electrical surge. Relocate the unit and plug into a
different outlet. Then push the “Reset” button and check to make sure
it is operating. If so, continue use; if not, call a Dri-Eaz tech specialist
Use a 115V, 3-prong
grounded connection Do not use with
an adaptor
NOTE: Humidity will rise with the use of
TurboDryers, because they lift moisture
from wet materials into the air. To learn
about managing humidity during drying,
contact your local distributor or call Dri-
Eaz Education at 800-575-5152.
WARNING
ELECTRIC SHOCK HAZARD
This unit must be electrically
grounded
The power cord is equipped with a
3-prong grounding plug. Use only
with a matching receptacle.
Do not cut off the grounding prong.
Do not use an adapter.
Do not use with a damaged power
cord
Do not use an extension cord.
Read and understand manual be-
fore operating.
ADAPTOR
WARNING
07-01537 Copyright 2006 Dri-Eaz Products, Inc.
2
COOL AND VENTILATE
Place the airmover on a flat surface, and direct the air from cooler
areas (including the outdoors) into a warm room.
TURBODRYER STORAGE
READ AND SAVE THESE INSTRUCTIONS
Stackable
Units can be stacked (up to 3) on their sides
for storage.
NOTICE
Stacking feature is not secure enough to
be used during transport.
Preventive Maintenance
Routine maintenance can significantly increase the life of your Tur-
boDryer. It also promotes efficient operation. The applications and
amount of use by owners vary, so the recommendations listed below
are for average-to-high-volume use in water damage. Constant opera-
tion or use in other environments may require additional maintenance.
Contact Dri-Eaz for more information.
NOTE: Do not oil motor bearings; they are permanently oiled.
BEFORE EACH USE:
• Inspect power cord for cuts, fraying or damage; do not use if dam-
aged.
• Remove lint or obstructions from the grills using a vacuum or com-
pressed air.
• Inspect exterior components (switch, knob, etc.) for damage.
QUARTERLY (OR AS NEEDED):
• Clean the exterior with a household all-purpose spray cleaner.
Spray the rag, then apply to the surface.
• To renew shine on the plastic, use a vinyl cleaner.
• Remove grill and blower, then blow off internal components with
compressed air.
ANNUALLY:
• Inspect components and internal wiring for discoloration, loose con-
nections, or fraying.
WARNING
ELECTRIC SHOCK HAZARD
Keep motor and electrical parts
dry.
Do not operate in standing water.
Do not expose to rain, water or
snow.
Do not get the exterior, motor or wir-
ing wet.
Do not clean with wet objects, i.e.,
power washers, soap and water, etc.
If motor or electrical parts become
wet, allow them to dry completely
before using.
Read and understand manual be-
fore operating.
Always disconnect the TurboDryer from its
power source before performing any mainte-
nance or cleaning.
WARNING
WARNING
Keep air intakes clear. Reduced
airflow can cause motor to overheat.
Clean any lint or other material
from the screens before each use.
Do not operate near draperies or
other material that could block the
air intakes.
Clean dust and dirt from motor
using a vacuum or compressed air.
Do not use or store where flamma-
ble vapors like gasoline, solvents, or
thinners are present.
Do not use near open flames, or
heat sources.
Read and understand manual be-
fore operating.
FIRE HAZARD
07-01537 Copyright 2006 Dri-Eaz Products, Inc.
3
Important Safety Instructions: Always disconnect the
TurboDryer from its power source before performing
any maintenance or cleaning.
TOCLEAN INTERIOR (AS NEEDED):
To remove grill and blower wheel:
1. Use a Phillips #2 screwdriver to remove 2 screws.
2. Remove inlet grill.
3. Loosen the blower wheel shaft nut (3/8” socket driver).
Note the backstop for ensuring alignment when replac-
ing wheel.
4. Pull the blower wheel out of the unit.
1
2 3
4
3
To remove control panel and motor:
Rotate the unit onto its side so that the controls are facing up.
5. Unscrew 2 screws securing cord guard (#2 Phillips screwdriver).
6. Remove cord guard.
7. Remove 4 motor mount bolts with 3/8” nutdriver.
8. Pull motor assembly out of the housing.
5
6
8
To reassemble unit:
Follow the steps above in reverse order (starting with #9).
Note: Before tightening shaft nut on wheel, ensure that bolt is aligned with flat
spot on shaft (see photo A).
7
A
07-01537 Copyright 2006 Dri-Eaz Products, Inc.
4
APPLYING YOUR UNIQUE ADHESIVE LABEL:
• Locate the smooth area on the front side of the rotomolded
housing.
• Clean the area with a standard household cleaner.
• Once dry, apply a durable label using heavy-duty adhesive.
Model Specifications
Sahara ProX3
Height 18.8” (48 cm) Speeds Three Weight 27 lbs
Width 17.0” (43 cm) Switch Type Rotary Positions 3 (0°, 45°, 90°)
Depth 18.3” (47 cm) Rated Airflow 2700 CFM
4587 CMH Carpet
Clamp Available as ac-
cessory
Static
Pressure 1.36” (3.5 cm) Tested Airflow 1013 CFM
1718 CMH Circuit Pro-
tection Circuit Breaker/
GFCI
Motor 0.33 HP Overheating Cut-
offs Dual Thermal
Protectors Safety
Marks UL, C-UL
Power 4 amps Cord Length 25 ft. (7.6 m) Housing Polyethylene
Troubleshooting
For any problems not listed below, call your local distributor or contact our Service Department toll free at 888-867-3235.
PROBLEM
CAUSE
SOLUTION
Unit does not operate No power to machine Plug in the unit; check circuit breaker or fuse
Switch not turned on Turn on switch
Blower wheel jammed Remove material jamming wheel
Intake or exhaust blocked Turn machine off and allow to cool, then remove blockage
No power to outlet Reset circuit breaker/GFCI
GFCI tripped Reset circuit breaker/GFCI
Unit vibrates exces-
sively Accumulation of soil on wheel Clean blower wheel
ABOUT MICROBAN® ANTIMICROBIAL PROTECTION:
MICROBAN® antimicrobial protection is built into products during the manufacturing process, giving you antim-
icrobial protection that lasts for the life of the product. MICROBAN antimicrobial protection inhibits the growth of
bacteria, mold and mildew that can cause stains, odors and product deterioration. The continuous antimicrobial
cleaning action makes products easier to cleanse and keeps dirt and other buildup away between cleanings. Nor-
mal cleaning practices should still be followed as described above.
07-01537 Copyright 2006 Dri-Eaz Products, Inc.

Other Drieaz Dryer manuals

Drieaz Vortex User manual

Drieaz

Drieaz Vortex User manual

Drieaz WolfPack User manual

Drieaz

Drieaz WolfPack User manual

Drieaz F367-115V User manual

Drieaz

Drieaz F367-115V User manual

Drieaz AirWolf 115-volt User manual

Drieaz

Drieaz AirWolf 115-volt User manual

Drieaz Sahara User manual

Drieaz

Drieaz Sahara User manual

Drieaz Dri-Pod F451 User manual

Drieaz

Drieaz Dri-Pod F451 User manual

Drieaz Jet CXV TurboDryer F367 User manual

Drieaz

Drieaz Jet CXV TurboDryer F367 User manual

Drieaz Turbovent 48 User manual

Drieaz

Drieaz Turbovent 48 User manual

Drieaz TurboDryer Sahara Pro X3 User manual

Drieaz

Drieaz TurboDryer Sahara Pro X3 User manual

Drieaz Ace TurboDryer User manual

Drieaz

Drieaz Ace TurboDryer User manual

Drieaz AirPath User manual

Drieaz

Drieaz AirPath User manual

Drieaz F108 User manual

Drieaz

Drieaz F108 User manual

Drieaz Sahara User manual

Drieaz

Drieaz Sahara User manual

Drieaz Jet CXV TurboDryer User manual

Drieaz

Drieaz Jet CXV TurboDryer User manual

Drieaz DriForce InterAir F211-115V User manual

Drieaz

Drieaz DriForce InterAir F211-115V User manual

Drieaz TurboDryer Sahara User manual

Drieaz

Drieaz TurboDryer Sahara User manual

Drieaz Sahara ProX3 115V User manual

Drieaz

Drieaz Sahara ProX3 115V User manual

Drieaz TurboDryers Sahara E User manual

Drieaz

Drieaz TurboDryers Sahara E User manual

Drieaz Velo User manual

Drieaz

Drieaz Velo User manual

Drieaz DriForce F211 User manual

Drieaz

Drieaz DriForce F211 User manual

Drieaz ACE F259 User manual

Drieaz

Drieaz ACE F259 User manual

Drieaz Ace TurboDryer User manual

Drieaz

Drieaz Ace TurboDryer User manual

Popular Dryer manuals by other brands

Milnor 72072 manual

Milnor

Milnor 72072 manual

AEG LAVATHERM T36800 operating instructions

AEG

AEG LAVATHERM T36800 operating instructions

Electrolux Electric Dryer owner's manual

Electrolux

Electrolux Electric Dryer owner's manual

Mediclinics M23A manual

Mediclinics

Mediclinics M23A manual

Hotpoint Ariston FTCD 87 Instruction booklet

Hotpoint Ariston

Hotpoint Ariston FTCD 87 Instruction booklet

Asko DC7794 user manual

Asko

Asko DC7794 user manual

Samsung SDC17709 user guide

Samsung

Samsung SDC17709 user guide

Whirlpool DryAire installation instructions

Whirlpool

Whirlpool DryAire installation instructions

KitchenAid Clothes Dryer Use & care guide

KitchenAid

KitchenAid Clothes Dryer Use & care guide

bewello BW3000 user manual

bewello

bewello BW3000 user manual

Asko T700 Series Use and care guide

Asko

Asko T700 Series Use and care guide

Fisher & Paykel DE7060P INSTALLATION GUIDE/USER GUIDE

Fisher & Paykel

Fisher & Paykel DE7060P INSTALLATION GUIDE/USER GUIDE

AEG TR838P4B user manual

AEG

AEG TR838P4B user manual

Bosch WTH83F80CH Installation and operating instructions

Bosch

Bosch WTH83F80CH Installation and operating instructions

Asko T208H.W.AU Instructions for use

Asko

Asko T208H.W.AU Instructions for use

Whirlpool LE6805XP Use & care guide

Whirlpool

Whirlpool LE6805XP Use & care guide

Gardner Denver 9VXRD Series instruction manual

Gardner Denver

Gardner Denver 9VXRD Series instruction manual

Siemens WT45RV27IL Installation and operation instructions

Siemens

Siemens WT45RV27IL Installation and operation instructions

manuals.online logo
manuals.online logoBrands
  • About & Mission
  • Contact us
  • Privacy Policy
  • Terms and Conditions

Copyright 2025 Manuals.Online. All Rights Reserved.