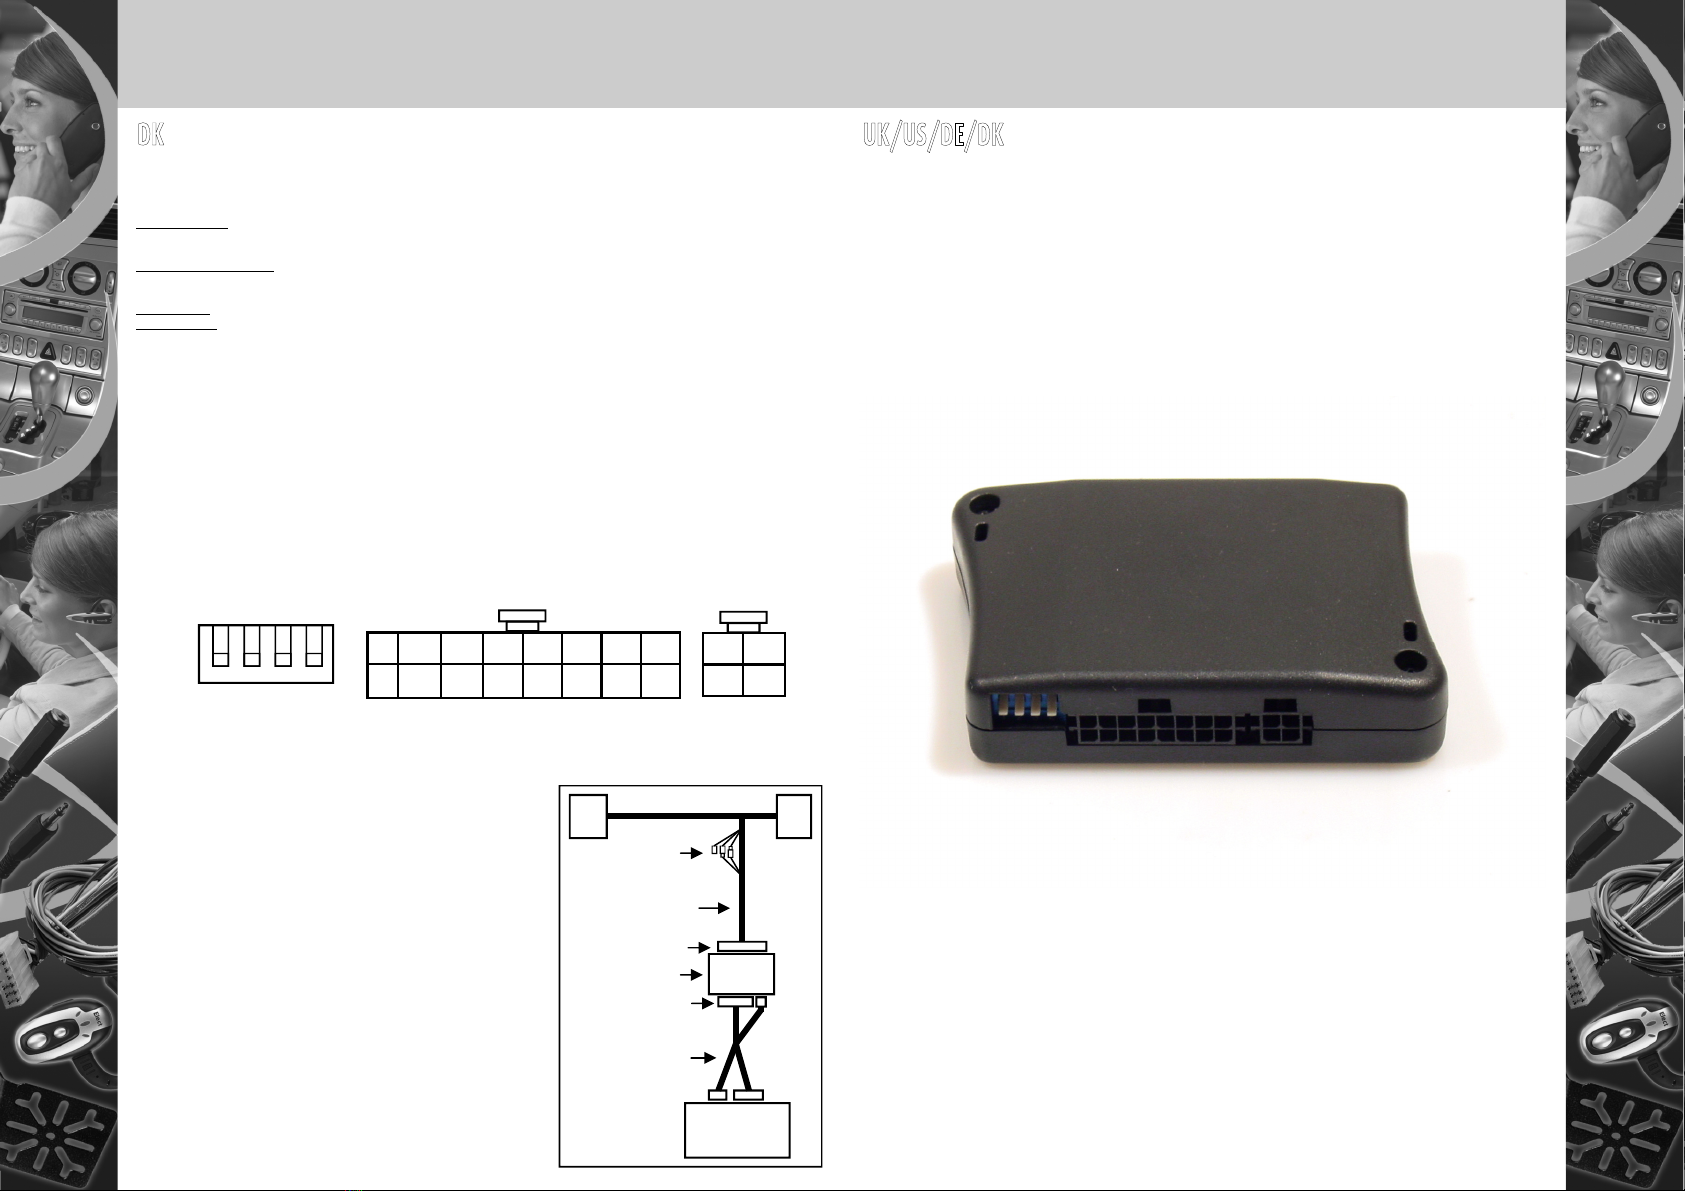
Produktbeschreibung
“MI” 3G Drive & Talk Aufrüstung für Audio2Car inkl. IGNIBOX Schaltkreis
Die Artikel “MI” wird verwendet um eine Audio2Car Lösung zu einer Drive & Talk Lösung aufzurüsten. Dies ermöglicht den Einsatz von Audio2-
Car Kabeln bei Freisprechanlagen ohne eingebautes Mute Relais.
Lautsprecher-Funktion: Durch Verwendung des Relais in der Mute-Box, wird der Radio-Ton stumm geschaltet und die Sprachausgabe der Frei-
sprechanlage über die vorderen Fahrzeuglautsprecher ausgegeben. Die “MI” Box enthält eine zusätzliche Mute Steuerung (Stummschaltung)
über DIP Schalter. Über diese DIP Schalter kann der Installateur festlegen, welche Lautsprecher stumm geschaltet werden. Stromversorgung
der Freisprechanlage: Alle 3G Mute-Boxen werden direkt vom Audio2Car Kabel versorgt. Die Stormversorgung der Freisprechanlage liegt im 16-
poligen Stecker der Mute-Box an. Die “MI” Box benötigt keine Verbindung zu einer Zündungsquelle, Sie erzeugt ihr eigenes Zündsignal, wenn
der Motor läuft. So kann die Freisprechanlage einfach mit Strom versorgt werden und Eingriffe in die Fahrzeugverkabelung werden minimiert.
Mute Funktion: Die Mute-Funktion der Freisprechanlage wird über eine Schutzdiode mit der gelben Mute-Leitung des Audio2Car Kabels verbun-
den.
AUX Integration: Der 4-pol. Stecker der Mute-Box hat eine direkte Verbindung zum 4-pol. AUX-Stecker des Audio2Car Kabels. Dies ermöglicht
den Anschluss einer Kram AUX Lösung zur Verwendung eines Sound System Verstärkers f.d. Musikwiedergabe und erhöht die Tonqualität.
Technische Daten
Beschreibung: CE geprüft, 3G Drive & Talk Mute-Box mit 3 DPDT Relais, Line In u. Out, Schutzdiode
und Befestigungsbohrungen.
Betriebsspannung: 10-16V DC. Verpolungschutz. Nachfolgende Werte basieren auf 12V DC.
Überspannungsschutz: Überspannungsschutz gemäß ISO 7637-2:1990 Impuls 5.
Stromaufnahme: <5 uA (Passiv) / 40 mA (Aktiv)
Schaltspannung: Aktiv : < +8VDC Passiv : > +10VDC
Max. Strom an Mute-Eingang: 3,2 mA. Aktiv, wenn geerded.
Max Strom über Zündungs-Ausgang: 1 Amp. mit Überlastungsschutz
Max. Sicherungsgrösse: 5 Amp für Konstantstrom, Zündungsversorgung ungesichert.
Max. Belastung/Lautsprecher: 90 Watt RMS / 125 Watt Musik @ 4 Ohm (3 Amp Relais)
IP Klasse: IP51
Abmessungen: 75 x 52 x 19 mm
Steckerbelegung der 16 u. 4-pol. Stecker:
Funktion der DIP Schalter:
Dip Schalter 1 = Hintere Lautsprecher Mute ein/aus. Ansicht von der Kabeleingangseite
Dip Schalter 2 = Rechter Frontlautsprecher Mute ein/aus.
Dip Schalter 3 = Linker Frontlautsprecher Mute ein/aus.
Dip Schalter 4 = Bei Stellung OFF, Abschaltzeit der Zündung wird um 5 Min. verlängert.
Installationsanleitung
Nur gültig für Software Version 5.11
1. Audio2Car Kabel gemäss Audio2Car Einbauanleitung installieren.
2. Mute-Box anschliessen. Zwischen den 24-pol. Steckverbinder des Audio2Car
Kabels mit den grünen, weissen, grauen und violetten Lautsprecher Leitungen
und den16 und 4-pol. Steckverbindern des 3G Drive & Talk Adapters einsetzen.
3. Lautsprecher, die stumm geschaltet werden, über DIP Schalter 1 bis 3
auswählen. Standardeinstellung ist: alle Lautsprecher stumm geschaltet.
4. Funktionstest durchführen. Die Freisprechanlage sollte 5-30 Sek. nach
Starten des Motors einschalten und 0-4 Minuten nach Abschalten des Motors und
Abziehen des Zünschlüssels ausschalten. Verlängert auf 5-9 Minuten wenn DIP
Schalter 4 in Stellung OFF. Siehe Schritt 5. Wenn die Freisprechanlage einschaltet,
bitte erneut Verbindung von Konstantstrom und Masse prüfen. Bei korrekter
Installation von Adapter Kabel und Audio2Car Kabel werden Anrufe je nach DIP
Schalter Stellung über einen oder zwei der Frontlautsprecher wiedergegeben.
Achtung: Wird während eines Telefonates das Fahrzeug abgeschaltet, ver-
sorgt die Zündungsquelle die Freisprechanlage weiterhin mit Strom, bis das
Gespräch beendet ist.
5. Abschaltverzögerung wählen. Die Abschaltverzögerung der Zündung kann
durch Stellung des DIP Schalters 4 in Position OFF verlängert werden. Die ver-
längerte Abschaltverzögerung wird bei Fahrzeugen mit Start/Stop Automatik
verwendet, um zu verhindern, dass die IGNI-BOX die Zündungsquelle abschaltet,
wenn das Fahrzeug angehalten wird und die rote Motor-Kontrolleuchte erlischt.
Bei Stellung des DIP Schalters 4 in Position OFF wird die Abschaltverzögerung um
5 Minuten verlängert.
Product description
“MI” 3G Drive & Talk upgrade for Audio2Car including IGNIBOX Circuitry
The “MI” item number is used to upgrade an Audio2Car solution to a Drive & Talk solution. This enables the use of Audio2Car cables
for carkits without build-in mute relays. The “MI” also includes the artificial ignition circuitry known from the Kram IGNIBOX and the
possibility to control which speakers are muted.
Speaker-function: This is achieved by using the relays in the mute-box, the radio sound is muted and the sound from the carkit is send
through the cars front speakers. This way you will achieve a perfect hand free sound without interference from the car radio. The “MI”
box includes additional mute control via the DIP switch, using the DIP switches the installer can choose which speakers are muted.
Power supply of the carkit: All 3G mute-boxes are supplied directly from the Audio2Car cable. The carkit supply is available in the 16
pin connector on the carkit side of the mute-box. The “MI” box does not need an ignition source connected as it will generate its own
when the engine is running. This way you can easily supply the carkit and cutting of the cars wiring loom is minimized.
Mute function: The mute from the carkit it connected, through a protection diode, to the yellow mute wire in the Audio2Car cable.
Aux integration: The 4 pin connector on the Mute-box has a direct connection to the 4 pin AUX connector on the Audio2Car harness.
That allows a Kram Aux solution to easily be connected. This will allow the use of the car sound system amplifier for Music playback
and thereby achieving higher sound quality.
Technical Specifications
Description: CE approved, 3G Drive & Talk mute-box with 3 DPDT relays, Line in & out, Mute series
diode and holes for zip-ties.
Voltage supply range: 10-16V DC. Protect against reversed power supply. Value below are based on a 12V DC
Load dump protection: Load dump protected according to ISO 7637-2:1990 Pulse 5.
Current usage: <5 uA (passive) / 40 mA (active)
Activation voltage: Active : < +8VDC Passive : > +10VDC
Max current supplied to Mute-input: 3,2 mA. Active when grounded.
Max current supplied by Ignition output: 1 Amp. Overload protected.
Maximum Fuse size: 5 Amp for constant supply, Ignition supply fuse not used.
Maximum output pr. speaker: 90 Watt RMS / 125 Watt music power @ 4 Ohm (3 Amp relays)
IP class: IP51
Size: 75 x 52 x 19 mm
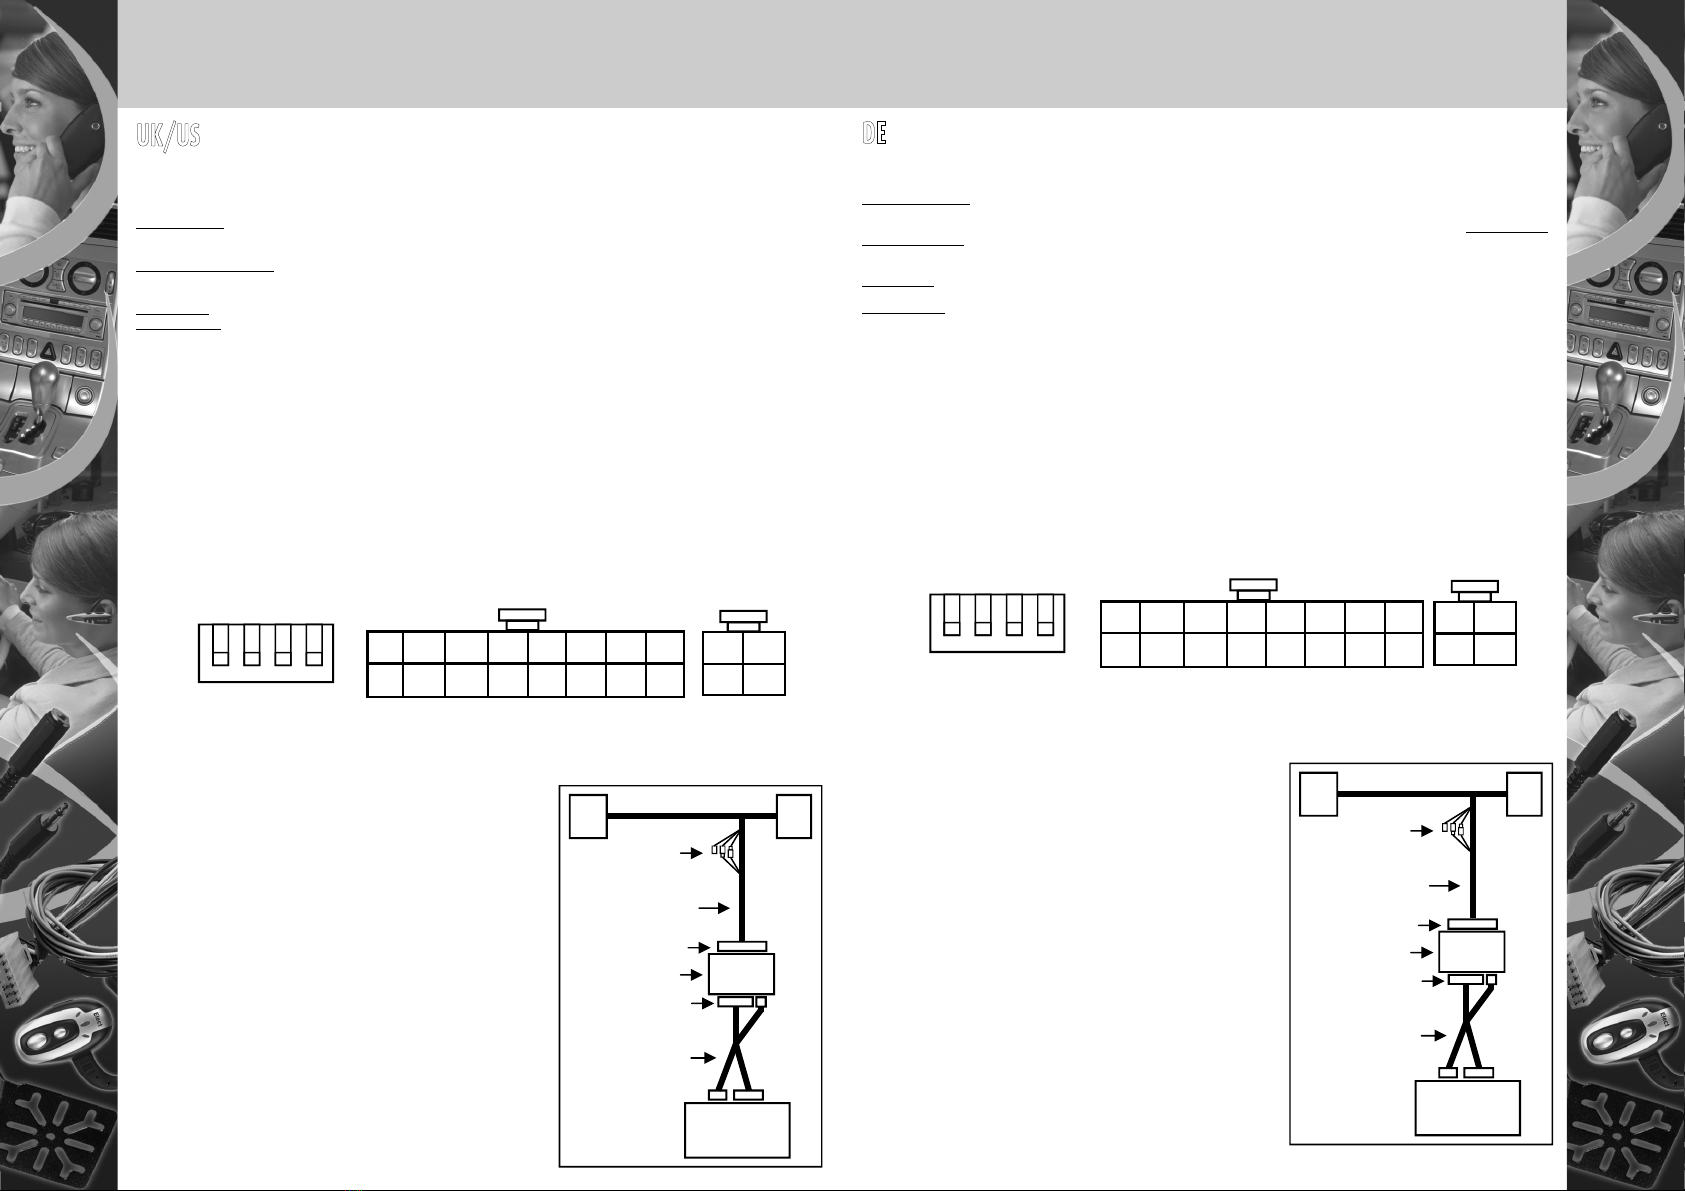
Configuration chart for 16 & 4 pin connector:
Function of DIP switches:
Dip switch 1 = Rear speaker mute on/off. Connectors seen from cable entry side
Dip switch 2 = Right front speaker mute on/off.
Dip switch 3 = Left front speaker mute on/off.
Dip switch 4 = When switched to OFF Ignition switch off time is extended by 5 minutes.
Installation description
Valid only for version 5.11 Software
1st: Install the Audio2Car cable according to the Audio2Car instruction sheet.
2nd: Connect the Mute-box. Between the 24 pin connector from the Audio2Car
cable with the green, white, gray, and purple speaker wires and the 16 pin and 4
pin connector from the 3G Drive & Talk adaptor.
3rd: Select which speakers are muted using the dip switches 1 to 3. Standard
setting is all speakers muted.
4th: Make a function check. The carkit should turn on within 5-30 sec. after the
engine is started and should turn off 0-4 minutes after the engine is turned off and
key is removed. Extended to 5-9 minutes if the dip switch 4 is set to off. See step
5. If the carkit does not turn ON please recheck connection of Constant 12v and
ground supply. When the carkit, adaptor cable and Audio2Car cable is installed
correctly it will redirect your call through one or two front speakers depending on
the dip switch setting. Note: If a call is in progress when the car is turned off
the ignition source will be kept ON until the call has ended.
5th: Choose switch off delay. The ignition switch off delay can be extended by
setting dip switch 4 to Off. An extended switch off delay are used for cars with
automatic engine start/stop system to avoid the IGNI-BOX turning off the ignition
source when the car is stopped at a red light with the engine turned off. When Dip
switch 4 is switched Off the turn off delay is extended by 5 minutes.
For further information about installation of the carkit please see the Audio2Car
installation sheet and the carkit installation guide.
Drive & Talk
The professional mute
Drive & Talk
The professional mute
3G D&T Adaptor
Item number DAxxx
Carkit
24 pin Connector
Audio2Car Harness
Item number 84xxx
Bullet Connectors
MI
16 & 4 pin Connector
3G D&T Mute-box
3G D&T Adapter
Artikelnummer DAxxx
Carcit
24-poliger Stecker
Audio2Car Kabel
Artikelnummer 84xxx
Rundstecker
MI
16- u. 4-pol. Stecker
3G D&T Mute-box
Input
LF+
Input
RF+
12V
Ign.
12V
Const.
Input
LF-
Input
RF-
Mute
in
Mute
out
Gnd
Line in
Right -
Line in
Left -
Line in
Right +
Line in
Left +
1 2 3 4
OFF
ON
Input
LF+
Input
RF+
12V
Ign.
12V
Const.
Input
LF-
Input
RF-
Mute
in
Mute
out
Gnd
Line in
Right -
Line in
Left -
Line in
Right +
Line in
Left +
1 2 3 4
OFF
ON