DS18 HYDRO MRX1 User manual

MRX1
owner’s manual
MRX1
POWERSPORTS & MARINE
MULTIMEDIA RADIO
POWERSPORTS & MARINE
MULTIMEDIA RADIO

OPERATION:
Turn on/off the unit:
Press on/off button to turn on the unit. When the unit is on. Press and hold it for
2 seconds to turn off the unit.
Sound and setting adjustment:
Shortly press VOL knob for the audio menu:
BAS->TRE->BAL->FAD->EQ->LOUD
Press and hold VOL knob for 2 seconds for the setting menu:
SUB-V(20~0) -> SW(80HZ/120HZ/160HZ)-> CLK HH -> CLK MM ->
CT(indep/sync) ->CLOCK(12/24)->
BEEP(on/off)->P_VOL(17)->AREA(USA/EUR)->DX/LOC->ST/MONO
In each item rotate the VOL knob to set them.
EQ: To select the preset EQ as below: FLAT->POP->ROCK->CLAS->EQ OFF.
LOUD (on/off): Turn on/off the loudness function.
SUB-V (20~0): Subwoofer volume adjustment.
SW (160Hz/120Hz/80Hz): Subwoofer Low Pass Frequency selection.
CLK HH/CLK MM: To adjust the hours and minutes of the clock.
CT (INDEP/SYNC):
CT INDEP: The clock works independently.
CT SYNC: The clock will be synchronized to the received RDS station’s time.
Note: When the time was set by manual. The CT will back to INDEP
mode automatically.
CLOCK 24/12: Setting the time to 24H or 12H format.
BEEP (on/off): Turn on/off the beep sound.
P-VOL (Preset VOL): Setting the power on volume. If the volume at shutdown is
small than the P-VOL value. Next time turn on the unit, the volume will be
maintained at shutdown volume. If the volume at shutdown is greater than the
P-VOL value. Next time turn on the unit the volume will be restored to the
P-VOL value.
AREA (USA/EUR): Choose America or Europe region frequency.
DX/LOC (Distance/Local):
LOC: Receive the strong signal station only in seek station.
DX: Receive strong and weak signal station in seek the station.
STEREO/MONO:
STEREO: Receive FM stereo signal.
MONO: Change FM stereo to monochrome. It can reduce the noise when the
signal is weak.
Display the clock or information
Shortly press CLK button to show the clock or information.
Reset the unit
Press and hold dk button for 5 seconds to reset the unit.
Note: When RESET function is activated, all the memories will be lost.
MUTE on/off operation
In RADIO/AUX source press dbutton for MUTE on/off function. In USB/BT
source press dk button for Pause/Play function.
Radio Operation
Receive a radio station
Press SRC button to select RADIO mode. Then press BAND button to select a
band. Shortly press e/fbutton to receive the desired radio station. Press
and hold e/f button for manual tuning the frequency.
Manually store station
Receiving a desired station. Press and hold the PRESETS button for 2 seconds.
It shows “SAVE P1”. Rotating VOL knob to select P1~6 then press VOL
button. The station will be saved.
Listening to the memory station
Shortly press the PRESETS button then rotating VOL knob to select the presets
1-6 of current band.
Auto store station
Press and hold BAND button to auto store stations to numeric buttons 1-6 of
band 1~3.
USB Operation
When an USB driver inserted to the unit, the unit will play the MP3/WMA file
automatically. If an USB drive is already inserted in the unit. Keep pressing SRC
button shortly until the USB mode display appears.
Select file
Press e/f button to skip to next/previous file. Hold e/f button to fast
forward or fast reverse.
Play/Pause
Press dk button to pause/play the playing.
DIR+/DIR- function
Shortly press PRESETS button for 1 time. It shows DIR-SCH. Rotating VOL
knob to select another directory to play.
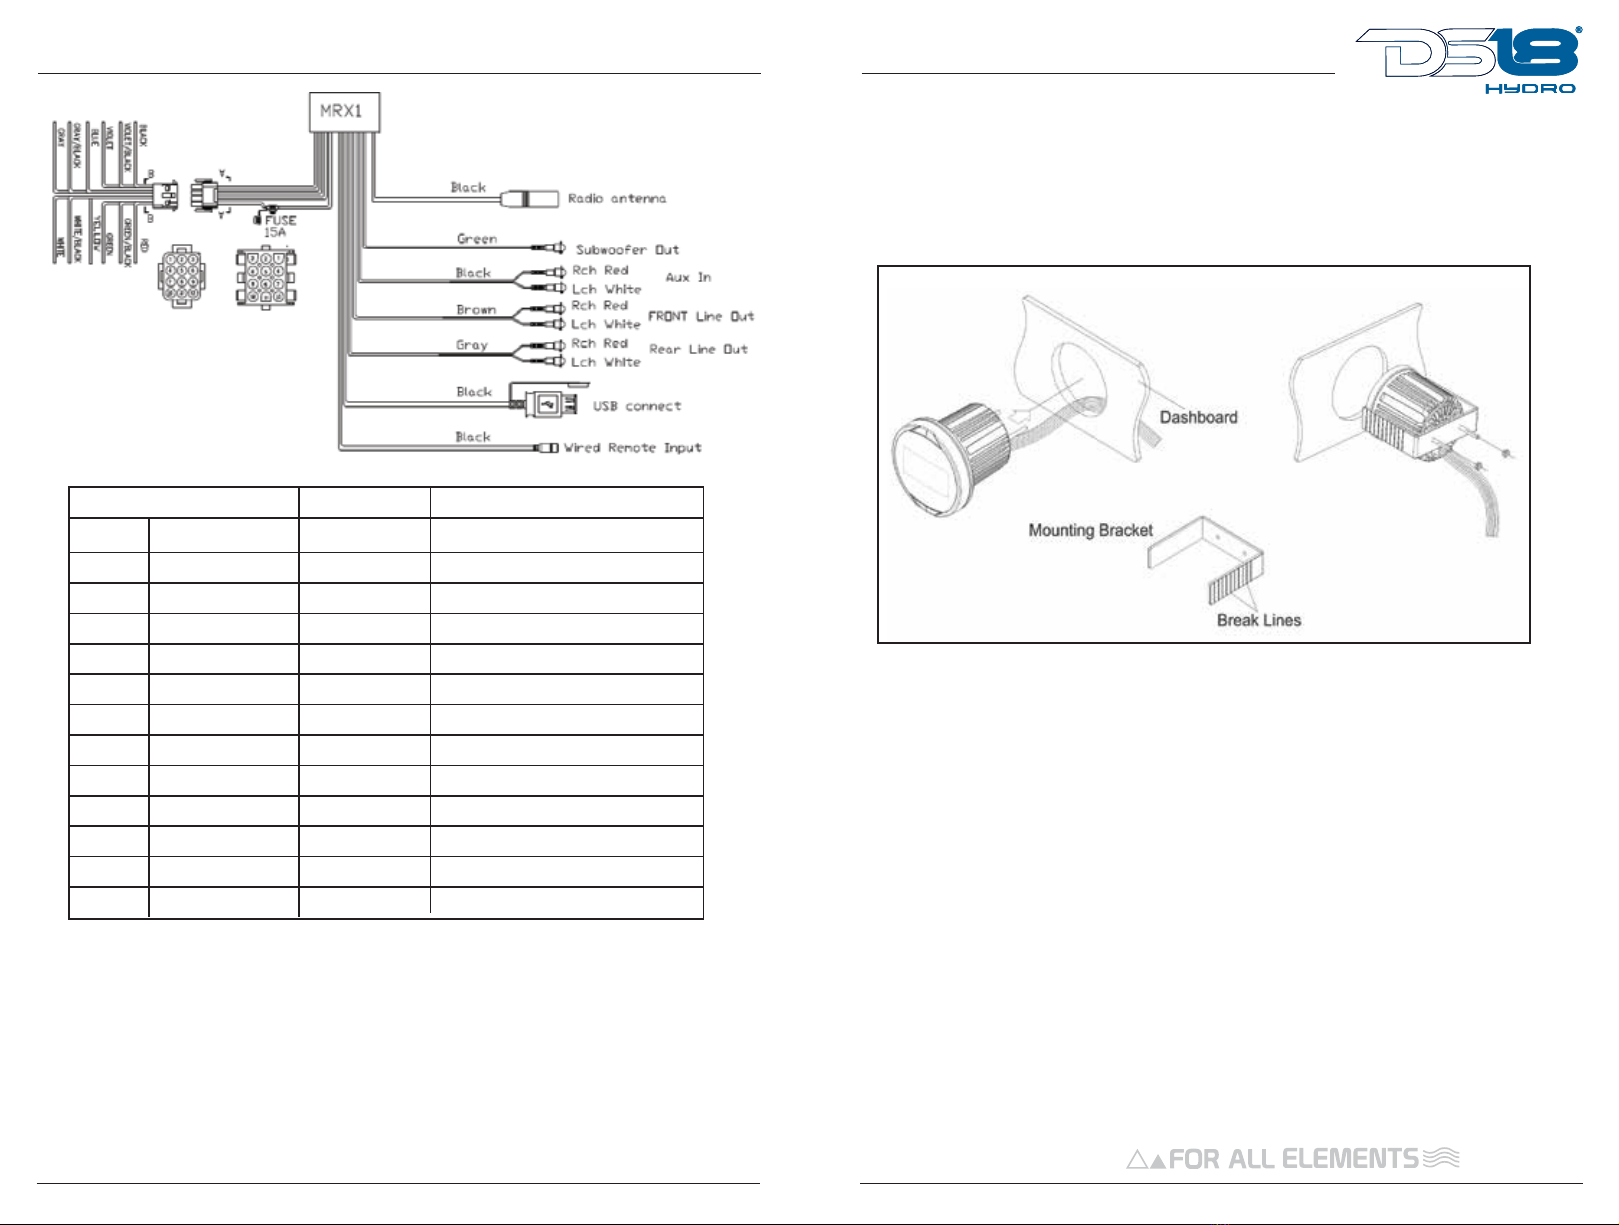
MRX1

KEY FUNCTION
MEASUREMENTS
1.POWER/SRC BUTTON
2.LCD DISPLAY
3.PRESETS BUTTON
4. SEEK UP BUTTON
5.VOL BUTTON
6. BAND BUTTON
7. DISP BUTTON
8. SEEK DOWN BUTTON
9.PLAY/PAUSE BUTTON
Search song
Shortly press PRESETS button for 2 times. It shows NUM-SCH. Rotating VOL
knob to enter numbers. Press VOL knob to play.
RPT (ALL/ONE/FOLD)
MP3/WMA playing, Press and hold PRESETS button for 2 seconds, it shows
“RPT ALL”. Rotating VOL knob to select RPT ALL/RPT ONE/RPT FOLD.
RDM (ON/OFF)
MP3/WMA playing, Press and hold PRESETS button for 2 seconds, then
shortly press it again. It shows “RDM OFF”. Rotate VOL knob to select RDM
on/off.
Back to play the 1’st song
MP3/WMA playing, Press and hold BAND button. It will play the 1’st song of
the USB.
AUX IN operation
Connecting the audio signal to the R/L IN connecter behind the unit. Then
pressing SRC button to switch to AUX mode.
Bluetooth Operation
Pairing
On mobile phone, select the Bluetooth item searching the Bluetooth device.
“DS18-MRX1” should appear in the list, select “DS18-MRX1” and then input
password “0000” If it needs a password. When successful paired, the BT
symbol will be shown on LCD.
Bluetooth Audio
Press SRC button to switch to BT mode. It will play a song of your mobile
phone automatically. Press dk key to pause/play the song. Press e/f
button to select next/previous song.
Disconnect the Bluetooth
In AUX/BT source. Press and hold DISP button for 2 seconds to
disconnect/re-connect the Bluetooth.
2.99”/74mm
Ø3.12”/79.5mm
0.81”/20.8mm
Ø4.52”/115mm
MRX1
POWERSPORT & MARINE
MULTIMEDIA RADIO

1. This player can only be used by the 12V DC cathode grounding electrical
system.
2. Do not connect the terminals of the battery until the player is absolutely with
wellerection joint
3. Please make sure to connect the yellow wire to the positive of the battery (+).
4. When change the fuse. Please make sure the specifications are same.
5. Using good quality speaker with 4-8 ohm can result in the best effect of the
equipment
WIRING CONNECTION
1. This player should be installed by professional technician.
2. Please read the instruction and operation of equipment carefully
before installing.
3. Make sure to connect first the other wires before power connection.
4. To avoid short circuit. Please make sure all the exposed wire is
insulated.
5. Please secure all the wires after installation.
6. Please make connection to the player accordingly to this instruction
manual. Wrong connection may cause damage.
7. This player is only for 12V DC electric systems and please make sure
your vehicle or boat belongs to this kind of cathode grounding electri-
cal system.
8. Please connect the wires rightly. Wrong connection will cause
malfunction or damage the electrical system.
Once a suitable location has been determined, drill the hole and secure the
stereo using the metal mounting bracket. If the bracket needs to be shortened,
remove the appropiate number of breakaway segments using a pair of pliers
INSTALLATION
PIN NO.
WIRE INSERTION VIEW. SECTION A-A. SECTION B-B
WIRE COLOR. WIRE SPEC DESCRIPTION
1.
2.
3.
4.
5.
6.
7.
8.
8.
10.
11.
12.
GREEN
GREEN/BLACK
RED
WHITE
WHITE/BLACK
YELLOW
GRAY
GRAY/BLACK
BLUE
VIOLET
VIOLET/BLACK
BLACK
20# AWG
20# AWG
20# AWG
20# AWG
20# AWG
20# AWG
20# AWG
20# AWG
20# AWG
20# AWG
16# AWG UL
16# AWG UL
LEFT REAR SPEAKER (+)
LEFT REAR SPEAKER (-)
ACC (+12V)
BATTERY (+12V)
LEFT FRONT SPEAKER (+)
LEFT FRONT SPEAKER (-)
RIGHT FRONT SPEAKER (+)
RIGHT FRONT SPEAKER (-)
RIGHT REAR SPEAKER (+)
RIGHT REAR SPEAKER (-)
GROUND
POWER AMP REMOTE TUNER ON
MRX1

Before going through the checklist, check wiring connection. If any of the problems
persist after checklist has been made, consult your nearest service dealer.
FEATURES TROUBLE SHOOTING
MRX1
GENERAL
Power Supply Requirements : DC 12 Volts, Negative Ground
Chassis Dimensions : 115(W) x 115 (D) x 74(H)
Tone Controls
- Bass (at 100 Hz) : ±10 dB
- Treble (at 10 kHz) : ±10 dB
Maximum Output Power : 4 x 40 watts
RMS continuous power : 4 x 15 W @ 4 ohm
4 x 20 W @ 2 ohm
Current Drain : 10 Ampere (max.)
RADIO FM AM
Frequency Coverage USA: 87.5 to 107.9 MHz 530 to 1710 kHz
EUR: 87.5 to 108 MHz 522 to 1620 kHz
IF 10.7 MHz 450 KHz
Sensitivity 4μV(S/N=30dB) 36dBuV(S/N=20dB)
Stereo Separation >25dB /
Symptom
No Power
No Sound Volume is in minimum
The fuse is blown Replace the fuse
Adjust volume to a
desired level
Wiring is not properly
conneted
The opperation keys do
not work
The radio does not work.
The Redio Station automatic
selection does not work.
The built-in microcomputer
is not operating properly
due to noise
The antenna cable is not
connected
Insert the antenna cable
Firmly
Select station manuallyThe signal are too weal
Press the reset button
Check wiring connectionl
Thw car ignition switch
is not on
If the Power supply is
connected to the car
accessory circuits, but
the engine is not moving,
awitch the ignition
key to “ACC”
Cause Solution
Table of contents