Dukane MPS2 User manual

Mobile Presentation System
MPS2
Touch Panel Control
User’s Manual
Audio Visual Products
#401-MPS2-01

2MPS Users Manual

3
MPS Users Manual
User Manual - Mobile Projection System with
Interactive Touch Panel Control
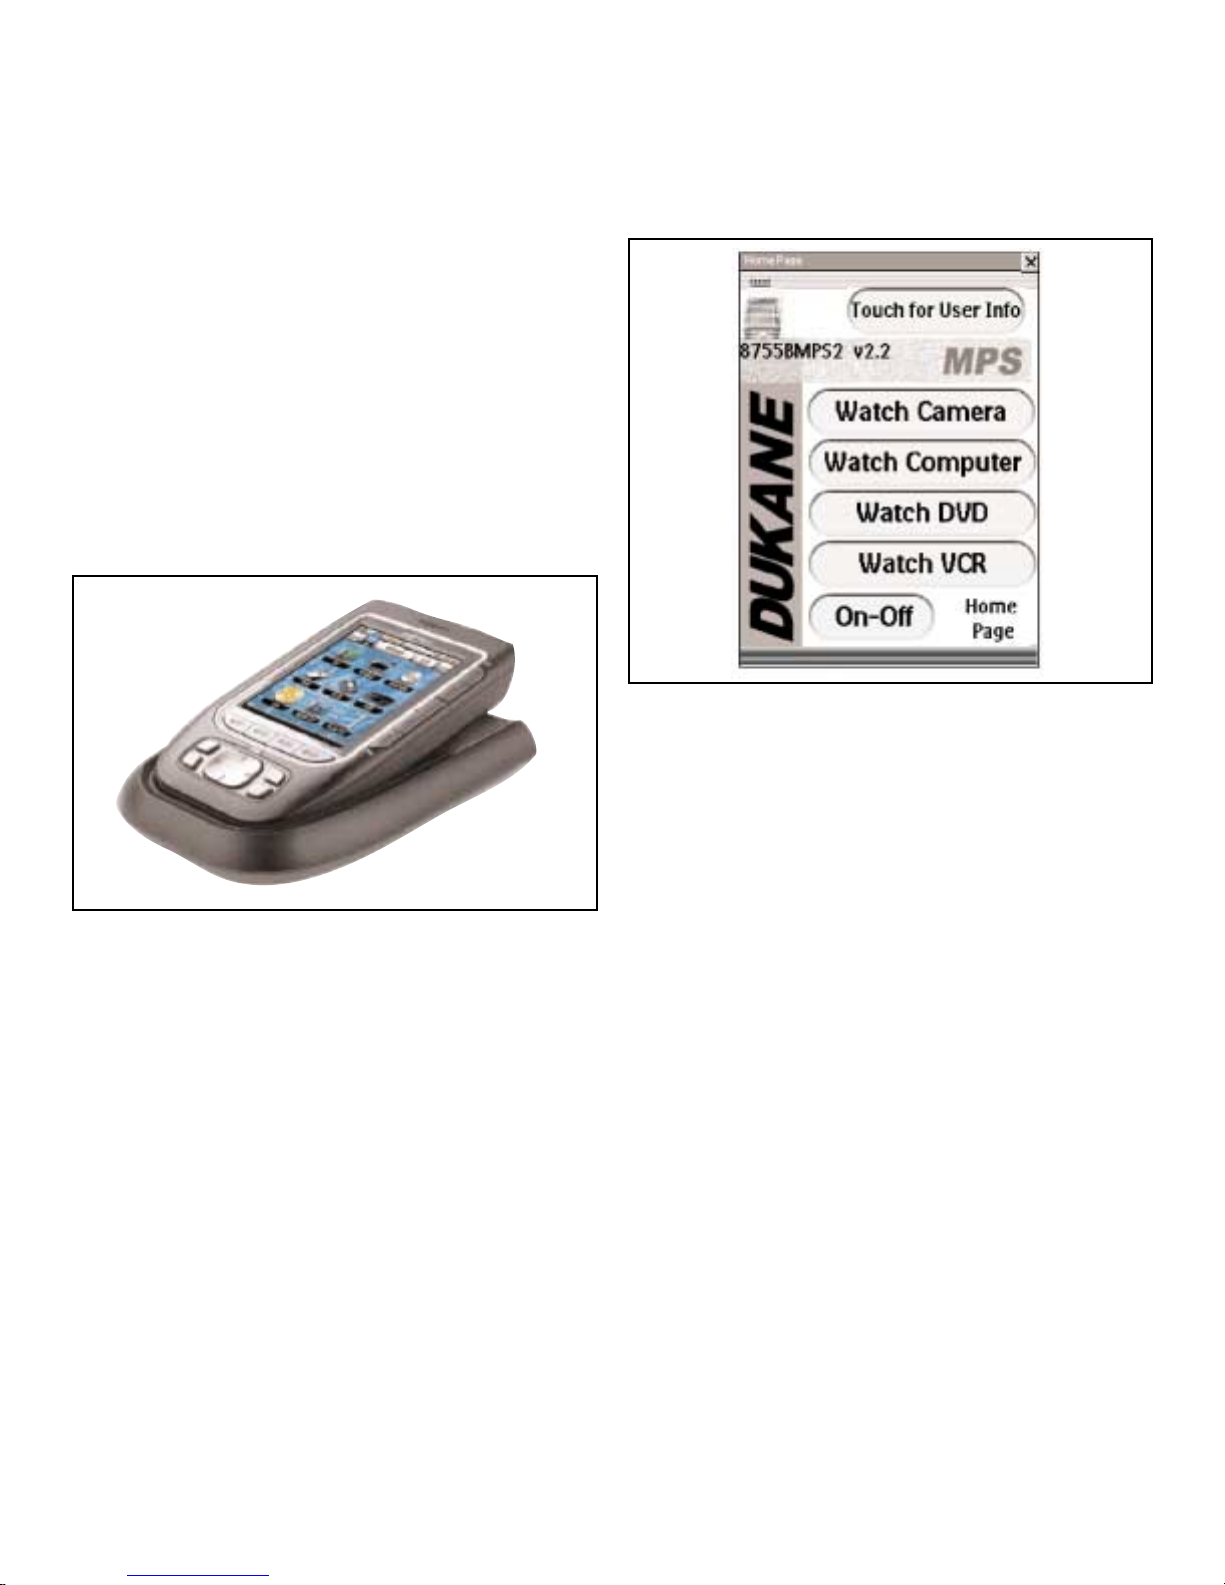
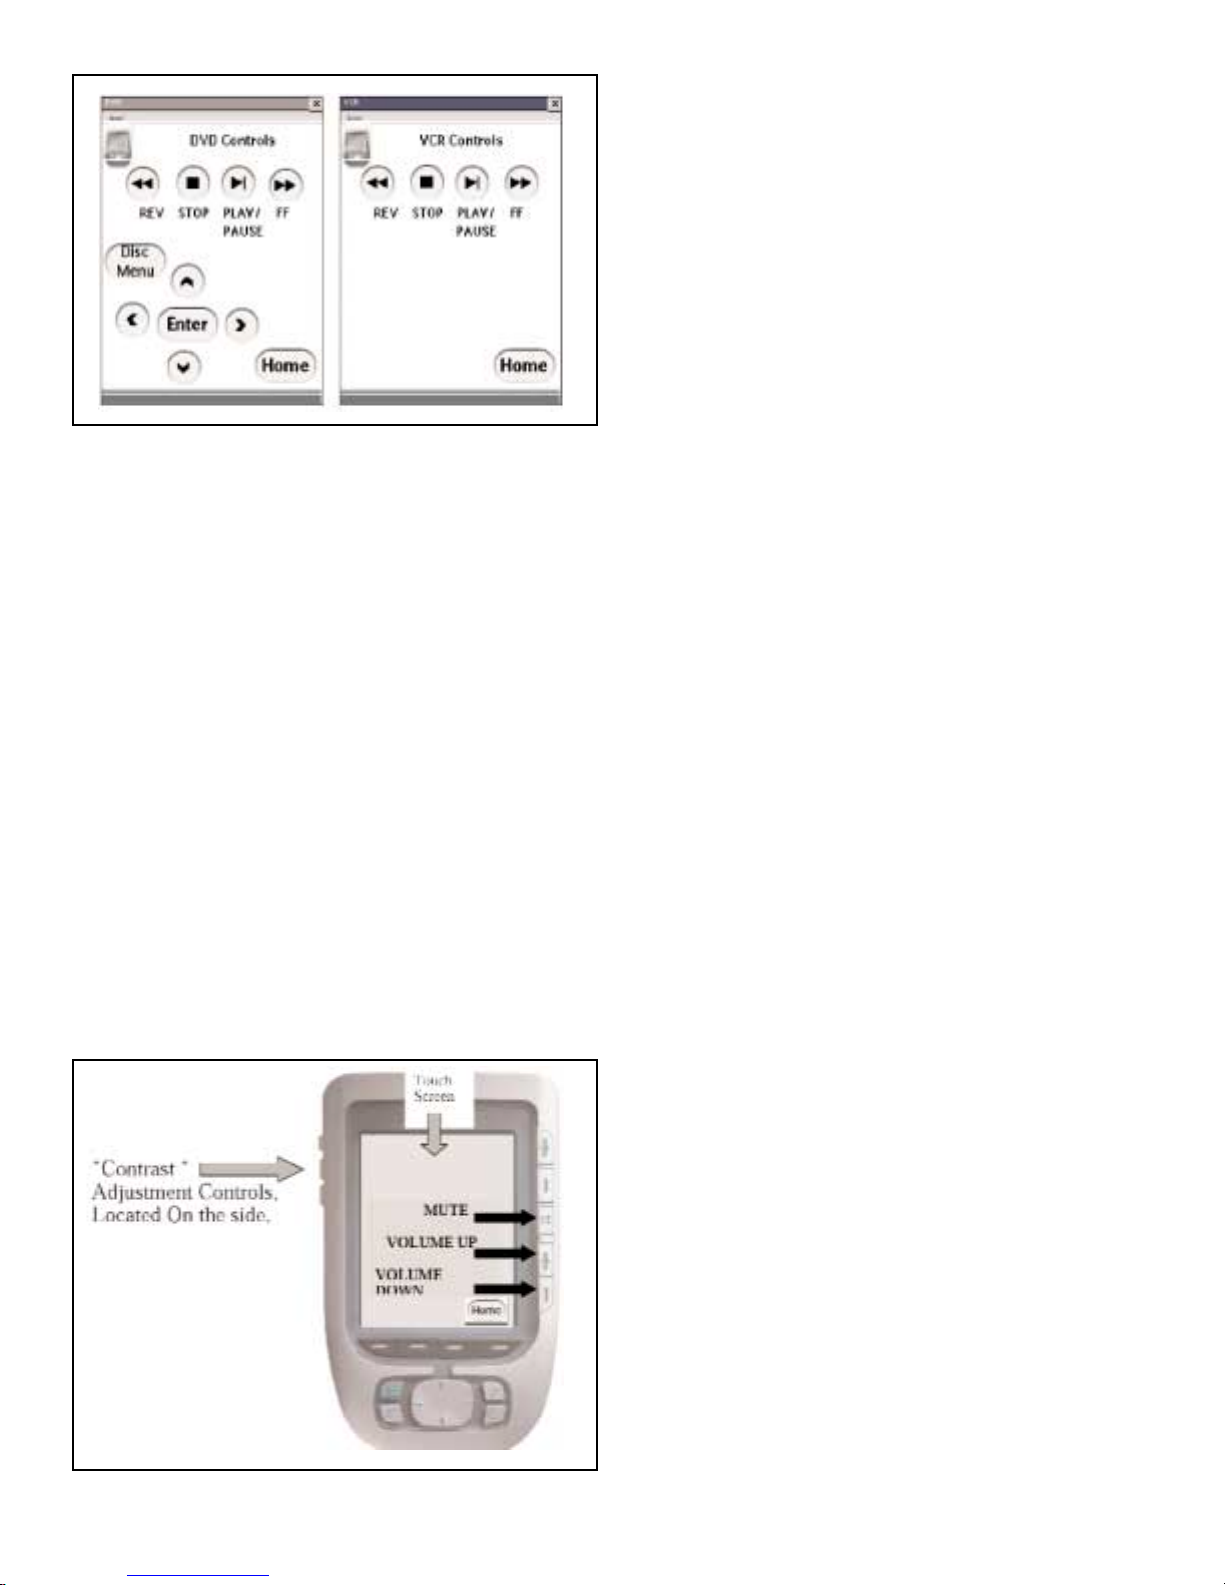
Universal Interactive touch panel
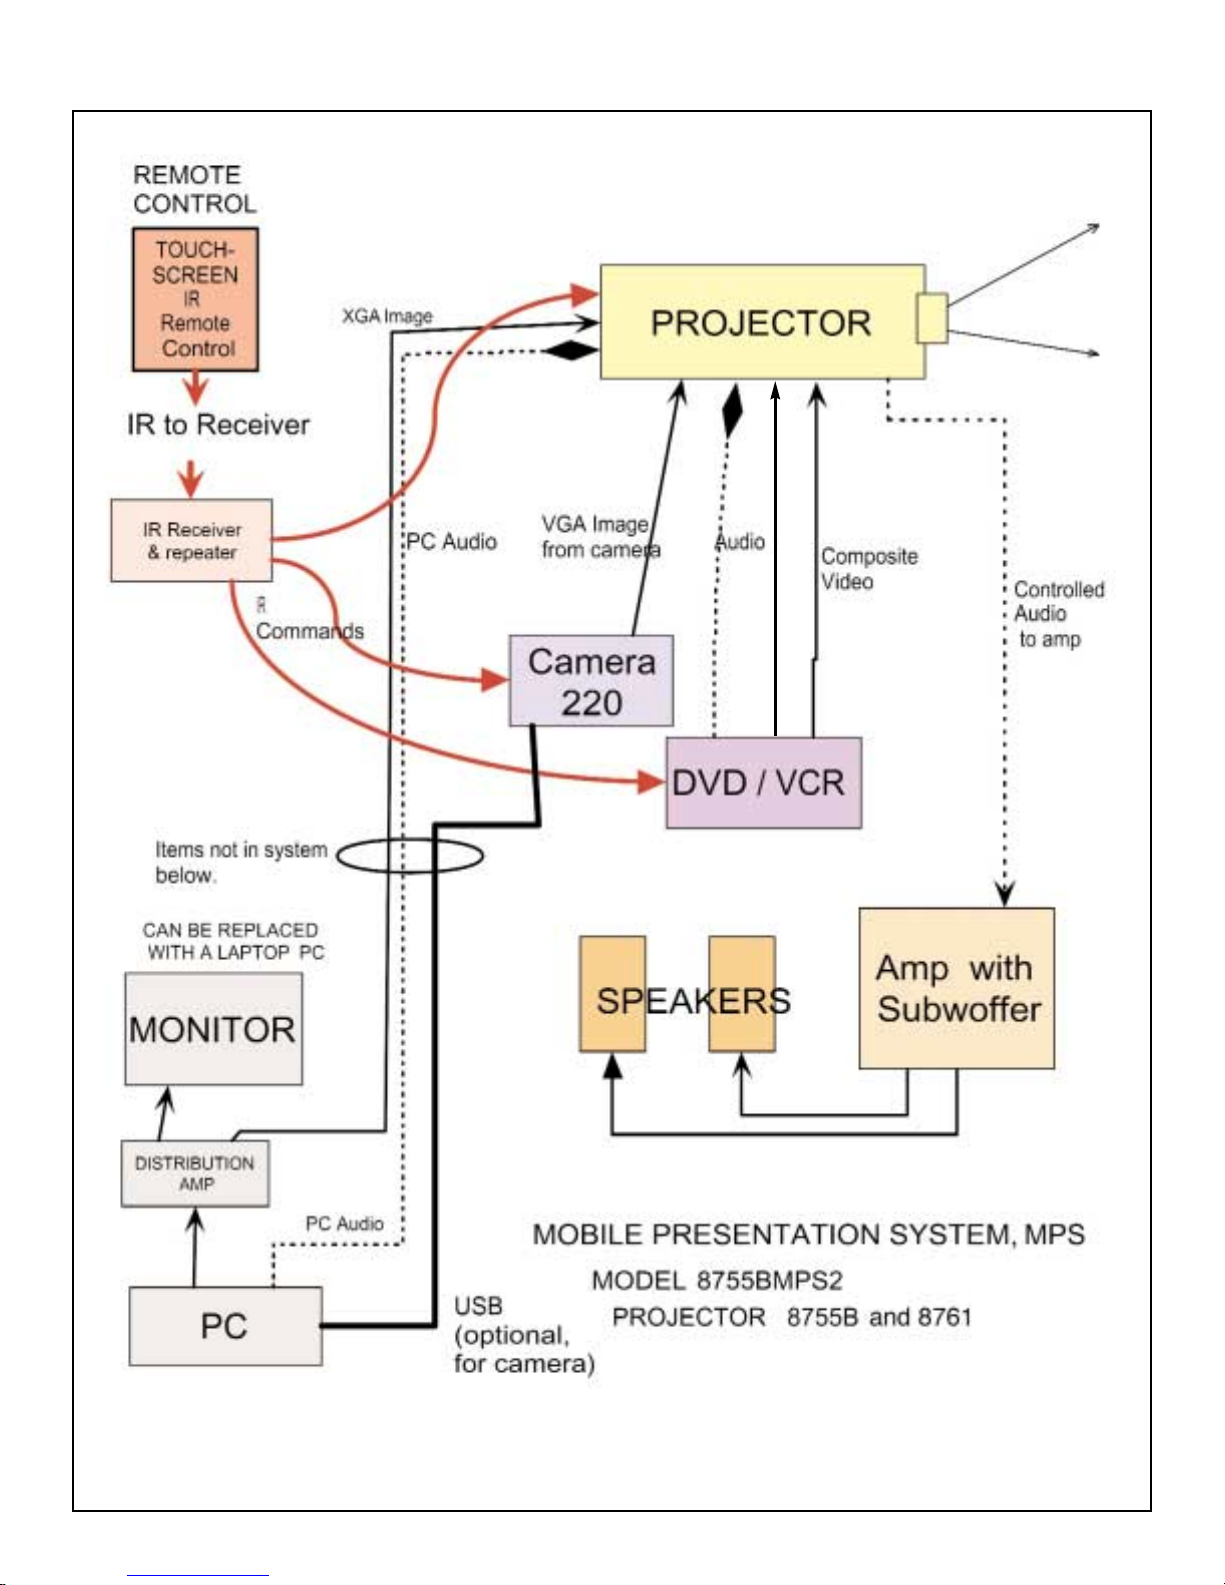
The multimedia Mobile Projection System has
been equipped with a special IR (infrared) receiv-
er system that detect the command signals from
the hand held interactive touch panel control and
relays them to the projector, DVD-VCR, camera
and other devices. The detector for this system is
located in the front panel under the tilting projec-
tor plate. The detector receives the IR signals that
may be reflected from the screen or other items
before the cart.
The system depending on the model may also
have a universal interactive touch panel control
such as the Philips Pronto. This interactive touch
panel come fully programmed for operation of the
Mobile System. This means the interactive touch
panel has the unique command code for the
devices on the cart. The model of the system and
the software version is indicated on the "Home"
page of the interactive touch panel. The interac-
tive touch panel, shown in Figure 1, comes with a
docking station and internal rechargeable
batteries.
General operation
The interactive touch panel control and docking
station are included inside the cart drawer.
Remove and place them on the top plate with the
dark edge side facing toward the screen. The IR
signals are emitted through the dark plastic
window on the front of the interactive touch panel
control. The interactive touch panel can be oper-
ated in the docking station or hand held simply
pointed toward the screen. While in the docking
station the batteries are being automatically
recharged so when removed it is fully charged.
Operation of the MPS
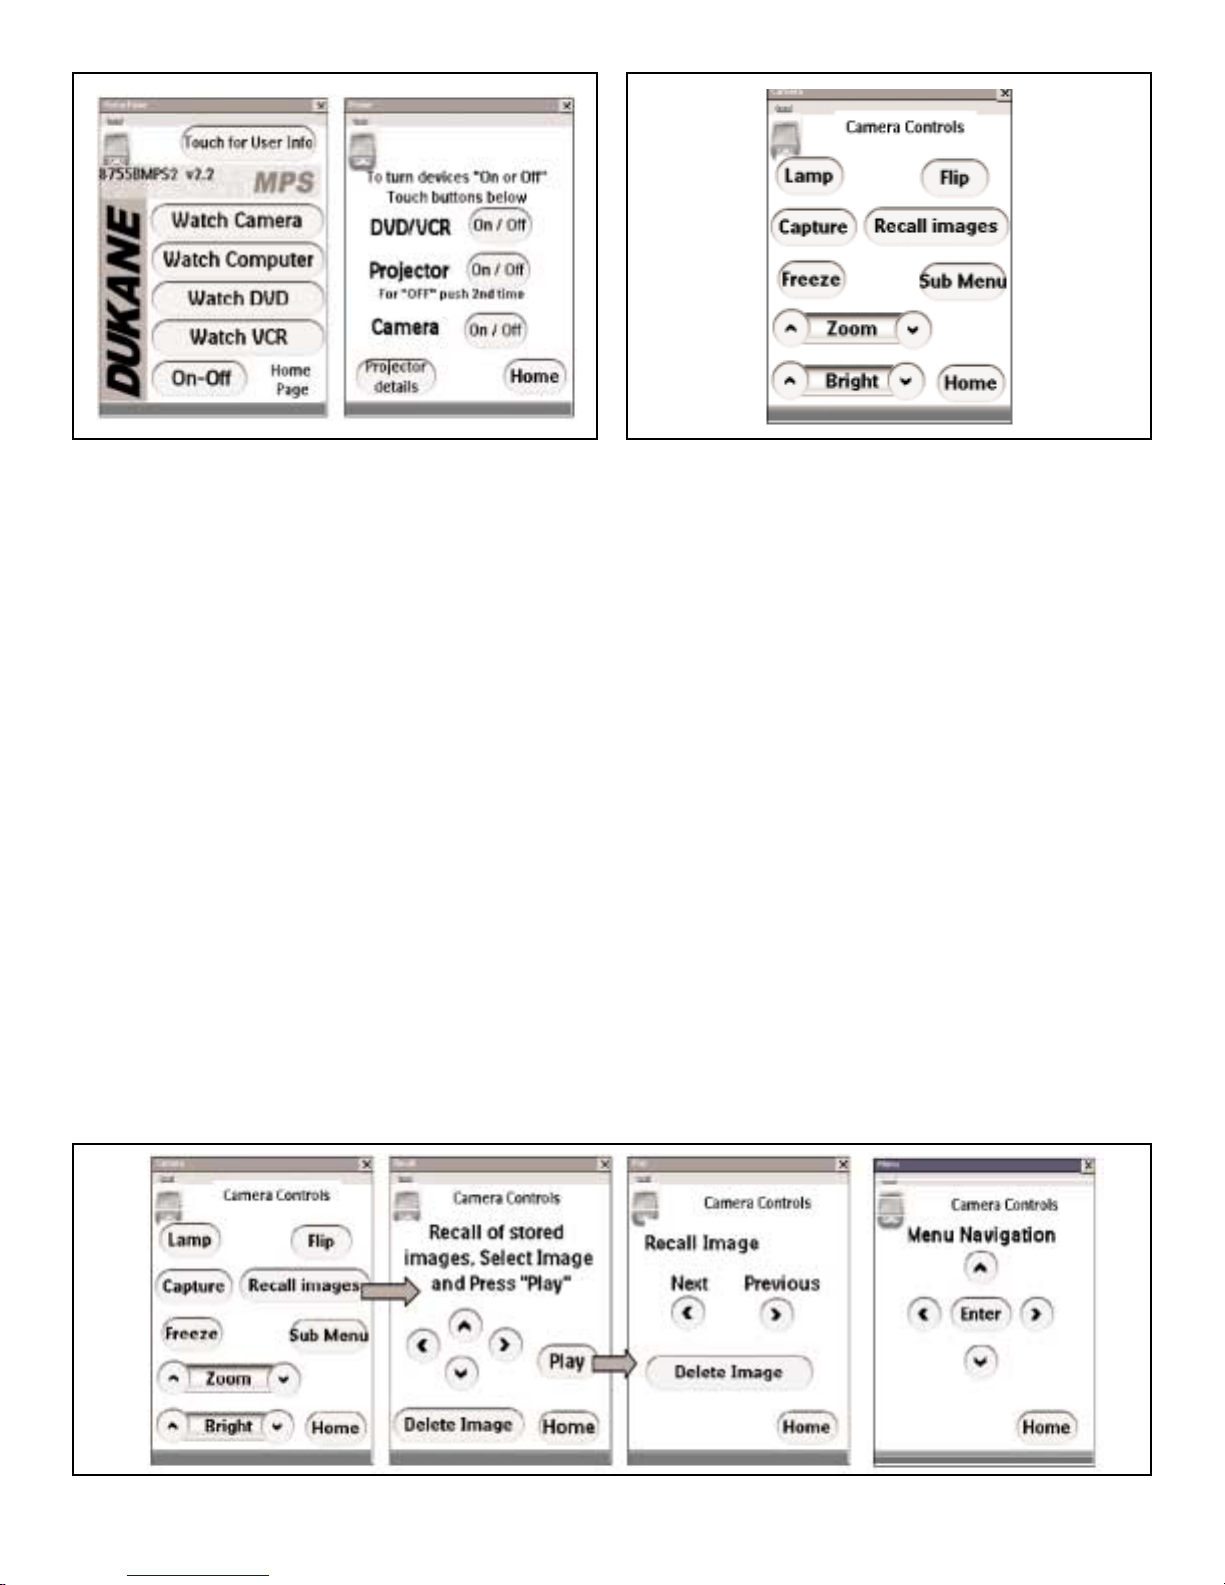
To turn ON the system simply touch the "On/Off"
button on the panel. The next page, Fig 3, will
then appear with special buttons to turn ON each
device. Touch each of these buttons. It will take
about 15 seconds for the projector to respond
and start its lamp. If the projector control lights
are ON it is in the warm-up process. Should
something not start, the command can be issued
again, however, if it was ON it may be turned Off.
The buttons send the same command for ON or
OFF. Next go back to the Home page by touching
the "Home" button in the lower right.
Please note that a page will disappear after
about 45 seconds if no actions are taken. This is
to conserve battery life. Touching the panel or
pushing any button will activate the panel image.
The touch panel will also beep indicating a
command has been received.
Fig.1. Touch Panel in Docking Station
Fig.2. HOME PAGE

4MPS Users Manual
The projector should now be operating /and
an image visible on the room projection screen. It
may be necessary to adjust the projector tray
angle, focus, and zoom settings.
With an image on the screen the device of
interest can be selected by touching the "Home"
button. The "Home Page" then appears and the
device to view can be selected by touching the
"Watch -------" button.. A control page for that
device then becomes visible.
Camera Operation
The "Camera" control page is shown in Fig 4. The
controls permit operation of the first level camera
functions. For the camera there is a second page
of controls for the stored images. This page
appears when the "Recall images" is touched.
The next page contains the buttons to select
the image to be played full screen (by touching
"Play") or deleting the image. This is followed by
the "Play" page, which lets you select the previ-
ous or next image in the thumbnail array, or you
can delete the image.
The relation of the pages is shown in Fig 5
where the sequence of pages is indicated. To
return to prior pages use the lower right "Home"
touch button.
DVD-VCR Operation
The controls for these devices appear when the
appropriate button is touched. When watching
the DVD or VCR and the "Home " button is
touched a STOP command is sent to the player.
This hauls the DVD or tape at the present loca-
tion. It permits you to return to the same location
when you again select the device. Fig 6 shows
these control pages.
Fig.3. Home and ON/OFF pages. Fig.4. Camera Home Page
Fig.5. Camera control pages.

5
MPS Users Manual
Sound – Volume Control
The touch panel controls for volume are the lower
right side plastic buttons marked with "+" and "–"
as shown in Figure 7. Push or hold down the vol-
ume buttons. The middle button is the mute con-
trol. Repeated pushing will change from ON to
the OFF mute state. For some projectors this may
also blank the image producing a dark screen
with no sound present.
Another volume control is located on the shelf
in the cart. It can be used to set the overall vol-
ume range and the bass level.
Setting Contrast for the Interactive
Touch Screen
To modify the contrast look at the buttons located
on the left side of the Touch Panel. Hold the
"Contrast" button down and at the same time
press the "+" or "-" buttons to adjust the level. The
lowest contrast level will make the image almost
disappear.
Shutting Off the System
To turn OFF the system go to the "Home" page
and touch the "On-Off button. This recalls the
page with the three "On-Off" buttons for the
devices. Touch the desired buttons. For the pro-
jector an on screen message will appear indicat-
ing that the projector button must be touched a
second time to confirm the OFF command. This
is done to avoid unintentional shutdown since the
projector may require a 2 minute cool down
before it can be restarted.
Special Setup – Clock
The interactive control has been fully pro-
grammed to operate with the projection system.
The only modification may to set the clock for a
specific time zone. This is possible by following
the "Setting Time and Date" instructions in the
remote control "Users Guide."
Care must be taken to avoid other modifications
of the program. Should the program become cor-
rupted and errors detected, a replacement pro-
gram is available. Contact Dukane.
Correcting operation
If a command does not seem to function or if lost
in the menu structure, touch the "Home" button at
the lower right on the screen. Maybe the IR out-
put from the remote did not reach the receiver.
Also, the system may have been busy working on
a prior command. This may require a command
to be repeated.
The camera must fully complete a task, such as
display the entire thumbnail images, before it can
receive another command.
Fig.6. DVD and VCR pages.
Fig.7. Control buttons on panel.

6MPS Users Manual
No Image from the Projector
VCR - Check that the VCR is not on a blank tape
section at the front or rear of the tape.
DVD- Check that you are not on a blank area of
the DVD. Press the "Device Menu" button
to get the DVD disc menu.
Computer- Check to see that the computer is
connected and set to output an
image. Usually the "Fn" and the "F5"
keys need to be simultaneously
pushed to change the computer
image output state on a laptop.
Camera- Check to see if camera is on. Turn the
camera light OFF – ON to confirm state.
Control of the Projector
The special projector control menu can be
accessed using the "Projector Details" button on
the "On / Off" or Power page. The pages shown
in Fig 8 indicate the operational options. The
detailed control of the projector is described in its’
operating manual. The projector’s "on screen"
menu permits special setup type adjustments that
are not routinely preformed. Use the "Home" but-
ton to return to your starting point.
Fig.8. Special Projector controls.

7
MPS Users Manual
Mobile Presentation System wire diagram.
S-Video

Audio Visual Products
2900 Dukane Drive
St. Charles, Illinois 60174
www.dukcorp.com/av
Toll-free: 800-676-2485
Fax: 630-584-5156
Audio Visual Products
#401-MPS2-01
Table of contents
Other Dukane Projector Accessories manuals