1 Preparing the satellite dish
1
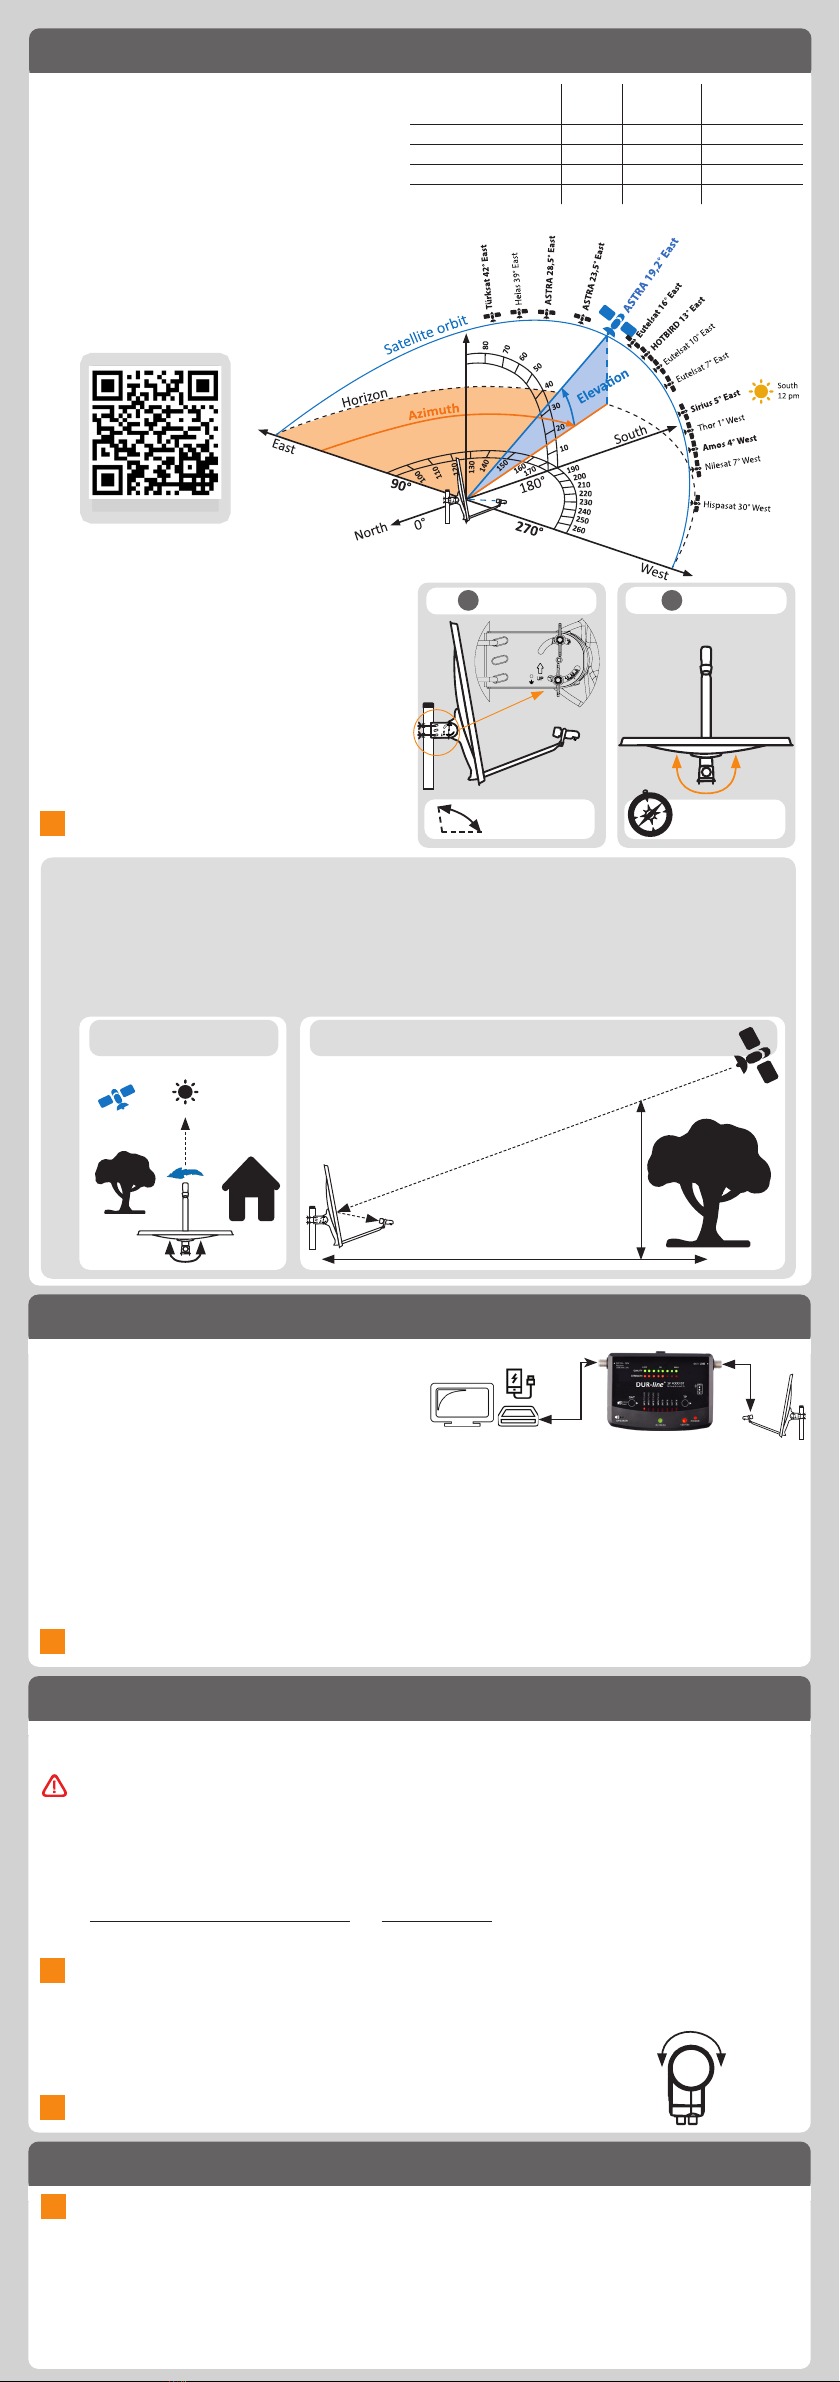
Step 1: Determine the angle of the
satellites
It is necessary to know the approximate
posion on the horizon in order to quickly
align the antenna to the correct satellites.
For this purpose, either use
the easy online calculator at
www.durline.de/tools/satcalc.html
or scan the following QR code.
Or:
Step 2: Roughly posioning the
satellite dish
You now need to align the antenna towards the
direcon in the sky
where the satellite is
expected.
Elevaon angle: Using the antenna
scale (back part)
Azimuth angle: align by compass
(E.g. smartphone/Sainder)
The dishes on neighbouring roofs
should serve as a guide.
2 Start using the satellite nder
2.1 Connect the Sainder to the LNB
Use the coaxial cable that was included with the
product –
Connect “LNB” to the LNB output
2.2 Connect the receiver/power supply (receiver is o)
Connect the (Receiver-) supply cable to the le connecter
2.3 Switch on the receiver/power supply
The receiver now takes over the Sainder power supply – Sainder starts, several LEDs
illuminate and Bluetooth is acvated.
2.4 Selecng desired satellites on the Sainder (if necessary, press “SAT” buon)
8 satellites are pre-programmed. By pressing the “SAT” key, the next “SAT” posion is selected (LED1-8).
On the reverse side of the Sainder there is a mapping of SAT posions and satellite names. Astra 19.2°
is acvated on start-up.
Depending on the LNB type and its amplicaon oset, it may be the case that up to 4 STRENGTH LEDs
are already illuminated even though a satellite has not been located.
3 Adjust the satellite dish more precisely
3.1 CAREFULLY turn the satellite dish le and right –
take into account the LED display and buzzer volume
Turn SLOWLY
When the antenna is roughly aligned, and a satellite is received, the STRENGTH LEDs will illuminate.
The more illuminated LEDs, the stronger the signal is.
When the QUALITY LEDs also illuminate, the correct satellite is received. When only the STRENGTH LEDs
illuminate, the incorrect satellite has been located.
3.2 Carefully turn AND lt the antenna unl you have moved it into the opmum posion
If STRENGTH cannot be further enhanced and all QUALITY LEDs are illuminated, the antenna is
opmally aligned.
Depending on the antenna size it is possible that not all STRENGTH LEDs illuminate. This is normal, as
for very large antennae reserves must be available.
On the contrary, all the QUALITY LEDs should illuminate when the antenna is opmally aligned!
3.3 LNB Skew opmisaon
It is oen possible to slightly increase the signal strength/quality
by turning its retaining clamp in small increments.
For remote satellites far from the southern point, use the angle calculator!
Skew opmisaon is not required for Astra 19.2°!
4
Check the TV picture and also remove the Sainder
The Satfinder does not feed the signal through to the TV! That is to say no TV picture with an
interconnected Satfinder!
4.1 Disconnecting the receiver/power supply and removing Satfinder
Initially, disconnect the power supply from the mains in order to avoid short circuits, then remove the
Satfinder from the signal path.
4.2 Check the picture of a number of channels on your TV (if necessary, start a channel search)
4.3 Fasten the satellite dish clockwise
Finally, connect the supply cable to the LNB - job done.
i
Reference direcons for the most com-
mon private and public broadcasters,
such as Sky, can be found in the above
table (ASTRA 19.2° East).
i
i
Rules of thumb:
1. Satellites that can be received in Europe are found in the South. The southern point corresponds to
180° (E.g. use mobile compass).
Turn in a easterly direcon (to the le) or a westerly direcon (to the right) from this point. Astra 19.2° E
is located a few degrees to the east, so you therefore need to turn to the le (see Graphic 1).
2. It is also necessary to ensure that the antenna is adjusted to align with the correct elevaon angle.
Please ensure that no obstacles mask the view of the satellite. A clear view is absolutely essenal
(see Graphic 2).
2Azimuth:
Astra 19.2
= approx. 170°
i
Angle calculator
1Elevaon:
approx.
30°
Astra 19.2
= approx. 30°
ASTRA 19.2° East
Germany region:
Azimuth
angle:
Elevaon
angle:
LNB lt
angle (skew):
North-west (Dortmund)
165° 30° -2°
North-east (Berlin) 173° 30° -2°
South-west (Stugart) 167° 33° -2°
South-east (Munich) 170° 34° -0°
1. For Astra 19.2°:
turn slightly to the le
TV / Receiver
LNB
USB
Satellite posions in Europe
Astra
19.2°
Antenna
from above
South
12:00 midday
2. Obstrucon max. half as high as distance from the antenna
Obstrucon
max. 5 m
10 m
i
+ -


