Duro Dyne PLSU3 User manual

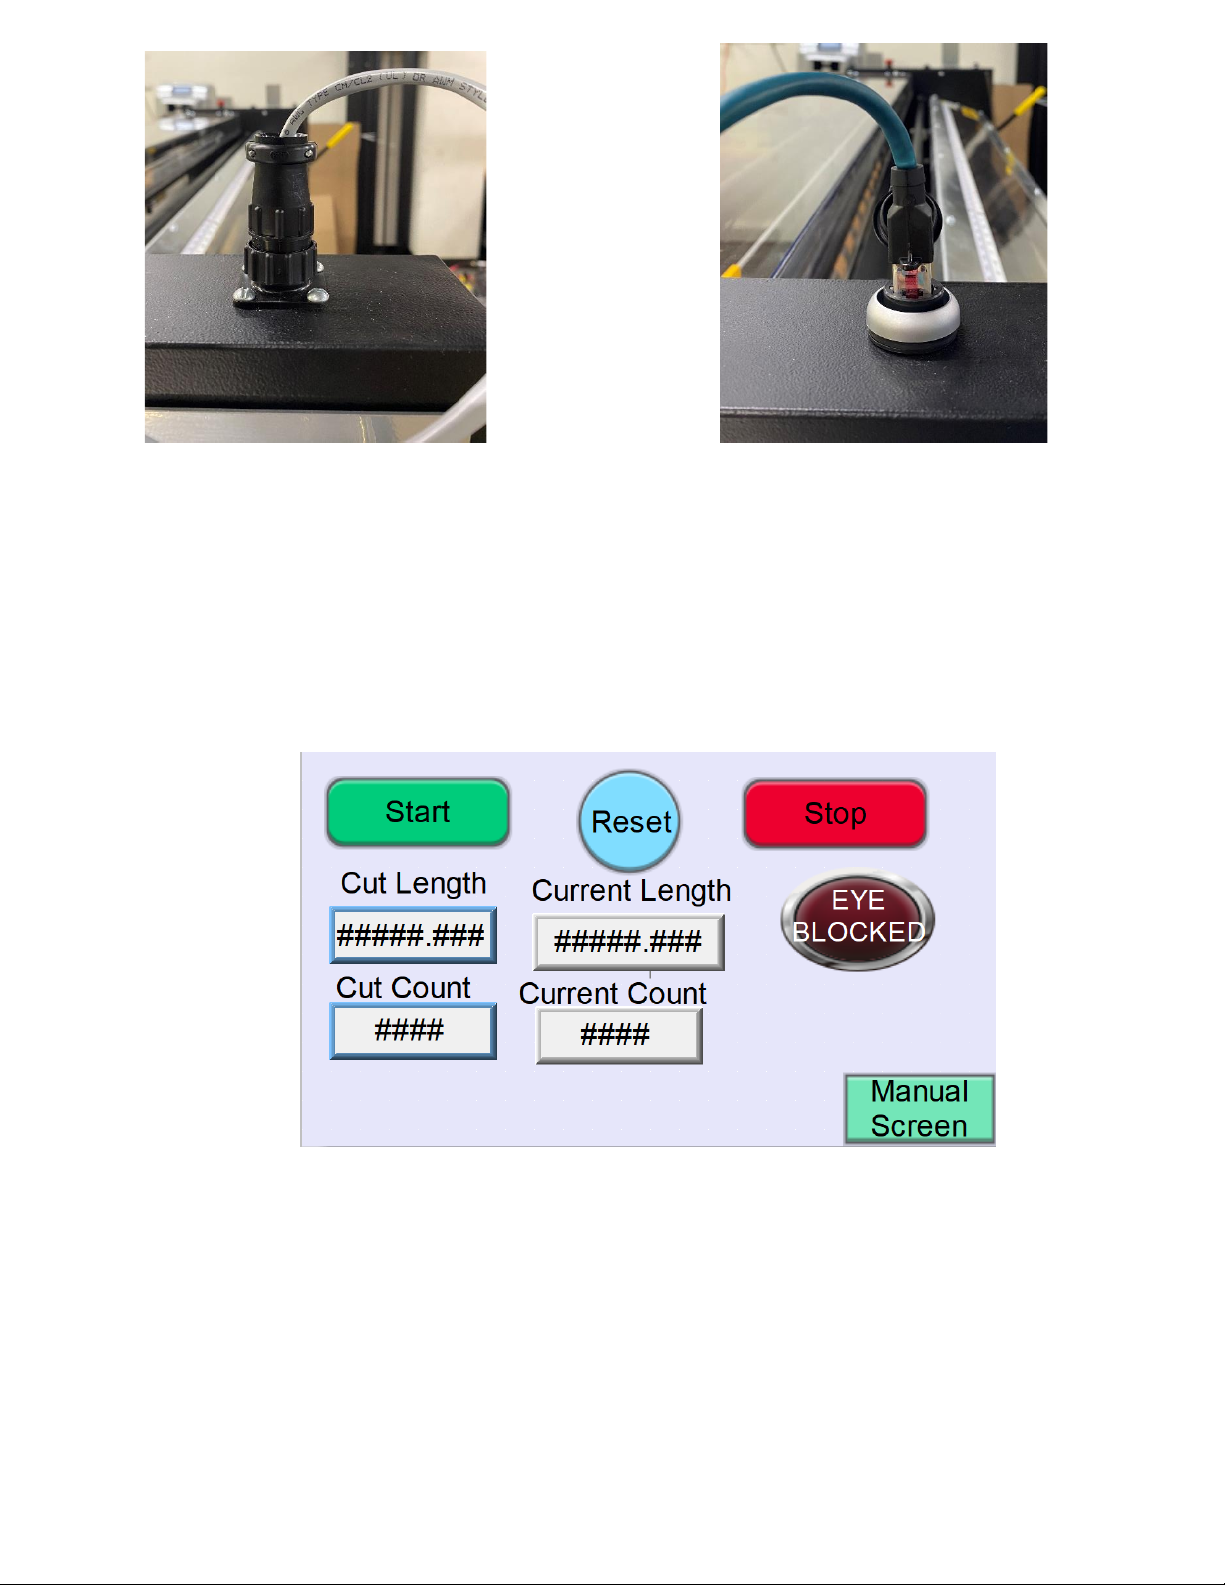
PLSU3 Theory of Operation
Safety Operation:
Dump Valve and E-stops/Guard-interlocks
The new PLSU3 is equipped with modern safety features that includes two emergency
stop buttons (E-stops), a safety relay, a single solenoid air dump valve and cover/guard
interlock switches. The safety dump valve is connected directly to the main air regulator.
The safety relay is connected to the PLC [2] input and connected in series with the two
red E-stop buttons [3] (located on top of each side of the machine) and the front and
back guard-interlock switches [4]. Breaking any of these switches causes the dump valve
to release its air pressure, locking out the cutting blade and internally locking out the
motor. If the machine loses electrical power, the dump valve will automatically dump all
the air from the system.
There are FIVE (5) ways to dump all air from the system and ensure cutting blade safety
when working on/operating the machine:
1) Pressing/pushing down either of the two red E-stop buttons at any time during
operation.
2) Lifting up the front safety shield (steel/clear Lexan shield protecting the two rollers),
which in turn, breaks the interlock switch.
3) Removing the rear clear Lexan safety guard, which would have to be removed by
extracting the screws with a Phillips head screwdriver and would in turn, break the
interlock switch.
4) Pulling back the quick release shutoff valve connected directly to the air regulator
underneath the machine.
5) Completely removing the air hose from the air regulator underneath the machine.
Cutting-Blade Safety
It is very important to be aware that when air pressure is loaded back into the system,
pressure will be engaged right back into the air cylinder that drives the cutting blade. This
will resume the cutting motion if the blade had not completed its path prior to the
machine’s loss of air pressure. For example, if air pressure is lost while the blade has
completed half of its cutting path, it will complete the other half of its cutting path upon
loading air pressure back into the system. No body parts should be in the vicinity of this
moving blade at any time.
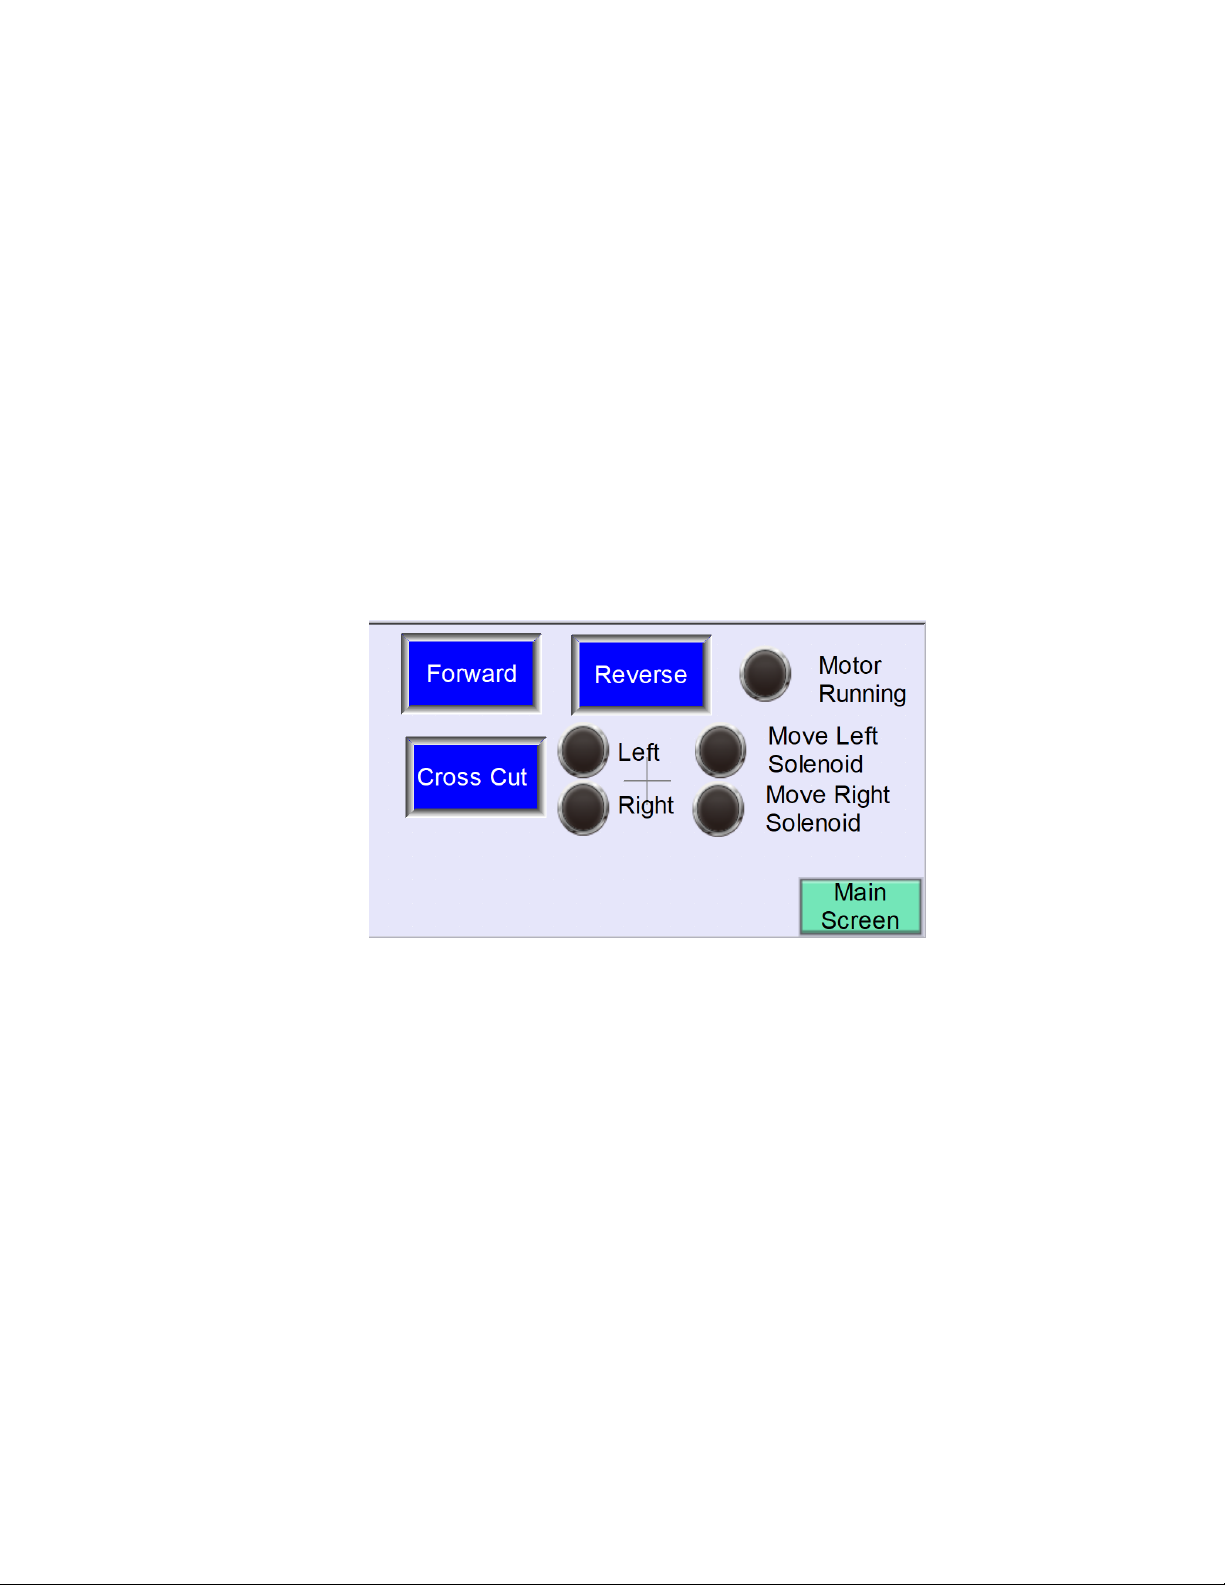
Motor-Drive Roller Safety
The motor driver roller is covered by the steel and clear Lexan composed front safety
shield; if the operator lifts this cover up the air will dump, and the motor will stop. If the
material has not reached the material eye sensor and the guard is lifted, the material will
stop feeding through. To resume feeding, the cover needs to be set back down and the
cut program will need to be resumed. The material will always retain its set distance.
Internally, the material drive roller will never be in motion while the cutting blade is in
motion to prevent any collisions between the material and the cutting blade.

Additionally, if no material is placed over the encoder and start is pressed, then the motor
will run
INFINITELY
until the stop button is pressed on the HMI’s main screen.
HMI-Lock out screen
If either E-stop buttons or the interlock guard switch is broken, the HMI [5] screen will
default to a red lock-out screen as shown below in Pic.1. The operator cannot resume
operating the machine until the necessary safety measures are met.
Pic.1 E-stop screen
General Operation
Human Machine Interface
Upon initial start-up the operator will have the option of choosing which side of the
machine they would like the touch-screen HMI to be mounted (left or right). The touch-
screen HMI’s power cable and network (ethernet) cable needs to be plugged in to their
respective ports as shown in Pic.2.
Pic.2 HMI plugs

Pic 2.1 HMI Power Cord Plug Pic 2.2 HMI Network Cord Plug
Main Screen
When the 110V line cord is plugged in and one of the two main power push button
switches is pushed on, the touch-screen HMI will power up. While the HMI is powering up
DO NOT touch and hold the screen or else it will go into screen calibration mode. When
fully powered-up (<20 seconds) the HMI will automatically display the Main Screen
depicted in Pic.3.
Pic.3 Main Screen View
Cut Length: Enter the desired length of cut here by clicking the blue-outlined box, entering the value of
cut length, and pressing ENTER
Cut Count: Enter the desired quantity of cut-to-length pieces of insulation here by clicking the blue-
outlined box, entering the value of cut quantity, and pressing ENTER
Current Length: Shows the current length of how much material has past the encoder (for one cut
program)
Current Count: Shows the current count of how many pieces of have been cut during one cut program
Start: Begins the cutting program. Press this button after setting the cut count and cut length parameters
Reset: Resets the cut count to 0 and begins a new cutting program.
If the “current count” reads the same
value of the “cut count”, you MUST hit the reset button in order to begin a new cutting program.

Stop: Brings the motor to a complete halt at any time during the cutting program. Also will stop the
cross-cut blade completely if pressed during the cross-cut blade’s path.
Eye Blocked/Cleared indicator: Shows the status of the eye sensor. “Eye blocked” means there is material
covering the eye sensor, and “Eye cleared” means nothing is blocking the eye sensor.
The machine will
not run/resume the cutting program if there is material blocking the eye sensor. After each cut is made,
the resulting, cut-to-length piece of insulation needs to be hand-removed from the table of the machine
in order to clear the eye sensor.
Manual Screen: Brings the touch screen HMI to its manual screen, as pictured below.
Manual Screen
The “Manual Screen”allows the operator to operate the machine manually. To enter the
“Manual Screen”press the “Manual Screen”key on the bottom right corner of the “Main
Screen”. When loading the insulation material, the “Forward”jog button should be held
down until “EYE BLOCKED”is displayed in red. This is also the screen where you can
perform an initial crop cut, which will need to be done every time insulation is fed into the
rollers and into the machine. To return to the “Main Screen”, press the “Main Screen”
button on the bottom right corner of the screen.
Pic.4 Manual Screen
Forward: Drives the motor forward and pulls the material
through
the machine
Reverse: Drives the motor backwards and pulls the material
out
of the machine
Cross Cut: Manually sends the cross-cut blade across the machine and makes one cut of insulation
Left indicator light: Indicates the cross-cut blade is on the left side of the machine, if lit
Right indicator light: Indicates the cross-cut blade is on the right side of the machine, if lit
**Note: If the blade is stuck anywhere but the left and right home positions, then these lamps will
be off, and the motor will not execute (as stated in the safety section).
Motor Running indicator light: Indicates that the motor is currently running and cycling
Move Left Solenoid indicator light: Indicates that the blade is in motion and moving towards the
left side cross-cut blade position (left hand side of the machine)
Move Right Solenoid indicator light: Indicates that the blade is in motion and moving towards the
right side cross-cut blade position (right hand side of the machine)
Main Screen: Returns the HMI to its main cut program screen

PLSU3: Getting Started
1) Power up your PLSU3 machine by plugging the 110VAC line cord into a 110VAC power source.
2) To turn the machine on, ensure that BOTH green power buttons are depressed on either side of
the machine. The machine will not turn on unless BOTH BUTTONS are pushed down.
3) Locate the air regulator assembly that is located underneath the table of the PLSU3. Connect the
air supply and turn on the air supply. Adjust the air regulator to 80 PSI by turning the regulator
knob clockwise to increase air pressure and counterclockwise to decrease the air pressure.
4) Load your insulation into the PLSU3 liner dispenser and begin feeding it through the machine, by
following these steps:
a. Press down one of the red emergency stop buttons on either side of the machine to
ensure air pressure has been dumped from the system to allow a safe material loading
process.
b. Secure the material guide using the hardware already in place on the inner (least
accessible) side of your machine.
c. Pull down the upper roller lifter handle to un-pinch the rollers and begin feeding your
insulation through the machine. Make sure to feed the insulation
past
the eye sensor and
table-mounted reflector, as pictured below:
Pic 5.1.
Correct
Pic 5.2
Incorrect
d. Release the upper roller lifter handle to secure and pinch your insulation in the machine.
e. Twist the red emergency stop button clockwise and pull up to release it and bring air
pressure back to the machine.
5) You can now perform a crop cut to zero the machine’s encoder. This manual cut is vital to ensure
accurate cut lengths during your cutting program. Be sure to perform this cut
every time
you load
material into the machine. Ensure the material/insulation is past the eye sensor (see step 5), then
press “Manual Screen” (lower right corner). On the Manual Screen, use the “Cross Cut” button to
make one manual cut and remove the cut material from the machine.
6) Switch back to the main screen and enter your cutting program by setting the “cut length” to the
desired length of insulation and by setting the “cut count” to the desired number of pieces
needed to be cut. Press the parameter’s value to edit the value, enter the value, and press ENTER.
7) Press the green start button to begin cutting your material. After each cut is made, be sure to
remove the cut-to-length material from the machine to allow the cutting program to keep running.
8) Once the machine reaches the set number of cuts entered by the operator, the motor will stop
running and no more pieces will be cut. The “cut count” value will match the “current count” value
on the screen. Press “reset” before running a new cutting program to reset the count to zero.

OFFSET GUIDE
Please use this guide to adjust overall cut length accuracy on the PLSU3 machine, ONLY if necessary.
When you power up the machine, you will see the main screen (below):
Press the “manual screen” button in the bottom right corner:

This will bring you to the manual screen, pictured below. From there, press the yellow “Offset” button in the
bottom left corner:

You will now be directed to the offset screen, as pictured below. Press the white box with the blue outline and
type in your desired offset value (for example, if your pieces are 1/8” short, you will type “0.125” into the box and
press enter. If your pieces are 1/8” too long, you should type “-0.125” into the box and press enter). You will only
be able to enter offset values in decimal form and not fractional. In the example below, we are adding 1/16” to
the total cut length. Press the “main screen” button when you are all finished to return to the main screen and
begin a cutting program.
Table of contents
Popular Cutter manuals by other brands

Alpha Professional Tools
Alpha Professional Tools ESC-150 instruction manual

Makita
Makita EK7650H Original instruction manual

Scheppach
Scheppach HSC130 Translation of original instruction manual

Woods
Woods BRUSHBULL BB6000X Operator's manual

Surtek
Surtek CCO720 User manual and warranty

TOP GUN WELDING
TOP GUN WELDING 2040 5IN1 Operator's manual