Dutch Lighting Innovations DLIMini User manual
DLIMini Controller
Daily Lighting Management
Installation Manual
EN - Original manual
WWW.DUTCHLIGHTINGINNOVATIONS.COM

1
EN
Preface
Thank you for buying the DLMini. The
compact DLMini is made with high quality
components only to assure a high reliability,
a long service life and safe operation.
For a correct installation, it is important
to read the installation manual carefully
before you start with the installation of the
controller.
In this manual, the DLMini will be referred
to as “the controller”.
Introduction
Intended use
The controller can be used to control
fixtures.
The controller is intended to be used in
combination with one of the DLI fixtures.
This installation manual explains how to
install and use the controller. Read and
understand this manual completely before
installing and using the controller.
Using the controller otherwise than
specified in this manual, is considered as
unintended use and will void all warranty.
Warranty
Refer to the general terms and conditions
of Dutch Lighting Innovations for
information about the warranty conditions.
Liability
Any changes and/or modifications to the
controller will void the warranty. We accept
no liability for damage caused by improper
use of the controller.
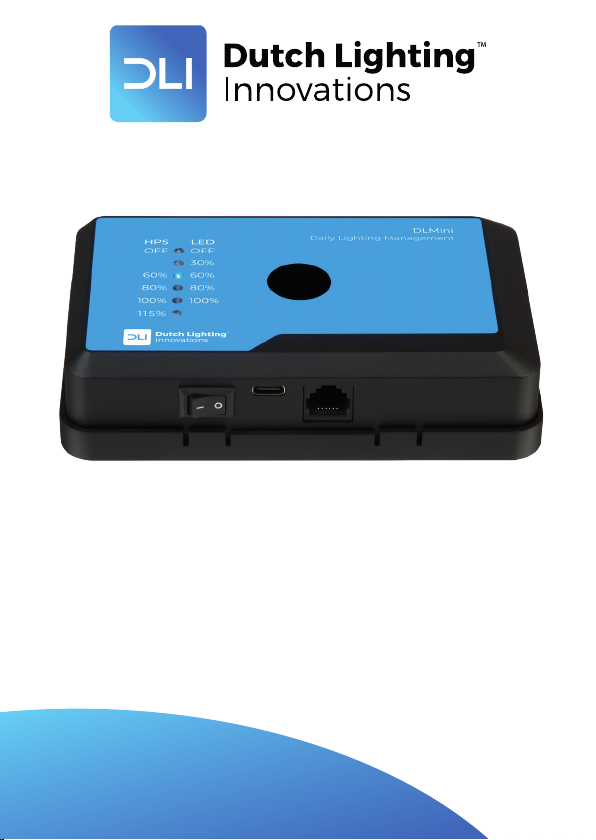
Product description
Description
The controller can be used to control
fixtures.
Main parts
See image 1 for an overview of the main
parts of the controller.
1. LED indicators
2. Menu button
3. On/off switch
4. USB charging port
5. RJ port
6. Bracket
7. RJ cable
8. USB charging cable
9. T splitter
10. USB power adapter1
1 Country specific.
10
9
8
7
6
5
4
3
2
1
1
2
Specifications
Type DLMini
Dimensions 134 x 84 x 31 mm
Weight 0.175 kg
US power adapter
Input 100 – 240 V, 0.4 A,
50/60 Hz
Output 5V, 1A
EU power adapter
Input 100 – 240 V, 0.6 A,
50/60 Hz
Output 5V, 1A
Safety
-
Warning!
– Read and understand this manual
completely before installing and using
the controller.
– Always observe the local rules for
installing and using the controller.
– Always keep away from children and
pets.
– Never open the controller. Danger
of short-circuiting which pose a fire
hazard.
– Never rewire, repair or reconfigure any
component of the controller. Danger of
short-circuiting which may pose a fire
hazard.
– Never use the controller in a wet
environment or outdoors. Danger of
short-circuiting which may pose a fire
hazard.
– Never use the controller in the proximity
of dangerous or combustible materials.
Danger of combustion which may pose
a fire hazard.
1
Caution!
– Always connect the USB power cable
properly.
– Always connect the RJ cable properly.
– Never use a damaged controller,
power cable or power adapter. If the
power cable is damaged, contact the
manufacturer to receive a new power
cable.
– Always use screws and plugs that are
suited for your wall and that they have
sufficient holding power. Contact your
local specialised retailer if needed.
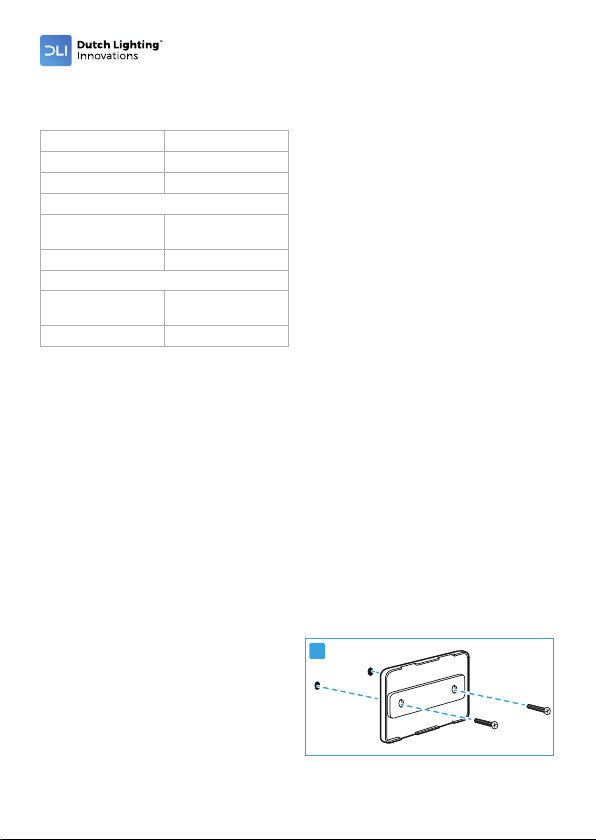
Installation
Installing the controller
1
Caution!
– Always use screws and plugs that are
suited for your wall and that they have
sufficient holding power. Contact your
local specialised retailer if needed.
1. Remove the bracket of the controller.
2. Hold the bracket against the desired
place on the wall.
3. Mark the holes of the bracket on the
wall.
4. Remove the bracket.
5. Drill the holes.
6. Insert plugs in the holes.
7. Fasten the bracket with screws. See
image 2.
8. Insert the controller in the bracket.
2

3
EN
Connecting the USB charging cable and
the RJ cable
1
Caution!
– Always connect the USB power cable
properly.
– Always connect the RJ cable properly.
1. Plug the USB charging cable into the
USB power adapter.
2. Plug the other end of the USB charging
cable into the controller.
3. Plug the USB power adapter into a
power outlet.
4. Plug the RJ cable into the RJ port of the
controller.
5. Plug the other end of the RJ cable into
a fixture.
4Always use a DLI fixture in combination
with the controller.
6. Connect more fixtures.
– Use the RJ out port on the fixture to
connect more fixtures.
– Use the T splitter to connect more
fixtures.
Use
1. Switch the on/off switch to I to switch on
the controller.
2. Press the menu button to switch
between the different percentages.
4The LED indicator shows which
percentage is currently chosen.
Maintenance
-
Warning!
– Never open the controller. Danger
of short-circuiting which pose a fire
hazard.
Check the controller regularly for dust or
dirt. Clean the controller if necessary.
Disconnecting the USB charging cable
and the RJ cable
1. Switch the on/off switch to 0 to switch
off the controller.
2. Unplug the USB power adapter from
the power outlet.
3. Unplug the RJ cable from the fixture.
4. Unplug the RJ cable from the RJ port of
the controller.
5. Unplug the USB charging cable from
the controller.
6. Unplug the USB charging cable from
the USB power adapter.
Storage and disposal
Store the controller in a dry, dust-free and
clean environment.
Store in a room with an ambient
temperature between 0 – 35 °C and a
relative humidity between 5% and 85%, non
condensating.
This product should not be thrown away
with other household waste. To prevent
possible harm to the environment or
human health by uncontrolled waste
disposal, you are responsible for recycling
it so that it can promote the sustainable
reuse of raw materials. To return your used
product, you can use the regular return
and collection systems applicable in your
country.
Contact
Dutch Lighting Innovations
Lakenblekerstraat 41, 1431 GE Aalsmeer,
The Netherlands
www.dutchlightinginnovations.com
info@dutchlightinginnovations.com
T +31 (0)297 760500
Popular Controllers manuals by other brands

Digiplex
Digiplex DGP-848 Programming guide

YASKAWA
YASKAWA SGM series user manual

Sinope
Sinope Calypso RM3500ZB installation guide

Isimet
Isimet DLA Series Style 2 Installation, Operations, Start-up and Maintenance Instructions

LSIS
LSIS sv-ip5a user manual

Rockwell Automation
Rockwell Automation 1769-L31 installation instructions


