dye INVISION3 i3 User manual

i3AND PRO i3
OWNER’SMANUAL
Dye Precision, Inc. U.S. Patent # 6,886,183.
CE Certified by: CERTOTTICS Scarl,
Zona Industriale Villanova, 32013 Longarone (BL), Italy
Notified Body Number: 0530
USA 10637Scripps Summit Ct. San Diego,CA 92131
P858-536-5183 F 858-536-5191
EUROPE Unit 1, ZK Park, 23 Commerce Way
Croydon, Surrey CRO 4ZS United Kingdom
P+44 (0) 20-8649-6330 F +44 (0) 20-8649-6339
ASIA 3F-2, No. 287, Jung Jeng Rd., Luju Hsiang
Taoyuan 338, Taiwan (R.O.C.)
P+886-3-312-6540 F +886-3-311-8723
www.dyepaintball.com
Copyright ©2007 DYE Precision, Inc. The stylized “i3” logo, the stylized “sphere”
logo and the “dye” logo are either registered trademarks, trademarks, or design
trademarks of DYE Precision, Inc.
™

WARNING: Flying paintballs can result
in serious eye injury or blindness.
Never lift the goggle or take them off when within range of flying paintballs.
Make sure the lens is securely locked in the goggle frame.
Inspect the lens for cracks before each use.
Make sure there are no gaps between the goggle and your face.
Adjustthe goggle strap snugly so that it won't fall off.
Do not playpaintball unlessall markers arelimited to 300 feet per second (92
meters per second) or less.
Thoroughly clean paint off lens using only cool, clear water.
Storein a cool, dry placewith no chemical fumes.
Immediately replace any lens that has taken a direct hit from ten feet (three
meters) or closer.
Do not use this goggle until you have read, understood and followed all
instructions and safety precautions in the owner's manual.
If the owner's manual is unavailable or lost, get another copyby calling DYE
Precision, Inc. at (858) 536-5183 or visit www.dyepaintball.com
2
WARNING

WARNING: No goggle can prevent fogging
under all conditions. If your goggle does fog up,
do not remove them while in a paintball area.
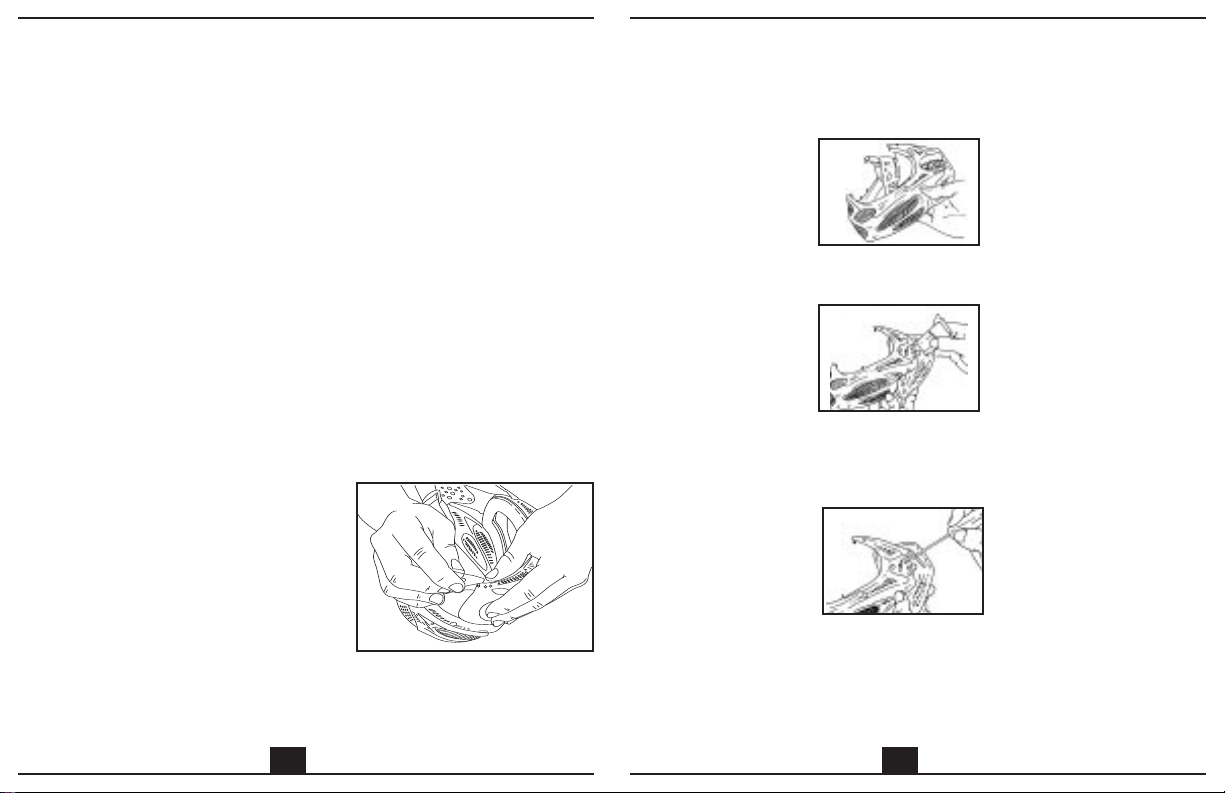
If your goggle comes off for any reason while in a paintball area:
•stop
•cover your eyes with your hands, and
•yell for help.
BLINDNESS IS A LIFE-ALTERING INJURY. DON'T RISK IT!
Even if you are an experienced player, we urge you to take the time to read this
manual. It includes important safety information and describes techniques that
can help you extend the useful life of your DYE®i3™goggle system.
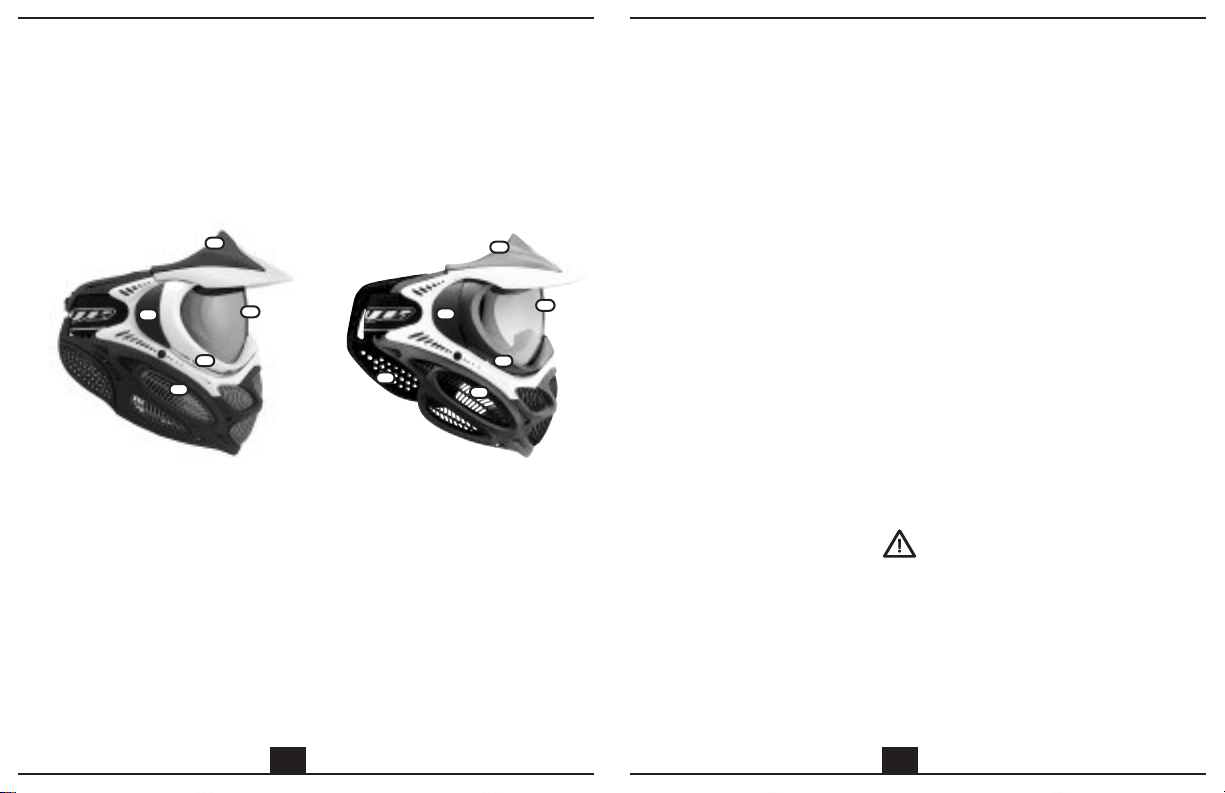
The DYE®i3™goggle system is intended to function with all genuine DYE®
components in place – lens, goggle, goggle frame, mask, ear pieces and strap.
• Do not add anything tothe system.
• Do not put stickers on the goggle, goggle frame, mask, lens or strap.
•Manyadhesives can weaken the lens and goggle.
• Do not attach anything to the system.
• Do not take anything off of the system.
• Do not cut, trim or reshape any component of the system.
• You may use the system without the visor. Do not use
the system without any of the other components.
3
WARNING: Some states have laws about paintball play. It is your
responsibility to know and follow the laws of the state where you play.
WARNING: Failure to follow all instructions and heed all warnings
may result in serious and/or permanent injury.
WARNING: Never remove the DYE®i3™Goggle System while on the
playing field.
WARNING: Wear the DYE®i3™Goggle System whenever
shooting a paintball marker or near an area wherepaintball
markers are being shot.
WARNING: All paintball markers must be chronographed. Do not
playwherepaintball velocities exceed 300 feet per second
(92 meters per second).
WARNING: Observe the rules of safe play and the rules of safe
paintball marker handling at all times.
WARNING: Do notmodify the lens, goggle, goggle frame, mask,
strap or anyother part of the goggle system. Modifying the goggle
system may void the warranty and can lead to serious injury.
4

WARNING: Wear the DYE®i3™Goggle System with the mask
and strap assembly properly attached. The goggle strap is
not an ear protector.
WARNING: Check the lens before and after each use, and replace
the lens immediately if you observe any cracks. Replace the lens
immediately if it is directly hit with a paintball from a distance of ten
feet (three meters) or less.
WARNING: Replace the lens after it has been in use for one year.
WARNING: Each DYE®i3™Goggle lens is factory treated with a
coating to retard fogging. Do not apply anti-fog treatments to any
DYE®i3™Goggle lens. No treatment can prevent fogging under all
conditions. Fogging may occur.
WARNING: Use only genuine DYE®i3™Goggle lenses in the
DYE®i3™Goggle system.
5
Safety Information 2-5
Table of Contents 6
What’s in the Box 7
Getting Started 8
Safety Check 9
Fitting 10
Cleaning 11-12
Storage 13
Removing the Lens 14-15
Installing the Lens 16
Adjusting the Mask 17
Changing the Soft Earpieces 18
Changing the Strap 19-20
Warranty 21
6
CONTENTS

7
Getting Started
Paintball is an adventure sport. Even when paintball is played as intended you
can get hurt. No goggle system can prevent serious injury in all situations.
The DYE®i3™Goggle system is intended for use by paintball players participating
in a supervised game of paintball with competent referees at a paintball facility
where each paintball marker is chronographed before each game and paintball
velocity is limited to 300 feet per second (92 meters per second) or less.
If any portion of this manual is unclear, or if you are unable to obtain satisfactory
answers to any question from your dealer, contact DYE®at (858) 536-5183 or visit
www.dyepaintball.com
•Remove the owner’s manual and read it.
•Remove protective film from the lens.
• Perform a safety check on the entiresystem (page 9).
•Remove eyeglasses or sunglasses.
• Put the goggle on.
•Adjust to fit snugly (page 10).
WARNING TO LAW ENFORCEMENT, MILITARY
AND GOVERNMENT CUSTOMERS:
Do not use the DYE®i3™Goggle system with simunitions. Contact DYE®
technical support to discuss special applications.
8
What’s In the Box
THIS BOX CONTAINS:
• One DYE i3™Goggle System or One DYE Pro i3™Goggle System*
• Owner’s Manual
• Goggle Bag
DYE I3 Goggle System DYE Pro I3 Goggle System
1 Visor 1 Visor
2 Lens 2High Definition Lens
3 Lens Frame 3Lens Frame
4 Strap Assembly 4 Strap Assembly
5 Tri Mold Mask 5 Tri Mold Mask
6 Soft Flexible Earpiece
*This box contains either the DYE i3™Goggle System or the DYE Pro i3™Goggle System depending on which
goggle system you purchased.
1
1
2
2
3
3
4
4
5
5
6

Safety Check
WARNING: The DYE®i3™Goggle System suffers wear and stress
even in normal use. Scratches, cracks and discoloration are signs
of stress-caused fatigue and indicate that a part is at the end of its
useful life and needs to be replaced.
Here's a simple, sixty-second safety check. Get in the habit of making this safety
check every time you're about to play paintball.
Before each use, perform a safety check.
1Look for scratches on the lens and goggle frame.
2Look for cracks on the lens and goggle frame.
3Look for discoloration on the lens and goggle frame.
4Do not use a lens thatis scratched, cracked or discolored.
Replace the lens immediately.
5Makesurethat the lens is securely attached to the goggle
frame and that all lens lock tabs are flush to the goggle frame.
6Makesurethatthe strap is securely attached to the frame
(right and left).
7Make sure the sliding adjustment clips on the strap are
not cracked or broken.
8Make sure that the mask is securely attached to the goggle frame.
9If you use the visor,makesure that the visor is securely
attached tothe goggle frame and mask.
9
Fitting
WARNING: If your goggle system does not fit properly, it may fall
off. Do not use a goggle system that does not fit snugly.
The DYE®i3™Goggle System is not intended for use with eyeglasses.
• After you have performed the safety check of the
entiregoggle system, put it on.
• The goggle must fit firmly on your face so that it will not move.
• Check for gaps between the foam on the goggle frame
and your face. The goggle must create a seal with your face.
• If there are any gaps, the strap is too loose.
• Remove the system from your head and shorten the strap
by moving the two slides evenly apart. The two slides on
the goggle strap have teeth to retard slipping. These teeth
prevent proper adjustment while the system is snugly on your head.
• Put the system on and again check for gaps.
• If there are no gaps but the system feels too tight, remove the
system from your head and move the two clips evenly together.
10

Cleaning
WARNING: Clean only with plain water. Chemical cleaners (Windex,
409, Simple Green, etc.) contain alcohol and detergents which can
weaken the lens and goggle.
Lens Cleaning
Clean your goggle immediately (same day) after each use or whenever they are
dirty or covered with paint. Please follow the lens cleaning instructions carefully
to preserve the life of your lens.
Remove the lens from the goggle frame for proper cleaning.
Fog Resistant Single Lens
Gently clean both sides of the lens with clear water and a cotton cloth.
Dry the lens with a clean soft cotton cloth. Do not excessively rub the inner lens
surface, it will remove the fog resistant coating.
Thermal Double Lens
Gently clean the outside of the lens with clear water and a cotton cloth. Gently
dry the outside of the lens with a clean cotton cloth. Dab the inner lens with a
damp cotton cloth. Do not rub the inner lens surface. The inner lens surface
scratches very easily.
11
Reminders
• Don't use cleaning solutions other than clear water.
Windex, 409, or other household cleaners may damage the lens.
• Don't use paper towels. They scratch the lens.
• Don’t immerse the goggle frame in water.
• Don’t immerse the inner lens of a double lens in water.
• Don’t rub the lens too hard. Both sides of the lens have
aprotective coating that can be rubbed off.
• If paint or debris remain on the goggle after cleaning,
you may have to remove the lens for thorough cleaning.
Followthe instructions for lens removal (pages 14.15) and
installation (page 17).
Mask Care
The mask may be rinsed with a hose or immersed in water, but only AFTER
removing the mask from the goggle frame. Dry the mask with a soft cotton cloth.
Do not dry the mask in direct sunlight.
Strap Care
Wipe paint off the strap with a damp cotton cloth. Do not wash the strap in a
washing machine. If the strap is severely stained, replace it.
12
Cleaning Continued

Storage
WARNING: Never store the DYE®i3™Goggle system in areas that
may have chemical fumes. Gasoline, kerosene, alcohol and other
chemicals and fumes will weaken the lens and goggle.
WARNING: Never store your DYE®i3™Goggle system in areas of
extreme heat or cold. Temperature extremes will damage the lens and
the goggle. Store your goggle in a cool, well-ventilated place.
• Store your goggle in a cool, well-ventilated place free from any
kind of industrial or household fumes.
• Do not store your goggle with dirty lenses or frames.
• Do not allowadirty goggle to sit overnight without cleaning.
• Do not expose your goggle frame or lens toharmful household
or industrial fumes.
• Do not store your goggle in plastic garbage cans,
garbage bags, or anyplastic container.
• Do not storeyour goggle in the trunk of your car.
• Do not store your goggle in direct sunlight or near heaters,
stoves or other heat sources.
13
Removing the Lens
[Lens replacement is easier if the visor is first removed from the goggle frame.]
Tip: Replace your lens at least once each year. Factory applied protective
coatings on each lens surface will wear off even with gentle cleaning.
Remove the Visor
Remove the center post from the goggle frame by pulling up on the visor and
pushing the post upward from the inside.
Remove the two side posts by carefully pulling on the visor and pushing one post
at a time up from the inside.
[The mask maybe removed from the goggle frame with the visor still attached to the
mask atthe twoside posts.]
Removethe Mask
1Remove the top right mask post from
the goggle frame.
2Move clockwise around the mask, removing
the posts one atatime.
3Grasp the strap retainer with your right
hand and tilt it straight upward.
4Twist the strap retainer firmly to remove it. [See figure 1]
5Slide the strap retainer through the mask.
6Repeat steps 3-5 for the other side.
WARNING: Use only your hands when changing DYE®lenses.
Use oftools is likely to scratch or damage the lens.
14
1

Remove the Lens from Goggle Frame
1Start at the top center with logo.
2Using your thumbs, push upward and peel the top of the
goggle frame off the top lens tab.
3Roll the goggle frame up and over the foward retention lens tabs.
4Still using your thumbs, remove the goggle frame from the top
two tabs on the right.
5Grasp the goggle frame at the right side, hold the lens carefully with
your other hand, and pull the goggle frame out of the bottom two tabs.
6Continue with the nose tabs, the bottom twotabs and finally
the top two tabs.
7Continue rolling the goggle frame off the retention tabs until the
lens is free from the frame.
15
Installing the Lens
Tip: DYE®replacement lenses come with a protective film on the inside of the thermal lens.
Leave the protective film on during installation. Remove the protective film before use.
Install the lens in the goggle frame.
1Moisten the lens retention tabs with water.
2Grasp lens by top edge with thumb over logo. [See figure 1]
3Pinch the nose portion of the goggle frame and insert the
two nose tabs, one on each side of the bridge.
4Move to the left and insert the two bottom tabs. Use palm pressure on
the bottom of the goggle frame to push in the two bottom left tabs.
5Slide right side of lens into the inner gutter.
6Move to the right of the nose and insert the two bottom tabs.
Use palm pressureon the bottom of the goggle frame topush
in the two bottom right tabs.
7Slide right side of lens into the inner gutter.
8Move logo piece over the logo without snapping it in. [See figure 2]
9Line up remaining tabs to be inserted.
10 Apply palm pressure to the two tabs on the left.
11 Apply palm pressure to the two tabs on the right.
12 Use thumb pressureto insert the logo tab. [See figure3]
13 Check thatall tabs are completely inserted into the goggle frame.
Roll your thumb from the outside of the goggle frame over each
tab. Each tab should feel flush with the goggle frame. Tabs may
need a final push to completely seat. It’s not easy. If it were easy,
the lens would come apart.
16
Removing Lens Continued
213

WARNING: If the lens is not completely seated in hard goggle frame,
the lens may separate during use and cause injury.
Attaching the Mask
To attach the mask to the goggle frame:
1Hold the goggle in your right hand and the mask in your left hand.
2Insert two tabs on the bottom right.
3Insert the nose tab.
4Insert the two tabs on bottom left. Make sure flap on bottom edge
of goggle frame is inside.
5Weave strap through ear pieces.
6Attatch the top posts of the mask into the proper holes on the
goggle according to your preference, see “Adjusting the Mask”.
Inspect the mask attachment carefully. Make sure that there are no gaps between
the mask and the goggle frame.
Adjusting the Mask
The DYE®I3 Goggle System has been designed to be adjustable to accomodate
different size faces. Find which adjustment is most comfortable for a sure fit.
1On the top of the goggle frame
bythe strap retention clips, you
will see two larger holes. These
holes will allow you to adjust your
I3 Goggle System to fit more
comfortably on your face. [See figure 1]
2The holes towards the edge of the
frame are for a more looser fit around
your face.
3The holes towards the center of the frame are for a more close
fit around your face.
17
Changing the Soft Earpieces
1Start out with the goggle frame completely removed from the mask and
strap assembly. [See figure 1]
2Push the strap assembly through the ear section of the mask.
3Push the strap assembly through the soft earpiece. [See figure 2]
4Using a flathead screwdriver, unscrew the earpiece retention screw in the
recessed area of the mask. [See figure3]
This will free the soft earpiece from the mask. Do not lose the screw.
5Next, attach the new earpiece in the same position and follow steps 2-4
in reverse order.
6Finally, attach the goggle frame to the mask and reassemble the strap
assembly to the goggle frame.
18
1
1
2
3

Attaching the Visor
1Moisten the ends of the visor posts.
2Push the left visor post into the round
hole on the left side of the mask.
3Push the right visor post into the hole on
the right side of the mask.
4Push the center post of the visor
through the center hole in the top of the
goggle frame until it reaches the first stop ring. [See figure 1]
5The visor can be adjusted by pushing the center post to the
second stop ring.
Note: The gap between the visor and the top of the goggle frame is normal.
Changing the Strap
The strap is easily removed from the goggle frame. In ordinary use
and maintenance, it is necessary to remove the strap from the goggle frame.
The lens maybe changed with the strap still attached to the goggle frame.
The goggle frame maybe cleaned with the strap attached to the goggle.
Tip: Strap removal and installation is much easier when the goggle is at room temperature.
The material is not flexible when it is cold.
Remove the Strap
1Hold the mask firmly in your left hand.
2Grasp the strap retainer with your right hand and tilt it straight upward.
3Twist the strap retainer firmly to remove it. [See figure 2]
19
Install the Strap
WARNING: The right and left strap attachment clips are not the
same. The back of each clip is marked either “L” for left, or “R” for
right. Make sure that the Dye logo on the strap faces up. When
properly installed the top of the strap attachment clip is flush with the
top of the goggle frame. It is much easier to install the strap clip into
the goggle frame if the lens is already in the goggle frame.
1With the strap lying in the palm of your hand, hold the strap clip
between thumb and forefinger.
2Moisten the bottom tab on the strap clip.
3Insert the top tab of the strap clip into the slot on the goggle frame.
4While pushing upward on the top of the strap clip, push the lower
part of the strap clip into the goggle frame.
5Look inside the goggle frame and confirm that both ends of the strap
retaining tab are completely through the goggle frame.
6Tug the strap firmly to ensure that the tabs are seated.
Note: It is not easy to install the strap clip into the goggle frame.
Changing the Strap Continued
1
2
20

DYE Limited Warranty
DYE Precision, Inc. warrants that your DYE®i3™goggle system will be free from defects in
materials and workmanship for one (1) year from the date of original retail purchase.
Any product determined by DYE®to be defective in materials or workmanship in accordance
with the above warranty will be repaired or replaced, at the option of DYE®,free of charge
when received at the factory freight prepaid, together with proof of purchase.
This warranty is expressly in lieu of all other warranties. Any implied warranties of
merchantability or fitness for a particular purpose are limited to the same duration as this
express warranty.
This warranty does not cover incidental or consequential damages. DYE®shall not be liable for
any incidental or consequential damages. Some states do not allow the exclusion or limitation
of implied warranties, incidental or consequential damages, so the above limitations and
exclusions may not apply to you.
This warranty does not cover any problem resulting from misuse, abuse, neglect, alteration,
failure toperform maintenanceas instructed, unauthorized repair or service, or damage caused
by contaminants.
This warranty does not cover any representation or warranty made by Dealers beyond the
provisions of this warranty.
This warranty does not cover costs incurred for normal repair, inspection and preventive
maintenance.
You must establish proof of purchase to obtain warranty service or replacement.
You may establish proof of purchase by completing the Warranty Registration Card and
mailing it to DYE®.
This warranty gives you specific legal rights, and you also have other rights which vary from
state to state.
If you have any questions about your DYE®product, please call
DYE Precision, Inc. at (858) 536-5183 or visit www.dyepaintball.com
21
This manual suits for next models
1
Table of contents
Other dye Motorcycle Accessories manuals