Este dispositivo cumple con las normas de
funcionamiento de los emisores de luz Productos,
21 DFR, Parte 1040, Capítulo 1, Sección J, Salud
Radiológica.
PARTES & ACCESORIOS DISPONIBLES
PARTE DESCRIPCCION
32050 Focos Fluorescentes de Repuesto de 6-Watts (2 piezas)
32065P
Flaps Damper
© Dynamic Solutions Worldwide, LLC
GUARDE ESTAS INSTRUCCIONES
MANUAL DEL PROPIETARIO
MODELO: DT2000XLP
¡Gracias por comprar el DYNATRAP®
trampa de insectos voladores!
Este producto puede estar cubierto por una o más patentes de EE.UU.
o aplicaciones pendientes de patente. Ver www.dynatrap.com/patents
Dynamic Solutions Worldwide, LLC
12247 W. Fairview Ave. Milwaukee, WI 53226
Teléfono: 414-431-2819
Llamada Gratis: 1-877-403-TRAP (8727)
Fax Gratis: 877-403-3293
Visítenos en nuestra página web www.dynatrap.com
GARANTIA LIMITADA
DYNAMIC garantiza al comprador original que este producto esta libre de defectos de materiales y mano de
obra. Esta garantía esta limitada a remediar cualquier parte defectuosa durante un periodo de un año a partir de
la fecha de compra original. Retenga su recibo original como prueba de compra. Esta garantía no es aplicable ni al
foco, ni al maltrato o uso inapropiado, a nuestro juicio. Si esta unidad es alterada, se anula la garantía. Esta no
es aplicable a esta unidad si fue comprada fuera de los Estados Unidos, excluyendo Canadá y México. DYNAMIC
no será responsable en ningún caso de daños incidentales, punitivos, derivados o daños de ningún otro tipo por
incumplimiento de esta o de cualquier otra garantía, ya sea expresa o implícita. Algunos estados no permiten
limitación con respecto a la duración de una garantía implícita y, por lo tanto, la limitación o exclusión anterior
podría no serle aplicable. Esta garantía le otorga derechos legales específicos y usted puede tener además otros
derechos que variarán de un estado a otro.
Sírvase leer estas instrucciones antes de usar el trampa electrónico de insectos DynaTrap®y guárdelas como referencia futura.
1. Desenchufe el aparato siempre antes de reemplazar el foco. Reemplace el foco con el mismo tipo nominal 6 vatios. (DynaTrap Parte # 32050)
2. No coloque este producto cerca de fuentes de calor, gas, aceite u otros materiales inflamables.
3. Para reducir el riesgo de lesiones, es necesario supervisar de cerca cuando se use el aparato cerca de niños.
4. No opere ningún aparato con un cable o enchufe dañado, después de un mal funcionamiento o si se ha caído o dañado de alguna manera.
Devuelva el aparato al centro de servicio autorizado más cercano para su revisión, reparación o ajuste eléctrico o mecánico.
5. Este aparato contiene doble aislamiento. Utilice sólo piezas de repuesto idénticas. Vea las instrucciones para Reparaciones de Electrodomésticos de
doble aislamiento.
6. No toque las piezas en movimiento.
7. Los insectos recolectados dentro de la unidad podrían contribuir a un incendio; por lo tanto, limpie los insectos muertos de la unidad con frecuencia.
8. No coloque ni guarde el aparato donde pueda caer o ser empujado a una bañera o fregadero. No coloque donde pueda caer en el agua o cerca de
materiales inflamables.
9. No toque el ventilador cuando este en movimiento.
10. No abuse del cordón — Nunca transporte o cuelgue la unidad por el cable ni lo jale para desconectarlo del tomacorriente. Mantenga el cable
alejado del calor, aceite o bordes filosos.
11. No desconecte el aparato tirando del cable. Para desenchufar, tome el enchufe, no del cable.
12. Utilice únicamente los accesorios recomendados o vendidos por el fabricante.
INSTRUCCIONES IMPORTANTES DE SEGURIDAD
LIMPIEZA
Limpieza frecuente prolongara la vida útil de la unidad, garantizara la prevención de incendios, y la unidad funcionara en forma
más eficiente.
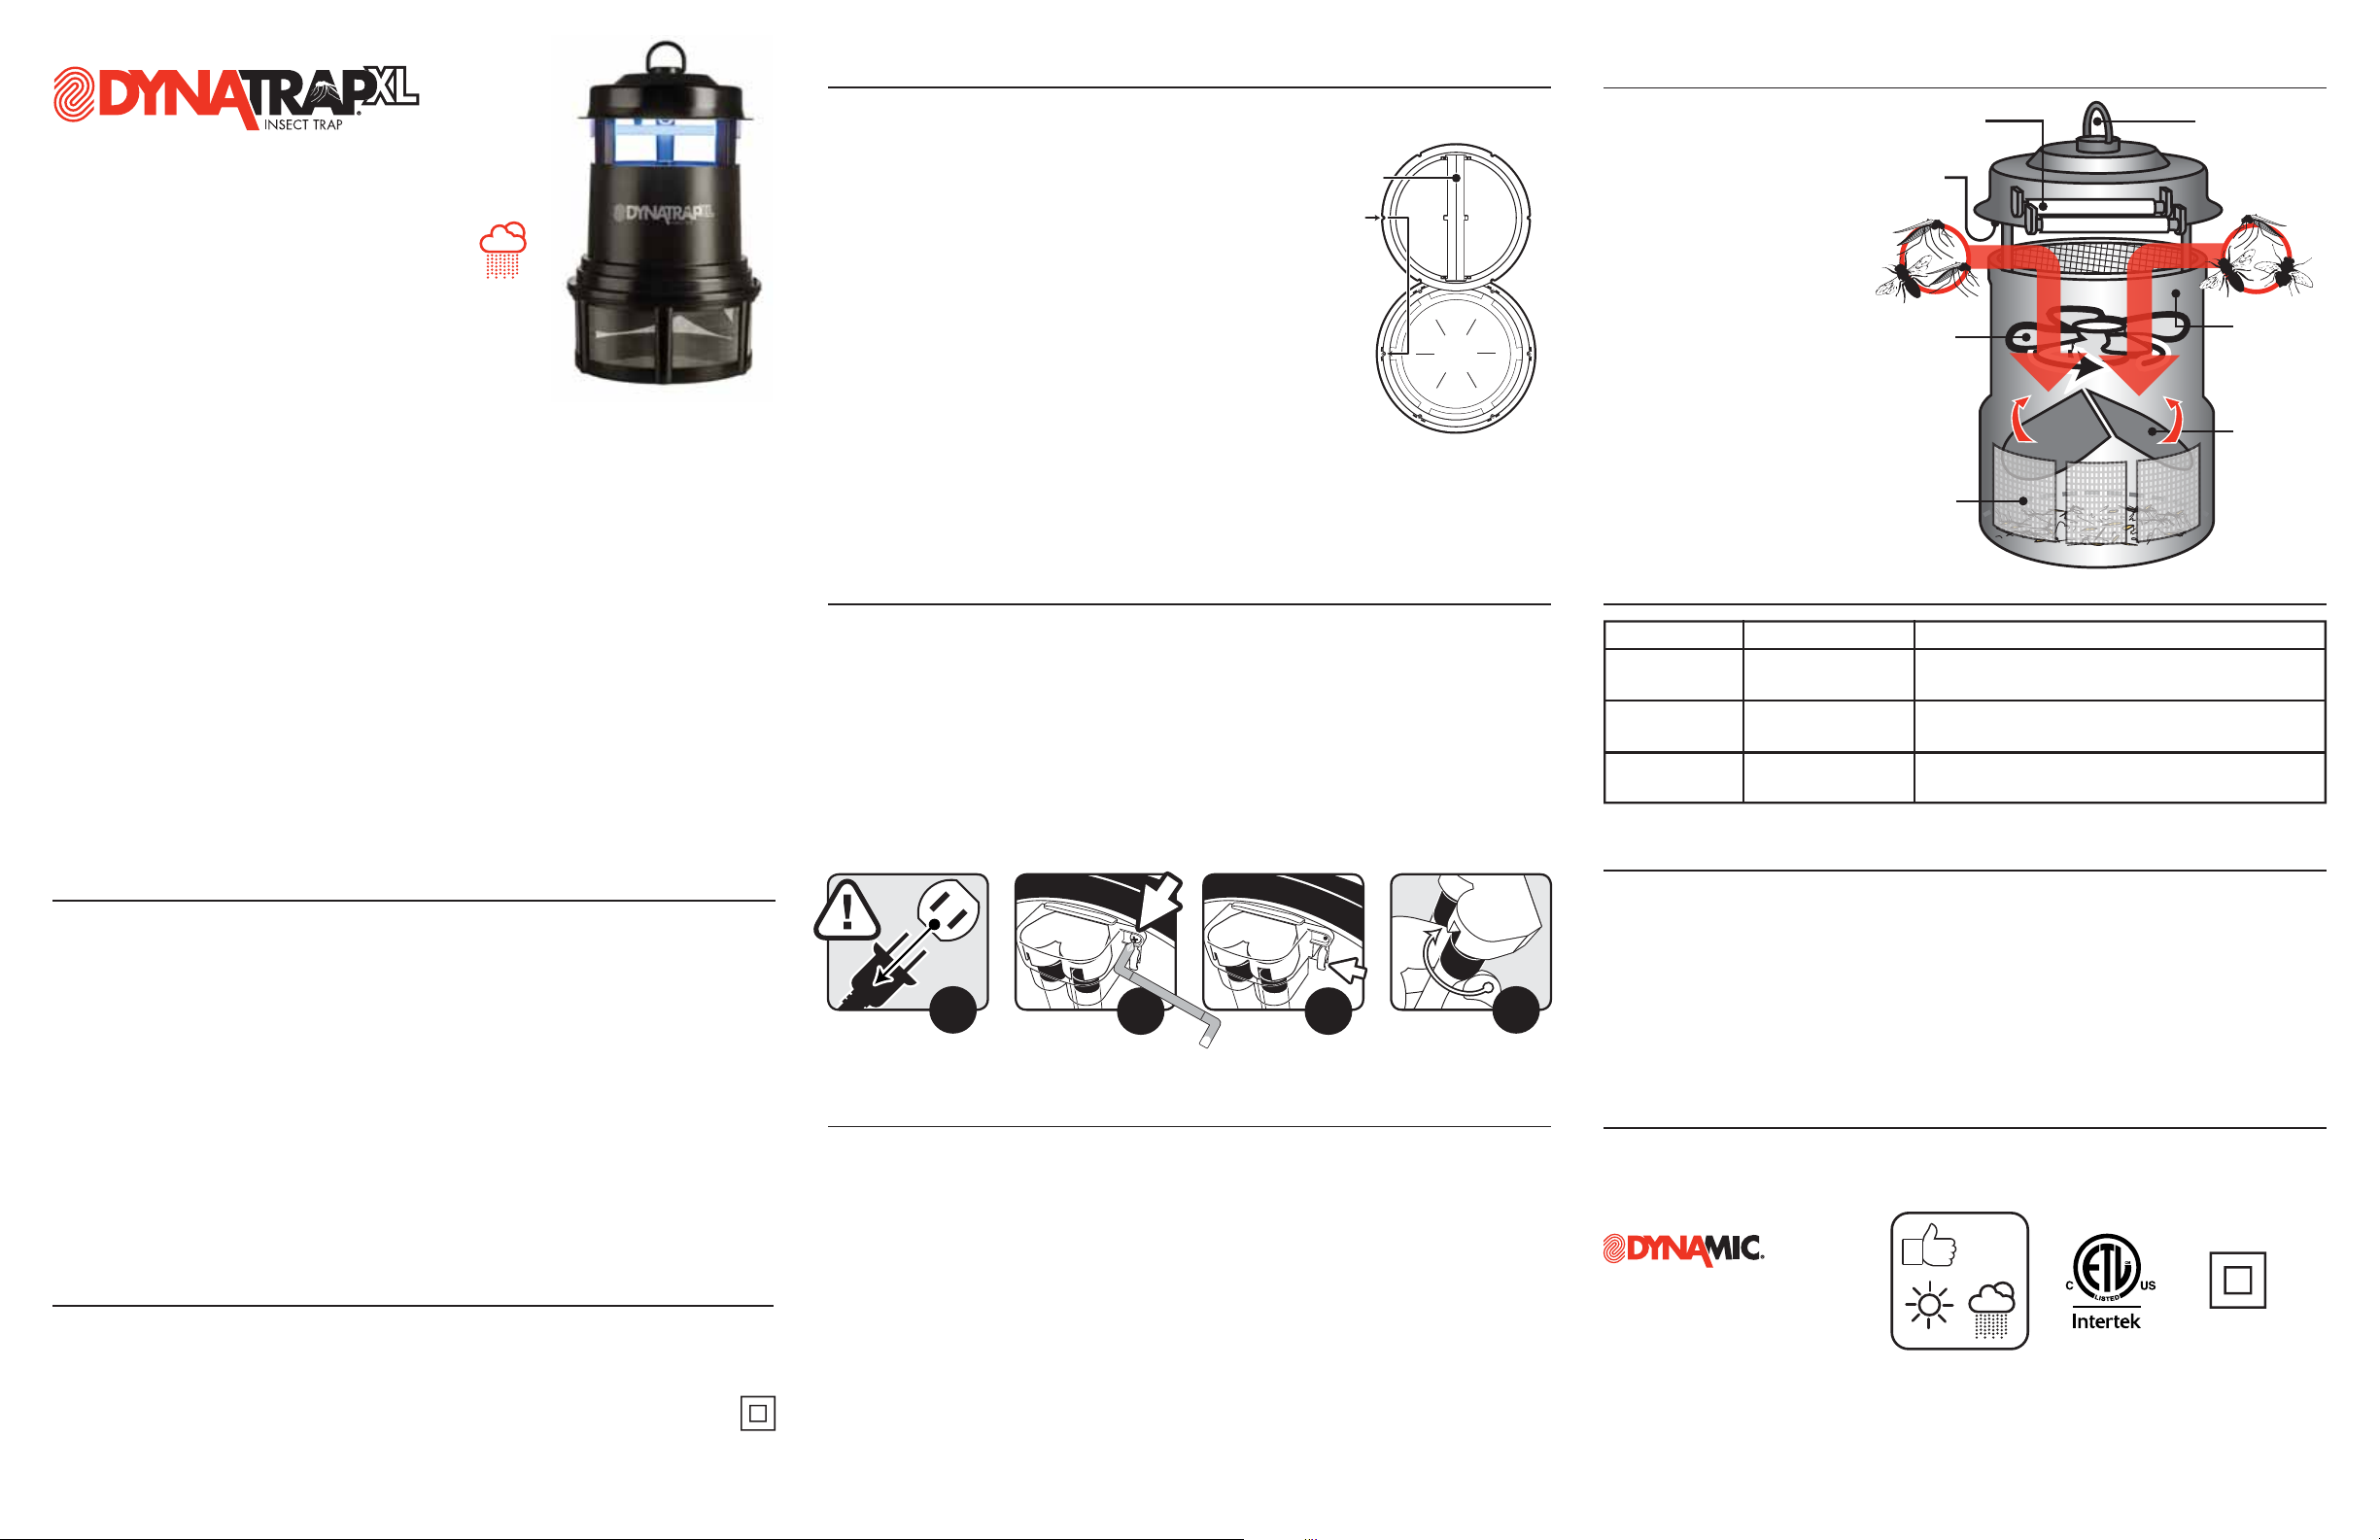
1. Remueva la jaula de retención simplemente sujetando la trampa y girándola hacia la izquierda.
2. Sujete el borde del travesaño y tire hacia arriba con firmeza para remover la compuerta de aire.
3. Descarte el contenido y limpie cualquier acumulación en el interior de la jaula de retención con un cepillo pequeño.
4. Coloque la compuerta de aire a la jaula de retención y vuelva a cerrarla con un giro hacia la derecha.
IMPORTANTE: NO presione o apriete la malla de metal de las ventanillas en la jaula de retención cuando se le de limpieza o
ensamblaje, ya que se podría fácilmente romper.
REMPLAZANDO LOS FOCOS
La vida de uso de los focos es de aproximadamente 3,000 horas (o cerca de 4 meses), y deben de reemplazarse después de este
tiempo para mantener la eficacia óptima de la luz ultravioleta. Aun cuando usted vea la luz de los focos, su capacidad para insectos
disminuye con el tiempo.
1. Apague la unida en la posición “off” y Desconecte El Cable, permita que los focos se enfríen antes de cambiarlos.
2. Remueva los tornillos de la cubierta protectora de plástico trasparente que cubre los focos.
3. Retire las dos cubiertas de plástico transparente oprimiendo las lengüetas y tirando hacia abajo.
4. Gire con cuidado foco hacia la izquierda y jale el foco hacia afuera.
5. Coloque los focos nuevos en sus bases, cuidadosamente gire hacia la derecha, y asegúrese de que las puntas de los focos estén
correctamente asentados.
El foco de repuesto, lo puede adquirir en la tienda donde compró este producto, o bien directamente en DynaTrap llamando al
1-877-403-TRAP (8727).
6. Remplace las dos cubiertas de plástico transparente, comprimiendo con los dedos y hacia arriba las pestañas que los sujetan.
IDENTIFICACION Y RESOLUCION DE PROBLEMAS
Los focos no alumbran y
el ventilador no gira. 1. No hay corriente
eléctrica. 1. Revise la conexión, el contacto, o el breaker eléctrico.
2. Asegúrese de que el switch de prendido esta en la posición “on”.
Los focos prenden, pero
el ventiladornogira. 1. El ventiladoresta en
corto. 1. DESCONECTE LA UNIDAD: Examine el ventilador para ver si esta libre
de suciedad o insectos muertos. Limpie de acuerdo a la sección
de “Limpieza”.
El ventiladorgira, pero
los focos noprenden. 1. Los focos no están
firmemente colocados.
2. Los focos están fundidos.
1. Revise quelos focos estén firmemente colocados en la base del foco.
2. Cambie los focos si es necesario, de acuerdo a las instrucciones
bajo “Reemplazo del foco”.
Problema: Posible Causa: Corrección:
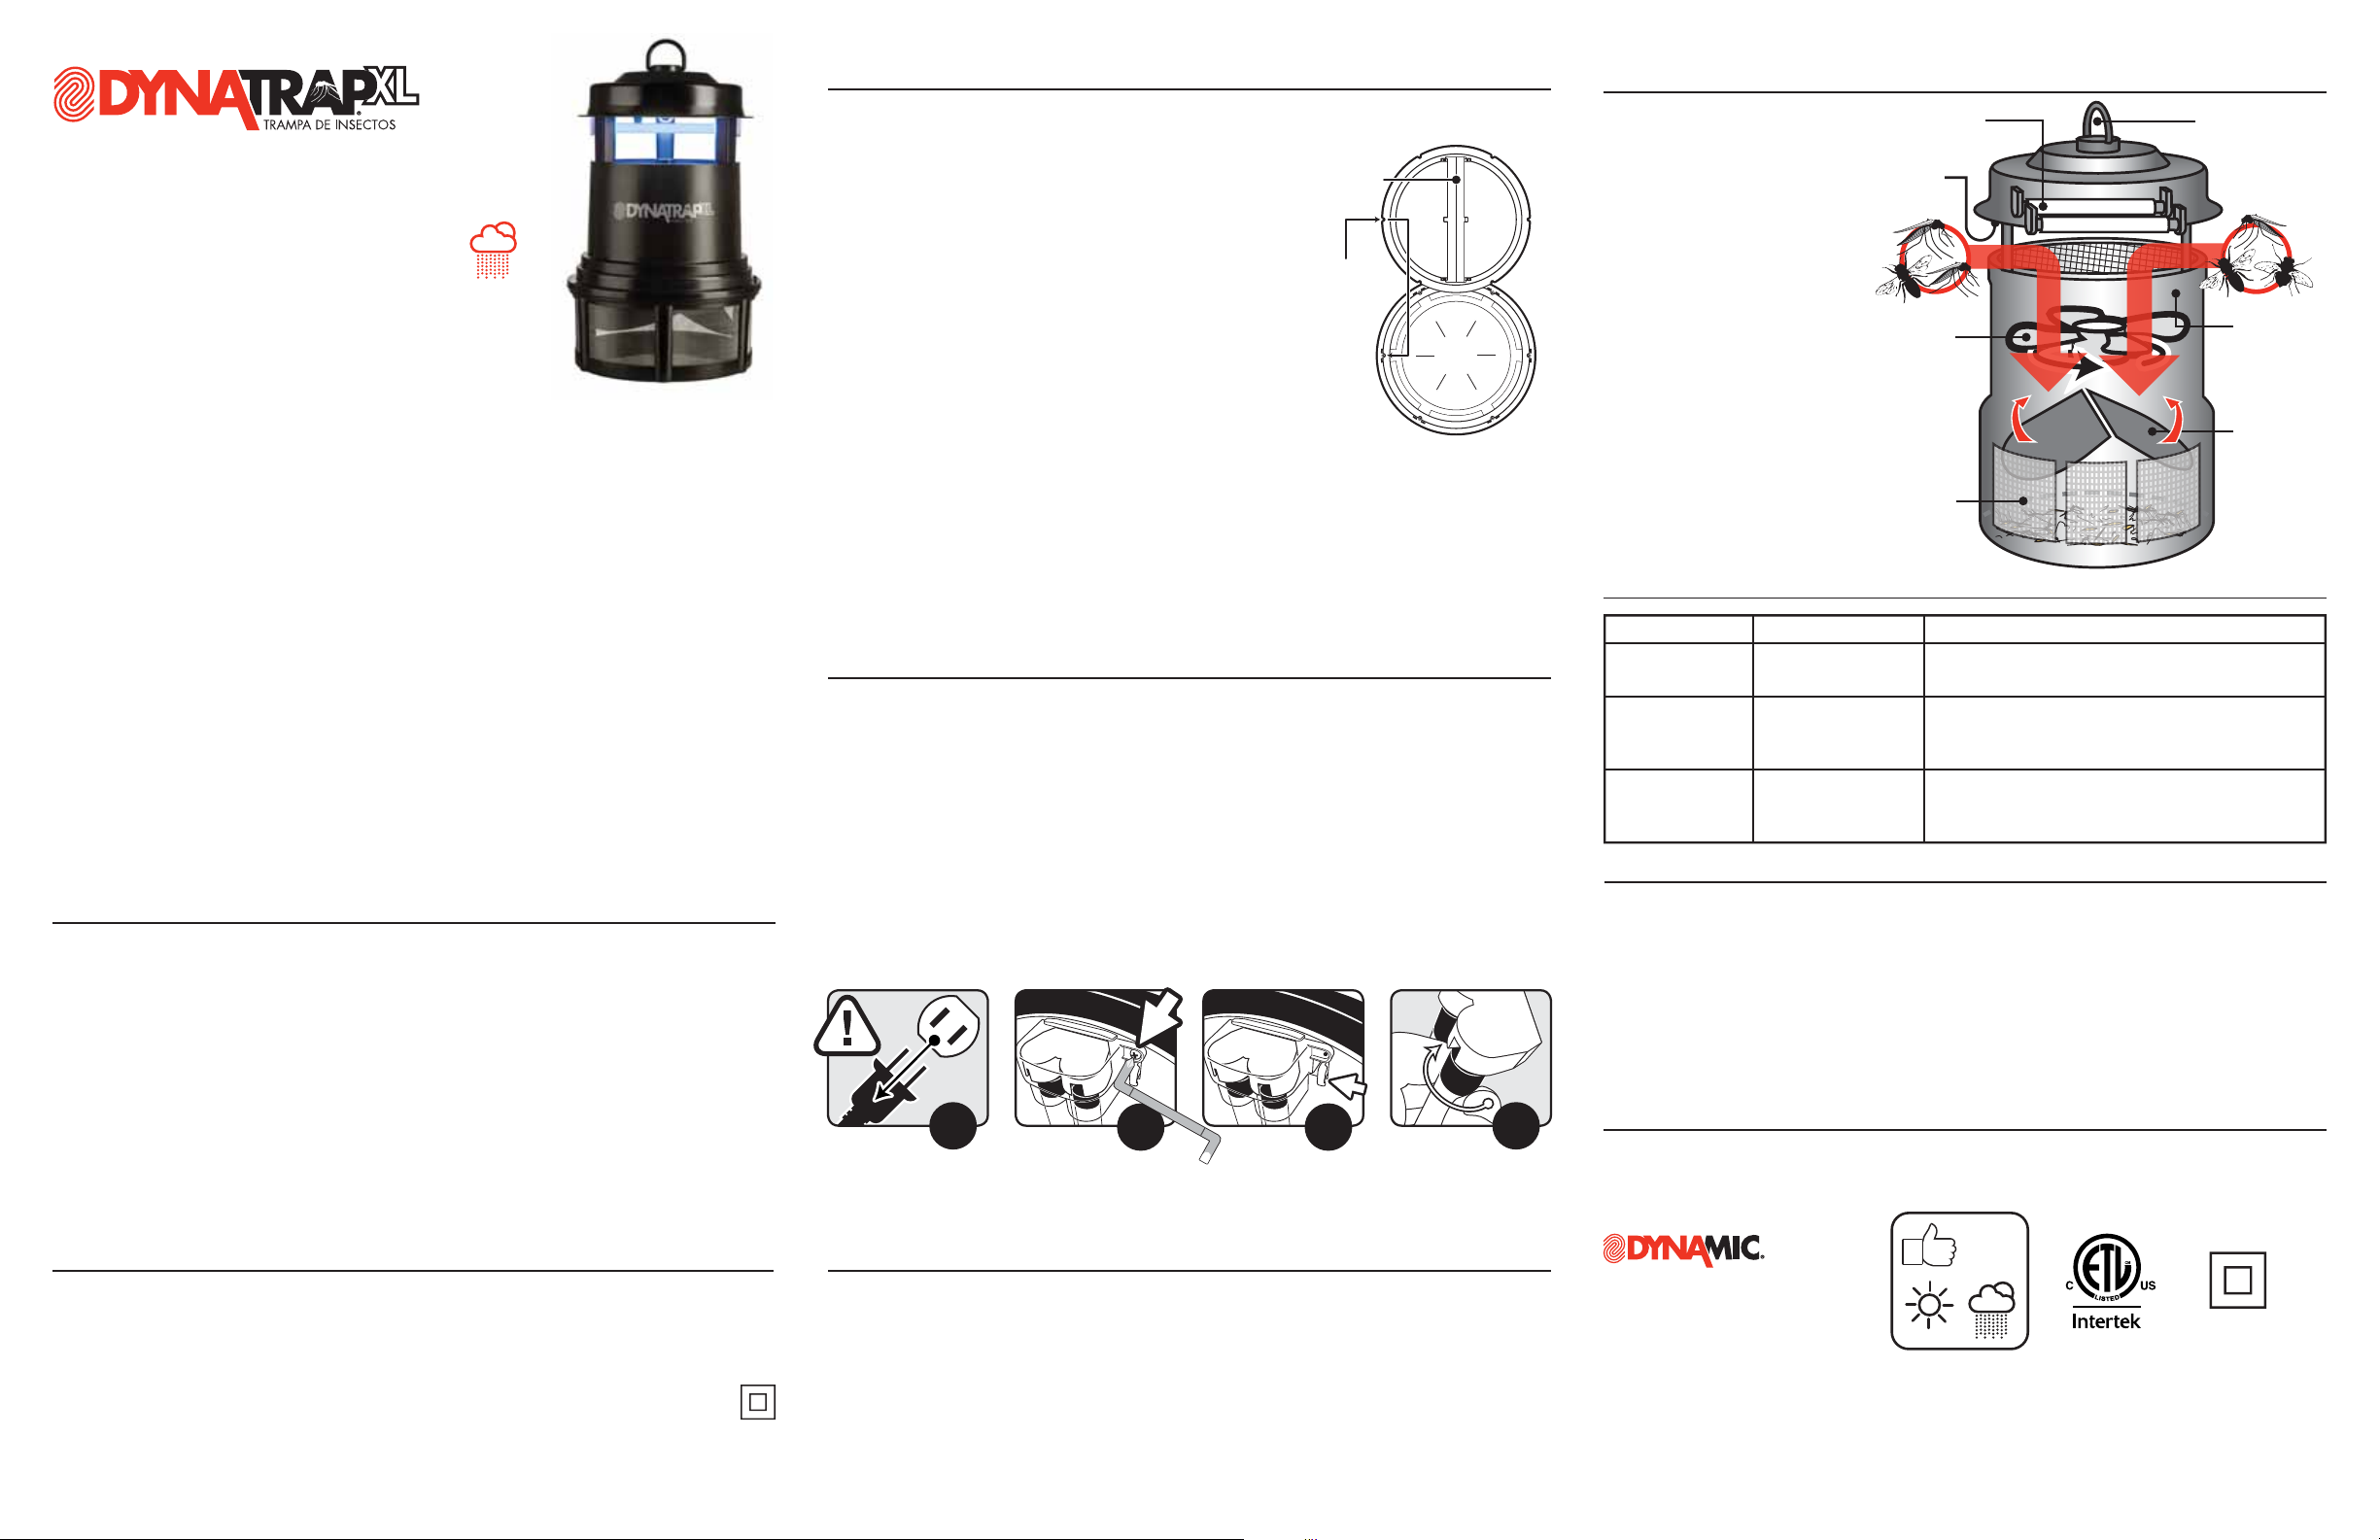
GANCHO PARA COLGAR
(OPCIONAL)
COMPUERTA
AUTOMÁTICA
SE CIERRA
CUANDO SE
APAGA,
PREVINIENDO
INSECTOS AUN
VIVOS QUE SE
ESCAPEN
SUPERFICIE CON
CAPA DE TIO2
2 FOCOS
ULTRAVIOLETA
SWITCH PARA
PRENDER O
APAGAR
PODEROSO Y
SILENCIOSO
VENTILADOR
CAMARA DE
RECOLECCION
COMO FUNCIONA LA TRAMPA DE INSECTOS DYNATRAP®
Los insectos voladores son atraídos a la
unidad por medio de la luz y el CO2
(dióxido de carbono) que es generado por
la foto-catálisis que sucede entre la capa
de TiO2(dióxido de titanio) y los focos
ultravioletas; luego el ventilador los
succiona hacia una cámara de recolección
donde quedan atrapados hasta que se
deshidratan y mueren. La cámara de
recolección puede ser removida, de esta
forma se pueden periódicamente vaciar
los contenidos en la basura. Las rejillas en
la cámara de recolección permiten ver lo
que ha sido atrapado, alertando de esta
manera la siguiente vez que se necesita
vaciar.
INSTALACION E INSTRUCCIONES DE OPERACION
1. Remueva el cartón de la jaula de retención.
2. Coloque la compuerta de aire en la jaula de retención con el travesaño hacia arriba.
Oriente las seis muescas de la compuerta de aire con las muescas correspondientes
en la jaula de retención.
3. Coloque la trampa sobre la jaula de retención y gire hacia la derecha para cerrarla
firmemente.
4. Guarde el paquete original para su almacenamiento cuando no use la trampa o esté
fuera de temporada (si es necesario).
5. Si decide colgar la unidad, colóquela aproximadamente de 3-6 pies sobre el nivel
del suelo para obtener una captura de insectos óptima y también para un fácil
acceso para su limpieza. La unidad también se puede colocar en el suelo si Ud. lo
desea.
6. Enchufe el cable a un receptáculo exterior a cable de
exterior aprobado por UL, tal como se describe en “INSTRUCCIONES IMPORTANTES
DE SEGURIDAD”.
7. Coloque el interruptor en la posición "ON". El interruptor está ubicado debajo de la
cubierta superior, y a un lado de los focos.
8. Para mejores resultados, deje la unidad todo el tiempo prendida
excepto cuando se vaya a limpiar o se dé servicio.
9. La actividad captura será mayor por la noche. Para obtener mejores resultados, coloque
la unidad lejos de otras fuentes de luz que compitan con la trampa.
10. Se recomienda colocar la unidad de 20 a 40 pies de distancia de donde se encontrara la gente.
11. Esta unidad es totalmente resistente a la intemperie - diseñado para uso en exteriores, incluyendo
condiciones lluviosas.
A000-003
En un aparato con doble aislamiento, esto significa que tiene dos sistemas de aislamiento en lugar de conexión a tierra. No sistema de
conexión a tierra es proporcionado en un aparato con doble aislamiento, ni tampoco es necesario agregar un medio para la conexión a
tierra del aparato. El tratar de componer o darle servicio a un aparato con doble aislamiento requiere sumo cuidado y conocimiento del
sistema, y debe ser realizado únicamente por personal de servicio calificado. Partes de reemplazo en productos de doble aislamiento
deben ser idénticas a las partes en el aparato. Un aparato con doble aislamiento está marcado con las palabras "DOBLE AISLAMIENTO"
o "Aislamiento doble". El símbolo (un cuadrado dentro de un cuadrado) también está marcado en el aparato.
INSTRUCCIONES PARA APARATOS DE DOBLE AISLADO, APARATO CONECTADO CON CABLE:
MUESCAS PARA
ALINEACIÓN (6)
TRAVESAÑO
ENSAMBLAJE DE LA
COMPUERTA DE AIRE
JAULA DE
RETENCIÓN
INSTRUCCIONES IMPORTANTES DE SEGURIDAD
RELATIVAS AL RIESGO DE INCENDIO, DESCARGAS
ELÉCTRICAS O LESIONES PERSONALES
LEA TODAS LAS INSTRUCCIONES ANTES DE USAR ESTE APARATO
CUIDADO, Cuando use aparatos eléctricos, se deben de seguir precauciones básicas, incluyendo lo siguiente:
– Para desconectar, apague todos los controles en la posición (“0”), luego, remueva la clavija del enchufe eléctrico.
– Desconecte del enchufe cuando no este en uso y antes de darle servicio.
– Para reducir el riesgo de choque eléctrico, no ponga el aparato en agua o cualquier otro líquido.
– Este aparato esta proveído con aislado doble. Use solo con partes de repuesto idénticas. Vea instrucciones para Servicio de Aparatos
de Doble Aislado.
– Conecte solamente a un tomacorriente protegido con un interruptor de circuito de falla a tierra (GFCI).
– Para reducir el riesgo de descarga eléctrica, este aparato tiene un enchufe polarizado (una pata más ancha que la otra). Este
enchufe encajará en un tomacorriente polarizado de una sola manera. Si el enchufe no encaja completamente en el tomacorriente,
invierta el enchufe. Si aún así no encaja, comuníquese con un electricista calificado para que instale una toma adecuada. No cambie
el enchufe de ninguna manera.
– Para uso doméstico al intemperie solamente.
4
3
2
1
CONSTRUCCIÓN
TODO TIEMPO
INTERIOR / EXTERIOR
LLUEVA O TRUENE
24/7