DYS DMT-10 User manual

Digital Handheld Marine Tester
MODEL: DMT-10
Instruction Manual

- 2 -
Content
Main Parts and the Functions 4
Display symbols on LCD 5
CAUTION 6
1.Precaution before use__________________________________________________________________________________________6
2.Cautions on safety______________________________________________________________________________________________7
3.Cautions on measuring_________________________________________________________________________________________8
4.Cautions on ownership_________________________________________________________________________________________8
Product Specification 9
In order to make measurements 11
Examples of measurement method 12
Precautions that should be taken when calibrations are made 13

- 3 -
How to make calibrations 14
If the temperature unit is to be changed (℃<-- -->℉) 15
Adjustment of temperature 15
Replacement of batteries 16
When a failure takes place 17
Regarding A/S 18

- 4 -
Main Parts and the Functions
1. Sensor: When contaminated, please use a dishwashing cleaner and a sponge to clean it and dry it with a dry cloth or a tissue.
2. Sensor cap: Please be sure to cover the sensor cap when making measurements; its separation should be
made only when it is cleaned.
3. Sensor connection ring (Sensor ribbed collar): Please do not separate it because there is danger of leakage.
4. HOLD/CAL button: It is used when a solution calibration is made at the salinity of 30 ppt with the measured value held.
5. MOLD/SEL button: It is used when you select items to be measured, apply a zero correction, and change the unit of
temperature (oC -> o
6. ON/OFF button: It is used when turning on or off electric power; one press after another will toggle it on and off. If power is
not turned off after use, it will automatically go off in two minutes.
F)
7. Display panel
8. Battery cap: The battery can be replaced by opening it.
9. Hole for a portable hanger strap
*NOTE: All DMT-10 have been factory tested and calibrated for accuracy.

- 5 -
Display symbols on LCD
Display Description
°C (°F) To display the temperature of the specimen to be measured.
ppt To display the salinity of the specimen to be measured.
HOLD/CAL It is displayed when measured values are held and calculated
ERROR It is displayed when a value is out of the measurement scope or the scope
of measurable temperature.
It is displayed when in need of replacement of a battery.

- 6 -
CAUTION
This product has been developed for the purpose of measuring the Temp., Salinity and Specific Gravity of natural seawater
and/or synthetic seawater. This meter has been factory calibrated and performance tested to ensure accurate readings.
1 Precaution before use
Please read the entire operation manual before using this Digital Marine Tester. Failure to read this manual prior to usage
may result in equipment damage and will void warranty.
Caution:
Please observe the procedures and methods specified in the operation manual to
ensure precision, accuracy and reliable measurements and user safety.
Warning:
When the procedures and methods are not observed, accuracy and reliability of the
measurements cannot be guaranteed. This may lead to issues of safety and equipment failure.
!

- 7 -
2 Cautions on safety
-Please keep this product aw
ay from children. Ingestion of small parts may lead to choking and
serious injury. If the sensor protection cap or battery is swallowed, please consult a physician
immediately.
-The sensor and sensor cap part are waterproof only. Please do not submerge beyond ‘sensor
ribbed collar’ the digital tester. Avoid water contact above this line to prevent permanent
damage.
-
Please avoid damage to the sensors during cleaning. Be very careful not to scratch the surface
of the gold plated sensors.
-Use a damp cloth or
tissue to clean the main body of the tester. Use of chemicals such as
acetone or benzene may cause deterioration of the ABS housing.
-Never attempt to disassemble or modify this product, this will void warranty.
!

- 8 -
3 Cautions on measuring
-Please wa
sh the sensors with a neutral detergent using a soft cloth or sponge before and after
use for the most reliable test results. Dry off sensors with a clean cloth and always keep dry while
not in use.
-Make sure sensors do not contact any of the walls of the aquarium or sump while in
measurement mode. Contact of any solid material can give false lower readings.
-Keep sensors at least 1 cm from the side and bottom of the measuring container.
4 Cautions on ownership
-Avoid keeping the digital tester in high humidity environments, direct exposure to sunlight,
high temperatures, dust and moisture to prevent damage.
-Please keep sensor cap inserted to protect the sensors when not in use.
!
!

- 9 -
Product Specification
Name
Digital Handheld Marine Tester
Measurement target Aqueous solution (Seawater / Synthetic seawater)
Model number DMT-10
Measurement method Electric conductivity measurement system
Salinity measurement Measurement range: 0ppt∼50ppt
Measurement accuracy : ±2ppt
Measurement temperature range : 0°C∼70°C (32°F~158°F)
Temperature measurement Measurement range : 0°C∼100°C (32°F~212°F)
Measurement accuracy : ±1°C of reading
Specific Gravity Measurement range: 1.000∼1.037
Measurement accuracy: ±0.002 S.G
Measurement Temperature range: 0°C∼40°C(32°F~104°F)
Resolution
Salinity: 1ppt
Temperature: 0.1°C
Specific Gravity: 0.001
Power Supply
CR2032 Button Battery x 2 pcs
Battery life Approx. 6 months based on 3 times use per day
Size / Weight
30h x 30w x 195d mm mm / About 61g (including button battery)
Accessories
Sensor protection cap 1 ea, Instruction manual 1 vol., 30ppt Salinity
Standard Solution 1 Btl(40g), Meter Hanger Strap 1 Ea

- 10 -
In order to make measurements,
*Notice : Please do not forget to keep the Sensor Cap on for measuring
1. First of all, please separate the sensor cap and clean the sensor part in flowing water. If it is stained with oil, grease,
or foreign materials, please clean it with a dishwashing detergent and a sponge.
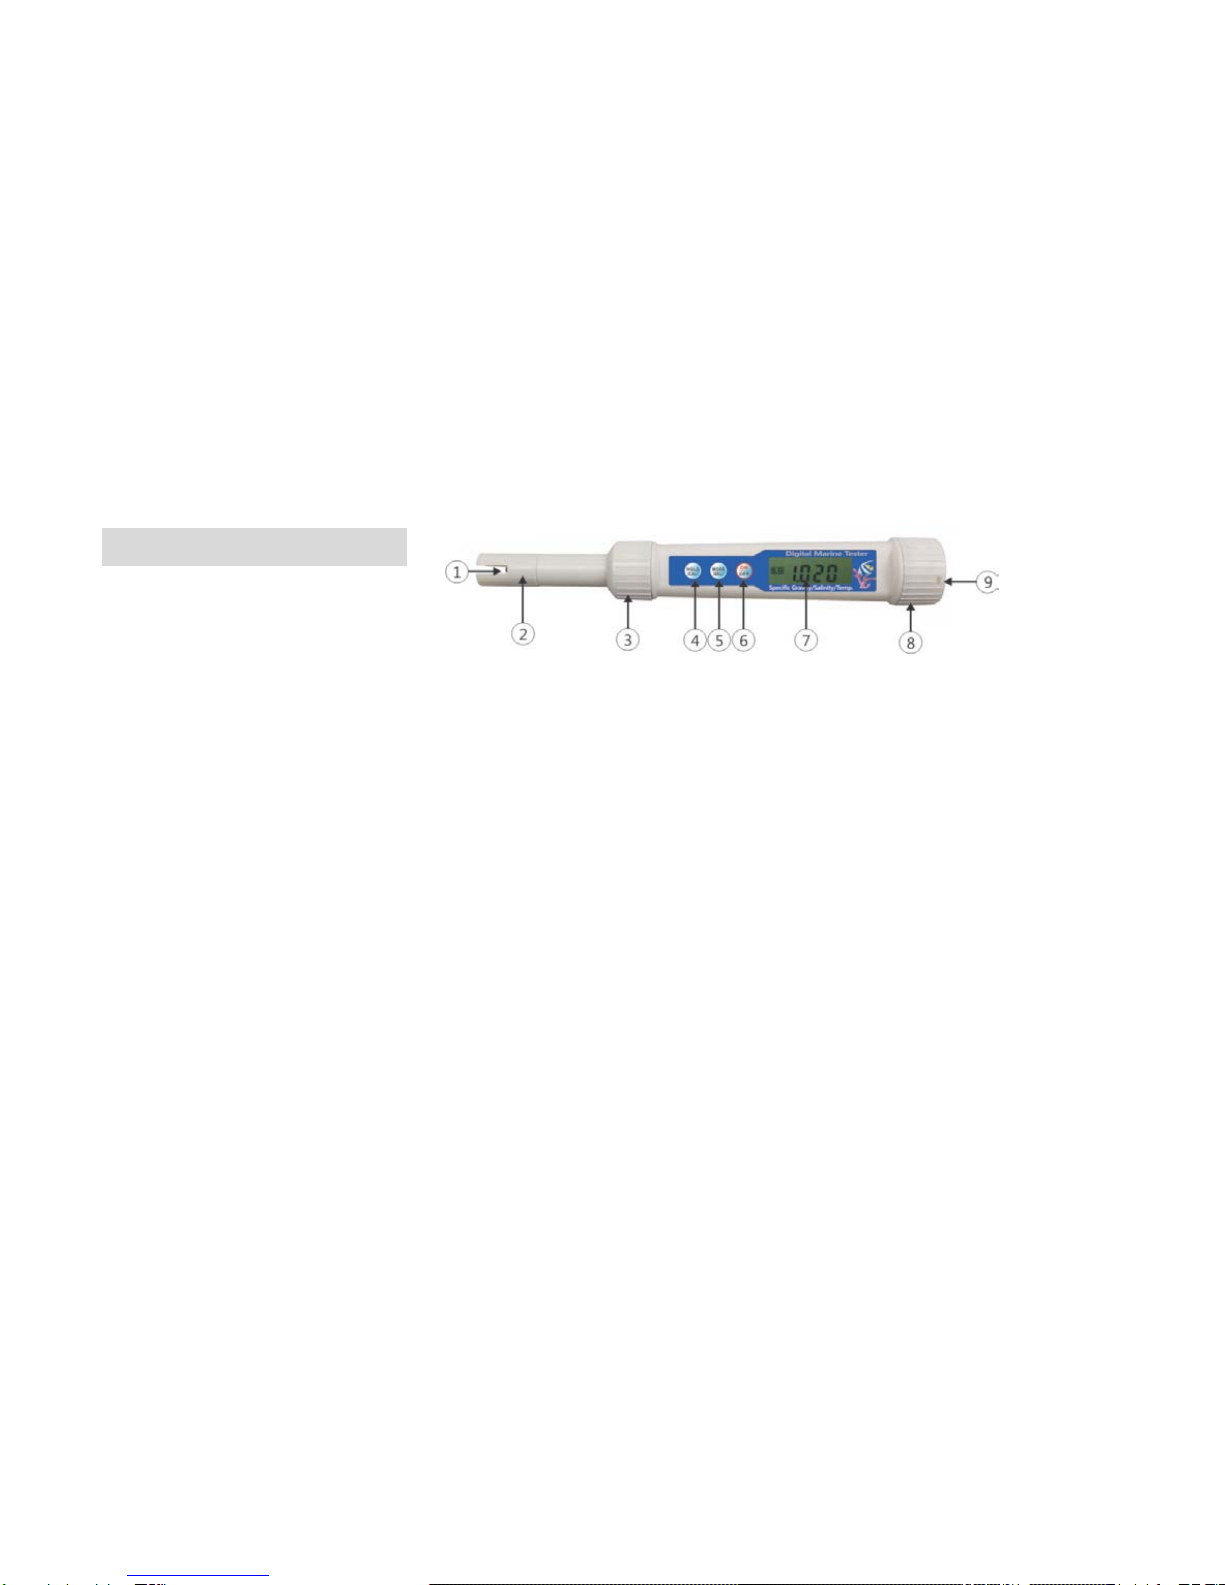
2. Then slip the sensor cap into its position, turn on power, and press the mode button one after another to
obtain measurements. (Temperature -> salinity -> specific gravity will appear in order.)
3. After selecting a desired measurement item, please put the DMT-10 into a water
container to make measurement.
The air bubbles stuck to the sensor after it is dipped into water can lead to measurement errors.
Shake sensor 5 retrun trips fast to take away the air bubbles.
When measured values are stabilized, please press the HOLD button and read it.
When the measurement is completed, please separate the sensor cap, which should be rinsed in flowing
water and dried completely with a cloth or a tissue, before putting it back and keeping it in store.

- 11 -
Examples of measurement method
*At the time when a measurement is taken, pls be sure to perform it with the Sensor Cap on.
At the time when washing is carried out, please be sure to separate the sensor cap before cleaning
the sensor part and the sensor cap.

- 12 -
Precautions that should be taken when calibrations are made
- Please make a calibration when an error is believed to exist in the measured value
- Please carry out a calibration when you put the DMT-10 in a 30 ppt standard solution and you do not obtain
the value of 30 ppt.
- Please make a calibration when surrounding temperature are between 15 and 30o
- When the calibration of a solution is made, the sensor part should be completely immersed in the solution.
C.
- In order to prevent the contamination of a correction solution and take an exact calibration, the sensor part
should be cleaned in flowing water and with a dishwashing cleaner, which should be dried of moisture with
a cotton swab etc, before dipping it into the standard solution.
- In case a standard solution is insufficient or is contaminated, please use a new one.
- A solution calibration should be carried out only after a zero calibration is applied.
- When a solution calibration is made, please close the cap of the solution and store it in an airtight state.

- 13 -
How to make calibration
*At the time when a measurement is taken, pls be sure to perform it with the Sensor Cap on.
[Zero calibration]
1. Please turn on power and wait for 20 seconds
2. Please press the MODE button to switch to the Salinity Measurement Mode.
3. A long press of the MODE button will enable the display panel to blink. At that time you take your hand off
the MODE button and wait, when the zero calibration is carried out and the mode will be automatically
returned to the Salinity Measurement Mode.
[Solution calibration]
1. After the zero calibration is completed, please wait for 20 seconds steeping the DMT-10 in the standard solution.
2. A long press of the CAL button will enable the display panel to blink. At that time you take your hand off the CAL button
and wait, when the 30 ppt calibration is carried out and the mode will be automatically returned to
the Salinity Measurement Mode.
Caution: It is required that the sensor be completely immersed in the solution.

- 14 -
If the temperature unit is to be changed (oC o
While the MODE/SEL button is being pressed at the temp measurement mode, the temperature unit will be changed.
F)
Adjustment of temperature
The adjustment of temperature is to be made when a measured value is different from that measured by
another precise thermometer.
1. A long press of the HOLD/CAL button at the temperature measurement mode will lead to the Temp adjustment Mode.
2. A press of the HOLD button will lower the temp by -0.1oC while a press of the MODE button will raise it by +0.1o
3. Please adjust the temperature only in Celsius; the Fahrenheit will be automatically changed.
C.

- 15 -
Replacement of batteries
The batteries should be replaced when the symbol of ‘Insufficient battery’ appears
1. Please open the battery cap and take the battery bracket out.
2. Extract the battery bracket carefully and remove the old batteries.
3. Replace two ‘CR2032’ batteries as shown on the picture
and to close the battery cap.
Attention! 1) Please make sure if the batteries are placed
on the right position of polarity.
2) To close the battery cap,be careful the battery cable
in order not to any problems.

- 16 -
When a failure takes place
Symptoms Causes Measures
Power is not turned on The polarity of the battery may
be reversed
Please check the battery polarity
The batteries run short Please replace the batteries
There may be damage to the
circuit due to water leakage
Please contact a service center
-It is not possible to make
normal measurements at
the salinity measurement
-A normal measurement is
not made even after
orrection
- The sensor may be stained with
foreign materials
- Batteries run short
-The sensor cap is not placed
properly
- Please clean the sensor using a
dishwashing cleaner and a cotton swap.
- Please replace the batteries
- Please use a new standard solution.
- Please put the sensor cap in place
before measurement
Other problems Arbitrary disassembly may lead to a
bigger problem. Please contact our
service center for services.

- 17 -
Regarding A/S
1. Product warranty
(1) This meter comes with a warranty at the back of the user manual. The specific details of the warranty should be filled out
at the store where you purchase the instrument. Please get familiar with the details before you file this manual well.
(2) The warranty period lasts for 6 months from the date of purchase. Any failure occurring during the warranty period
arising out of the instrument in itself shall be subject to free-of-charge repairs; however, any failure or damage resulting
from user’s mistakes or in connection with force majeure should be repaired at user’s account even during the warranty
period.
(3) Any repair conducted after the warranty period expires shall be subject to a charge stipulated on our regulation on repair
services, depending on the details of a repair service.
2. Request for repair and consultation
(1) Please contact either the store where the instrument is purchased or our company (at 02-858-6870) with any problem you
may have during the use of the instrument. Please do not dismantle or disassemble it.
(2) Please have a consultation with the store of purchase or our company (at 02-858-6870) for any question on its use.

- 18 -
Calibration Certificate
Model:
Series No.
Accessories:
Date:
Calibration Certificate
This Certificate guarantees that the product has been inspected and tested in accordance with the
published specifications. The instrument has been calibrated by using equipment, which already
calibrated to standards traceable to international standards.
Returning Defective Products for Repair
Please keep your original invoice or receipt for requires servicing. Return the products to us, shipping
charge prepaid.
Table of contents