e-Domotica EM6581 User manual
EM6581 e-Domotica Motion Sensor
English manual

2|ENGLISH
EM6581 e-Domotica Motion Sensor
Table of contents
1.0 Introduction................................................................................................................. 2
1.1 Functions and features .......................................................................................... 2
1.2 Packing contents.................................................................................................... 3
2.0 Install the battery........................................................................................................ 3
3.0 Add the motion sensor to your e-Domotica e-Centre ............................................... 4
4.0 Setup an absence alarm or night alarm .................................................................... 5
5.0 Setup your personal alarm system using the e-Domotica Portal. ............................ 8
5.1 Adding contact persons ......................................................................................... 8
5.2 Setup notifications to Contact persons.................................................................. 9
5.3 Assigning a camera to the Absence alarm ......................................................... 10
6.0 Mounting the EM6581 Motion Sensor ..................................................................... 10
6.1 Choosing the mounting location .......................................................................... 10
6.1.1 Mounting height ............................................................................................. 10
6.1.2 Ceiling lens and wall lens .............................................................................. 11
6.1.3 Detectoion area ............................................................................................. 12
6.1.4 Other points to consider ................................................................................ 12
6.2 Mounting the motion sensor ................................................................................ 13
7.0 Test the motion sensor ............................................................................................ 14
7.1 Detection display on the e-Centre screen, Mweb and the e-Domotica app ...... 14
7.2 Test the alarm ...................................................................................................... 14
8.0 Frequently Asked Questions.................................................................................... 15
9.0 Service and support ................................................................................................. 15
10.0 Warning and points of attention............................................................................. 15
11.0 Warranty conditions ............................................................................................... 16
12.0 Declaration of Conformity ...................................................................................... 17
1.0 Introduction
Congratulations with the purchase of this high-quality e-Domotica product! This
product has undergone extensive testing by e-Domotica technical experts. Should you
experience any problems with this product, you are covered by a five-year e-Domotica
warranty. Please keep this manual and the receipt in a safe place.
1.1 Functions and features
The EM6581 e-Domotica Motion Sensor is the ideal product to secure your home
wirelessly. Use one or more motion sensors to detect any motion in your living room,
bed room, kitchen, hallway, garage or office at home.
When motion is detected, the motion sensor will send a wireless signal to the e-
Domotica base station, the e-Domotica e-Centre. The e-Centre can fire the alarm and
3|ENGLISH
trigger the EM6575 e-Domotica Siren for example. Or notify you via the online e-
Domotica Portal by phone, text message or email.
It is also possible to use the EM6581 for more comfort at home, for example to switch
on lighting automatically when you enter a room. When no motion is detected
anymore, the lights can also be switched off automatically, or switched off
automatically after several (preset) minutes). Save energy and reduce your energy bill.
1.2 Packing contents
The following parts need to be present in the packing:
•e-Domotica Motion Sensor
•Manual
•Double sided adhesive tape
•Screws and plugs
•Batteries (3x AA)
2.0 Install the battery
Before you can use the motion sensor, the battery needs to be installed.
Follow these steps:
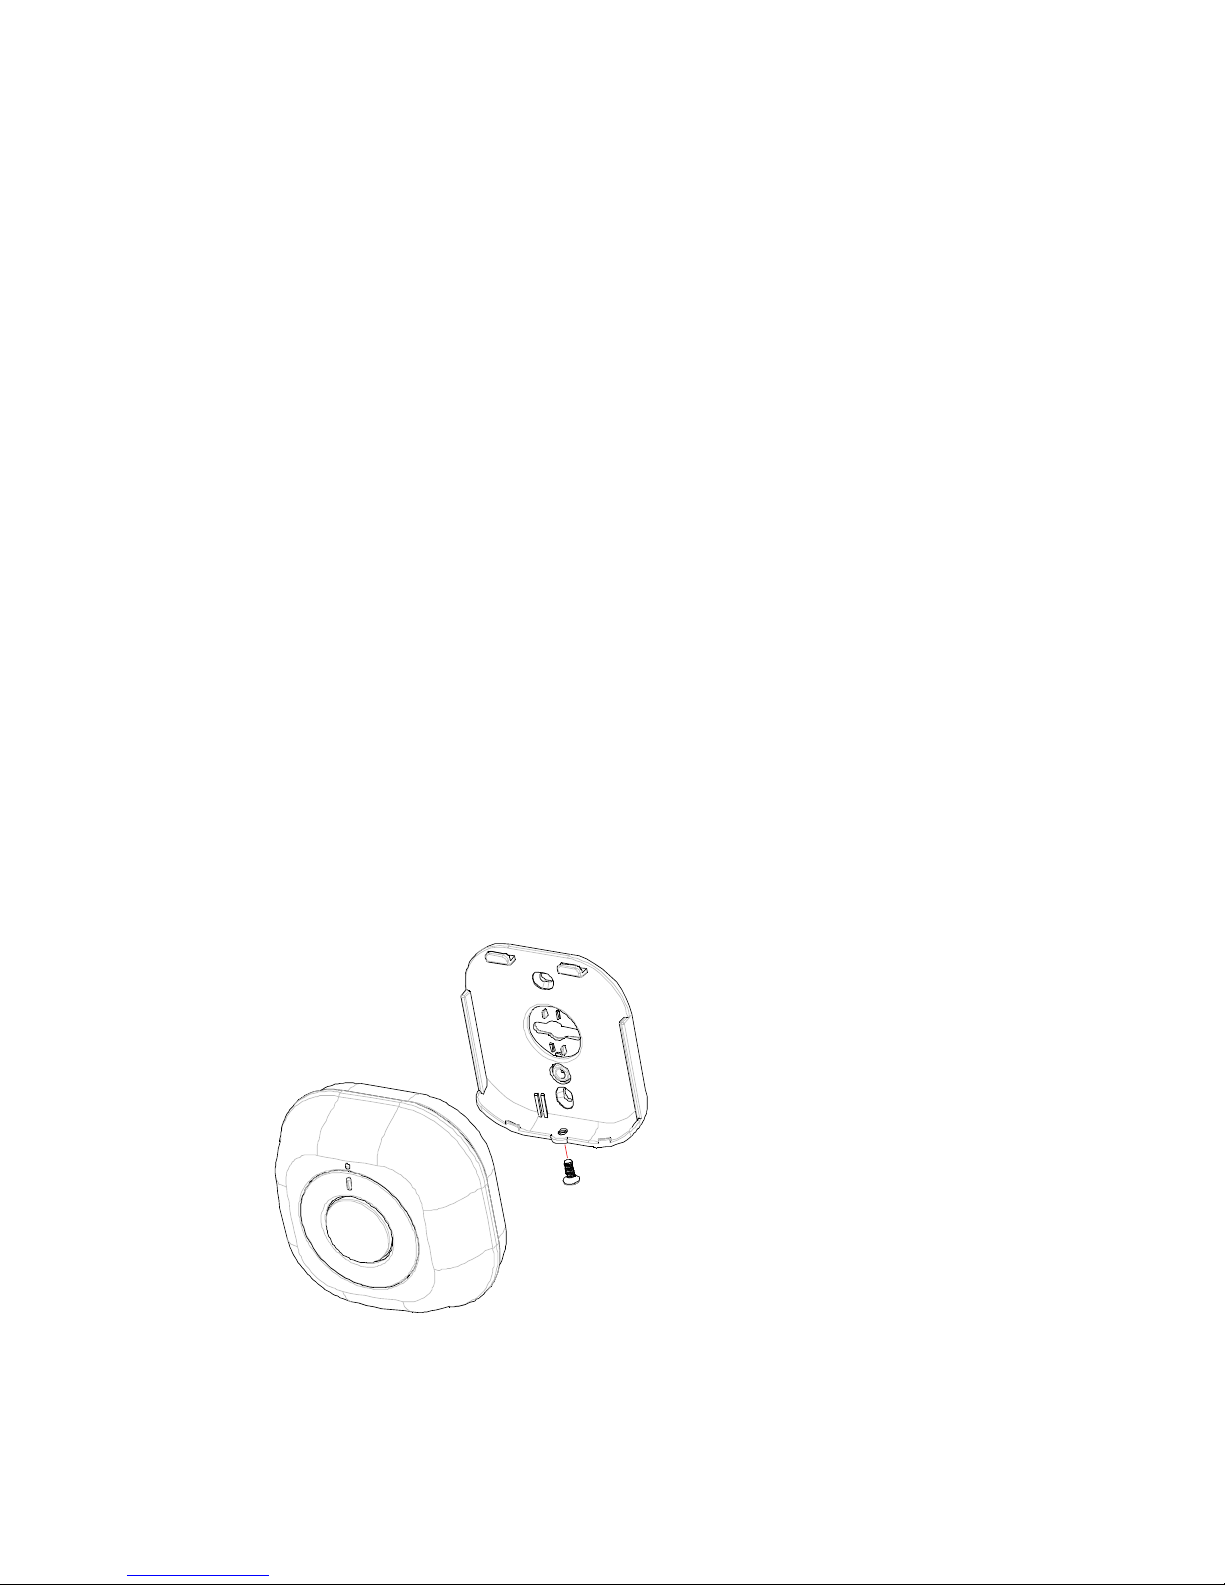
1. Unpack the motion sensor and the battery.
2. Unscrew the back panel from the motion sensor. The screw is located at the
bottom of the device.
3. Carefully remove the back panel, see the next drawing.
Image 1. Opening the motion sensor
4|ENGLISH
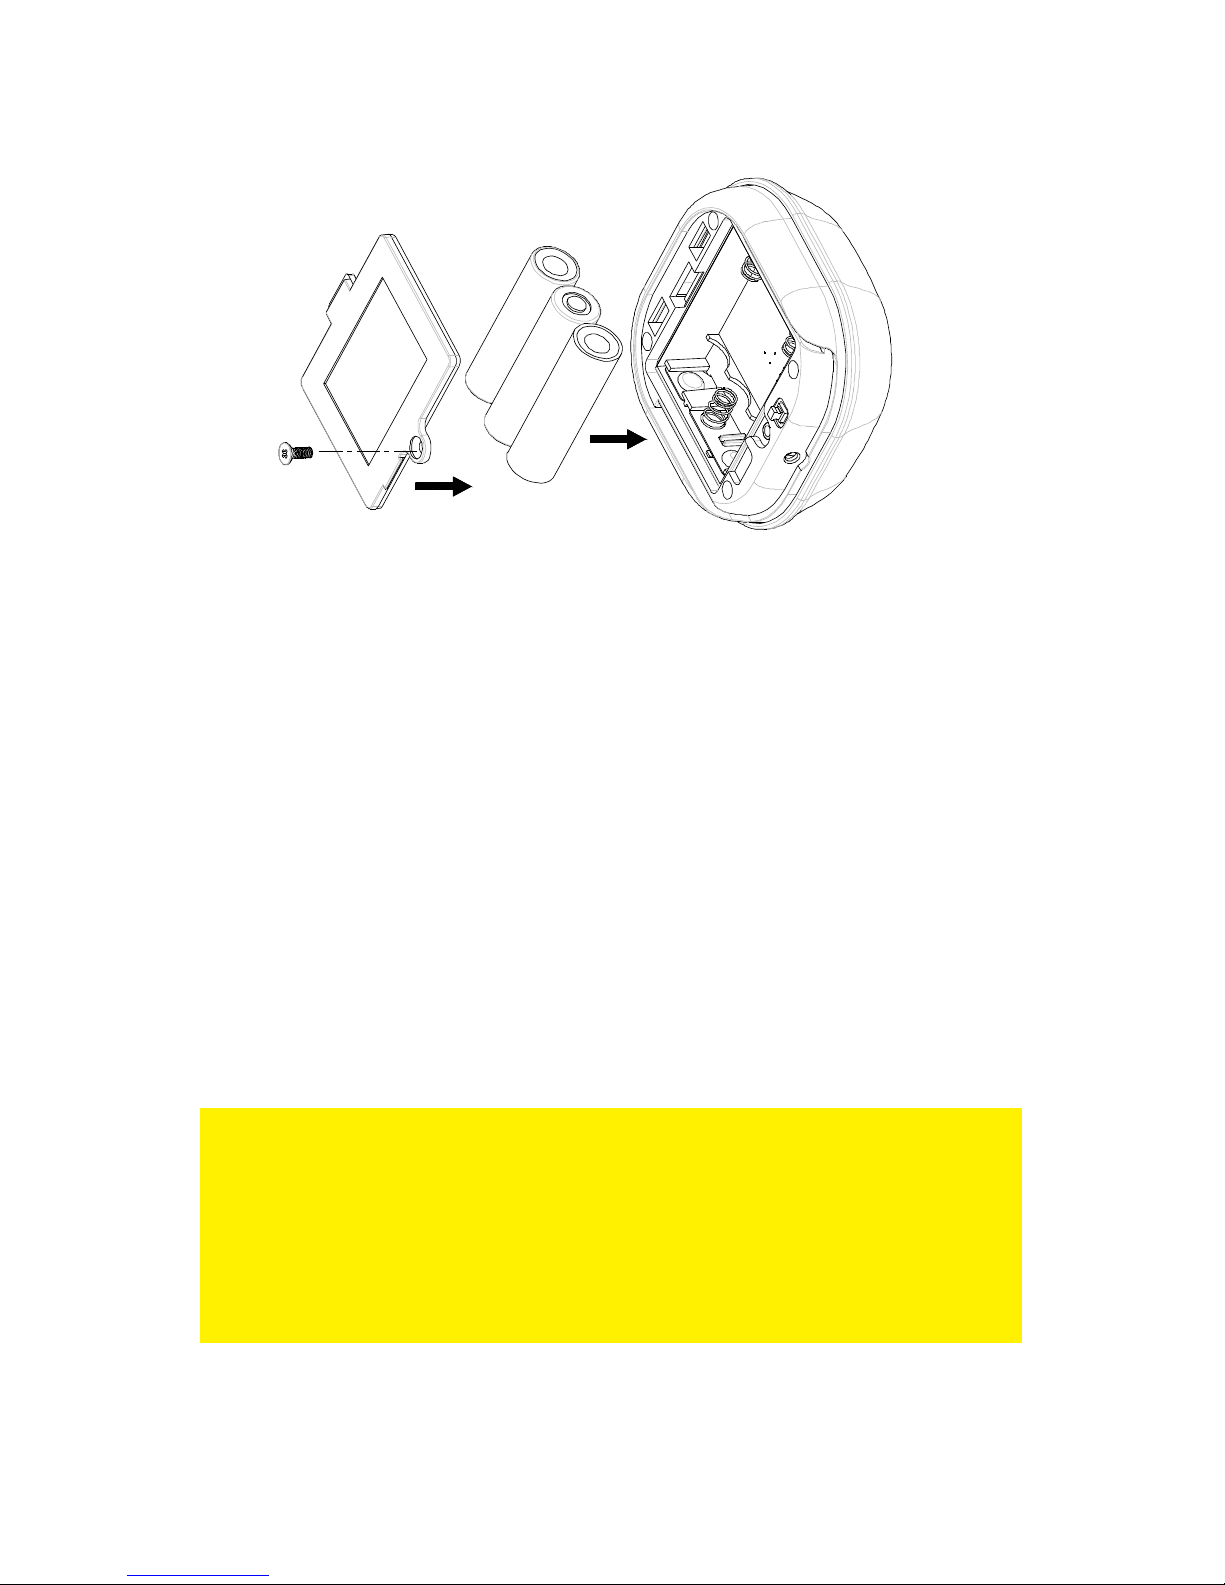
4. Place the batteries in the compartment.
Image 2. Placing the batteries
5. Leave the housing open, because you need the button to include the motion
sensor later.
6. The motion sensor will now warm up for 2 minutes.
7. The LED of the motion sensor (located behind the detection window) will blink
every 5 seconds to let you know it is ready to include.
The expected battery lifetime is about 6 months with normal conditions. If the battery
level is too low, the LED behind the detection window will blink (with a 30 seconds
interval).
3.0 Add the motion sensor to your e-
Domotica e-Centre
Add the wireless EM6581 e-Domotica Motion Sensor to your e-Centre using the
following steps.
Tips:
If you already use 230V powered e-Domotica accessories, you are able to include the
motion sensor on the location where the motion sensor needs to be mounted. The
benefit of doing this is that the e-Domotica accessories learn the communication route
to the e-Centre directly.
You might need to enable ‘Normal/High power’ (below the ‘Include’ button). This
option is available to include devices on a greater distance.
1. Make sure your computer is completely started.
2. Open your computer’s web browser.
5|ENGLISH
3. Enter “http://ecentre” in the address bar of your web browser and press the
‘Enter’ key on your keyboard.
4. The webpage of the e-Centre will be shown.
5. Go to the ‘e-Domotica Products’ page.
6. Click the ‘Include’ button. The e-Centre will start to search for new e-Domotica
devices.
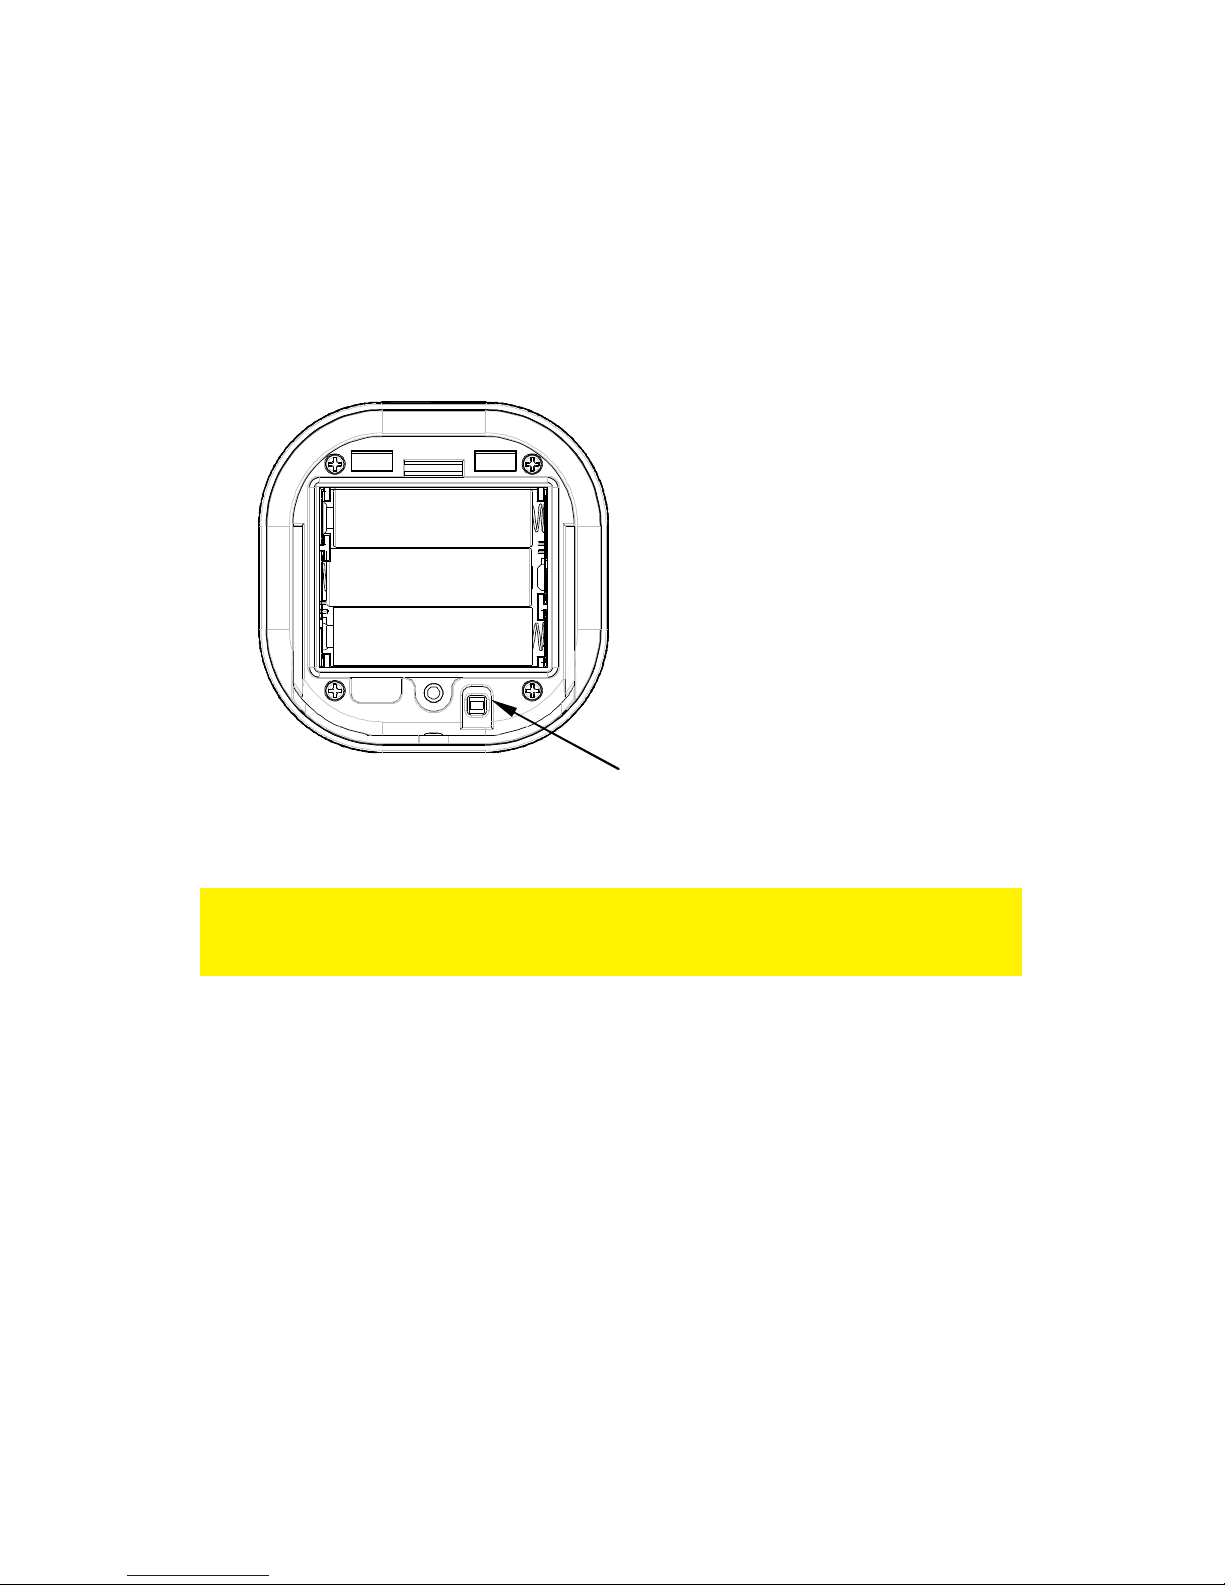
7. Press on the button of the motion sensor three times within 1.5 seconds. The
button is located on the backside of the motion sensor, see the image below.
Image 3. Button located on the backside of the motion sensor
8. The e-Centre webpage will inform you if the product is found.
If the product is not found, click the ‘Remove’ button on the webpage. Press the button
on the motion sensor three times within 1.5 seconds to exclude/empty the device. You
can now include the device again using the steps above.
9. Provide a name and location for the device and click ‘Save’.
10. The EM6581 is now added to your e-Centre and can be used.
11. Screw the back panel on the motion sensor.
Mounting the motion sensor is explained later in this manual.
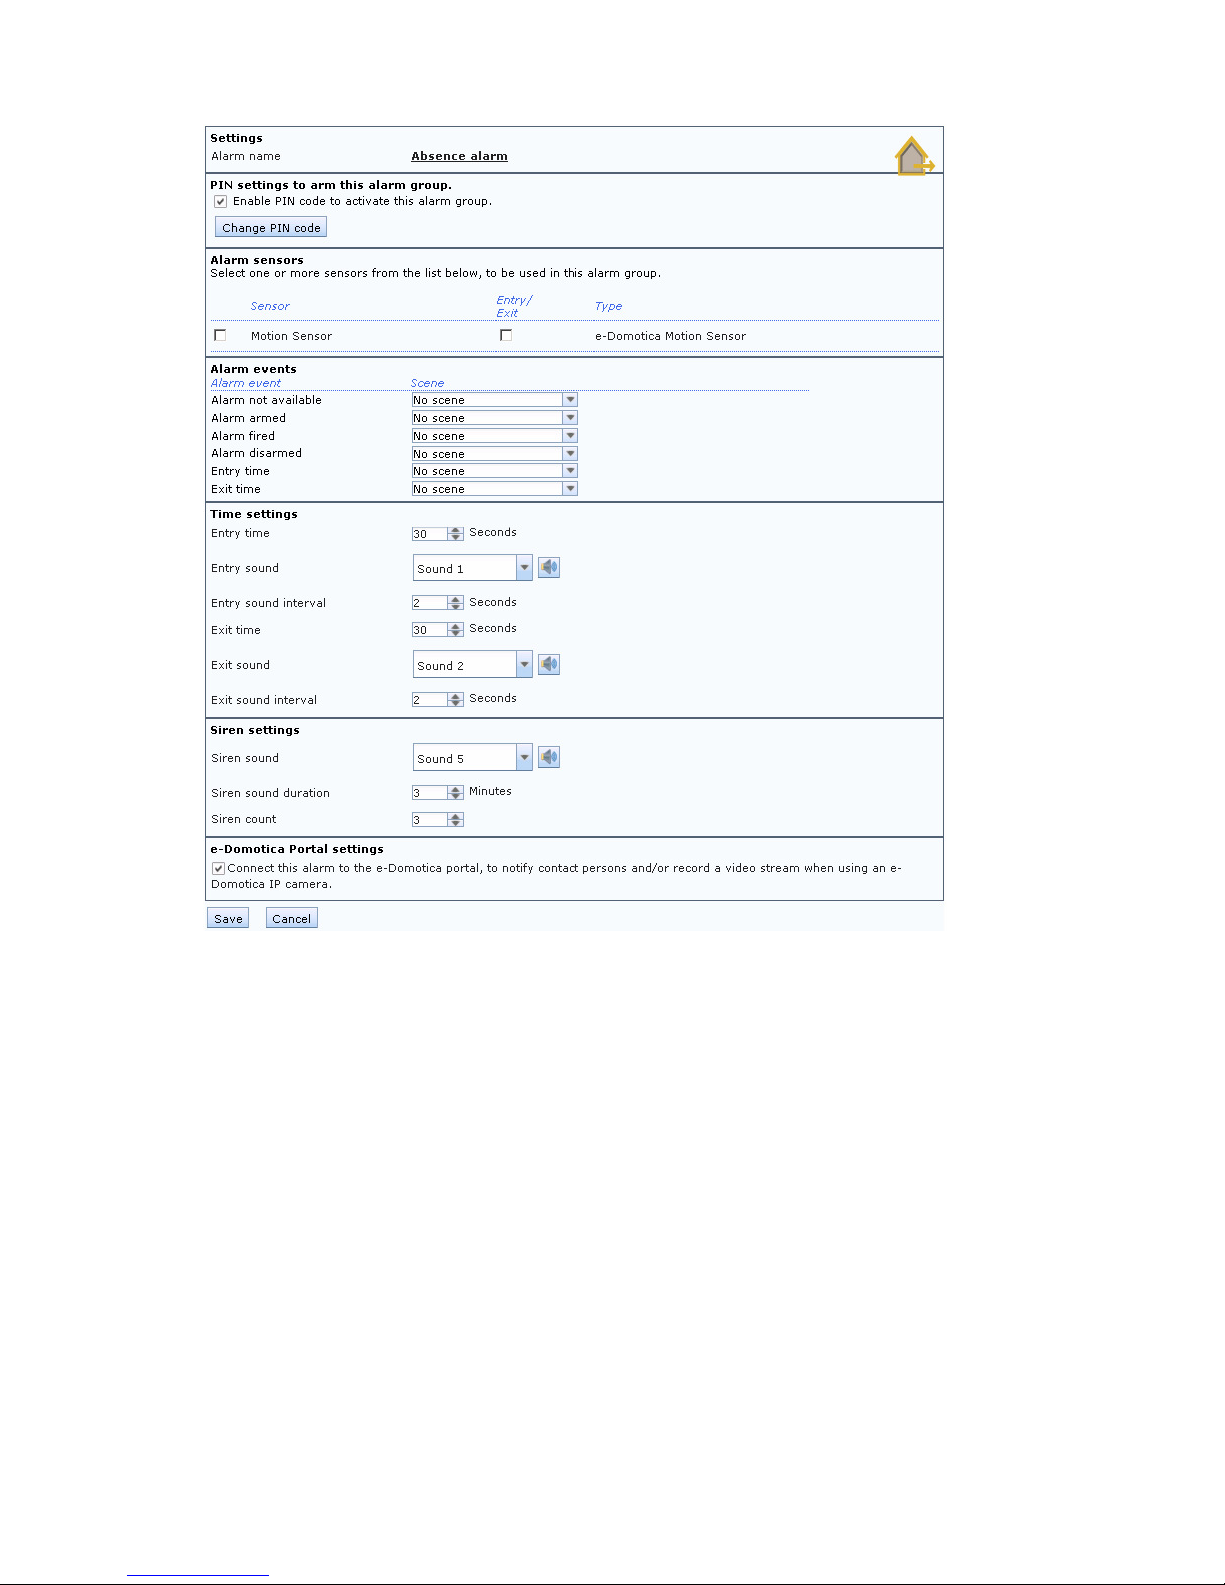
4.0 Setup an absence alarm or night alarm
You can use this motion sensor for one or more alarm groups. In this chapter the
motion sensor is added to an absence alarm.
6|ENGLISH
Image 4. Absence alarm settings
1. Click on ‘Alarm Settings’ in the menu.
2. Click ‘Edit’ to setup or change the settings of the absence alarm.
3. First setup the PIN settings for this alarm.
a. By default a PIN code 1234 is enabled using the alarm. In certain
situations, you do not want to use a PIN code, so you can disable this
by clicking on the checkbox. For most situations, this is not
recommended.
b. You can change the PIN code by clicking on ‘Change PIN’. A new
page will appear. First enter the ‘Old PIN’ (1234 by default), then enter
the ‘New PIN’. Confirm the new PIN code in the field ‘Repeat PIN’.
Click ‘Save’ to save the settings and automatically go back to the
previous page.
4. Select the Alarm Sensors. You can select one or more sensors to be used in for
this absence alarm.
5. Determine which sensors will be mounted in an entry and/or exit route from
outside your house to the e-Centre screen.

7|ENGLISH
For example if you are going to mount the e-Centre in your living room and have
a door sensor on the front door and back door together with a motion sensor in
the living room, you should enable these sensors, because these sensors are
located in the route to the e-Centre.
a. Sensors with the option ‘Entry/Exit’ enabled will trigger the entry time
and exit time first before firing the alarm. Enable this option for sensors
used on the ground floor.
b. Sensors without the option ‘Entry/Exit’ enabled will fire the alarm
directly. Use this for sensors used on a second or third floor for
example.
6. Set one or more Alarm Events. You can let the e-Centre execute a selected
scene on one of the alarm events. Below a list of the events and a example
a. Alarm not available: If you want the e-Centre to execute a scene if the
alarm is not available, select the desired scene.
b. Alarm armed: Once the alarm is armed the e-Centre can execute the
scene ‘All off’ to switch off all lights, for example.
c. Alarm fired: Once the alarm is fired the e-Centre can execute the
scene ‘All on’, to switch on all lights to scare off the intruder.
d. Alarm disarmed: If you disarm the alarm (by entering the correct PIN
code) the e-Centre will execute this scene.
e. Entry time: During the entry time the e-Centre can execute this scene.
For example, use a scene to enable the lights in your hallway. This
allows you to find your way to the e-Centre when entering your house.
f. Exit time: During the exit time the e-Centre can execute this scene. For
example, use a scene to enable the lights in your hallway. This allows
you to find your way to the door when exiting your house.
7. Set the time settings.
a. Entry Time: This is the time in seconds you need to enter your house
from the (front) door to the e-Centre and to disable the alarm. It is
recommended to check this carefully and to try this setting once it has
been set. If necessary change the setting to your desire.
b. Entry Sound: The e-Centre will play the selected sound on entering
your house. Click on the sound button ( ) to hear the selected sound.
c. Entry Sound Interval: This is the interval the e-Centre should use to
play the Entry Sound.
d. Exit Time: This is the time in second you need to exit your house, from
the e-Centre to the (front) door, once you have entered the PIN code. It
is recommended to check and try this setting once it has been set. If
necessary change the setting to your desire.
e. Exit Sound: The e-Centre will play the selected sound when exiting
your house. Click on the sound button ( ) to hear the selected sound.
f. Exit Sound Interval: This is the interval the e-Centre should use to play
the Exit Sound.
8. Set the Siren Settings.

8|ENGLISH
a. Siren Sound: The e-Centre will play the selected sound when the alarm
is fired. This concerns the internal siren of the e-Centre 2. Click on the
sound button ( ) to hear the selected sound.
b. Siren Sound Duration: This is the time (in minutes) the e-Centre should
play the Siren Sound.
c. Maximum number of Siren Count: This is the maximum number of
times the Siren should play.
9. Set the e-Domotica Portal settings, if your e-Centre is (to be) connected to the
portal. This enables you to contact yourself and/or contact persons when this
alarm is fired.
10. Click ‘Save’ to save the settings, you will automatically return to the previous
page.
5.0 Setup your personal alarm system using
the e-Domotica Portal.
The EM6581 Motion Sensor can be used with the e-Domotica Portal. This allows you
to notify yourself and other contact persons, once the absence alarm is fired.
This option is only possible if your e-Centre is connected to the internet and registered
on the portal. Also, you need to have added at least one (1) contact person for
reference.
1. Log in to the portal with your username and password.
2. Click in the left menu on the option ‘Alarm setup’.
3. Click on the “Change” button ( ) at the right hand-side of the absence alarm.
4. The following options appear: “Contact persons”, “Notifications” and “Assign
camera”. Refer to the following image:
Image 5. Edit absence alarm settings on the e-Domotica Portal
5.1 Adding contact persons
When you have added one or more contact persons during the first setup of your e-
Centre (refer to the manual of the EM6505, these contact persons are noticed here.
Refer to the following image for an example:

9|ENGLISH
Image 6. Select contact persons
Select one or more contact persons under ‘Available contact persons’ and use the
‘Add’ button to change them to the right side, under “Selected contact persons”.
You can also drag and drop the contact persons from left to right and in reverse, using
your mouse.
Click ‘Save and continue’.
5.2 Setup notifications to Contact persons
On this tab, you can decide in which ways the contact persons may be notified, in
case an alarm is fired. Refer to the following image for an example:
Image 7. Setup notifications
Check the options you want to use for the contact person(s). In this example, Mr. John
Smith will be notified by phone, SMS and email.
Click ‘Save and continue’.

10 |ENGLISH
5.3 Assigning a camera to the Absence alarm
On this tab, you can assign an e-Domotica camera to the Absence alarm. Refer to the
following image for an example:
Image 8. Assign a camera to the absence alarm
When the absence alarm is fired, the e-Centre will send the recorded images from the
selected camera to the e-Domotica Portal. These images will be stored on the e-
Domotica Portal, under the tab ‘Recordings’ in the left menu. This way, you can check
instantly if the alarm notification is real or maybe false.
Select the camera in the dropdown menu.
Click ‘Save and finish’ to save your configuration and finish the wizard.
In the manual of the EM6505, assigning a e-Domotica IP camera to the e-Centre is
fully explained.
6.0 Mounting the EM6581 Motion Sensor
You can choose to mount the motion sensor using the enclosed double sided
adhesive tape or you can use the screws and plugs.
If you are going to use the adhesive tape, make sure the mounting surface is clean
(no grease or dust). If the motion sensor should loosen from the wall a false alarm
might occur.
6.1 Choosing the mounting location
Before mounting the motion sensor, please consider the possibilities and images
shown in this chapter.
6.1.1 Mounting height
Wall mounting
11 |ENGLISH
Image 9. Mounting height and distance of the motion sensor
It is recommended to mount the motion sensor around 1.8 meters high. This height
allows the sensor to have the greatest range. Up to 10 meter and 110 degrees.
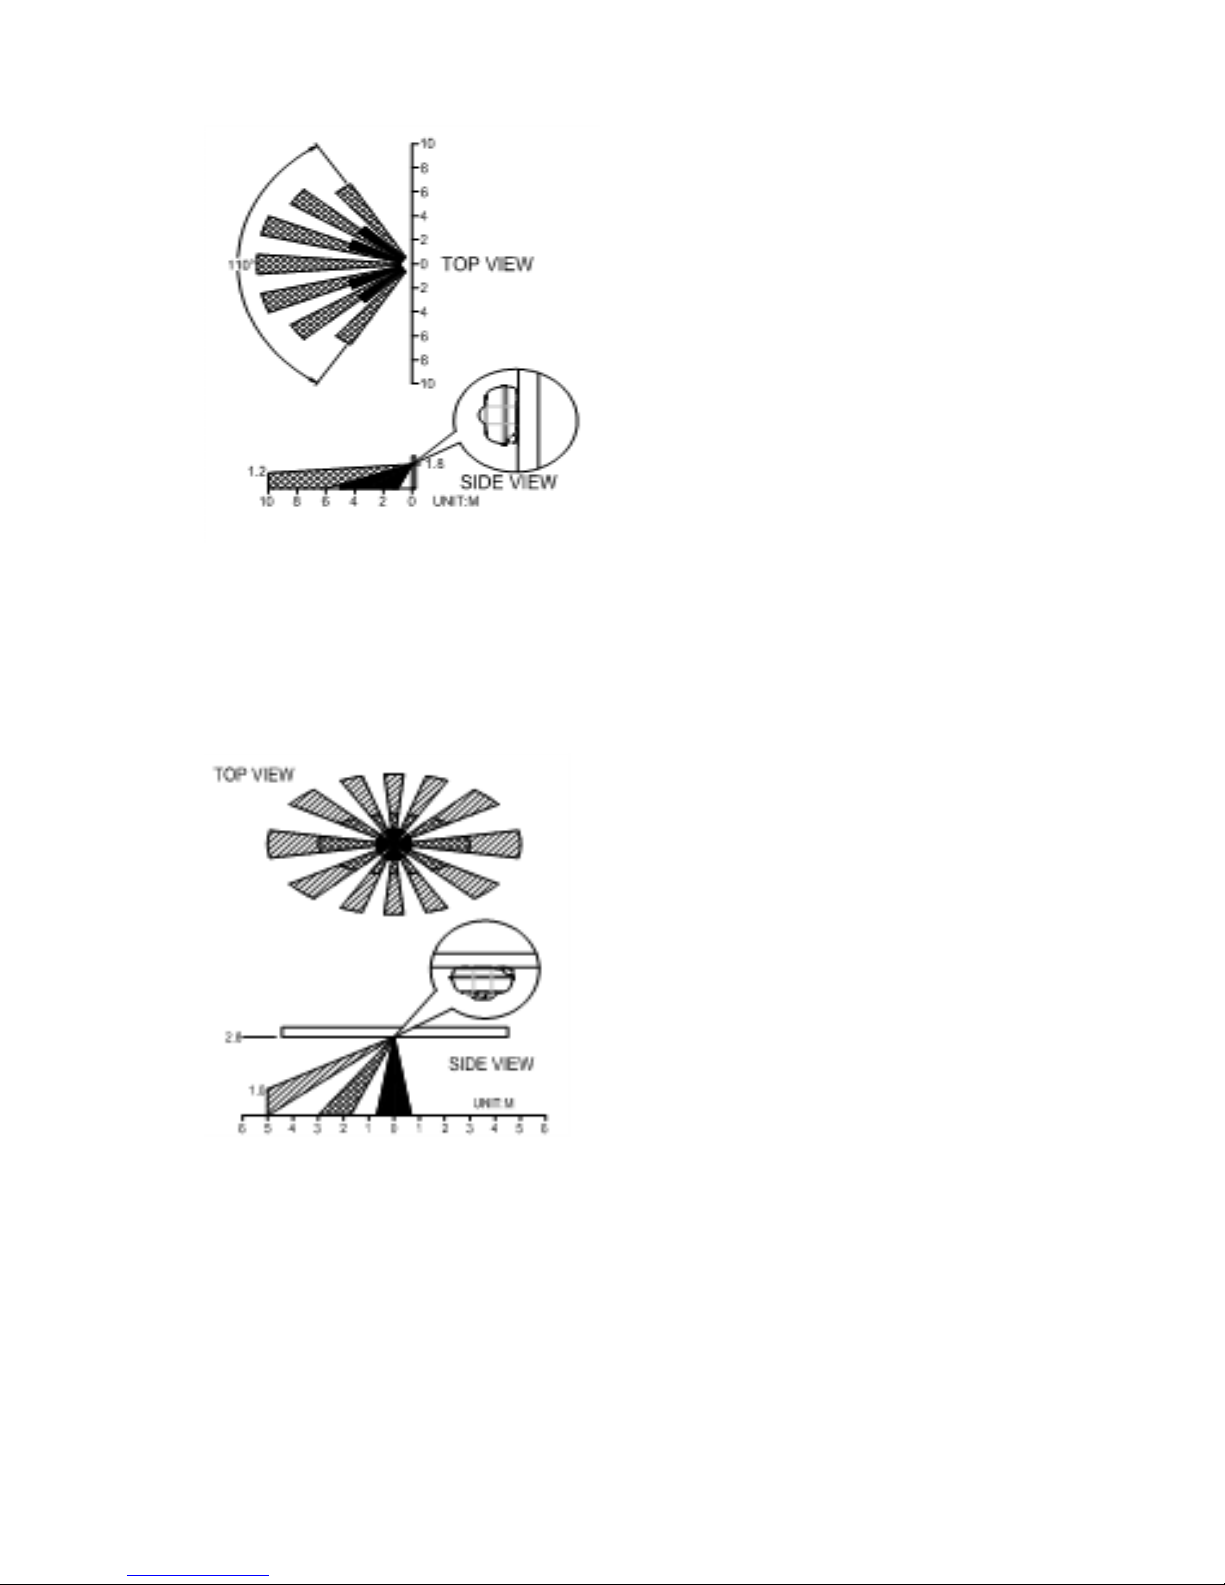
Mounting to the ceiling
Image 10. Mounting height to a ceiling.
It is recommended to mount the motion sensor to a ceiling at about 2.8 meter height.
This allows the motion sensor to cover a range of about 5 meters with 360.
6.1.2 Ceiling lens and wall lens
This motion sensor offers the possibility to change the detection lens. By default a wall
lens is mounted on the motion sensor. You can replace this for a ceiling lens.

12 |ENGLISH
Image 11. Remove wall lens counter clockwise.
Image 12. Mount the ceiling lens, clockwise.
Note! The ceiling lens has a shading cap mounted by default. This shading cap can be
used to cover a part of the ceiling lens to exclude it from the detection area. For
example when you want to detect only the kitchen area in a situation with an open
kitchen and living room. You can remove the shading cap using a screw driver.
6.1.3 Detectoion area
The best position to mount a motion sensor is to detect the route of the burglar
walking sideways through the detection area. Motion sensors detect more with
sideway movements compared to approaching movements.
Image 13. Left side is less sensitive, right side is most sensitive
6.1.4 Other points to consider
•Mount the motion sensor not towards windows (with direct sunlight). Motion
sensors are not suitable in a conservatory.

13 |ENGLISH
•Do not mount the motion sensor in view of a fan.
•Do not mount the motion sensor above a source of heat (fire, heating system,
boiler).
•Do not mount the motion sensor on a vibrating surface .
•Mount the motion sensor within the range of the e-Domotica e-Centre or 230V
powered accessories functioning as a repeater (switch or dimmer for example).
•When mounting, consider curtains, blinds or other moving objects which may
cover the motion sensor and disabling the detection area.
•The motion sensor can detect pets. Make sure that pets are not in the detection
area when arming the alarm.
6.2 Mounting the motion sensor
After deciding where to mount the motion sensor based on the information from the
previous chapter, you can now begin to mount the sensor. Remove the back panel
from the front part (if mounted back together again).
Image 14. Screw holes to mount the motion sensor
Image 15. Mounting to the ceiling

14 |ENGLISH
Some tips for the installation
1. Decide which holes you need to use to screw the back panel of the motion
sensor to the wall. Open the holes using a 3mm drill.
2. Use the back panel as a template to mark the drilling holes.
3. If necessary, drill a hole into the wall using a 5mm drill, mount the plug into the
hole.
4. Screw the back panel onto the wall using the enclosed screws. Not too tight to
avoid damage to the back panel.
5. Mount the motion sensor to the back panel using the screw and screw hole at the
bottom of the housing.
7.0 Test the motion sensor
Now that the motion sensor has been mounted you can test and use it. Take notice of
the following.
7.1 Detection display on the e-Centre screen, Mweb and
the e-Domotica app
You can check if motion has been detected on the e-Centre screen, Mweb web page
and the e-Domotica app using your smart phone or tablet.
Go to ‘Devices’, go to the location of the motion sensor and check the following.
Green: No detection/OK
Red: Detection/Not OK
Image 16. Detection shown on screen
Attention. After having detected motion, the motion sensor will remain open for about
30 seconds. If the motion sensore detects movement again the LED of the motion
sensor will be lit again.
7.2 Test the alarm
To test the alarm properly the mounting location of the motion sensor need to be
without any movement (for at least 30 seconds). Then press the button of the alarm
you want to arm. Enter the PIN code and press OK. The alarm is being armed. Wait
until the exit time has expired and walk into the room/location to trigger the alarm. The
alarm will be fired and the entry time started (depending on the settings).

15 |ENGLISH
You can now choose to disable the alarm using your disable PIN code or to continue
this alarm to check if phone calls or text messages are received via the e-Domotica
Portal.
8.0 Frequently Asked Questions
The latest frequently asked questions for your product can be found on the support
page of your product. e-Domotica will update these pages frequently to assure you
have the most recent information. Visit http://www.e-domotica.com/en/tips-and-advice
for more information about your product.
9.0 Service and support
This users manual has been carefully written by e-Domotica technical experts. If you
have problems installing or using the product, please fill out the support form at the
website http://www.e-domotica.com/en/customer-service.
You can also contact us by phone. Below you will find a list with phone numbers for
each supported country.
Country Phone number Rate per minute*
Belgium (Dutch) 070 277 286 €0.30
Belgium (French) 070 277 286 €0.30
Denmark +45 69918565 Local costs
Finland +35 8942415826 Local costs
Germany +49 (0) 2336 4745 17 Local costs
Italy +39 0240042016 Local costs
Norway +47 21075033 Local costs
Spain 807 080 042 €0.41
Sweden +46 840 309985 Local costs
The Netherlands 0900-3646368 €1.00 per call
UK +44 (0)203 318 9998 Local costs
* Rates mentioned in this table do not include cell phone charges.
10.0 Warning and points of attention
Due to laws, directives and regulations set out by the European parliament, some
(wireless) devices could be subject to limitations concerning its use in certain
European member states. In certain European member states the use of such devices
could be prohibited. Contact your (local) government for more information about this
limitations.

16 |ENGLISH
Always follow up the instructions in the manual, especially where it concerns devices
which need to be assembled.
Warning: In most cases this concerns an electronic device. Wrong/improper use may
lead to (severe) injuries!
Repairing of the device should be done by qualified e-Domotica staff. The warranty
immediately voids when products have undergone self repair and/or by misuse. For
extended warranty conditions, read the next chapter.
*Tip: e-Domotica manuals are written with great care. However, due to new
technological developments it can happen that a printed manual does not longer
contain the most recent information.
If you are experiencing any problems with the printed manual or you can not find what
you are looking for, please always check our website www.e-domotica.com first for the
newest updated manual.
Also, you will find frequently asked questions in the FAQ section. It is highly
recommended to consult the FAQ section. Very often the answer to your questions will
be found here.
11.0 Warranty conditions
The five-year e-Domotica warranty applies to all e-Domotica products unless
mentioned otherwise before or during the moment of purchase. When having bought a
secondhand e-Domotica product the remaining period of warranty is measured from
the moment of purchase by the product’s first owner. The warranty applies to all e-
Domotica products and parts inextricably connected to and/or mounted on the main
product. Power supply adapters, batteries, antennas and all other products not
integrated in or directly connected to the main product and/or products of which,
without reasonable doubt, can be assumed that wear and tear show a different pattern
than the main product are not covered by the e-Domotica warranty. Products are not
covered by the warranty when subjected to incorrect/improper use, external influences
and/or when opened by parties other than e-Domotica.

17 |ENGLISH
12.0 Declaration of Conformity
To ensure your safety and compliance of the product with the directives and laws
created by the European Commission you can obtain a copy of the Declaration of
Conformity concerning your product by sending an e-mail message to: info@e-
domotica.com. Clearly state ‘Declaration of Conformity’ and the article code of the
product of which you would like to obtain a copy of the Declaration of Conformity.
Trademarks: all brand names are trademarks and/or
registered trademarks of their respective holders.
The information contained in this document has been
created with the utmost care. No legal rights can be derived
from these contents. e-Domotica cannot be held
responsible, nor liable for the information contained in this
document. e-Domotica is part of Cross Hardware BV
EM6581 R1 | 08-2014
Table of contents


