E-LOK 8 Series User manual

805 User Manual

1. Crop out done as per template.
2. Arrow on spindle hub points down.
3. Check rubber gasket installed correctly, with
lugs pressed in tight, so proper seal around
backplate edge.
4. Ensure split pin is installed, securing spindle
to spindle hub.
5. Ensure screw casing bolts & through bolts tightened.
6. Ensure power cable wire installed correctly & not bent or
crimped in door.
7. Check batteries installed in correct position.
Professionally Installed by:
Pin code: Date:
8 - S e r i e s
Summary Check List:
For further details see pages 8-12
Top
_________________________
____________ ____/____/____

Keep the included mechanical keys in a convenient place
such as an Elements Hardware 1236 Key Safe
Replace the batteries when batteries are low voltage
Read this User Manual carefully before installing your 8-
Series Smart Lock
Please Note:
8 - S e r i e s
1236-BLK Shown:

Contents Page:
Pg 4.
Pg 5.
Pg 6.
Pg 7.
Pg 8.
Pg 9.
Pg 10.
Pg 11.
Pg 12.
Pg 13.
Pg 14.
Pg 15.
Pg 16.
Pg 17.
Pg 18.
Pg 19.
Pg 20.
Pg 21.
Pg 22.
Pg 23.
Pg 24.
Pg 25.
Pg 26.
Pg 27.
Pg 28.
Pg 29.
Pg 30.
Pg 31.
Pg 32.
Pg 33.
Pg 34.
Pg 35.
Pg 36.
8-Series Body Dimensions
Mortice Lock Options
8-Series Packing List
8-Series Specifications
Adjusting the Handing
Clutch Arrow on Spindle Hub
Installation; Steps 1-4
Installation; Steps 4-7
FactoryReset; If you're admin
Factory Reset; other methods
First Set-up
Bluetooth + Pincode Unlocks
RFID Card + Privacy Lock
RemoteUnlock + eKey
Admin Passcode + Unlock Records
Battery Percentage + Lock Clock
Passage Mode
Extra lock settings 1
Extra lock settings 2
Extra lock settings 3
TransferringOwnership
Use of Master Admin, Admin + User Pg. 1
Use of Master Admin, Admin + User Pg. 2
Use of Master Admin, Admin + User Pg. 3
8-Series Handle Functions
Unlockwith Mechanical Key
E-LOKGateway Pg. 1
E-LOKGateway Pg. 2
E-LOKGateway Pg. 3
E-LOK Gateway additional notes
Maintenance Guide
Important Notes
Contact
8 - S e r i e s
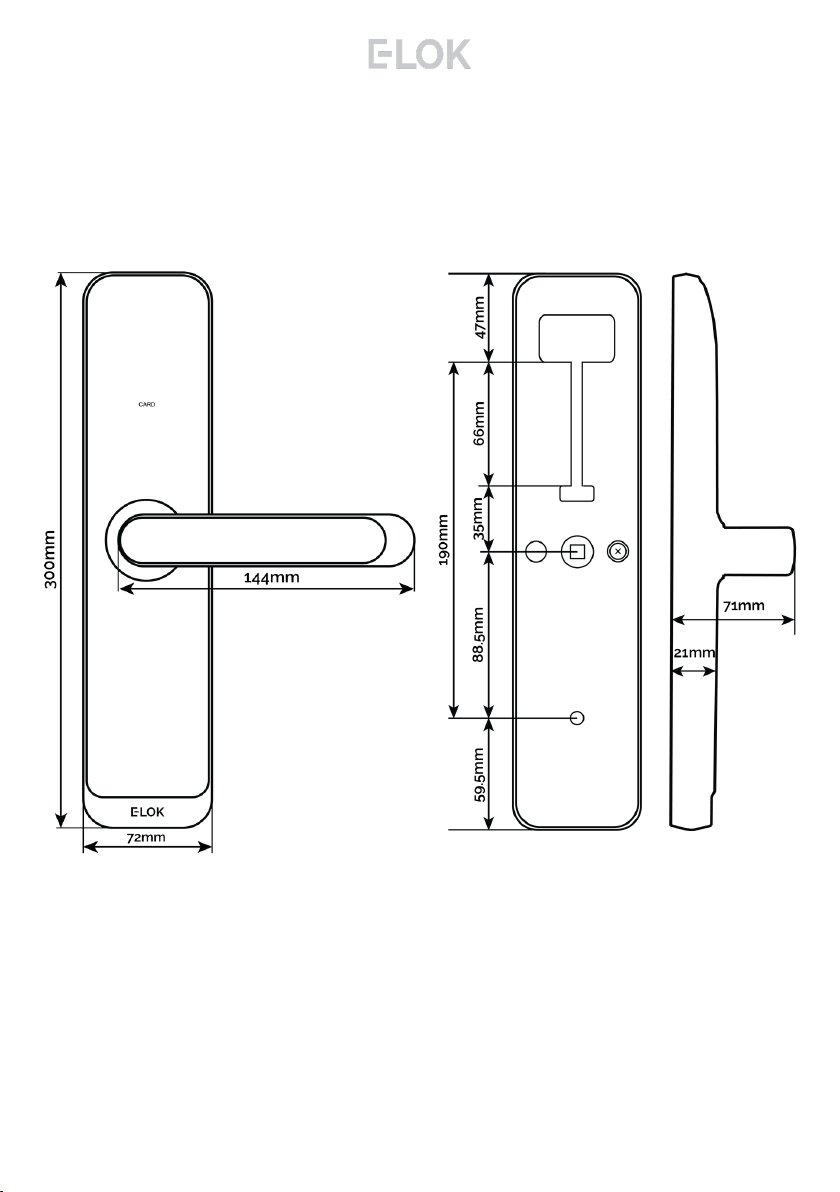
8-Series Body Dimensions:
4
8 - S e r i e s

60mm
Mortice Lock Options:
74mm
240mm
Back set:
Case Width:
Face Plate:
All Mortice templates available
online to download at E-LOK.com
5
70mm
8 - S e r i e s
240mm
86mm
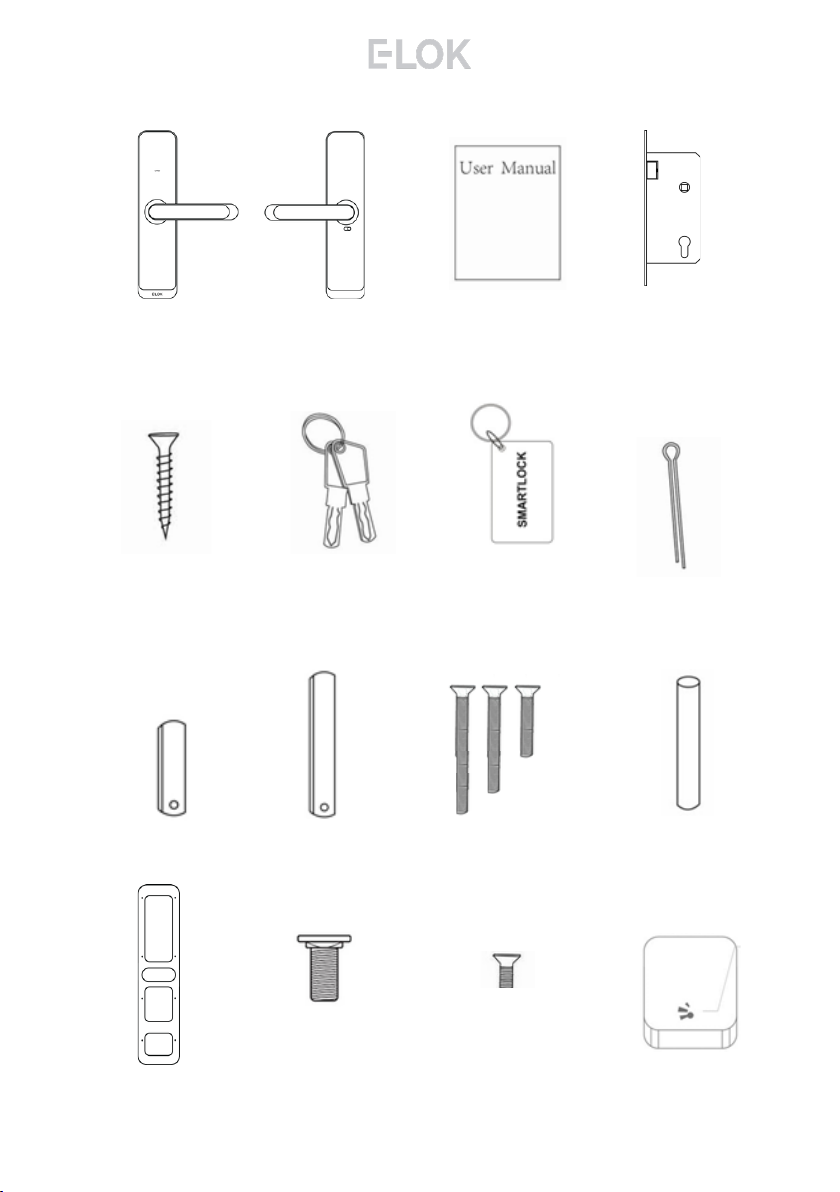
8-Series Packing List:
Front Panel
QTY 1
Back Panel
QTY 1
User Manual
QTY 1
Mortice lock
QTY 1
Faceplate & Striker
Screw QTY 4
Mechanical Key
QTY 3
RFID Card
QTY 3
Short Spindle
QTY 1
Split Pin
QTY 1
Fixing Screws 1
QTY 3
Screw Casing
QTY 2
Gasket
QTY 2
Sliding Screw
QTY 2
Fixing Screws 2
QTY 2
Gateway
(Optional)
6
(not included
with 805-0)
Long Spindle
QTY 1
For door
thickness:
30-50mm
For door
thickness:
50-80mm
8 - S e r i e s

Specifications:
E-LOK 8-Series Smart Lock
E-LOK App
Black
Pin Code,
RFID Card,
E-LOK App,
Mechanical Key.
Unlimited
200 Pin codes
200 RFID Cards
6V (4*AA Batteries)
5,000 Lock and Unlock Operations
—20°C — 70°C
10% - 95%
30mm - 80mm
Aluminium Door, Wooden Door
300mm(H)*72mm(W)*21mm(D)
300mm(H)*170mm(W)*71mm(D)
60mm & 70mm Back Set
2 Year Mechanical & Electrical
2 Year
IP 55
Product Name:
Operating Application:
Finish:
Unlock Methods:
Max Num. Locks on App:
Max Num. Pin Codes:
Max Num. RFID Cards:
Batteries:
Battery life:
Operating Temp:
Operating Humidity:
Suitable Door Thickness:
Suitable Door Types:
Product Size (Body only):
Product Size (Including Lever):
Available Mortice lock Sizes:
8-Series Residential Warranty:
E-LOK Gateway Warranty:
Weather Rating:
7
- Must be Alkaline
8 - S e r i e s

Turn lock upside down
Push latch into lock case
Holding latch in lock case, turn 180
degrees
Release latch to full extended position.
To reverse the Mortice Lock:
Locate handing screw as shown on right:
Un-do and remove handing screw.
Rotate entire lever 180 degrees into
opposite position.
Re-install handing screw in opposite
position.
Test lever action and ensure screw is tight.
Complete this same process for the second E-
LOK 8-Series panel.
Ensure handing screw is tight before moving on.
Steps to change handing on E-LOK 8-Series:
8
Adjusting The Handing:
Flip Lock
Press latch
tongue in &
rotate.
8 - S e r i e s
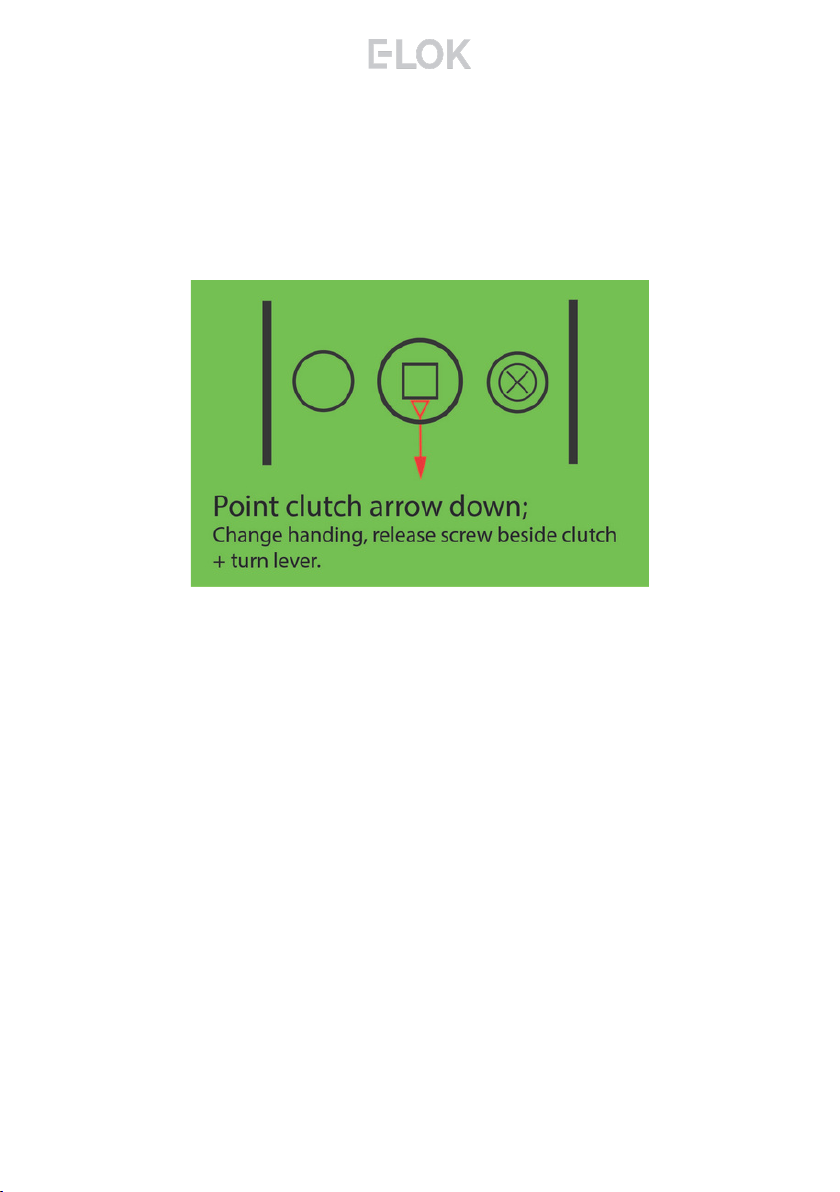
If this step is missed and the arrow is pointing;
Horizontal: Whilst outside, the deadbolt won't throw when
lever is lifted up.
Upwards: The E-LOK will appear to stay unlocked
permanently.
If you are experiencing these symptoms please ensure the
arrow alignment is correct + split pin is installed.
9
Clutch Arrow on spindle hub
The arrow on the spindle hub must be installed pointing down for
the E-LOK 8-Series to work as designed.
8 - S e r i e s

Step 1.
If you are retrofitting into anexisting mortice
hole, this step may not be required. If you
are fitting the 8-Series into a new hole,
takethe including mortice template and cut
the holes into your door. Your E-LOK 8-
Series comes with screws to both suit
wooden and aluminium doors.
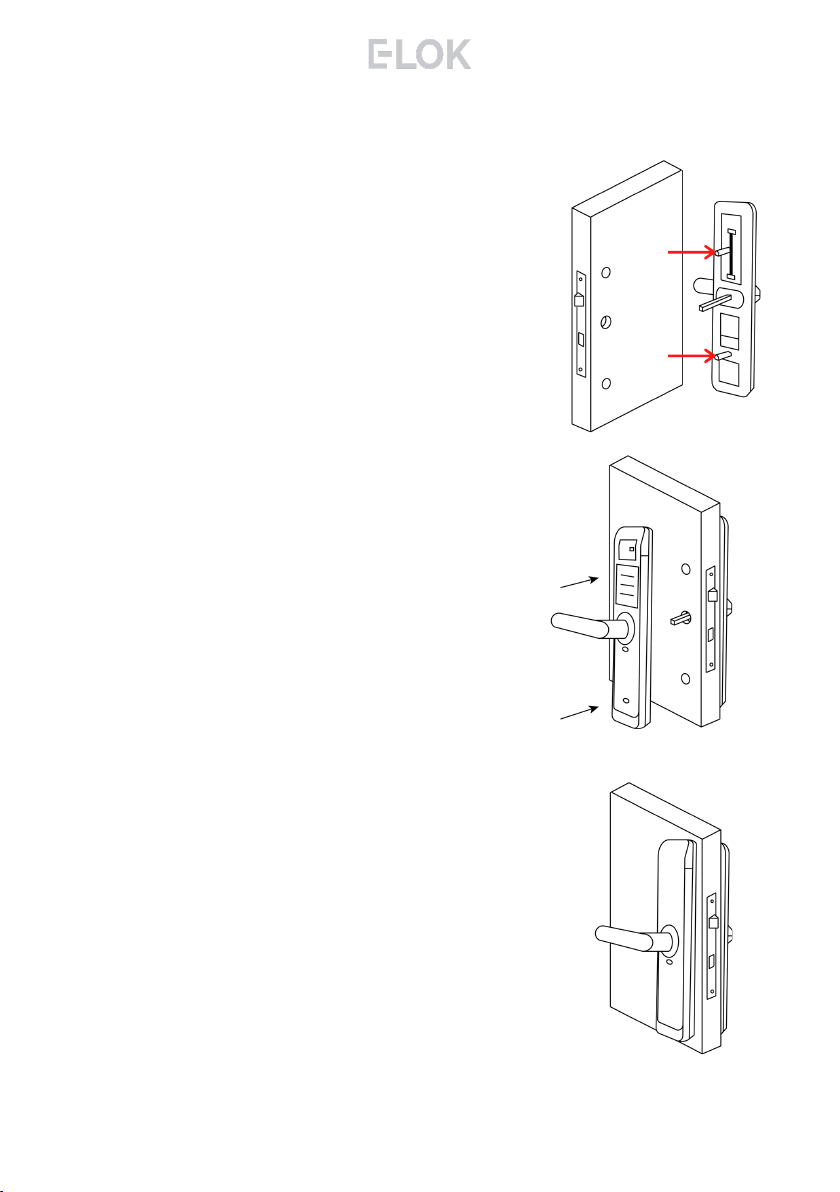
Step 2.
On the door face, you'll be required to make
holes to suit the top screw, spindle and
bottom screw of the E-LOK Lockset. Note
the top fixing screw is adjustable, please cut
to actual screw position.
Step 3.
Install the mortice lock into the door.
Ensure fixings are tight and straight.
Step 4.
Install the spindle into the outdoor handle.
Ensure that before you install, check the
clutch arrow is pointing down. Use the
included split pin to secure spindle in
place.
Installation:
10
8 - S e r i e s
Step 5.
Now install the adjustable height screw
casing on the outdoor handle + bottom
screw casing and attach the included
rubber gaskets to both the front and back
handle.
Step 6.
Now you are ready to connect the front and
back panel. Remove the battery case from
the inside panel. Connect the cable, ensure
there is space in the door for it. Screw
fixings from inside panel into screw casings
from outside panel.
Step 7.
Screw and tighten the inside panel to the
outside panel, using the appropriate fixings
according to door width.
Install Batteries and attached battery
cover back in plate.
E-LOK 8-Series Smartlock should be ready
to go!
Installation:
11
8 - S e r i e s

12
Factory Reset: (if you are admin + in Bluetooth range)
Normal Factory Reset:
You must be admin + in Bluetooth range of
the Smart lock in order to complete factory
reset.
You can factory reset your E-LOK by going
into the lock settings and tapping "Delete".
This will fully factory reset the E-LOK smart
lock.
From here you can re-setup the smart lock
as normal.
8 - S e r i e s
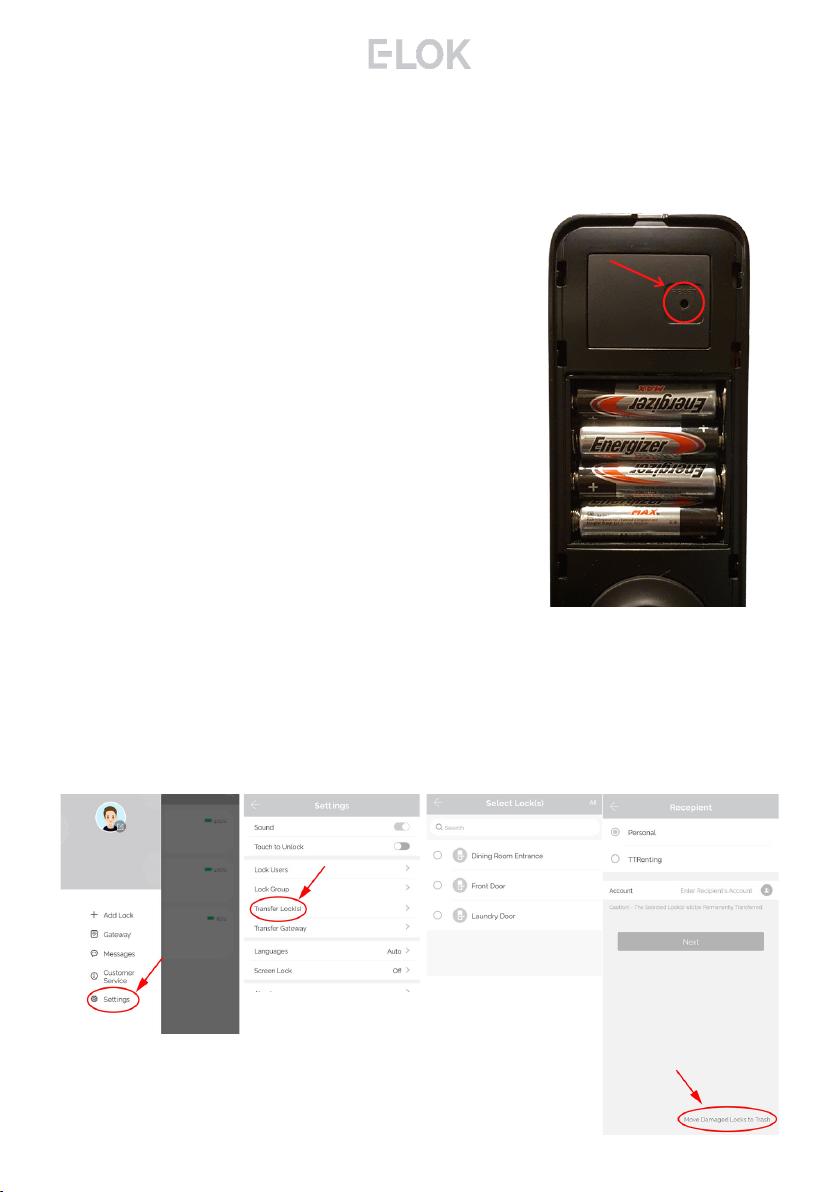
Factory Reset (if you are not admin):
Manual reset:
If you are not admin of the E-LOK Smart
Lock, remove battery cover and complete:
Long press the button on the bottom left
side in battery case for5 seconds or until
you hear "Please Input Initialisation
Passcode"", input code "000#" on the front
panel.
The system reset will be complete. From
here you can link the E-LOK smart lock to
your phone.
Trouble shooting:
If you manual reset whilst you were admin of the E-LOK, Transferring
Lockset to Trash will complete the reset of the E-LOK:
8 - S e r i e s
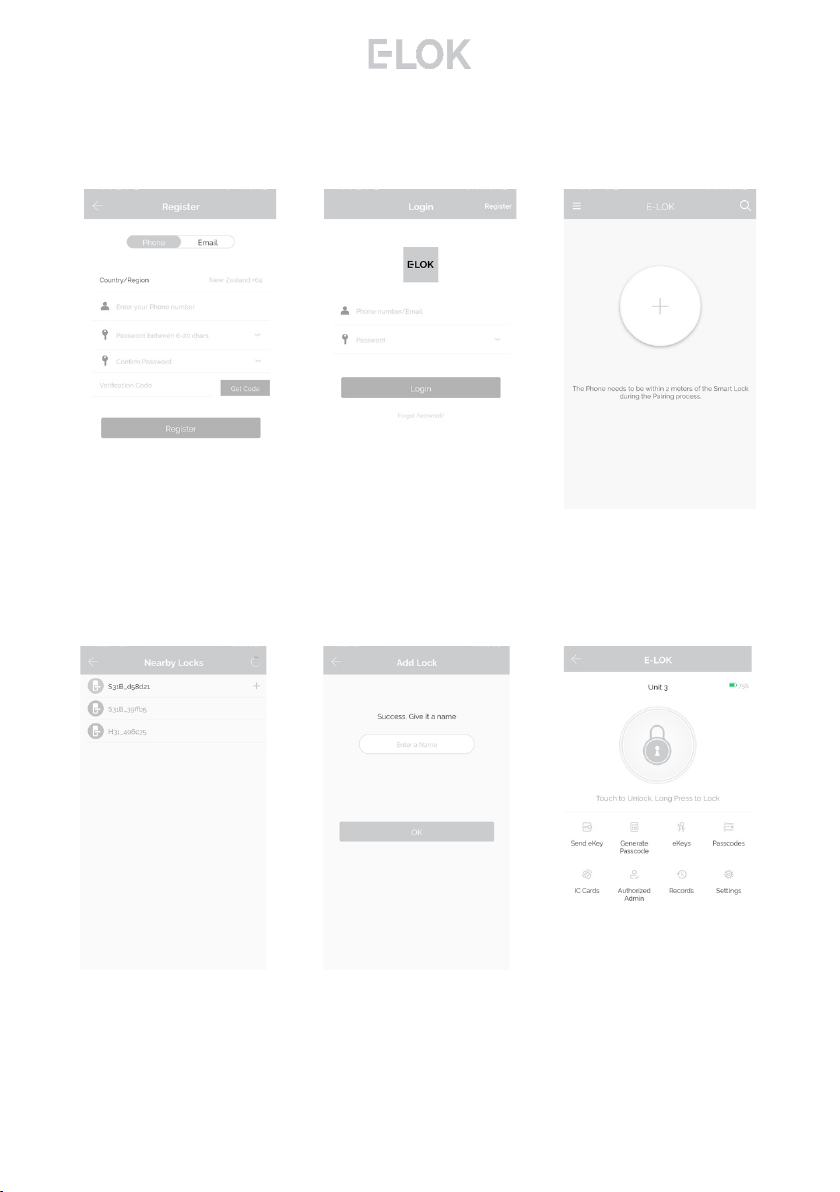
First Set-Up:
1. Registeran account
with E-LOK using either
phone number or email.
2. Login to your account. 3. Ensure E-LOK 8-Series is
on and Bluetooth enabled
on phone, connect to lock.
Tap pinpad & + sign to pair.
4. Select your E-LOK 8-
Series. Note it will not be
called the model of your
E-LOK lock set.
5. Rename your E-LOK
8-Series to your
preference.
6. View your E-LOK lock
set management page.
Get the E-LOK App by visiting E-LOK.com for the app download link
14
8 - S e r i e s

Bluetooth Unlock + Pin codes
Bluetooth Unlock:
After you've connected your phone to your E-LOK Smartlock, open the lock
management page and tap the "Unlock" icon. This will unlock your Lockset via
Bluetooth and it will automatically re-lock itself according to the set auto lock
timer.
Pin code Management:
E-LOK App allows you to set a virtually unlimited amount of pincodes. You can
set a range of different types of pincode. The best to use is custom to create
yours. Set it to permanent, name it and set your preferred sequence. (4-9 digits).
Recurring pincode allows you to set a pincode that only works at certain times
and days. Either set the pincode to work one day a week, daily, weekdays or
weekends -during set hours. The app also allows for one-time and timed
pincodes.
15
8 - S e r i e s

RFID Card + Privacy Lock
RFID Card Management:
E-LOK App allows you to store 200 unique RFID Cards. To set one up of the
three included with your E-LOK 8-Series Lockset, tap "IC Cards" on the lock
management page, tap the menu on the top right then follow the prompts to
add your RFID Card. Name them individually and add them to your key-ring for
easy usability.
16
Privacy Lock:
New feature with the 8-Series is a privacy lock. To use it, enable in the lock
settings and use sliding button on inside panel of the Smart Lock as shown. Red
means only the Key Override or Master Admin can enter, all other pincodes and
RFID cards won't unlock the 8-Series. Green means lock is in normal mode. The
8-Series will move from red to green when you pull down the inside lever.
8 - S e r i e s

Remote Wi-Fi Unlock (only with E-LOK Gateway Add-on).
After you've connected your phone to your E-LOK Lockset and connected your
E-LOK Gateway, open the lock management page and ensure Unlock Remotely
is enable in the settings. Now Tap the Unlock icon. This will unlock your E-LOK
via Wi-Fi.
e-Key Management:
An e-Key gives another person with an E-LOK App Account access to view and
use your E-LOK 8-Series. Tap on the "eKey" icon on the lock management page,
this allows you to send an electronic key to another person with an E-LOK App
account. You can either set the account to be an Admin or a User. Check the
Master Admin page for further information on how to use e-Keys.
Remote Unlock + e-Key
17
8 - S e r i e s

Admin Passcode + Unlock Records
Admin Passcode:
E-LOK comes with an admin pass code. To view this tap "Settings" on the lock
management page, tap "Basics" and then tap "Admin Passcode".
Unlock Records:
E-LOK App records what pass codes were used to unlock the E-LOK and when.
You can view these records by going into the "Records" menu on the lock
management page. In the example you can see the name of the unlock code, eg
"John", what time it was used and what type of unlock code was used. With App
versions 1.2 and above, you can now view failed unlock attempts and see what
code was used.
18
8 - S e r i e s

Battery Percentage + Lock Clock:
Check Battery Percentage:
E-LOK App allows you to check the battery percentage of your E-LOK in two
easy ways. In the lock select page, the app will give you a percentage overview
to the nearest 5%. You can also find a more accurate battery level in the settings
of the lock set. Tap into "Settings", then "Basics" and then view your battery
percentage.
19
E-LOK Lockset Clock:
For the unlock records to be synched correctly, the Lockset clock needs to be
calibrated. To do this, Tap into "Settings" then "Lock Clock". Here tap "Calibrate
Time". Your E-LOK Lockset will communicate with the E-LOK App and set the
correct time. This will ensure the operation/unlock records are accurate.
8 - S e r i e s
This manual suits for next models
1
Table of contents
Other E-LOK Door Lock manuals


Popular Door Lock manuals by other brands


Lockly
Lockly Satin Nickel Secure Plus Smart Lock Deadbols installation guide

Hissmekano
Hissmekano LI-25-H Installation instruction

Schlage
Schlage LT Series installation instructions

Signature Hardware
Signature Hardware HUBBARD 953546-PR manual

Lockly
Lockly LATCH EDITION SECURE PGD628 installation guide

Assa Abloy
Assa Abloy 1264 Installation instruction

ZKTeco
ZKTeco ML100 installation guide

Yale
Yale Assure Lock Lever Touchscreen YRL226 manual

Yale Lift-Tech
Yale Lift-Tech nexTouch Installation and programming instructions

Salto
Salto XS4 Original installation guide

Ingersoll-Rand
Ingersoll-Rand Schlage L Series Service manual

Zks
Zks G1 Installation & user manual